Note
Access to this page requires authorization. You can try signing in or changing directories.
Access to this page requires authorization. You can try changing directories.
Intel explorer provides a centralized experience for searching and investigating threat intelligence in the Microsoft Defender portal. You can also use Intel explorer to create and manage Microsoft Sentinel threat intelligence.
Use Intel explorer to:
- Search and filter threat intelligence.
- Create STIX threat intelligence objects.
- Manage threat intelligence with ingestion rules.
- Manage relationships between threat intelligence objects.
- Add tags and edit threat intelligence objects.
- Investigate indicators and related infrastructure.
- Query threat intelligence with Advanced hunting.
- Export threat intelligence to supported TAXII destinations.
Note
The legacy standalone Microsoft Threat Intelligence portal and legacy Intel Explorer experience were retired on August 1, 2026. This article describes the threat intelligence experience integrated into the Microsoft Defender portal. For more information, see Transition to the new Threat intelligence experience.
Prerequisites
Before you begin:
- Publicly available Microsoft Threat Intelligence data is available to Microsoft Defender XDR customers at no additional cost.
- To create and manage Microsoft Sentinel threat intelligence, you need the permissions of a Microsoft Sentinel Contributor or higher role.
- To import or export threat intelligence, install the Threat Intelligence solution in Microsoft Sentinel and enable the relevant connectors. For more information, see Use STIX/TAXII to import and export threat intelligence in Microsoft Sentinel.
Important
Microsoft Threat Intelligence can include observations of active malicious infrastructure and adversary tooling. You can safely search suspicious IP addresses, domains, and other indicators in Intel explorer. Don't browse directly to suspicious or malicious resources from a web browser.
Search and filter threat intelligence
Use Intel explorer to search and filter threat intelligence without writing a query.
Sign in to the Microsoft Defender portal.
Select Threat intelligence > Intel explorer.
Enter a keyword or value in the search box.
Select a threat intelligence type.
To narrow the results, use one or more of the available filters:
Targeted industries, Targeted geography, or Source: Filter results by common threat intelligence attributes.
Add filter: Filter by additional attributes available for the selected threat intelligence type.
Select a threat intelligence object to open its details.
The information available depends on the type of object you select. For example, an IP address can include:
- Reputation
- Related threat intelligence articles
- Services
- Resolutions
- Certificates
Note
Changes to threat intelligence might take a few minutes to appear in Intel explorer. If you don't see a recent change, refresh the page after a few minutes.
Tip
When working with a defanged indicator such as contoso[.]com, remove the brackets before entering the value in Intel explorer. Don't enter malicious indicators directly into a web browser.
Create threat intelligence
Use Intel explorer to create STIX threat intelligence objects and define relationships between them.
Create a STIX object
Sign in to the Microsoft Defender portal.
Select Threat intelligence > Intel explorer.
Select the Indicators tab.
Select New.
Select an Object type.
Enter the object details.
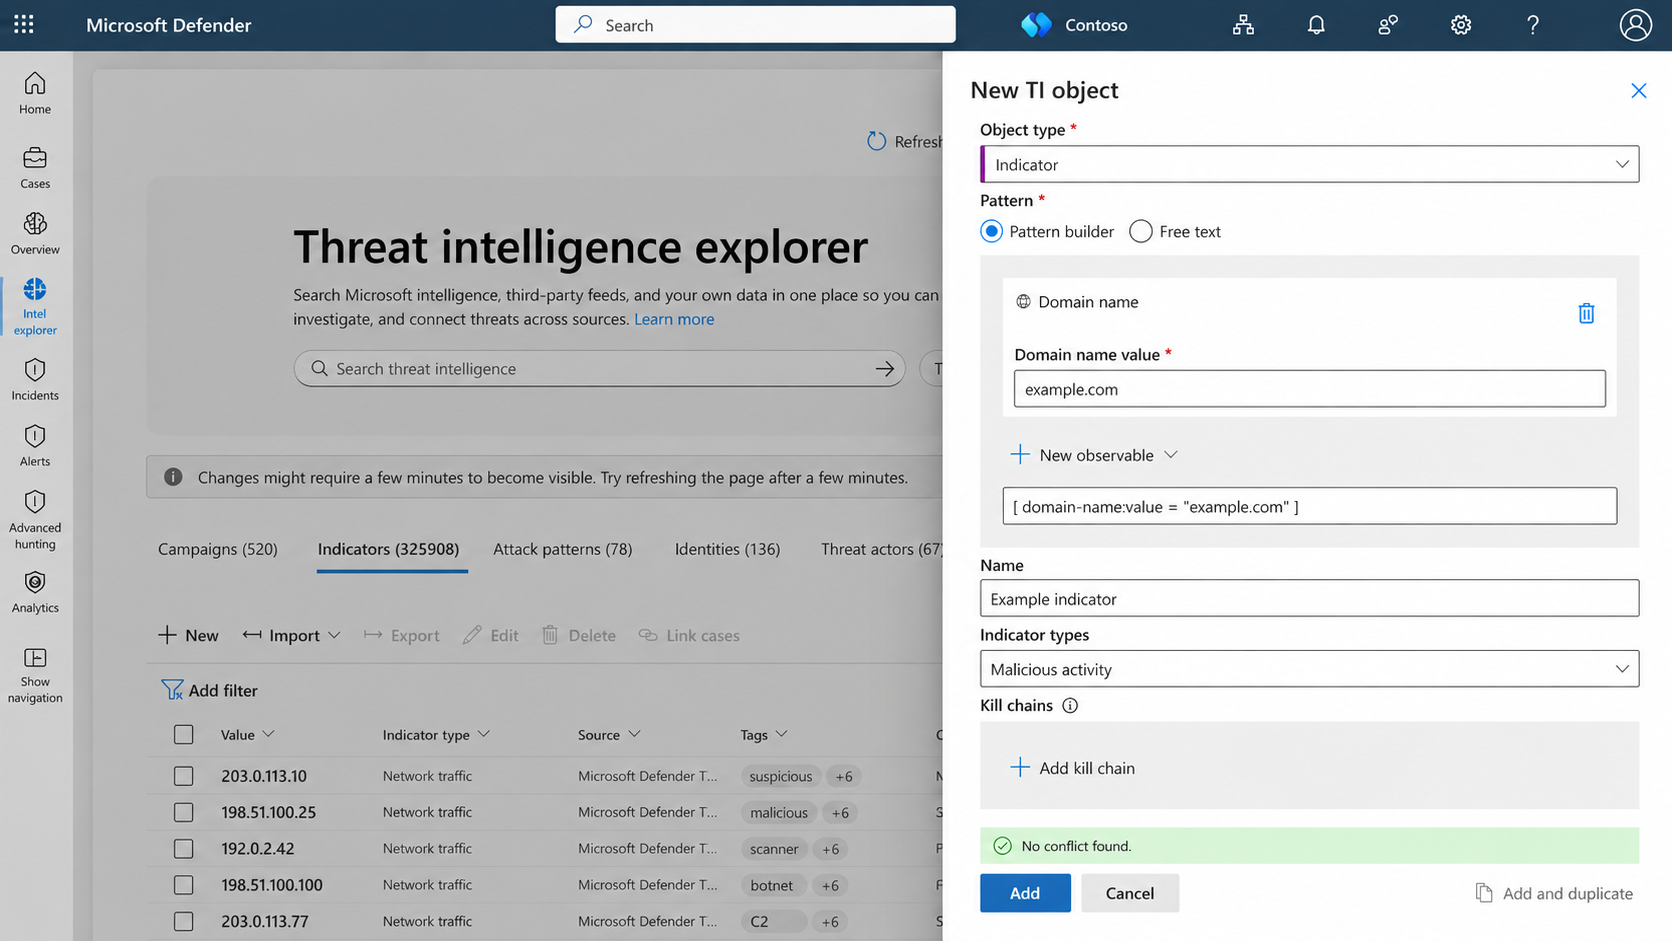
Specify a sensitivity value or Traffic light protocol (TLP) rating if needed.
Select Add to create the object.
To create another object with the same common metadata, select Add and duplicate instead of Add.
For more information about supported STIX objects, see Threat intelligence in Microsoft Sentinel.
Manage threat intelligence with ingestion rules
Use ingestion rules to modify incoming threat intelligence based on defined conditions. For example, you can reduce noise, extend the validity of high-value indicators, or add tags to incoming objects.
To create an ingestion rule:
Sign in to the Microsoft Defender portal.
Select Threat intelligence > Intel explorer.
Select Ingestion rules.
Enter a name for the rule.
Select an Object type.
Select Add condition.
Configure the condition.
Select Action.
Select an action.
Select Add action if additional configuration is required.
Configure the action.
Add a tag if needed.
Select the rule Order.
Turn on Status if you want to enable the rule.
Select Add.
Rules run from the lowest order number to the highest. Each rule evaluates every object that's ingested.
Note
An object's Modified date isn't updated when the object is changed by an ingestion rule.
For more information, see Threat intelligence ingestion rules.
Manage relationships between threat intelligence objects
Use relationships to connect threat intelligence objects and provide context about how the objects are associated.
To add or edit a relationship:
Sign in to the Microsoft Defender portal.
Select Threat intelligence > Intel explorer.
Search for and select a threat intelligence object.
In the entity side panel, find the relationships section.
Add a new relationship or edit an existing relationship.
Select the relationship type and related threat intelligence object.
Save your changes.
Common STIX relationships include:
| Relationship type | Description |
|---|---|
| Duplicate of, Derived from, Related to | Common relationships for STIX domain objects |
| Targets | An Attack pattern or Threat actor targets an Identity |
| Uses | A Threat actor uses an Attack pattern |
| Attributed to | A Threat actor is attributed to an Identity |
| Indicates | An Indicator indicates an Attack pattern or Threat actor |
| Impersonates | A Threat actor impersonates an Identity |
For more information, see the STIX 2.1 relationship specification.
Tag threat intelligence
Use tags to group threat intelligence objects and make them easier to find.
If an object represents a connection to another threat intelligence object, such as a threat actor or campaign, consider creating a relationship instead of using a tag.
Sign in to the Microsoft Defender portal.
Select Threat intelligence > Intel explorer.
Search for the threat intelligence objects you want to update.
Select one or more objects of the same type.
Select Add tags.
Enter one or more tags.
Save the changes.
Because tags are free-form, use consistent naming conventions across your organization.
Edit threat intelligence
You can edit threat intelligence objects one at a time.
For objects created directly in Microsoft Sentinel, all supported fields are editable. For threat intelligence ingested from partner sources such as threat intelligence platforms (TIPs) and TAXII servers, only specific fields are editable, including:
- Tags
- Expiration date
- Confidence
- Revoked
Only the latest version of a threat intelligence object appears in Intel explorer.
To edit an object:
Sign in to the Microsoft Defender portal.
Select Threat intelligence > Intel explorer.
Search for the threat intelligence object.
Select the object.
Select Edit.
Update the supported fields.
Save the changes.
For more information about how threat intelligence objects are updated, see Threat intelligence lifecycle.
Review enriched indicator information
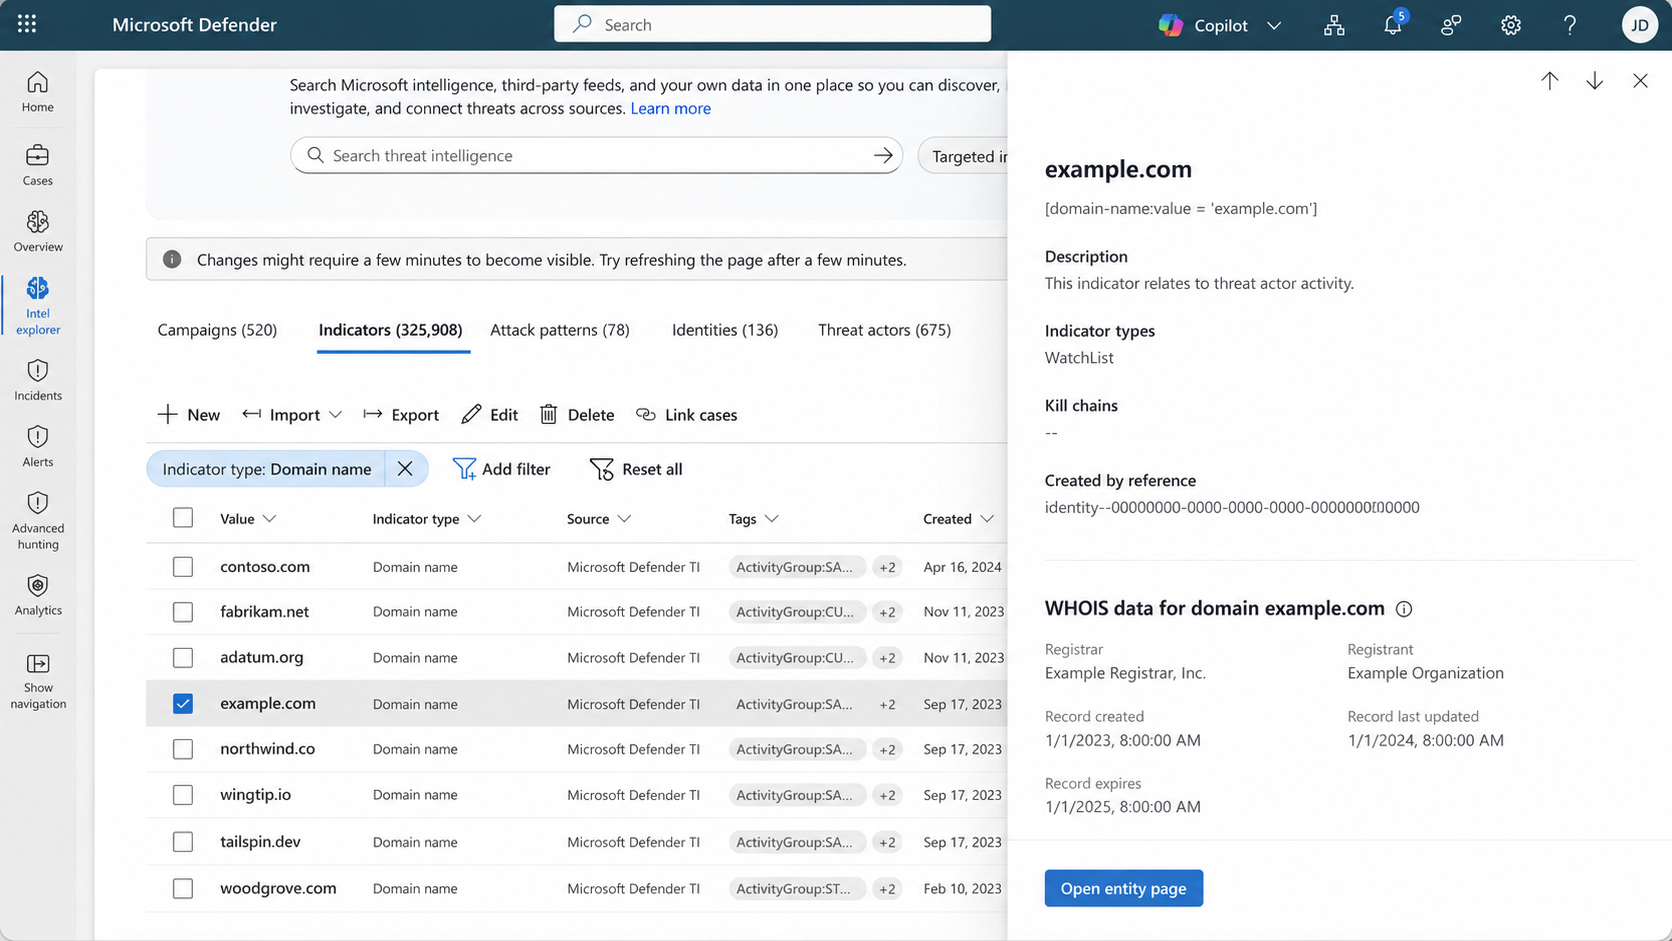
IP address and domain indicators can include GeoLocation and WhoIs data to provide more context during an investigation.
Sign in to the Microsoft Defender portal.
Select Threat intelligence > Intel explorer.
Search for an IP address or domain indicator.
Select the indicator.
Review the available
GeoLocationandWhoIsinformation.
Important
GeoLocation and WhoIs enrichment is currently in preview. The Azure Preview Supplemental Terms include additional legal terms that apply to Azure features that are in beta, preview, or otherwise not yet generally available.
Investigate related threat intelligence
Use related threat intelligence to move from an artifact or indicator to associated Microsoft threat research and other threat intelligence objects.
Sign in to the Microsoft Defender portal.
Select Threat intelligence > Intel explorer.
Search for an artifact or indicator.
Select the search result.
Review related threat intelligence.
Select a related threat intelligence object.
Review the object details.
Select a related indicator to continue the investigation.
For example, you can start with a vulnerability, review related Microsoft threat intelligence, and then investigate indicators associated with reported exploitation activity.
Investigate related infrastructure
Use infrastructure relationships to identify connections between artifacts and expand an investigation from an initial indicator.
Infrastructure chaining uses relationships between connected data to help identify additional infrastructure associated with an adversary or campaign.
Sign in to the Microsoft Defender portal.
Select Threat intelligence > Intel explorer.
Search for an IP address or domain.
Select the search result.
Review the available infrastructure information.
Select a related artifact.
Review the intelligence for the selected artifact.
Select another related artifact to continue the investigation.
Depending on the artifact, infrastructure information can include:
- DNS and reverse DNS data
- Resolutions
- WHOIS information
- Subdomains
- Certificates
- Services
- Trackers
- Components
- Cookies
For a walkthrough, see Gather threat intelligence and perform infrastructure chaining.
Export threat intelligence
You can export Microsoft Sentinel threat intelligence from Intel explorer to supported external destinations.
For example, if you ingest threat intelligence by using the Threat Intelligence - TAXII data connector, you can export threat intelligence back to a TAXII server for bidirectional intelligence sharing.
Microsoft Sentinel supports exporting threat intelligence to TAXII 2.1-based platforms.
Important
Carefully consider the threat intelligence data you export and its destination, which might reside in a different geographic or regulatory region. Data export can't be undone. Make sure that you own the data or have authorization to export or share it with third parties.
To export threat intelligence:
Sign in to the Microsoft Defender portal.
Select Threat intelligence > Intel explorer.
Select one or more STIX objects.
Select Export.
Select a server from the Export TI dropdown.
Select Export.
If no server is available, configure a TAXII 2.1 server for export. For more information, see Enable the Threat Intelligence - TAXII Export data connector.
Important
Threat intelligence export uses a bulk operation. If a bulk export operation fails, Microsoft Sentinel pauses subsequent export operations until the failed operation is removed from the bulk operations history.
View export history
Sign in to the Microsoft Defender portal.
Select Threat intelligence > Intel explorer.
Find the exported threat intelligence object.
Select View export history in the Exports column.
Related content
- Threat intelligence in Microsoft Defender
- View threat intelligence in entity pages
- Query threat intelligence
- Gather vulnerability intelligence
- Gather threat intelligence and perform infrastructure chaining
- Threat analytics reports in Microsoft Defender
- Use Microsoft Security Copilot for threat intelligence
- Transition to the new Threat intelligence experience
- Threat intelligence in Microsoft Sentinel
- Use STIX/TAXII to import and export threat intelligence in Microsoft Sentinel