Note
Access to this page requires authorization. You can try signing in or changing directories.
Access to this page requires authorization. You can try changing directories.
Note
Community interest groups have now moved from Yammer to Microsoft Viva Engage. To join a Viva Engage community and take part in the latest discussions, fill out the Request access to Finance and Operations Viva Engage Community form and choose the community you want to join.
The following steps explain how a user in the System Administrator, Electronic Reporting Developer, or Electronic Reporting Functional Consultant role can configure parameters of the ER framework, design the required ER configurations of a new ER solution to access the data of a particular business domain, and generate a custom report in Microsoft Office format. You can complete these steps in the USMF company.
Design a model mapping for the configured data model
Create a new model mapping configuration
- Design a new model mapping component
- Add data sources to access application tables
- Add data sources to access application enumerations
- Add ER labels to generate a report in a specified language
- Add a data source to transform the results of comparing enumeration values to a text value
- Bind data sources to data model fields
- Complete the design of the model mapping
In this example, you create a new ER solution for the Questionnaire module. This new ER solution lets you design a report by using a Microsoft Excel worksheet as a template. You can then generate the Questionnaire report in Excel or PDF format, in addition to generating the existing SQL Server Reporting Services (SSRS) report. You can also modify the new report later, upon request. No coding is required.
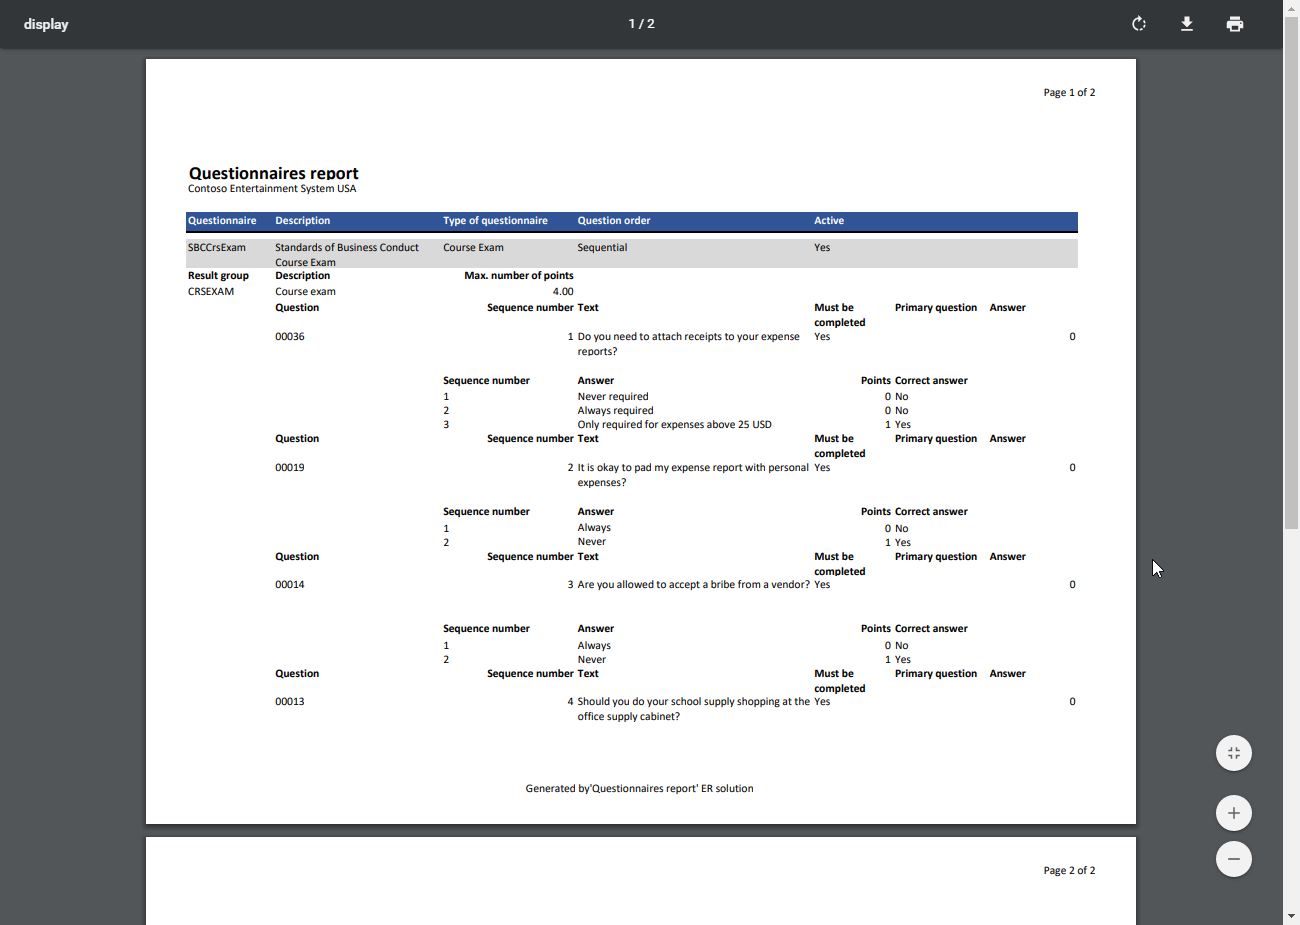
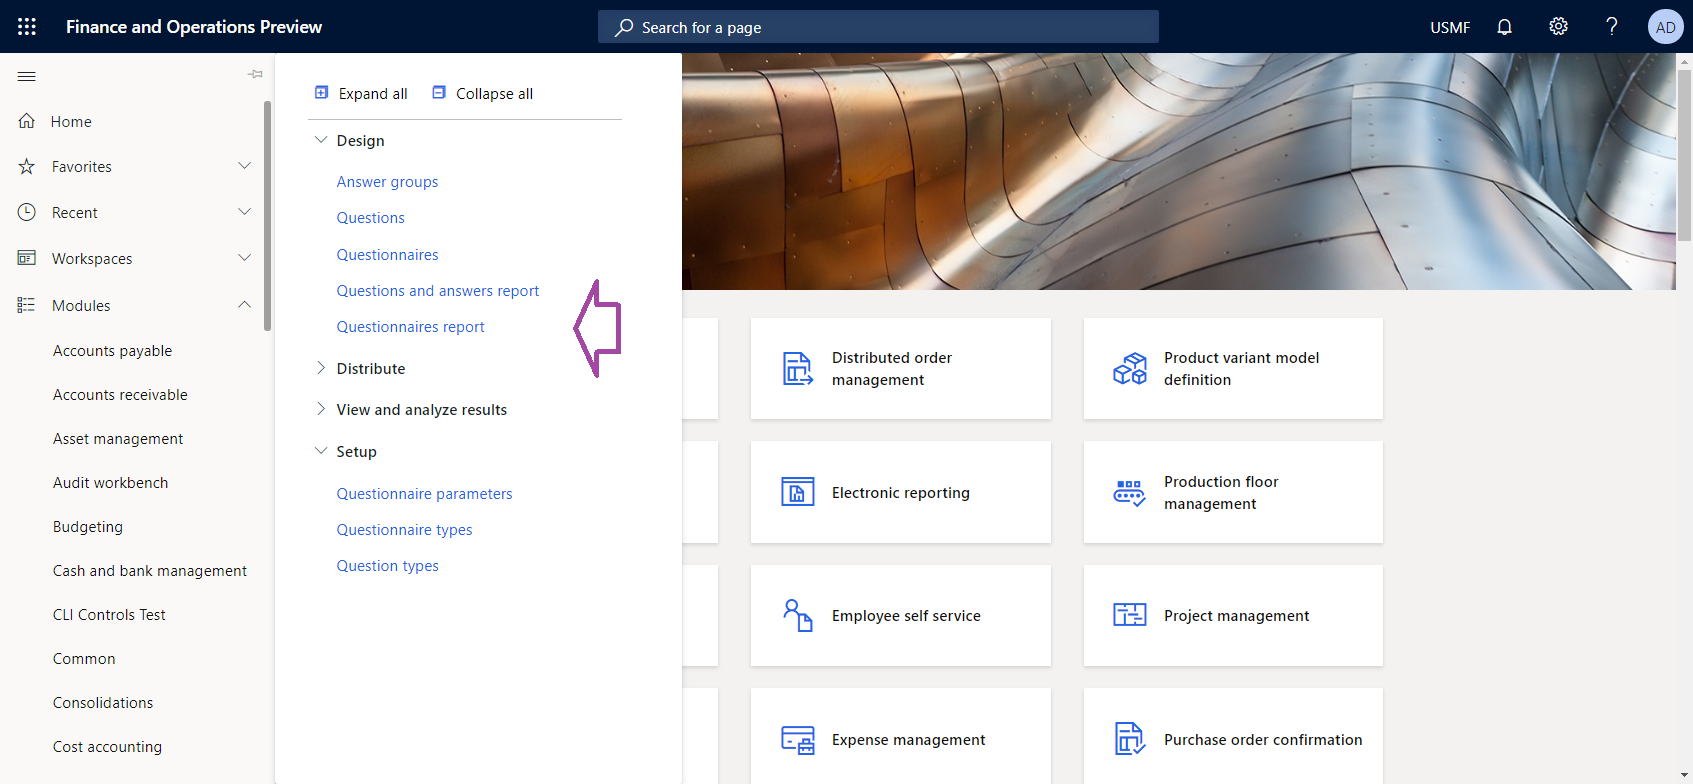
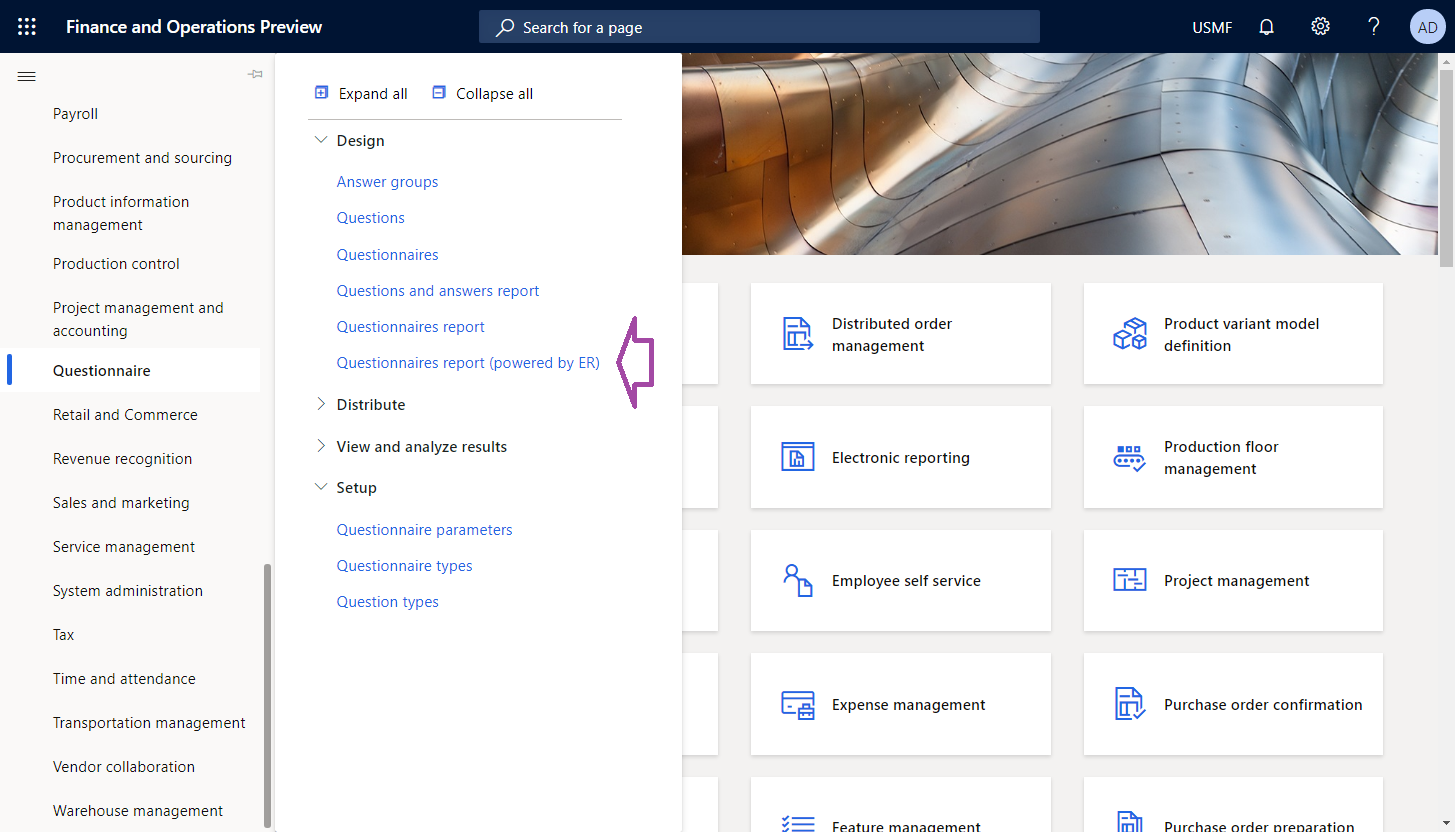
To run the existing report, go to Questionnaire > Design > Questionnaires report.
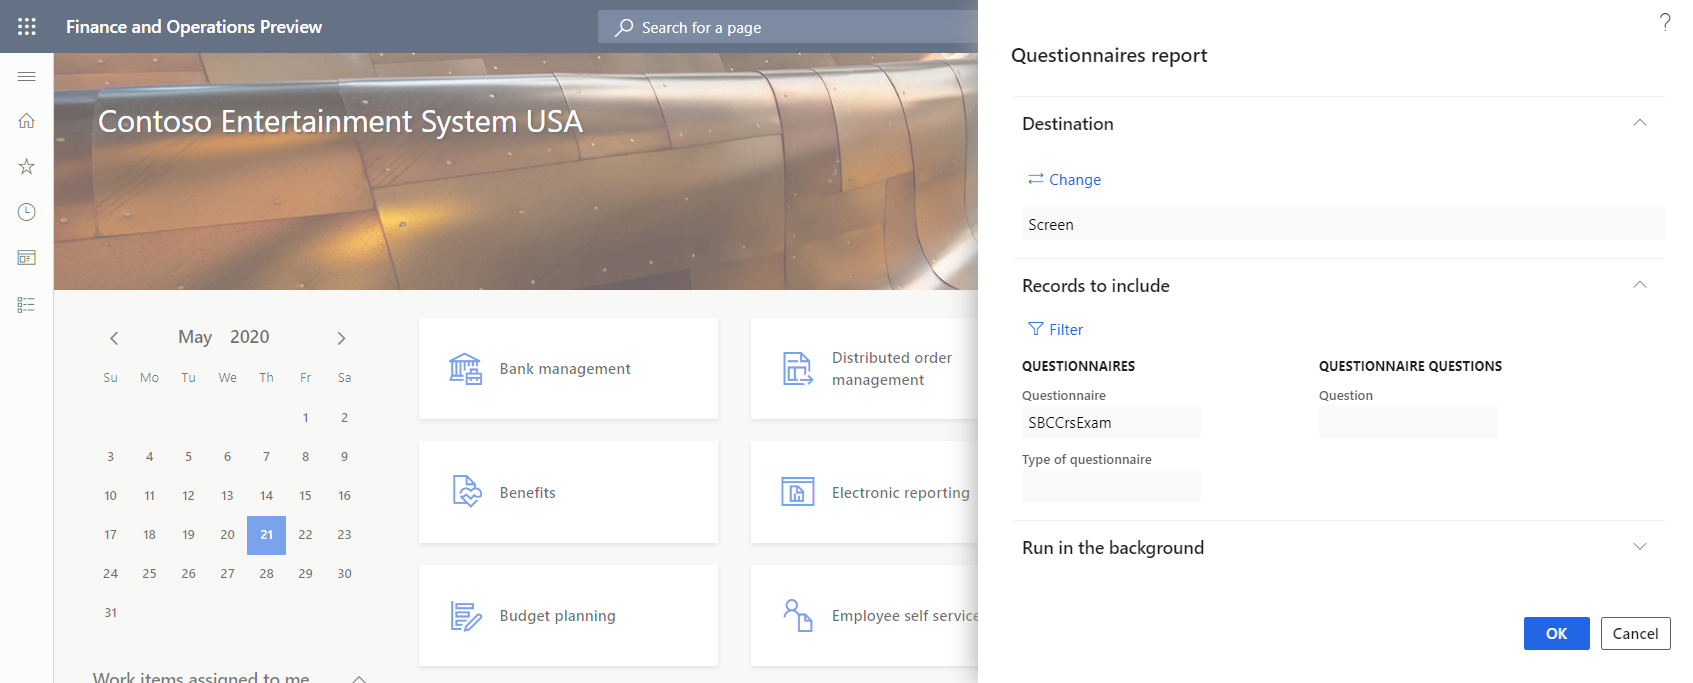
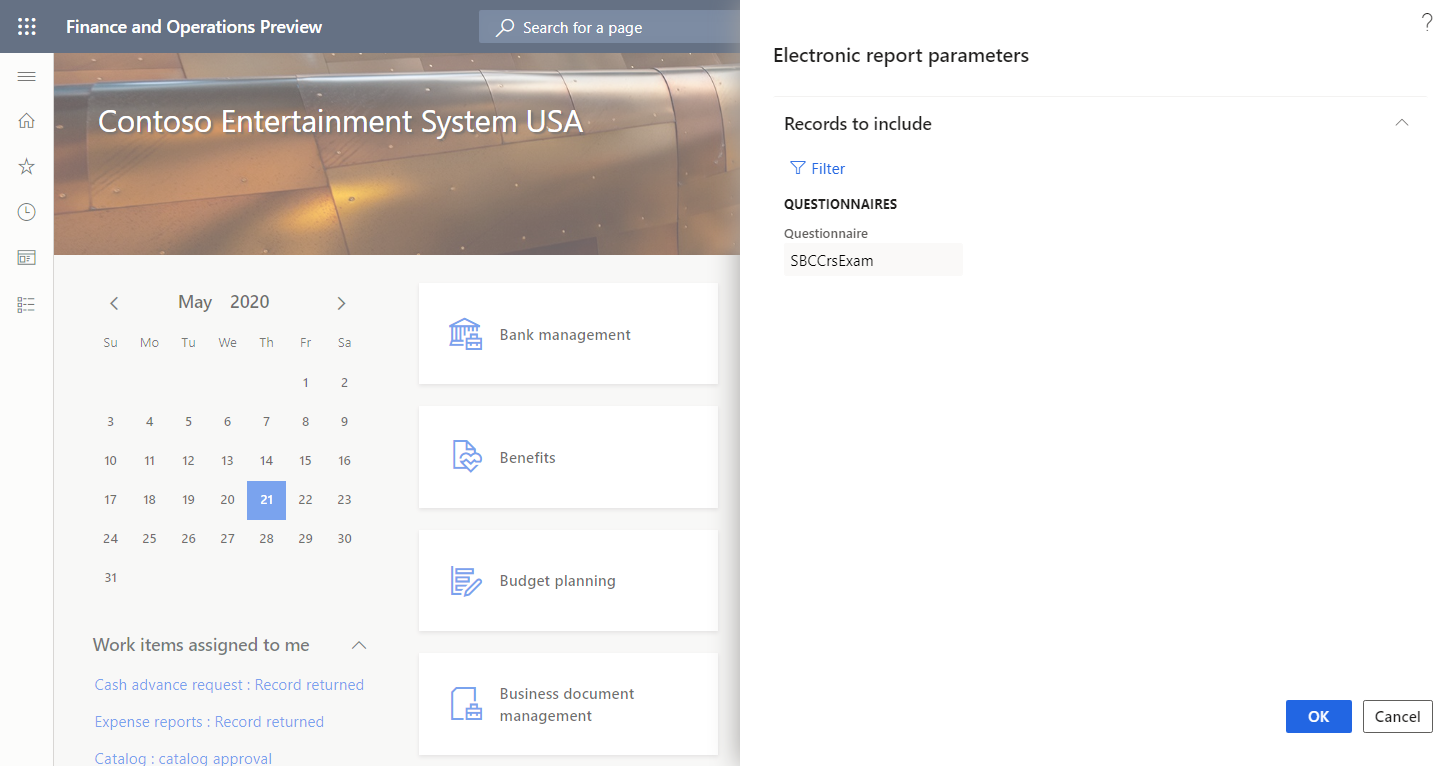
In the Questionnaires report dialog box, specify selection criteria. Apply a filter so that the report includes only the SBCCrsExam questionnaire.
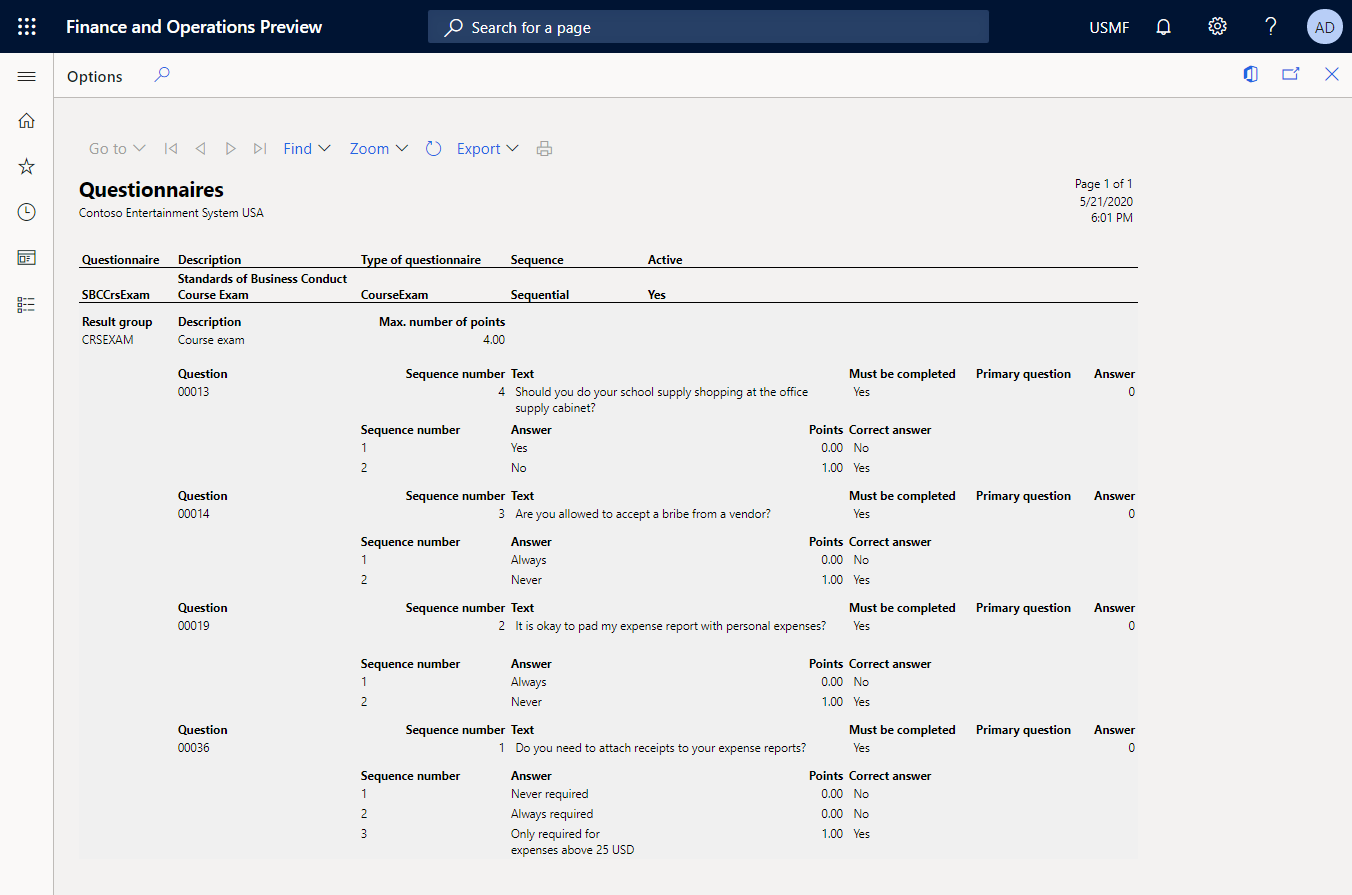
The following illustration shows the generated version of the SSRS report for the SBCCrsExam questionnaire.
Configure the ER framework
As a user in the Electronic Reporting Developer role, you must configure the minimal set of ER parameters before you can start to use the ER framework to design your new ER solution.
Configure ER parameters
Go to Organization administration > Workspaces > Electronic reporting.
In the Electronic reporting workspace, select Electronic reporting parameters.
On the Electronic reporting parameters page, on the General tab, set the Enable design mode option to Yes.
On the Attachments tab, set the following parameters:
- Set the Configurations field to File for the USMF company.
- Set Job archive, Temporary, Baseline, and Others fields to File.
For more information about ER parameters, see Configure the ER framework.
Activate an ER configuration provider
Each ER configuration belongs to an ER configuration provider. Therefore, you must activate an ER configuration provider in the Electronic reporting workspace before you can add or edit any ER configurations.
Note
Only the owner of an ER configuration can edit it. Therefore, before you can edit an ER configuration, activate the appropriate ER configuration provider in the Electronic reporting workspace.
Review the list of ER configuration providers
- Go to Organization administration > Workspaces > Electronic reporting.
- In the Electronic reporting workspace, in the Related links section, select Configuration providers.
- On the Configuration providers page, each configuration provider record has a unique name and URL. Review the contents of this page. If a record for Litware, Inc. (
https://www.litware.com) already exists, skip the next procedure, Add a new ER configuration provider.
Add a new ER configuration provider
- On the Configuration providers page, select New.
- In the Name field, enter Litware, Inc.
- In the Internet address field, enter
https://www.litware.com. - Select Save.
Activate an ER configuration provider
- Go to Organization administration > Workspaces > Electronic reporting.
- In the Electronic reporting workspace, select the Litware, Inc. configuration provider.
- Select Set active.
For more information about ER configuration providers, see Create configuration providers and mark them as active.
Design a domain-specific data model
You must create a new ER configuration that contains a data model component for the Questionnaire business domain. You use this data model as a data source when you design an ER format to generate the Questionnaire report.
By completing the steps in the Import a new data model configuration section, you can import the required data model from the provided XML file. Alternatively, you can complete the steps in the Create a new data model configuration section to design this data model from scratch.
Import a new data model configuration
- Download the Questionnaires model.version.1.xml file, and save it to your local computer.
- Go to Organization administration > Workspaces > Electronic reporting.
- In the Electronic reporting workspace, select Reporting configurations.
- On the Action Pane, select Exchange > Load from XML file.
- Select Browse, and then find and select the Questionnaires model.version.1.xml file.
- Select OK to import the configuration.
To continue, skip the next procedure, Create a new data model configuration.
Create a new data model configuration
- Go to Organization administration > Workspaces > Electronic reporting.
- In the Electronic reporting workspace, select Reporting configurations.
- Select Create configuration.
- In the drop-down dialog box, in the Name field, enter Questionnaire model.
- Select Create configuration to create the configuration.
Name the data model
- On Configurations, in the configuration tree, select Questionnaire model.
- Select Designer.
- On Data model designer, on the General FastTab, in the Name field, enter Questionnaires.
Add new data model fields
On Data model designer, select New.
In the drop-down dialog box for adding a data model node, follow these steps:
- Select Model root as the type of the new node.
- In the Name field, enter Root.
- Select Add to add the new node.
This root descriptor provides data for the Questionnaire report. A single data model can have multiple descriptors. Each descriptor can be specified for a single ER format, to identify data that is required to generate the report.
Select New again. In the drop-down dialog box for adding a data model node, follow these steps:
- Select Child of an active node as the type of the new node.
- In the Name field, enter CompanyName.
- In the Item type field, select String.
- Select Add to add the new field.
This field passes the name of the current company to an ER report that consumes this data model as a data source.
Select New again. In the drop-down dialog box for adding a data model node, follow these steps:
- Select Child of an active node as the type of the new node.
- In the Name field, enter Questionnaire.
- In the Item type field, select Record list.
- Select Add to add the new field.
This field passes the list of questionnaires to an ER report that consumes this data model as a data source.
Select the Questionnaire node.
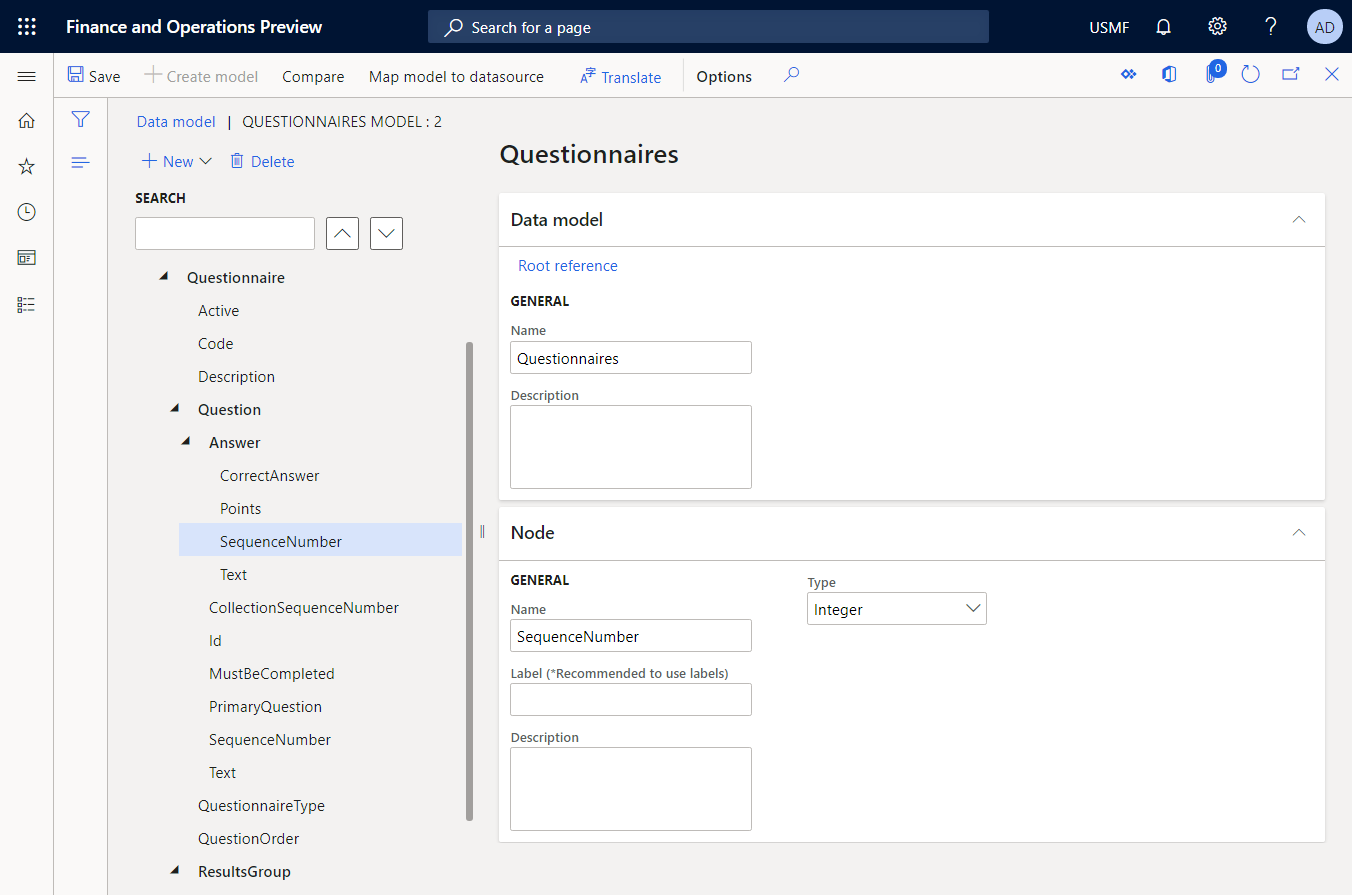
Continue to add the required fields of the editable data model in the same manner until you complete the following data model structure.
Field path Data type Field designation/returned value Root The reference point to request questionnaire data. Root\CompanyName String The name of the current company. Root\ExecutionContext Record Format execution details. Root\ExecutionContext\FormatName String The name of the ER format that is being run. Root\Questionnaire Record list The list of questionnaires Root\Questionnaire\Active String The status of the current questionnaire. Root\Questionnaire\Code String The code of the current questionnaire. Root\Questionnaire\Description String The description of the current questionnaire. Root\Questionnaire\QuestionnaireType String The type of the current questionnaire. Root\Questionnaire\QuestionOrder String The numerical order of the current questionnaire. Root\Questionnaire\ResultsGroup Record The result parameters of the current questionnaire. Root\Questionnaire\ResultsGroup\Code String The identification code of the current result group. Root\Questionnaire\ResultsGroup\Description String The description of the current result group. Root\Questionnaire\ResultsGroup\MaxNumberOfPoints Real The maximum number of points that can be earned. Root\Questionnaire\Question Record list The list of questions for the current questionnaire. Root\Questionnaire\Question\CollectionSequenceNumber Integer The sequence number of the current answer collection. Root\Questionnaire\Question\Id String The identification code of the current question. Root\Questionnaire\Question\MustBeCompleted String A flag that indicates whether the current question must be answered. Root\Questionnaire\Question\PrimaryQuestion String A flag that indicates whether the current question is primary. Root\Questionnaire\Question\SequenceNumber Integer The sequence number of the current question. Root\Questionnaire\Question\Text String The text of the current question. Root\Questionnaire\Question\Answer Record list The list of answers for the current question. Root\Questionnaire\Question\Answer\CorrectAnswer String A flag that indicates whether the current answer is correct. Root\Questionnaire\Question\Answer\Points Real The points that are earned when the current answer is selected. Root\Questionnaire\Question\Answer\SequenceNumber Integer The sequence number of the current answer. Root\Questionnaire\Question\Answer\Text String The text of the current answer. The following illustration shows the completed editable data model on the Data model designer page.
Save your changes.
Close the Data model designer page.
Complete the design of the data model
- Go to Organization administration > Electronic reporting > Configurations.
- On Configurations, in the configuration tree, select Questionnaire model.
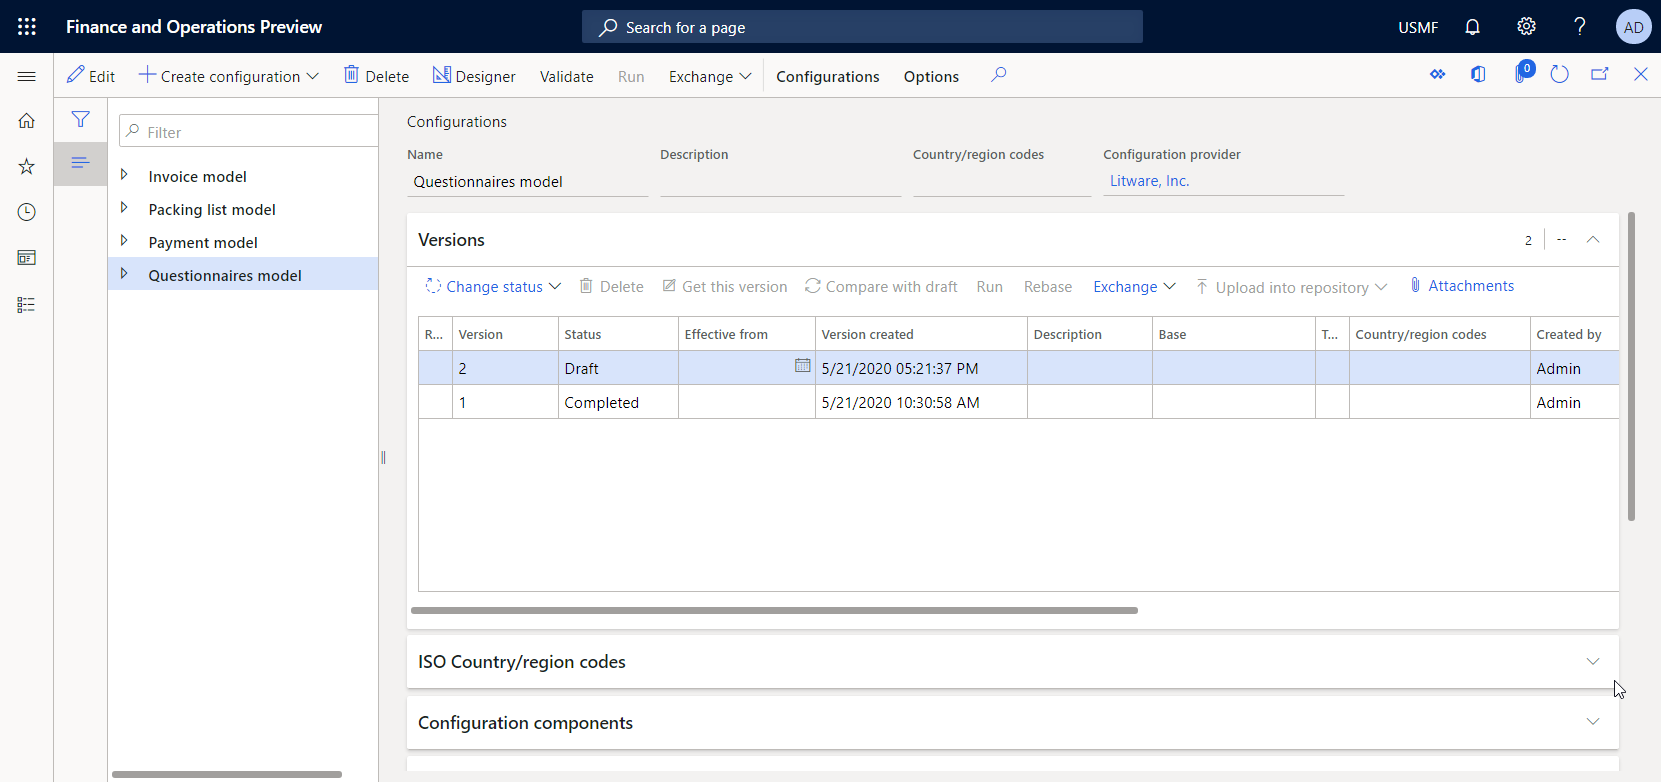
- On the Versions FastTab, select the configuration version that has a status of Draft.
- Select Change status > Complete.
The status of version 1 of this configuration changes from Draft to Completed. You can't change version 1 anymore. This version contains the configured data model and can be used as the basis for other ER configurations. Version 2 of this configuration is created and has a status of Draft. You can edit this version to adjust the Questionnaire data model.
For more information about versioning for ER configurations, see Electronic reporting (ER) overview.
Note
The configured data model is your abstract representation of the Questionnaire business domain and contains no relations to artifacts that are specific to Microsoft Dynamics 365 Finance.
Design a model mapping for the configured data model
As a user in the Electronic Reporting Developer role, you must create a new ER configuration that contains a model mapping component for the Questionnaire data model. Because this component implements the configured data model for Finance, it's Finance-specific. You must configure the model mapping component to specify the application objects that fill the configured data model with application data at runtime. To complete this task, you must be aware of the implementation details of the data structure of the Questionnaire business domain in Finance.
By completing the steps in the Import a new model mapping configuration section, you can import the required model mapping configuration from the provided XML file. Alternatively, you can complete the steps in the Create a new model mapping configuration section to design this model mapping from scratch.
Import a new model mapping configuration
- Download the Questionnaires mapping.version.1.1.xml file, and save it to your local computer.
- Go to Organization administration > Workspaces > Electronic reporting.
- In the Electronic reporting workspace, select Reporting configurations.
- On the Action Pane, select Exchange > Load from XML file.
- Select Browse, and then find and select the Questionnaires mapping.version.1.1.xml file.
- Select OK to import the configuration.
To continue, skip the next procedure, Create a new model mapping configuration.
Create a new model mapping configuration
Go to Organization administration > Electronic reporting > Configurations.
On Configurations, in the configuration tree, select Questionnaire model.
Select Create configuration.
In the drop-down dialog box, follow these steps:
- In New, select Model Mapping based on data model Questionnaires.
- In Name, enter Questionnaire mapping.
- In Data model definition, select the Root definition.
- Select Create configuration to create the configuration.
Design a new model mapping component
- On Configurations, in the configuration tree, select Questionnaire mapping.
- Select Designer to open the list of mappings.
- Select the Questionnaires mapping mapping that was automatically added for the Root definition.
- Select Designer to start to configure the selected mapping.
A new mapping is automatically added for the Root definition. This mapping has the To model direction. Therefore, you can use this mapping to fill in a data model with required data.
Add data sources to access application tables
You must configure data sources to access the application tables that contain questionnaire details.
On Model mapping designer, in the Data source types pane, select Dynamics 365 for Operations\Table records.
Add a new data source that you use to access the KMCollection table, where every record represents a single questionnaire:
- In the Data sources pane, select Add root.
- In the dialog box, in Name, enter Questionnaire.
- In Table, enter KMCollection.
- Set the Ask for query option to Yes. You can then specify filtering options for this table in the system query dialog box at runtime.
- Select OK to add the new data source.
In the Data source types pane, select Dynamics 365 for Operations\Table records.
Add a new data source that you use to access the KMQuestion table, where every record represents a single question in a questionnaire:
- In the Data sources pane, select Add root.
- In the dialog box, in Name, enter Question.
- In Table, enter KMQuestion.
- Select OK to add the new data source.
In the Data source types pane, select Dynamics 365 for Operations\Table records.
Add a new data source that you use to access the KMAnswer table, where every record represents a single answer to a question in a questionnaire:
- In the Data sources pane, select Add root.
- In Name, enter Answer.
- In Table, enter KMAnswer.
- Select OK to add the new data source.
In the Data source types pane, select Functions\Calculated field.
Add a new calculated field that you use to access a record of the KMQuestionResultGroup table from every record of the parent KMCollection table:
- In the Data sources pane, select Questionnaire.
- Select Add.
- In the dialog box, in Name, enter $ResultGroup.
- Select Edit formula.
- In the ER formula editor, in Formula, enter FIRSTORNULL(@.'<Relations'.KMQuestionResultGroup) to use the path of the one-to-many relation between the KMCollection and KMQuestionResultGroup tables.
- Select Save, and close the formula editor.
- Select OK to add the new calculated field.
In the Data source types pane, select Functions\Calculated field.
Add a new calculated field that you use to access question records of the KMQuestion table from every record of the parent KMCollectionQuestion table:
- In the Data sources pane, select Questionnaire.
- Expand the <Relations node that contains one-to-many relations of the KMCollection table.
- Select the related KMCollectionQuestion table, and then select Add.
- In the dialog box, in the Name field, enter $Question.
- Select Edit formula.
- In the formula editor, in the Formula field, enter FIRSTORNULL (FILTER(Question, Question.kmQuestionId = @.kmQuestionId)) to return the appropriate question records from the KMQuestion table.
- Select Save, and close the formula editor.
- Select OK to add the new calculated field.
In the Data source types pane, select Functions\Calculated field.
Add a new calculated field that you use to access answer records of the KMAnswer table from every record of the parent KMQuestion table:
- In the Data sources pane, select Questionnaire.<Relations.KMCollectionQuestion.$Question, and then select Add.
- In the dialog box, in the Name field, enter $Answer.
- Select Edit formula.
- In the formula editor, in the Formula field, enter FILTER (Answer, Answer.kmAnswerCollectionId = @.kmAnswerCollectionId) to return the appropriate answer records from the KMAnswer table.
- Select Save, and close the formula editor.
- Select OK to add the new calculated field.
In the Data source types pane, select Dynamics 365 for Operations\Table.
Add a new data source that you use to access methods of the CompanyInfo table. Note that the find() method of this table returns a record that represents a company of the current Finance instance that this mapping is called in the context of.
- In the Data sources pane, select Add root.
- In the dialog box, in the Name field, enter CompanyInfo.
- In the Table field, enter CompanyInfo.
- Select OK to add the new data source.
Add data sources to access application enumerations
You must configure data sources to access application enumerations and compare their values with values of fields of the Enumeration type in the application tables. Use the result of the comparison to fill in appropriate fields of the data model.
On the Model mapping designer page, in the Data source types pane, select Dynamics 365 for Operations\Enumeration.
Add a new data source that you use to access values of the EnumAppNoYes enumeration:
- In the Data sources pane, select Add root.
- In the dialog box, in the Name field, enter EnumAppNoYes.
- In the Enumeration field, enter NoYes.
- Select OK to add the new data source.
In the Data source types pane, select Dynamics 365 for Operations\Enumeration.
Add a new data source that you use to access the values of the KMCollectionQuestionMode enumeration:
- In the Data sources pane, select Add root.
- In the dialog box, in the Name field, enter EnumAppQuestionOrder.
- In the Enumeration field, enter KMCollectionQuestionMode.
- Select OK to add the new data source.
Add ER labels to generate a report in a specified language
You can add ER labels to configure some of your data sources to return values that depend on the language that is defined in the context of the model mapping's call.
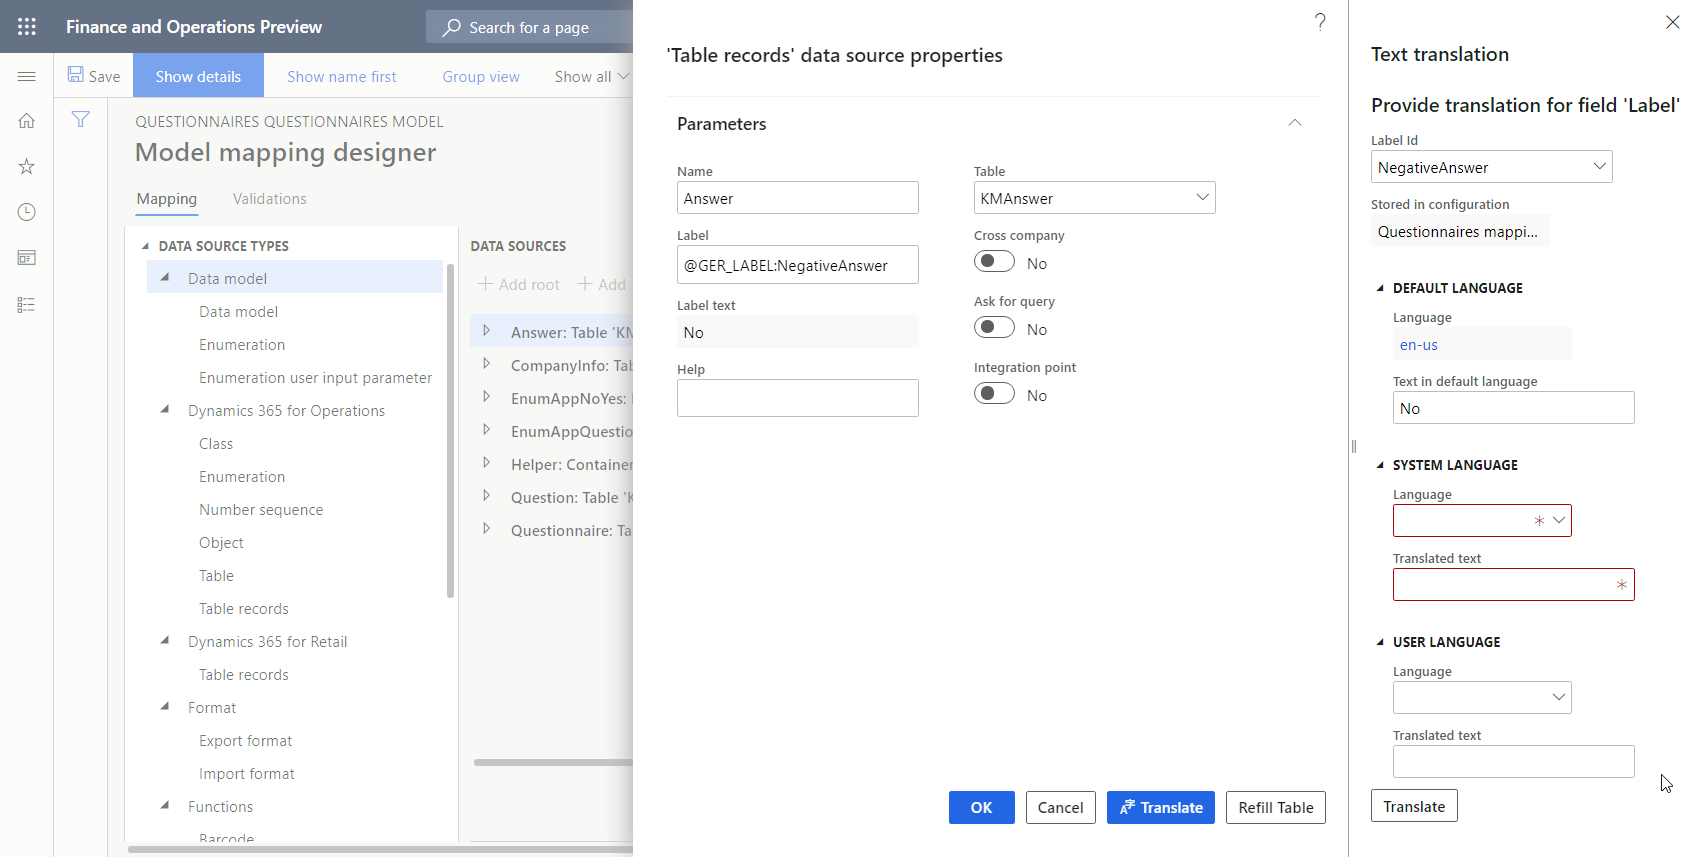
On the Model mapping designer page, in the Data sources pane, select Answer, and then select Edit.
Activate the Label field.
Select Translate.
In the Text translation dialog box, follow these steps:
- In the Label Id field, enter PositiveAnswer.
- In the Text in default language field, enter Yes.
- Select Translate.
- In the Label Id field, enter NegativeAnswer.
- In the Text in default language field, enter No.
- Select Translate.
Close the Text translation dialog box.
Select Cancel.
You entered ER labels only for the default language. For information about how to translate ER labels into other languages, see Design multilingual reports.
Add a data source to transform the results of comparing enumeration values to a text value
Because you must transform the results of the comparison between enumeration values and text values several times for different sources, it's a good idea to configure this logic as a single data source. However, to make this data source reusable, you must then configure it as the parameterized data source. For more information, see Support parameterized calls of ER data sources of the Calculated field type.
On the Model mapping designer page, in the Data source types pane, select General\Empty container.
Add a new container data source:
- In the Data sources pane, select Add root.
- In the dialog box, in the Name field, enter Helper.
- Select OK to add the new container data source.
In the Data source types pane, select Functions\Calculated field.
Add a new data source:
In the Data sources pane, select Helper.
Select Add.
In the dialog box, in the Name field, enter NoYesEnumToString.
Select Edit formula.
In the formula editor, select Parameters.
Follow these steps to specify parameters for the configured expression:
- Select New.
- In the dialog box, in the Name field, enter Argument.
- In the Type field, select the Boolean data type.
- Select OK.
In the Formula field, enter IF (Argument = true, @"GER_LABEL:PositiveAnswer", @"GER_LABEL:NegativeAnswer") to return the text of the appropriate ER label, depending on the language of the execution context and value of the specified parameter.
Select Save, and close the formula editor.
Select OK to add the new data source.
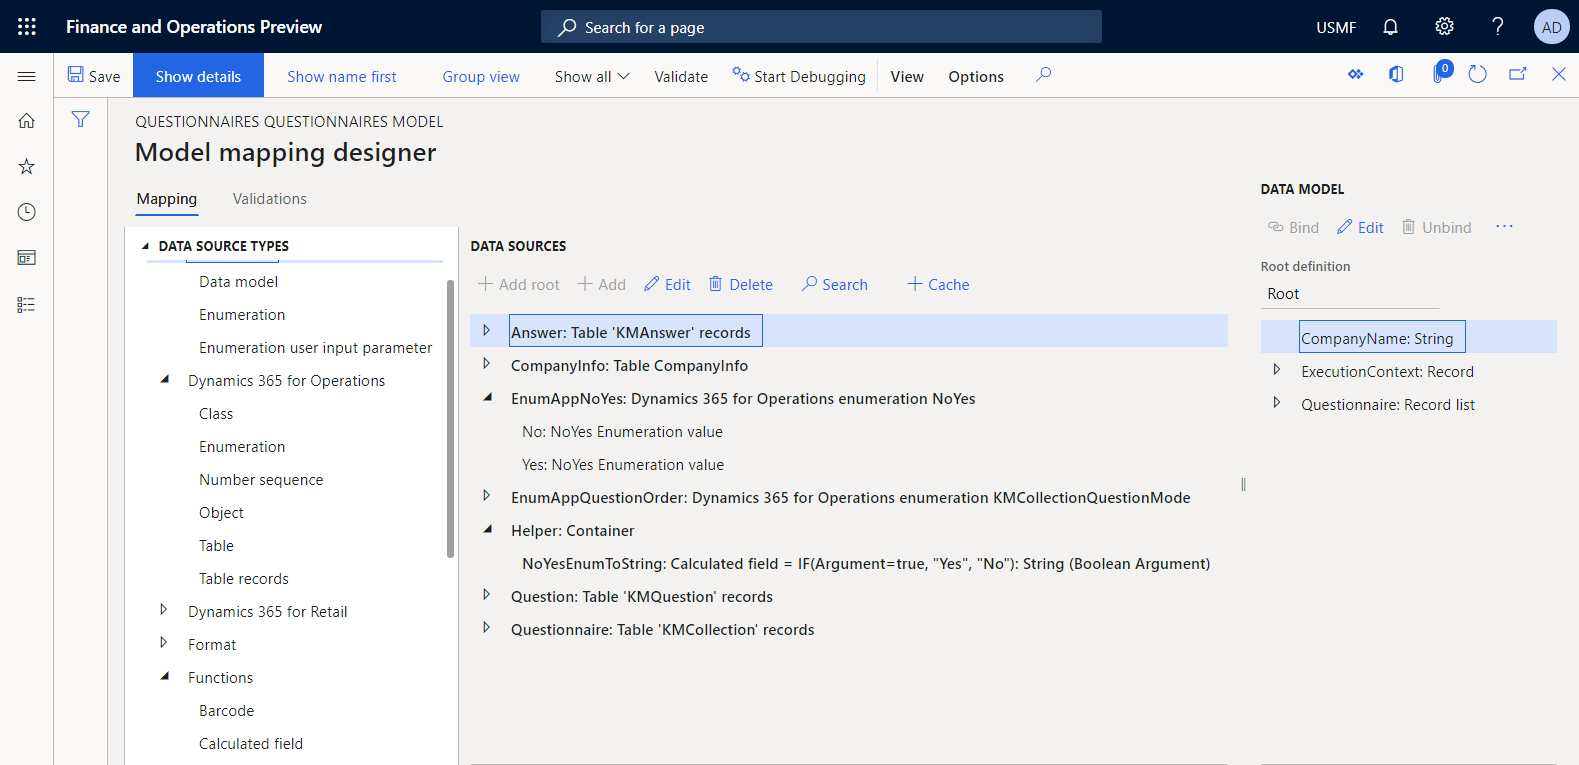
Bind data sources to data model fields
You must bind the configured data sources to the fields of the data model to specify how the data model is filled in with application data at runtime.
On the Model mapping designer page, in the Data model pane, select CompanyName.
In the Data sources pane, expand CompanyInfo, and then follow these steps:
- Expand the CompanyInfo.find() node that represents the find() method of the CompanyInfo table.
- Select CompanyInfo.find().Name.
- Select Bind to fill in the name of the company that the configured model mapping is called in the context of at runtime.
In the Data model pane, select Questionnaire.
In the Data sources pane, select Questionnaire, and then select Bind to fill in questionnaire records.
In the Data model pane, expand Questionnaire, and then follow these steps:
- In the Data model pane, select Active.
- In the Data model pane, select Edit.
- In the Formula field, enter Helper.NoYesEnumToString (@.Active = EnumAppNoYes.Yes) to fill the text-dependent and language-dependent result of the comparison between enumeration values.
Continue to bind data sources to data model fields in the same manner until you achieve the following result.
Field path Data type Action Binding expression CompanyName String Bind CompanyInfo.'find()'.Name Questionnaire Record list Bind Questionnaire Questionnaire\Active String Edit Helper.NoYesEnumToString(@.active = EnumAppNoYes.Yes) Questionnaire\Code String Bind @.kmCollectionId Questionnaire\Description String Bind @.Description Questionnaire\QuestionnaireType String Bind @.'>Relations'.kmCollectionTypeId.Description Questionnaire\QuestionOrder String Edit CASE (@.questionMode,
EnumAppQuestionOrder.Conditional, "Conditional",
EnumAppQuestionOrder.Random, "Random (percentage in questionnaire)",
EnumAppQuestionOrder.RandomGroup, "Random (percentage in result groups)",
EnumAppQuestionOrder.Sequence, "Sequential",
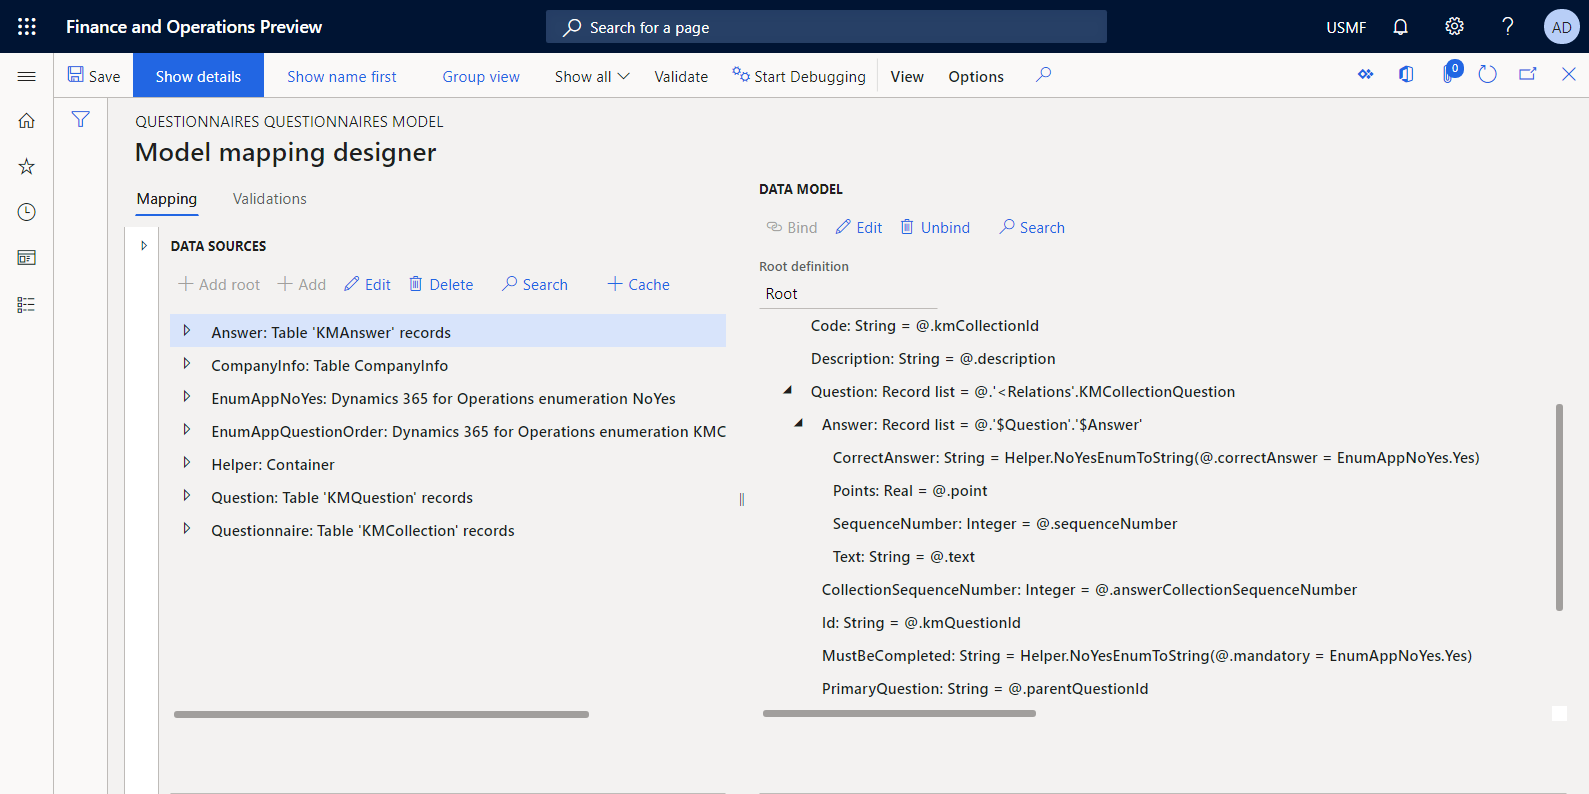
"")Questionnaire\ResultsGroup Record Questionnaire\ResultsGroup\Code String Bind @.'$ResultGroup'.kmQuestionResultGroupId Questionnaire\ResultsGroup\Description String Bind @.'$ResultGroup'.description Questionnaire\ResultsGroup\MaxNumberOfPoints Real Bind @.'$ResultGroup'.maxPoint Questionnaire\Question Record list Bind @.'<Relations'.KMCollectionQuestion Questionnaire\Question\CollectionSequenceNumber Integer Bind @.answerCollectionSequenceNumber Questionnaire\Question\Id String Bind @.kmQuestionId Questionnaire\Question\MustBeCompleted String Edit Helper.NoYesEnumToString(@.mandatory = EnumAppNoYes.Yes) Questionnaire\Question\PrimaryQuestion String Bind @.parentQuestionId Questionnaire\Question\SequenceNumber Integer Bind @.SequenceNumber Questionnaire\Question\Text String Bind @.'$Question'.text Questionnaire\Question\Answer Record list Bind @.'$Question'.'$Answer' Questionnaire\Question\Answer\CorrectAnswer String Edit Helper.NoYesEnumToString(@.correctAnswer = EnumAppNoYes.Yes) Questionnaire\Question\Answer\Points Real Bind @.point Questionnaire\Question\Answer\SequenceNumber Integer Bind @.sequenceNumber Questionnaire\Question\Answer\Text String Bind @.text The following illustration shows the final state of the configured model mapping on the Model mapping designer page.
Save your changes.
Close the Model mapping designer page.
Complete the design of the model mapping
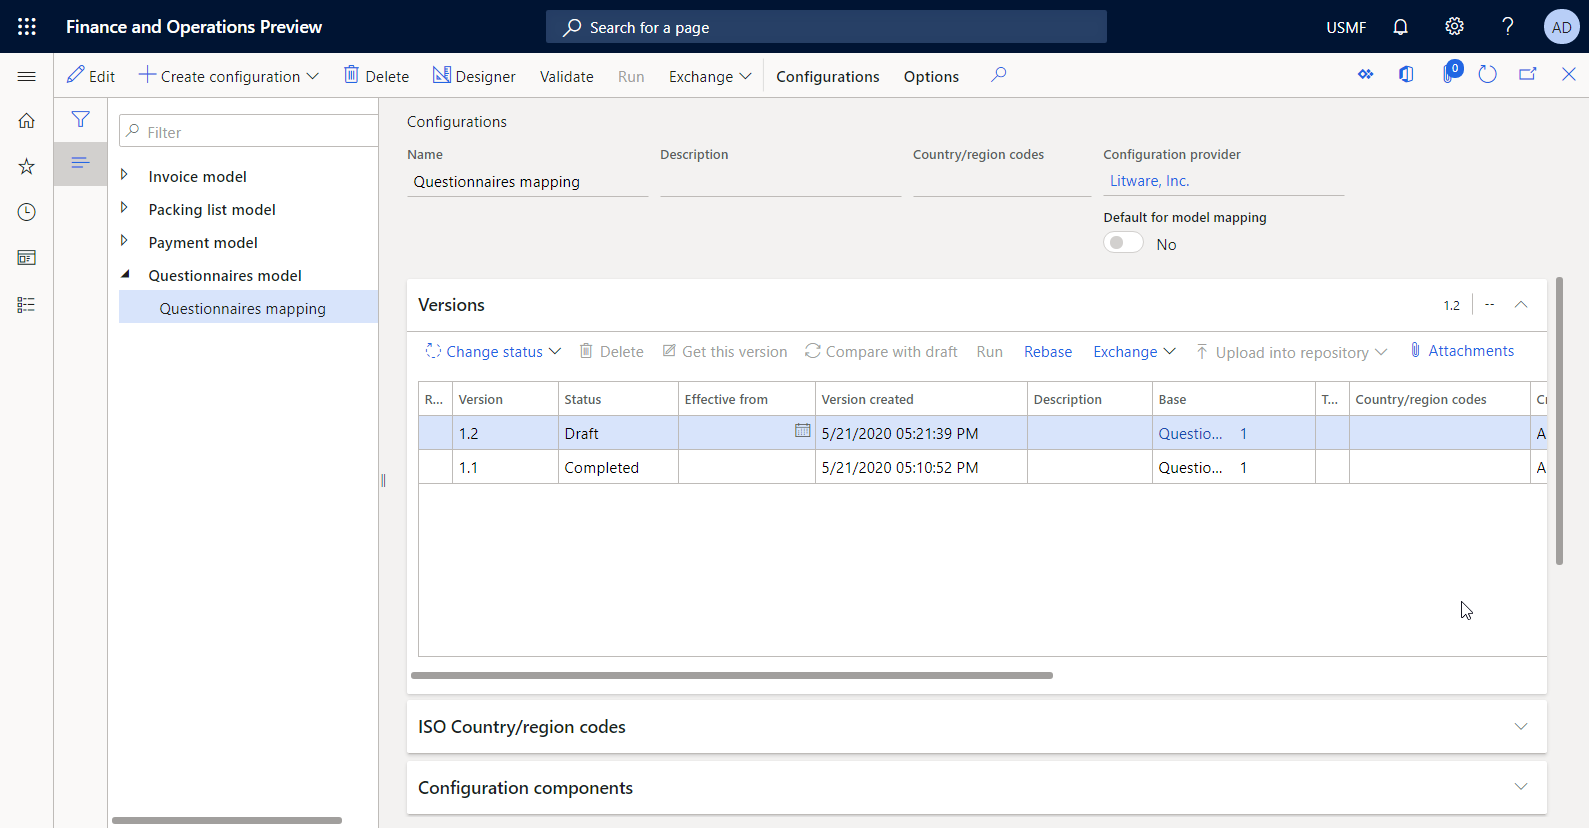
- Go to Organization administration > Electronic reporting > Configurations.
- On Configurations, in the configuration tree, select Questionnaire mapping.
- On the Versions FastTab, select the configuration version that has a status of Draft.
- Select Change status > Complete.
The status of version 1.1 of this configuration changes from Draft to Completed. You can no longer change version 1.1. This version contains the configured model mapping and can be used as the basis for other ER configurations. Version 1.2 of this configuration is created and has a status of Draft. You can edit this version to adjust the Questionnaire mapping configuration.
Note
The configured model mapping is your Finance-specific implementation of the abstract data model that represents the Questionnaire business domain.
Design a template for a custom report
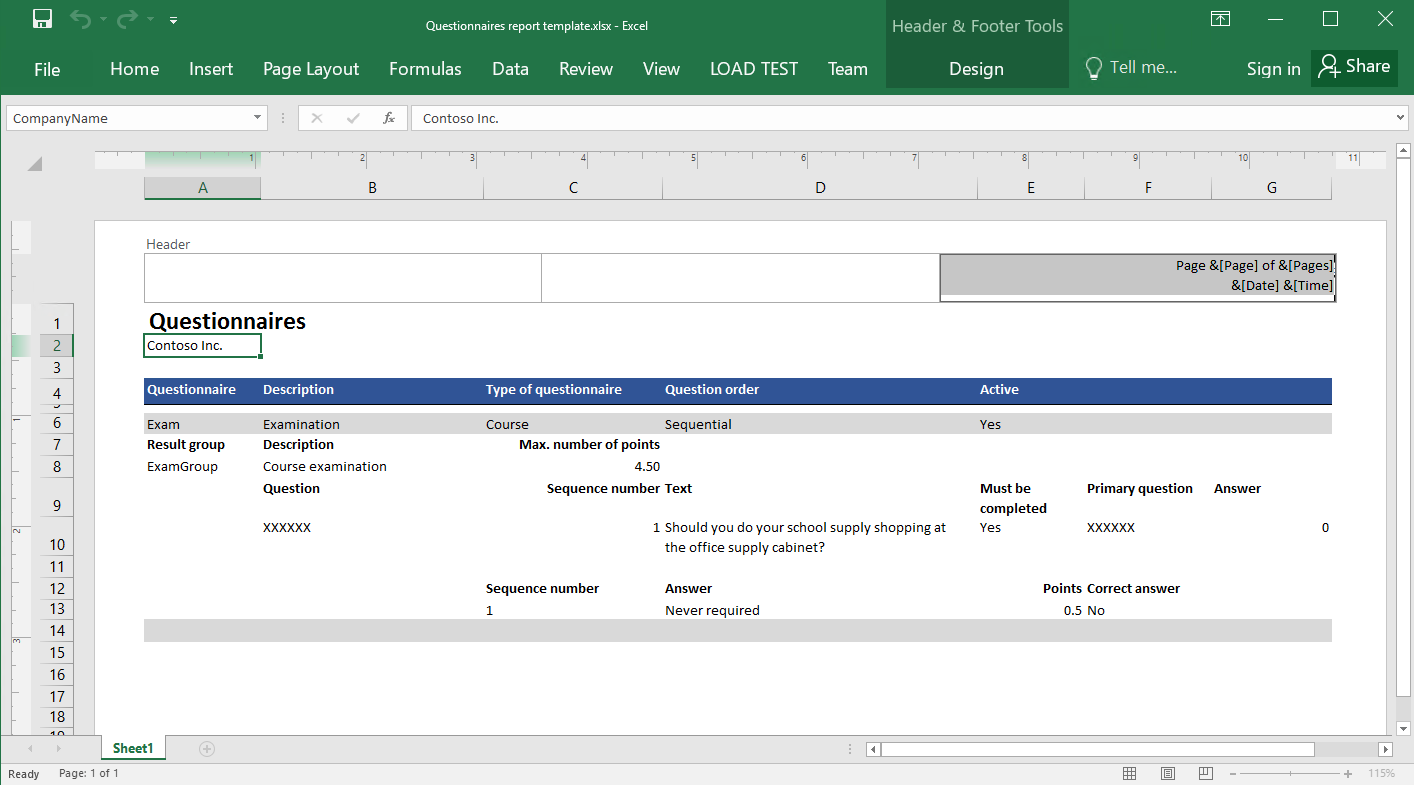
The ER framework uses predefined templates to generate reports in Microsoft Office formats (Excel workbooks or Word documents). While generating the required report, the framework fills the template with the required data according to the configured dataflow. Therefore, you must first design a template for your custom report. Design this template as an Excel workbook, the structure of which represents the layout of a custom report. Name every Excel item that you plan to fill with required data.
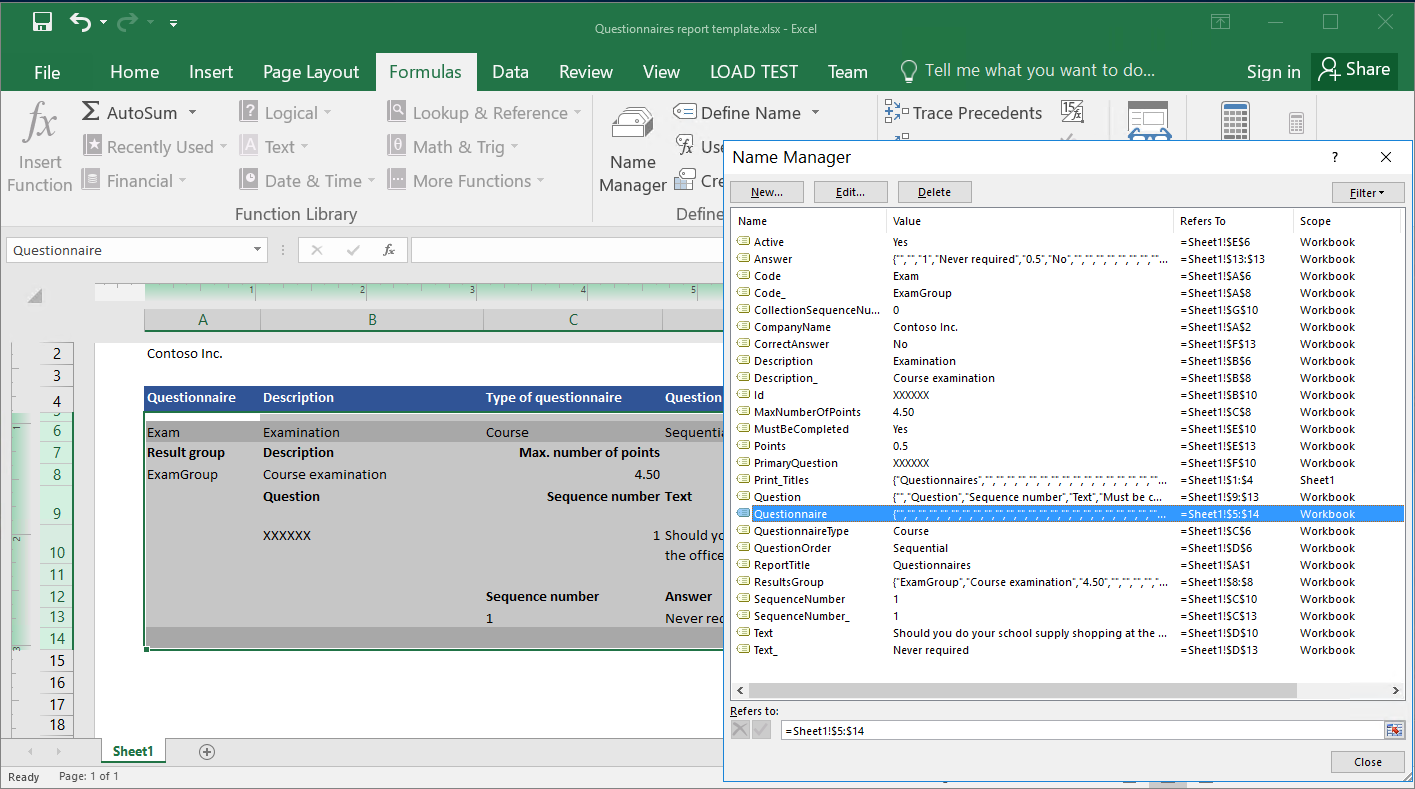
- Download the Questionnaires report template.xlsx file, and save it to your local computer.
- Open the file in Excel, and review the structure of the workbook.
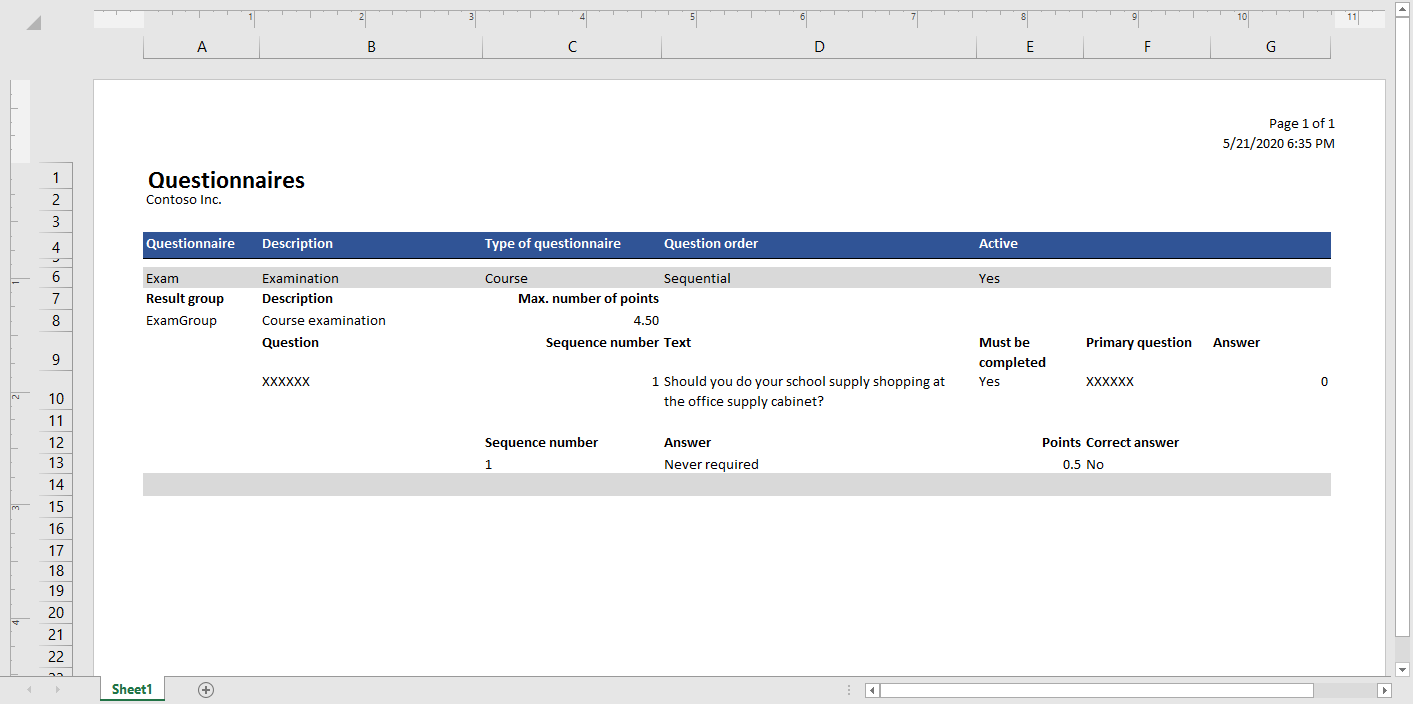
As the following illustration shows, the downloaded template is designed to print specified questionnaires that present a questionnaire's questions together with appropriate answers.
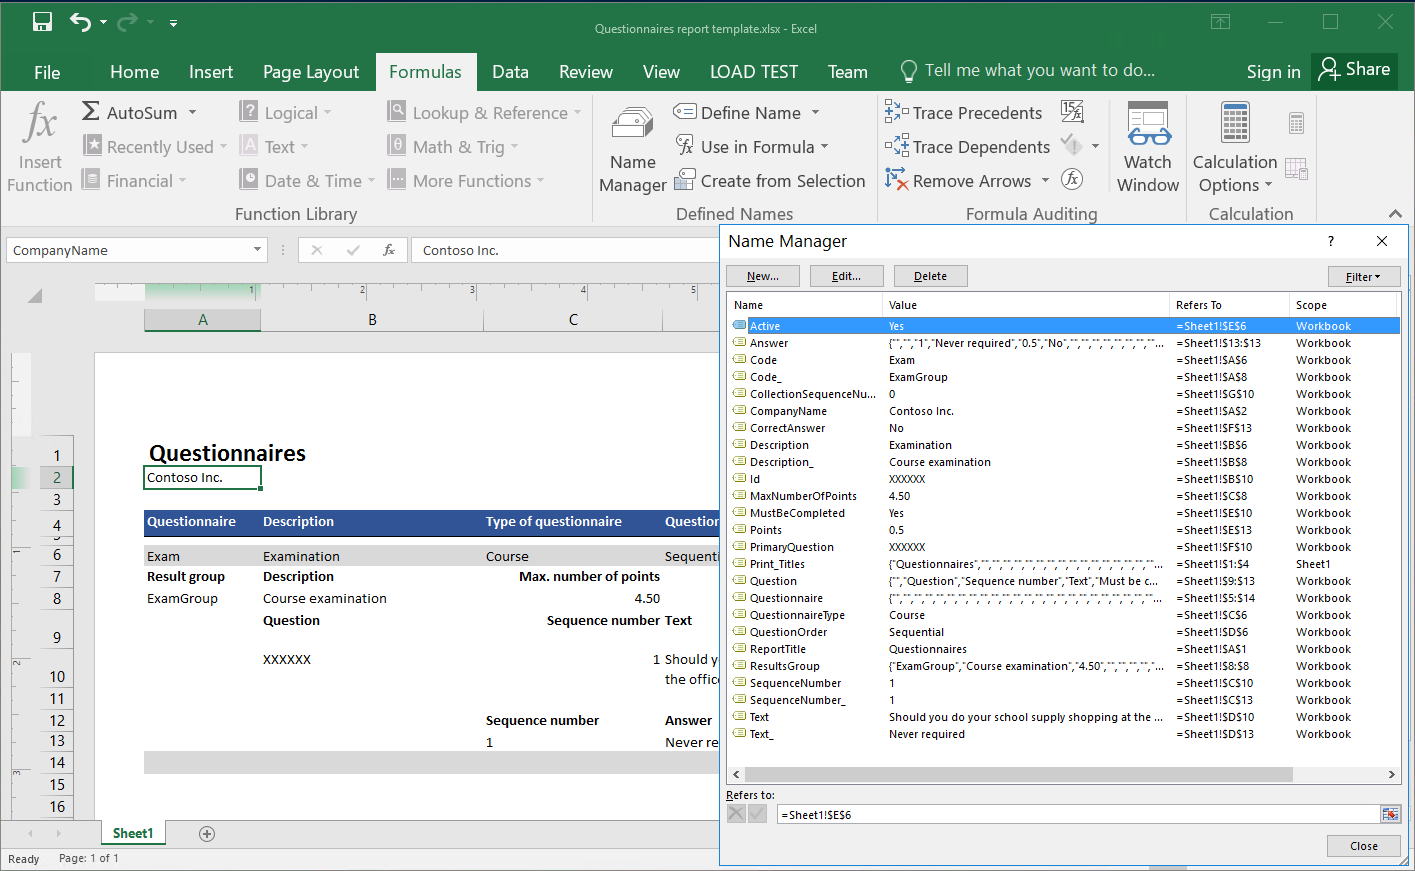
Excel names are added to this template to fill in the questionnaire details. Use Name Manager to review the Excel names.
Report labels are added as fixed text in the English language. You can replace the report labels with new Excel names that fill in the labels with language-dependent text by using the ER format labels, as you did for language-dependent expressions in the configured model mapping. In this case, ER labels must be added in the editable ER format.
As the following illustration shows, the custom report header is specified to enable Excel to do paging.
Design a format
As a user in the Electronic Reporting Functional Consultant role, you must create a new ER configuration that contains a format component. You must configure the format component to specify how a report template is filled with required data at runtime.
By completing the steps in the Import a designed format configuration section, you can import the required format from the provided XML file. Alternatively, you can complete the steps in the Create a new format configuration section to design this format from scratch.
Import a designed format configuration
- Download the Questionnaires format.version.1.1.xml file, and save it to your local computer.
- Go to Organization administration > Workspaces > Electronic reporting.
- In the Electronic reporting workspace, select Reporting configurations.
- On the Action pane, select Exchange > Load from XML file.
- Select Browse, and then find and select the Questionnaires format.version.1.1.xml file.
- Select OK to import the configuration.
To continue, skip the next procedure, Create a new format configuration.
Create a new format configuration
Go to Organization administration > Electronic reporting > Configurations.
On Configurations, in the configuration tree, select Questionnaire model.
Select Create configuration.
In the drop-down dialog box, follow these steps:
In New, select Format based on data model Questionnaires.
In Name, enter Questionnaire report.
In Data model version, select 1.
Note
- If you select a specific version of the base data model, the structure of the corresponding version of the data model appears as the structure of the Model data source in the format that you create.
- You can leave this field blank. In that case, the structure of the Draft version of the data model appears as the structure of the Model data source in the format that you create. You can then adjust your model and immediately see those adjustments in your format. This approach might improve the efficiency of ER solution design when you configure your data model, model mapping, and format simultaneously.
- If you select a specific version of the base data model, you can switch to using the Draft version later, when you start to edit a format.
In Data model definition, select the Root definition.
Select Create configuration to create the configuration.
Import a report template
On Configurations, in the configuration tree, select Questionnaire report.
Select Designer to start to configure a custom format.
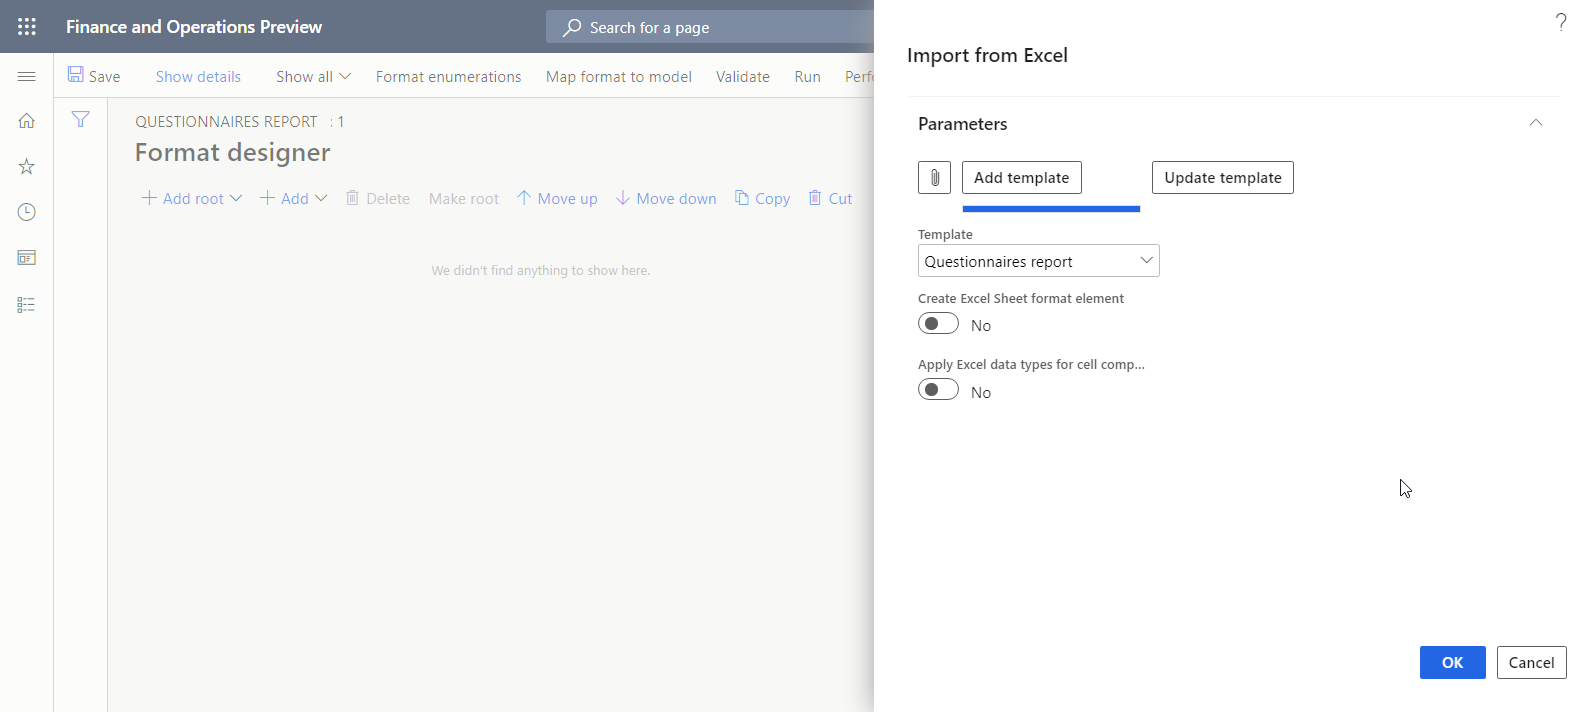
On Format designer, on the Action Pane, select Import > Import from Excel.
In the dialog box, follow these steps:
- Select Add template.
- Find and select the locally saved Questionnaires report template.xslx file, and then select Open.
- Select OK to import the template.
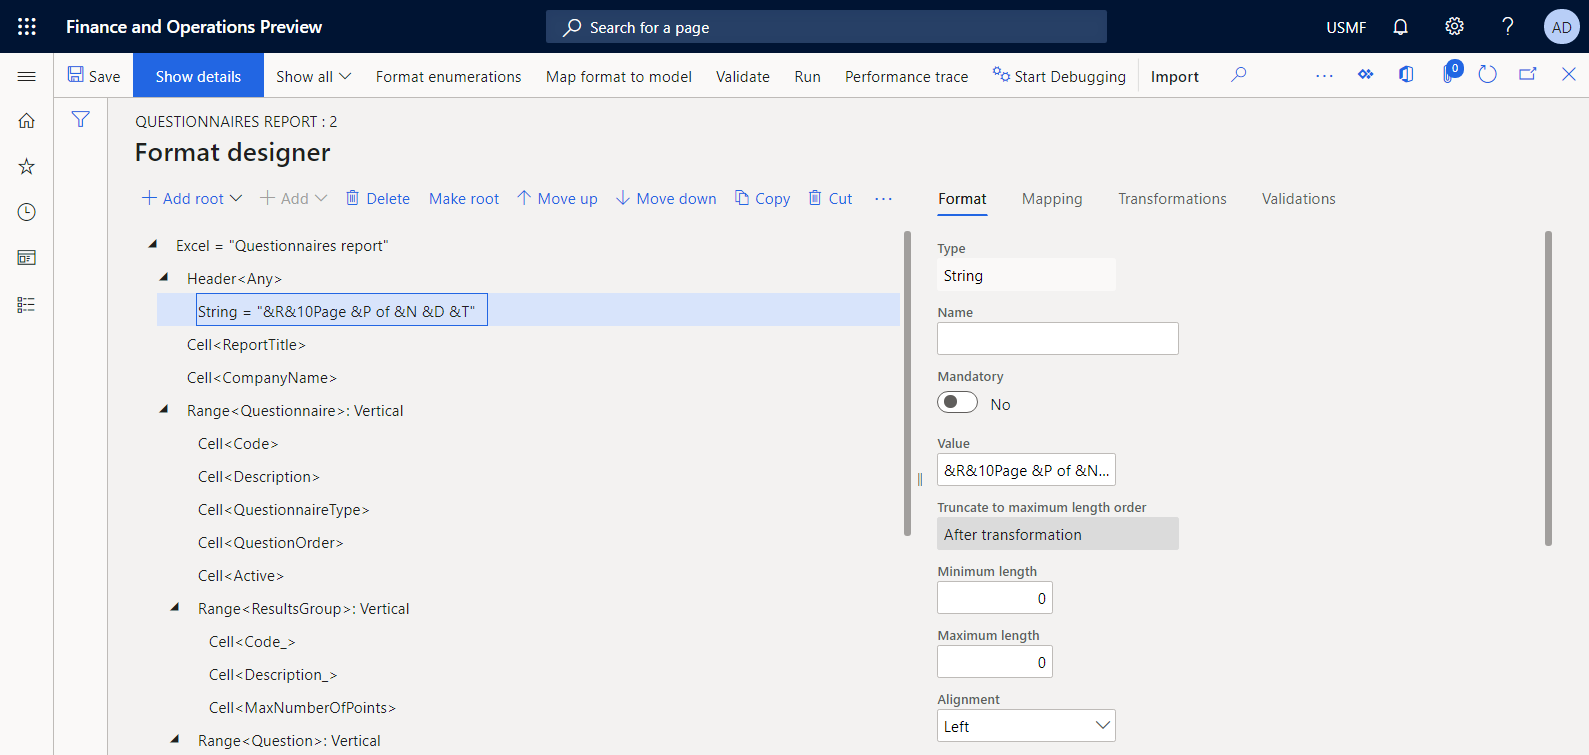
The Excel\File format element is automatically added to the editable format as a root element. Additionally, either the Excel\Range format element or the Excel\Cell format element is automatically added for every recognized Excel name of the imported template. The Excel\Header format that has the nested String element is automatically added to reflect the header settings of the imported template.
Configure a format
On Format designer, in the format tree, select the Excel root element.
In the Language preference field, select User preference to run the report in the user's preferred language.
In the Culture preference field, select User preference to run the report in the user's preferred culture.
For information about how to specify the language and culture contexts for an ER process, see Design multilingual reports.

In the format tree, expand the root node, and then select ResultsGroup.
On the Format tab, in the Replication direction field, select No replication, because you don't expect to have multiple result groups for a single questionnaire.

Select Save.
Define the data binding for a report title
You must specify a data binding for a format element that fills in the title of a generated report.
On Format designer, on the Mapping tab, select the Report\ReportTitle element.
Select Edit formula.
In the formula editor, select Translate.
In the Text translation dialog box, follow these steps:
- In the Label ID field, enter ReportTitle.
- In the Text in default language field, enter Questionnaires report.
- Select Translate, and then select Save.
- Select Translate to close the Text translation dialog box.
Close the formula editor.
Use this technique to make all other labels of the current template language-dependent. For information about how to translate the added labels of a single ER configuration into all supported languages, see Design multilingual reports.
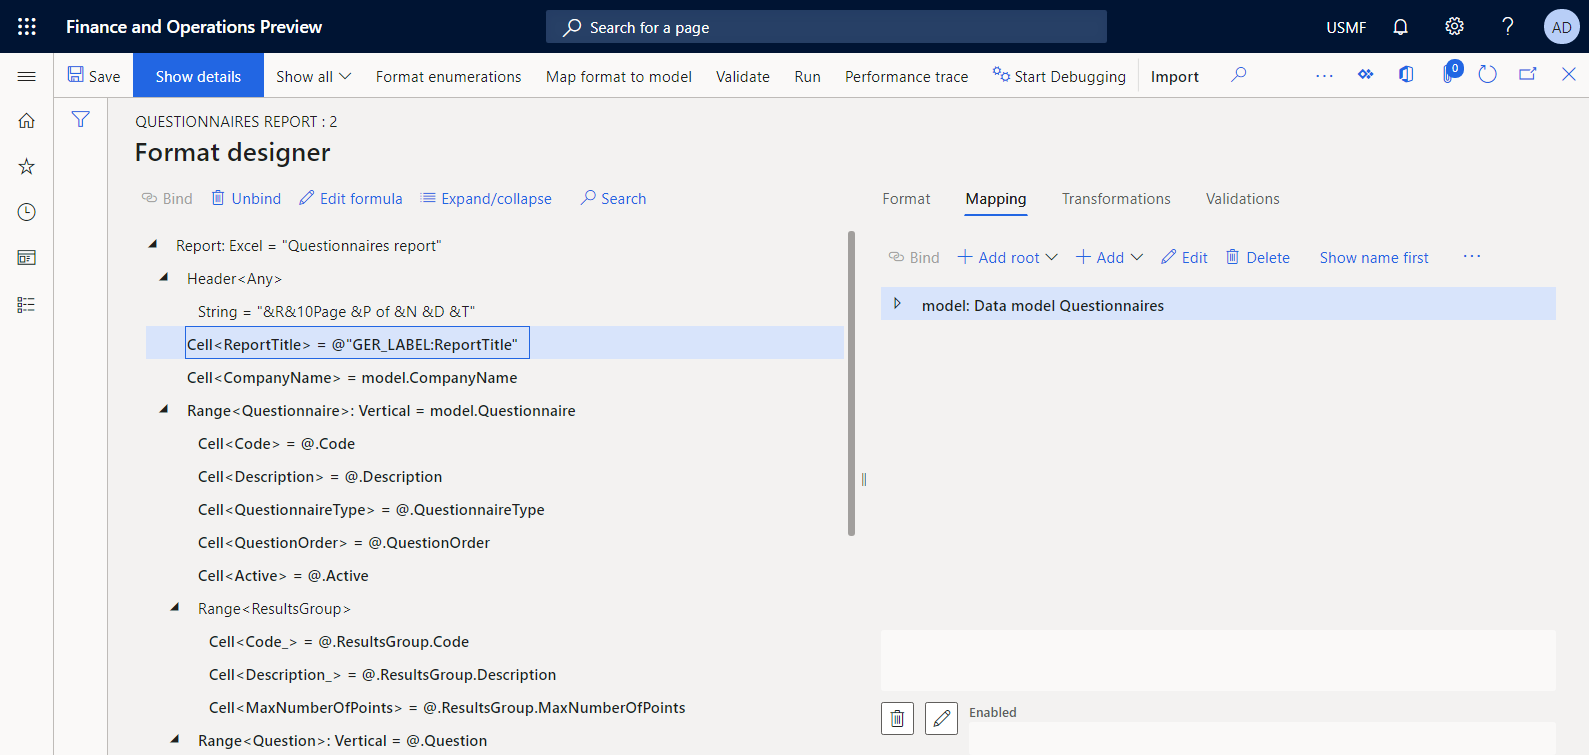
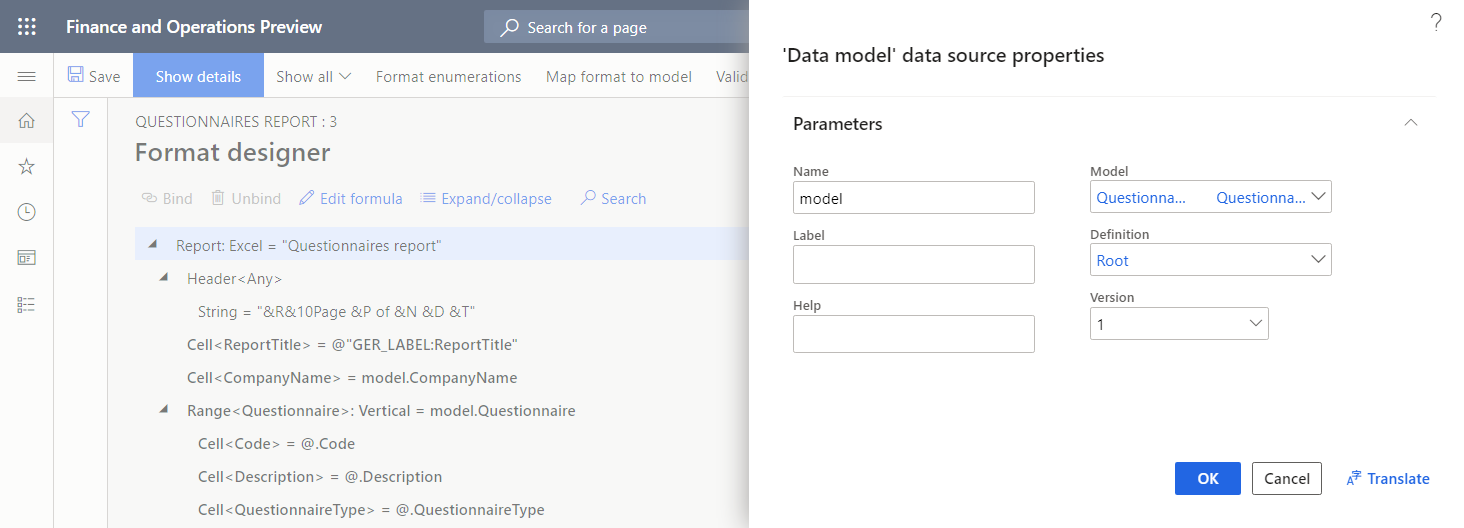
Review model data source
- On the Format designer page, on the Mapping tab, select the model data source that represents the base data model of this ER format.
- Select Edit.
- Review the information in the Data source properties dialog box. This data source represents version 1 of the Questionnaires data model component that resides in the Questionnaires model ER configuration.
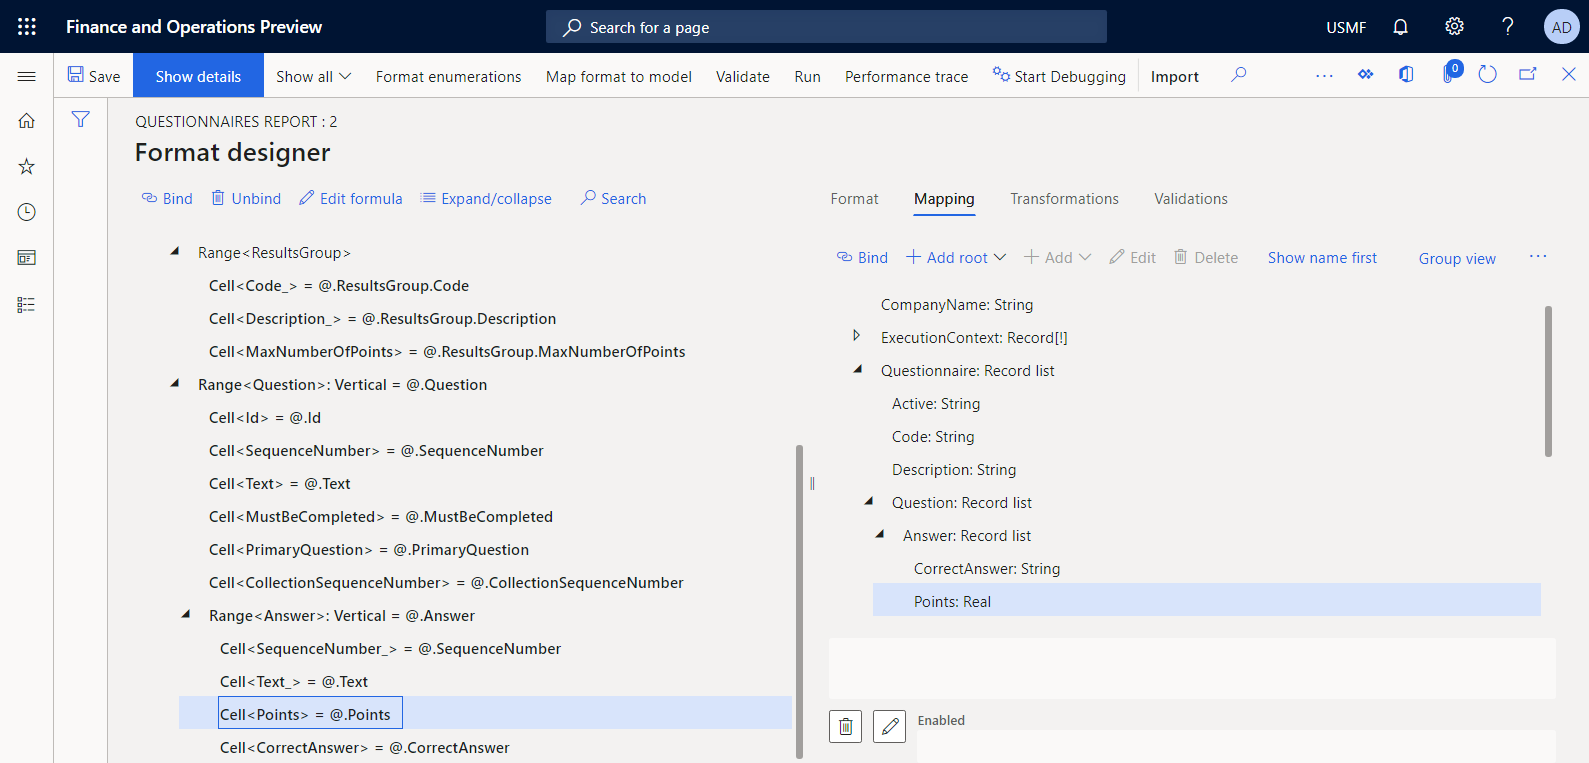
Bind format elements to data source fields
To specify how a template is filled in at runtime, bind every format element that is associated with an appropriate Excel name to a single field of this format's data source.
On the Format designer page, in the format tree, select the Report\CompanyName format element.
On the Mapping tab, select the model.CompanyName data source field of the String type.
Select Bind to enter a company name in a template.
In the format tree, select the Report\Questionnaire element.
On the Mapping tab, select the model.Questionnaire data source field of the Record list type.
Select Bind.
Select Show details to see more details for format elements.
The Questionnaire range format element is configured as vertically replicated. When it's bound to a data source of the Record list type, the appropriate Questionnaire range of the Excel template is repeated for every record of the bound data source.

Because the Questionnaire range of the Excel template is defined between rows 5 through 14, these rows are repeated for every reported questionnaire.
Configure similar bindings for the remaining format elements, as described in the following table.
Note
In this table, the information in the "Data source path" column assumes that the relative path ER feature is turned on.
Format element path Data source path Excel\ReportTitle @"GER_LABEL:ReportTitle" Excel\CompanyName model.CompanyName Excel\Questionnaire model.Questionnaire Excel\Questionnaire\Active @.Active, where @ is model.Questionnaire Excel\Questionnaire\Code @.Code Excel\Questionnaire\Description @.Description Excel\Questionnaire\QuestionnaireType @.QuestionnaireType Excel\Questionnaire\QuestionOrder @.QuestionOrder Excel\Questionnaire\ResultsGroup\Code_ @.ResultsGroup.Code Excel\Questionnaire\ResultsGroup\Description_ @.ResultsGroup.Description Excel\Questionnaire\ResultsGroup\MaxNumberOfPoints @.ResultsGroup.MaxNumberOfPoint Excel\Questionnaire\Question @.Question Excel\Questionnaire\Question\CollectionSequenceNumber @.CollectionSequenceNumber, where @ is model.Questionnaire.Question Excel\Questionnaire\Question\Id @.Id Excel\Questionnaire\Question\MustBeCompleted @.MustBeCompleted Excel\Questionnaire\Question\PrimaryQuestion @.PrimaryQuestion Excel\Questionnaire\Question\SequenceNumber @.SequenceNumber Excel\Questionnaire\Question\Text @.Text Excel\Questionnaire\Question\Answer @.Answer Excel\Questionnaire\Question\Answer\CorrectAnswer @.CorrectAnswer, where @ is model.Questionnaire.Answer Excel\Questionnaire\Question\Answer\Points @.Points Excel\Questionnaire\Question\Answer\Text @.Text When you finish, select Save.
The following illustration shows the final state of the configured data bindings on the Format designer page.
Important
The whole collection of specified data sources and bindings represents a format mapping component of the configured format. This format mapping is called when you run the configured format for report generation.
Run a designed format from ER
You can now run a designed format for testing purposes from the Configurations page.
- Go to Organization administration > Electronic reporting > Configurations.
- On the Configuration page, in the configuration tree, expand Questionnaire model, and then select Questionnaire report.
- Select Designer for the format version that has a status of Draft.
- On the Format designer page, select Run.
- In the ER parameters dialog box, on the Records to include FastTab, configure the filtering option so that only the SBCCrsExam questionnaire is included.
- Select OK to confirm the filter.
- Select OK to run the report.
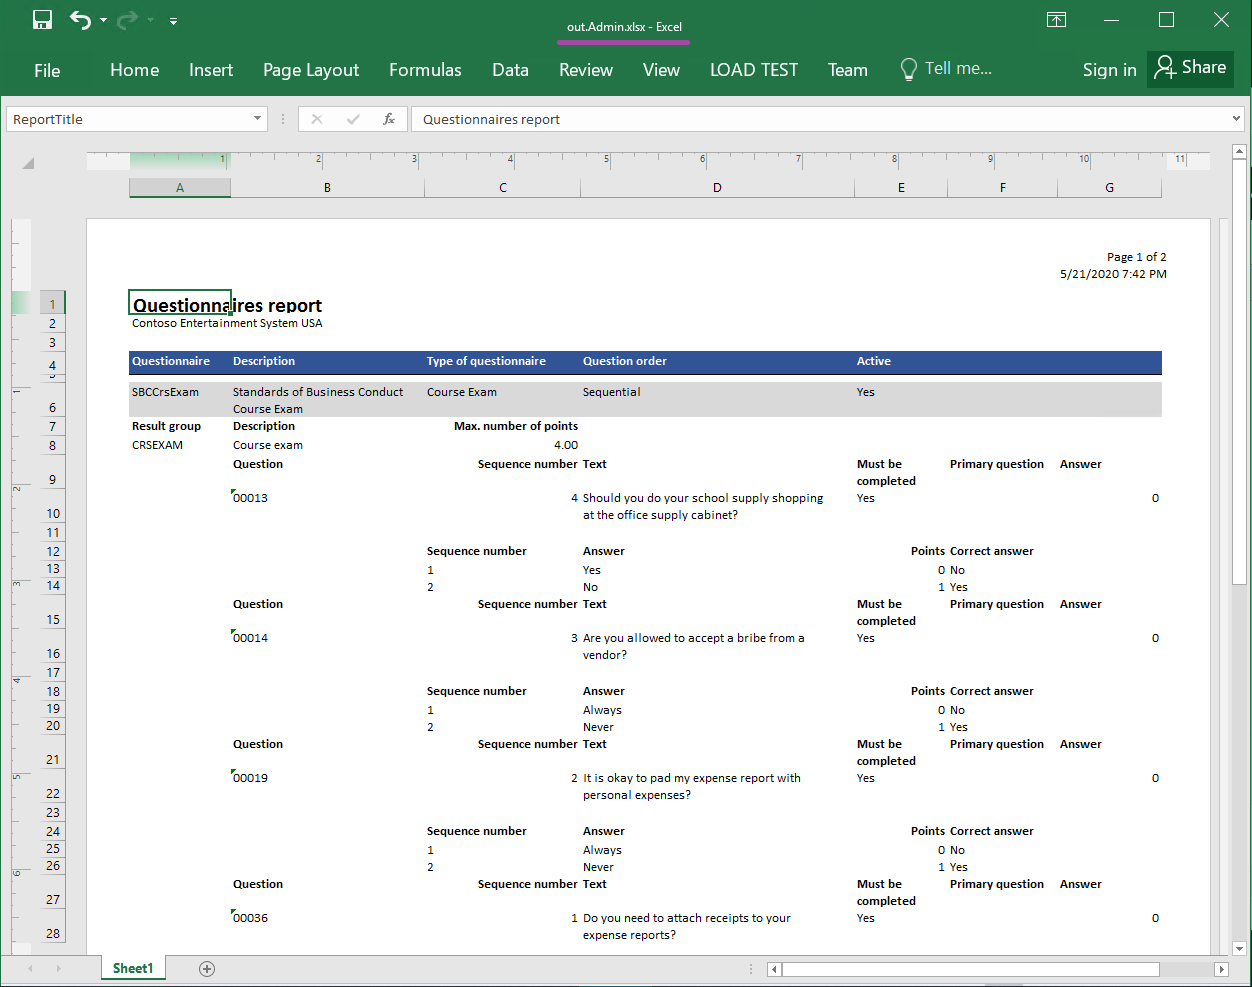
- Review the generated report.
By default, a generated report is delivered as an Excel file that you can download. The following illustrations show two pages of the generated report in Excel format.

Tune a designed format
Modify a format to change the name of a generated document
By default, the alias of the current user names a generated document. When you modify the format, you can change this behavior so that a generated document is named based on your custom logic. For example, the name of a generated document can be based on the current session date and time, and on the report's title.
- On Format designer, select the Report root item.
- On the Mapping tab, select Edit file name.
- In the Formula field, enter
CONCATENATE (\@"GER_LABEL:ReportTitle", " - ", DATETIMEFORMAT(SESSIONNOW(), "yyyy-MM-dd hh-mm-ss")). - Select Save, and close the formula editor.
- Select Save.
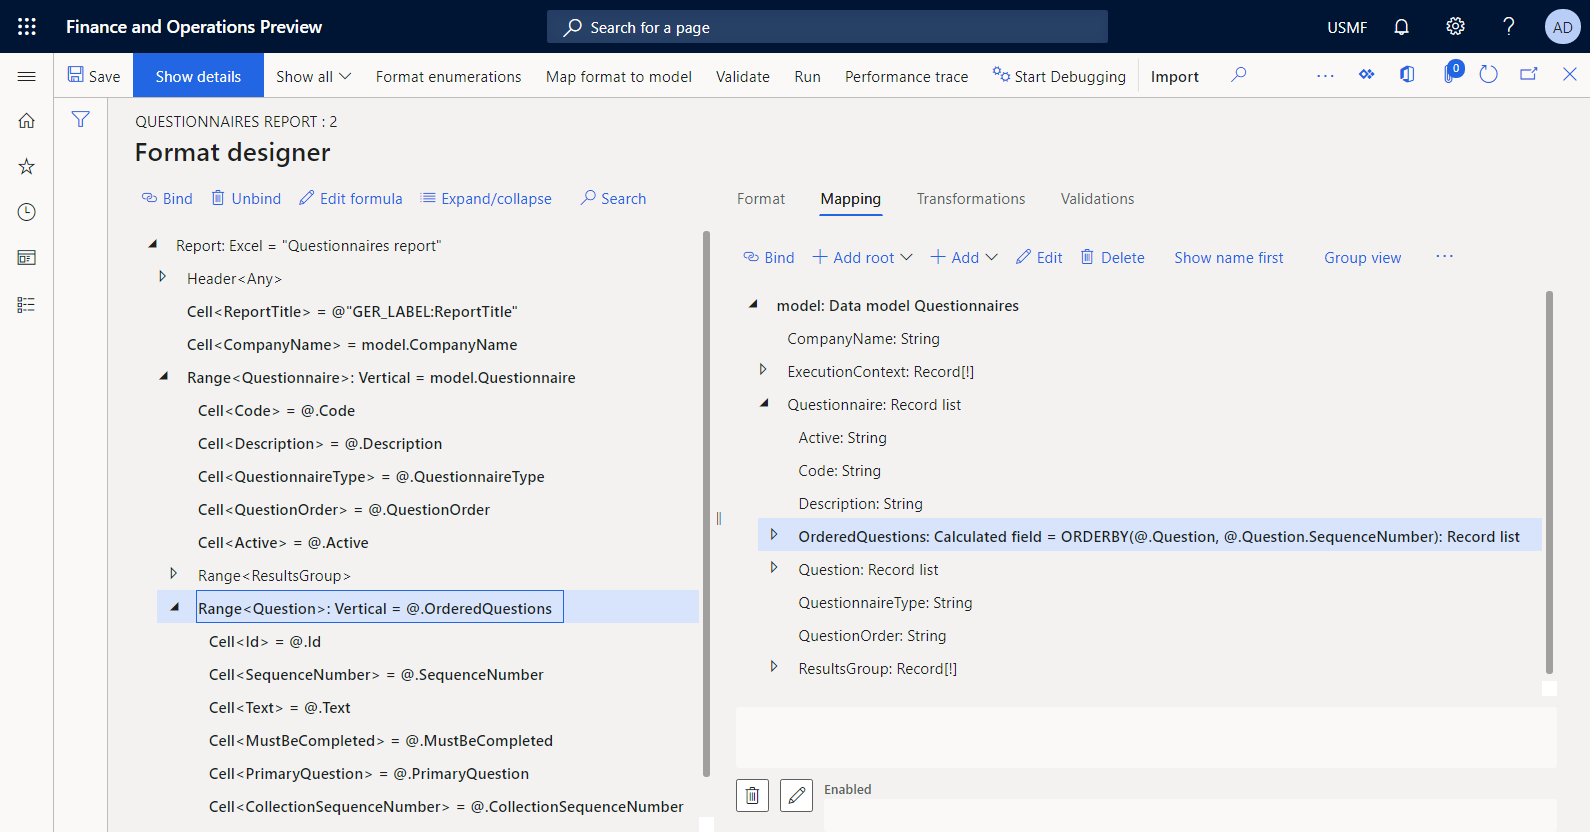
Modify a format to change the order of questions
The questions don't appear in the correct order in a generated report. You can change the order by modifying the format.
On Format designer, select the Report root item.
On the Mapping tab, in the format tree, expand Report\Questionnaire\Question.
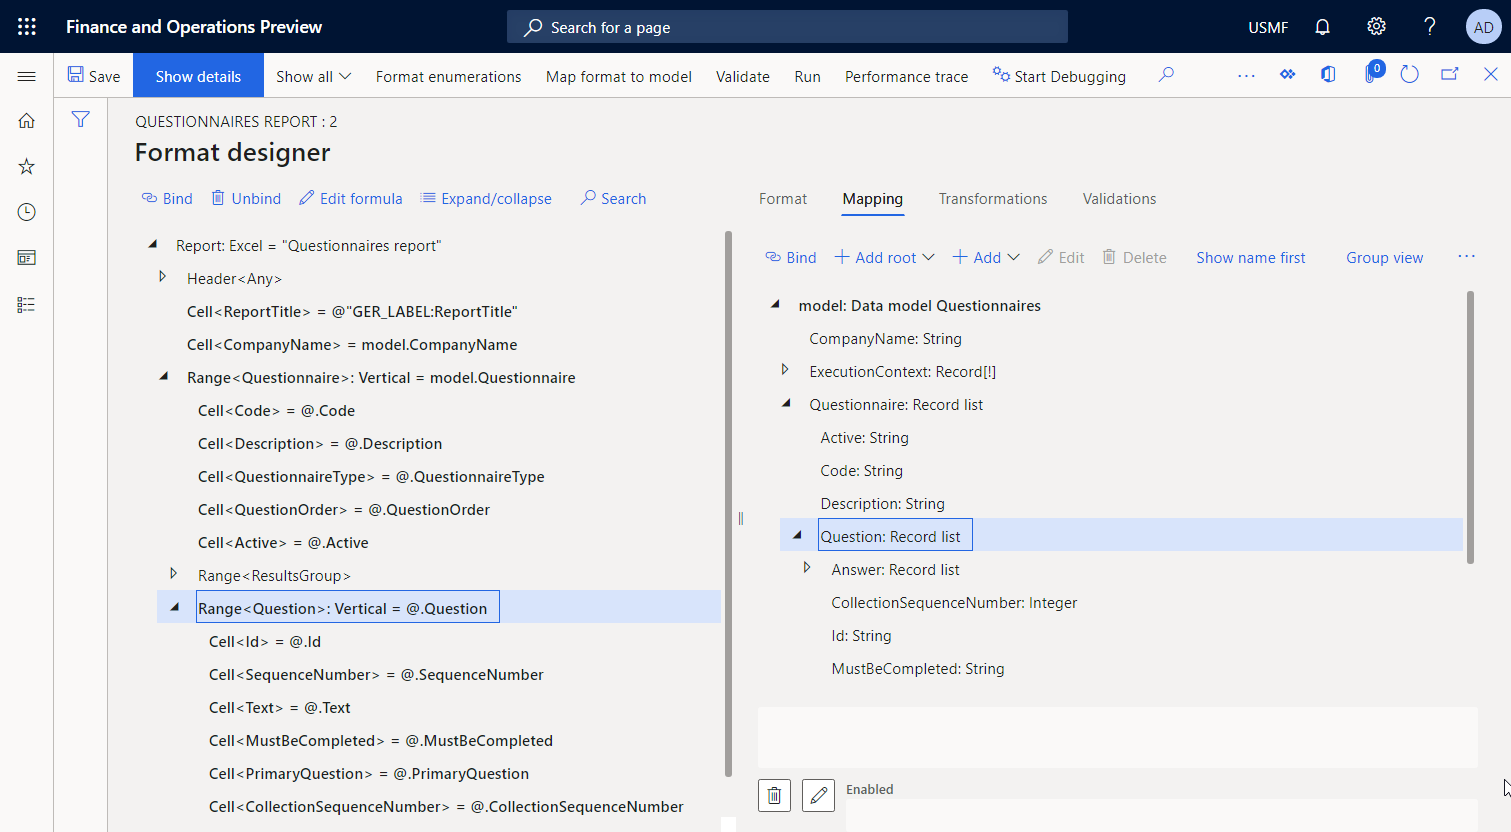
On the Mapping tab, select model.Questionnaire.
Select Add > Functions\Calculated field, and then, in the Name field, enter OrderedQuestions.
Select Edit formula.
In the formula editor, in the Formula field, enter ORDERBY (model.Questionnaire.Question, model.Questionnaire.Question.SequenceNumber) to order the list of questions of the current questionnaire by the sequence order number.
Select Save, and close the formula editor.
Select OK to complete the entry of a new calculated field.
On the Mapping tab, select model.Questionnaire.OrderedQuestions.
In the format tree, select Excel\Questionnaire\Question.
Select Bind, and then confirm that the current model.Questionnaire.Questions path is replaced by the new model.Questionnaire.OrderedQuestions path in all bindings of nested elements.
Select Save.
Run a modified format from ER
You can now run a modified format for testing purposes from the ER framework.
- On the Format designer page, select Run.
- In the ER parameters dialog box, on the Records to include FastTab, configure the filtering option so that only the SBCCrsExam questionnaire is included.
- Select OK to confirm the filter.
- Select OK to run the report.
- Review the generated report.
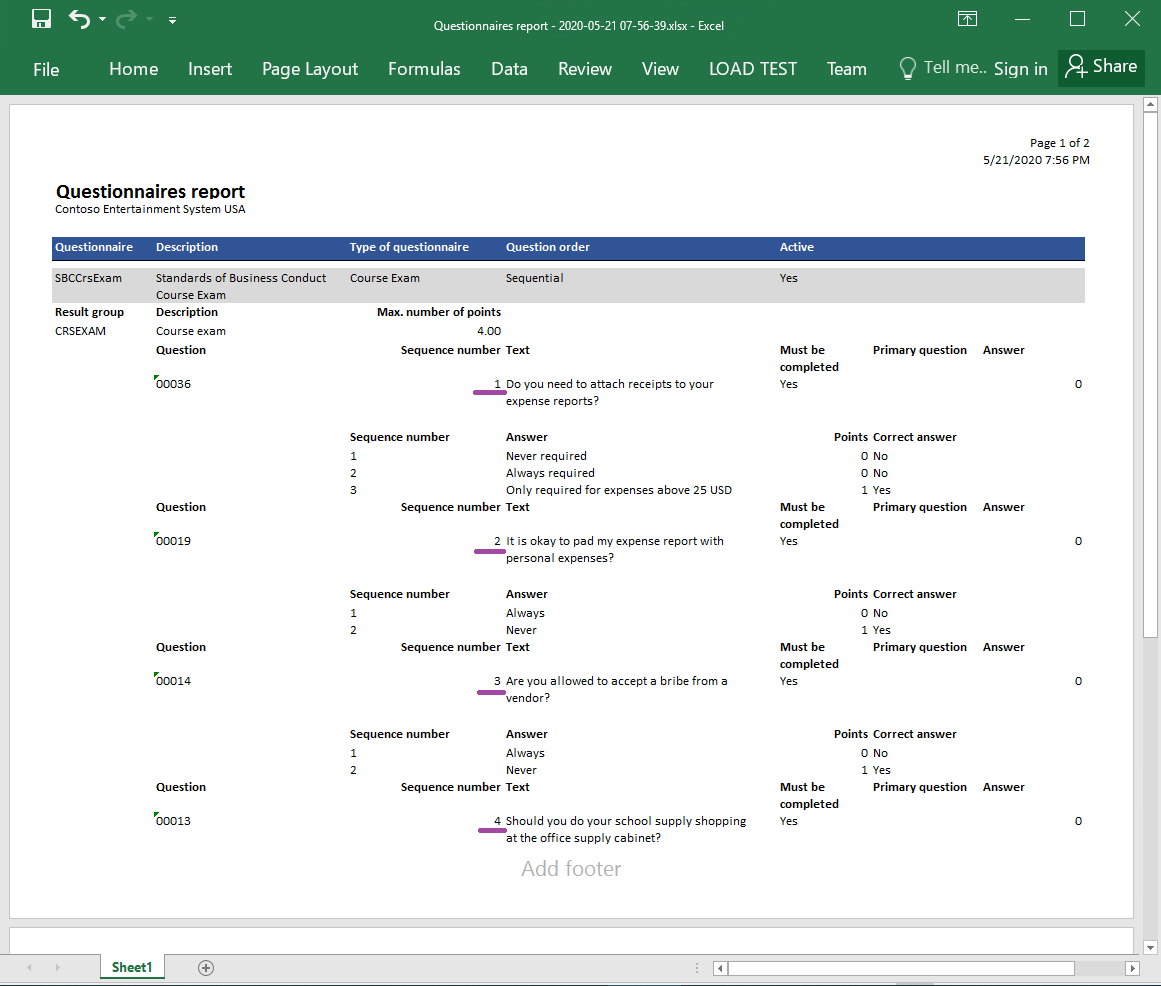
The following illustration shows a generated report in Excel format where the questions are correctly ordered.
Complete the format design
- Go to Organization administration > Electronic reporting > Configurations.
- On Configurations, in the configuration tree, expand Questionnaire model, and then select Questionnaire report.
- On the Versions FastTab, select the configuration version that has a status of Draft.
- Select Change status > Complete.
The status of version 1.1 of this configuration changes from Draft to Completed. You can no longer change version 1.1. This version contains the configured format and can be used to print your custom report. Version 1.2 of this configuration is created and has a status of Draft. You can edit this version to adjust the format of your Questionnaire report.
Note
The configured format is your design of the Questionnaire report and contains no relations to the Finance-specific artefacts.
Develop application artifacts to call the designed report
As a user in the System Administrator role, you must develop new logic so that the configured ER format can be called from the application user interface (UI) to generate your custom report. Currently, ER doesn't offer any capability for configuring this type of logic. Therefore, some engineering work is required.
To develop the new logic, you must deploy a topology that supports continuous build. For more information, see Deploy topologies that support continuous build and test automation. You must also have access to the development environment for this topology. For more information about the available ER API, see ER framework API.
Modify source code
Add a data contract class
Add the new QuestionnairesErReportContract class to your Visual Studio project. Write code that specifies the data contract to use for running the configured ER format.
/// <summary>
///     This class is the data contract class for the <c>QuestionnairesErReportDP</c> class.
/// </summary>
/// <remarks>
///    This is the data contract class for the Questionnaires ER report.
/// </remarks>
[
    DataContractAttribute,
    SysOperationContractProcessingAttribute(classStr(QuestionnairesErReportUIBuilder))
    ]
    public class QuestionnairesErReportContract extends ERFormatMappingRunBaseContract implements SysOperationValidatable
{
    ERFormatMappingId formatMapping;

    /// <summary>
    ///    Validates the report parameters.
    /// </summary>
    /// <returns>
    ///    true if no errors; otherwise, false.
    /// </returns>
    public boolean validate()
    {
        boolean ret = true;
        if (!formatMapping)
        {
            ret = checkFailed(strFmt("@SYS26332", new SysDictType(extendedTypeNum(ERFormatMappingId)).label()));
        }
        return ret;
    }
    [
        DataMemberAttribute('FormatMapping'),
        SysOperationLabelAttribute(literalstr("@ElectronicReporting:FormatMapping")),
        SysOperationHelpTextAttribute(literalstr("@ElectronicReporting:FormatMapping"))
    ]
    public ERFormatMappingId parmFormatMapping(ERFormatMappingId _formatMapping = formatMapping)
    {
        formatMapping = _formatMapping;
        return formatMapping;
    }
}
Add a UI builder class
Add the new QuestionnairesErReportUIBuilder class to your Visual Studio project. Write code to generate a runtime dialog box that looks up the format mapping ID of the ER format to run. The provided code looks up only ER formats that contain a data source of the Data model type that refers to the Questionnaires data model by using the Root definition.
Note
Alternatively, you can use ER integration points to filter ER formats. For more information, see API to show a format mapping lookup.
/// <summary>
/// The UIBuilder class for Questionnaires ER report
/// </summary>
class QuestionnairesErReportUIBuilder extends SysOperationAutomaticUIBuilder
{
    public const str ERQuestionnairesModel = 'Questionnaires';
    public const str ERQuestionnairesDataContainer = 'Root';

    /// <summary>
    /// Action after build of the dialog UI.
    /// </summary>
    public void postBuild()
    {
        DialogField formatMapping;
        super();
        formatMapping = this.bindInfo().getDialogField(this.dataContractObject(),
            methodStr(QuestionnairesErReportContract, parmFormatMapping));
        formatMapping.registerOverrideMethod(
            methodStr(FormReferenceControl, lookupReference),
            methodStr(QuestionnairesErReportUIBuilder, formatMappingLookup),
            this);
    }

    /// <summary>
    /// Performs the lookup form for format mapping.
    /// </summary>
    /// <param name="_referenceGroupControl">
    /// The control to perform lookup form.
    /// </param>
    public void formatMappingLookup(FormReferenceControl _referenceGroupControl)
    {
        ERObjectsFactory::createFormatMappingTableLookupForControlAndModel(
            _referenceGroupControl,
            ERQuestionnairesModel,
            ERQuestionnairesDataContainer).performFormLookup();
    }
}
Add a data provider class
Add the new QuestionnairesErReportDP class to your Visual Studio project. Write code that introduces the data provider to use for running the configured ER format. The provided code includes only the data contract for this data provider.
/// <summary>
/// Data provider class for Questionnaires ER report.
/// </summary>
public class QuestionnairesErReportDP
{
    QuestionnairesErReportContract contract;
    public static QuestionnairesErReportDP construct()
    {
        QuestionnairesErReportDP  dataProvider;
        dataProvider = new QuestionnairesErReportDP();
        return dataProvider;
    }
}
Add a labels file
Add the new QuestionnairesErReportLabels_en-US labels file to your Visual Studio project. Specify the following labels for new UI resources:
- The @QuestionnairesReport label for a new menu item that contains the following text in US English (en-US): Questionnaires report (powered by ER)
- The @QuestionnairesReportBatchJobDescription label for a batch job title if a selected ER format is scheduled for execution as a batch job
Add a report service class
Add the new QuestionnairesErReportService class to your Visual Studio project. Write code that calls an ER format, identifies it by a format mapping ID, and provides a data contract as a parameter.
using Microsoft.Dynamics365.LocalizationFramework;
/// <summary>
/// The electronic reporting service class for Questionnaires ER report
/// </summary>
class QuestionnairesErReportService extends SysOperationServiceBase
{
    public const str ERModelDataSourceName = 'model';
    public const str DefaultExportedFileName = 'Questionnaires report';
    public const str ParametersDataSourceName = 'RunTimeParameters';

    /// <summary>
    /// Generates report by using Electronic reporting framework
    /// </summary>
    /// <param name = "_contract">The Questionnaires report contract</param>
    public void generateReportByGER(QuestionnairesErReportContract _contract)
    {
        ERFormatMappingId formatMappingId;
        QuestionnairesErReportDP  dataProvider;
        dataProvider = QuestionnairesErReportDP::construct();
        formatMappingId = _contract.parmFormatMapping();
        if (formatMappingId)
        {
            try
            {
                ERIModelDefinitionParamsAction parameters = new ERModelDefinitionParamsUIActionComposite()
                    .add(new ERModelDefinitionObjectParameterAction(ERModelDataSourceName, ParametersDataSourceName, _contract, true));

                // Call ER to generate the report.
                ERIFormatMappingRun formatMappingRun = ERObjectsFactory::createFormatMappingRunByFormatMappingId(formatMappingId, DefaultExportedFileName);
                if (formatMappingRun.parmShowPromptDialog(true))
                {
                    formatMappingRun.withParameter(parameters);
                    formatMappingRun.withFileDestination(_contract.getFileDestination());
                    formatMappingRun.run();
                }
            }
            catch
            {
                // An error occurred while exporting data.
                error("@SYP4861341");
            }
        }
        else
        {
            // There is no data available.
            info("@SYS300117");
        }
    }
}
When you use an ER format that runs application data, you must configure a data source of the Data model type in the format mapping. This data source refers to a specific part of the specified data model by using a single root definition. When the ER format runs, it calls this data source to access the appropriate ER model mapping that is configured for a given model and root definition.
You can pass all the information you prepare in the source code and store as part of the data contract to the running ER format by using an ER model mapping of this type. In the ER model mapping, you must configure a data source of the Object type that refers to the QuestionnairesErReportContract class. To identify a model mapping, you must specify a data source that calls this model mapping. In the provided code, this data source is specified by the ERModelDataSourceName constant that has the model value. To identify which data source is used to expose the data contract in the model mapping, you must specify a data source name. In the provided code, this name is specified by the ParametersDataSourceName constant that has RunTimeParameters value.
Note
In a new environment, you might have to refresh the ER metadata so that this type of class is available in the ER model mapping designer. For more information, see Configure the ER framework.
Add a report controller class
Add the new QuestionnairesErReportController class to your Visual Studio project. Write code that runs an ER format in either synchronous mode or batch mode, as you prefer, in the dialog box that is built based on the logic of the provided QuestionnairesErReportUIBuilder class.
/// <summary>
/// The controller for Questionnaires ER report
/// </summary>
class QuestionnairesErReportController extends ERFormatMappingRunBaseController
{
    /// <summary>
    /// The main entrance of the controller
    /// </summary>
    /// <param name = "args">The arguments</param>
    public static void main(Args args)
    {
        QuestionnairesErReportController operation;
        operation = new QuestionnairesErReportController(
            classStr(QuestionnairesErReportService),
            methodStr(QuestionnairesErReportService, generateReportByGER),
            SysOperationExecutionMode::Synchronous);
        operation.startOperation();
    }

    /// <summary>
    /// Gets caption of the dialog.
    /// </summary>
    /// <returns>Caption of the dialog</returns>
    public ClassDescription defaultCaption()
    {
        ClassDescription batchDescription;
        batchDescription = "Questionnaires report (powered by ER)";
        return batchDescription;
    }
}
Add a menu item
Add the new QuestionnairesErReport menu item to your Visual Studio project. In the Object property, this menu item refers to the QuestionnairesErReportController class. Use it to specify a user permission to select and run an ER format. In the Label property, this menu item refers to the @QuestionnairesReport label that you created earlier, so that correct text is presented in the application UI.
Add a menu item to a menu
Add the existing KM menu to your Visual Studio project. Add a new QuestionnairesErReport item of the Output type to this menu. This item must refer to the QuestionnairesErReport menu item that is described in the previous section.
Build a Visual Studio project
Build your project to make the new menu item available to users.
Run a format from the application
Go to Questionnaire > Design > Questionnaires report (powered by ER).
In the dialog box, in the Format mapping field, select Questionnaires report.
Select OK.
In the Electronic report parameters dialog box, on the Records to include FastTab, set the filter so that it includes only the SBCCrsExam questionnaire.
Select OK to confirm the filter.
Select OK to run the report.
Review the generated report.
Tune a designed ER solution
Modify the configured ER solution so that it uses the data provider class you developed to access details of the running ER format. Also, make it enter the name of this ER format in a generated report.
Modify a model mapping
Add data sources to access a data contract object
- Go to Organization administration > Electronic reporting > Configurations.
- On Configurations, in the configuration tree, expand Questionnaire model, and then select Questionnaire mapping.
- Select Designer to open Model to datasource mapping.
- Select Designer to open the selected mapping in the model mapping designer.
- On Model mapping designer, in the Data source types pane, select Dynamics 365 for Operations\Object.
- In the Data sources pane, select Add root.
- In the dialog box, in the Name field, enter RunTimeParameters, as defined in the source code of the QuestionnairesErReportService class.
- In the Class field, enter QuestionnairesErReportContract, which you coded earlier.
- Select OK.
- Expand RunTimeParameters.
The added data source provides information about the record ID of the running ER format mapping.
Add a data source to access ER format mapping records
Continue to edit the selected model mapping by adding a data source to access ER format mapping records.
- On Model mapping designer, in the Data source types pane, select Dynamics 365 for Operations\Table records.
- In the Data sources pane, select Add root.
- In the dialog box, in the Name field, enter ER1.
- In the Table field, enter ERFormatMappingTable.
- Select OK.
Add a data source to access a format mapping record of a running ER format
Continue to edit the selected model mapping by adding a data source to access the format mapping record of the running ER format.
- On Model mapping designer, in the Data source types pane, select Functions\Calculated field.
- In the Data sources pane, select Add root.
- In the dialog box, in the Name field, enter ER2.
- Select Edit formula.
- In the formula editor, in the Formula field, enter FIRSTORNULL (FILTER(ER1, ER1.RecId = RunTimeParameters.parmFormatMapping)).
- Select Save, and close the formula editor.
- Select OK.
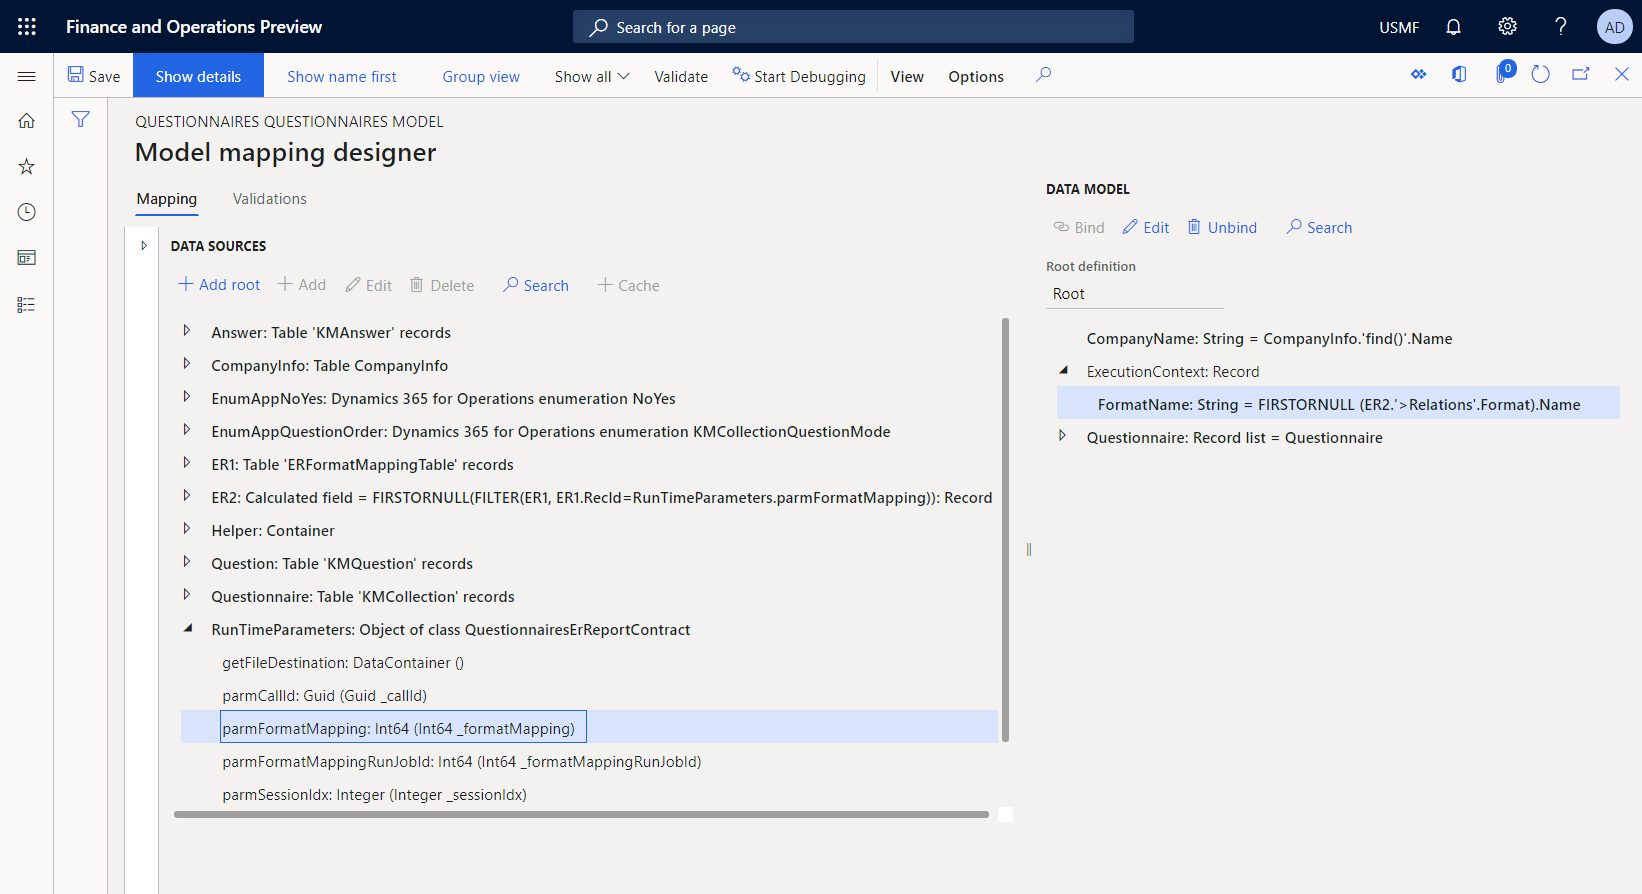
Enter the name of the running ER format in the data model
Continue to edit the selected model mapping so that the name of the running ER format is entered in the data model.
- On Model mapping designer, in the Data model pane, expand ExecutionContext, and then select ExecutionContext\FormatName.
- In the Data model pane, select Edit to configure a data binding for the selected data model's field.
- In the formula editor, in the Formula field, enter FIRSTORNULL (ER2.'>Relations'.Format).Name.
- Select Save, and close the formula editor.
Because you used the FormatName field, the configured model mapping now exposes the name of an ER format that calls this model mapping during execution.
Complete the design of the model mapping
- On Model mapping designer, select Save.
- Close the page.
- Close the model mappings page.
- On Configurations, in the configuration tree, make sure that the Questionnaire mapping configuration is still selected. Then, on the Versions FastTab, select the configuration version that has a status of Draft.
- Select Change status > Complete.
The status of version 1.2 of this configuration changes from Draft to Completed. You can't change version 1.2 anymore. This version contains the configured model mapping and can be used as the basis for other ER configurations. Version 1.3 of this configuration is created and has a status of Draft. You can edit this version to adjust the Questionnaire model mapping.
Modify a format
You can modify the configured ER format so that its name appears in the footer of a report that is generated when the ER format runs.
Add a new format element
- Go to Organization administration > Electronic reporting > Configurations.
- On Configurations, in the configuration tree, expand Questionnaire model, and then select Questionnaire report.
- Select Designer.
- On Format designer, select the Report root item.
- Select Add to add a new nested format element for the selected Report root item.
- Select Excel\Footer.
- In the Name field, enter Footer.
- Select Report\Footer, and then select Add.
- Select Text\String.
Bind the added format element
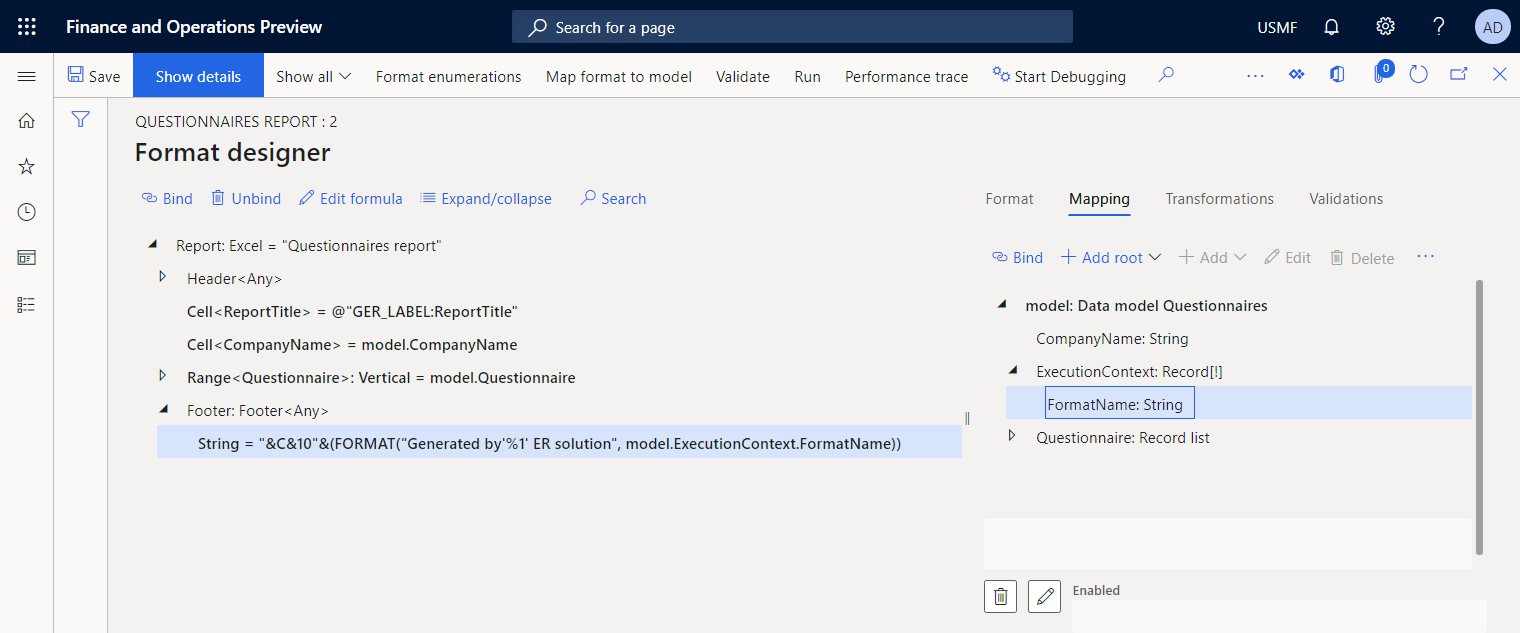
- On Format designer, on the Mapping tab, in the format tree, for the active Footer\String element, select Edit formula.
- In the formula editor, in the Formula field, enter
CONCATENATE ("\&C\&10", FORMAT("Generated by'\%1' ER solution", model.ExecutionContext.FormatName)). - Select Save, and close the formula editor.
- Select Save.
You modified the configured format so that its name is entered in the footer of a generated report by using the Footer\String element.
Complete the format design
- Close Format designer.
- On Configurations, in the configuration tree, make sure that the Questionnaire report configuration is still selected. Then, on the Versions FastTab, select the configuration version that has a status of Draft.
- Select Change status > Complete.
The status of version 1.2 of this configuration changes from Draft to Completed. You can no longer change version 1.2. This version contains the configured format and can be used as the basis for other ER configurations. Version 1.3 of this configuration is created and has a status of Draft. You can edit this version to adjust the Questionnaire report.
Run a format from the application
- Go to Questionnaire > Design > Questionnaires report (powered by ER).
- In the dialog box, in the Format mapping field, select Questionnaires report.
- Select OK.
- In the ER parameters dialog box, on the Records to include FastTab, set the filter so that it includes only the SBCCrsExam questionnaire.
- Select OK to confirm the filter.
- Select OK to run the report.
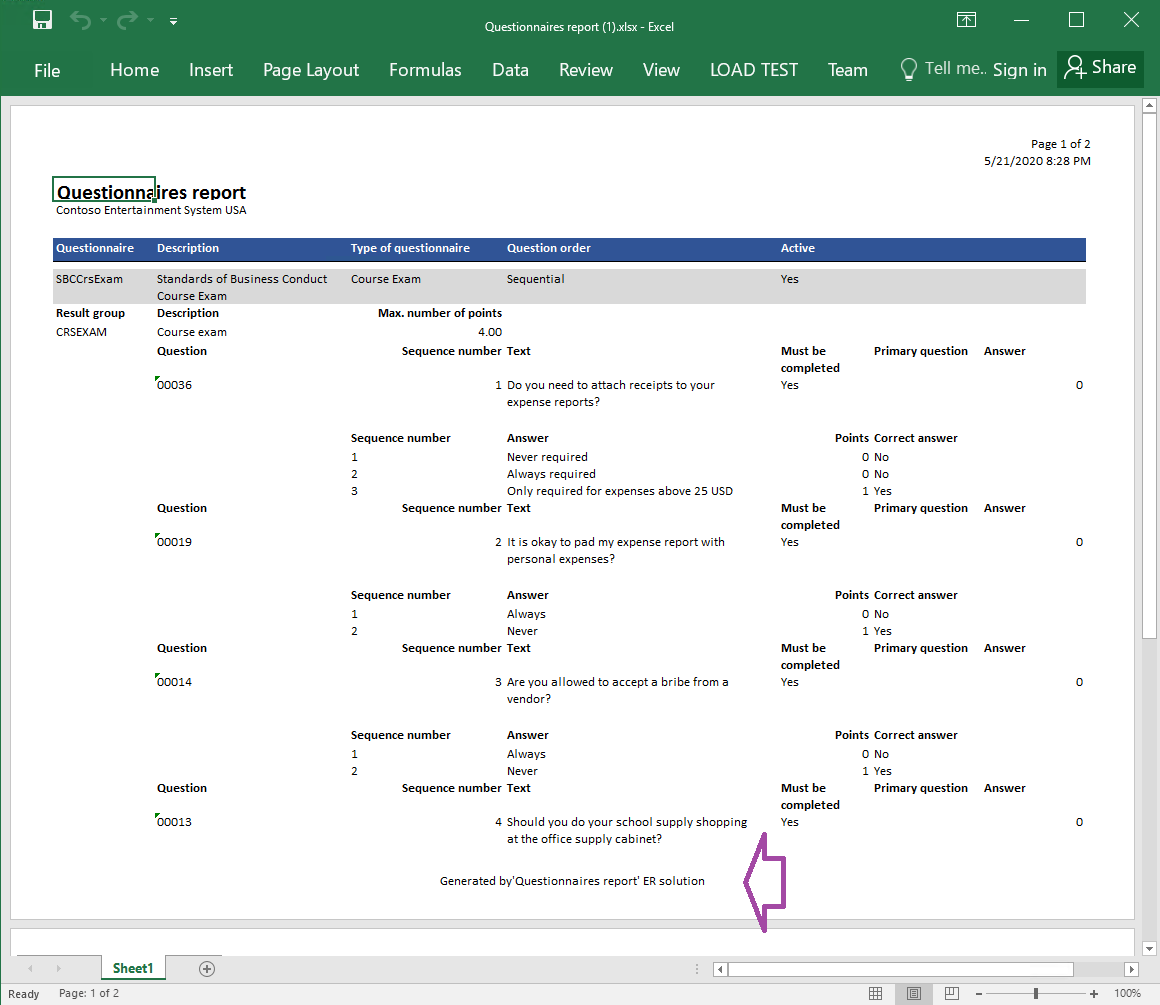
- Review the generated report in Excel format.
The footer of the generated report contains the name of the ER format that was used to generate it.
Run a format from ER
- Go to Organization administration > Electronic reporting > Configurations.
- On Configurations, in the configuration tree, expand Questionnaire model, and then select Questionnaire report.
- On the Action Pane, select Run.
- In the Electronic report parameters dialog box, on the Records to include FastTab, set the filter so that it includes only the SBCCrsExam questionnaire.
- Select OK to confirm the filter.
- Select OK to run the report.
- Review the generated report in Excel format.
The footer of the generated report doesn't contain the name of ER format that was used to generate it, because the running model mapping wasn't passed the data contract object when the ER format called it.
Configure a format destination for on-screen preview
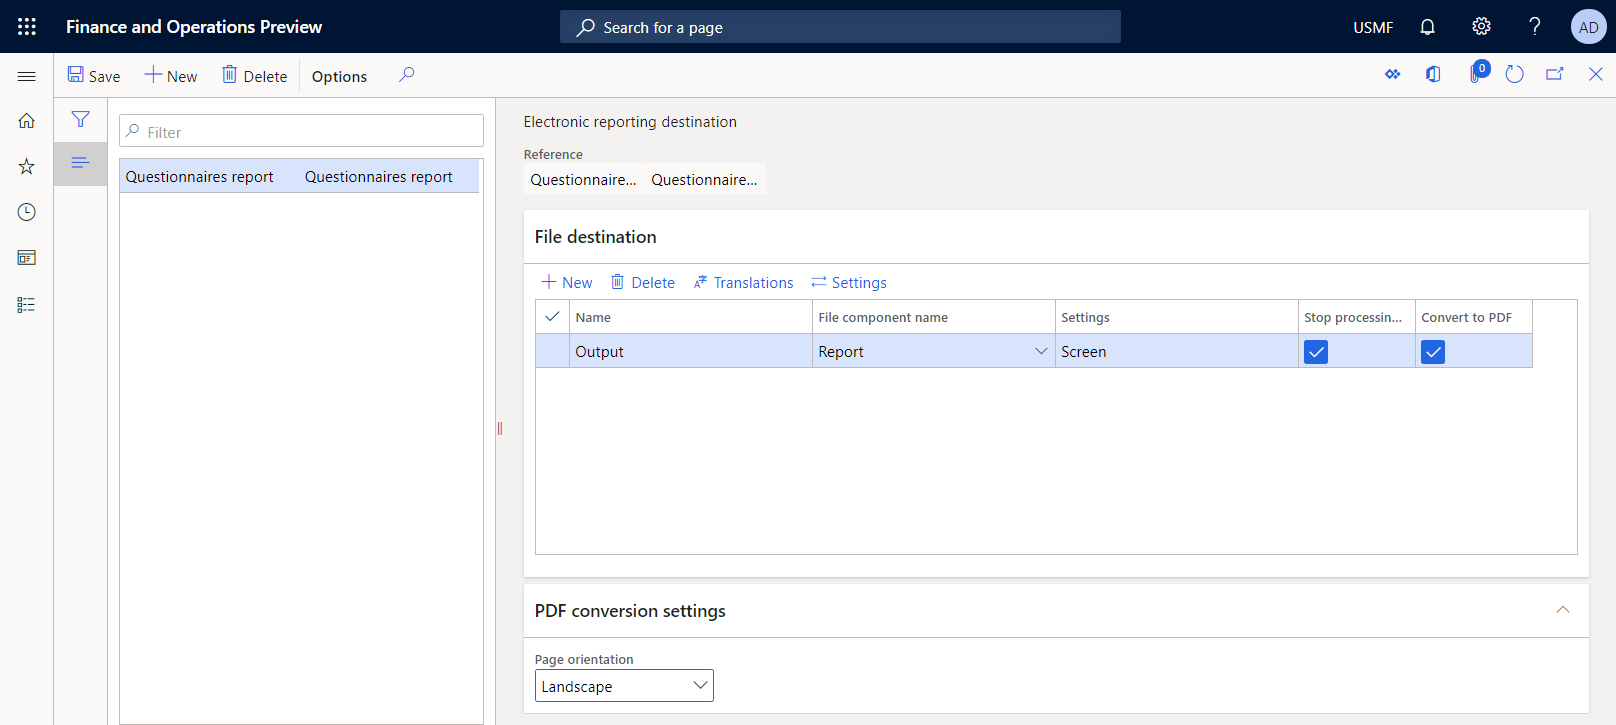
- Go to Organization administration > Electronic reporting > Electronic reporting destination.
- On Electronic reporting destination, add a destination record for the configured Questionnaire report ER format.
- On the File destination FastTab, set up the Screen destination for the Report format component that you added as the root element of the configured Questionnaire report ER format.
- On the PDF conversion settings FastTab, configure the destination to convert a report to PDF format that uses the Landscape page orientation.
Run a format from the application to preview it as a PDF document
Go to Questionnaire > Design > Questionnaires report (powered by ER).
In the dialog box, in the Format mapping field, select Questionnaires report.
Select OK.
In the Electronic report parameters dialog box, on the Records to include FastTab, set the filter so that it includes only the SBCCrsExam questionnaire.
Select OK to confirm the filter.
On the Destinations FastTab, notice that the Output field is set to Screen. If you want to change the configured destination, select Change.
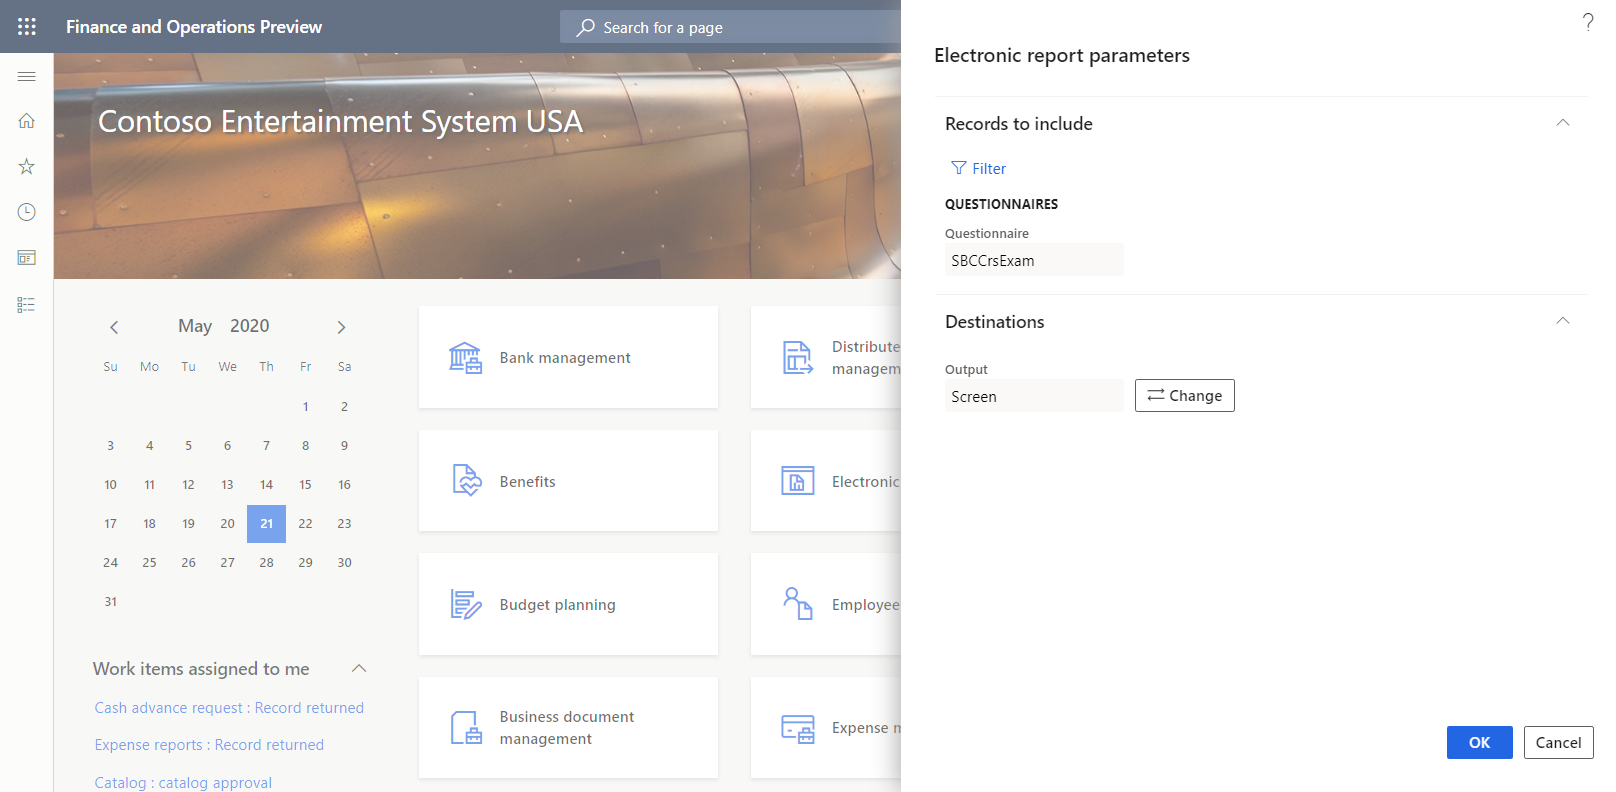
Select OK to run the report.
Review the generated report in PDF format.