Configure Application task manager
The Application task manager allows agents to easily manage and complete the tasks of each business process stage of the Onboarding process. The Application task manager includes a user interface control that you can embed in the Onboarding app. Further, the component includes a task workflow in which new tasks are generated when you use the Task definition entity to submit an application or applicant.
The business admin can configure the tasks generated for each business scenario in the Task definition entity by updating the form to meet specific business requirements. For example, the business admin can define the following details: the name of the task, its type (general or verification), whether the task is relevant for some of the business scenario categories, and whether the task should be generated for a certain party role, the application or only for the primary applicant. Additionally, the business admin can define whether to associate the task to a content tab that needs to be reviewed as part of the verification tasks.
The task workflow is triggered to create the tasks when the agent adds a new applicant or application. The added application or applicant meets all the standard conditions stated in the task definition table. However, if necessary, the business admin can create a complex task workflow by using rules to accommodate conditional task lists based on additional application attributes. In this situation, the business admin needs to create a complex workflow using Power Automate. The task definition form allows the admin to specify whether the task is generated as part of a standard workflow or by a self-generated complex task workflow.
Task configuration
Task type
The business admin can configure two types of tasks within the Task definition entity:
General tasks: These are tasks that the Onboarding agents need to perform manually.
Verification tasks: These tasks require verification from the Onboarding agent to be marked complete. The agent can perform the verification by adding content tabs to the main application form, adding special verification components within the tabs, and linking these components to a specific task definition of type Verification.
Task association type
The business admin can define one of the following Task association types in the Task definition entity:
Application-level: These tasks are defined once for each application.
Per role: These tasks are relevant for specific roles within the application. For example, in the Loan onboarding app, there can be tasks that are relevant only for the borrower and co-signers and not the guarantor.
Per primary applicant: These tasks that are relevant only for the primary applicant. Each application includes only one primary applicant.
Verification tasks
To verify the content as part of the tasks to be done, the business admin can define a Verification task and embed one of the following special components within a tab:
Applicant list: This component displays a list of applicants to verify beside a form. You can link this component to a Task association type per role or per primary applicant.
Verification status: This component links to a task definition and enables in verifying form information. You can link this component to an Application-level Task association type.
Tab associated with a task configuration
A tab configuration in an onboarding app provides the agents with access to different forms and documents that they need to review as part of the onboarding process. The business admin can embed the following special components provided by the Application task manager to ease the review process and to verify tasks within the content tab:
Applicant list
The Applicant list component embedded in a tab helps agents to view the form information for each individual applicant. The Applicant list page displays a list of all applicants on the left hand side and displays the form information corresponding to a selected applicant on the right hand side. When the agent scrolls from one applicant to the next, the information automatically updates to reflect the selected applicant's details.

Configure a task definition in the Applicant list component
You can update the properties of the Applicant list control to include a Task definition Id. The Id enables the Onboarding agent to complete the verification task for each applicant using the content tab and the task tab.
Note
Ensure that the linked Task Id provided in the control is of Verification type. The Task association type can be per role or per primary applicant.
Display the applicants' list by task definition
If the Applicant list control properties include a task definition, then the applicants' list displays only the applicants that have a task specified with the relevant role. For example, if the Loan onboarding app provides separate roles for a borrower, a co-signer, and a guarantor; but if you set up the task definition only for the borrower and co-signer roles, then the applicants' list includes only the borrower and co-signer applicants.
If a task isn't defined in the properties, then the applicants' list displays all the applicants that are part of the application.
Display the applicants' list by task
If the Applicant list control properties don't include a task, then the applicants listed in the relevant form are displayed. If the control includes a task, then it must be of Verification type. Any other type results in a configuration error. The Task association type can be per role or per primary applicant, and the applicants' list is filtered by associated roles.
Task verification status
Task verification status is a component that you can embed in a tab. The component's control properties include a link to a task definition, which enables you to verify the form information.
Important
The linked task type must be of Verification type and the Task association type must be Application-level.
You can embed the Task verification status in a tab that includes the Applicant list with no Task definition Id defined within its properties. So, you can view the content by applicant, but the task verification is by tab and not by applicant.
Note
Configuring both the components, including the task definition, is invalid.
If you define the component within a tab, the component displays for all applications even if a task isn't in the application list.
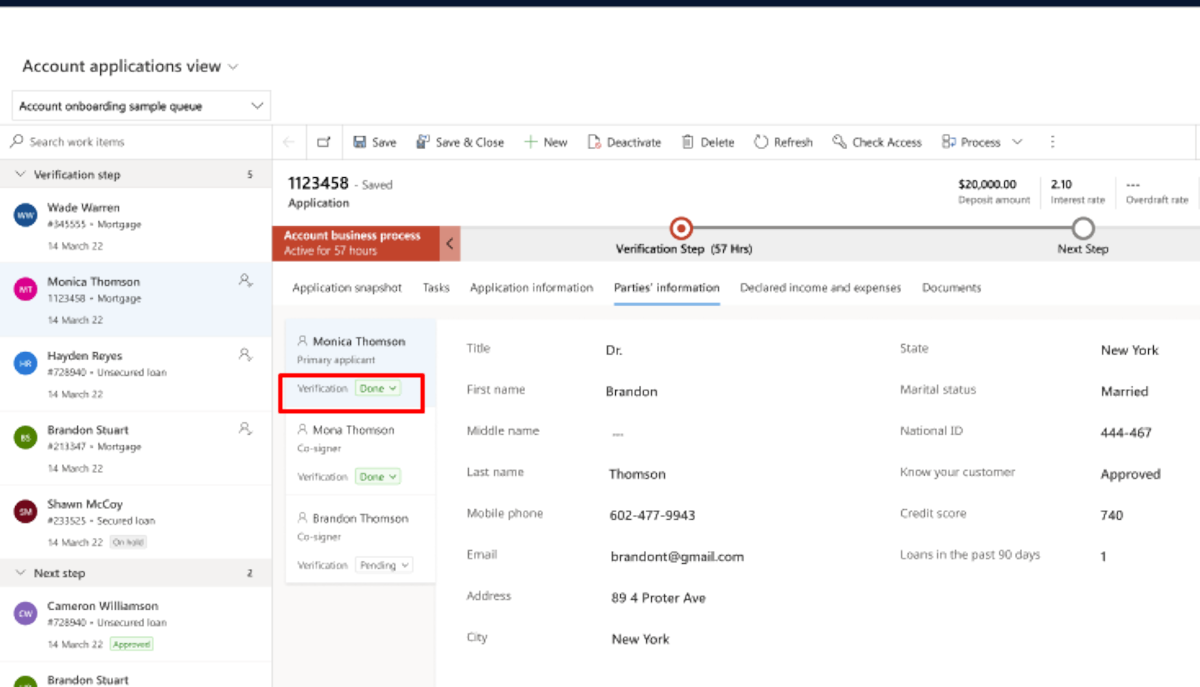
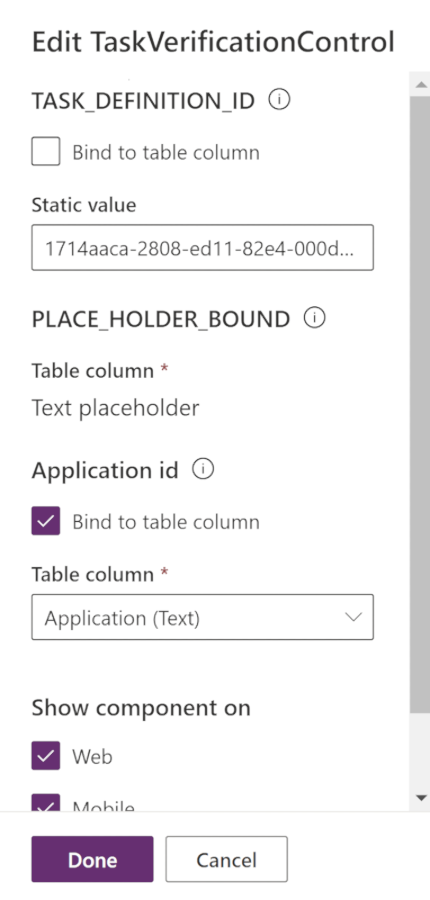
The following image shows a tab configured with the Task verification status component and includes a Task definition Id:
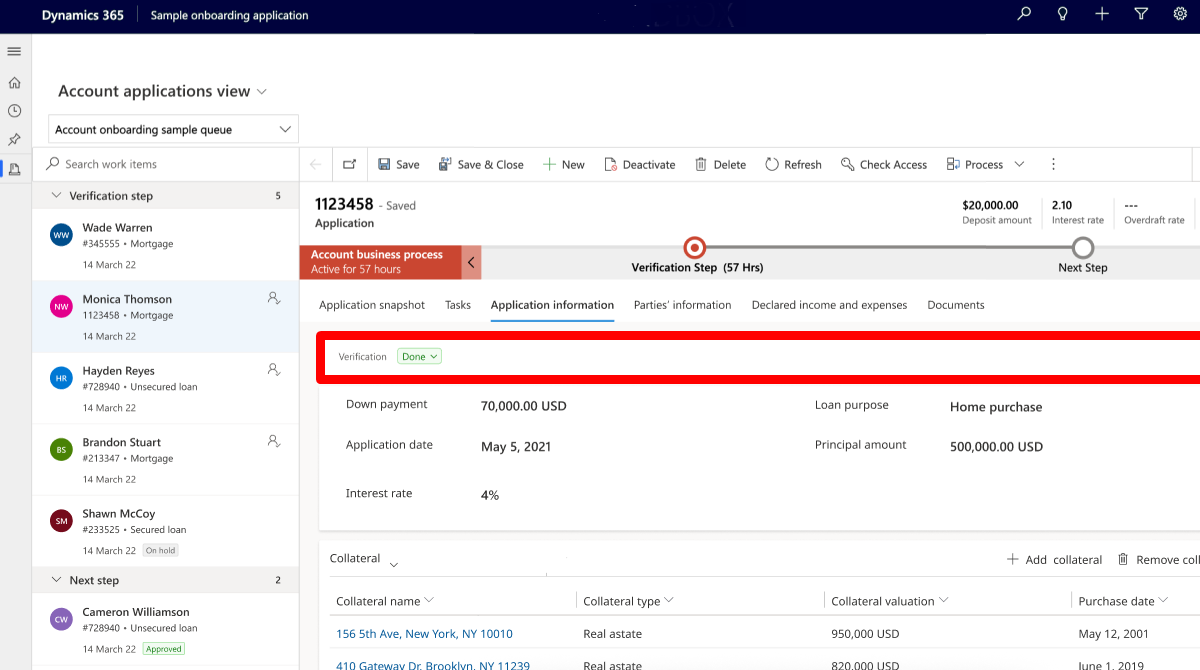
The following image shows a tab configured with the Task verification status component either without an attached Task definition Id or a Task definition Id that isn't part of the current application tasks:

Task definition configuration
To embed the task component in the Onboarding application, you need to follow these steps:
1. Verify the business scenario definition
2. Enhance the data model to include all the required business data
3. Define the Onboarding business scenario categories
4. Define the onboarding applicant roles
1. Verify the business scenario definition
Ensure that the business scenario is defined, as specified in 2. Define the business scenario.
2. Enhance the data model to include all the required business data
As mentioned in Data model considerations, the extended Application entity and the Related party entity store all the business information for an onboarding scenario. For example, the Account application entity stores the data for the Open a bank account onboarding app while the Related party entity holds the applicant's information for the same scenario.
You can perform the following steps to enhance the data model:
Link the application extended table to the application entity table by updating a polymorphic field named Application details (msfsi_detailsid). You can use the multi-table lookups API for the linking. In the Open a bank account onboarding app, link the application table (msfsi_application) to the Account application table.
Create extra business tables that are relevant for the onboarding data collection. For example, the Account onboarding employment table that describes the applicant's employment history is linked to the Related party table.
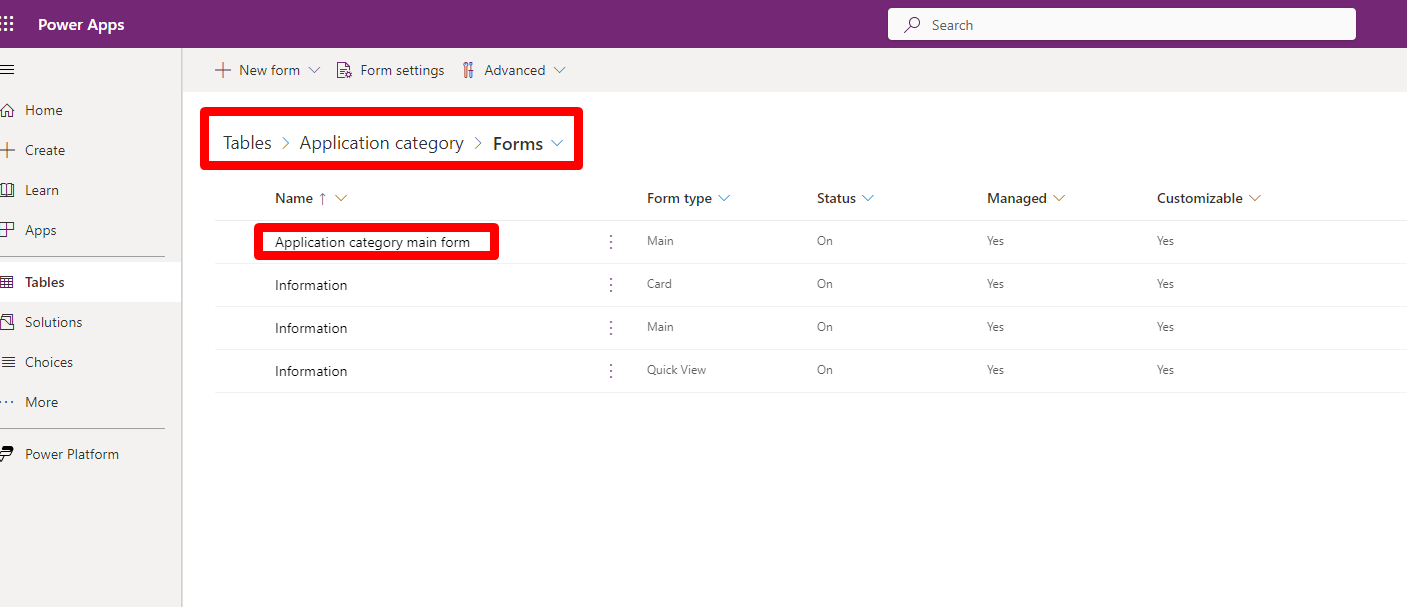
3. Define the Onboarding business scenario categories
Each business scenario can hold several categories in which you can have different task definitions. For example, the Open a bank account onboarding app includes the following categories: checking and savings.
Sign in to Power Apps.
Go to Tables > Application category > Forms.
Add the required business scenario categories.
4. Define the onboarding applicant roles
You need to define the applicant roles for the Onboarding application. For example, you can add the Owner role for the account onboarding scenario.
Sign in to Power Apps.
Go to Tables > Related party role, and select Related party role form.
Add the applicant roles for the Onboarding app.
5. Define task groups
A task group aggregates a set of related tasks in the Application task manager component. The grouping eases the task checklist visibility. An example of a task group can be one that aggregates all the tasks related to the verification of applicant information. You can name this task group Verify party details.
You must define a relevant task group with the tasks in a proper order because of the effect on the order of the tasks in the user interface. The first task has the value of one. This value increases with every subsequently ordered task.
Sign in to Power Apps.
Go to Tables > Task group, and select Task group main form.

6. Create the task definition
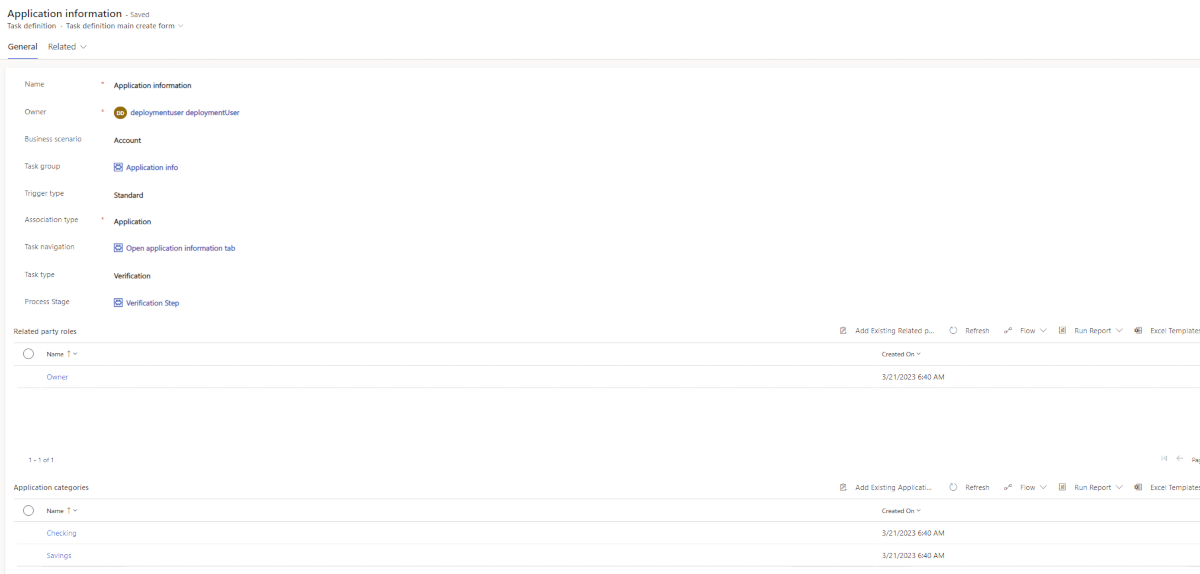
Define the relevant tasks for a business scenario using the task definition form that is already available. You must define the following values:
Task name: The name of the task shown in the Application task manager user interface, in the task list.
Business scenario: The relevant business scenario for the task.
Process stage: The business scenario business process stage that handles the task.
Category: Each business scenario can have multiple categories with different task definitions or documents required as part of the onboarding process.
Task group: Holds all tasks that are related to the same subject. You can see the task groups in the Application progress component as a summary of the pending tasks.
Task type: This value can be either a General task or a Verification task. Verification tasks can be linked to special tab components that enable in liking a task to a tab and verifying it within the content tab.
Association type: Decides whether the task should be associated with an application, a role, or a primary applicant. The Association type determines whether a single task or multiple tasks are generated per applicant in the Onboarding app, implying a one-to-one relationship between the task definition and the created application task.
Roles that are relevant for the task: For example, the Review personal details task is relevant for all applicants with the Owner role defined but the Review employment information task can be relevant only for roles other than Owner.
Navigation: If the tasks require navigation to another tab, the Navigation attribute holds the tab name.
Trigger type: A trigger type defines what type of workflow generates the task records for the specific task definition. You can define two types of workflow: standard and complex. The standard workflow is defined as part of the Onboarding essentials. You can create the complex workflow, if necessary.
Tip
We recommend that you define a task in the checklist to review the documents. After the Onboarding agent completes verifying all the documents, they must change the status of the Review documents task to Done.
Cancel a task definition
You can cancel a task definition from an existing business scenario. As a result, new applications won't include the canceled task definition. In addition, for existing applications that include the canceled task, the business admin can decide whether to display the canceled tasks in the task user interface or hide them.
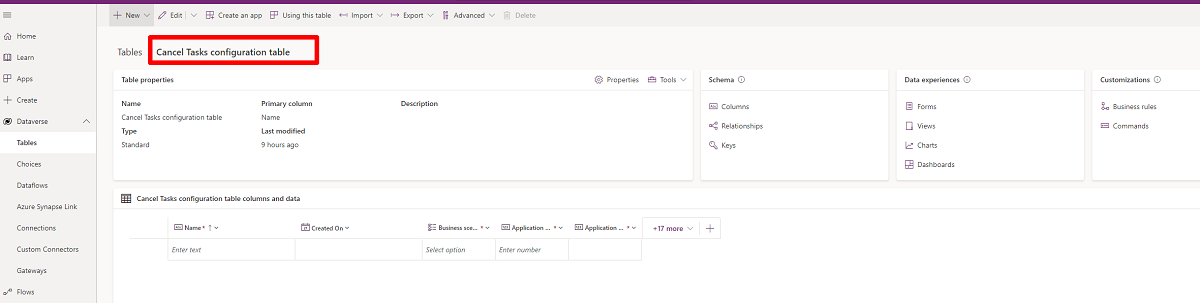
To cancel a task definition, follow these steps using Power Apps:
- Open the Cancel tasks configuration table and select the statuses that aren't affected by the Cancel task action. These tasks are left as part of the application task list even after the task definition is deactivated. For example, the business admin might specify that in case of the application status being Approved or Rejected, it isn't impacted by the Cancel task definition action.
Note
For existing workflows, you must either populate the Attribute status and Status reason values in the Cancel tasks configuration table for the workflow to work properly, or leave the table empty.
- Select Edit row, and then select the Deactivate action for the task record you want to cancel.
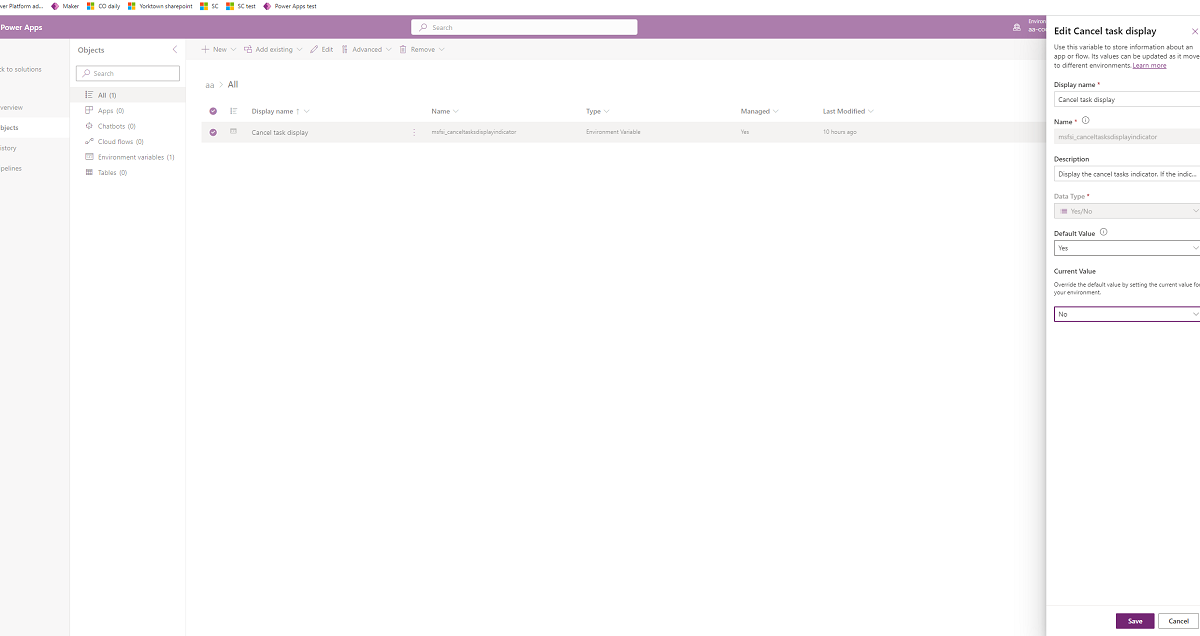
Hide the canceled tasks in the user interface
By default, you can view the canceled tasks for a business scenario. However, you can choose to hide the canceled tasks.
To hide the canceled tasks, follow these steps using Power Apps:
Go to your solution.
Select Add Existing > More > Environment variable, and then select Cancel task display.
Select Next > Edit > New value. Select No from the dropdown list.
After deleting a BPF step
The business admin needs to manually update the task definition table after deleting a Business Process Flow (BPF) step. If the tasks within the deleted BPF step need to be inactivated, the business admin can do so. As a result, the Cancel task workflow is automatically triggered.
7. Define task workflows
The following two workflow types can trigger task creation:
Standard task workflow: This workflow is included as part of the Application task manager
Complex task workflow: This workflow can be created manually
Standard task workflow
A standard workflow considers the attributes listed in the Task definition table and is commonly used for most tasks.
The standard workflow is a set of cloud-automated flows that trigger the task creation process to generate tasks when you create a new application or applicant.
Important
The task modification process isn't automatically triggered when you modify the applicant role or define a new primary applicant. You need to handle the process manually.
The following flows are part of the standard task workflow:
Task creation for an application
Trigger: After an application is created
Conditions:
- Fetch task definition by:
- Association type: Primary or Role
- State code: Active
- Trigger type: Standard
- Business scenario and category are the same as those of the application that is created.
- Fetch task definition by:
Task creation for Related party
Trigger: By role or primary applicant.
Conditions:
- Fetch task definition by:
- Association type: Application
- State code: Active
- Trigger type: Standard
- Business scenario and category are the same as those of the application that is created.
- A child workflow is created that checks if the applicant's role matches the task definition and whether the applicant is defined as primary.
- Fetch task definition by:
Define a complex task workflow to generate the tasks checklist
You can define a complex workflow for a task creation that requires additional parameters apart from the task definition attributes or a different task trigger type. For example, if the applicant's birth date is relevant to trigger a task, you can create a complex flow and consider the birth date from the contact details entity as a condition.
8. Embed the Application task manager
You can add tabs to your model-driven app and embed the Application task manager.
Set up tabs for content display
Create multiple tabs and forms to display information as part of the onboarding process. You can use the Applicant list control to display a list of all applicants on the left-hand side of the app page and display the form information corresponding to a selected applicant on the right-hand side. When you select an applicant on the list, it displays the details of the applicant.
Add the Applicant list component for display in a special tab
Follow these steps in Power Apps to add the Applicant list component to a special tab:
Create a tab and provide it with a logical name.
Add content by using Power App capabilities or the Applicant list control on top of the Related party entity.
Add the Applicant list component to the tab.
a. Select Expand this tab by default when creating the tab.
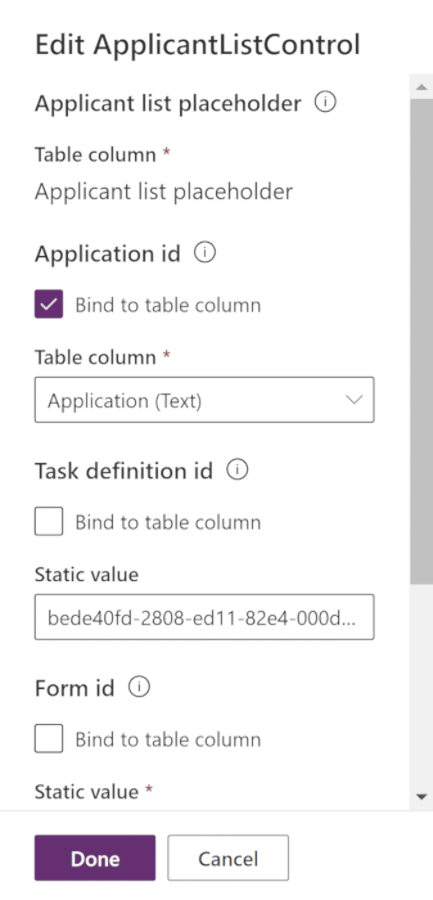
b. Select the section and drag ApplicantListControl to the section.
c. Set the Applicant list placeholder.
d. Select Bind to table column.
e. Define the Application table column.
f. Leave the Task definition ID parameter empty.
g. Define the form ID. This form displays information per applicant.
Link content tab to a Verification task
You can link a content tab to a Verification task by using special components such as the Applicant list component or Verification status. Linking a tab to a task as specified eases the verification process. Linking tasks to a tab is optional.
Add the Applicant list component with the task definition for display in a special tab
You can include the task definition when adding the Applicant list component. This step ensures that the applicants' list for selection and the content form provides the selected applicant's details and a Verification status dropdown list for the applicant.
Note
Ensure that the linked task is of Verification type while the Task association type is per role or per primary applicant. Otherwise, the system displays a configuration error.
Create a tab and provide it with a logical name.
Add content using the Power App capabilities or the Applicant list control on top of the Related party entity.
Add the Applicant list component to the tab.
a. Select the Expand this tab by default checkbox when creating the tab.
b. Select the section and drag ApplicantListControl to the section.
c. Set the Applicant list placeholder.
d. Select Bind to table column.
e. Define the Application table column.
f. Define the Task definition ID parameter from the Task definition table, if necessary to verify within the tab information as part of the Onboarding task checklist.
g. Define the form ID. This form displays the information per applicant.
Add the Verification status component
You can also use the Verification status component to verify tasks within a tab.
Note
Ensure that the linked task is of Verification type while the Task association type is per role or per primary applicant. Otherwise, the system displays a configuration error.
Add the Verification status component to the tab
Select Expand this tab by default when creating the tab.
Select the section and drag ApplicantListControl to the section.
Define the Task definition ID parameter from the Task definition table.
Define the application ID and select Bind to table column.
Add a form to the tab for review from the control.
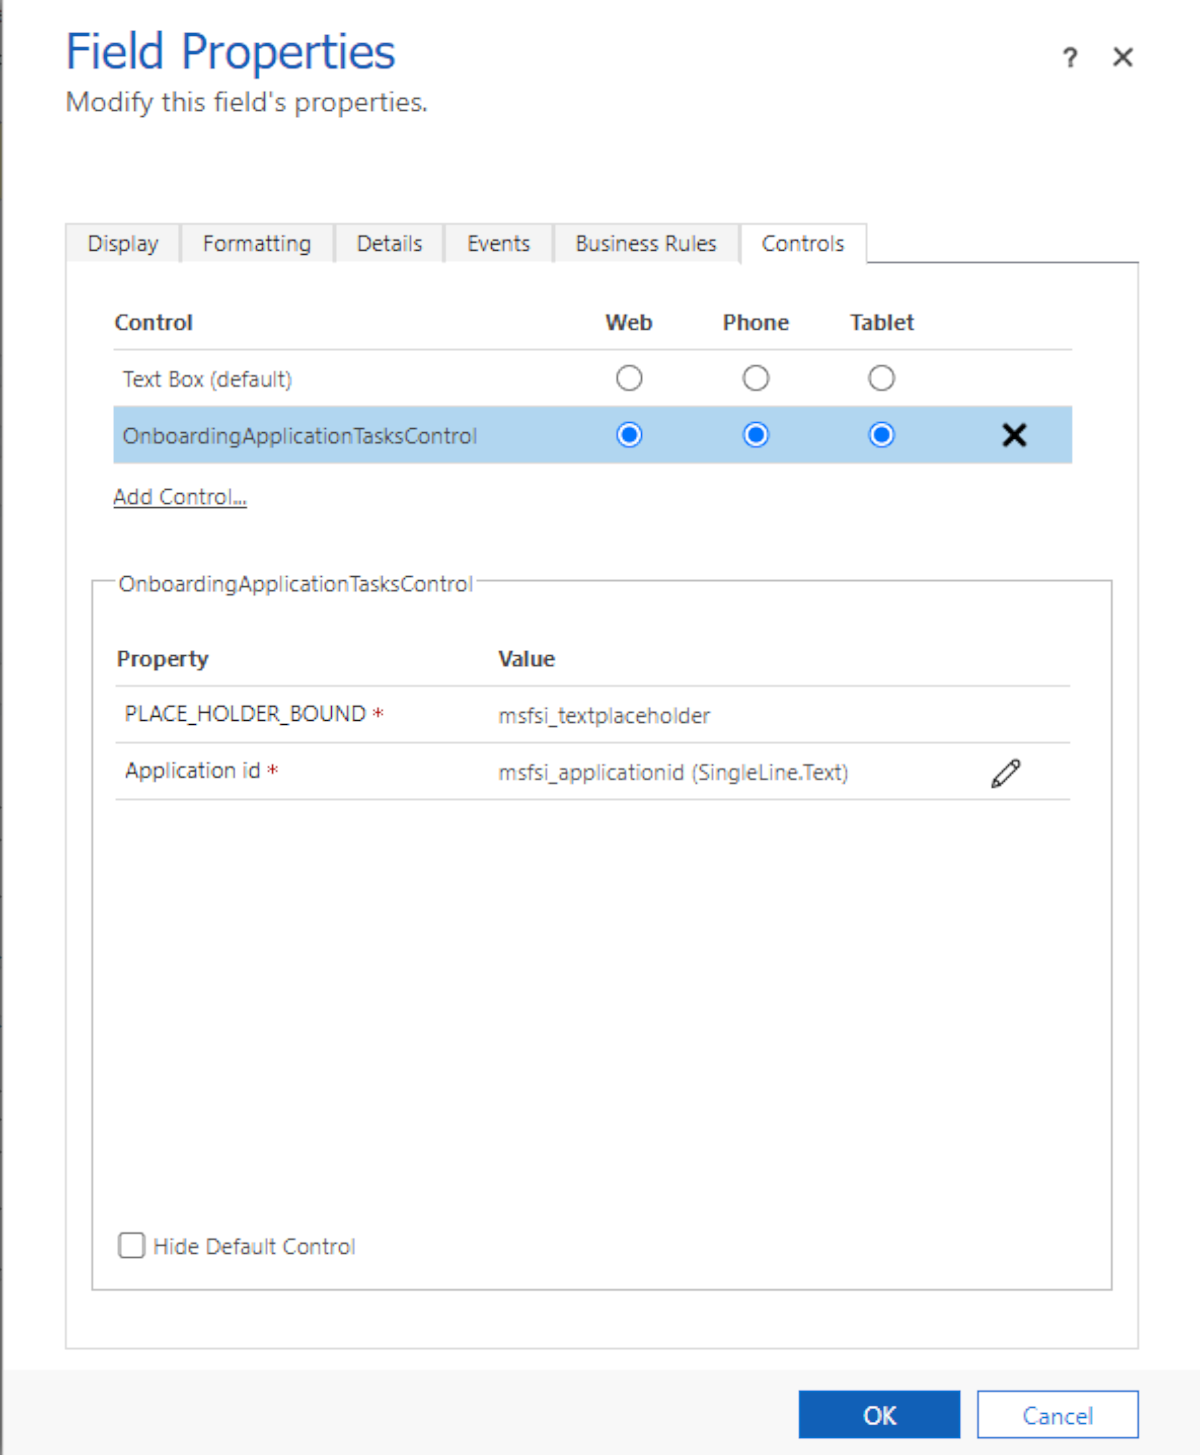
Embed the Application task manager component
The Application task manager component allows you to define and generate tasks that must be done to complete the data collection stage of a business scenario. This component represents all the tasks of the application in one control. The best way to use the component is to create a dedicated tab for it.
Create a tab called Tasks.
Select Expand this tab by default when creating the tab.
Add the msfsi_textplaceholder field to the tab.
Replace this field with OnboardingApplicationTasksControl.
Set the Application Id parameter.