Note
Access to this page requires authorization. You can try signing in or changing directories.
Access to this page requires authorization. You can try changing directories.
In general, you can send email messages to your customers directly from Dynamics 365 Sales. However, when you enable the email engagement feature, you get more choices for emails, such as follow or unfollow, when you compose an email.
Contact your administrator if you don't see the email engagement features described here. More information: Configure email engagement.
Consideration
Before using email engagement features, make sure your sales app's personal time zone matches your current time zone. This setting is used when you schedule email delivery time and follow-up reminders. If you don't set this value, the application uses your app's personal time zone, which might not match your actual time zone. For example, if your personal time zone in the application is set to IST (Indian Standard Time) and your current time is set to GMT (Greenwich Mean Time), scheduling an email for 10:00 AM GMT sets the delivery time to 3:30 PM IST, which might not be your intended delivery time.
To set your personal time zone, go to your personalization settings and change Set the time zone you are in to your current time zone. For more information, see Set your personal options.
Create a message
The features of email engagement apply to every email that you send through Dynamics 365 Sales. When you send an email, it automatically adds an email activity to the record, and that record is set as the message's Regarding value. Also, the email engagement feature collects key performance indicators (KPIs) and determines where the email is displayed based on the recipients (To, From, and Copy-to addresses).
Note
- You can't track emails if a recipient chooses to block tracking. For more information, see blocks followed messages.
- Email engagement isn't supported when you send bulk email.
- You can only follow emails and attachments that are sent through Dynamics 365 email. You can't follow email and attachments sent through the Outlook client, though they're marked as tracked in Dynamics 365 Sales.
Before creating the email, understand the different options that are available in the email form:

- Attachment: A list of files attached to your email along with controls for adding, removing, and modifying the attachments.
- Follow/Don't Follow: Turn on following to track your customer's engagement with the message or turn it off to stop tracking. Other controls and links appear as needed, such as when a recipient doesn't allow following. For more information, see Follow or unfollow a message.
- Send Later: Set the delivery time for your message if you don't want to send it right away. Recommended delivery times might appear here, depending on the recipient's time zone.
- Set a Reminder: Set a reminder to follow up at a specific time. For example, you might want to get an alert if the message remains unopened for three days.
- Insert Template: Insert standard text that you can revise as needed. Your organization can have multiple templates depending on the business requirements, such as a meeting follow-up or an introduction. Email engagement suggests a template based on previous performance.
To create and send an email:
- Open the record you want to add the activity to (typically a contact, opportunity, lead, or account).
- In the Timeline section, select + (Create a timeline record) > Email.
- Select a recipient and enter the message subject.
- Enter the body of your message, or insert an email template.
- Select Send, or select Save to save the message as a draft and finish it later.
Tip
To add a link to your message, select the text you want to add the link to, press Ctrl+K, and type or paste the link address.
Use an email template
Email templates are standard messages that you send often, such as introductions, confirmations, thank-you messages, and reminders. They can include dynamic values that the system fills in automatically, such as the recipient's name or an order number. They give you a quick start when you're writing common messages.
Email engagement analyzes the performance of all the messages your sales team sends from Dynamics 365 Sales and identifies the most successful templates. It shows all available templates, but it highlights the ones that generate the most opens, replies, or sales.
- Create a message.
- On the command bar, select Insert Template.
- In the Email templates window, select the language if needed, and then search for and select a template.
- Select Apply template.
The template content is inserted into the message body. - Customize the template content as needed.
- Select Send, or select Save to save the message as a draft and finish it later.
Add attachments
When you attach documents, spreadsheets, or images to your emails, you can follow these attachments to know whether the recipient opened them. You can include both followed and unfollowed attachments in the same email.
By default, attachments aren't followed. You must manually follow each attachment you want to track. Also, you can't follow attachments when the message recipients don't allow following.
In the Attachment section, select +.
Locate and select the file to attach.
Select Open.
Depending on the file size, attaching might take several seconds.Select the attachment to track and then select more options > Follow.
The attachment is now followed and the Followed column shows Yes.Note
The Follow option is available only when the enhanced attachment feature is disabled. Contact your administrator to disable the enhanced attachment feature.
Select Send, or select Save to save the message as a draft and finish it later.
Follow or unfollow a message
When you follow an email, email engagement can tell you if the recipient opened it, replied to it, opened an attachment, or selected a link in it. For more information, see View message interactions with email engagement.
The Email Engagement section includes the following indicators and controls:
| Indicator or control | Description |
|---|---|
 |
Indicates you're following the current email, including any links you include, and you have the option to follow any files you attach. Select Don't Follow to stop tracking the message. This state is the default for new messages when your organization turns on email engagement and all the recipients allow following. |
 |
Indicates you're not following the current email, including any links you include. You can't follow any attachments either. Select Follow to turn on following if the recipients allow it. |
 |
Indicates that one or more recipients set following to Do Not Allow. You can't follow this message unless you either remove the recipients that don't allow following or change their setting. - Select View Preferences to view the recipient names and following preferences in a new window. Select a name to open the recipient's record. - If you removed recipients who don't want to be followed or changed their setting to allow following, select Retry Follow to try again. - Select Don't Follow to stop trying to follow this message. Within about 15 minutes after a followed message is opened, the system creates an action card in the assistant. The card includes links to the message and related records and action buttons to generate a call activity, snooze the alert, or dismiss it. Learn more about guided customer communications with assistant. |
Choose the most effective delivery time
Your email messages might receive more or less attention depending on when they arrive in recipients' inboxes. For example, many people start their day with a full inbox, so messages that arrive overnight must compete for attention and might get put off or even forgotten. Emails that arrive later in the day might get noticed and handled right away. With email engagement, you can compose your email messages when it's convenient for you, but let Dynamics 365 Sales deliver them when it's best for your recipients.
The system sometimes recommends a delivery time based on the recipient's time zone. It assumes a standard workday of 8:00 AM to 5:00 PM, Monday through Friday, and suggests the next closest business hour if you're working outside the recipient's business day. If the message has more than one recipient or no address is provided, the system doesn't make a recommendation.
Your organization must turn on Bing Maps and the recipient must have a physical address in Sales for email engagement to determine the time zone.
If no recommendation is given, or if you prefer to use your own logic, you can specify any delivery time you choose.
Note
Sending emails might be delayed up to 30 minutes.
The delivery time feature is available for both followed and unfollowed messages.
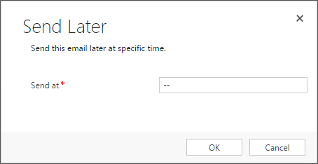
When you're ready to send the message, look under Send Later in the Email Engagement section.
If the system can recommend a delivery time, one appears here. Whether or not it does, you can delay delivery anyway.
Select Send Later.

If the system recommended a time or date, that information is filled in for you. If not, the date is blank. In either case, it uses your local time, not the recipient's.
In the Schedule email dialog box, select date and time for delivery.
Note
The date picker uses your app's personal time zone. Make sure it's set to your current time zone. For more information, see the Consideration section.
Select Schedule email.
The Delay Send indicator turns green. Select Change Schedule or Remove Delay if you need to change the delay or send the message right away. You can change the scheduled delivery at any time before the message is sent.

Select Send, or select Save to save the message as a draft and finish it later.
Scheduled messages appear as such in the Activities list for the Regarding record. Until the scheduled time arrives, you can delete or reschedule the message from there. You can also edit the follow-up reminder date or time. You can't change any other settings after you select Send.
Set a message follow-up reminder
To make sure you don't forget to follow up on an important email, set a reminder. This feature is available only for sent email.
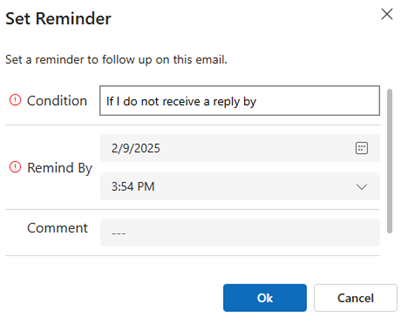
When you're ready to set the reminder, in the Email Engagement section, select Set a reminder.

In the Set Reminder dialog box, fill in the following fields.
- Condition: Select the condition that triggers the reminder:
- If I do not receive a reply by: Triggers the reminder if no reply is received by the Remind by date. Only available for followed messages.
- If the email is not opened by: Triggers the reminder if the message isn't opened by the Remind by date. Only available for followed messages.
- Remind me anyway at: Triggers the reminder at the specified time and date, no matter what.
- Remind by: Specify the date and time to show the reminder when the Condition is met.
- Comment: Optionally, add a note to the reminder.
Note
The date picker uses your app's personal time zone. Make sure it's set to your current time zone. For more information, see the Consideration section.
- Condition: Select the condition that triggers the reminder:
Select OK to save your settings and close the window.
The Set Reminder indicator turns blue and a short summary of your reminder settings appears. After the reminder time passes, the summary updates to indicate this. Select Change Reminder or Remove Reminder if you need to change the reminder or remove it.

Select Send, or select Save to save the message as a draft and finish it later.
When the reminder is triggered, the system creates an action card in the assistant. The card is given high priority, so you should see it right away. The card includes links to the message and related records and action buttons to snooze or dismiss the alert. Learn more about email reminder card.
Can't find the feature in your app?
There are a few possibilities:
- You don't have the necessary license to use this feature. Check out the comparison table and the licensing guide to see which features are available with your license.
- You don't have the necessary security role to use this feature.
- To configure or setup a feature, you need to have the Administration and customization roles
- To use sales-related features, you need to have the Primary sales roles
- Some tasks require specific Functional roles.
- Your administrator hasn't turned on the feature.
- Your organization is using a custom app. Check with your administrator for exact steps. The steps described in this article are specific to the out-of-the-box Sales Hub and Sales Professional apps.
Related information
Turn on email engagement
View message interactions with email engagement
Configure privacy preferences
Create templates for email