Note
Access to this page requires authorization. You can try signing in or changing directories.
Access to this page requires authorization. You can try changing directories.
Important
- This topic is prerelease documentation and is subject to change.
- Preview features designated as production-ready employ privacy and security measures typically present in generally available features, as further explained in our preview terms.
Overview
The Dynamics 365 app for Microsoft Teams allows sellers to share and update Dynamics 365 records, as an interactive card, within Teams conversations.
While business users can access the feature themselves by adding, signing in, and setting up the Dynamics 365 app for Teams, you can drive faster and more seamless adoption by:
- Familiarizing yourself with the feature.
- Understanding how the information is displayed in the interactive card.
- Preinstalling and pinning the app for business users who can benefit from the feature.
- Encouraging business users to sign in and set up the app.
Dynamics 365 app for Teams autoinstall
In order to enhance the Teams experience for Dynamics 365 users, the Dynamics 365 app for Teams is automatically installed to all the active Dynamics 365 users.
Note
A user is considered as active after they successfully sign in to one of the Dynamics 365 applications or a model-driven Power Apps app.
With the Dynamics 365 app for Teams, users will have their collaboration in Teams enhanced with:
- Dynamics 365 links will automatically unfurl, showing useful record details.
- Users are able to view Dynamics 365 data in Teams, while continuing their chats.
- Users can search, connect, and update Dynamics 365 records directly in Teams.
The Dynamics 365 app for Teams will be installed automatically in all environments that haven't disabled the installation of the Dynamics 365 app. For information to disable autoinstall of Dynamics 365 app for Teams, see Disable autoinstall of Dynamics 365 app for Teams.
Familiarize yourself with the feature
It's important to become familiar with the feature to understand the nuances of how it works and identify the business users for whom preinstalling and pinning the app will add value.
To familiarize yourself with the feature:
How is the information displayed in the interactive card?
The information in the interactive card is displayed using the view of type Quick Find View of a table. You must validate and edit the columns in the Quick Find View view to ensure that interactive cards display the right information. To change the information that the cards display, you can edit the columns in the Quick Find View view of a table as per the requirement.
Preinstall and pin the Dynamics 365 app in Microsoft Teams
Preinstalling and pinning the Dynamics 365 app in Teams increases the discoverability of the app by business users and encourages them to share records in a secure way. It requires creating a custom Teams app policy and assigning the policy to users.
Note
- The ability to preinstall and pin apps for users by managing app policies is available as part of Microsoft Teams and is not a feature of Microsoft Dynamics 365. This document details how to use the Microsoft Teams feature to preinstall the Dynamics 365 app for Teams.
- You need to be a Teams administrator to preinstall and pin the Dynamics 365 app for Teams for business users. For more information on Teams administrator roles, see Use Microsoft Teams administrator roles to manage Teams.
Create a custom Teams app setup policy
Sign in to Microsoft Teams admin center.
In the left pane, go to Teams apps > Setup policies.
Under the Manage policies tab, select Add.

Enter a name and description for the policy.
Turn on User pinning.
Under Installed apps, select Add apps.
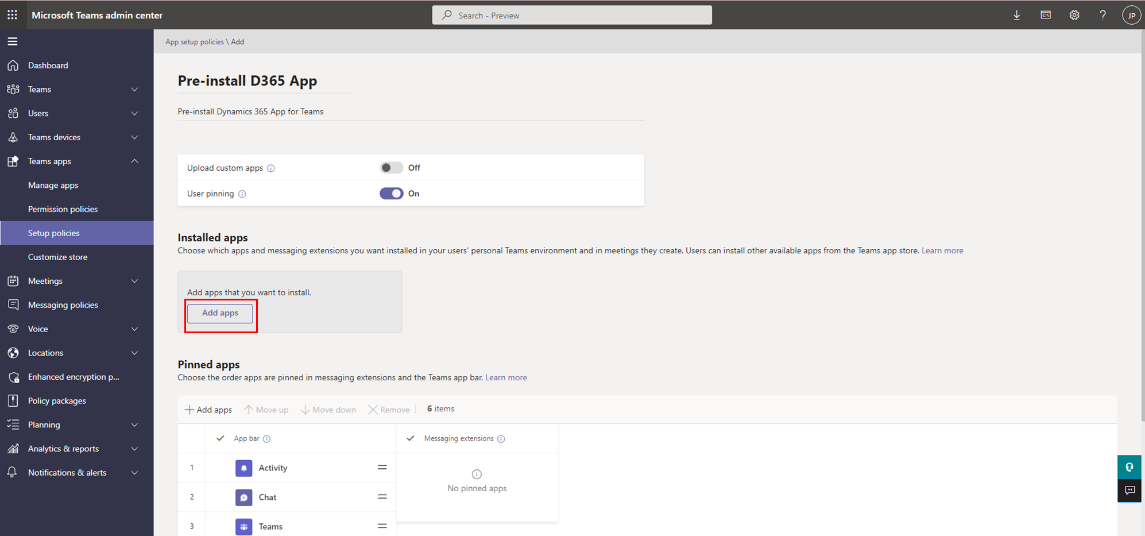
In the Add installed apps panel, search for the Dynamics 365 app, and then select Select. You can also filter apps by app permission policy.
Select Add.
Under Pinned apps, select Add apps.
In the Add pinned apps panel, search for the Dynamics 365 app, and then select Select. You can also filter apps by app permission policy.
Select Add.
Under the App bar or Messaging extensions, arrange the apps in the order that you want them to appear in Teams.
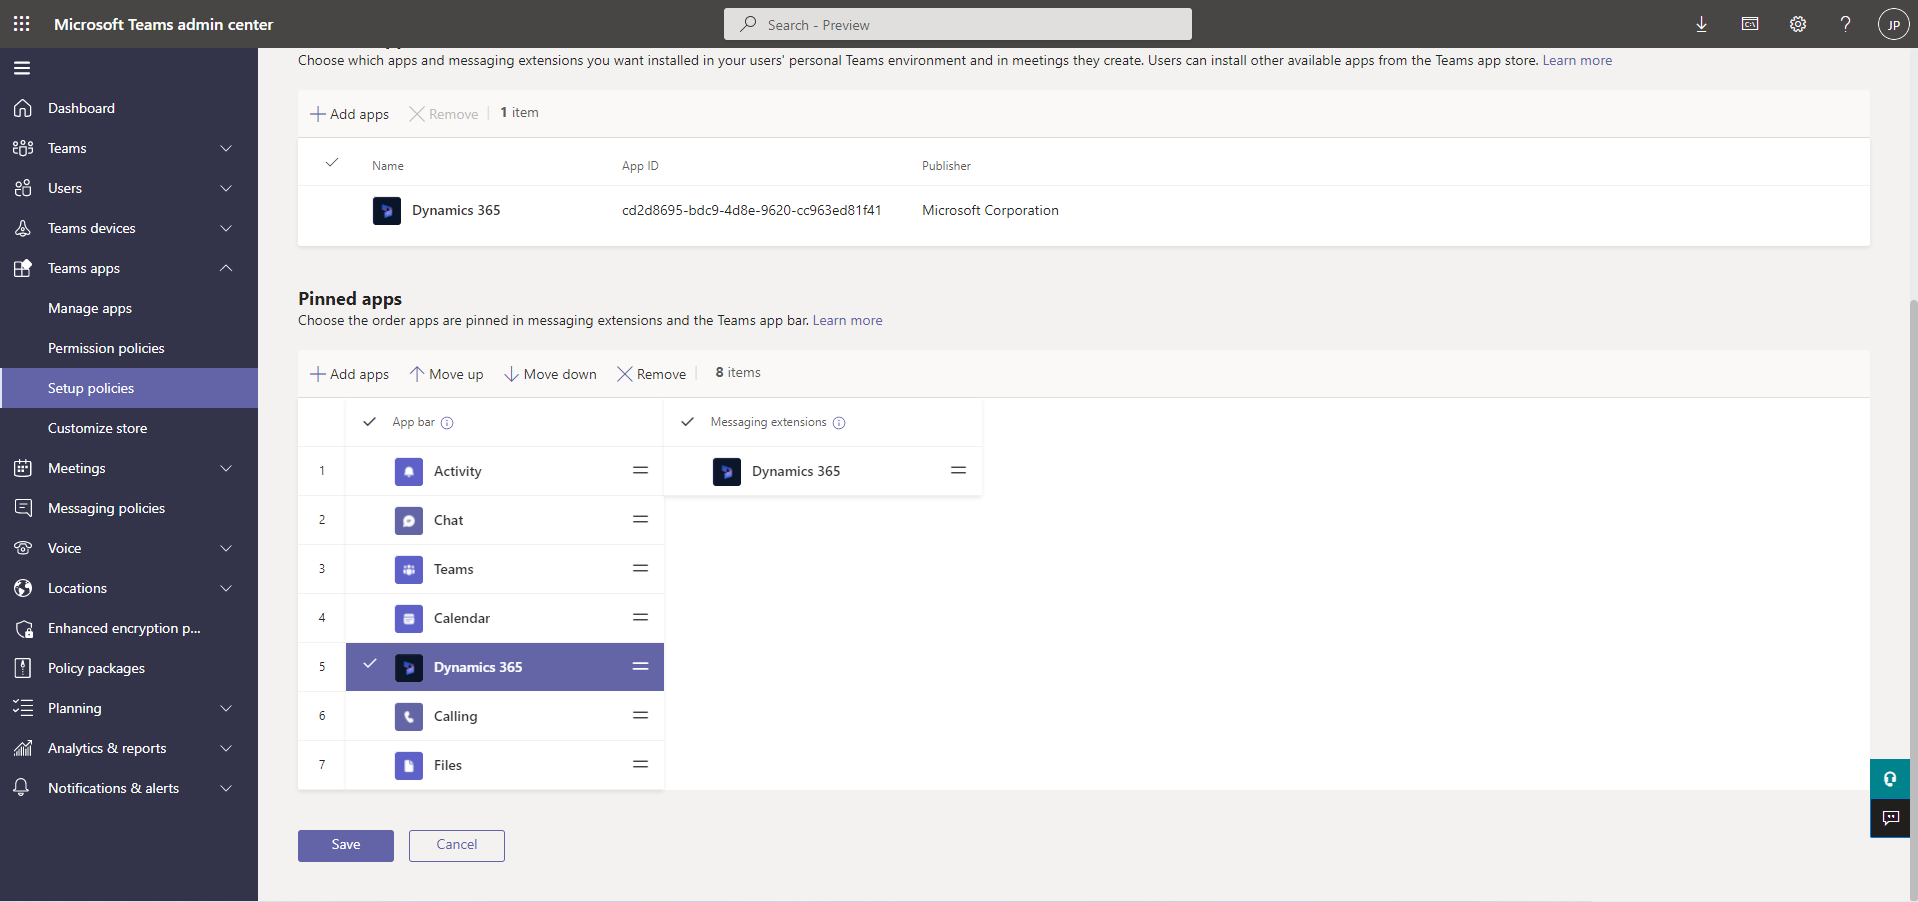
Select Save.
Assign the custom Teams app setup policy to a user group
Policy assignment to groups lets you assign a policy to a group of users, such as a security group, an organizational unit, or a distribution list.
Sign in to Microsoft Teams admin center.
In the left pane, go to Teams apps > Setup policies.
Under the Group policy assignment tab, select Add.
In the Assign policy to group panel, do the following:
Search for and add the group you want to assign the policy to. Ideally this would be the group to which sellers, service agents, and other Dynamics 365 users belong to. If you have Dynamics 365 users spread across multiple groups, you'll have to create multiple group policy assignments.
Set the ranking for the group assignment.
Select the policy created earlier – to preinstall and pin the Dynamics 365 app for Teams.
Select Apply.
Note
- To learn more about assignment policies on Teams, go to Assign policies to users and groups.
- You can also assign the policy to individual users.
Encourage business users to sign in and set up the app
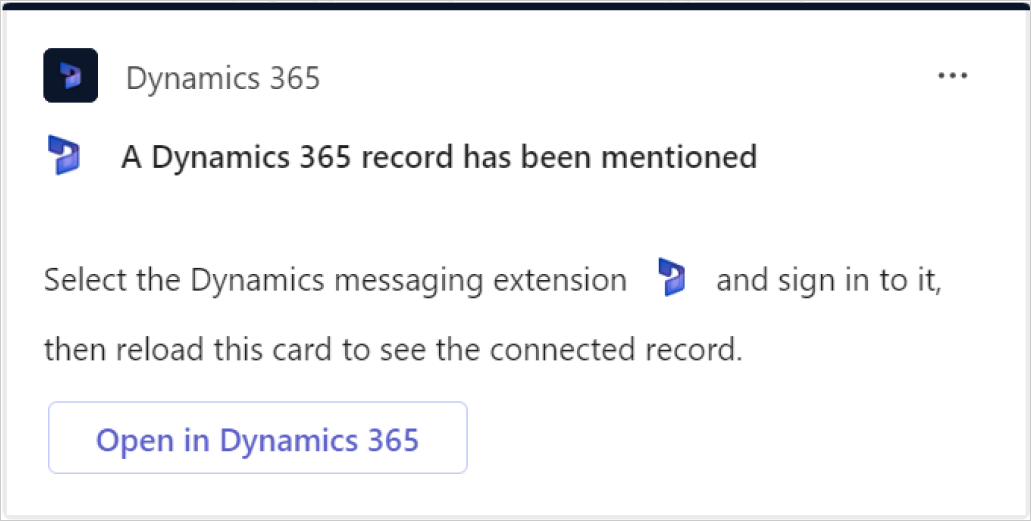
After you create a custom policy and assign it to users, you must encourage your users to sign in to the Dynamics 365 app for Teams to view, share, and update Dynamics 365 records in Microsoft Teams chats and channels. They need to sign in only once. and signing in provides a seamless user experience. When users have the app installed but haven't signed in, they see this message displayed in the interactive card when they access the Dynamics 365 record in Teams:
Disable autoinstall of Dynamics 365 app for Teams
The installation of the Dynamics 365 app can be disabled from Power Platform admin center or Microsoft Teams admin center.
Power Platform admin center
Power Platform admin center allows you to disable the autoinstallation of the Dynamics 365 app in Teams. This prevents the app from being installed for all users in your organization. However, users can still install the app from the Teams app store.
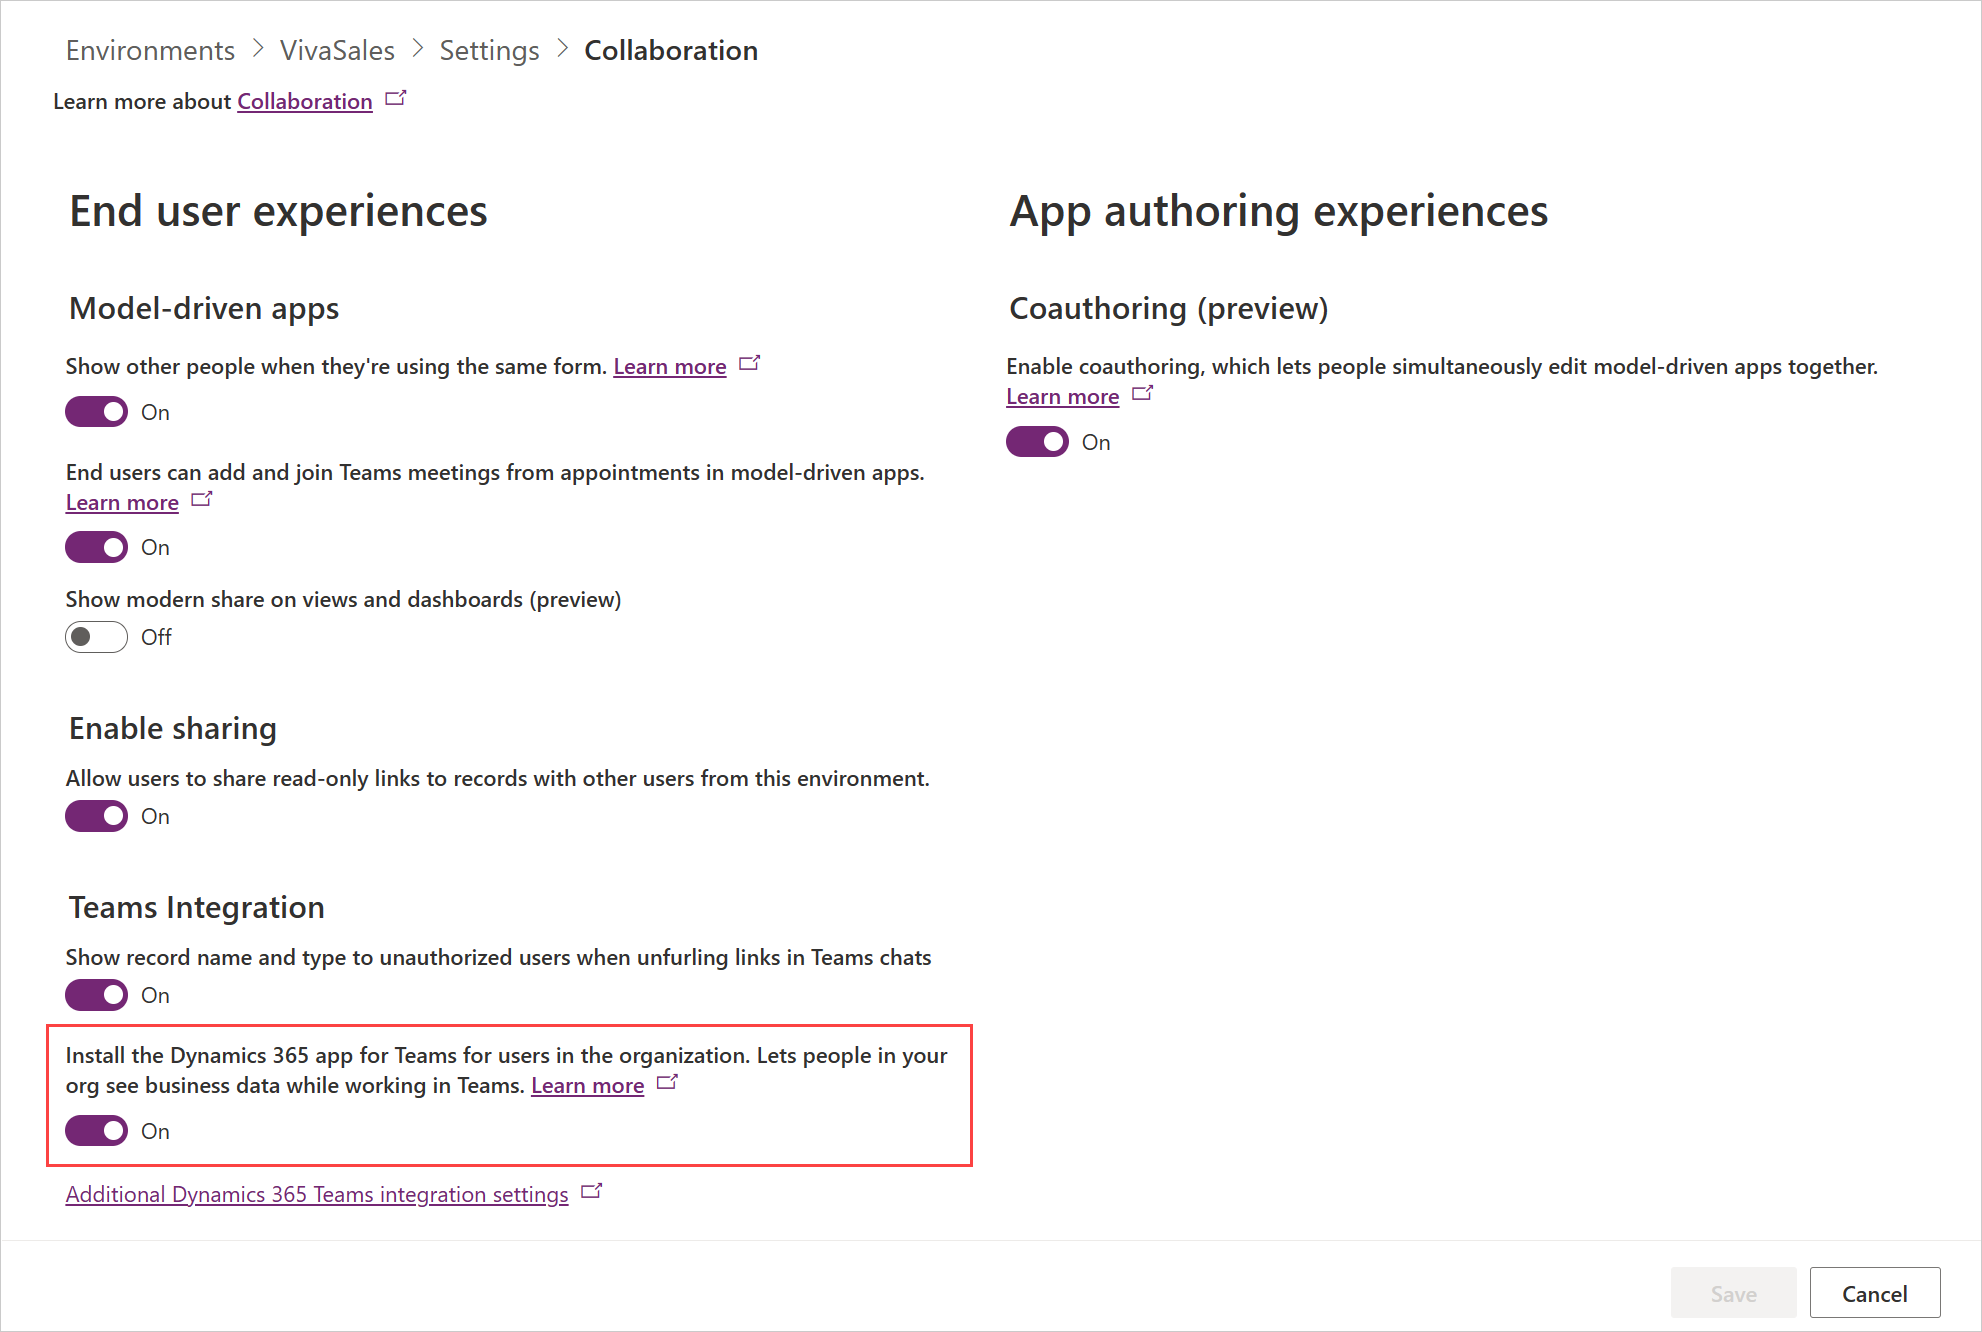
Go to Environments > Settings > Product > Collaboration.
Under Teams Integration, turn off the Install the Dynamics 365 app for Teams for users in the organization. Lets people in your org see business data while working in Teams toggle.
Select Save.
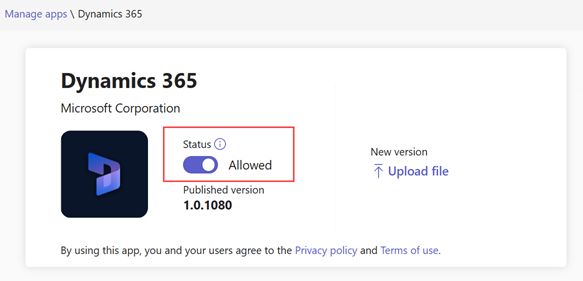
Microsoft Teams admin center
Microsoft Teams admin center allows you to disable the autoinstallation of the Dynamics 365 app in Teams and prevent users from manually installing it from the Teams app store.
In the left navigation pane, go to Teams apps > Manage apps.
Search for the Dynamics 365 app, and select it.
Turn off the Status toggle.
Related information
Share and update Dynamics 365 records within Microsoft Teams conversations