Subnet mapping UI overview
You can incorporate your own subnet mapping in order to build peering groups and peering restrictions based on local IP. The benefits are:
- Only users that are in the same group peer with each other.
- Cross-site peering is prevented. That is, peers with differing Group IDs don't peer.
- Enriched analytics show site-based peering and performance.
- VPN subnets can be explicitly excluded. Useful if you have a full-tunnel setup configured, you can disable peering between users that are inside the office and remote users connecting via VPN.
- Enable peering connections between internet users.
Prerequisite: expose viewers' IP addresses
The Microsoft eCDN service requires viewers' IP addresses to be exposed to the service to actuate the peering process, and facilitate your subnet mapping configuration.
Important
Modern browsers conceal their users' IP address from SDKs. It is vitally important that the Microsoft eCDN service's SDK be exposed to its beneficiaries' IP addresses.
For more information, see how to disable IP obfuscation exclusively for the Microsoft eCDN service.
Prepare your subnets
The expected subnet mapping format is a CSV file with a specific structure. Follow the provided formatting guidance. Only the first three fields are mandatory.
| Column name | Data type | Description | Guidance |
|---|---|---|---|
| Group Id | String | Your site name is displayed in the analytics. Only peers with the same Group ID are able to peer with each other. | Required |
| Subnets | CIDR | Space or comma (,) delimited network specifiers in the CIDR format. | Required |
| P2P | Enum | Configure how users who fall under this group behave. Possible values:
|
Required |
| WAN | Enum | Enabling WAN toggles on the STUN protocol, which allows us to create peering connections between internet users. For example, in regions with poor internet connectivity, such as mountainous and rural areas, it might be more beneficial for a viewer to source content from nearby peers rather than reaching a more distant source. Possible values:
|
Optional |
| Label | String | Labels help you identify sites more precisely. For example, you have a Group ID called "Berlin" and within that group there's a subnet that's WiFi-only, so you'd label it "WiFi-only." We encourage the use of labels. |
Recommended |
| Country | String | Manually override the country/region as determined based on the viewer's public IP address. This option is useful for viewers whose internet breakout point doesn't represent their true location. | Optional |
| City | String | Same behavior and guidance as Country column. | Optional |
Important
*For leech mode to work properly, the p2p-leech subnet(s) must share a Group ID with one or more reachable subnets that are set to p2p-on. See the Leech row in the below screenshot example for reference.
Tip
Have CQD building mapping? Reach out to us for an experimental script designed to convert a building mapping CSV to Microsoft eCDN's subnet mapping format.
Example subnet mapping CSV

Note
The last row, the p2p-off "catch-all" group, in this example is redundant and is included here explicitly for illustrative purposes. When a subnet mapping **is present, viewers who are not assigned to a group will be configured as p2p-off. For more information, see the Default Groups section.
Limitations
- Maximum 50k total subnets (up to 50k row max)
Default Groups
There are scenarios where viewers are placed into predefined groups, regardless of subnet mapping, dependent on the criteria as described in this matrix.
| Criteria matrix | Subnet mapping present | No subnet mapping | ||
|---|---|---|---|---|
| Group name | p2p config | Group name | p2p config | |
| No IP / Failed IP | Ungrouped | off | Ungrouped | off |
| IP supplied (no match) | Default Group | off | all | on |
| IP supplied (matches defined group) | refer to config | refer to config | --- | --- |
One of two significant groups could apply to your viewers even when a subnet mapping is present.
Ungrouped - Viewers are assigned to this p2p-off group when their eCDN client does not receive a valid IP address from the operating system. This group can be applied whether or not subnet mapping has been uploaded to the eCDN management console. Most commonly, they're browser viewers who don't have the prerequisite mDNS configuration to disable IP masking. For more, see the How To Disable mDNS guidance.
Default Group - This p2p-off group is applied to viewers who weren't accounted for in the subnet mapping at the time of the event. You can find the first 3 octets of the viewers' captured local IPs under the Private IP column of the User breakdown table in the Drilldowns dashboard to investigate and try to isolate the unaccounted for users. Per Microsoft privacy policy, we can't expose individual viewers' full IP addresses.
all - This group is applied when a subnet mapping is NOT present, to all viewers whose eCDN client was supplied with a valid IP address by the operating system. These viewers are set to p2p-on.
Scope overlap
Caution
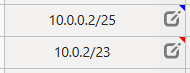
In the event of overlapping scopes, a client will be assigned to the subnet with the smallest scope into which its IP address belongs.
This behavior can be utilized creatively to retain a simpler subnet mapping if you have a subnet within a larger supernet for which you want different p2p configurations, a VPN subnet for example.
Example
Take a hypothetical viewer with an IP address of 10.0.10.5 and the following subnet mapping example.
| Group Name | Network/CIDR | Config |
|---|---|---|
| Site A | 10.0.0.0/16 | p2p-on |
| Site B | 10.0.10.0/24 | p2p-off |
Site A with 65,534 usable IPs that ranges from 10.0.0.1 to 10.0.255.254 overlaps Site B's scope, which ranges from 10.0.10.1 to 10.0.10.254 with 254 usable IPs. As such, the viewer would fit into both scopes, but would be assigned to Site B with p2p-off as the /24 is the smallest applicable scope.
Multi-NIC scenario
In a scenario where a device has multiple valid local IP addresses, the following logic is applied to determine the device's group assignment.
- First, all the device's local IP addresses are assigned a group according to the subnet mapping.
- Next, the IP addresses are prioritized based on their group's p2p configuration. IPs that are in a p2p-on group are prioritized higher than p2p-off IP addresses.
- Lastly, in an uncommon scenario where there are multiple IP addresses in differing p2p-on groups, we choose the first one according to the prioritization as determined by WebRTC.
Access the subnet mapping UI
Access the Microsoft eCDN Management Console, expand the Configuration tab in the navigation panel and select Subnet Mapping.
Upload your subnets
Access the Subnet Mapping UI.
Select Upload CSV and select your subnet mapping file.

In Preview mode, if your columns aren't autodetected correctly, you can reassign columns using the header row if necessary. Required columns must be assigned to proceed. Cell values will be evaluated in the next step.

Before continuing, you can also edit your CSV's raw content.

Select Continue to proceed to Edit mode.
In Edit mode, make any necessary corrections.
Microsoft eCDN can detect many types of errors such as missing mandatory values, subnet duplication, invalid characters or CIDR, missing columns, and so on. Problem cells are marked with a colored tip at the top-right of the cell, blue for warning, red for error.
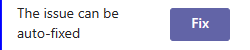
The UI also generates a card for each offending value with a brief description and location of the issue. Some issues can be automatically corrected by selecting the "Fix" button. Offending values that can't be automatically fixed can be manually corrected by clicking on the cell.
Select Save once all errors are resolved.
Note
New subnet mapping labeling cannot be applied retroactively to prior event data.
Editing your subnets
Clicking the Edit button or clicking on one of the actions in the row menu (such as Delete or Duplicate) enables editing mode. The "Editing" notion above the table and the presence of various interactive context controls indicate you are in the editing mode, as can be seen in the below screenshot. To discard your edits, select the Discard button. A cell with an invalid value has a colored tag at the top-right of the cell and generate a card in the Unsaved Changes section, below the Subnet Mapping Preview table.
Supported edit actions include:
Updating group ID, CIDR, P2P configuration, WAN configuration, label, country, and city
Adding, duplicating, and deleting rows
Saving and discarding edits
Each edit is displayed in the Diff Preview box below the Subnet Mapping Preview table. After finalizing your edits, select the Save button to commit the changes.

Revisions
A revision is created each time you save a subnet mapping. Our backend stores the last 20 revisions. You can view all revisions and their editors by clicking the downward arrow next to Current Revision, underneath the Subnet Mapping table.
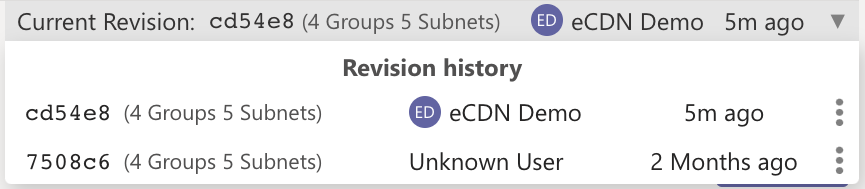
From the three-dot menu on the right, you have the option of restoring or downloading a prior revision.