Use the Virtual Appointments app in Microsoft Teams
 Some features described in this article require Teams Premium.
Before you begin
This article is intended primarily for users in your organization who will set up the Virtual Appointments app for staff members on their team. This can include managers, supervisors, schedulers, or other employees. Users who initially create a shared appointment calendar are automatically assigned the Virtual Appointments admin role for that calendar and can perform most of the tasks in this article.
If you’re an IT admin, see Manage the Virtual Appointments app to learn how to control access to the app in your organization.
Team members can find the app in the Teams app store, or you can share the installation link to help them find it. IT admins can use an app setup policy to pin the app for your organization, or team members can pin the app themselves.
Overview of the app
Use the Virtual Appointments app in Microsoft Teams for all your virtual appointment needs. The app enables a seamless end-to-end experience for business-to-customer engagements, integrating schedules, analytics, and management options, all in one place.
You can schedule, view, and manage virtual appointments, get real-time status updates in a queue view, send appointment reminders, view analytics and reports on virtual appointments activity, and configure calendar, staff, and booking page settings.
Use it to schedule and manage appointments such as financial consultations, healthcare visits, virtual fittings, interviews, customer support, education office hours, and more. You can also publish an online booking page for your clients, customers, and patients to book appointments with your staff.
The app makes it easy to manage the complex scheduling demands of any organization. Schedulers can manage multiple department and staff calendars, as well as communications with internal and external attendees, from a single experience.
The virtual appointments are held through Teams meetings, which offer robust video conferencing capabilities. For example, a doctor can share their screen and review test results with a patient. Or, a banking advisor can request electronic signatures on documents, allowing them to close transactions remotely.
You get an experience that's tailored to your industry. Here are some examples of how you can use it in your organization.
| Healthcare | Financial services | Retail | Sales | HR |
|---|---|---|---|---|
|
|
|
|
|
With a Teams license, you can use basic Virtual Appointments capabilities that make it easy to schedule and join business-to-customer meetings. For example, you can schedule appointments in the calendar and external attendees can join through a browser without having to download Teams. Teams Premium unlocks advanced Virtual Appointments capabilities to manage and personalize the experience. These include a queue view of scheduled and on-demand appointments, SMS notifications, custom waiting rooms, and analytics.
Set up an appointment calendar
To schedule and manage appointments in the app, you must first set up an appointment calendar. You must have the Virtual Appointments admin role to set up and manage most appointment calendar settings.
Step 1: Create a new appointment calendar or connect an existing calendar
To get started, create a new appointment calendar or connect an existing one that you previously created.
To create a new appointment calendar
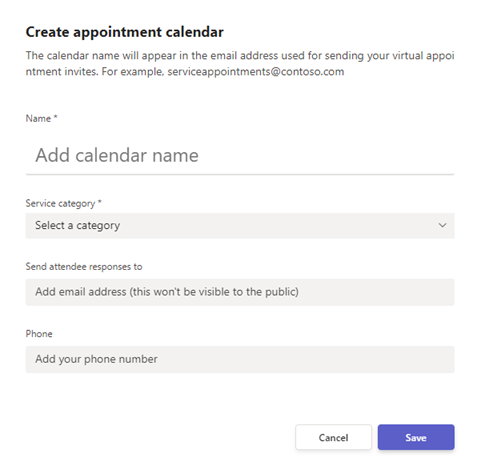
On the Home tab or Schedule tab of the app, choose Create appointment calendar.
Complete the form and choose the relevant service category for your organization. If you’re part of a larger organization, consider creating separate calendars for specific departments within your organization.
To learn more, see Create a calendar in Virtual Appointments.

To work with an existing appointment calendar
- On the Home tab or Schedule tab of the app, choose Connect existing calendar.
- Search for the calendar that you want, select it, and then choose Done.
Step 2: Add staff
You can add up to 100 staff members to an appointment calendar. Each person you add will have their calendar displayed on the Schedule tab. Schedulers can then view their availability in the app and schedule appointments for them.
- On the Manage tab, select Staff.
- Add staff members and assign a role to each person you add.
To learn more, see Add and manage staff to make scheduling a breeze.
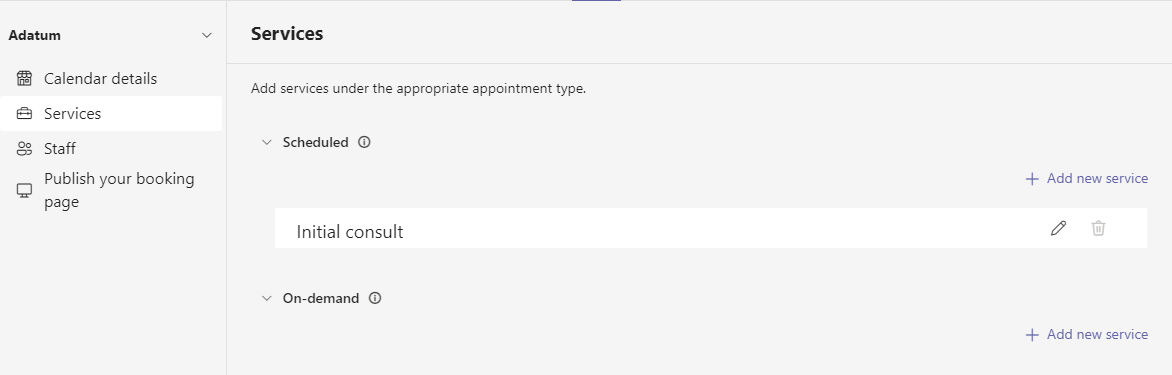
Step 3: Add services using appointment types
Next, add services to the calendar using the appropriate appointment type. Before you do that, it's important to understand the two different appointment types so that you can choose the appointment type that best represents the services offered by your organization:
- Scheduled appointment type: Used by schedulers to book scheduled appointments for staff and attendees. These appointments are scheduled for a specific date, time, and duration.
- On-demand appointment type: Used by your customers, clients, and patients for on-demand appointments. On-demand appointments are for services that are provided upon request, similar to a walk-in waiting room. This feature requires Teams Premium.
- To add a service, on the Manage tab, select Services, and then under Scheduled or On-demand, select Add service.
- Do one of the following:
- If you chose Scheduled, follow the steps in Scheduled appointments.
- If you chose On-demand, follow the steps in On-demand appointments.

Scheduled appointments
Enter a name for the service. For example, Account opening, Prescription renewal, Loan consultation, or Tax preparation.
Specify any other information and settings you want. Schedulers can then use the appointment type to schedule an appointment. The information that you add is included in the email confirmation that's sent to attendees every time this type of appointment is booked.
You can configure options such as whether attendees can join from a desktop or mobile browser without having to download Teams, add an email reminder, set up SMS text notifications, and link forms.
Set up SMS text notifications
This feature is now part of Teams Premium.
Attendees need a valid United States, Canada, or United Kingdom phone number before they can receive SMS notifications.
To send SMS notifications to attendees by default, turn on Send them text messages. Attendees receive confirmation and reminder text messages that include the Teams meeting link and scheduled appointment details. They can opt out of receiving the messages by replying STOP, or resume receiving them by replying START.
Keep in mind that schedulers can later choose to turn off the setting on an as-needed basis when they use the appointment type to schedule an appointment.
To learn more, see Use text messages to remind customers of their appointment.
Note
Admins can use the SMS notifications usage report to see how your workforce is using SMS notifications with virtual appointments.
Link forms
You can link up to four forms for attendees to fill out each time a scheduled appointment type is booked. For example, you might require attendees to complete a registration form before they join an appointment.
To link a form, choose Link a form.
Enter the URL of the form, and then choose Link.
If this is the first time you're linking a form, you're prompted to create a Microsoft 365 group to store forms. Choose Create group to create the group. You only have to do this one time for the booking calendar.
When working with forms, keep in mind that:
- To make changes to a form that's already linked to an appointment type, select the form in the appointment type or from within the Microsoft 365 group at https://forms.office.com.
- Uploading files to forms that contain a file upload question is supported when all attendees are from the same organization.
When a scheduler uses the appointment type to schedule an appointment, they can then choose to include the form, remove it, or add any other forms that you linked to the appointment type. Attendees must fill out the form before they join the appointment.
Note
If you're a healthcare provider, any information provided by you or patients in Teams (including the Forms app, Virtual Appointments app, meeting recordings if enabled by you, or any other Teams virtual appointments services) that's necessary for medical records continuity or retention purposes should be downloaded, copied, and/or notated directly in such records by you. This service does not maintain legal medical records or a designated record set.
On-demand appointments
This feature requires Teams Premium.
Enter a name for the service. For example, Drop-in appointment, Account opening, Prescription renewal, Loan consultation, or Tax preparation.
Your customers, clients, and patients can then choose the appointment type on your booking page to request an on-demand appointment with your staff.
Publish a booking page
If you're a Virtual Appointments admin, you can publish an online booking page where people can book scheduled and on-demand appointments with your staff.
On the Manage tab, select Publish your booking page.
Turn on Publish booking page.
To enable people to request on-demand appointments on your booking page, turn on Allow requests for On-demand services.
This feature requires Teams Premium.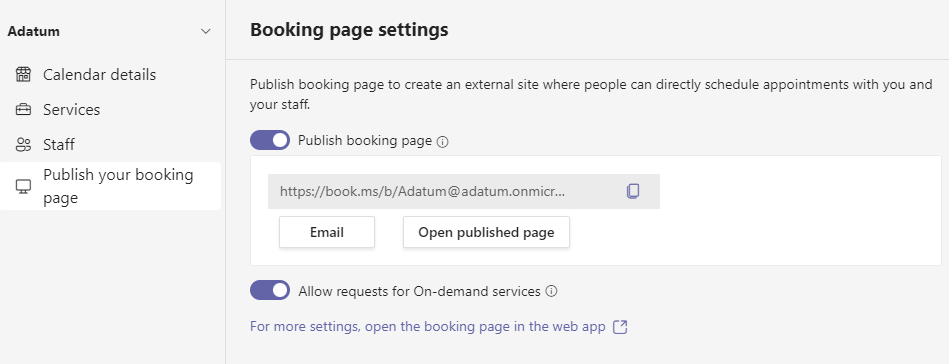

Here's an example of what a published booking page looks like.

You can customize and manage your booking page settings in the Bookings web app. To learn more, see Customize and publish your booking page for customers to schedule appointments and Customize and publish your booking page.
Monitor appointments and get real-time status updates in the queue view
This feature requires Teams Premium.
The queue view on the Queue tab provides your staff with a dashboard to monitor all scheduled and on-demand virtual appointments for the day, with updates in real time.

From the queue, schedulers can add a new booking, view relevant appointment details, and see appointment statuses throughout the day. They can also send email reminders to assigned staff and attendees and send SMS notifications to attendees for scheduled appointments. Staff can join and manage appointments directly from the queue.
When an attendee joins the waiting room, the status changes, and their wait time is displayed and tracked. The view automatically refreshes with color-coded updates so that changes can easily be identified.
View analytics
The Virtual Appointments usage report in the Analytics tab gives you an overview of virtual appointments activity in your organization. The report provides key metrics such as total number of appointments, appointment duration, lobby wait time, and no shows. You can view detailed activity for virtual appointments scheduled and conducted through multiple scheduling entry points and drill down into individual appointment data.

The analytics experience depends on user role:
- Virtual Appointments admins get organizational analytics. If you're an admin, you'll see an org-level report showing aggregated analytics across all departments in your organization. To learn more, see Virtual Appointments usage report.
- Non-admins get either departmental or individual analytics. Staff members who are associated with a department see a report that shows data for the given department. If a person isn’t associated with a department, the report shows data for the appointments that they conducted. To learn more, see Analyze your Virtual Appointment usage.