Note
Access to this page requires authorization. You can try signing in or changing directories.
Access to this page requires authorization. You can try changing directories.
This article describes how to configure basic voice interactive voice response (IVR) agents for use in Dynamics 365 Contact Center applications. Basic voice agents are typically built to use classic orchestration.
To get your agent ready for voice services, see Integrate a voice-enabled agent with Dynamics 365 Contact Center.
Enable Basic voice
A voice-enabled agent is different from a chat-based agent. The voice-enabled agent includes specific system topics for handling voice scenarios. A chat-based agent uses the Text modality. A voice-enabled agent uses the Speech & DTMF modality. The two modalities are mutually exclusive.
Enable voice allows you to author voice-enabled agents and ensures speech-related features are authored correctly.
If you don't start your agent by using the Voice template, you must turn on the Enable voice option in the agent's Settings.
With an agent open, go to Settings > Voice.
Select Enable voice. The Make voice the default modality for creating and updating within topics option is also set by default.
Select Basic if you plan on using topics and classic orchestration for your agent. Learn more in Choose how to control the conversation and Choose how to handle speech.
Note
Select Realtime voice if you plan on using generative orchestration for your agent.
When you turn on Enable voice and Make voice the default modality for creating and updating within topics, your agent gets the following updates:
- The ability to author voice features when switched from text to Speech & DTMF.
- The voice system topics Silence detection, Speech unrecognized, and Unknown dial pad press are automatically added to handle speech-related scenarios.
- Increase accuracy with agent data (on by default), which improves speech recognition accuracy.
- The existing agent flow doesn't change (such as the Main Menu topic to start conversations with mapped DTMF triggers).
Important
- The Enable voice setting only changes the voice authoring capabilities, not the channel setting. Turn on the Telephony channel for a fully voice-enabled agent.
- In addition, setting Enable voice on an agent that wasn't originally configured for voice features means that the agent doesn't have the Main Menu (preview) topic. You must recreate that topic, if needed.
- If you can't turn on Enable voice, check the Power Platform environment hosting your agent and ensure that Get new features early is turned off for that environment. For more information, see Unable to turn on Optimize for voice.
- The Increase accuracy with agent data setting only works when the voice-enabled agent uses trigger phrases. If the agent is configured to use topic descriptions, there's no effect on accuracy.
Disable optimization for voice
Turn off Enable voice in agent authoring if you don't use the Telephony channel. After you turn off Enable voice, you see the following changes:
- No agent authoring for voice features, such as DTMF and barge-in.
- The default text modality is set.
- No improvement to speech recognition, since there's no speech recognition.
- No voice system topics or global DTMF topic.
Note
Some topics might report errors during publish if they still reference the DTMF topic (now turned off).
- No change to your agent flow and channel setting, since turning off optimization doesn't remove the Telephony channel.
- Turning on or turning off Enable voice doesn't take effect until you publish your agent. If you turn it on or off accidentally, and the agent switches between modalities, you have time to fix it.
Important
If your Telephony channels are enabled, turning off Enable voice can break your agent, since all DTMF triggers are automatically disabled.
Use voice as your primary authoring mode
When you turn on Enable voice, the Make voice the default modality for creating and updating within topics option automatically turns on. If you turn off this option, make sure to select the Speech & DTMF modality at each node where you want to add voice messaging.
Message availability
Using the text or speech modality can affect your channel differently.
| Text modality | Speech modality | Agent text & speech channel |
|---|---|---|
| Message available | Message empty | Message available |
| Message empty | Message available | Message not available |
Customized automatic speech recognition
Voice-enabled agents for a specific domain, such as medical or finance, might encounter users who use finance terms or medical jargon. Some terms and jargon are hard for the voice-enabled agent to convert from speech to text.
Note
The Increase accuracy with agent data setting only works when the voice-enabled agent uses trigger phrases. If the agent is configured to use topic descriptions, there's no effect on accuracy.
To ensure the speech input is recognized accurately, improve speech recognition:
Select Settings > Voice in your agent.
Select Increase accuracy with agent data to enable the agent's default customized automatic speech recognition settings.
Select Save to commit your changes.
Publish your agent to see the new changes.
Agent-level voice options reference
Use the Voice settings to configure timeouts for various voice-related features. Settings you apply on this page become the default for topics you create in your agent.
To make changes to the agent-level timeout options:
Go to the Settings page for your agent and select Voice.
Select the settings you want and adjust the agent's default settings.
Select Save to commit your changes.
Agent-level settings
The following table lists each option and how it relates to node-level settings.
| Voice-enabled agent-level section | Setting | Description | Default value | Node-level override |
|---|---|---|---|---|
| DTMF | Interdigit timeout | Maximum time in milliseconds allowed while waiting for the next DTMF key input. Applies multi-digit DTMF input only when users don't meet the maximum input length. | 3000 ms | Question node with voice properties for Multi-digit DTMF input |
| DTMF | Termination timeout | Maximum duration in milliseconds to wait for a DTMF termination key. Limit applies when user reaches maximum input length and didn't press termination key. Applies only to multi-digit DTMF input. After the limit times out and terminating DTMF key doesn't arrive, agent ends the recognition and returns the result up to that point. If set to "continue without waiting," the agent doesn't wait for termination key. Agent returns immediately after user inputs the max length. |
2000 ms | Question node with voice properties for Multi-digit DTMF input |
| Silence detection | Silence detection timeout | Maximum silence in milliseconds allowed while waiting for user input. Limit applies when the agent doesn't detect any user input. The default is "no silence timeout." Agent waits infinitely for user's input. Silence detection for voice times the period after the voice finishes speaking. |
No silence timeout | Question node with voice properties for Multi-digit DTMF input System topic (silence detection trigger properties) for Configure silence detection and timeouts |
| Speech collection | Utterance end timeout | Limit applies when user pauses during or after speech. If pause is longer than timeout limit, agent presumes user finished speaking. The maximum value for utterance end timeout is 3000 ms. Anything above 3000 ms reduces to 3000 ms. |
1500 ms | Question node with voice properties |
| Speech collection | Speech recognition timeout | Determines how much time the agent allows for the user's input once they begin speaking. The default value is 12000 milliseconds (about 12 seconds). No recognition timeout means infinite time. Agent reprompts the question. If no response, the voice is beyond Speech recognition timeout. | 12,000 ms | Question node with voice properties |
| Latency messaging | Send message delay | Determines how long the agent waits before delivering the latency message after a background operation request started. The timing is set in milliseconds. | 500 ms | Action node properties for long-running operation |
| Latency messaging | Minimum playback time | The latency message plays for a minimum amount of time, even if the background operation completes while the message is playing. The timing is set in milliseconds. | 5000 ms | Action mode properties for long-running operation |
| Speech sensitivity | Sensitivity | Controls how the system balances detection of speech and background noise. Lower the sensitivity for noisy environments, public spaces, and hands-free operation. Increase the sensitivity for quiet environments, soft-spoken users, or voice-command detection. The default setting is 0.5. | 0.5 | There are no node-level overrides for this control. |
Note
- An agent with large trigger phrases and entity sizing takes longer to publish.
- If multiple users publish the same agent at the same time, your publish action is blocked. You need to republish the agent after others finish their existing agent edits.
To learn more about the fundamentals of publishing, see Key concepts - Publish and deploy your agent.
Enable barge-in
When you enable barge-in, your agent users can interrupt your agent. This feature is useful when the agent user doesn't need to hear the entire message. For example, callers might already know the menu options, because they heard them in the past. By using barge-in, the agent user can enter the option they want, even if the agent isn't finished listing all the options.
When to disable barge-in
- Disable barge-in if you recently updated an agent message or if the compliance message shouldn't be interrupted.
- Disable barge-in for the first agent message to ensure agent users are aware of new or essential information.
Specifications
Barge-in supports DTMF-based and voice-based interruptions from the agent user.
You can control barge-in with each message in one batch. Place
barge-in-disablednodes in sequence before each node where barge-in is allowed. Otherwise, the system treatsbarge-in-disabledas an allow-barge-in message.
When one batch queue finishes, the barge-in automatic setting resets for the next batch. The barge-in flag at each subsequent message controls it. You can place barge-in disabled nodes as the sequence starts again.

Tip
If consecutive Message nodes are followed by a Question node, voice messages for these nodes are defined as one batch. One batch starts with a message node and stops at the question node, which waits for the user's input.
Avoid disabling barge-in for lengthy messages, especially if you expect agent users to interact with the agent often. If your agent user already knows the menu options, let them self-service where they want to go.
Set up barge-in
Select a Message or Question node, and set the desired modality to Speech & DTMF.
Select the three dots (…) for the node, and then select Properties.
For Message nodes, the Send activity properties panel opens on the side of the authoring canvas.
Select Allow barge-in.
For Question nodes, the Question properties panel opens, then select Voice.
From the Voice properties, select Allow barge-in.
Save the topic.
Configure silence detection and timeouts
Silence detection lets you configure how long the agent waits for user input and the action it takes if the agent receives no input. Silence detection is most useful in response to a question at the node level or when the agent waits for a trigger phrase to begin a new topic.
You can configure the default timeouts for topics.
To override the defaults for a node:
Select the three dots (…) for the node, and then select Properties.
The Question properties panel opens.
Select Voice and make adjustments to the following settings:
Silence detection timeout option Description Use agent setting Node uses the global setting for silence detection. Disable for this node The agent waits indefinitely for a response. Customize in milliseconds The agent waits for a specified time before repeating the question.
Fallback action
You can configure some behaviors as a fallback action:
- How many times the agent should repeat a question
- What the reprompt message should say
- What the agent should do after a specified number of repeats
Speech input
For speech input, specify values for the following settings:
- Utterance end timeout: How long the agent waits after the user finishes speaking.
- Speech recognition timeout: How much time the agent gives to the user once they start responding.
To configure silence detection behavior when your agent waits for a trigger phrase, adjust the settings in the On silence system topic.
Add a latency message for long running operations
For long backend operations, your agent can send a message to users to notify them of the longer processes. Agents on a messaging channel can also send a latency message.
| Latency message audio playback | Latency message in chat |
|---|---|
| Continues to loop until the operation completes. | Sent only once when the specified latency is hit. |
In Copilot Studio, your agent can repeat a message after triggering a Power Automate flow:
Select the three dots (…) of the node, and then select Properties. The Action properties panel opens.
Select Send a message.
In the Message section, enter what you want the agent to say. Use SSML to modify the sound of the message. The agent repeats the message until the flow is complete.
You can adjust how long the agent should wait before repeating the message under the Delay section. Set a minimum amount of time to wait, even if the flow completes.
Configure call termination
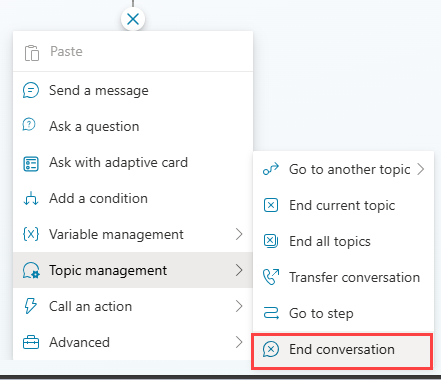
To configure your agent to end the call and hang up, add a new node (+) and select Topic management > End conversation.
Detect answering machines
You can configure your agent to detect an answering machine and leave a message with the agent user after the agent user's message finishes. The Answering Machine Detection system topic allows you to create a custom message for scenarios when your agent encounters a user's voice mail. In the Message node, define the message that's left when the agent encounters an answering machine.

Format speech synthesis with SSML
Use speech synthesis markup language (SSML) to change how the agent sounds when it reads messages out loud. For example, you can change the pitch or frequency of the spoken words, the speed, and the volume.
SSML uses tags to enclose the text you want to modify, similar to HTML. Use the following tags in Copilot Studio:
| SSML tag | Description | Link to speech service documentation |
|---|---|---|
<audio src="_URL to an audio file_"/> |
Add the URL to an audio file within the tag. The file must be accessible by the agent user. | Add recorded audio |
<break /> |
Insert pauses or breaks between words. Insert break options within the tag. | Add a break |
<emphasis> Text you want to modify </emphasis> |
Add levels of stress to words or phrases. Add emphasis options in the opening tag. Add the closing tag after the text you want to modify. | Adjust emphasis options |
<prosody> Text you want to modify </prosody> |
Specify changes to pitch, contour, range, rate, and volume. Add prosody options in the opening tag. Add the closing tag after the text you want to modify. | Adjust prosody options |
<lang xml:lang="xx-XX"> Text you want to modify</lang> |
Adjust the speaking language within the same message when using a multilingual neural voice. | Adjust speaking languages |
Note
When using the <audio src="_URL to an audio file_"/> tag, if you store the URL in a variable, encode the URL before inserting it into the audio src SSML tag in the message. Use the EncodeHTML Power Fx function to encode the URL when assigning it to a variable in the assign action.
Find and use a tag
SSML uses tags to enclose the text you want to modify, like HTML.
Use the following tags in Copilot Studio:
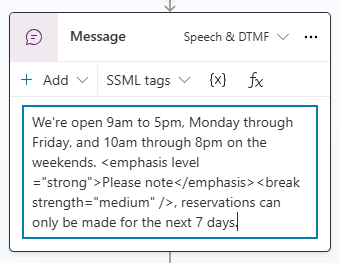
Select a Message or Question node. Change the mode to Speech & DTMF.
Select the SSML tags menu and select a tag.
The message box is populated with the tag. If you already have text in the message box, the tag's code is appended to the end of your message.
Surround the text you want to modify with the opening and closing tags. You can combine multiple tags and customize individual parts of the message with individual tags.
Tip
You can manually enter SSML tags that don't appear in the helper menu. To learn more about other tags you can use, see Improve synthesis with Speech Synthesis Markup Language.
Transfer a call to a representative or external phone number
You can set up the agent to transfer the call to an external phone number. Copilot Studio supports blind transfer to a PSTN phone number and the direct routing number.
Note
You can also use SIP X-headers to handle call transfers. For more information, see Configure SIP X-headers for voice-enabled agents.
To transfer to an external phone number:
In the topic you want to modify, add a new node (+). In the node menu, select Topic management and then Transfer conversation.
Under Transfer type, select External phone number transfer and enter the transfer number.
(Optionally) add a Session Initiation Protocol (SIP) User-to-User Information (UUI) header to the phone call.
This header is a string of
key=valuepairs, without spaces or special characters, displayed for external systems to read.Select the three dots (…) of the node, and then select Properties. The Transfer conversation properties panel opens.
Under SIP UUI header, enter the information you want to send with the call transfer. Variables aren't supported when transferring to an external phone number.
Caution
Only the first 256 characters in the string are sent. The header only accepts numbers, letters, equal signs (
=), and semicolons (;). All other characters, including spaces, braces, and brackets, or formulas aren't supported and can cause the transfer to fail.
Tip
Include a + in your phone number for the corresponding country code.
Transfer egress with SIP UUI for the target phone number must use direct routing. Public switched telephone network (PSTN) phone numbers don't support SIP UUI header transfers.
To transfer to a representative, see Explicit triggers.
Use voice variables
Copilot Studio supports the population of variables. You can use predefined variables or create custom ones.
Note
- For more information on how to use and create variables in Copilot Studio, see Work with variables.
- For information about other activity and conversation variables available for voice-enabled agents, see Variables for voice-enabled agents.
A voice-enabled agent in Copilot Studio supports context variables. These variables help you integrate your agent conversations with Dynamics 365 Contact Center when transferring a call.
For more information about context variables in Dynamics 365 Contact Center, see Context variables for Copilot Studio bots.
This integration supports these scenarios with the following variables when you transfer:
| Variable | Type | Description |
|---|---|---|
System.Activity.From.Name |
String | The agent user's caller ID |
System.Activity.Recipient.Name |
String | The number used to call or connect to the agent |
System.Conversation.SipUuiHeaderValue |
String | SIP header value when transferring through a direct routing phone number |
System.Activity.UserInputType |
String | Whether the agent user used DTMF or speech in the conversation |
System.Activity.InputDTMFKey |
String | The agent user's raw DTMF input |
System.Conversation.OnlyAllowDTMF |
Boolean | Voice ignores speech input when set to true |
System.Activity.SpeechRecognition.Confidence |
Number | The confidence value (between 0 and 1) from the last speech recognition event |
System.Activity.SpeechRecognition.MinimalFormattedText |
String | Speech recognition results (as raw text) before Copilot Studio applied its dedicated natural language understanding model |
Note
When you use the System.Conversation.OnlyAllowDTMF variable set to true, make sure that you use the following configuration:
- All Message nodes not expecting user input have barge-in turned off, or are followed by Question nodes with appropriate DTMF mappings.
- Avoid sending informational messages inbetween Question nodes when DTMF-only is turned on globally.
- Use a per-question DTMF mappings instead of a global DMTF-only confirguration for better control.
Informational messages sent while DTMF-only mode is turned on might cause the platform to generate empty DTMF grammar, leading to telephony errors. This is why it's recommended to use per-question DTMF mapping.