Note
Access to this page requires authorization. You can try signing in or changing directories.
Access to this page requires authorization. You can try changing directories.
When testing your bot, you need to consider both the contexts you want your bot to run in, and any functionality you add to your bot that requires data specific to Microsoft Teams. Ensure that the method you choose to test your bot aligns with its functionality.
Test by uploading to Teams
The most comprehensive way to test your bot is by creating an app package and uploading it to Teams. Uploading the app package to Teams is the only method to test the full functionality available to your bot, across all scopes.
There are two methods for uploading your app:
- Use Developer Portal for Teams.
- Create an app package manually, and then upload your app.
Note
To alter the manifest and re-upload your app, delete the bot before uploading the altered app package. To test the bot, enable custom app upload in Teams. See enable custom app upload.
We don't recommend uploading multiple apps with differing content under the same bot ID. This could lead to unpredictable bot behavior. Remove or uninstall any prior versions of the apps, ensuring only the latest version is uploaded. If the apps share the same bot ID, assign the necessary permissions in the app package. Additionally, activate both apps in the app permission policy and the managed apps, ensuring they aren't blocked. Failure to do so might result in issues during app usage.
Debug your bot locally
If you're hosting your bot locally during development, you need to use a tunneling service like ngrok in order to test your bot. After you download and install ngrok, add ngrok to your path, and run the following command to start the tunneling service:
ngrok http <port> --host-header=localhost:<port>
Use the https endpoint provided by ngrok in your app manifest.
Note
- If you close your command window and restart, a new URL is generated and you need to update your bot endpoint address to use it.
- Bots built through Microsoft Bot Framework must be accessible through the https endpoint, however the endpoint isn't exposed. The endpoint is linked only between Bot Framework and your internal address.
Test your bot without uploading to Teams
Occasionally, it's necessary to test your bot without installing it as an app in Teams. We provide two methods for testing the bot. Testing your bot without installing it as an app can be useful to ensure your bot is available and responding. However, it doesn't allow you to test the full breadth of Microsoft Teams functionality you've added to your bot. If you want to fully test your bot, see testing by uploading.
Use the Bot Emulator
The Bot Framework Emulator is a desktop application that permits bot developers to test and debug their bots locally or remotely. The emulator helps you to chat with your bot and inspect the messages that your bot sends and receives. This is useful to verify that your bot is available and responding. However, the emulator doesn't permit you to test any Teams-specific functionality you add to the bot. The responses from your bot aren't an accurate visual representation of how they're rendered in Teams. If you need to test either of these, it's best to upload your bot.
For more information, see complete instructions on the Bot Framework Emulator.
Talk to your bot directly by ID
Important
- Talking to your bot by ID is intended for basic testing purposes only. Any Teams-specific functionality you add to your bot fails to work.
- Users can't chat with bots that aren't connected to a Microsoft Teams app such as Azure bots created through the Bot Framework or Power Virtual Agents. We recommend you to create a new Teams app connected to the Azure Bot using the Developer Portal, publish it to Teams, and allow users to install the app using the app permission policies. If you want to test the app, you can assign users an app setup policy that allows uploading custom apps and chat with the Azure bot through a direct link to a chat.
Initiate a conversation with your bot by using its ID. When a bot is added through one of these methods, it isn't addressable in channel conversations, and you can't take advantage of other Teams app capabilities like tabs or message extensions. Initiate a conversation in one of the following ways:
On the Bot Dashboard page for your bot, under Channels, select Add to Microsoft Teams. Teams launches a personal chat with your bot.
Directly reference your bot's app ID from within Teams:
Go to Bot Dashboard > Details and copy the Microsoft App ID for your bot.
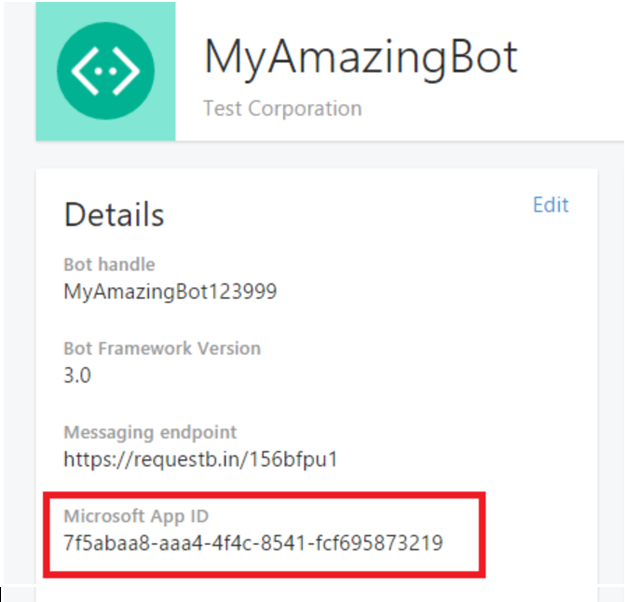
Open Microsoft Teams, on the Chat pane, select the New chat icon. In the To: filed, enter your bot's Microsoft App ID.

The app ID must resolve to your bot name.
Select your bot and send a message to initiate a conversation. Alternatively, you can paste your bot's app ID in the search box in the top left in Teams. In the search results page, go to the People tab to see your bot and to start chatting with it.
Note
For Teams to refer to your bot's app ID, enable custom app upload.
Your bot receives the conversationUpdate event as you add the bots to a team, without the team information in the channelData object.
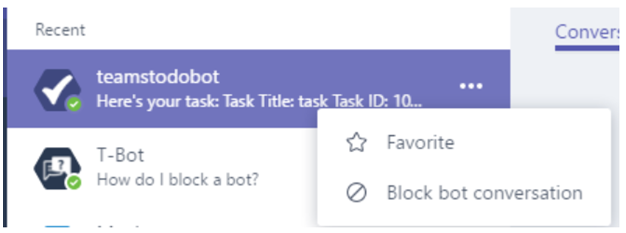
Block a bot in personal chat
Users can choose to block your bot from sending personal chat messages. They might toggle this by right-clicking your bot in the chat channel and choosing Block bot conversation. This means, your bots continue to send messages, however, the user doesn't receive the messages.
Remove a bot from a team
Users can delete the bot by choosing the trash-can icon on the bots list in their team's view. This only removes the bot from that team's use. Individual users can still interact in personal context. Users can't remove or disable bots in personal context.
Disable a bot in Teams
To stop your bot from receiving messages, go to your Bot Dashboard and edit the Teams channel. Clear the Enable on Microsoft Teams option. This prevents users from interacting with the bot, however, it's still discoverable and users can add it to Teams.
Delete a bot from Teams
To remove your bot completely from Teams, go to your Bot Dashboard and edit the Teams channel. Choose the Delete button at the bottom. Deleting a bot from Teams prevents users from discovering, adding, and interacting with your bot. Deleting a bot from Teams doesn't remove the bot from other user's Teams instances, however, it stops functioning for them as well.
See also
Collaborate with us on GitHub
The source for this content can be found on GitHub, where you can also create and review issues and pull requests. For more information, see our contributor guide.
Platform Docs