Events
Take the Microsoft Learn AI Skills Challenge
Sep 24, 11 PM - Nov 1, 11 PM
Elevate your skills in Microsoft Fabric and earn a digital badge by November 1.
Register nowThis browser is no longer supported.
Upgrade to Microsoft Edge to take advantage of the latest features, security updates, and technical support.
Power Apps can connect to Azure Blob Storage. You can upload files such as Word, Excel, or multimedia images, audio or video using the Azure Blob Storage connector for Power Apps.
When you design a canvas app that connects to Azure Blob Storage, the app uses the blob storage account name and key to connect. After you share the app with others, users can use the connection configured inside the app to upload files to Azure Blob Storage without the need to share blob storage name and keys with the app users.
In this article, you'll learn how to create a sample canvas app that connects to Azure Blob Storage, and add controls to the app that allow you to upload different types of files to the connected blob storage.
Note
To learn more about other types of cloud storage options with Power Apps (such as OneDrive, OneDrive for Business, Google Drive, Dropbox, or Box), go to Connect to cloud storage from Power Apps.
Before you begin, create and configure a BlockBlobStorage account. You can also use legacy BlobStorage account, though not recommended. More information: Types of storage accounts in Azure Blob Storage
Power Apps requires a connection to Azure Blob Storage to be created for the app to connect to the storage.
To create the Azure Blob Storage connection:
Sign in to Power Apps.
On the left-pane, expand Data.
Select Connections.
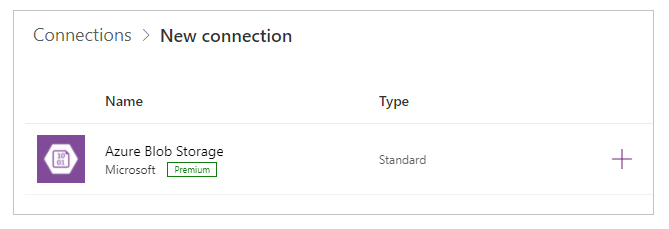
Select New connection.
Select Azure Blob Storage.
Copy and paste the account name, and access key.
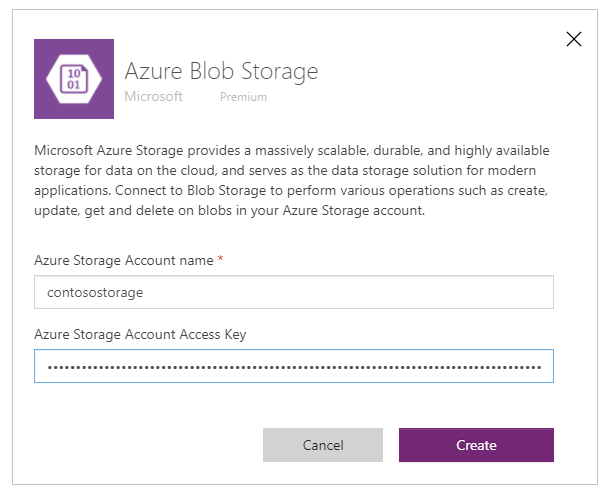
For more information about how to copy account name and access key, go to View account access keys in Azure.
Select Create.
Your connection to the Azure Blob Storage is now configured and ready to use with canvas apps.
Now that you have the connection with Azure Blob Storage created, let's create a canvas app that connects to this storage.
Note
In this section, you'll create a sample app with sample controls, functionality and layout design. Depending on your business requirement, you can create the app with a different structure, or customize differently.
Create a blank canvas app with the name "Sample app for Azure Blob Storage" and Phone layout.
Inside Power Apps Studio, on the left-pane, select  .
.
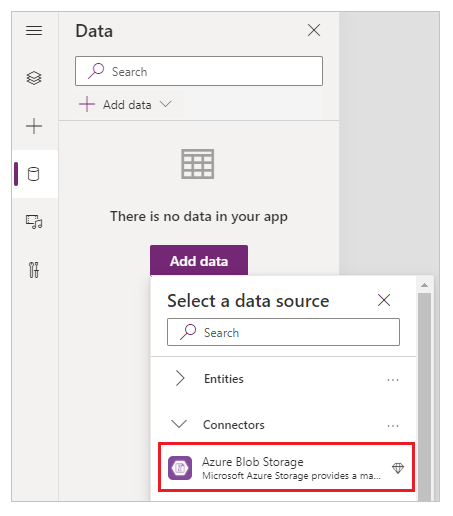
Select Add data.
From the list of connectors, select Azure Blob Storage.
Now that you have the app connected to Azure Blob Storage, let's add galleries to see containers and files within the containers from the connected storage.
Select Insert -> Gallery -> Blank vertical.
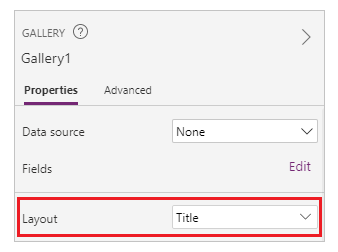
From the right-side of the screen, on the property pane, select the layout drop-down and choose Title.
Select first ![]() inside the gallery, and delete it.
inside the gallery, and delete it.
![]()
From the right-side of the screen, on the property pane, select the drop-down for data source, and choose Azure Blob Storage.
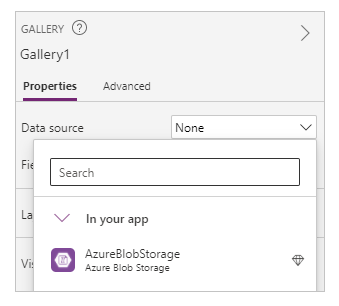
Set the Items property of the gallery to:
AzureBlobStorage.ListRootFolderV2().value

This operation lists blobs in the Azure Blob Storage root folder. More information: List blobs in root folder
Select Insert -> Gallery -> Blank vertical to add another blank vertical gallery.
Move the gallery below the gallery you added earlier that shows the list of containers.
From the right-side of the screen, on the property pane, select the layout drop-down and choose Title, subtitle, and body.
Select first ![]() inside the gallery, and delete it.
inside the gallery, and delete it.
From the right-side of the screen, on the property pane, select the drop-down for data source, and choose Azure Blob Storage.
Set the Items property of the gallery to:
AzureBlobStorage.ListFolderV2(Gallery1.Selected.Id).value
This operation lists blobs in a container. More information: List blobs
Note
Gallery1 in this formula is the reference to the gallery added earlier that lists all containers in the storage account. Update the formula with the gallery name if different.
From the right-side of the screen, on the property pane, select Edit for Fields.
Change the selected fields for the gallery title as DisplayName, subtitle as LastModified, and body as Path.
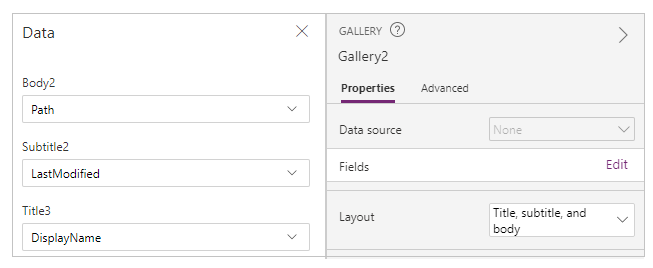
The gallery now shows the list of files from the container selected using the gallery on the top.
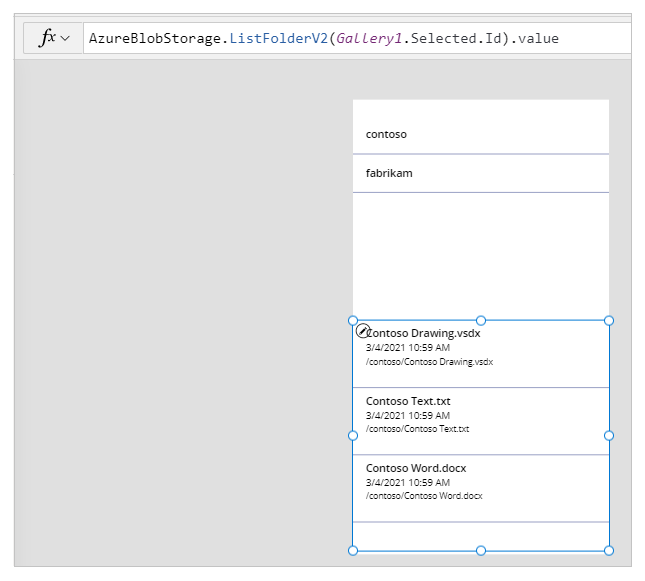
Select Insert -> Text label.
Place the label on top of the app screen.
Set the label's Text property as "Select a container".
Use the properties pane on the right-side of the screen and choose the label text color, size, and label text background color of your choice.
Select Insert -> Text label.
Place the label above the gallery with the list of files.
Set the label's Text property as "Files list".
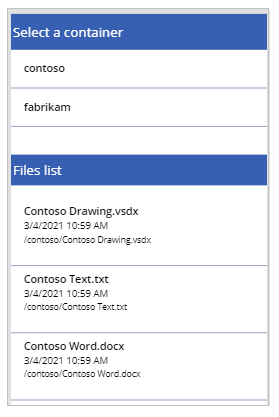
With the app design so far, you're able to select a container and then list the files from the container.
Let's configure the app with controls and logic to allow upload of files to the connected Azure Blob Storage.
Select Insert -> Media -> Add picture to add the ability to select files to upload.
Resize the Add picture control and place it on the bottom-left of the app screen.
Set the Text property of the control to "Select a file to upload".
Select Insert -> Button.
Place the button on bottom-right side of the app screen.
Set the Text property of the button to "Upload".
Select Insert -> Text input.
Place the text input control above the Upload button.
Set the Default property of the button to "Enter File Name".
Set the OnSelect property of the button to:
AzureBlobStorage.CreateFile(Gallery1.Selected.Name,TextInput1.Text, UploadedImage1.Image)
This operation uploads a blob to Azure Blob Storage. More information: Create blob
Note
Gallery1 in this formula is the reference to the gallery added earlier that lists all containers in the storage account. The file will be uploaded to the selected container in gallery 1. TextInput1 and uploadImage1 reference the text input and upload image controls. Update the formula with the control names if different.
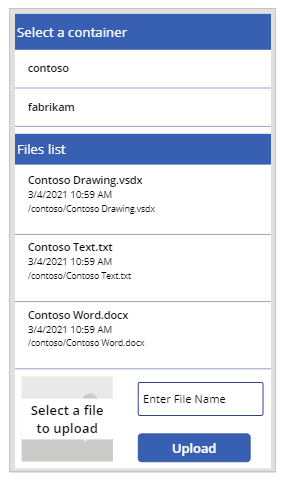
The app controls look like this in the sample app now.
Tip
Ensure you select All files when using the upload option to ensure all file types are visible in the file explorer dialog box.
So far you've added the ability to view containers, files from the selected container, and the option to upload files to the storage. Now, let's understand how to work with the download capability with the connected storage.
Select the first row in the gallery with the list of files from a container.
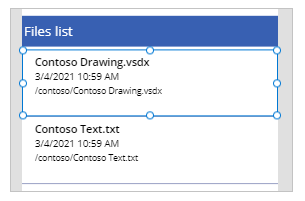
Select Insert -> Icons -> Download. This adds the download icon for all rows in the gallery.
Move the first download icon towards the right side inside the gallery on the app screen. This also moves the rest of the icons for the next rows in the gallery.
![]()
Set the OnSelect property of the download icon to:
Launch(AzureBlobStorage.CreateShareLinkByPath(ThisItem.Path).WebUrl)
This operation creates a SAS link for a blob using the path. More information: Create SAS URI by path
Important
SAS URI created using CreateShareLinkByPath has a default expiry of 24 hours. If you have a business requirement to expire the URI in a shorter or different time, consider updates to this formula. For example, the below sample expires the URI in 1 hour using Now() and DateAdd() functions.
Launch(AzureBlobStorage.CreateShareLinkByPath(ThisItem.Path,{ExpiryTime:DateAdd( Now(),1)}).WebUrl)
Tip
For more information about configuring Azure Blob Storage for public anonymous access, and different public access levels, go to Configure anonymous public read access for containers and blobs.
The app now has the ability to allow you to download the files.
Play the app to test, and verify the app works as expected. After the testing, ensure you save and publish the app before you close Power Apps Studio. And then, you can share the app with others within your organization, or guests outside your organization.
In this section, you'll learn about optional and additional customizations that you can consider for your app.
You can use Media type, or Path fields for the gallery to optionally display the image content in the respective controls. For example, PDF viewer for PDF files, Image for images, or Audio/video for audio/video files.
For example, to filter the files with the file extension type of .pdf, use the following sample formula.
If(".pdf" in Gallery2.Selected.Path, AzureBlobStorage.GetFileContent(Gallery2.Selected.Id))
Similarly, you can use different file extension types, or media types to additionally customize added controls.
The Azure Blob Storage connection doesn't refresh data inside the galleries automatically when the data is updated. If you have more than one container, you can select the other container and then, select the previously selected container back to refresh the connected gallery to display the changes.
Another method that can be considered is to use a collection for the first gallery, and then, use the function ClearCollect to refresh the collection.
For example, the following formulas allow you to update the collection for the top containers list in the first gallery, and update the second gallery when the upload button is selected, or when the screen appears (OnVisible screen property).
Set the Items property of the first gallery for the list of containers to "TopLevelList".
Append to the upload button OnSelect property:
ClearCollect(TopLevelList, AzureBlobStorage.ListRootFolderV2().value)
Add to the screen OnVisible property:
ClearCollect(TopLevelList, AzureBlobStorage.ListRootFolderV2().value)
You can't use Microsoft Excel as the data source when the file is stored in Azure Blob Storage. To use Excel as the data source, use the other cloud storage connectors (such as OneDrive, OneDrive for Business, Google Drive, Dropbox, or Box). More information: Connect to cloud storage from Power Apps
Events
Take the Microsoft Learn AI Skills Challenge
Sep 24, 11 PM - Nov 1, 11 PM
Elevate your skills in Microsoft Fabric and earn a digital badge by November 1.
Register now