Create an app to view a shape in mixed reality
You can use the View Shape in MR control in your app to let users see if a simple cube might fit within a specified space. They might want to do this to see how a certain object that you provide would fit in their space. If you have a 3D model or a head-on picture for the object, you'd like to fit test consider using the View in MR instead.
The control creates a button in your app. When app users select the button, it overlays a cube onto the live camera feed of the device. You set up the dimensions of the cube when you edit the control in Power Apps.
Watch this video to learn how to build mobile apps with View Shape in MR control:
In this article, we'll create a screen in an app that will allow users to create a custom cube shape by inputting unit to be used (centimeters, feet, inches, or meters), and defining the height, width, and depth of the cube.
Prerequisites
See prerequisites for mixed-reality capable devices.
Add controls for cube’s dimensions and units
Add header and labels to define cube's dimensions and units to the app screen.
Header label
With an app open for editing in Power Apps Studio, add a text label to the screen. Position it at the top-left corner of the screen and modify the following properties in the Properties tab:
| Property | Value |
|---|---|
| Text | "Place A Cube" |
| Font size | 24 |
| Font weight | FontWeight.Semibold |
| Text alignment | Align.Center |
| Width | Parent.Width |
Then in the Advanced tab, modify the following properties:
| Property | Value |
|---|---|
| Color | RGBA(255, 255, 255, 1) |
| Fill | RGBA(56, 96, 178, 1) |
This change will provide a header for the screen.
Labels and controls to specify cube properties
Add four text labels to the screen. These labels will be used to identify the controls we'll add later. For each label, modify the Text property to one of the following:
Unit TypeWidthHeightDepth
Set the Width property of these labels to 160 and position them so they're stacked vertically in the order described above, near the top of the screen and to the left side.
Add a dropdown control and three text entry controls. The dropdown will be used to select a unit type for the cube dimensions and the three text entry controls will be used to enter the width, height, and depth of the cube.
Select the drop-down, rename it to drpUnitType, and change the following properties:
Property Value Items ["Centimeters", "Feet", "Inches", "Meters"]Default "Feet"Width 280Position the control to the right of the Unit Type label.
Add three text input controls, and rename them to txtShapeHeight, txtShapeWidth, and txtShapeDepth. Change the following properties for all three controls:
Property Value Default 2Format TextFormat.NumberWidth 144Position the text input control named txtShapeWidth to the right of the Width label. Likewise, position the controls named txtShapeHeight and txtShapeDepth to the right of the Height and Depth labels, respectively.
Next, you'll add the View Shape in MR control and configure it to use the controls that were created to provide dynamic dimensions to the MR cube it'll generate.
Insert the View Shape in MR control
Insert the control into your app.
Open the Insert tab.
Expand Mixed Reality.
Select the control View Shape in MR to place it in the center of the app screen, or drag and drop it to position it anywhere on the screen.
Once the control has been added, position it near the bottom of the screen and change the following properties:
Property Value Text "Place a cube"ShapeWidth txtShapeWidth.TextShapeHeight txtShapeHeight.TextShapeDepth txtShapeDepth.TextUnits drpUnitType.Selected.ValueWidth 280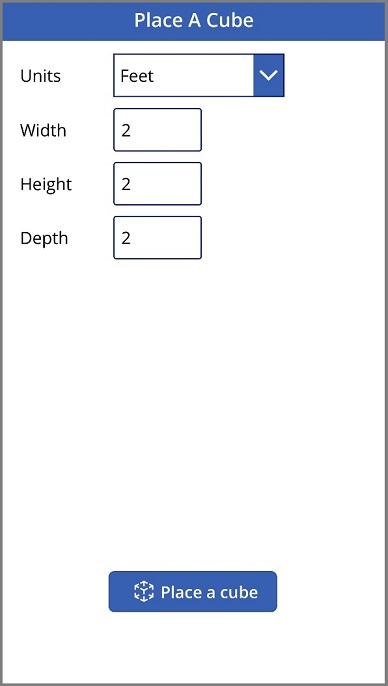
Test the app
Now that all the controls have been added, save and publish the app. On a mixed-reality capable device, open the app, and press the Place a cube button. This will open the View Shape in MR experience, allowing the user to define an area to be measured.
Follow the on-screen instructions to calibrate the device by slowly moving it left and right while pointing the camera at a surface to be measured. Once the calibration is complete, you'll see an array of dots on the surface and a circle near the center of the screen. This circle shows where the cube can be placed initially. Once the cube has been placed, it can be moved or rotated by using touch controls.
To move the cube, press on it and slide it to where you would like it to be placed. To rotate the cube, press one finger to the screen, and then swipe with another finger right or left.
Use the back button in the top-left corner to return to the app screen and change one or more of the width, height, depth, or unit type settings. Select the Place a cube button and place the new cube.
See also
Feedback
Coming soon: Throughout 2024 we will be phasing out GitHub Issues as the feedback mechanism for content and replacing it with a new feedback system. For more information see: https://aka.ms/ContentUserFeedback.
Submit and view feedback for