Note
Access to this page requires authorization. You can try signing in or changing directories.
Access to this page requires authorization. You can try changing directories.
Use the modern app designer to enable your model-driven apps for offline use on a mobile device. When offline mode is enabled, users interact with their data without internet connectivity on the Power Apps mobile app.
Prerequisites
Verify the following prerequisites before you enable mobile offline:
You need the environment maker, system administrator, or system customizer role to configure offline mode for model-driven apps. These roles have Create, Read, Write, Delete, and Share privileges on the Mobile offline profile table. For more information, see About predefined security roles
Users with the basic user role can open and use an offline app. This role has the Read privilege for the Mobile offline profile table.
If you have a custom security role, ensure you have the read privilege for the Mobile offline profile table. For more information, see Miscellaneous privileges
Optimize your app for mobile offline
Mobile apps run on smaller screens with limited connectivity. Before you enable offline mode, make sure your model-driven app is optimized for offline and mobile use. Consider the number of user scenarios that you want to cover and the amount of data the app uses. Create an app that's simple and lightweight.
If you have desktop and remote mobile users, optimize the user experience by creating two separate apps. Create an online app for your office users and another app for your mobile users who might have limited connectivity.
Follow these best practices when building an app for mobile offline use:
Identify the on-the-go scenarios that functionally relate, such as tasks performed by users working in the field.
Reduce the complexity of your app by limiting the amount of app metadata that needs to be downloaded on a user's device. Only add the tables and views that are needed for your mobile users. For more information, go to Add a page to your app
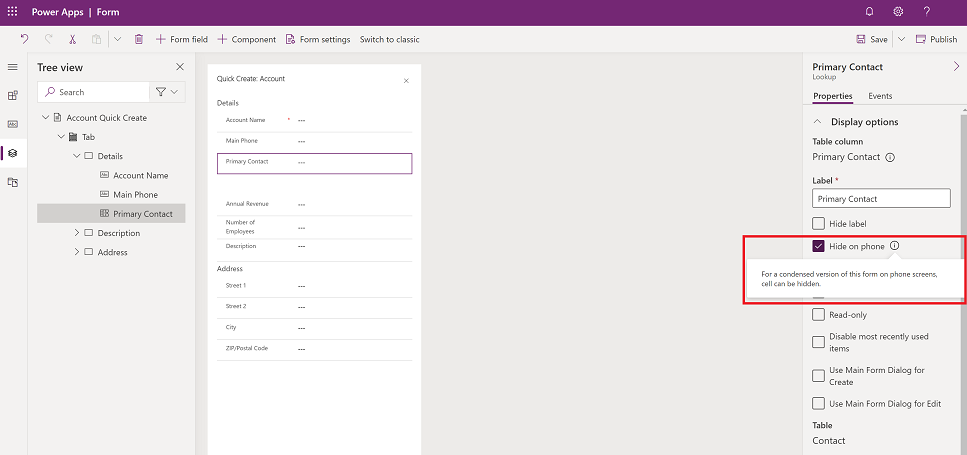
Only keep views that are necessary, and remove any that aren't needed on a day-to-day basis. For example, keep the My active accounts view and remove the All accounts view. Keep your forms lightweight for a smooth and intuitive experience on small-screen devices. The following are possible optimizations for forms on mobile:
Build dedicated forms for mobile use.
Share forms across the mobile and desktop experience, but disable some fields on mobile.
Enable your app for offline use
Sign in to Power Apps.
On the left pane, select Apps, and then select the model-driven app that you want to enable for offline.
Select More (...) > Edit to open the modern app designer.
On the command bar, select Settings.
On the General tab, set the Can be used offline toggle to On.
Select the type of offline profile: Default or Restricted to selected users.
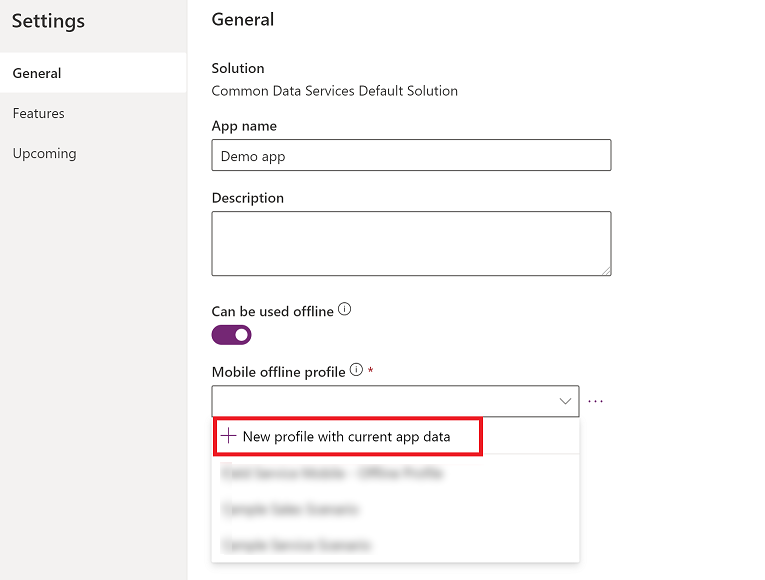
If you select Default, the app is enabled for offline use for all users. Select an existing offline profile, or select New profile with current app data. To set up a new offline profile, see Set up a mobile offline profile.
If you select Restricted to selected users, the app is enabled for offline use only for a selected list of users. Select one or multiple offline profiles, or select New profile with current app data. To set up a new offline profile, see Set up a mobile offline profile.
You must have admin privileges to assign users to an offline profile.
Close the Settings page, and then save and publish your app. When you're done, the app is set up for offline use.
Set up a mobile offline profile
The mobile offline profile represents the dataset that syncs on a user's device. The profile contains the tables, including related filters, that are applied when data is synced to a user's device. For more information about offline profiles, see Offline profile guidelines.
If the offline profile is in advanced mode, you'll need to add users to the offline profile. If you don't add a user to the offline profile, the user can't use the app in offline mode.
Enable a table for offline
A table needs to be enabled for offline to add it to an offline profile. Some tables are enabled for offline by default. Follow these steps to verify whether a table is enabled for offline.
Sign in to Power Apps.
In the left pane, select Data > Tables.
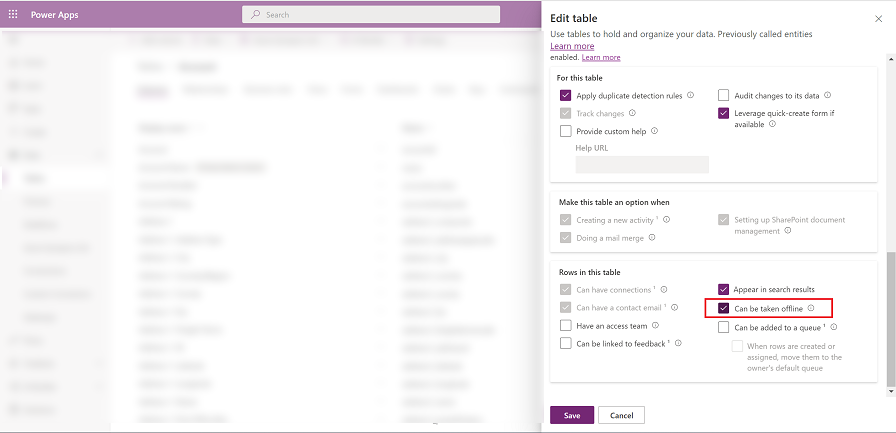
Select the table that you want to add to an offline profile, and then, on the command bar, select Settings.
In the Edit table settings, select Advanced options, and in the Rows in this table section, select Can be taken offline.
An app can only be linked to one profile. However, a profile can be shared between multiple apps. This can be useful when multiple apps share the same dataset, as it only needs to be downloaded once on the device and is shared between the apps.
Generate a default profile
The modern app designer generates a default offline profile based on how the app is configured.
The default offline profile is a starting point to help you quickly build an offline profile. The default profile doesn't compute the optimal filters for each table. It's important that you review and adjust the proposed filters based on your organization's needs.
Select New profile with current app data.
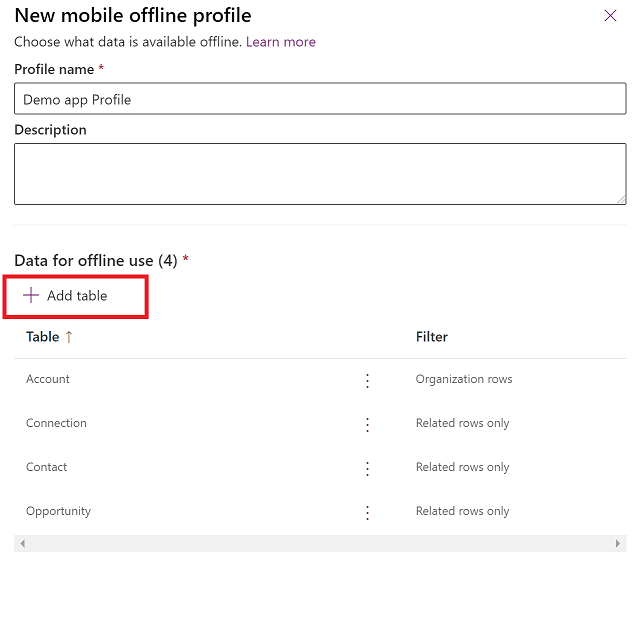
Review the proposed filters for each table. Make sure that the data downloaded on users' devices is limited to only what's necessary. Focus on the tables used most often in your app, which in most cases have the Organization rows filter set.

The tables that are added to the profile also have the Related rows only filter. These are tables used in certain views that require related information. You might not need to modify them according to your organization's needs.
Add a table to an offline profile and apply filters
Applying an appropriate filter for each of the tables configured in the offline profile is critical to limiting the amount of data that downloads on users' devices.
Be sure that you configure at least one of the profile rules for each table to download its data.
| Customization | Recommendation |
|---|---|
| Organization rows - if selected, then select at least one of these options: - User's rows - Team rows - Business unit rows |
If you want to define this filter, then you have to pick at least one of the given options. It's highly recommended to not have a business unit-level filter for a table, unless there's a strong justification. It's recommended for a master data scenario with a large data set, like a price list. |
| All rows | If you're selecting this filter, you can't define any other filter rules. |
| Related rows only | Be sure that the related table has been added to the offline profile. |
| Custom | You can define a custom filter up to three levels deep. |
Keep in mind that you can have 15 related tables in a custom filter. You can also have 15 relationships. These are distinct checks that might not add up. The 15-relationships limit is transitive, meaning if table B has N relationships, and you add a reference to table B in table A, then it increases the relationship count of A by N+1; one plus the N already in table B. This limit is per profile item for a table in the profile.
Select Add table.
Choose a table, and then define the filters.
Set the following filters:
Choose the rows that you want to make available offline. For the Custom option, use the expression builder to set up advanced conditions.
Relationships lists the different relationships available between the current table and other tables added in the offline profile. Selecting a relationship ensures that related rows following that relationship are downloaded and made available offline.
Files and Images define which columns for a file or image need to be downloaded offline. For files, you can choose to download every column or none at all. For images, you can select each column you want to download granularly.
Sync interval defines the sync frequency to be applied on the device to sync the data with the server. If a table's data doesn't change frequently, like a catalog or a product table, you might want to focus on only syncing data when necessary, such as refreshing only once a day.
You can only have up to 15 related tables in a profile. If you exceed the limit, you get an error and won't be able to publish the offline profile.
Select Add + save to add your table and filters to the profile.
When all tables are properly configured for the profile, select Done > Publish your application.
When the app is published, the app is enabled for offline use.
Add users to an offline profile
If you selected the Default offline profile mode, all your users who have access to the app can also use it in offline mode.
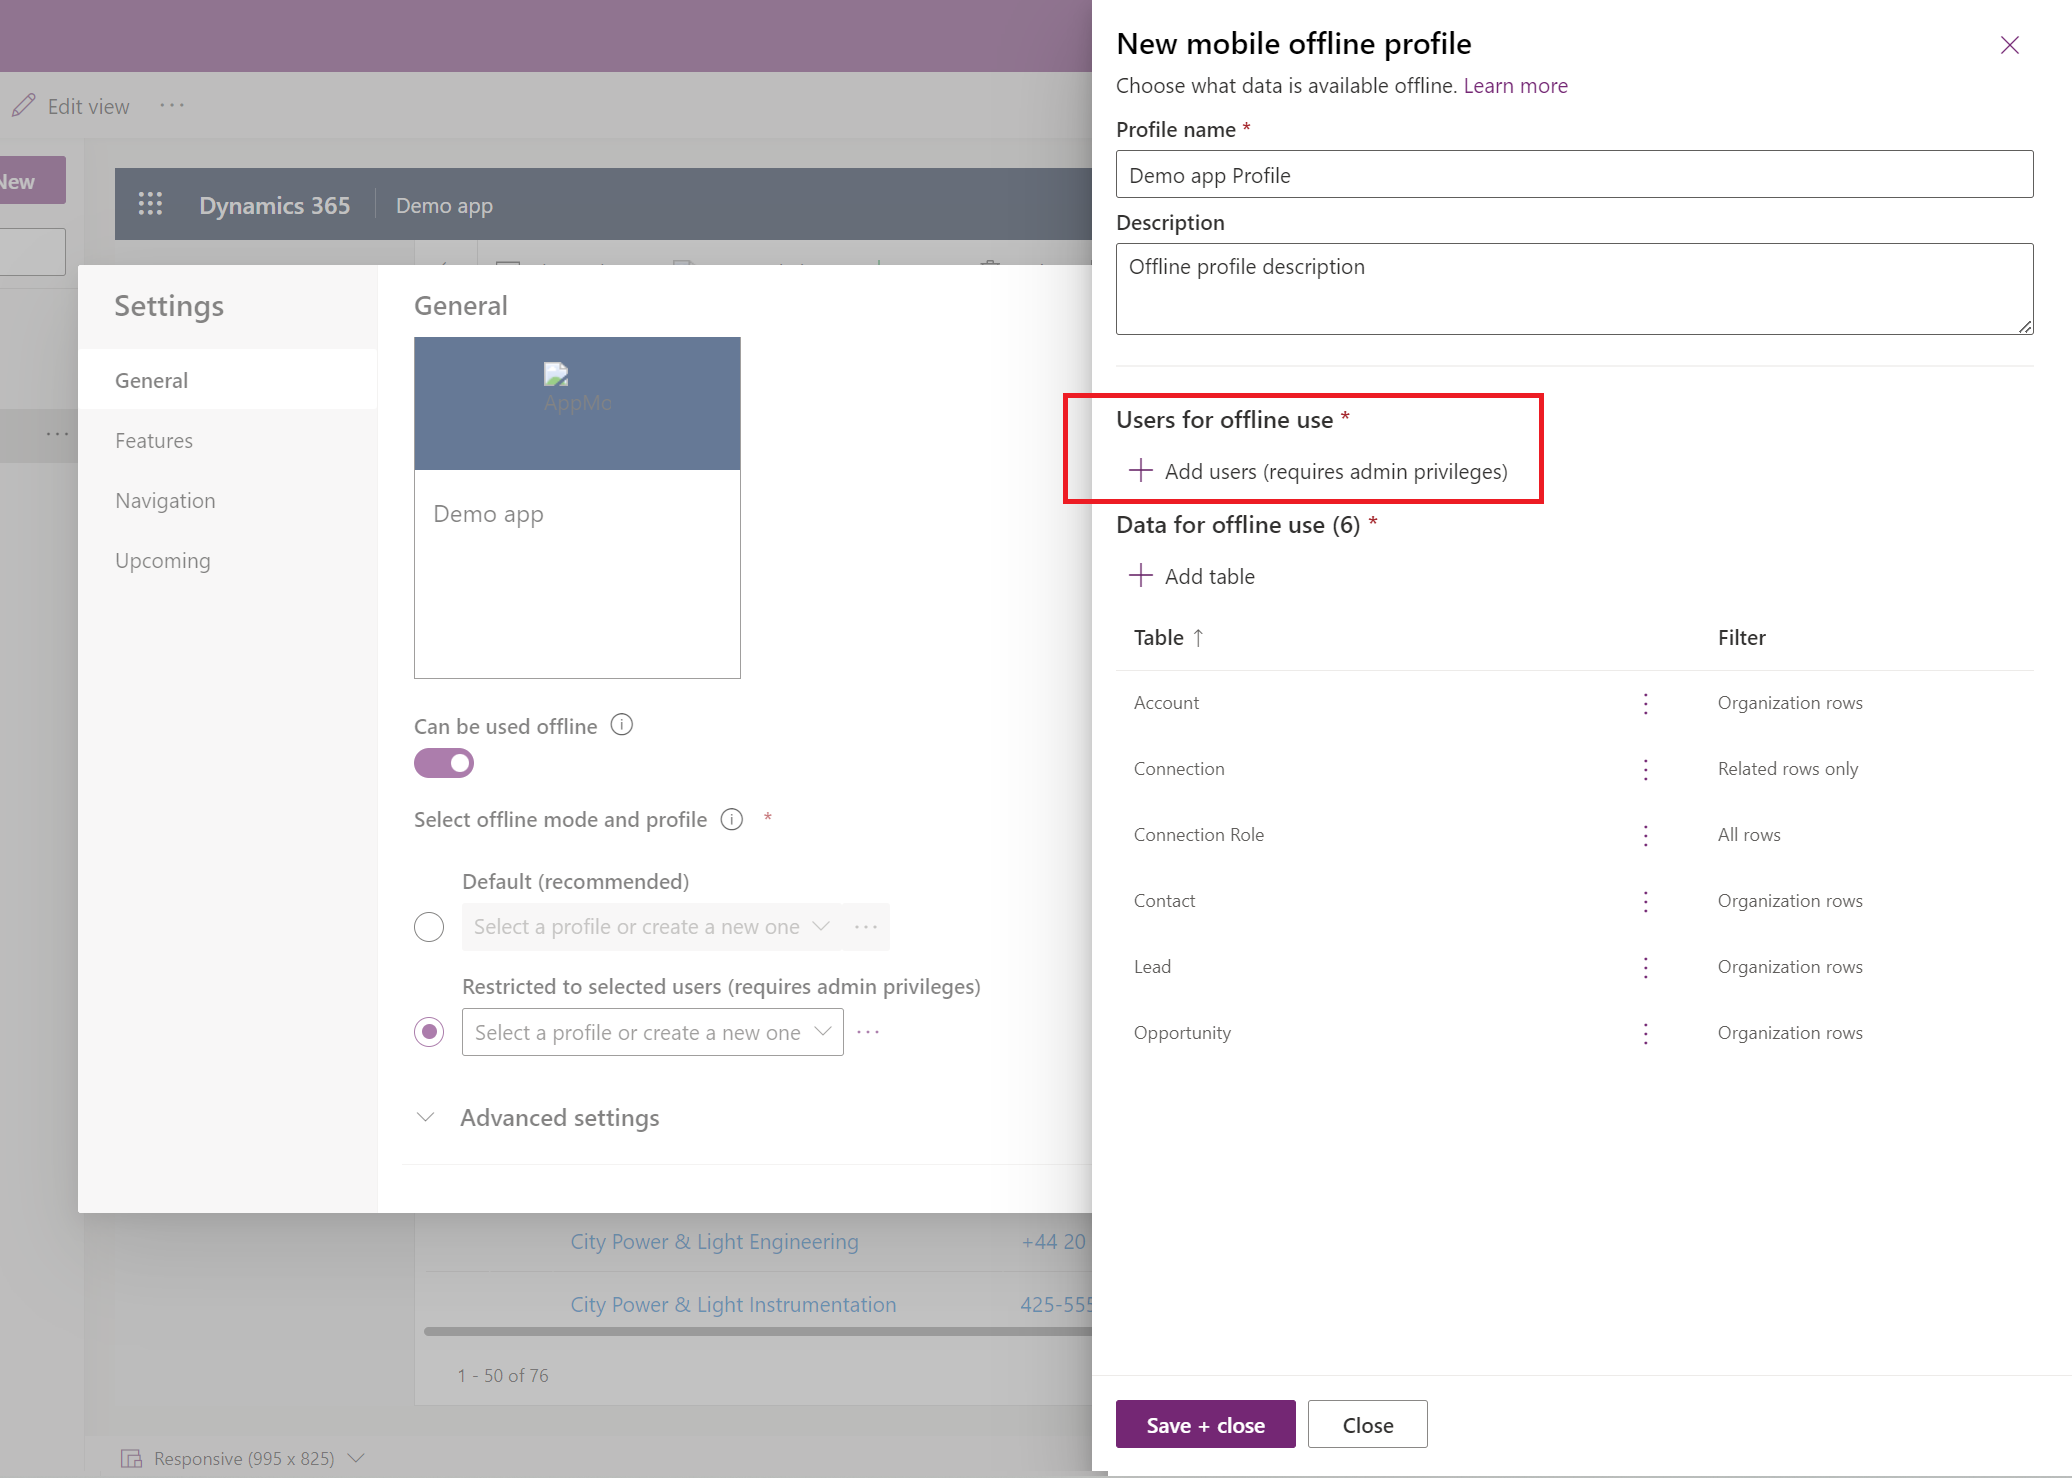
However, if you selected Restricted to selected users, you have to manually add users (requires admin privileges) to the offline profile. The app is enabled for offline use only for those configured users.
Select Add users (requires admin privileges).
Sign in to the Power Platform admin center.
In the Users with offline access area, select Add users.
Select the users that you want to add to the mobile offline profile. The users that are added, based on teams, are listed under each team. Users that are added individually are listed as individual users.
When you're done adding people, select Save.
If you made any changes to a Microsoft Entra ID group team, you must remove and add the team back to the mobile offline profile for the changes to take effect.
Enable mobile offline classic
Offline-first is the default mode when you enable an app for offline use. If you want to switch to the offline classic mode, you need to enable it for your model-driven app. It's a separate app setting for each app.
Sign in to Power Apps.
On the left pane, select Apps, and then select the model-driven app that you want to enable for offline.
Select More (...) > Edit to open the modern app designer.
On the command bar, select Settings.
On the Features tab, set the Enable offline classic toggle to Yes.
Select Save and then publish the app.
Define sync settings on mobile
You can allow users to control the automatic sync intervals or the connection type to synchronize the data.
On the command bar, select Settings.
Select the Upcoming tab:
- Set the Allow users to adjust sync frequency option to On to adjust the sync interval to sync more or less frequently depending on individual needs. Users can choose to not automatically sync, if they only want to sync on demand.
- Set the Allow users to sync on Wi-Fi only option to On to let users choose if their automatic sync happens on cellular networks and Wi-Fi connections or only when connected to a Wi-Fi network.
Turn on Online mode
Offline-first mode provides the best experience for users in no and low network conditions. Once your data is synchronized, you work with the data on your local device regardless of the network status. However, if your offline profile includes filters, you may not be able to access all the data you could when online in a browser, even when your device is connected to the network.
If it's important for users to access data that's not downloaded to their devices, you can activate the Online mode toggle that's visible to users in the Device status page. When users use the Online mode toggle, they can access data that's not synchronized to the local device. The toggle can be activated only when the device is connected to a network.
- On the command bar, select Settings.
- Select the Features tab.
- Set the Allow users to work in online mode option to On to let users choose if they want to use the app in online mode when connected to a network.
Supported capabilities
Business rules: Business rules are supported in mobile offline. For more information, see Create business rules to apply logic in a model-driven app form.
Business process flows: You can use business process flows in offline mode if the following conditions are met:
- The business process flow is used in an app that you can run on Power Apps mobile.
- The Power Apps mobile app is configured for offline use.
- The business process flow has a single table.
- The business process flow table is added in the offline profile.
Note
If a table is associated with multiple business process flows, in order for any of the business process flows to work offline, all the business process flows must be added to the offline profile.
Three commands are available for business process flows when you run an app in offline mode on the Power Apps mobile app:
- Next stage
- Previous stage
- Set active stage
For more information, see Run business process flows offline.
Lookup support: Lookups are supported for the tables that are configured for mobile offline. All the tables participating in the lookup should also be configured for offline use.
Notes on the Timeline control: Notes on the Timeline control are available in offline mode. You can take pictures, read notes, and add/remove attachments in offline mode. You need to add the Note table using the Related rows only option and the User (systemuser) in the offline profile.
Note
The Date field isn't available for mobile offline search.
Custom tables: These commands are available to edit the form: Mark Complete, Refresh, Convert To Opportunity, and Delete.