Note
Access to this page requires authorization. You can try signing in or changing directories.
Access to this page requires authorization. You can try changing directories.
Work queue processing refers to the management of a list of work items that need to be completed in a particular order. This list contains information about each item, such as its name, priority, expiration date, status, and the actual value to be processed.
Ways to process work queues:
Desktop flow-based processing in Power Automate desktop (PAD).
Using Dataverse pro-developer features (for advanced integration scenarios only):
Learn more about Dataverse's pro-code tooling: Dataverse developer documentation.
Processing walkthroughs
To showcase some of the available processing options, here are three different processing scenarios.
Desktop flow-based work queue processing in Power Automate desktop (PAD)
Process work queue items & Update examples
The first step to using work queue actions in Power Automate desktop is to create a work queue in the environment that you're working in and load some queue items with data to be consumed downstream. Queue items can be loaded into a work queue through a desktop flow, cloud flow or in bulk as outlined here, which populates queue items. In this example, some queue items have been added manually into a work queue to explain how actions in Power Automate desktop can be used.
The work queue items have been created and the value field includes text in JSON format that will be used downstream in the desktop flow.

The example flow we'll be using to demonstrate work queue action usage mimics a process that would consume a work queue item from the cloud, process the data included in the value field and convert it to a custom object to be processed downstream. Note that it isn't mandatory to use JSON or custom objects as values for your work queue items, but it can be a useful method for organizing values that have multiple properties and follow a specific schema.

- The Process work queue items action is used to designate which work queue to consume items from and process in your desktop flow. The action can be configured to select a work queue from a list using the dropdown arrow, pass a variable including the queue name. When run, this action works by bringing in the first (oldest) item from the work queue into your flow that contains a status of queued. Once the queue item begins processing in your flow, its status automatically changes to processing.
Note
If you're using a variable to dynamically select the work queue, use the ID of the work queue as input. The work queue ID is available under Advanced details of the work queue details page.


- A breakpoint (red dot) was set by clicking next to action 3 in the flow and then run through the PAD console. When the process pauses at the breakpoint, the WorkQueueItem variable can be opened by double clicking the populated value under Flow variables and this shows all the properties associated with the work queue item being processed.
Note
The WorkQueueItem variable shows the information of the current work queue item when there are remaining items to process. If there are no more work queue items to process and the action is complete, it shows the information of the last work queue item.

In action 2 of the flow, I converted the returned JSON value, which in this case is accessed via %WorkQueueItem.Value% into a custom object. The reason for this is because it helps parse the JSON and use the JSON properties downstream in your flow. In this hypothetical case, the info would be used to make entries into Farbrikam’s finance portal.
{
 "InvoiceId": "I-1006",
 "InvoiceDate": "06/04/2023",
 "AccountName": "Fabrikam",
 "ContactEmail": "invoicing@fabrikam.com",
 "Amount": 1253.78,
 "Status": "Paid",
 "WorkQueueKey": "Vendor Invoices",
 "ComponentState": 0,
 "OverwriteTime": "1900-01-01T00:00:00"
}
For instance, let's say there was a requirement to enter the invoice ID into a field of a finance system as part of a process where you're automating the UI of a web or desktop app – you can call that value using %JsonAsCustomObject.InvoiceId% to populate a text field and push a button.
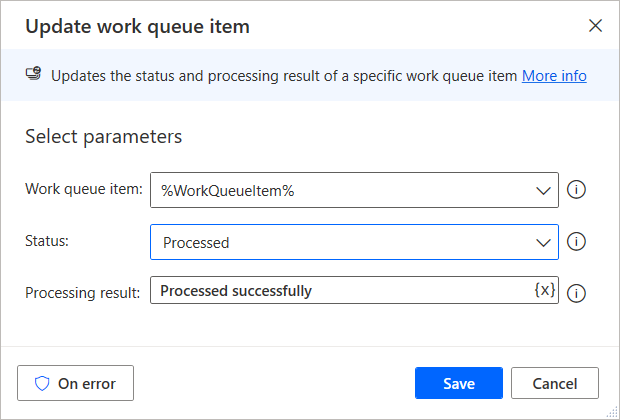
Moving along, this example contains some conditional statements once it completes processing the steps and uses the data from the custom object within the subflow Fabrikam Data Entry. If the process runs end-to-end without encountering any input system related exceptions the Update work queue item action is used to change the status of the work queue item to Processed and the processing result field can be used to input some optional notes. If the expires field is left blank, the new queue item retains the Items expire after value defined in the work queue properties.
Note
If work queue items are stuck in the processing state because a desktop flow fails to complete, use a cloud flow to retrieve and update the work queue items.
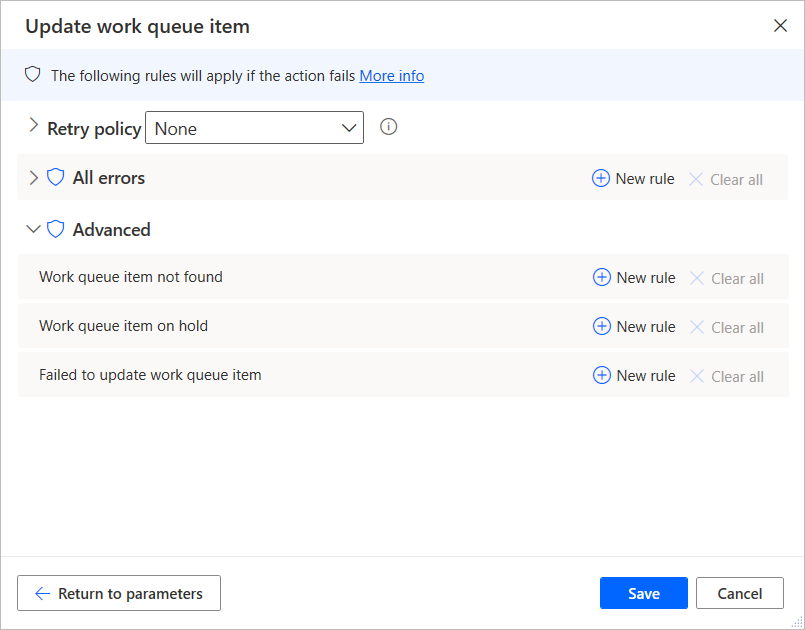
Exception handling options can be configured by clicking on error in the update work queue item action configuration window. Three options are available for customization under the advanced tab. Work queue item not found might occur if the work queue item is removed from the queue, either manually or through another systematic process, before it finishes processing in PAD. Work queue item on hold might occur if an automated process, or somebody changes the status of the work queue item being processed to on hold in the flow portal while the queue item is being processed. Failed to update work queue item might occur if the queue item no longer exists in the queue, or has been placed into the status on hold. All the above are edge cases, which might occur - learn more about handling errors in desktop flows here.
If some issue was determined during processing the data of the work queue item into the data entry system, the item could alternatively be assigned a status of generic exception, IT exception, or business exception. These exceptions statuses are available to be used when, or if, your automated use case meets criteria, which might apply.
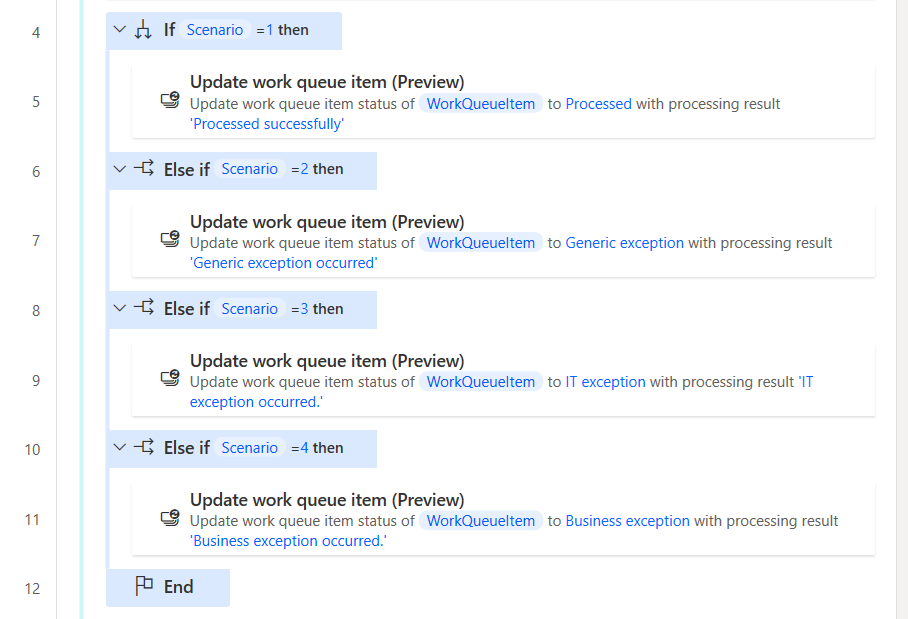
Let’s say that while processing a queue item, scenario 2 was met. In this case, the queue item is marked as generic exception in the originating queue. Depending on the scenario, you might decide to change the status of queue items, which couldn't be processed successfully as one of the alternative status options. From there, you can decide whether human intervention is required, or build a subsequent process with the logic required to manage each exception status.


Auto-retry pattern
The Process work queue items action in Power Automate Desktop includes an advanced option to configure or override an auto-retry mechanism. This feature allows you to specify the maximum auto-retry count per work queue item, which is useful for handling IT exceptions like transient network errors or temporary system unavailability. It enables the machine to retain the item and perform controlled retries without requeuing the item, ensuring more efficient and resilient work queue processing.
You can set and centrally control the maximum retry count on the work queue record in Dataverse. This default value applies to all desktop flows that process this work queue through the Process Work Queue Items action.
To override the queue-level default in your flow, navigate to the Advanced section of the Process work queue items action, and toggle the Override work queue auto-retry configuration option. This setting lets you adjust the maximum retry count to a higher or lower value, or even disable the retry mechanism by setting the max retry count to 0.
When you use the Update work queue item action with a status set to IT exception and a max auto-retry count greater than 0, the system doesn't immediately send the update to the work queue orchestrator. Instead, it retries the operation until it reaches the specified max retry count. The only value updated in the work queue item is the retrycount. This value increases from the second update attempt onwards until the max auto-retry count is reached. Additionally, a local work queue item variable called CurrentRetryCount increments with each retry. This variable allows you to implement custom logic based on its value if needed.

The flow won't request a new item when it loops back to the top of the Process work queue items action if the following conditions are met:
- The maximum retry count is not reached.
- No other updates occur except for IT exceptions.
When the max retry count is reached, the update action sends the update to the orchestrator, changing the item's status to IT Exception and including any provided processing notes.
Adding and requeuing work queue items examples from PAD
The Add work queue item enables desktop flow users to populate work queue items into a work queue, which has been set up in the flow portal. Batch item creation is supported by using the Add work queue items action.
In this example, an Excel file in .csv is dropped into a directory on a daily basis and each row needs to be added to a work queue.

The first couple of actions in this sample process map a folder where the daily Contoso Invoices.csv file is dropped - when the process runs it begins by reading the data table from the CSV file. The CSVTable variable contains the data, which has been imported and will be processed to new queue items.

Actions 3 and 4 generate the time at which we choose the new queue items to expire after being added into a work queue. Action 3 captures the current system data and time, then for this example 7 days are added onto it by using the %Add to datetime% action. The output is stored into a variable called ExpiryDatetime which will be used in the Add work queue item action.

Action 5 introduces the For each loop, which is used to iterate through each row of data in the imported CSVTable - this action renders a data row for the current item being processed.

All of the preceding actions in this example desktop flow are now incorporated into setting the values for the Add work queue item action.

The work queue parameter is set to the queue that we want to add new work queue items into - in this case Demo PAD queue was selected by choosing it from the dropdown menu.
The Priority parameter is left at the default, Normal, but options for Low and High are also optional. Higher priority work queue items are processed first, then normal and last when mixed into the same work queue.
The Name parameter has been set with a static prefix along with the variable value CurrentItem['ID'] - which contains the value from the ID cell of the data row being processed. This is optional but can be useful depending on your use case.
Using the values from the data row in the variable CurrentItem the Input parameter was entered in JSON format. Note each header name was appended to the currentitem variable using the notation ['name of header']
The Expires field is populated with the datetime variable we added 7 days onto in the previous steps. When left blank, the work queue item being added will contain the Items expire after value set for the work queue.
Processing notes are optional - use as deemed necessary.
When the process is run, each data row in the imported CSV creates a work queue item containing a Queued status, which means it's available for processing.

These are just some of many ways that work queue actions can be used in PAD. Take some time to explore and find creative uses to incorporate work queues into your Power Automate flows!
Requeue item with delay example
The Requeue item with delay action enables desktop flow users to requeue items and set a delay period at which time the item it can be released again for processing.
In this example, there's a work queue loaded with items, which are set to expire in 24 hours, but they can't be processed in time because there's some ongoing routine system maintenance being performed by IT and the items need to be requeued. The maintenance will be completed overnight, so we'll proceed to delay each queue item by 24 hours and then set them to expire 24 hours after the release period.

The first three actions of this example process are date time actions. The 'Get current date and time' action captures the system datetime at the moment the action is run. Next we used the 'Add to datetime' action to cover two requirements, first we need to define the delay time by adding 24 hours to the current datetime - then we need to add 48 hours to the current datetime as an expiry.


Next in the example, the 'Process work queue items' action is configured to point to the loaded work queue and the 'Requeue item with delay' is placed within the loop.

The values generated for the delay and the expiry can now be passed into the 'Requeue item with delay' action. The 'work queue item' field is populated by the variable produced by the loop - this instructs which queue item to requeue. Next we plugged in the values created using the datetime actions for the 'delay until' and 'expires' fields. The 'delay until' is mandatory, but you can use 'expires' and 'processing result' at your discretion.
With this simple process, you can requeue all available items in a queue, delay them for a certain time, with options to also set an expiration date and processing result.
Cloud flow and connector-based processing
The simplest way to dequeue a work queue item and process it is as follows:
Go to Power Automate and sign in with your credentials.
On the left menu, select My flows.
On the toolbar, select + New flow and then select Instant cloud flow.
Provide a Flow name, such as My first work queue flow, and then select Manually trigger a flow.
Select Create.
Once the flow designer opens, select + New step, and then select the Microsoft Dataverse connector.
In the list of actions, select Perform a bound action.
| Parameter | Value | Description |
|---|---|---|
| Table name | Work Queues | The name of the work queue table. |
| Action name | Dequeue | The action, which gets the next available item from the queue. |
| Row ID | [Work Queue ID] | The work queue ID (GUID) of the queue you'd like to dequeue from. You can get to this value by navigating to the work queue details page of your queue and opening the Advanced details panel. |
| request | request | FetchXML in stringified JSON format you want to apply on the Work Queue ID. Example: { "query": "<fetch mapping=\"logical\" returntotalrecordcount=\"true\" page=\"1\" count=\"1\" no-lock=\"false\">\n<entity name=\"workqueueitem\">\n<filter type=\"and\">\n<condition attribute=\"workqueueid\" operator=\"eq\" value=\"38b14649-cb09-ee11-8f6e-00224804934a\"/>\n<condition attribute=\"statuscode\" operator=\"eq\" value=\"0\"/>\n</filter>\n</entity>\n</fetch>"} Note: The workqueueid parameter in the condition attribute is mandatory. |

Note
A bound action is a Dataverse action that is defined on a specific table (work queues in our example) and can only be executed on records of that table. Bound actions are used by the platform to perform custom business logic or operations on a specific record.
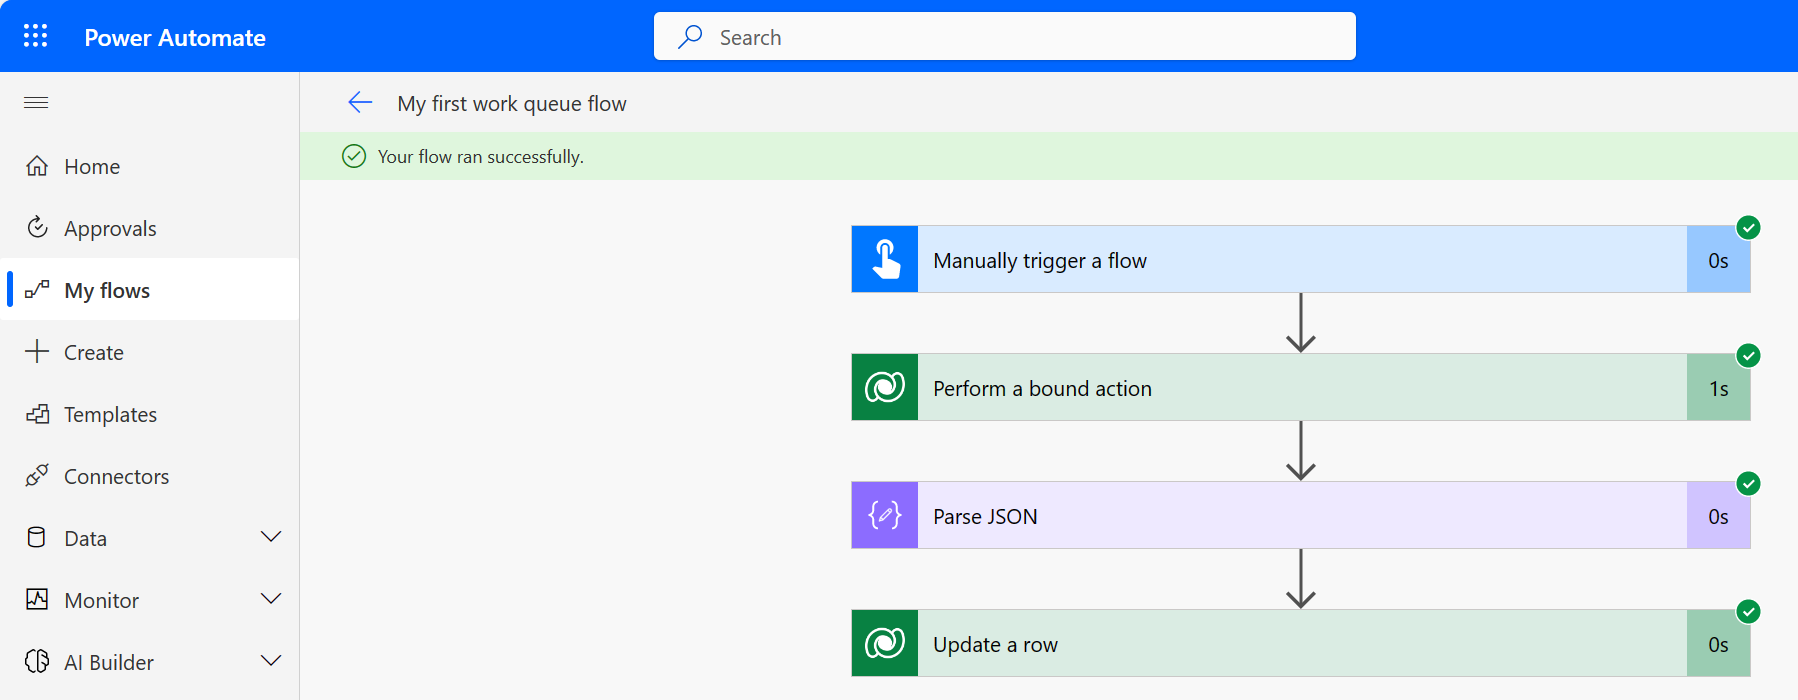
- Your flow should look similar to this now.

Select Save and then Test your flow.
In the testing side-pane select Manually, Test, Run flow and then Done.
If the flow ran successfully, you should get a similar result (but with different IDs).

- Next, copy the whole JSON content from the body field and then select Edit in the upper right corner of the flow.
Tip
After dequeuing a work queue item, use the JSON content of the item as a schema example for parsing the item's JSON properties. This allows you to easily access any property of the item returned by the work queue orchestrator in subsequent flow actions.
- Add a new step by selecting + New step and search for an action called Parse JSON and select it.

- Position your mouse in the Content field and select the body property from the previous action.

Next, select Generate from sample and paste the previously copied JSON string into the dialog and select Done.
Select + New step and then select the Microsoft Dataverse connector.
From the list of actions, select Update a row.
In the Table name field, select the Work Queue Items table and position your cursor in the Row ID field.
In the Dynamic content list, you'll now have all fields that are available in the work queue item table.
Select Show advanced options and then set the RowID, Processing Result, Status, and Status Reason fields to the following values.
| Field | Value | Details |
|---|---|---|
| Row ID | workqueueitemid | This value can be selected in the dynamic content list dialog. |
| Processing Result | The item has been successfully processed. | |
| Status | Processed | |
| Status Reason | Processed |

Select Save and Test the flow once more.
If the flow ran successfully, you should get a similar result as the following.
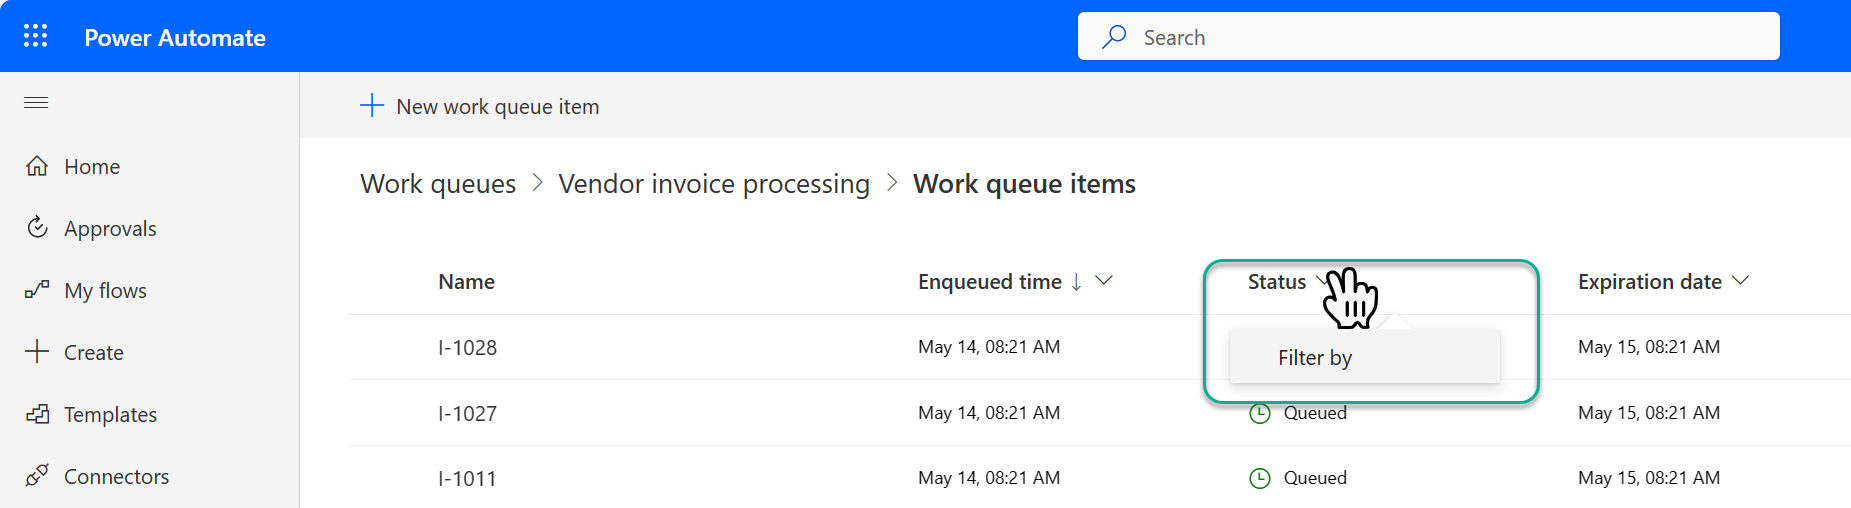
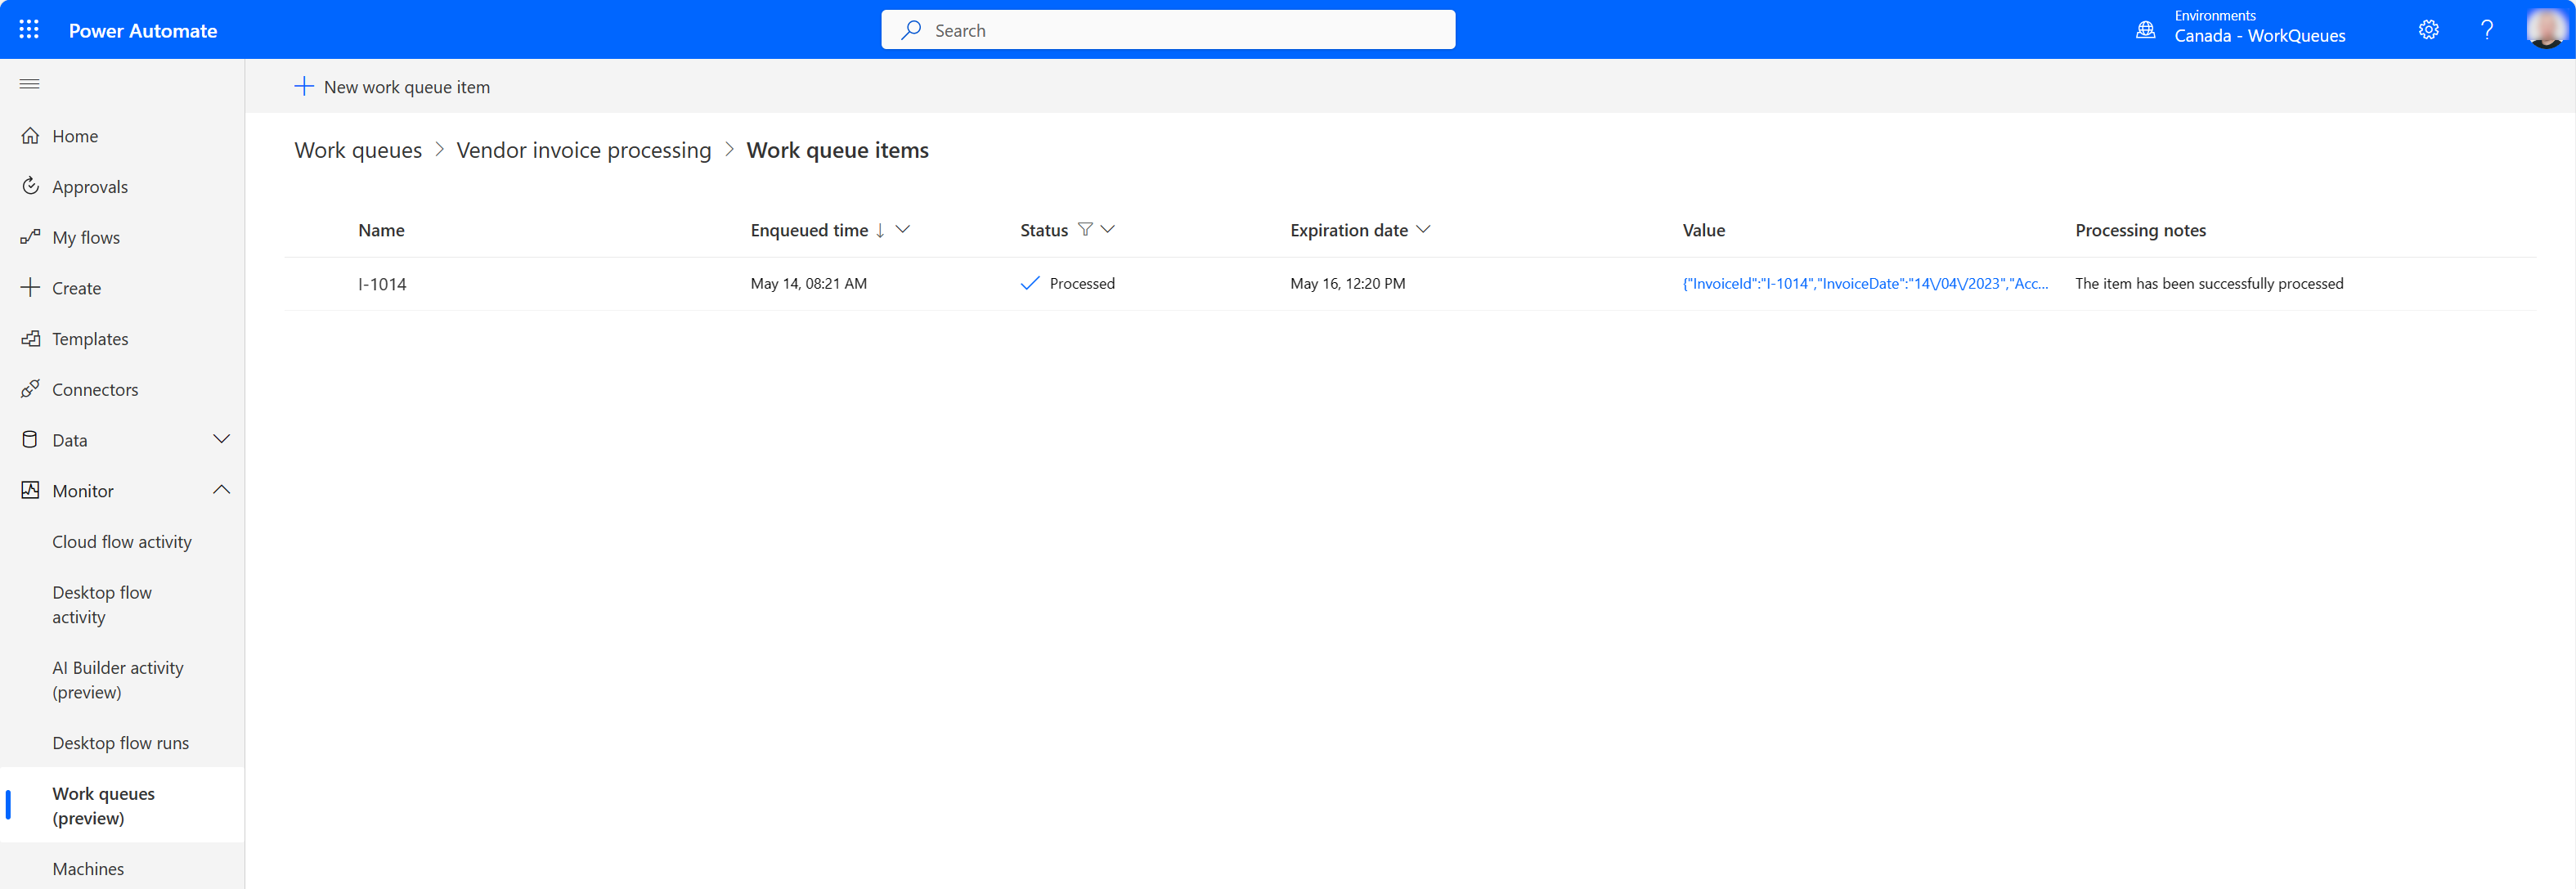
Now, navigate to the work queue details page and in the work queue item list section select See all.
Filter the Status field to only show Processing and Processed items to confirm that our dequeue and update actions worked as expected.


Congratulations, you just completed your first work queue processing scenario!


Cloud flow-based processing with desktop flow support
For this scenario, we extend the previous one by adding a desktop flow processing step as well.
Go back and edit the My first work queue flow.
Add a new action right after the Parse JSON action and search for Desktop flows connector and the Run a flow built with Power Automate for desktop.
In the desktop flow dropdown, either choose and edit an existing desktop flow or select + Create a new desktop flow and follow the instruction on screen to create the desktop flow and launch Power Automate for desktop. If you're new to desktop flows, you can learn more here.
Once the Power Automate for desktop designer opens, create two input variables called WorkQueueItemValue and WorkQueueItemName and then add two output variables called ProcessingNotes and ProcessingStatus respectively, all of which should have Text as their data type.
Provide a default value for the WorkQueueItem variable so that you can later test the script locally. In case you've followed the bulk-import tutorial you should have work queue items in the Vendor invoice queue that have their values in JSON format. Here's an example of one of the values used.
{
 "InvoiceId": "I-1006",
 "InvoiceDate": "06/04/2023",
 "AccountName": "Fabrikam",
 "ContactEmail": "invoicing@fabrikam.com",
 "Amount": 1253.78,
 "Status": "Paid",
 "WorkQueueKey": "Vendor Invoices",
 "ComponentState": 0,
 "OverwriteTime": "1900-01-01T00:00:00"
}
Now, Save the flow.
In the action panel, open the Variables action group and double-click the Convert JSON to custom object action to add it to the design canvas, which opens its property window.
Select the variable icon in the JSON field and choose the WorkQueueItemValue variable.
Rename the produced output variable from JsonAsCustomObject to VendorInvoice and select Save.
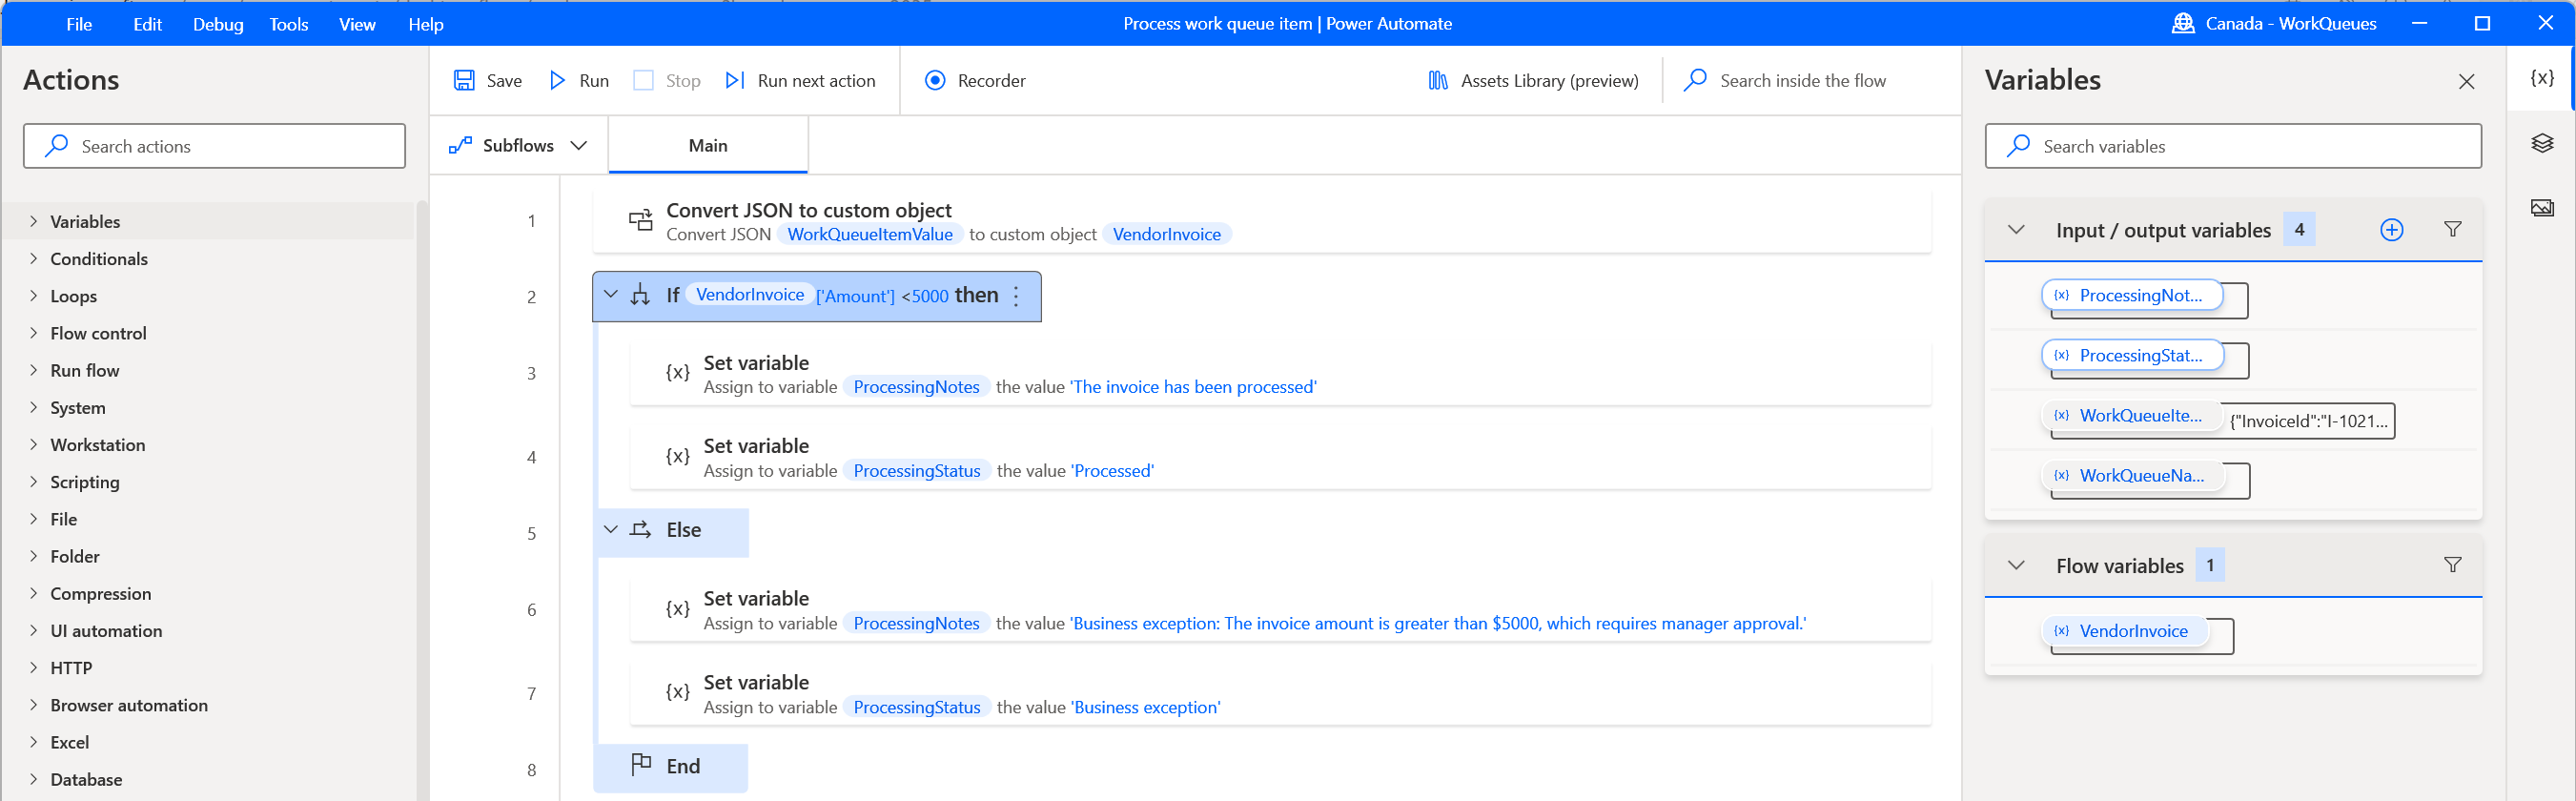
Next, add an If action from the Conditionals group and configure its properties as follows:
First operand Operator Second operand %VendorInvoice['Amount']% Less than (<) 5000 Select Save.
Add another action from the Conditionals group called Else and add it between the If and End action.
Now, add another two actions from the Variables group called Set variable and add them within the If and Else actions and set the ProcessingNotes and ProcessingStatus variables to the following values:
Variable Value %ProcessingNotes% The invoice has been processed %ProcessingStatus% Processed Copy the two Set variable action and paste them between the Else and the End action and change their values to match these:
Variable Value %ProcessingNotes% Business exception: The invoice amount is greater than $5000, which requires manager approval. %ProcessingStatus% Exception Your flow should look similar to this now.
Save the flow and run it to confirm that the flow logic works as expected.
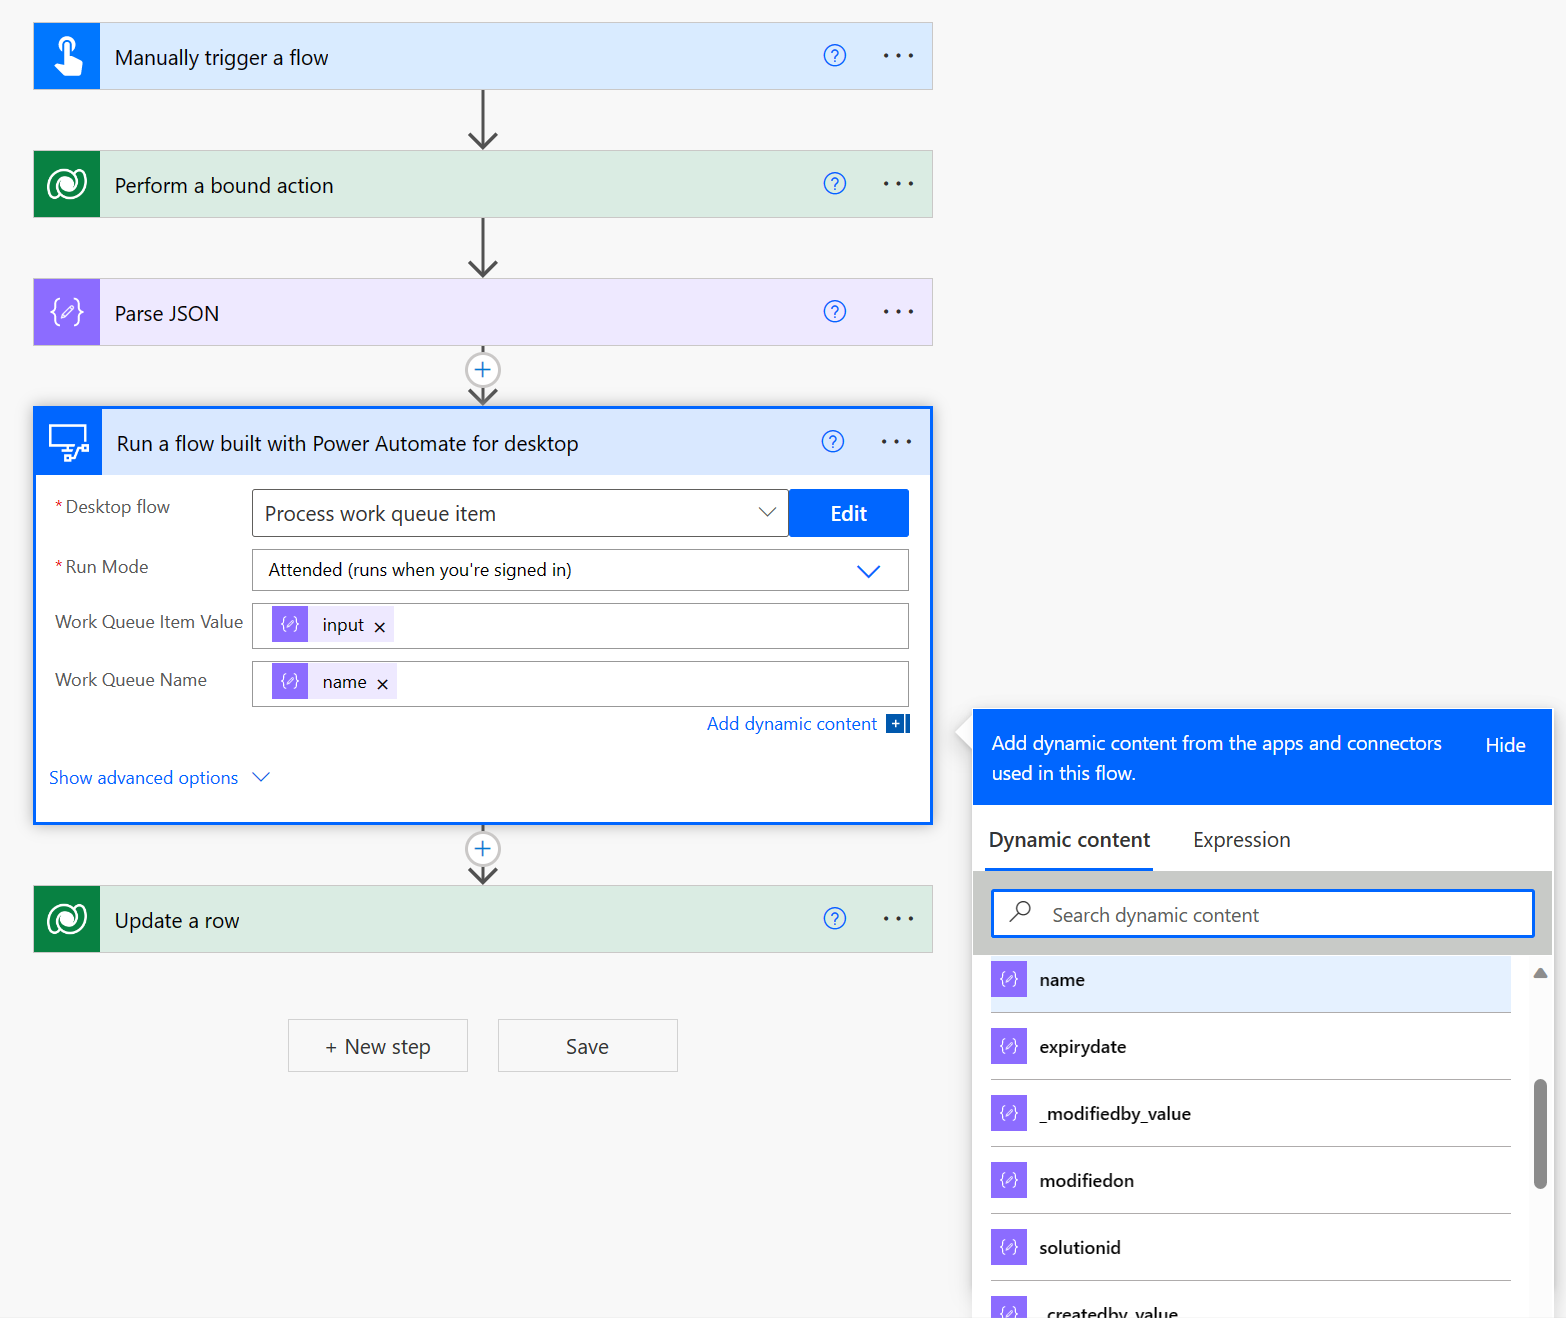
Go back to edit the My first work queue flow.
Select the newly created (or edited) desktop flow from the list and then select Attended as its Run Mode.
Fill in the Work Queue Item Value and Work Queue Item Name parameters as shown here:
Add a Condition action before the Update a row action.
Position your mouse in the Choose a value field and select Processing Status from the dynamic content list dialog.
Position your mouse in the other Choose a value field and enter Processed as the text value.
Drag and drop the Update a row action into the If yes section of the condition action.
Open the Update a row action details and replace the values to match the following:
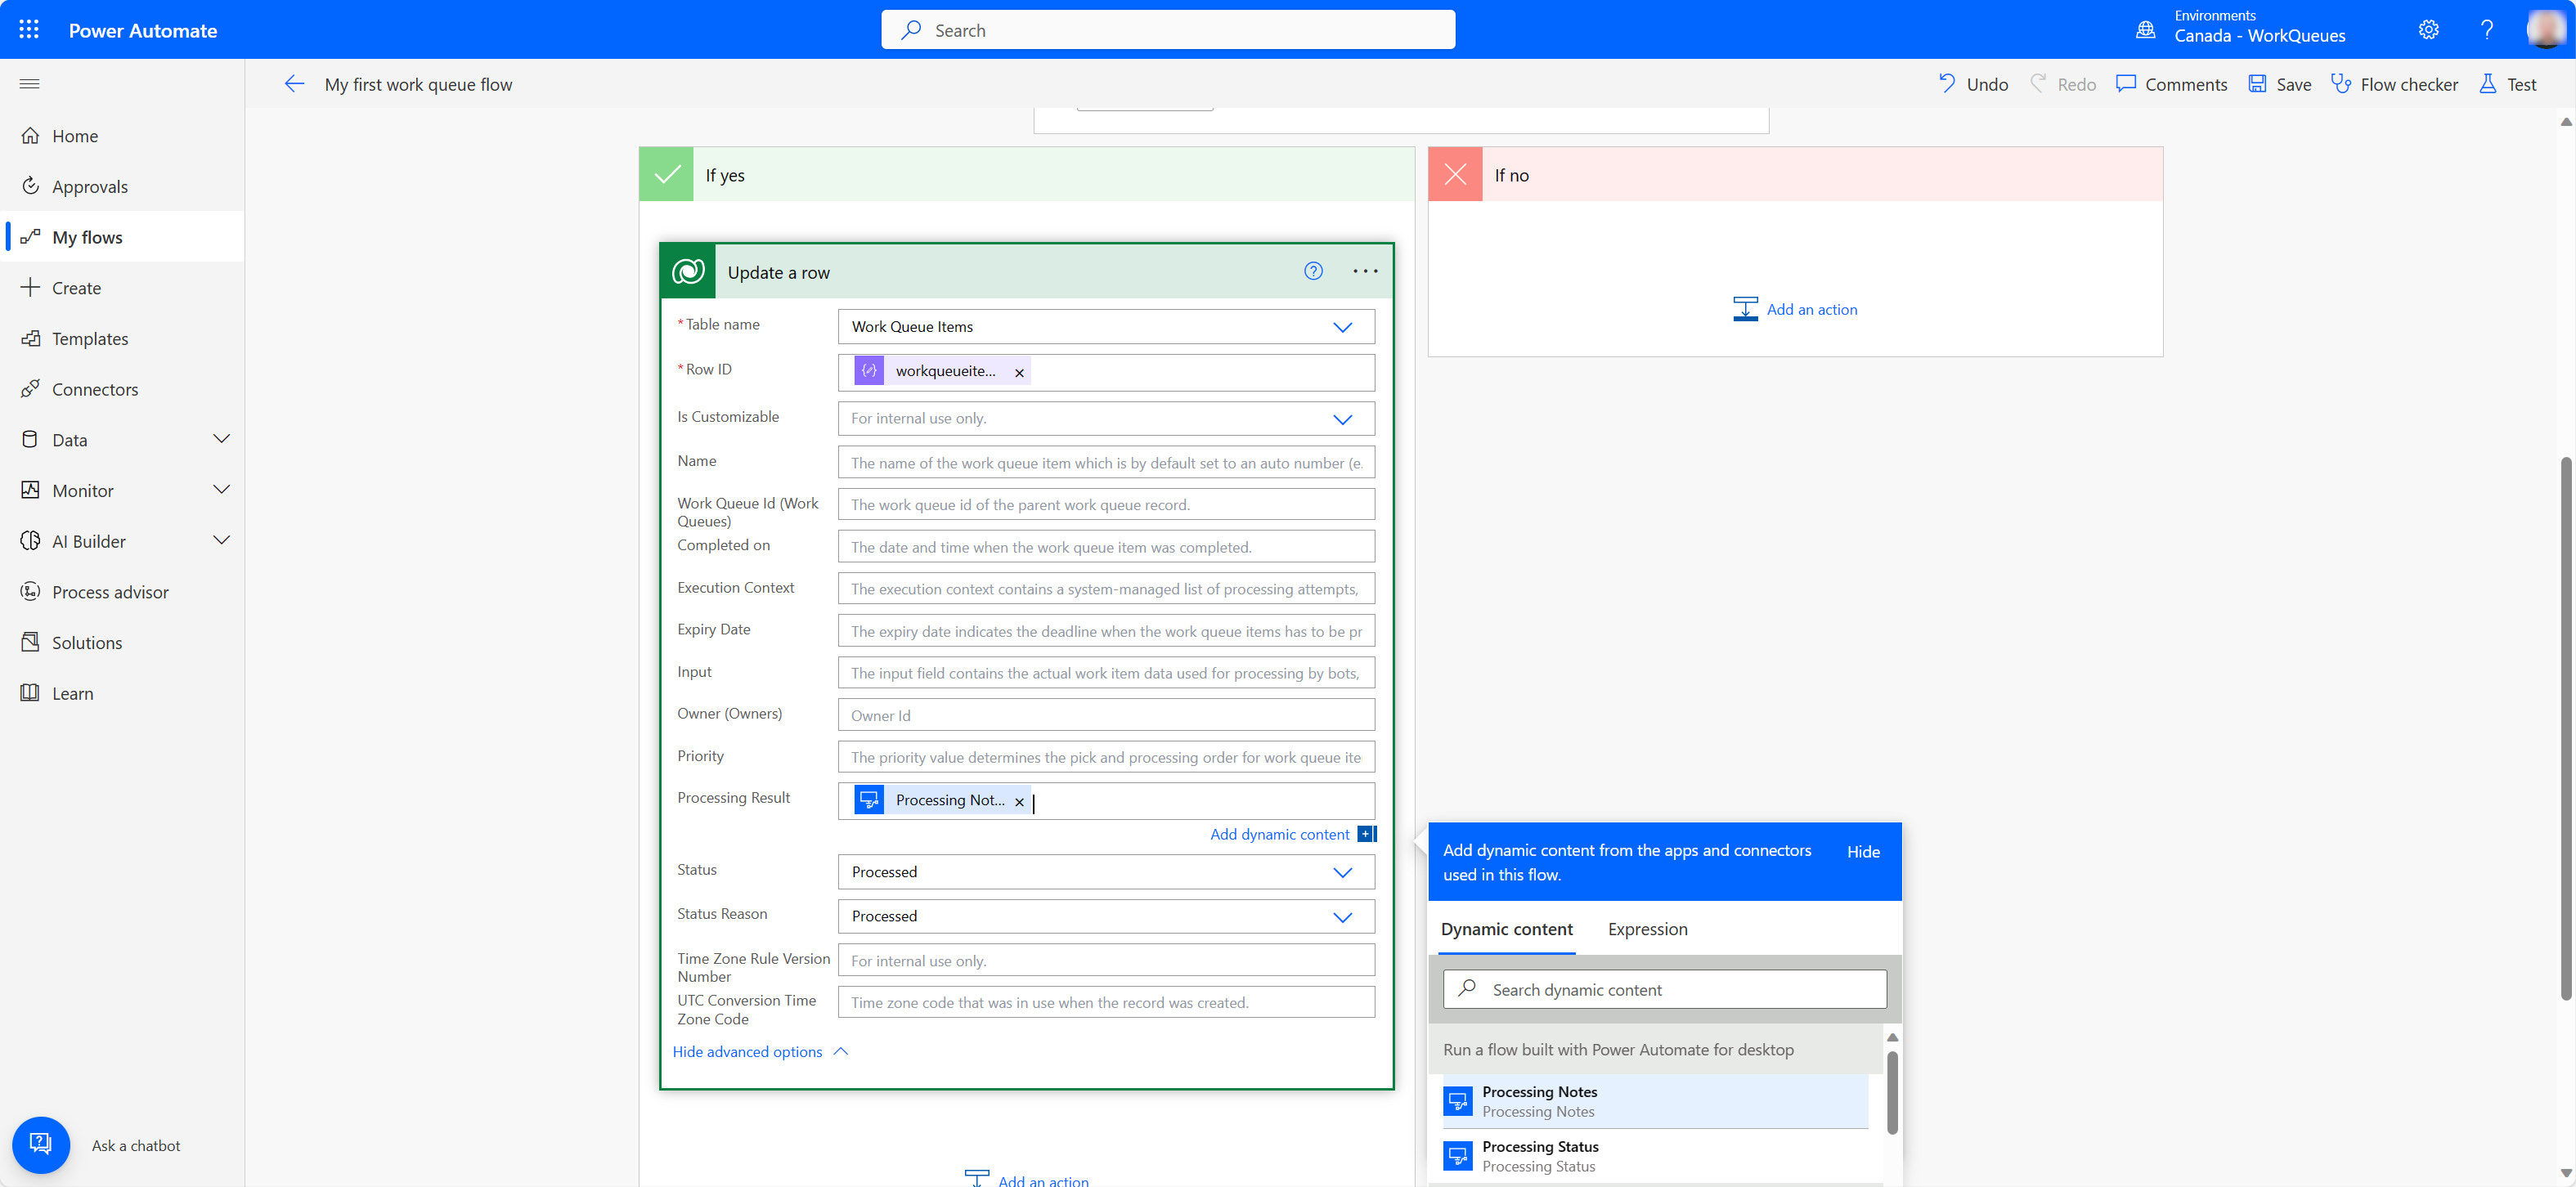
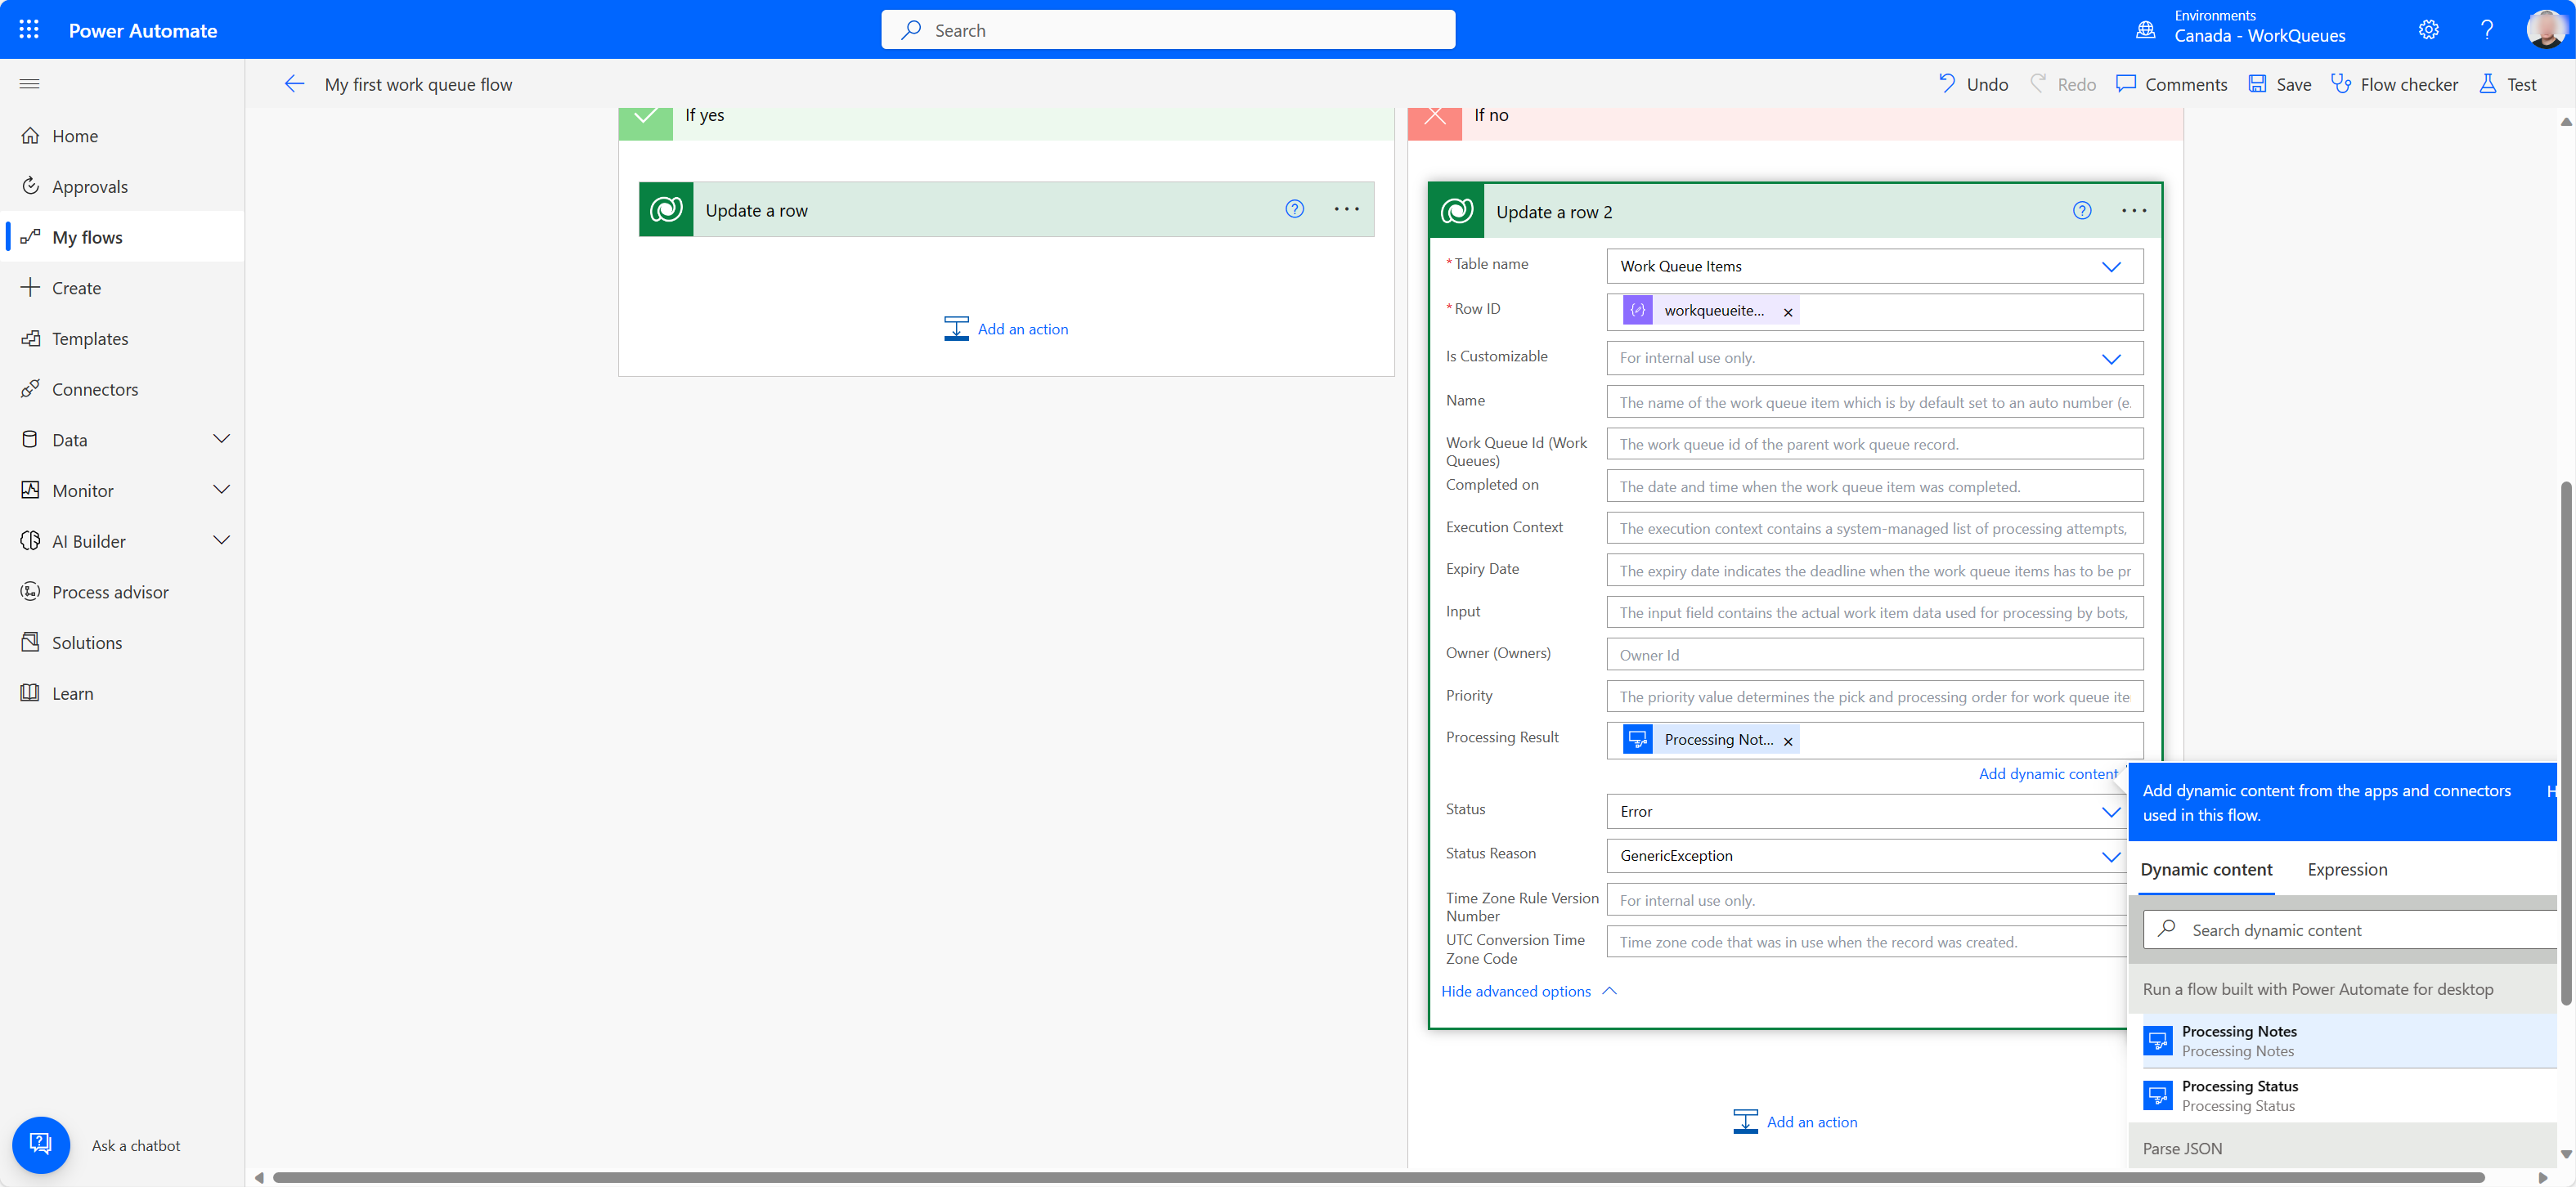
In the red If no box, add another Update a row action and select Work Queue Items as the Table name.
Next, select workqueueitemid as Row ID and open Show advanced options section select Processing Notes as the Processing Results value.
Select Error as Status and GenericException for Status Reason.
Select Save and Test to test the overall automation and observe the output from the desktop flow action.
To confirm that the work queue item has been processed you can go to the work queue details page, select See all in the work queue items section and filter the items by Processed status.


Well done, you just completed a more advanced scenario that included hybrid work queue processing!