Note
Access to this page requires authorization. You can try signing in or changing directories.
Access to this page requires authorization. You can try changing directories.
With Power Automate and work queues being an integral part of the Power Platform, you can easily streamline your data management processes. The suite of tools available is comprehensive, ranging from highly end-user optimized wizards to powerful cloud-based ETL services and even pro-code options. Whether you're a business user, an IT professional or a developer, you can find the right tool to create or bulk upload data with ease and efficiency.
Comprehensive bulk-import options
Here's a comprehensive list of data management and bulk-import options you can choose from.
Using a cloud flow with the Dataverse connector action - Add a row new action to add one or more rows to the Work Queues and Work Queue Items tables.
Using Microsoft Dataverse bulk-import options
- Import using a connector - Supporting data transformation with Power Query and connecting to many different sources, such as Excel, Azure, SQL Server, CSV, JSON, XML, Text, OData, and more.
- Import from Excel or CSV - Supporting Excel and CSV files with data validation and a visual mapping experience.
Using Power Platform Dataflows with its powerful cloud-based ETL services.
Adding work queue items with cloud flow and Dataverse connector
Go to Power Automate and sign in with your credentials.
On the left menu, select My flows.
In the toolbar, select + New flow and select Instant cloud flow.
Provide a Flow name and then select Manually trigger a flow option.
Select Create.
Once the flow designer opened, select + New step and select the Microsoft Dataverse connector.
In the list of actions, select Add a new row.
The following highlighted fields, represent the minimum fields required to add items to a work queue.
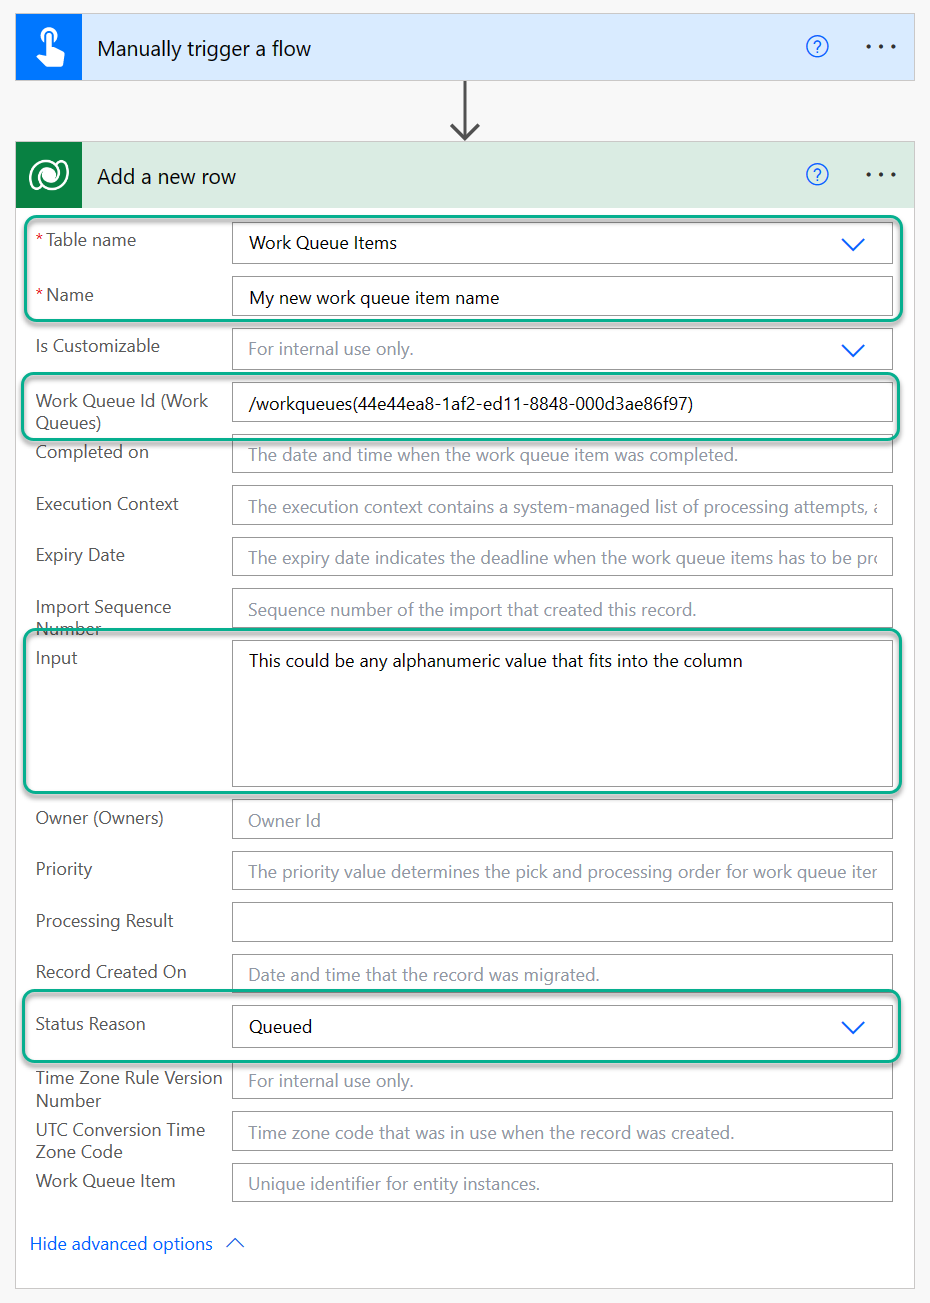
When using the Dataverse connector Add a row row action, it expects a certain pattern to be followed when referencing a parent record. An example of this pattern can be seen in the 'Work Queue ID (work Queues)' field, which uses the work queue ID (Guid) to reference the parent work queue, for example,
/workqueues(44e44ea8-1af2-ed11-8848-000d3ae86f97).Select Save and Test the flow.
Navigate to the work queue details page of the work queue you have specific in the action, and confirm that the newly created work queue item has been added.

Tutorial: Import a work queue and items from CSV
This tutorial showcases both mentioned Dataverse bulk-import options for importing a work queue along with its associated work queue items, which in this example is vendor invoices.
Note
While the easiest and most straight forward way to create work queues is through the Power Automate portal as described in Create a work queue, we've included work queue import steps as well to demonstrate the import from Excel or CSV approach.
Important
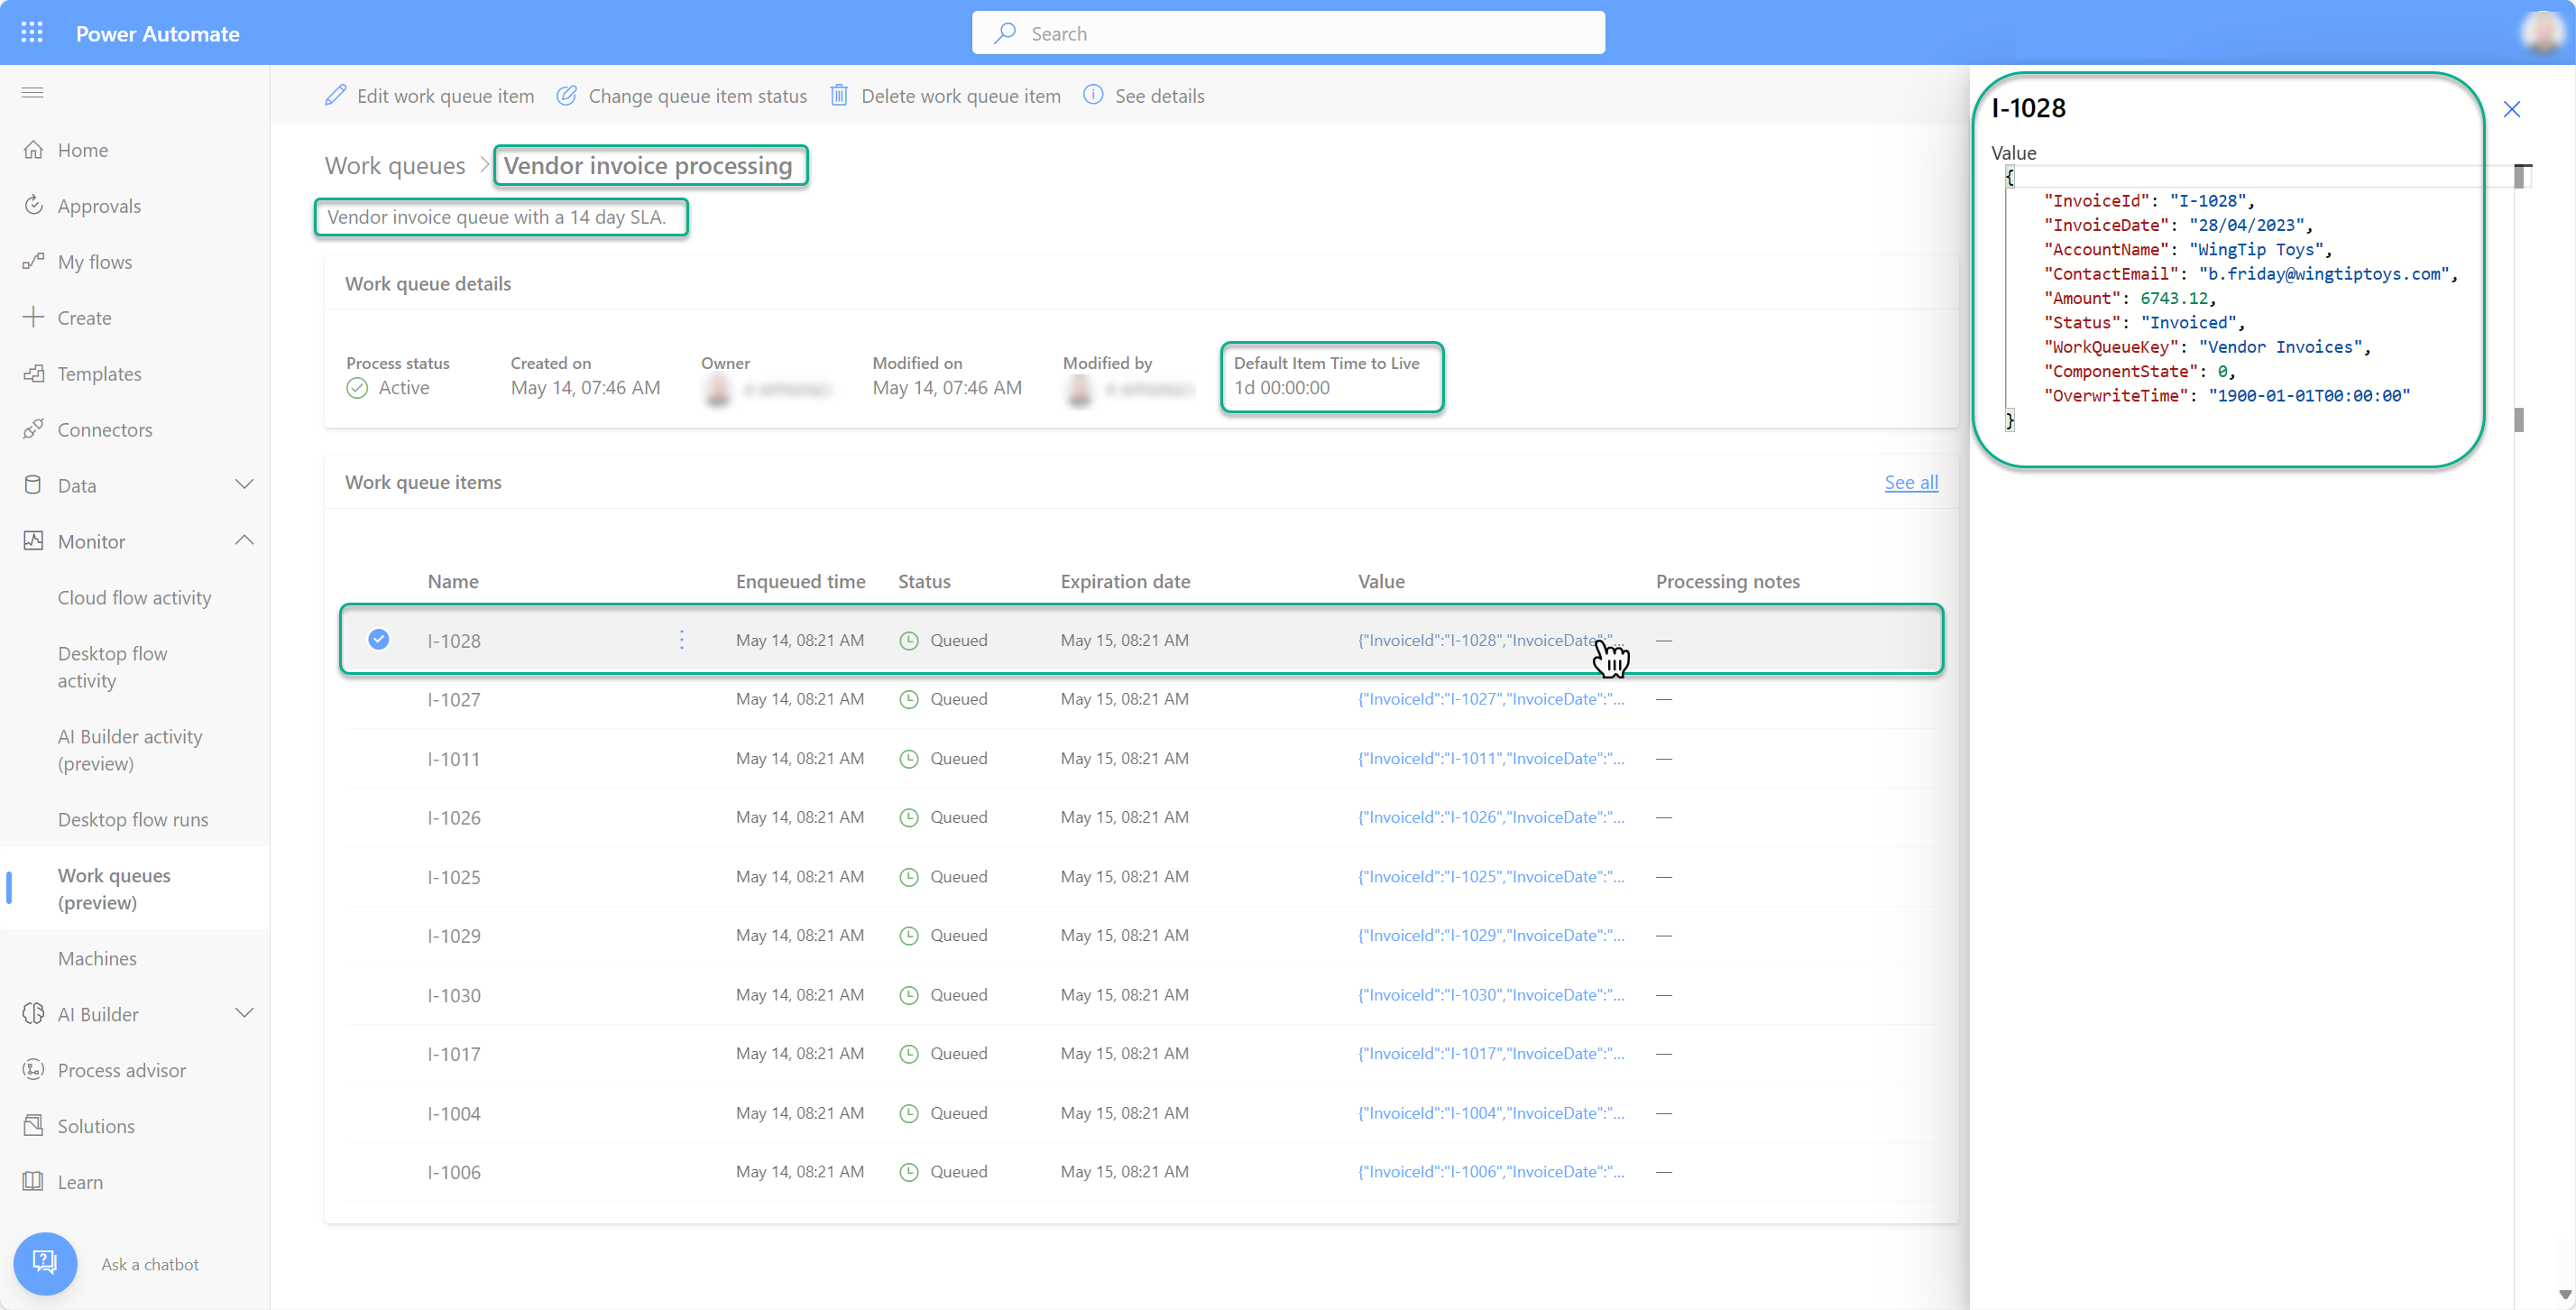
The CSV sample data for this tutorial includes three special columns: workqueuekey, componentstate, and overwritetime, along with their values. The componentstate and overwritetime fields typically have default values of 0 and 01/01/1900 00:00, respectively. The default value of the workqueuekey field is a Guid and is auto-generated when you create a work queue through the Power Automate portal. However, if you create a work queue through an import file (like in this example) or through the Dataverse connector in cloud flows, you can supply a more descriptive work queue key, such as Vendor Invoices. These fields are part of the work queue record and must be included in any import. To view their values, go to Power Apps and under Tables, search for Work Queue.
Prerequisites
- Power Automate or Power Apps premium license
- Some parts of this tutorial require OneDrive for Business access
Phase 1/3: Create sample files
Create a local file called vendor-invoice-queue.csv and paste the following text into it:
defaultitemtimetoliveinminutes,description,name,prioritytype,overwritetime,componentstate,workqueuekey,workqueuetype
1440,Vendor invoice queue with a 14 day SLA.,Vendor invoice processing,Fifo,01/01/1900 00:00,0,Vendor Invoices,Work Queue
Save the file.
Create another file called vendor-invoice-items.csv and paste the following rows into it:
WorkQueueItemId,InvoiceId,InvoiceDate,AccountName,ContactEmail,Amount,Status,WorkQueueKey,ComponentState,OverwriteTime
653d9256-a217-4742-8cfc-f7d0a4a0f902,I-1001,01/04/2023,Fabrikam,invoicing@fabrikam.com,4232.16,Paid,Vendor Invoices,0,01/01/1900 00:00
01634ba7-93bf-4aa6-85f7-15a4d6cb3b20,I-1002,02/04/2023,Litware Inc.,adixon@litware.com,2455.00,Paid,Vendor Invoices,0,01/01/1900 00:00
6fa8c944-5400-4db6-af6d-2f18d8b74bed,I-1003,03/04/2023,Proseware Inc.,lrobbins@proseware.com,7458.98,Paid,Vendor Invoices,0,01/01/1900 00:00
683be530-017f-48a7-899b-c7390836fc37,I-1004,04/04/2023,Tailspin Toys,p.gupta@tailspintoys.com,5237.26,Paid,Vendor Invoices,0,01/01/1900 00:00
daedf721-40e8-40a0-b6f9-e332e90c1187,I-1005,05/04/2023,WingTip Toys,b.friday@wingtiptoys.com,2230.99,Invoiced,Vendor Invoices,0,01/01/1900 00:00
64d6dbbb-52a8-47b1-8587-b791ae7e612a,I-1006,06/04/2023,Fabrikam,invoicing@fabrikam.com,1253.78,Paid,Vendor Invoices,0,01/01/1900 00:00
688e12f2-6528-43b1-ae36-d31214fad7dd,I-1007,07/04/2023,Proseware Inc.,lrobbins@proseware.com,3345.87,Paid,Vendor Invoices,0,01/01/1900 00:00
36ecf154-9cc4-43aa-aaa6-2b3e6807d6d2,I-1008,08/04/2023,Tailspin Toys,p.gupta@tailspintoys.com, 967.45 ,Paid,Vendor Invoices,0,01/01/1900 00:00
7404787b-e9c1-49fc-90cf-c1f3372d2577,I-1009,09/04/2023,WingTip Toys,b.friday@wingtiptoys.com,1437.75,Paid,Vendor Invoices,0,01/01/1900 00:00
53970b80-b23e-46e5-afb4-9f6f6f46c365,I-1010,10/04/2023,Fabrikam,invoicing@fabrikam.com,1687.43,Paid,Vendor Invoices,0,01/01/1900 00:00
41cf9fd8-c98f-4dea-be0a-ff70bc9c74b9,I-1011,11/04/2023,WingTip Toys,b.friday@wingtiptoys.com,2854.67,Paid,Vendor Invoices,0,01/01/1900 00:00
95ea6270-6efe-476f-a86c-892483242532,I-1012,12/04/2023,Litware Inc.,adixon@litware.com,6743.12,Invoiced,Vendor Invoices,0,01/01/1900 00:00
c639cd8c-b603-4a30-9659-30de6e333c2f,I-1013,13/04/2023,Fabrikam,invoicing@fabrikam.com,2997.12,Invoiced,Vendor Invoices,0,01/01/1900 00:00
9dcefd8a-f4cf-4592-b179-1e1bdfa808b4,I-1014,14/04/2023,Proseware Inc.,lrobbins@proseware.com, 843.76 ,Invoiced,Vendor Invoices,0,01/01/1900 00:00
4775f771-4168-46ca-9e10-5957c15e4145,I-1015,15/04/2023,Fabrikam,invoicing@fabrikam.com,1349.24,Invoiced,Vendor Invoices,0,01/01/1900 00:00
5450ea15-1a69-4692-b083-ba1ac0e8cb6e,I-1016,16/04/2023,Tailspin Toys,p.gupta@tailspintoys.com, 367.13 ,Invoiced,Vendor Invoices,0,01/01/1900 00:00
c7718c58-8b9c-4915-b9d7-f067ceac726b,I-1017,17/04/2023,Litware Inc.,adixon@litware.com,3984.54,Invoiced,Vendor Invoices,0,01/01/1900 00:00
ab1c46f8-6de2-4583-b0ba-0959a962e8f1,I-1018,18/04/2023,Fabrikam,invoicing@fabrikam.com,1943.89,Uninvoiced,Vendor Invoices,0,01/01/1900 00:00
9d5b0ab6-1cb0-40b8-af91-326417843eee,I-1019,19/04/2023,Proseware Inc.,lrobbins@proseware.com,2853.39,Paid,Vendor Invoices,0,01/01/1900 00:00
154d6965-1a4c-49c3-96e2-ce94f5bc92f1,I-1020,20/04/2023,Fabrikam,invoicing@fabrikam.com,8764.14,Paid,Vendor Invoices,0,01/01/1900 00:00
b5ff78f0-c3d7-4da0-b233-9cdbc0798f7c,I-1021,21/04/2023,Litware Inc.,adixon@litware.com, 643.68 ,Paid,Vendor Invoices,0,01/01/1900 00:00
816463ca-4ecd-4433-b56c-7d16df6a9fe0,I-1022,22/04/2023,Proseware Inc.,lrobbins@proseware.com,4232.16,Invoiced,Vendor Invoices,0,01/01/1900 00:00
2d1e88b7-f4f7-4885-98f0-f56e33218291,I-1023,23/04/2023,Tailspin Toys,p.gupta@tailspintoys.com,3345.87,Invoiced,Vendor Invoices,0,01/01/1900 00:00
338d57d0-f869-4707-b817-f9d1bbd9ed92,I-1024,24/04/2023,WingTip Toys,b.friday@wingtiptoys.com,3345.87,Invoiced,Vendor Invoices,0,01/01/1900 00:00
67b2184d-8a3a-40e8-8647-298852529070,I-1025,25/04/2023,Fabrikam,invoicing@fabrikam.com,3345.87,Invoiced,Vendor Invoices,0,01/01/1900 00:00
475b5afa-5c21-427e-af32-d4af33a018c2,I-1026,26/04/2023,Proseware Inc.,lrobbins@proseware.com,6743.12,Invoiced,Vendor Invoices,0,01/01/1900 00:00
23b08df8-49de-475d-96c6-894880d6d2ad,I-1027,27/04/2023,Tailspin Toys,p.gupta@tailspintoys.com,4232.16,Invoiced,Vendor Invoices,0,01/01/1900 00:00
2a3425b7-3e84-4560-a2eb-b20d5c666c25,I-1028,28/04/2023,WingTip Toys,b.friday@wingtiptoys.com,6743.12,Invoiced,Vendor Invoices,0,01/01/1900 00:00
58b40e26-a34a-493d-865f-d6dbe32edb96,I-1029,29/04/2023,Fabrikam,invoicing@fabrikam.com,4232.16,Invoiced,Vendor Invoices,0,01/01/1900 00:00
989ae0b3-a4d4-491c-be3a-5f32791c465a,I-1030,30/04/2023,WingTip Toys,b.friday@wingtiptoys.com,3345.87,Invoiced,Vendor Invoices,0,01/01/1900 00:00
Save the file.
Phase 2/3: Import work queue
- Next, go to https://make.powerapps.com and sign-in with your credentials.
- Confirm that you're in the correct environment and select Tables in the side-menu.
- Select the All tab.
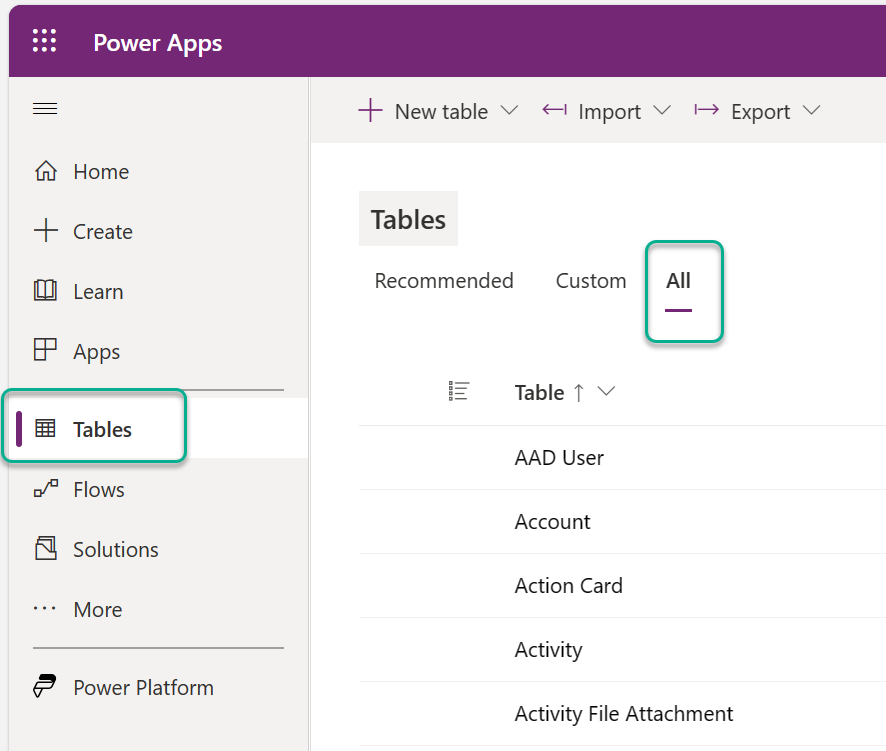
- Search for Work Queue table and open its details page.
- In the toolbar, select Import and then select Import data from Excel.
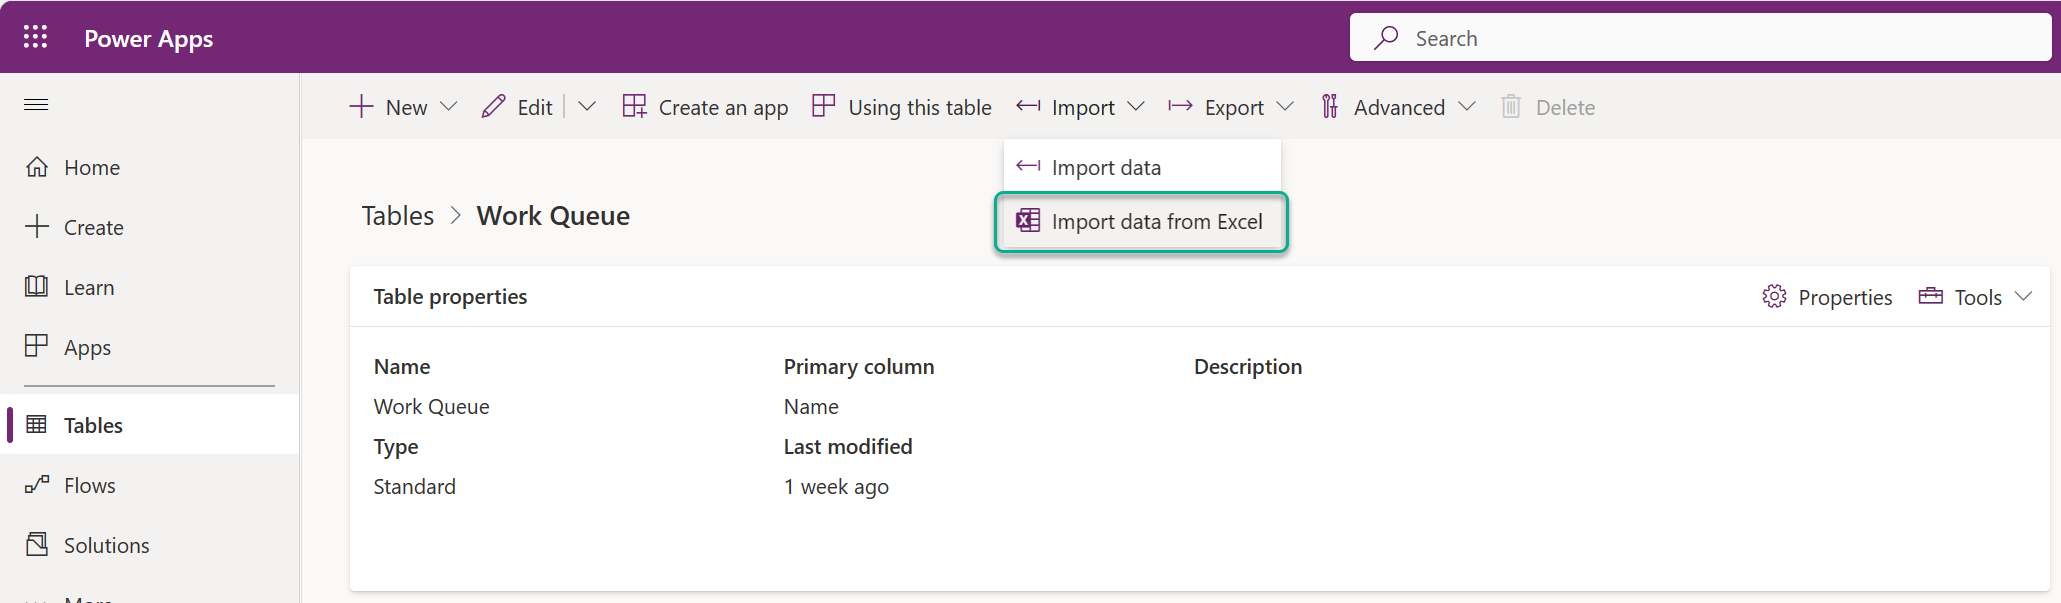
- Select Upload and choose the vendor-invoice-queue.csv file.
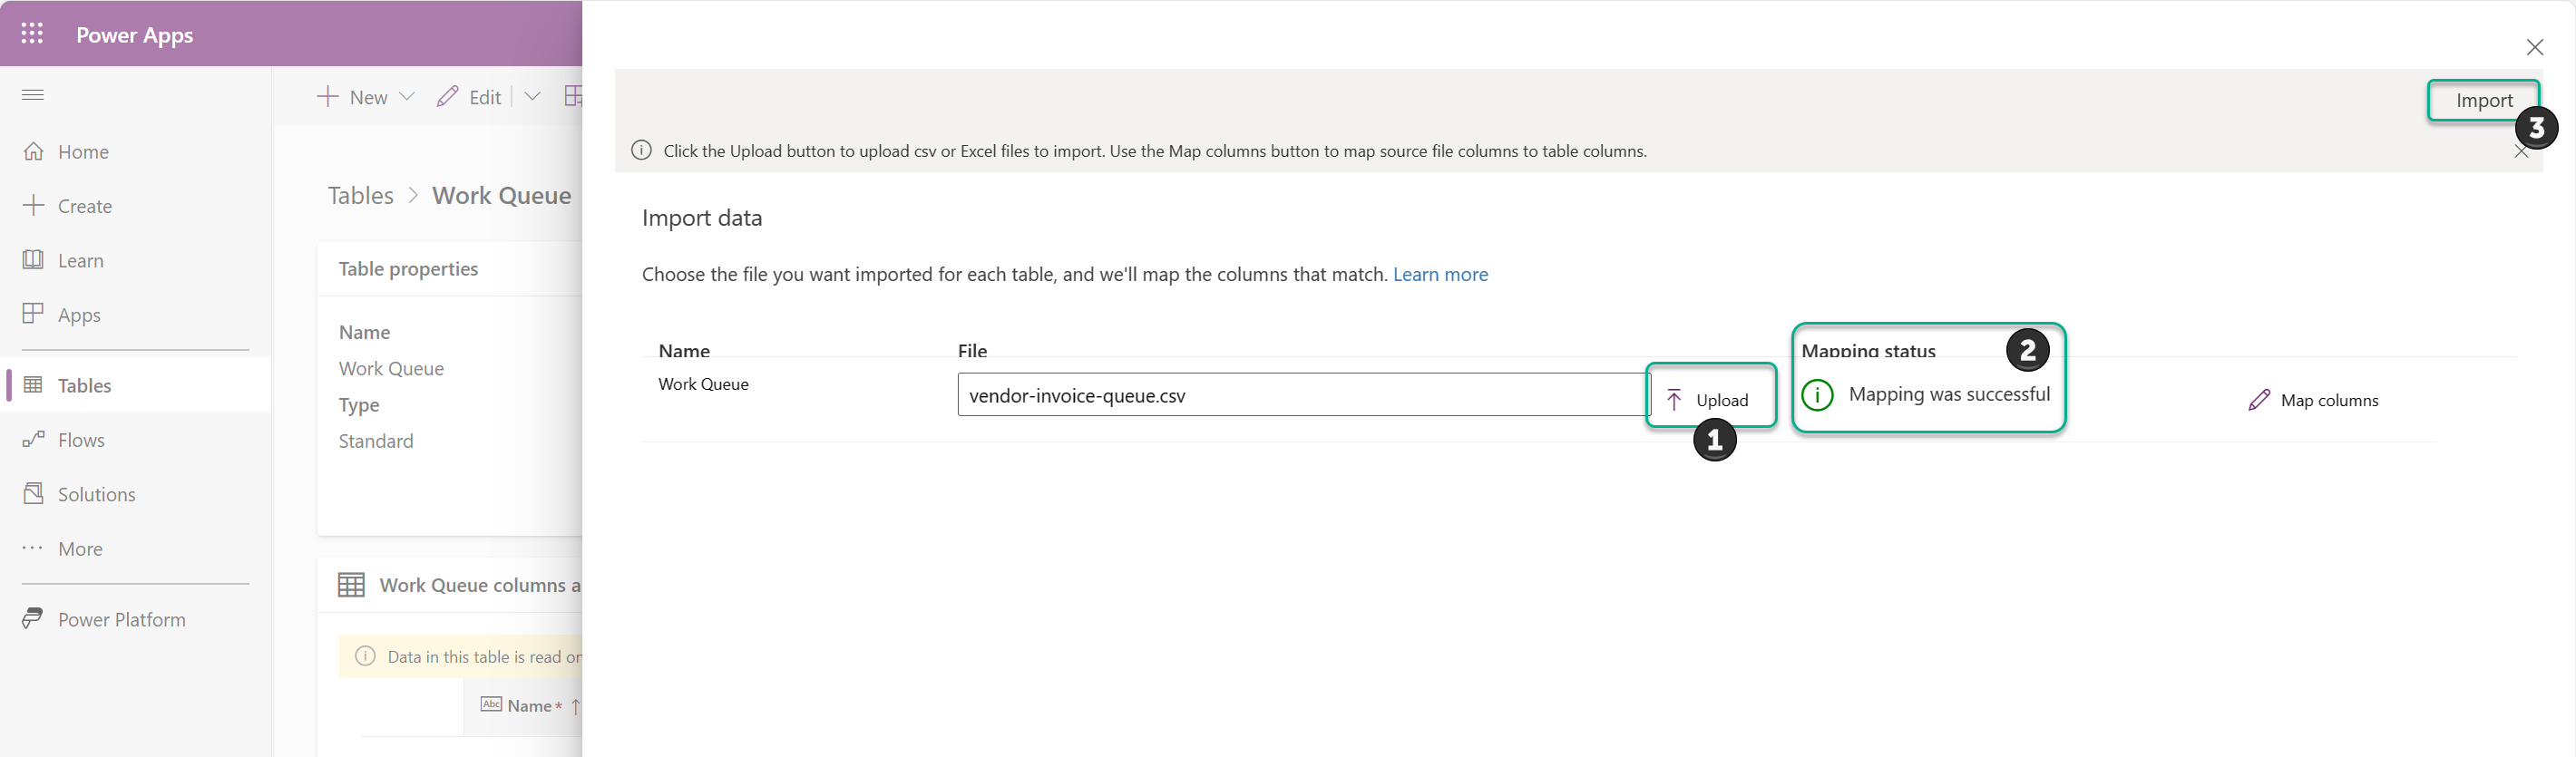
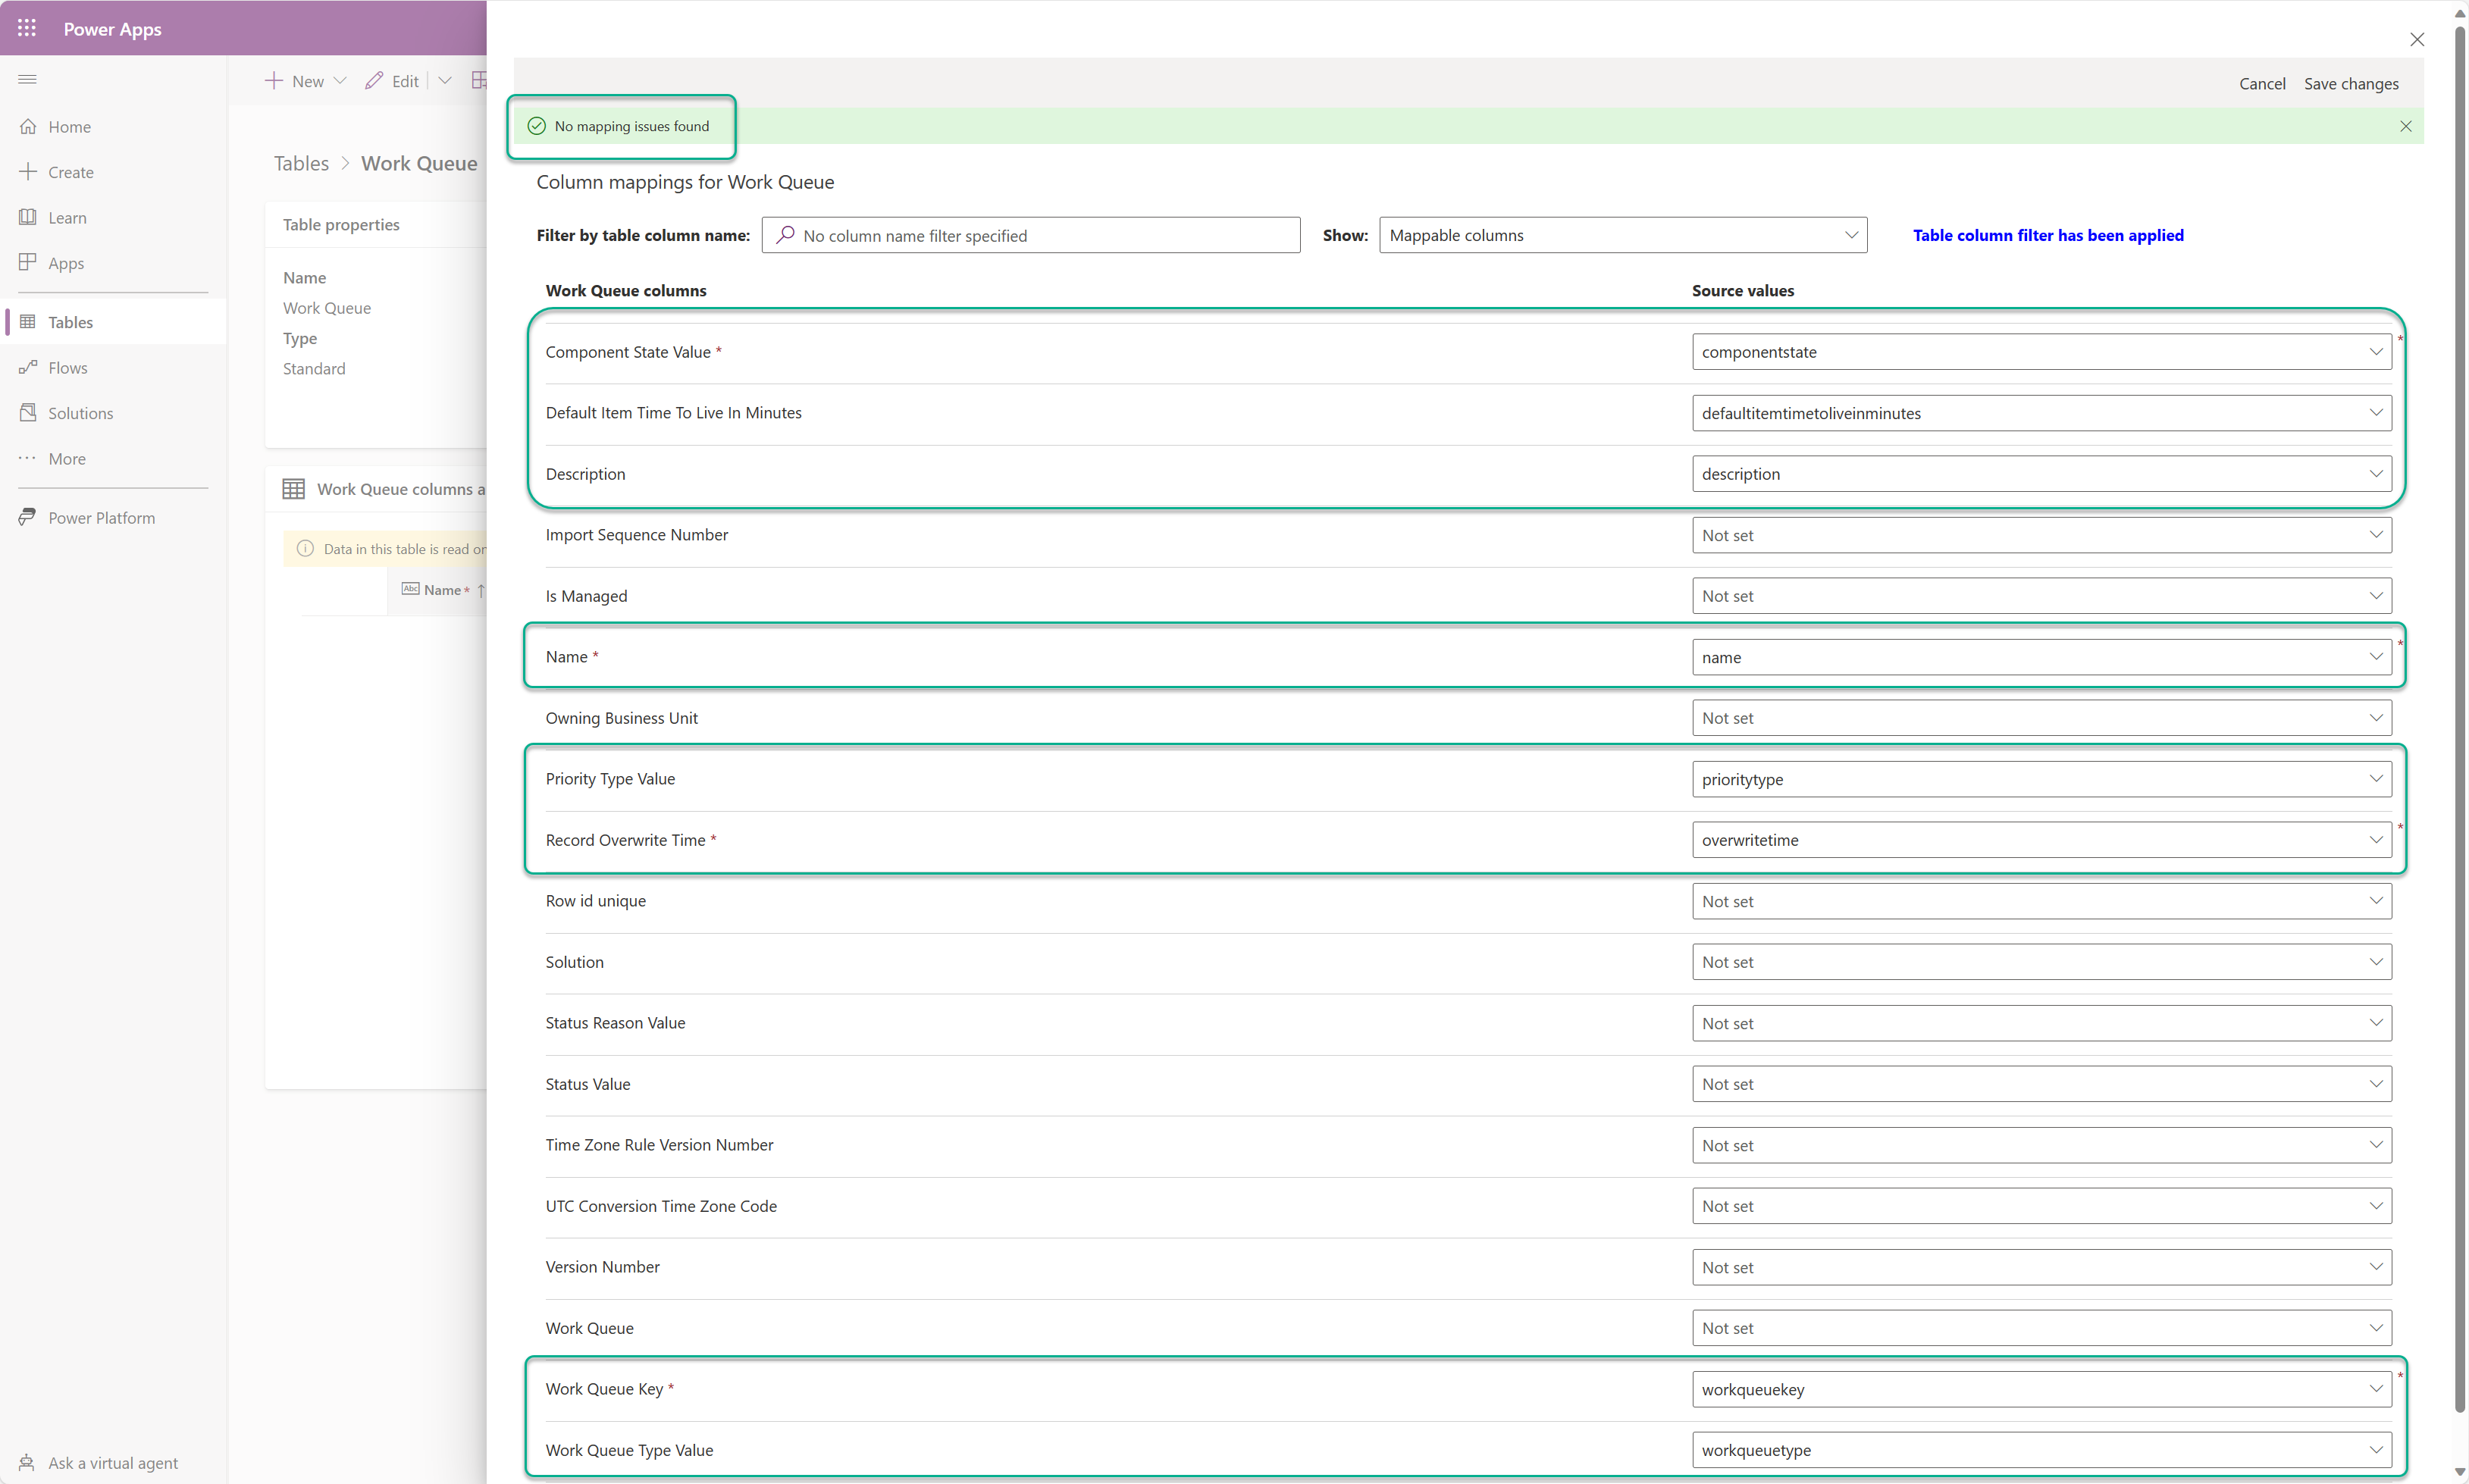
- Confirm that the automapping was successful, or if needed adjust it by selecting Map columns.
- Select Import.
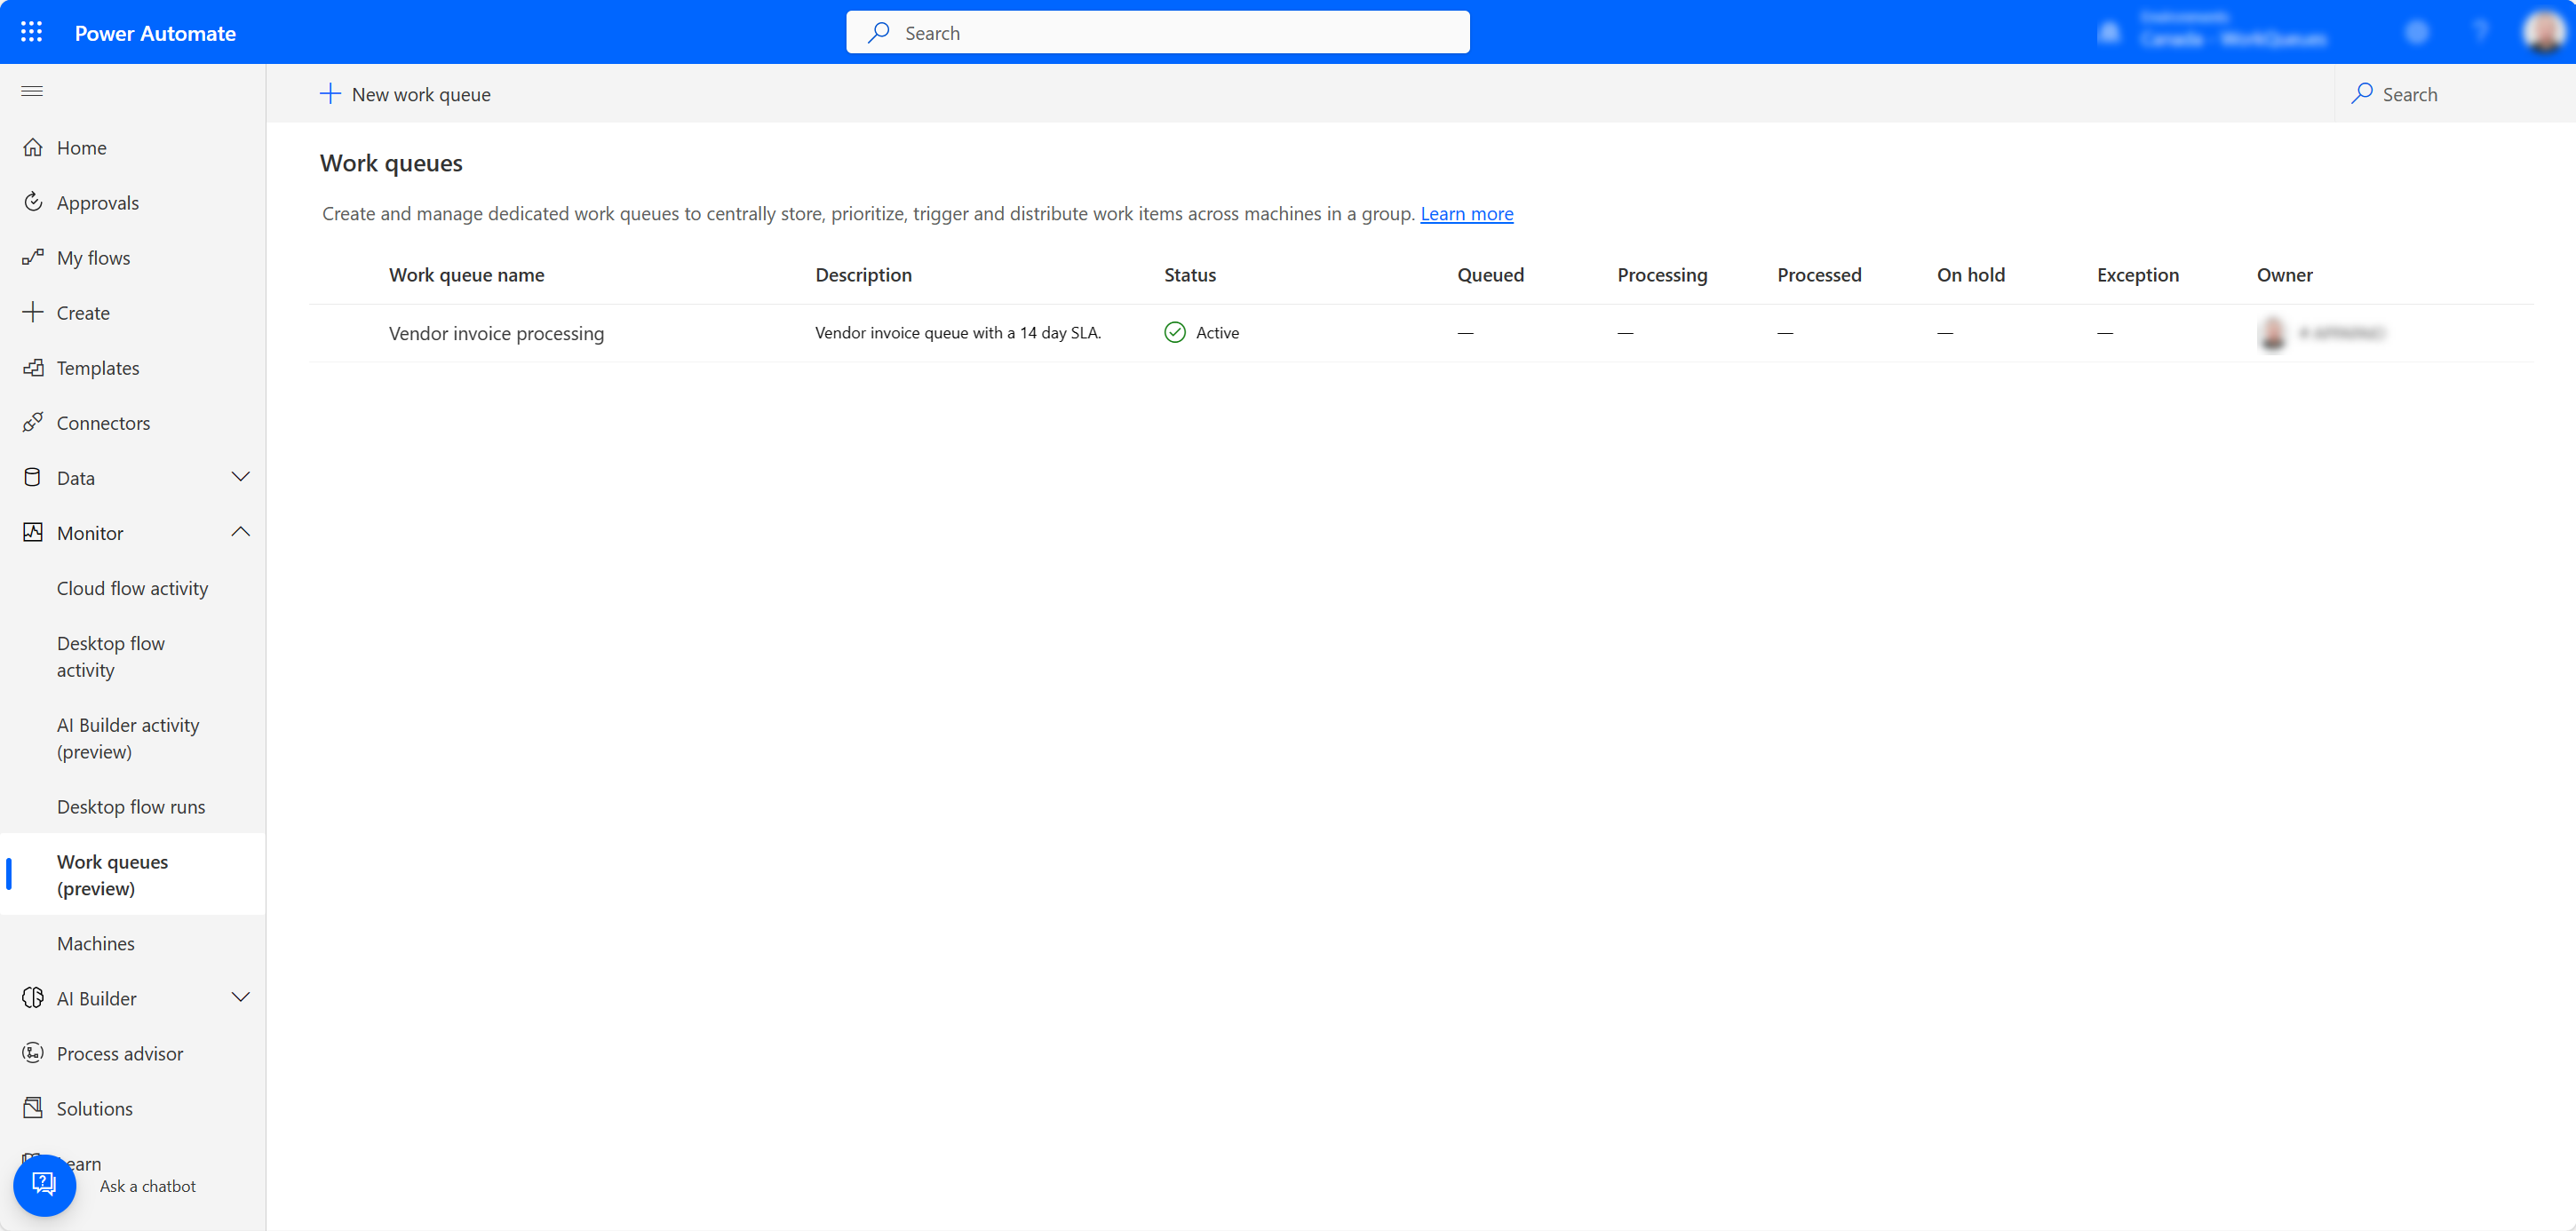
- Depending on your data volume, this might take some time to complete. Once complete, navigate to the work queue list page and confirm that vendor invoice queue has been added.


Phase 3/3: Import work queue items
- Next, go to https://make.powerapps.com and sign-in with your credentials.
- Confirm that you're still in the correct environment and select Tables in the side-menu.
- Select the All tab.
- Search for Work Queue Item table and open its details page.
- In the toolbar, select Import and then Import data.
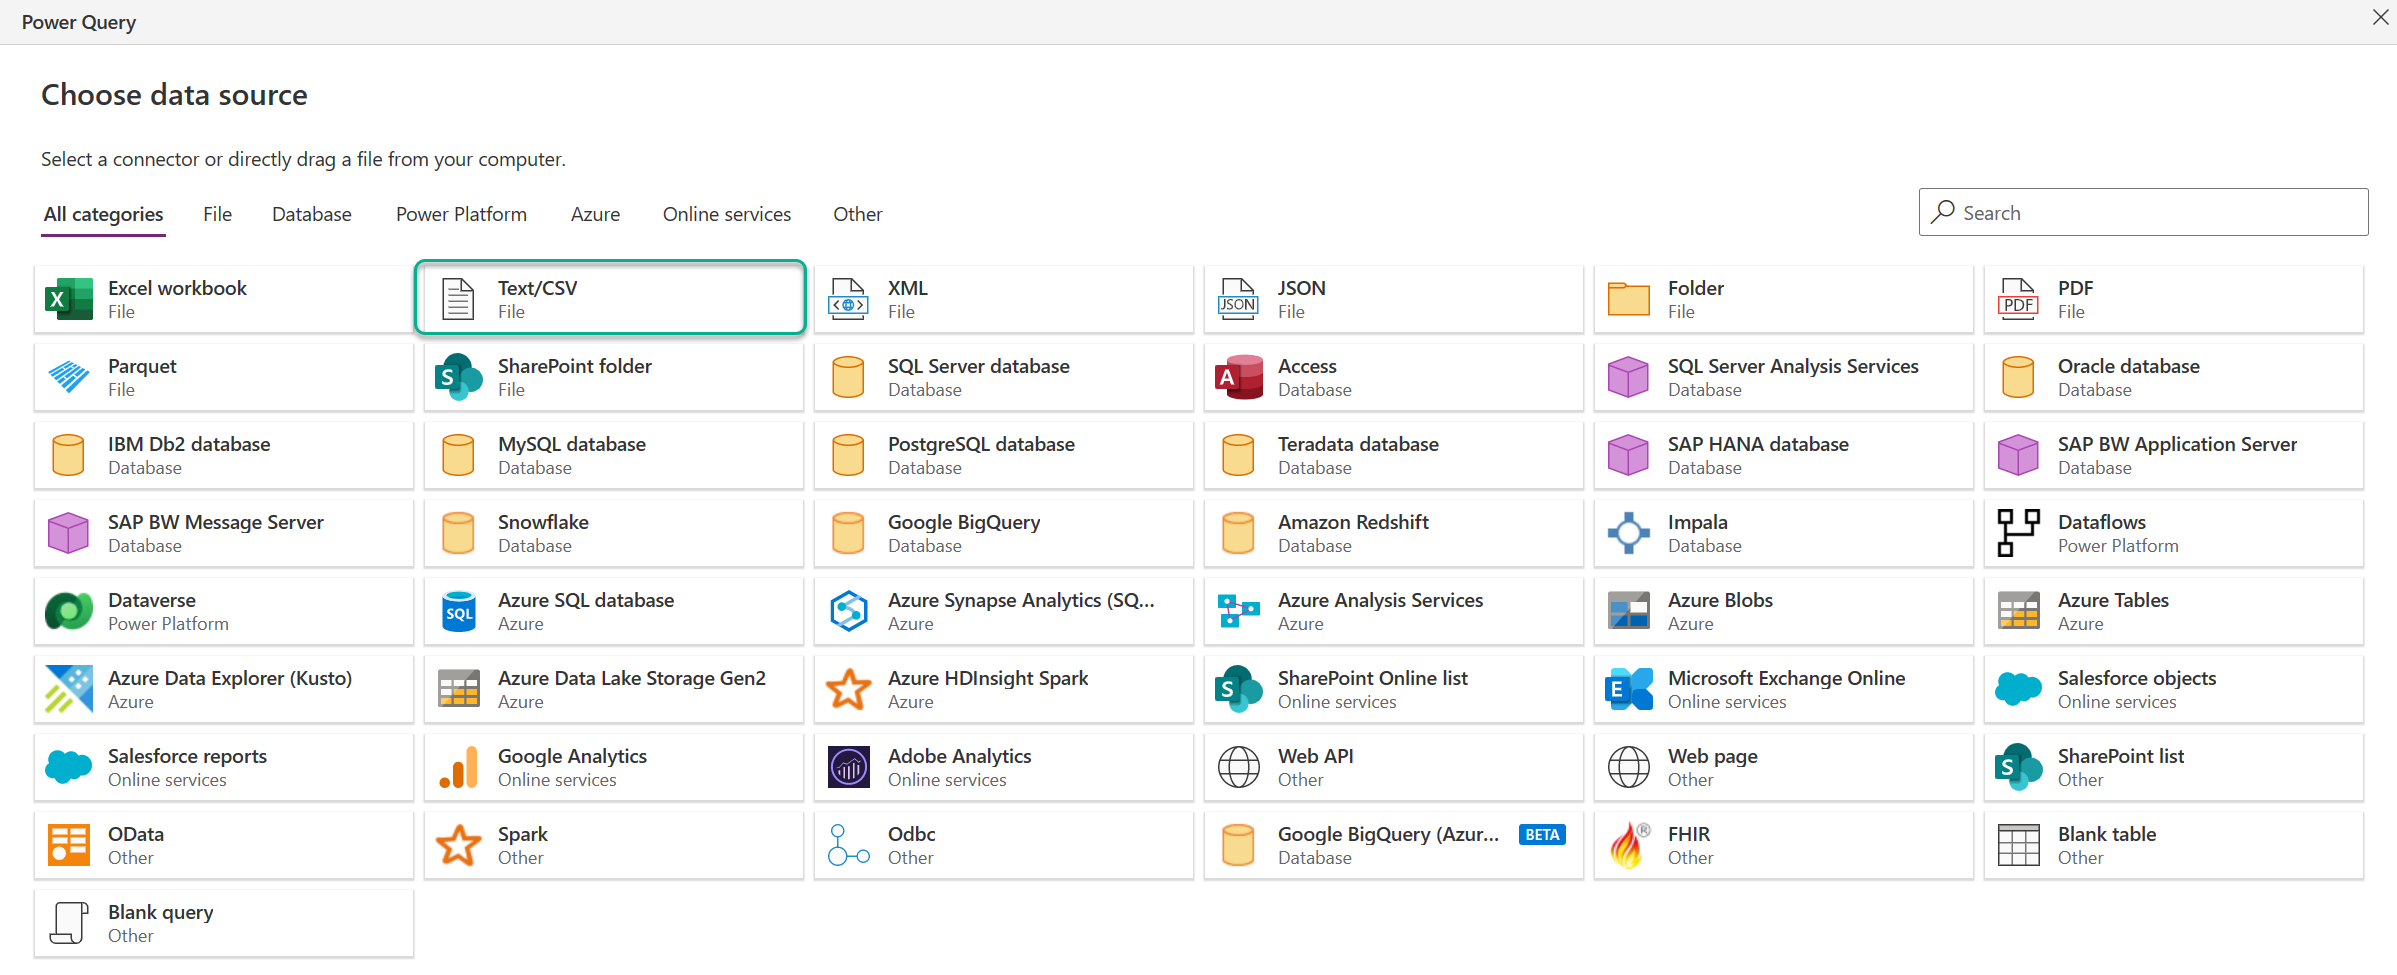
- In the Power Query dialog that opens, select the Text/CSV option.
- Next, select Upload file (Preview) and then Browse... for the vendor-invoice-items.csv file.
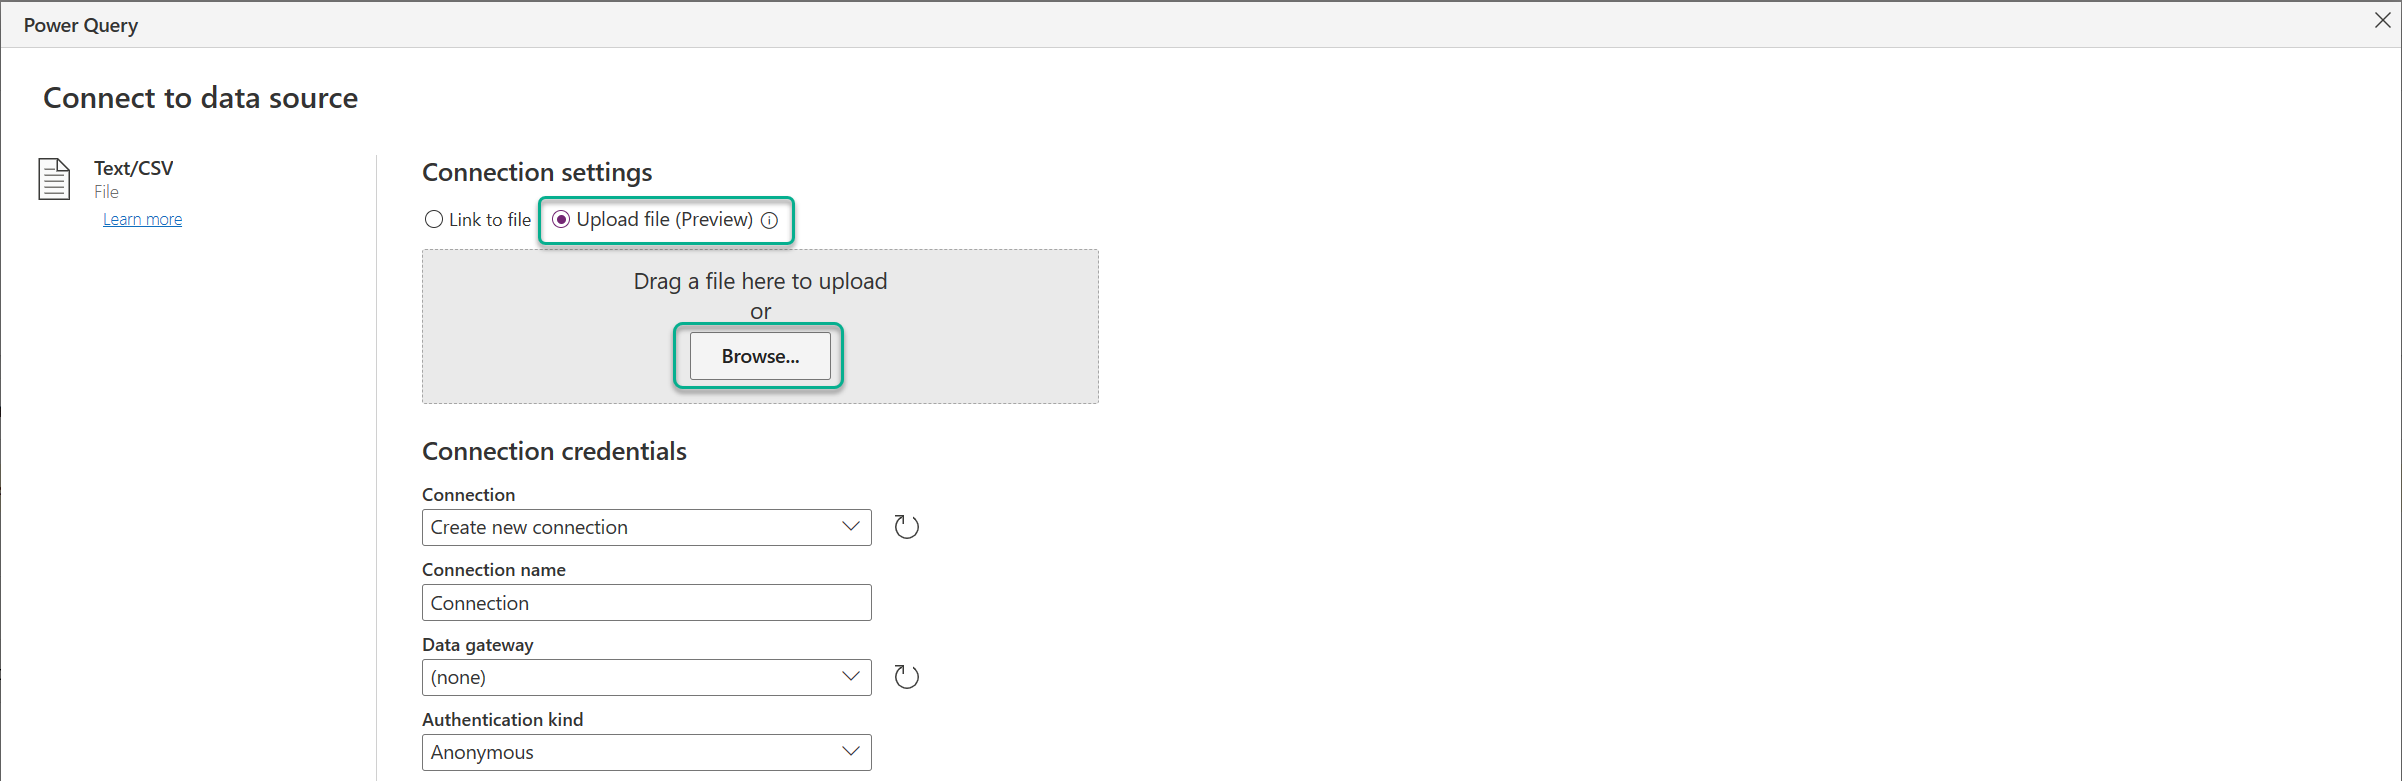
- If needed, establish a connection to your OneDrive for Business folder.
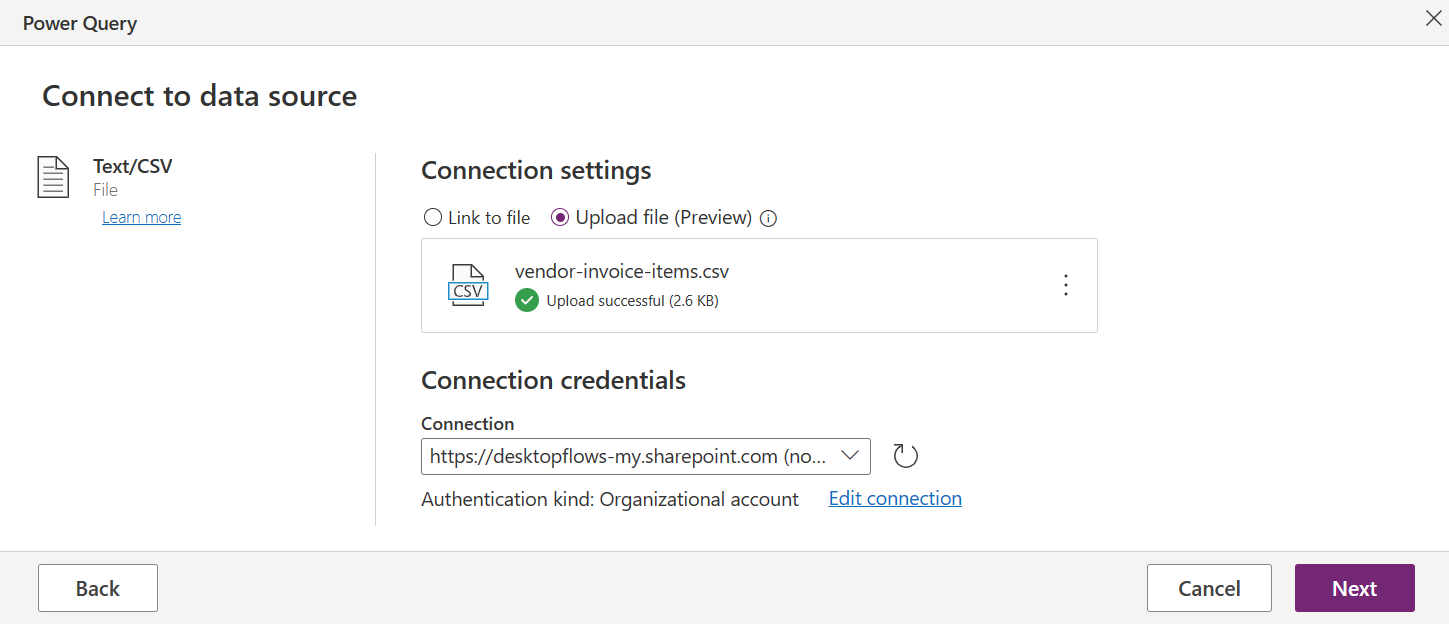
- Select Next and confirm that you see the work queue item records and that Comma is selected as delimiter.
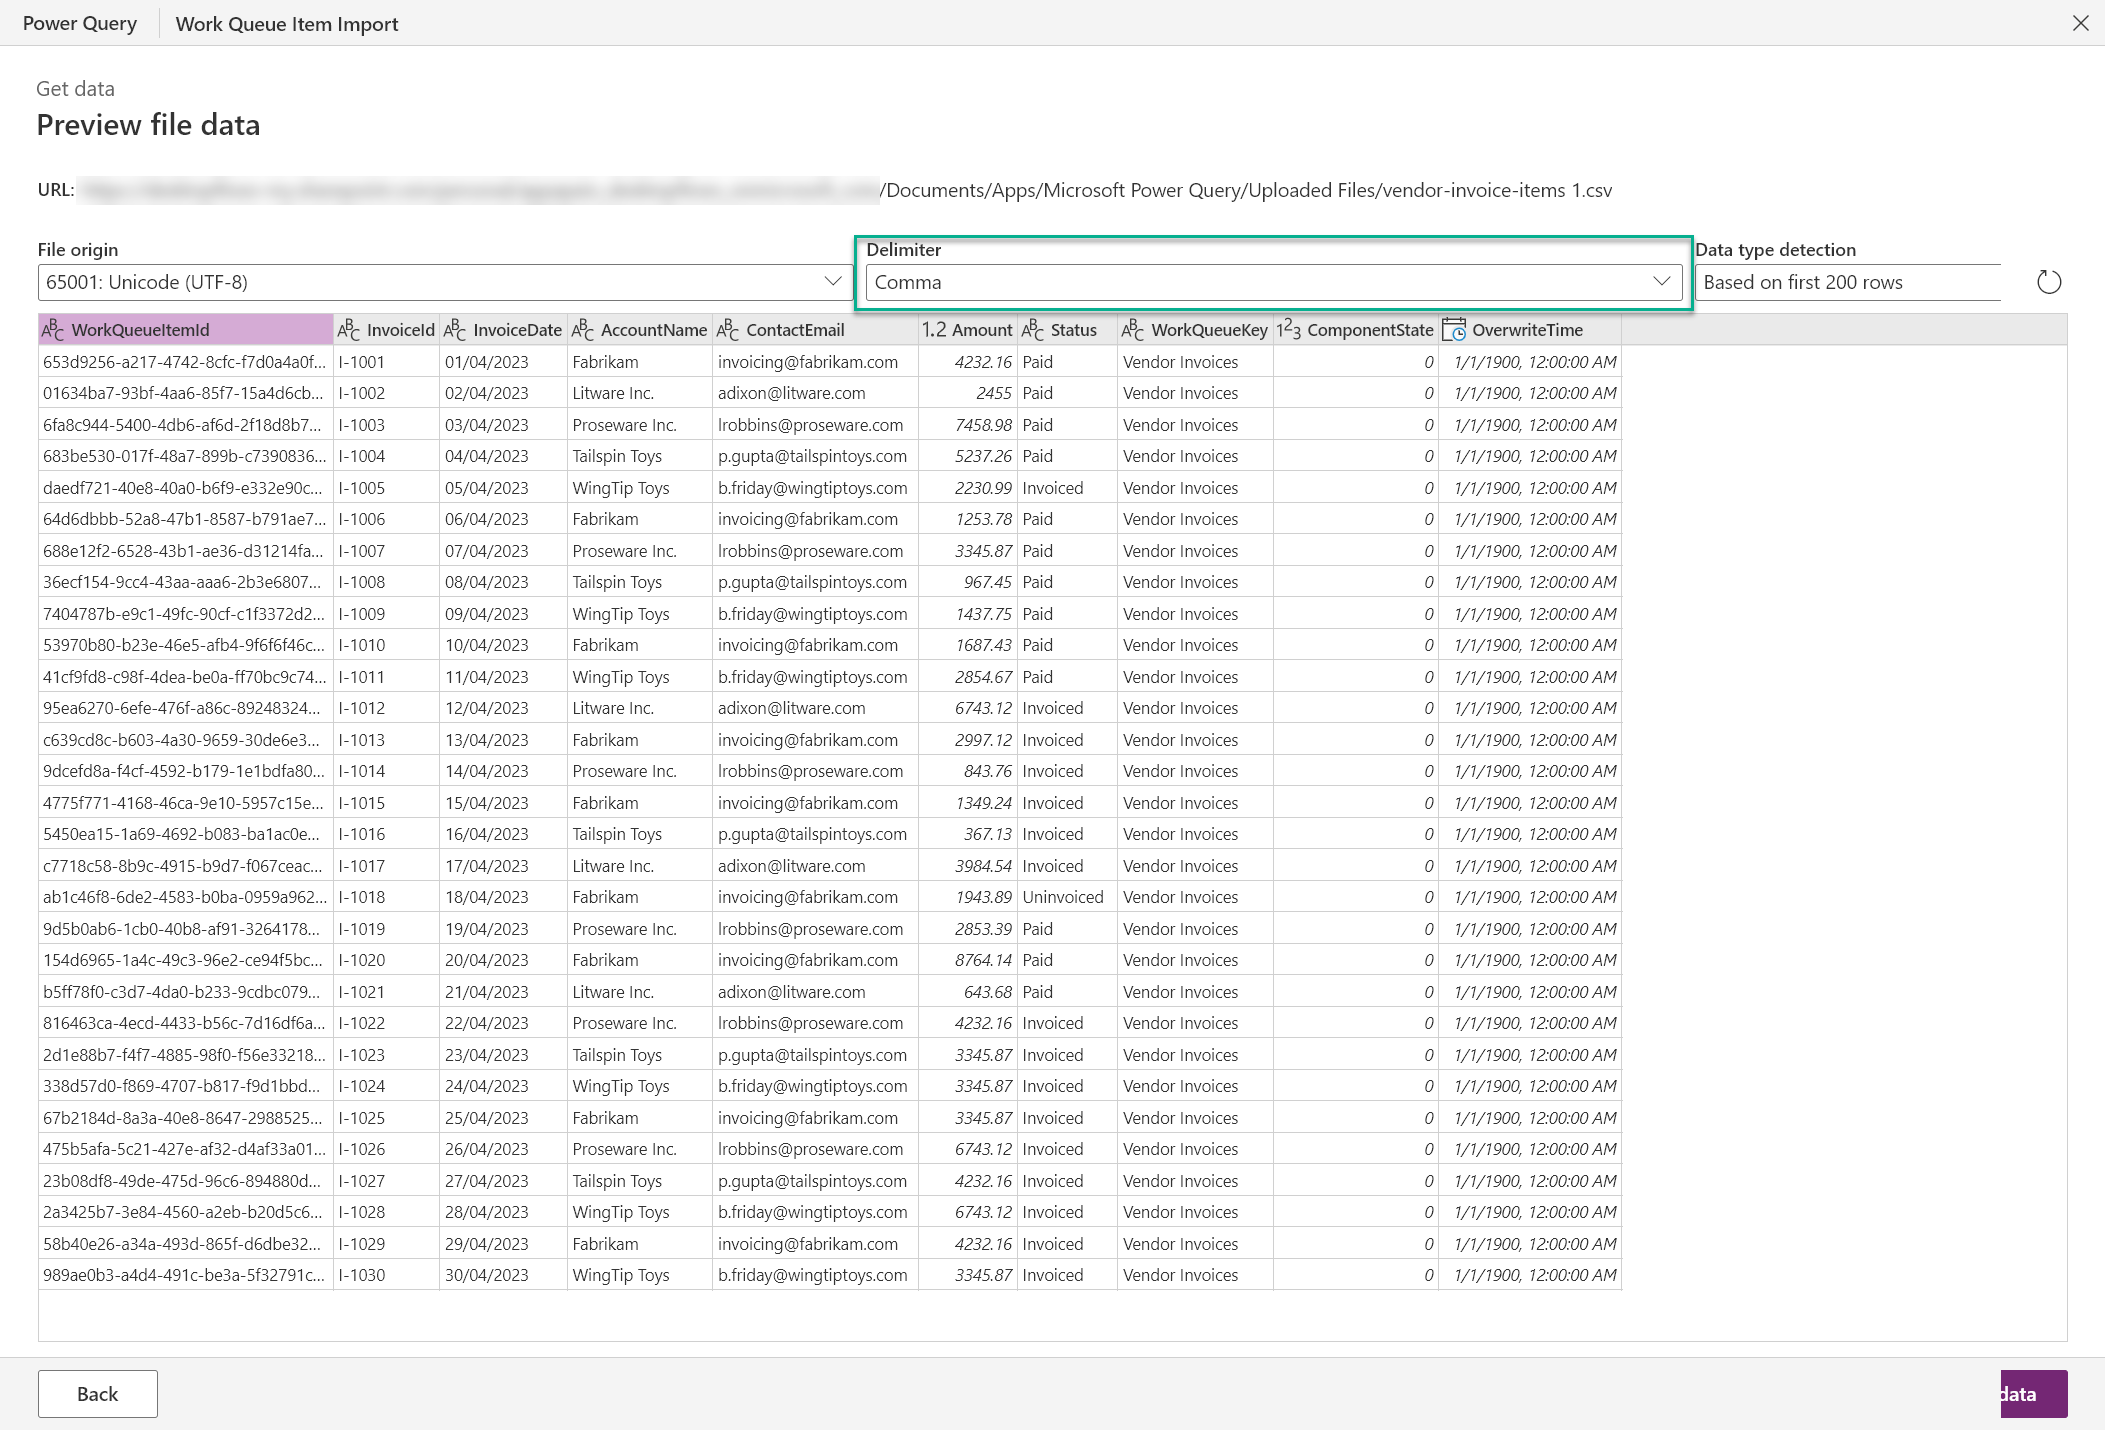
- Select Next.


Note
The next few steps are not required if all you want to do is import basic, already formatted values into the work queue items table. However, if you're looking to reshape the source data before you import it, then the following Power Query transformations might come in handy for your future use-cases.
In the Power Query transformation window, select the Add column tab on the ribbon toolbar and then select Custom column.
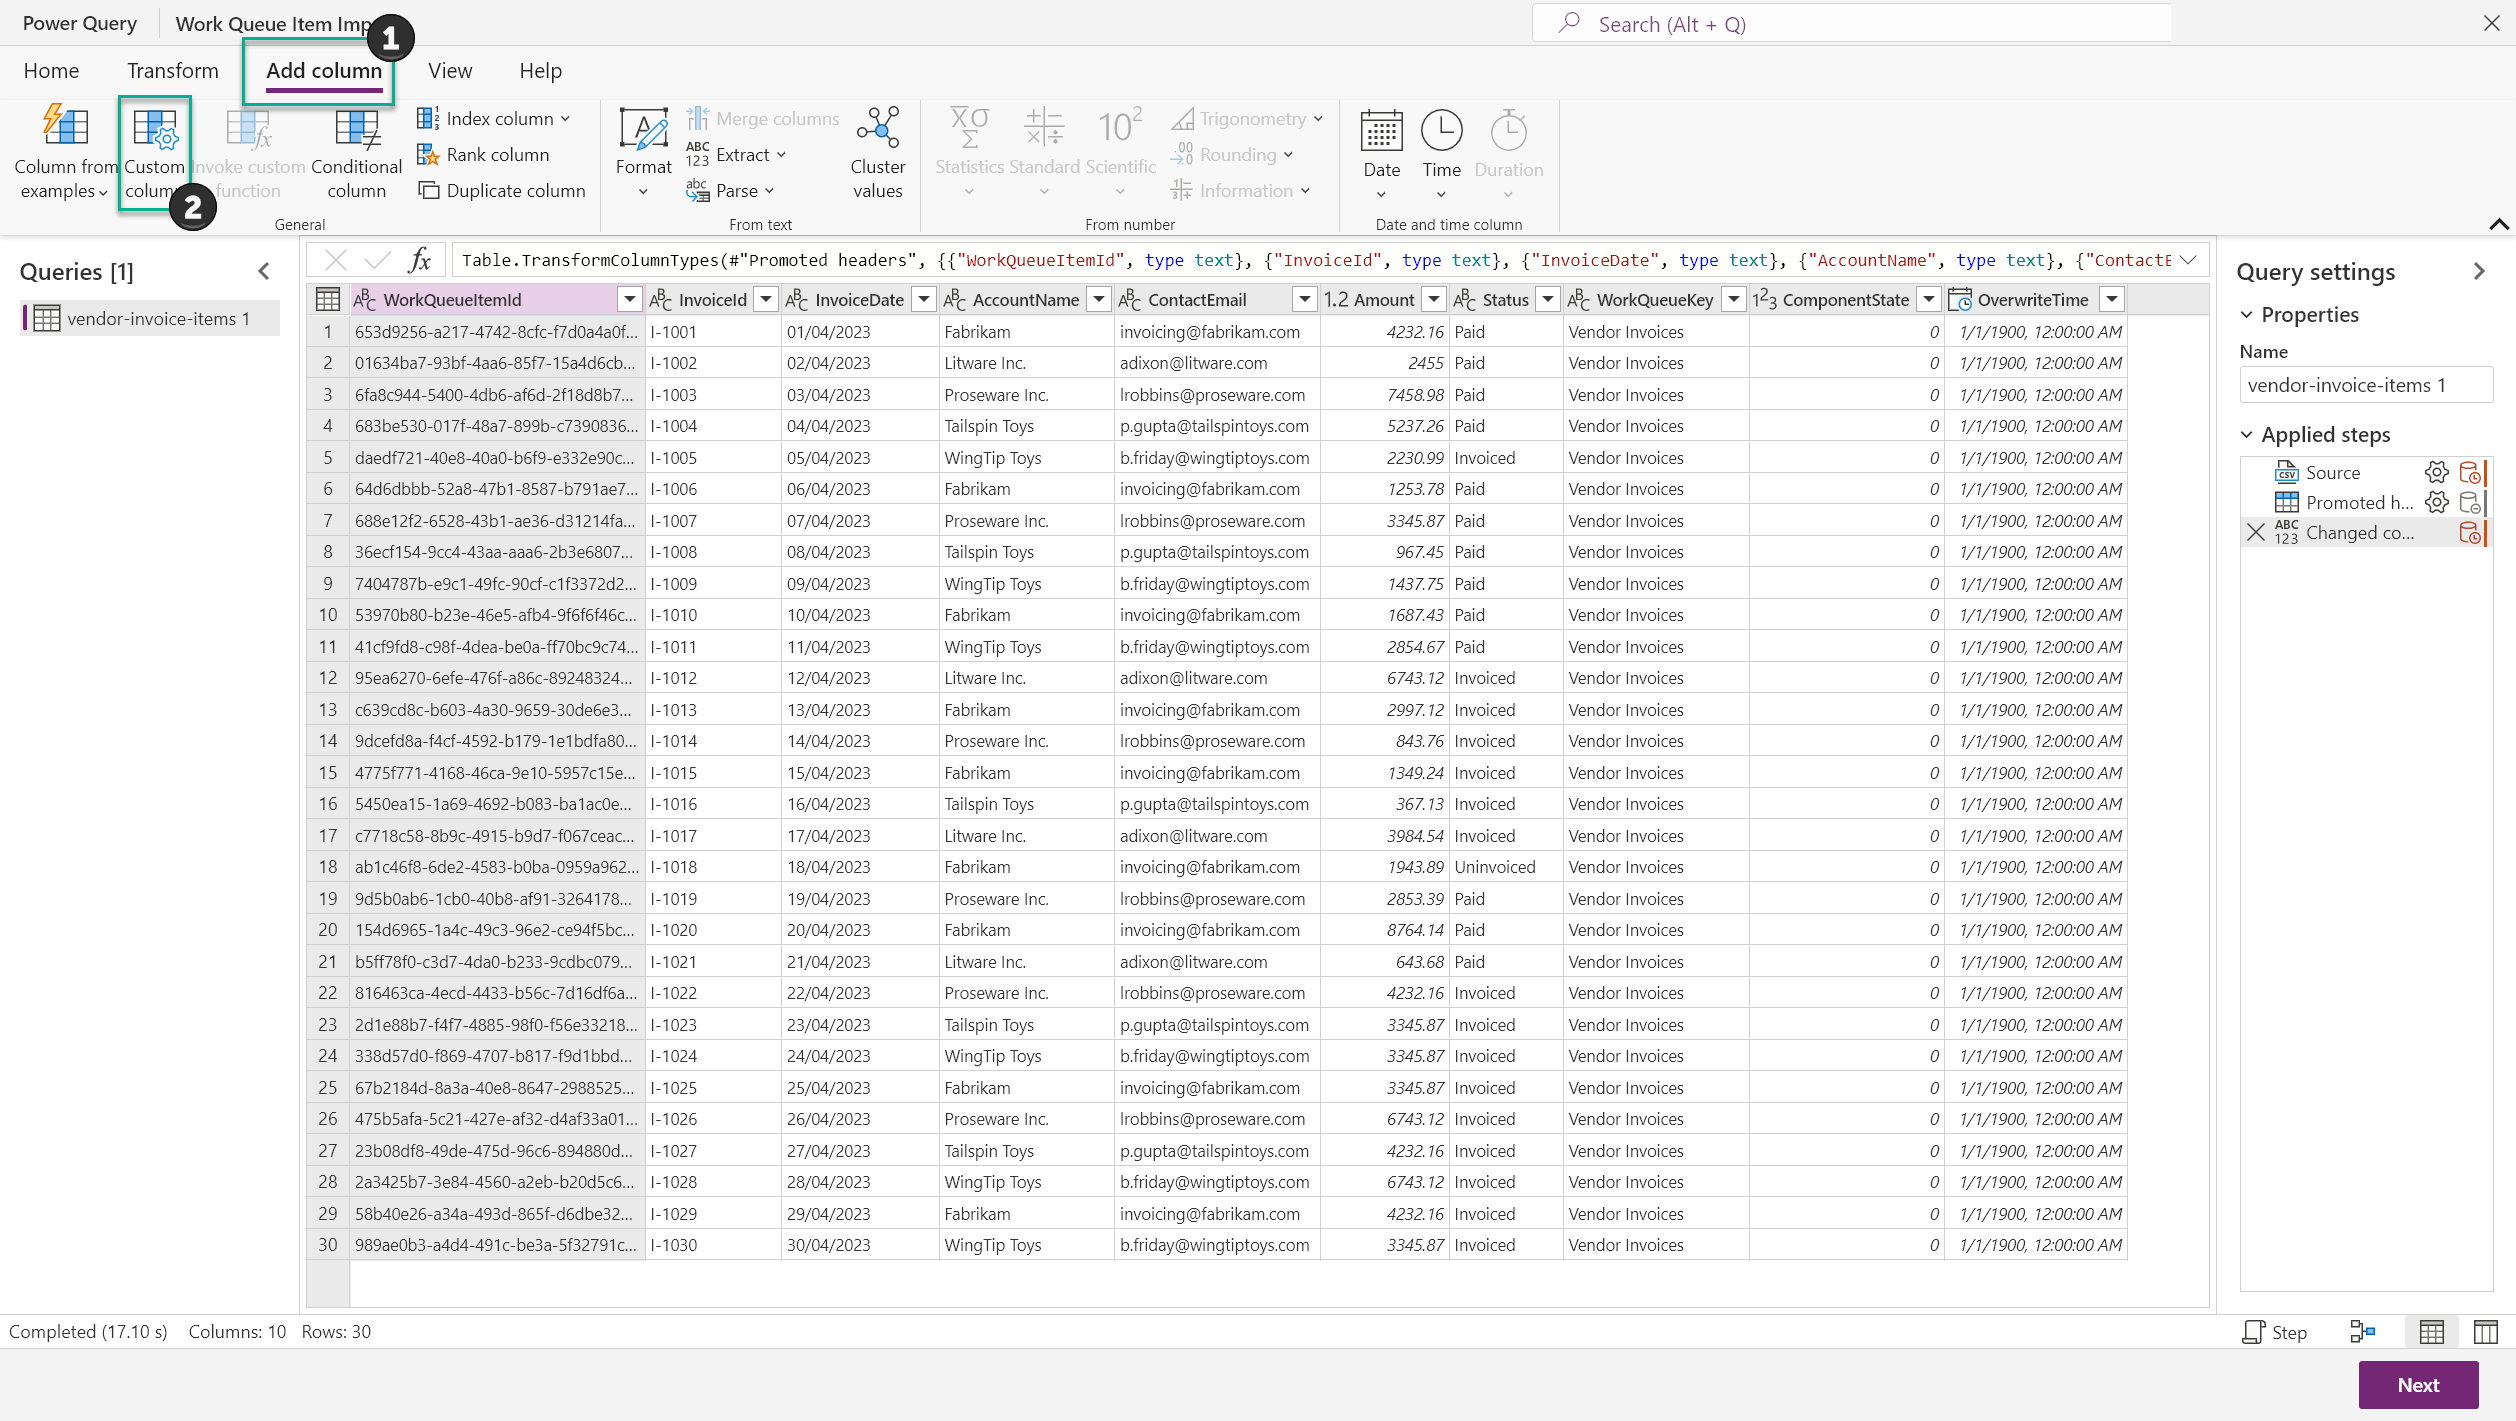
In the Custom column dialog box, enter Input as the new column name and Text.FromBinary(Json.FromValue(_)) in the custom column formula field.
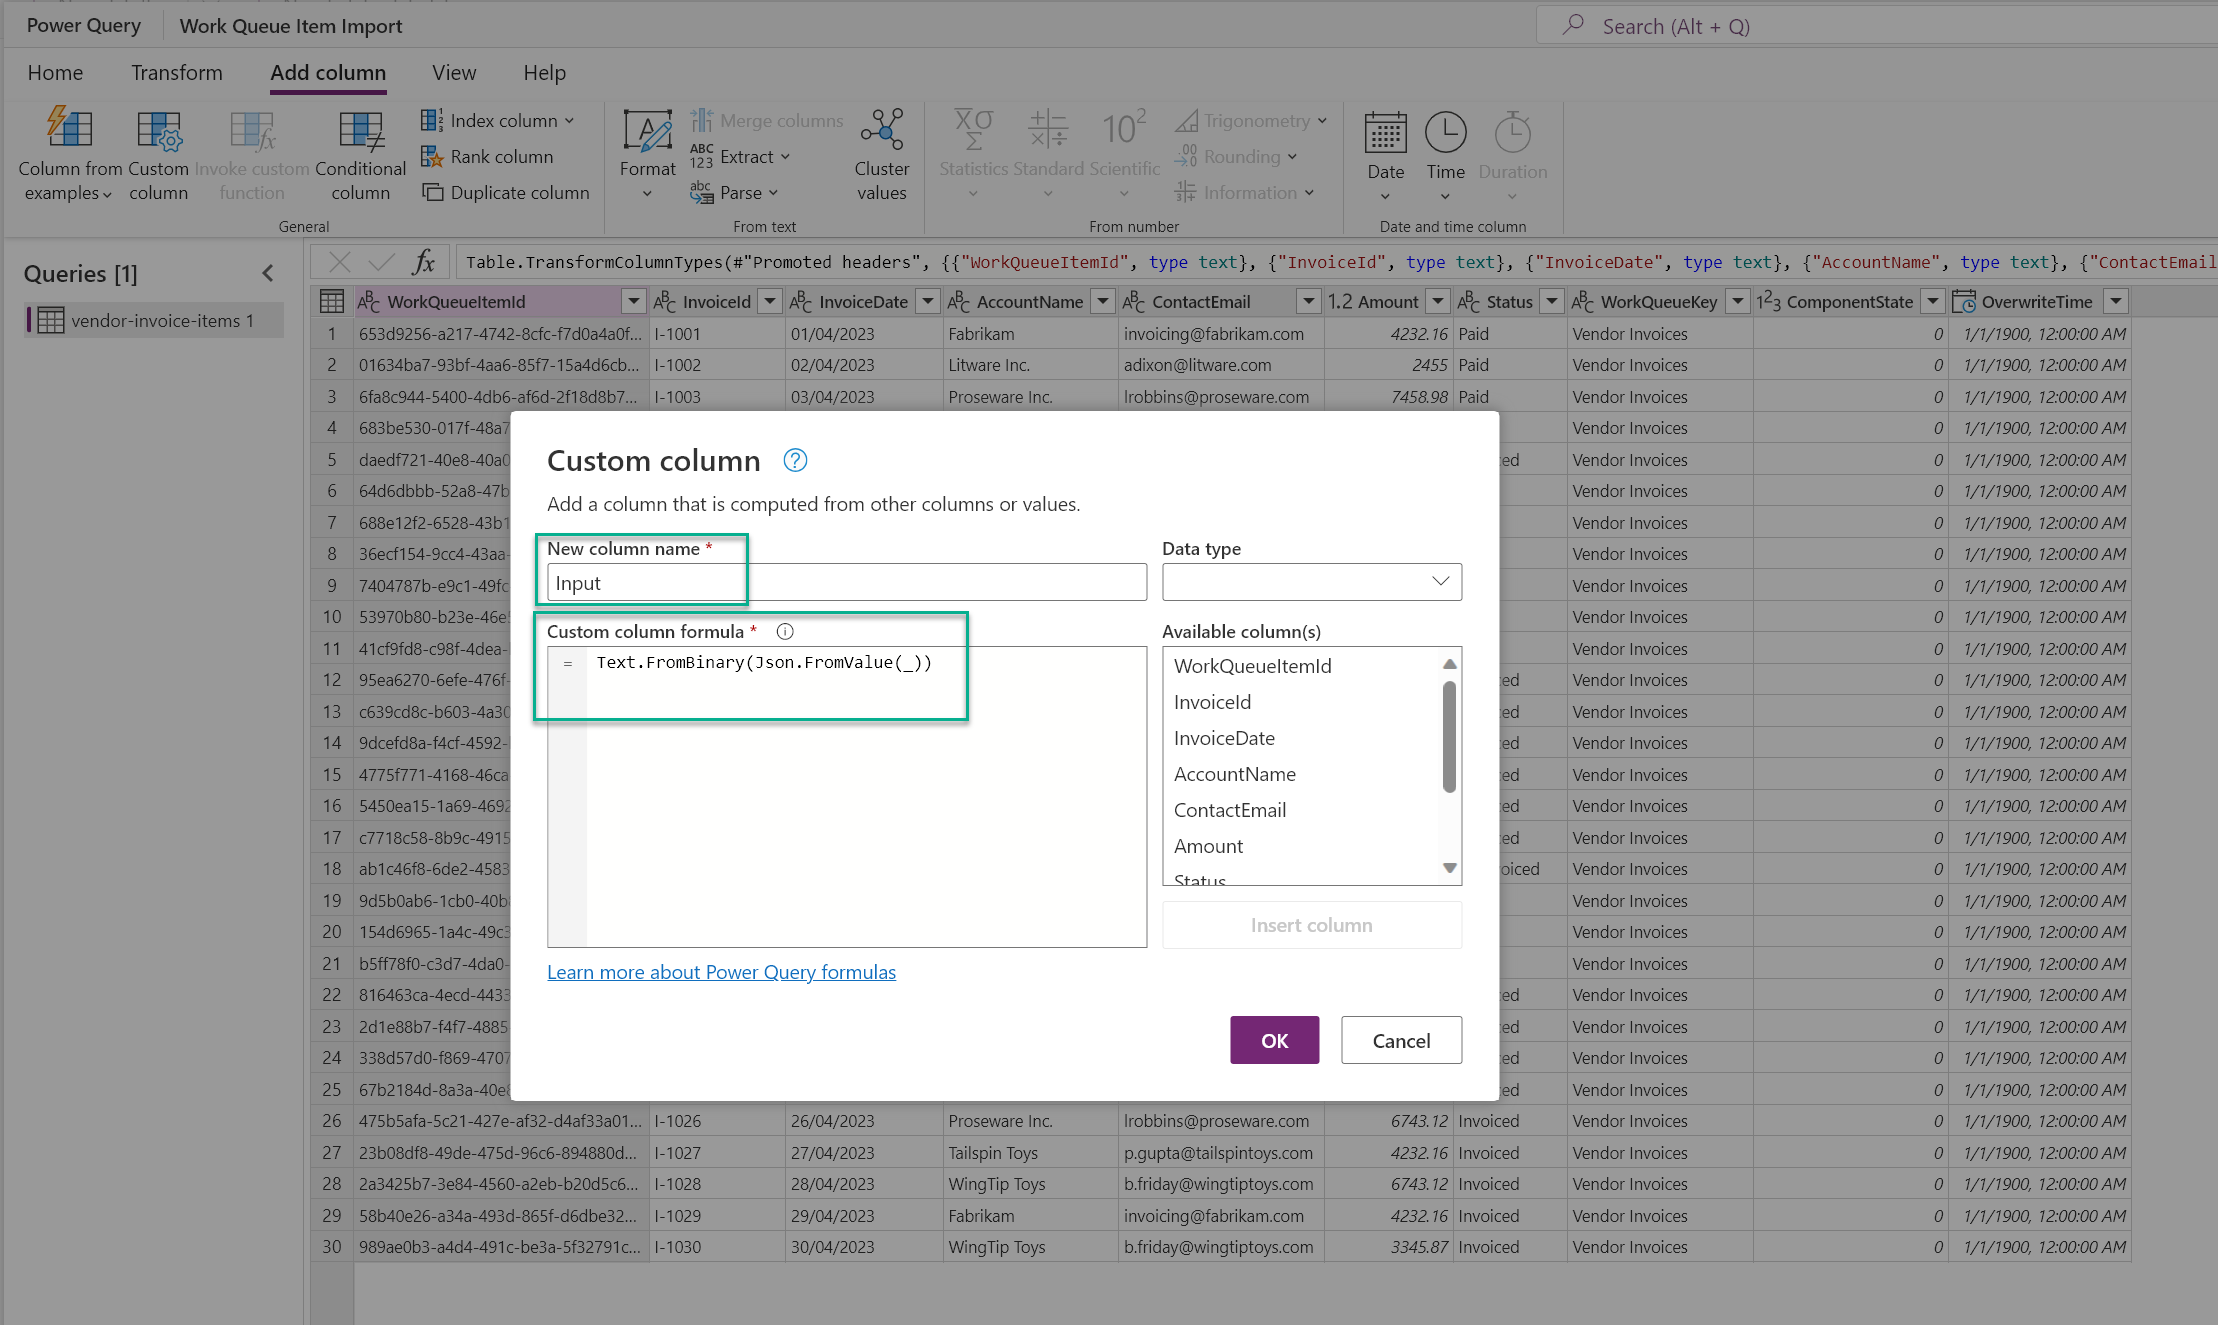
Here's what the formula does:
- Json.FromValue(_): This part of the expression takes the input value (that is, a row of the table) and converts it into a JSON-formatted text.
- Text.FromBinary(): This part of the expression takes the JSON-formatted text and converts it into binary format. This step is primarily used for optimizing data storage or transmission.
By using both of these functions together, the expression can turn each row of the table into a JSON object and store the resulting JSON object in a new column called Input. This process is repeated for each row of the table.
Select Ok.
Select Next.
On the mapping under the Load settings section, select Load to existing table.
Under Destination table, select workqueueitem.
Under Select key (optional) select workqueueitemid.
In the Column mapping section set the following mapping:
Source column Destination column Input input InvoiceId name ComponentState workqueueid.ComponentState OverwriteTime workqueueid.OverwriteTime WorkQueueKey workqueueid.workqueuekey 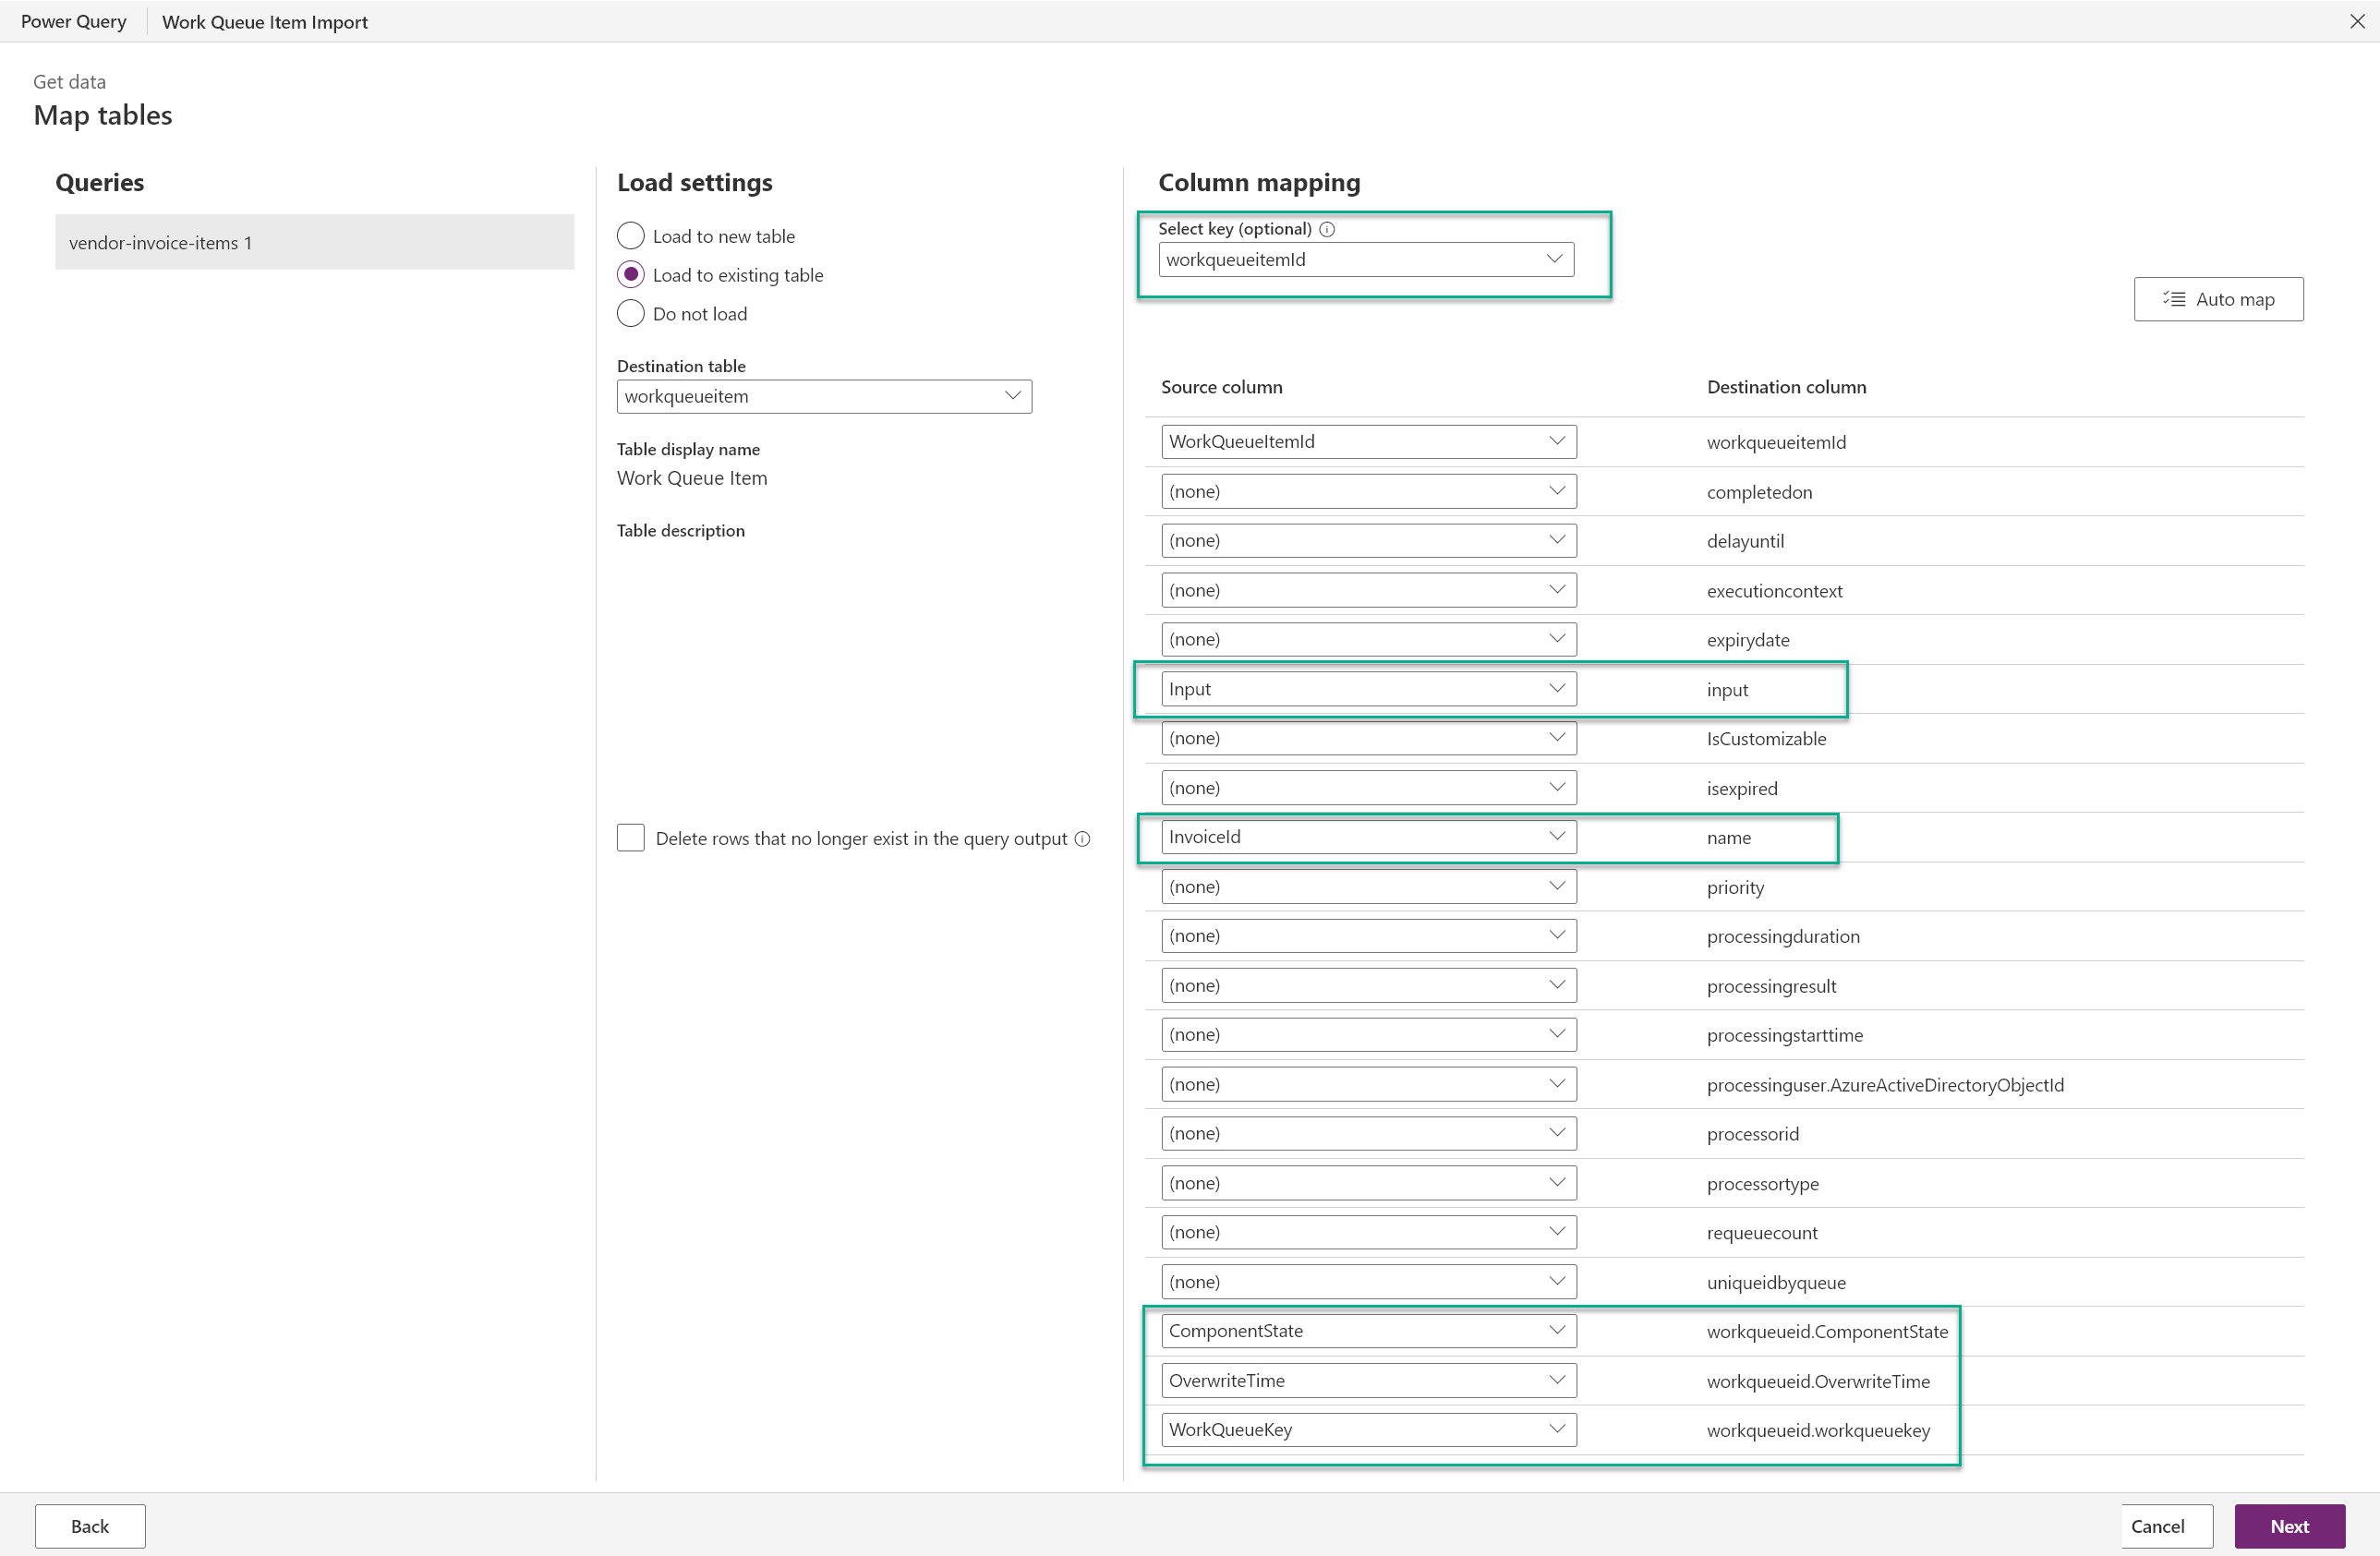
Select Next and then select Publish.
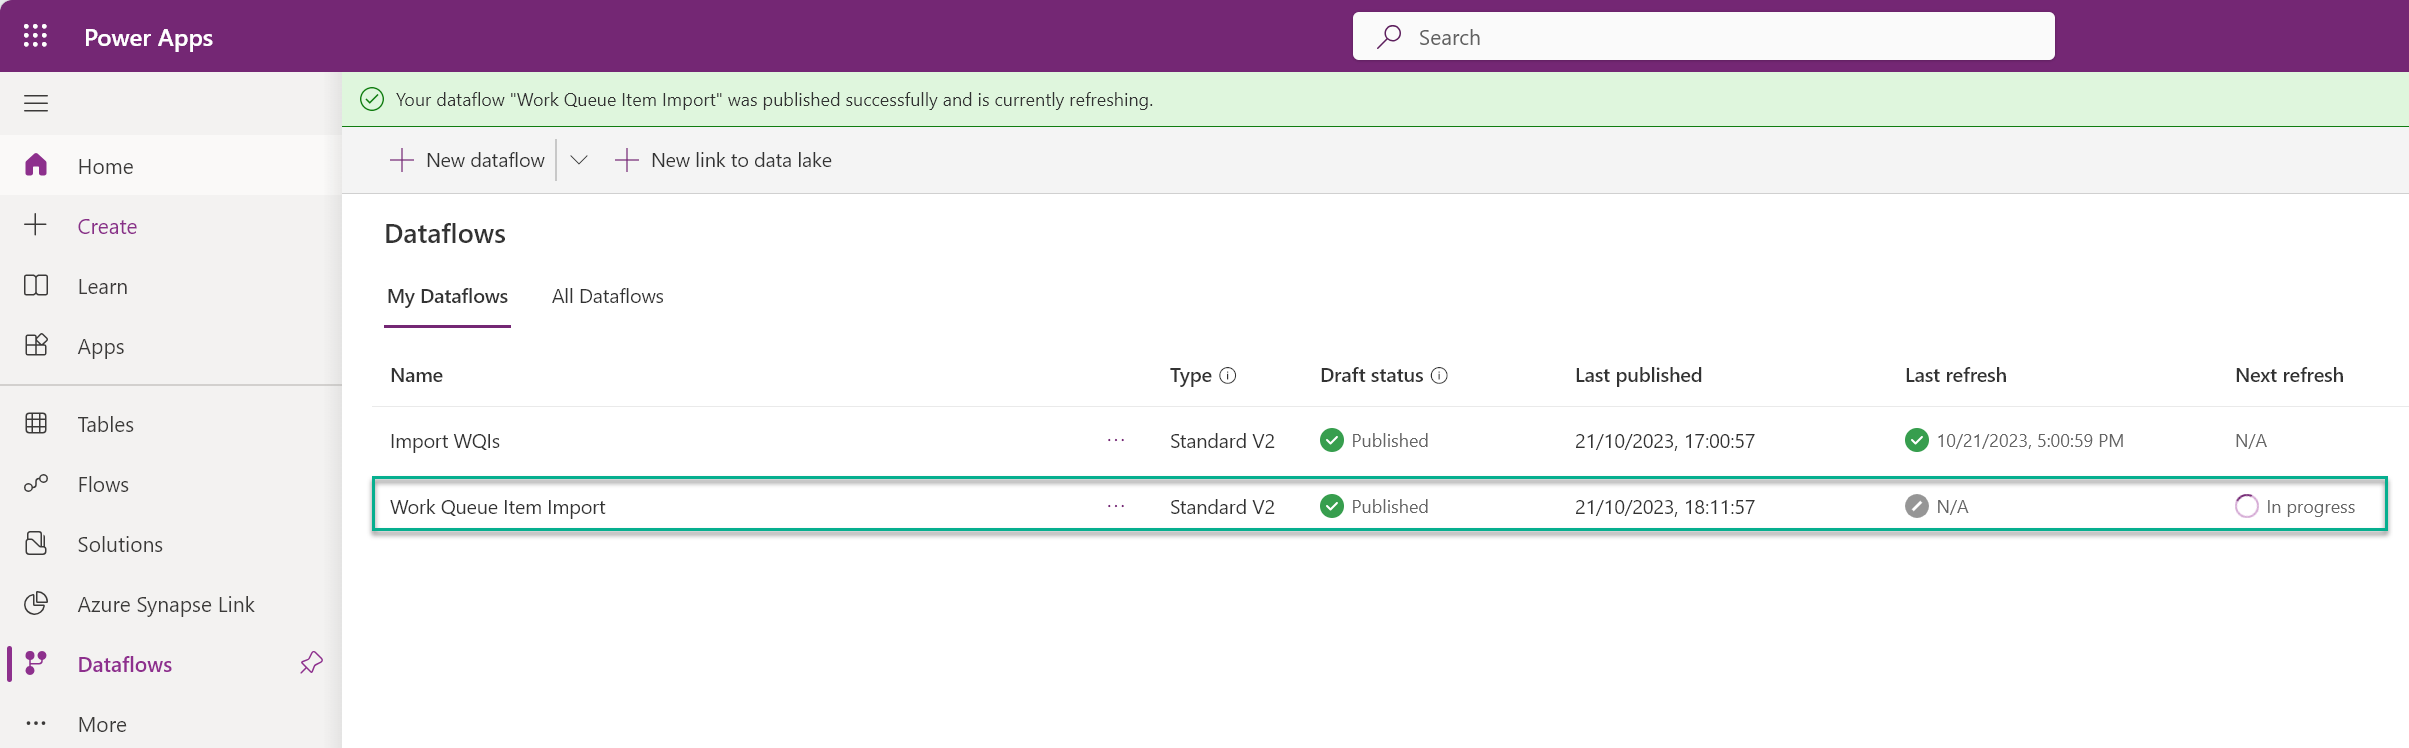
Go to the Power Apps maker portal and select Dataflows from the left-menu (you might have to select More first to get to the Dataflows menu).
Confirm that you see a new dataflow entry and that both icons show success once the import is complete.
Once complete, navigate to the work queue details page of the vendor invoice queue and confirm that the work queue items have been added.