Note
Access to this page requires authorization. You can try signing in or changing directories.
Access to this page requires authorization. You can try changing directories.
This article describes the ways you can share your datamarts and manage its permissions to provide users with specific access.
Important
The Power BI datamarts feature is being retired in October 2025. To avoid losing your data and breaking reports built on top of datamarts, you should upgrade your Power BI Datamart to a Warehouse. For more information, see Unify Datamart with Fabric Data Warehouse.
Sharing datamarts for consumption
Once a datamart is created, you can share it for downstream consumption by other users in your organization. Sharing a datamart enables the recipient to access the datamart in the following ways:
SQL connection string: Connect to the datamart’s underlying SQL connection string and query the datamart from SQL client tools.
Auto-generated semantic model: Build content based on the datamart’s underlying semantic model, by providing Build permissions.
There are a few ways to share a datamart, described in the following sections.
Share from a workspace
While in the workspace, select the Share option from the datamart’s context menu, as shown in the following image.

Share from the data hub
To share a datamart from the data hub, select Share from the datamart’s context menu within the data hub. You can perform this sharing from any of tabs in that window: All, My data, Trusted in your org or Recommended.
The following image shows selecting the context menu from within the data hub, and selecting Share.

Share from datamart information page
To share a datamart from the information page in the data hub, select the Share button from the ribbon at the top of the page.
The following image shows the Share button from the ribbon.

You can also select the Share datamart button from the information panel itself, within the data hub. The following image highlights the Share button on the information panel.

The share datamart process
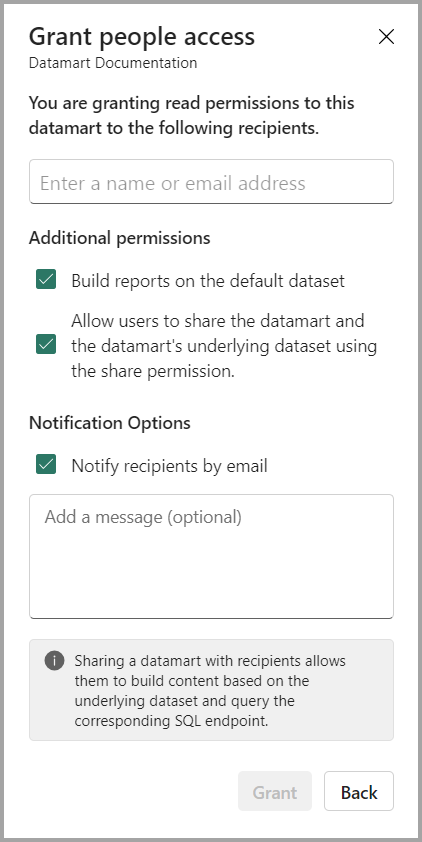
Regardless of which way you choose to share a datamart, the Grant people access window appears so you can enter the names or email addresses of the people or groups (distribution groups or security groups) in your organization with whom you want to grant access to the datamart.
You can choose whether recipients can reshare the datamart with others in the organization, by selecting the checkbox next to Allow recipients to share this datamart. There's an option to allow users to create Power BI reports (from scratch, autocreate, paginated reports) on top of the default semantic model that is connected to the datamart by selecting the checkbox next to Build reports on the default semantic model. Both of these options are selected by default.
You can also choose to send recipients a message to provide more context, by typing a message into the Add a message (optional) field in the Grant people access window.
The following image shows the Grant people access window.
Once you grant access, recipients receive an email stating access to the datamart is granted. The email includes a button titled Open this datamart that opens the datamart's information page.
When recipients open the link or otherwise navigate to the shared datamart, its information page shows the SQL connection string for connecting to the datamart. Users can use client tools other than Power BI, such as SSMS, to query the datamart using T-SQL.
The following image highlights the SQL connection string in a datamart information window.

Users can build reports with the datamart or use Analyze in Excel, and can also connect to the datamart or underlying semantic model from Power BI Desktop.
The following image highlights the Create a report entry point in a datamart information window.

Note
Sharing a datamart allows the recipient to access the datamart for downstream consumption and not to collaborate on the datamart creation. To enable other creators to collaborate on the datamart, you must provide Member, Admin, or Contributor access to the workspace where the datamart is created.
Manage permissions
The Manage permissions page shows the list of users who have access by either assigning to Workspace roles or item permissions (as described earlier in this article).
If you're an Admin or Member, go to your workspace and select More options which shows the context menu and select Manage permissions.

For users who were provided workspace roles, it shows the corresponding user, workspace role, and permissions. Admin and Members have Read, Write, and Reshare access to datamarts in this workspace. Contributors have Read and Write permissions. Viewers have Read permissions and can query all objects within the datamart. For users with whom a datamart was shared, item permissions such as Read and Reshare are provided by default.

You can choose to add or remove permissions using the Manage permissions experience. Remove reshare removes the Reshare permissions. Remove access removes all item permissions and stops sharing the datamart with the specified user.

Related content
This article provided information about creating reports using datamarts.
The following articles provide more information about datamarts and Power BI:
- Introduction to datamarts
- Sharing and discovering data using datamarts
- Understand datamarts
- Get started with datamarts
- Analyzing datamarts
- Access control in datamarts
- Datamart administration
For more information about dataflows and transforming data, see the following articles: