Note
Access to this page requires authorization. You can try signing in or changing directories.
Access to this page requires authorization. You can try changing directories.
Managing the Power Platform on a large scale across numerous environments, ranging from hundreds to tens of thousands, poses a significant challenge for both startup and enterprise IT teams. To address these complexities, environment groups offer a premium governance solution designed to streamline management tasks by organizing environments into logical collections and enforcing uniform policies and configurations.
Think of an environment group as a "folder" for your environments. Administrators can cluster a flat list of environments into structured groups based on criteria such as business unit, project, geographic region, or purpose. By creating these logical collections, IT teams gain the ability to manage multiple environments simultaneously and efficiently implement security, governance, and compliance policies on a large scale through centrally managed rules. This centralized approach eliminates the need to configure each environment one-by-one, ensures consistency, significantly reduces administrative overhead, and prevents issues such as configuration drift and chaotic management practices common in extensive deployments.
Note
- Environment groups can only contain managed environments.
- Each environment can belong to only one group, and groups can't overlap or be nested.
- Environments in a group can span different regions and types as long as each is managed.
- Environments can be transferred between groups by removing them from one and adding them to another.
Rules
A key advantage of environment groups is their ability to enforce governance at scale through rules. Environment groups allow tenant administrators to define rules that automatically apply standardized settings or policies across all member environments. These rules span critical areas of environment management, such as security and sharing, AI feature enablement, data retention policies, and application lifecycle management (ALM).
When a rule is published at the environment group level, it's enforced across every environment within that group. This means the corresponding setting or policy becomes locked (read-only) within individual environments, ensuring that local system administrators can't modify or override these centrally defined rules. Any subsequent changes can only be made by a tenant administrator with appropriate edit rights at the environment group level.
Learn more about the rules available in Rules for environment groups.
Note
- Per-environment exceptions aren't currently supported.
- When an environment is added to the group, it inherits the group's published rules.
- When an environment is removed, it retains the last applied configuration from the group's rules but becomes unlocked, allowing a local admin to modify it going forward.
Use cases and scenarios for environment groups

Environment groups are flexible. Whether you need to enforce compliance by region, provide personal sandbox spaces for makers, roll out AI features selectively, or standardize development and testing vs. production practices, environment groups can be adapted to fit. Some common use cases and scenarios where environment groups add value include:
Personal productivity environments
When using default environment routing, each maker can automatically get their own personal developer environment. It's best practice to place these environments into a dedicated group as they're created. For example, you may want a group named Personal Productivity. Within this group, apply rules that treat each environment as a safe, individual sandbox. For instance, restrict agent sharing to prevent accidental exposure of in-progress work, and include productivity aids like the maker welcome content. This approach isolates each user's work, similar to each person having their own OneDrive, and helps keep the default environment clean and secure.
AI feature management
Organizations exploring AI capabilities can use environment groups to roll out features in a controlled and intentional way. For example, an enterprise might create a Copilot Pilot group with sandbox environments where AI features are turned on for early testing and feedback. At the same time, production or sensitive environments can remain in a separate group with a more gradual rollout timeline. This setup supports safe, phased adoption while giving teams space to experiment and build readiness. As confidence grows, admins can update the rules to expand Copilot access to more groups or move environments between them. This ensures a clear and manageable path toward broader AI use.
Global environment strategy
Large organizations with many environments can group the environments by organizational units, such as by department, region, or subsidiary. For example, a global enterprise might have separate groups for North America, Europe, and APAC environments to enforce region-specific compliance and data residency rules. Each region’s group can have rules aligning with local regulations or business policies, like turning on certain features only where allowed. This structure brings order to a sprawling environment landscape and makes it easier to apply updates or policy changes en masse.
Development vs. production environments
In an ALM strategy, you might separate environments by lifecycle such as development, test, and production. Using environment groups, an admin can create a Dev/Test Group with relaxed policies such as one that allows some preview features or unmanaged customizations for agility, and a Production Group with stricter rules such as one that forces solution checker, blocks previews or unmanaged changes, or that has a longer backup retention for safety. This approach maintains high standards in production environments while giving development teams the flexibility they need to innovate. It helps strike a strong balance between governance and productivity.
Create an environment group
Complete the following steps to create a new environment group in the Power Platform admin center.
- Sign in to the Power Platform Admin center as a Power Platform tenant administrator.
- Select Manage in the navigation pane.
- In the Manage pane, select Environment groups.
- On the Environment groups page, select New group.
- In the Create group pane that appears:
- Add a name for your group in the Name field such as Personal Productivity.
- Add a brief description of the group in the Description field.
- Select Create.
After a few moments, the new group appears in your Environment groups list. At this point, the group is empty (contains no environments) and none of its rules are configured. You can now add environments and configure rules, as needed.
Note
If you prefer to operate outside of the Power Platform admin center, the Power Platform for Admins V2 (Preview) connector offers an alternative solution. It allows the creation and deletion of environment groups and the ability to add or remove environments from these environment groups, facilitating opportunities for automation.
Configure the rules for your environment group
After you create the environment group, Power Platform tenant administrators can immediately add managed environments or configure the group's rules. Both approaches work, but keep in mind that only published rules are enforced across environments.
- Sign in to Power Platform Admin center as a Power Platform tenant administrator.
- Select Manage in the navigation pane.
- In the Manage pane, select Environment groups.
- On the Environment groups page, select the group you created.
- Select the Rules tab for that group. You see a list of available rules.
- Select a rule to open its configuration panel. Adjust it as needed, then Save the rule. Repeat this step for all the rules you want to configure in this group.
- Select the Publish rules button in the command bar.
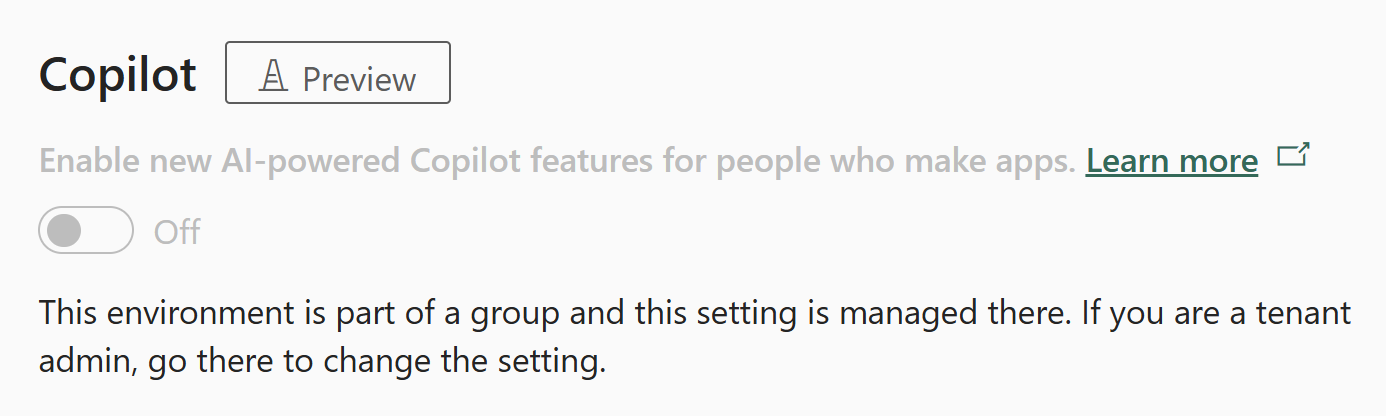
The following screenshot shows an environment-level setting that is locked by an environment group rule.
Note
- Configure only the rules relevant to your scenario.
- Untouched rules are managed at the environment level.
- Updated rules appear in bold with an asterisk (*) until published. Remember to republish rules to apply changes across environments.
Route environments to your environment group
One powerful way to use environment groups is in combination with default environment routing. Instead of having new makers build in the shared Default environment, environment routing provisions a dedicated developer environment for each maker and optionally assigns it to an environment group of your choice. If you want all new developer environments to be automatically placed under a specific group—and thus immediately governed by its rules—set up environment routing to point to that group.
- Select Manage in the navigation pane.
- In the Manage pane, select Environment groups.
- Select the Environment Routing button in the command bar.
- Under the Environment group section, choose the group you want your new developer environments to be created in.
- Select Save.
Going forward, whenever a new maker triggers the creation of a personal developer environment, the platform automatically creates their environment inside the specified group. The environment comes preconfigured as a managed environment with all the group’s rules already applied from the start. The maker doesn't need to choose an environment or set anything up. The maker is routed directly into a governed space that IT has predefined. Admins gain peace of mind knowing that even automatically created environments follow organizational policies, and makers get a ready-to-use environment without needing to worry about configuration.
Note
If an environment group is selected for routing but later you decide to change it, you can update the Environment routing settings to point new environments to a different group. Existing developer environments remain in whichever group they were originally placed, unless moved manually.
Add environments to your environment group
In addition to using routing for new environments, you can manually add existing environments to a group at any time.
- Select Manage in the navigation pane.
- In the Manage pane, select Environment groups.
- Select the target group (the group you want to add environments into).
- Select the Add environments button in the command bar.
- Select one or more environments from the list.
- Select Add.
Note
- Environments without Dataverse can't be selected in the picker.
- If you select an environment that has Dataverse, but it's not managed, you can upgrade it automatically as part of adding it to the group.
Manually create environments in the group
When manually creating a new environment, you can choose to place it into a group at creation time.
- Select Manage in the navigation pane.
- Go to the Environments page.
- Select New in the command bar.
- Select a group for your created environment.
- Enter the other details.
- Select Save.
By selecting a group here, the environment is created as a managed environment within that group, automatically inheriting the group's rules upon creation. If no group is selected, the environment is created outside of any group. You can always add it to a group later.
Remove an environment from your environment group
You can remove an environment from a group if it needs unique governance or if you created it by accident.
- Select Manage in the navigation pane.
- In the Manage pane, select Environment groups.
- Select the group.
- Select the environment you wish to remove.
- Select Remove from group in the command bar.
After removal, the environment retains the configuration previously applied by the group. However, its settings and policies are now unlocked, allowing the local environment admin to manage them directly. The environment remembers the last known state from the group, but is now free to evolve independently.
Delete an environment group
If an environment group is no longer needed, administrators can delete it to avoid clutter.
- Select Manage in the navigation pane.
- In the Manage pane, select Environment groups.
- Select the environment group that you wish to delete.
- Select Delete group in the command bar.
Important
When you delete a group, first remove all of its environments and ensure no developer environments are routed to it. If a group still has environments, you see a warning that prevents you from deleting the group.
Known limitation
If you've published any of the following rules within your environment group, the corresponding settings at the environment level are overridden when added to the group: sharing limits, maker welcome content, solution checker, usage insights, backup retention, and generative AI settings. For example, if you've published sharing limits in your environment group, but already had maker welcome content and sharing limits set at the environment level, upon adding the environment to the group, the sharing limits are updated to match the group's sharing limits and the maker welcome content is reset.
Related content
Managed environments overview
Usage insights
Limit sharing
Data policies
Licensing
View license consumption (preview)
Tenant settings