Discovering ONVIF-capable cameras in the local subnet
![]()
Alternatively, check out topics under Create video applications in the service.
Note
Azure Video Analyzer has been retired and is no longer available.
Azure Video Analyzer for Media is not affected by this retirement. It is now rebranded to Azure Video Indexer. Click here to read more.
This how to guide walks you through how to use the Azure Video Analyzer edge module to discover ONVIF compliant cameras on the same subnet as the IoT Edge device. Open Network Video Interface Forum (ONVIF) is an open standard where discrete IP-based physical devices, such as surveillance cameras, can communicate with additional networked devices and software. For more information about ONVIF please visit the ONVIF website.
Prerequisites
To complete the steps in this article, you need to:
- Have an active Azure subscription.
- Install the Azure CLI extension for IoT
- Complete one of the following:
- Have the Video Analyzer edge module version 1.1 (or newer) deployed to your IoT Edge device
- If using a Hyper-V Virtual Machine or EFLOW an external switch is required to perform the onvifDeviceDiscover direct method call. This requirement is due to a multicast call used for ONVIF device discovery.
The ONVIF feature of the Video Analyzer edge module requires specific container create options, as described in Enable ONVIF discovery feature. This ONVIF discovery feature require that port 3702 be available.
Note
If you have a new deployment of version 1.1 of the Video Analyzer edge module, you can skip to the section for Use direct method calls. Otherwise, follow the below sections to upgrade your existing Video Analyzer edge module to enable the ONVIF discovery feature.
Check the version
From a command prompt run the following commands:
az account set --subscription <YOUR_SUBSCRIPTION_NAME>
az iot hub module-twin show -m <VIDEO_ANALYZER_IOT_EDGE_MODULE_NAME> -n <IOT_HUB_NAME> -d <IOT_EDGE_DEVICE_NAME> --query 'properties.reported.ProductInfo' -o tsv
If the result of the above command is Azure Video Analyzer:1.0.1 then run the following steps to update the Video Analyzer edge module to version 1.1.
- In the Azure portal navigate to the IoT Hub (
<IOT_HUB_NAME>above) that is used with your Video Analyzer edge module deployment - Click on IoT Edge under Automatic Device Management and select the IoT Edge device (
<IOT_EDGE_DEVICE_NAME>above) to which the Video Analyzer edge module has been deployed - Click on Set modules and click on Review + create
- Click on Create
- After a few minutes the Video Analyzer edge module will update and you can run the above command again to verify
Enable ONVIF discovery feature
Next, add additional options into the container create options for the Video Analyzer edge module. This allows it to communicate through the host network to discover ONVIF enabled cameras on the same subnet.
In the Azure portal navigate to the IoT Hub
Click on IoT Edge under Automatic Device Management and select the IoT Edge device to which the Video Analyzer edge module has been deployed
Click on Set modules and select the Video Analyzer edge module
Go to the Container Create Options tab and add the following JSON entries to the respective sections:
In the JSON entry box, after the first
{enter the following:"NetworkingConfig": { "EndpointsConfig": { "host": {} } },In the
HostConfigJSON object:"NetworkMode": "host",
Click Update at the bottom
Click Review + create
Click Create
Use direct method calls
The Video Analyzer edge module provides direct method calls for ONVIF discovery of network attached cameras on the same subnet. The following steps apply to both the onvifDeviceDiscover and the onvifDeviceGet sections below:
- In the Azure portal navigate to the IoT Hub
- Click on IoT Edge under Automatic Device Management and select the IoT Edge device to which the Video Analyzer edge module has been deployed
- Click on the Video Analyzer edge module and click on Direct method in the menu bar at the top
onvifDeviceDiscover
This direct method lists all the discoverable ONVIF devices on the same subnet as the Video Analyzer edge module.
In the method name enter:
onvifDeviceDiscoverIn the payload enter:
{
    "@apiVersion":"1.1",
    "discoveryDuration":"PT8S"
}
The discovery duration is the amount of time that the Video Analyzer edge module waits to receive responses from ONVIF discoverable devices. It might be necessary in a large environment to adjust this value.
Within a few seconds you should see a
resultsuch as the following:{ "status": 200, "payload": { "value": [ { "serviceIdentifier": "{urn:uuid}", "remoteIPAddress": "{IP_ADDRESS}", "scopes": [ "onvif://www.onvif.org/type/Network_Video_Transmitter", "onvif://www.onvif.org/name/{CAMERA_MANUFACTURE}", "onvif://www.onvif.org/location/", "onvif://www.onvif.org/hardware/{CAMERA_MODEL}", "onvif://www.onvif.org/Profile/Streaming", "onvif://www.onvif.org/Profile/G", "onvif://www.onvif.org/Profile/T" ], "endpoints": [ "http://<IP_ADDRESS>/onvif/device_service", "https://<IP_ADDRESS>/onvif/device_service" ], } ] } }The return status of 200 indicates that the direct method call was handled successfully.
onvifDeviceGet
The onvifDeviceGet call supports both unsecured and TLS enabled endpoints. This direct method call retrieves detailed information about a specific ONVIF device.
Note
When the onvifDeviceGet call is made to an unsecured endpoint on an ONVIF enabled camera you need to set the Video Edge module Identity Twin setting "allowUnsecuredEndpoints" to true. For more information see article Module twin properties.
In the method name enter:
onvifDeviceGetIn the payload enter:
{
    "endpoint": {
        "@type": "#Microsoft.VideoAnalyzer.UnsecuredEndpoint",
        "credentials": {
            "username": "<USER_NAME>",
            "password": "<PASSWORD>",
            "@type": "#Microsoft.VideoAnalyzer.UsernamePasswordCredentials"
        },
        "url": "http://<IP_ADDRESS>/onvif/device_service"
    },
    "@apiVersion": "1.1"
}
In the above payload:
urlis the IP address of the ONVIF device from which you wish to get additional detailsusernameis the user name that is used to authenticate with the device, which has permissions to the ONVIF features. Some devices require specific accounts to be created for this purpose.passwordis the password for that user nameWithin a few seconds you should see a result such as:
{
    "status": 200,
    "payload": {
        "hostname": {
            "fromDhcp": true,
            "hostname": "{NAME_OF_THE_ONVIF_DEVICE}"
        },
        "systemDateTime": {
            "type": "ntp",
            "time": "2021-09-28T03:05:05.000Z",
            "timeZone": "GMT"
        },
        "dns": {
            "fromDhcp": true,
            "ipv4Address": [
                "{IP_ADDRESS}"
            ],
            "ipv6Address": []
        },
        "mediaProfiles": [
            {
                "name": "{Profile1}",
                "mediaUri": {
                    "uri": "{RTSP_URI}"
                },
                "videoEncoderConfiguration": {
                    "encoding": "h264",
                    "resolution": {
                        "width": 3840,
                        "height": 2160
                    },
                    "rateControl": {
                        "bitRateLimit": 15600,
                        "encodingInterval": 1,
                        "frameRateLimit": 30,
                        "guaranteedFrameRate": false
                    },
                    "quality": 50,
                    "h264": {
                        "govLength": 255,
                        "profile": "main"
                    }
                }
            },
            {
                "name": "{Profile2}",
                "mediaUri": {
                    "uri": "{RTSP_URI}"
                },
                "videoEncoderConfiguration": {
                    "encoding": "h264",
                    "resolution": {
                        "width": 1280,
                        "height": 720
                    },
                    "rateControl": {
                        "bitRateLimit": 1900,
                        "encodingInterval": 1,
                        "frameRateLimit": 30,
                        "guaranteedFrameRate": false
                    },
                    "quality": 50,
                    "h264": {
                        "govLength": 255,
                        "profile": "main"
                    }
                }
            }
        ]
    }
}
Return status of onvifDeviceGet
| Status | Code | Meaning / solution |
|---|---|---|
| 200 | Success | The direct method call completed successfully. |
| 400 | Bad Request | The request was malformed |
| 403 | Forbidden | The direct method call could not successfully retrieve the requested information from the ONVIF device due to an authentication failure. Check to ensure that the username and / or password in the message body was correct. |
| 500 | Error | An unknown error occurred. |
| 502 | Bad Gateway | Received an invalid response from an upstream service. |
| 504 | Timeout | The direct method call expired before the response of the ONVIF device was received. |
Troubleshooting
This section covers some troubleshooting steps:
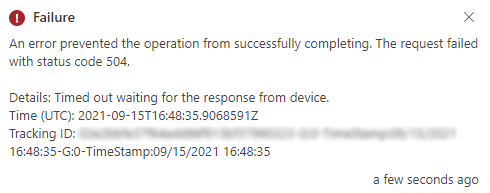
In the Azure portal on the IoT Edge module direct method blade if you receive the error "An error prevented the operation from successfully completing. The request failed with status code 504." (See image below):
Check to ensure that the setting for
"discoveryDuration":"PT8S"in the above direct method call is shorter than theConnection TimeoutorMethod Timeoutvalues.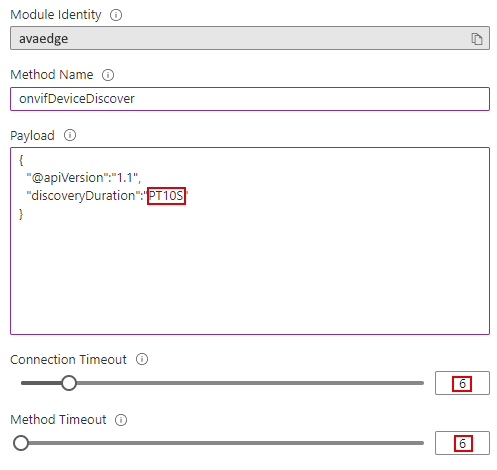
If the direct method
Resultsfield displays "{"status":200,"payload":{"value":[]}}, you may need longer discovery durations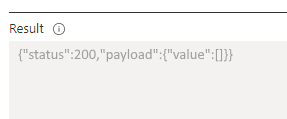
Adjust the time value (x) in
"discoveryDuration":"PTxS"to a larger number. Also adjust theConnection Timeoutand/orMethod Timeoutvalues accordingly.The
onvifDeviceGetdirect method call will not display any media profiles for H.265 encoded media streams.Return status of 403 can be returned in the event that the user account used to connect to the ONVIF device does not have permissions to the ONVIF camera features. Some ONVIF-compliant cameras require that a user is added to the ONVIF security settings to retrieve the ONVIF device information.
Currently the Video Analyzer edge module will return up to 200 ONVIF enabled cameras that are reachable on the same subnet via multicast. This also requires that port 3702 is available.
If onvifDeviceGet is called with a TLS Endpoint the ONVIF device name and IP address must be added to the hosts (/etc/hosts) file on the edge device. If a self-signed certificate is used for TLS encryption the certificate also needs to be added to the IoT Edge device’s certificate store.
For onvifDeviceDiscover direct method call from an EFLOW virtual machine the following steps must be performed:
- Connect to the EFLOW virtual machine and run
sudo iptables -I INPUT -p udp -j ACCEPT
- Connect to the EFLOW virtual machine and run
Next steps
- Try Quickstart: Analyze a live video feed from a (simulated) IP camera using your own HTTP model with the discovered ONVIF device