Apply changes with rebase
TFS 2017 | TFS 2015 | TFS 2013
Visual Studio 2019 | Visual Studio 2017 | Visual Studio 2015
One of the tradeoffs from the Git feature branch workflow is that you do not actively manage your version control history.
Git creates this history as you save your code in your commits and merges changes back into the main branch with pull requests.
This generated history can get complicated when you need to update a feature branch with changes from the main branch to catch up on work committed by others.
Your commit history will diverge from the main branch at multiple points, making it hard to follow.
Use rebase to address the problem of updating your branch with the latest changes from the main branch.
Rebase takes the changes made in the commits in your current branch and replays them on the history of another branch.
The commit history of your current branch will be rewritten so that it starts from the most recent commit in the target branch of the rebase.
Rebasing your changes in your feature branch off the latest changes in the main branch lets you test your changes on the most recent version in the main branch while keeping
a clean Git history.
In this tutorial you learn how to:
- Force push to update your remote branch
- Squash local commits
Use caution
Rebasing is a powerful tool for catching up changes a main branch but you must be careful about its use. Some things to keep in mind before you rebase:
- Never rebase commits that have been pushed and shared with others. The only exception to this rule is when you are certain no one on your team is using the commits or the branch you pushed.
- Use rebase to catch up with the commits on another branch as you work with a local feature branch. This is especially useful when working in long-running feature branches to check how your changes work with the latest updates on the main branch.
- You can't update a published branch with a
pushafter you've rebased the local branch. You'll need to force push the branch to rewrite the history of the remote branch to match the local history. Never force push branches in use by others.
During a rebase, Git attempts to reconcile the changes recorded in the commits on your branch and the changes in the commits in the target branch. Resolve any conflicts between the commits in the same way that you resolve merge conflicts.
When to rebase vs. merge
Using rebase instead of merging branches results in an easier to follow but less exact history of commits.
Your team should agree under what circumstances you should rebase a branch. You should still always merge branches into the main branch through a pull request.
A suggested approach is to allow rebasing local changes that you have made but haven't shared with others, but to merge once you are sharing changes
with others. This avoids trouble with rewriting history while still letting you easily catch up with changes as you develop your code locally.
Note
Visual Studio 2019 version 16.8 and later versions provide a new Git menu for managing the Git workflow with less context switching than Team Explorer. Procedures provided in this article under the Visual Studio 2019 tab provide information for using the Git experience as well as Team Explorer. To learn more, see Side-by-side comparison of Git and Team Explorer.
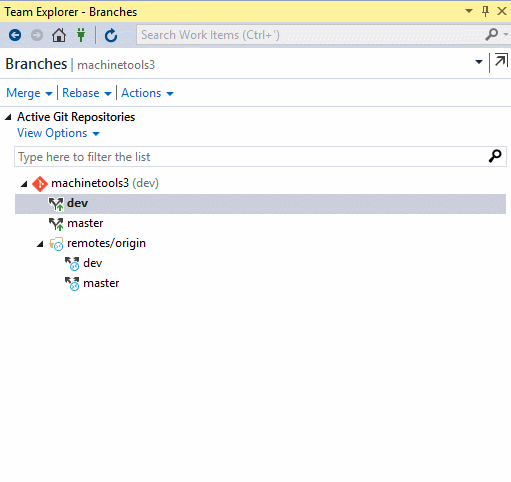
In Team Explorer, go to the Branches view. Click Rebase. You'll see a prompt to rebase the changes from your current branch, and then a drop-down to specify which branch the changes in the current branch should be replayed on top of. If there is a conflict, resolve it just like you resolve merge conflicts in Visual Studio.
Force push to update your remote branch
Warning
Never force push a branch that others are working on. Only force push branches that you alone work with.
After a successful rebase, your local branch will have a different history than your remote branch. You must force push your local branch to update your remote branch.
> git push -f users/frank/myfixes
Squash local commits
Interactive rebase is not currently supported in Visual Studio, but you can use the following command line steps to consolidate your commits.
A special use of rebase is available to condense the changes made in a set of commits down to one single commit. This is useful to clean up commit histories
before they are pushed to a remote branch. The benefits to the readability are significant, and since you never rebase shared code, you can summarize the
changes easily.
To consolidate commits, first decide about how many commits you'd like to squash into one. You don't have be exact as you'll get to pick out exactly which commits to squash when you run the command. If you had five commits to squash, then you'd make sure there are no unstaged changes and run:
> git rebase -i HEAD~5
This will open up an editor where you will see something like:
pick 7b43f3f Updated router.js
pick 00859d9 Updated README.md
pick 9d247f7 initial commits
pick 7068b09 Updated README.md with build instructions
You'll keep the first of the changes (leave it pick), and then change pick to squash for the rest of the changes. Save and close the editor.
Git will now attempt to condense the commits into a single commit. After the rebase completes, you will have a new editor
window open up where Git asks you to give a commit message for the commit with the combined changes. You'll want to condense
this down to one line of text (just like you would have for a normal commit) and save and quit the editor.
Note
Azure DevOps users can squash merge their pull requests to consolidate commits added to the main branch.