Self Hosting Windows Communication Foundation Services
Robert Green
MCW Technologies
Download
Articles in this series
- Introduction to Windows Communication Foundation
- Hosting Windows Communication Foundation Services
- Self Hosting Windows Communication Foundation Services
- Creating and Maintaining Service and Data Contracts
- Fault Handling in WCF Services
- Sessions, Instancing and Concurrency in WCF Services
- Transactions in WCF Services
- Message Patterns in WCF Services
- Authentication and Authorization in WCF Services - Part 1
- Authentication and Authorization in WCF Services - Part 2
Introduction
This tutorial is the second in a two-part series on hosting Windows Communication Foundation (WCF) services. In the previous tutorial (Hosting Windows Communication Foundation Services), you explored the role of the service host and reviewed your options for hosting WCF services. You then hosted WCF services using Internet Information Services (IIS) and Windows Process Activation Service (WAS).
In this tutorial, you will see how to host WCF services in a console application and to host WCF services. This is known as self hosting. You can use the same techniques to host WCF services in a Windows service, a Windows Forms application or a Windows Presentation Foundation application.
Self Hosting a WCF Service
In order for clients to call a WCF service, you must host the service in a runtime environment. The role of the host application is to start and stop the service, listen for requests from clients, direct those requests to the service and send responses back to the clients.
To host a service, the host application uses the ServiceHost class in the System.ServiceModel namespace. The application uses this class to instantiate the service, configure endpoints, apply security and start listeners that handle requests from clients.
One of the benefits of hosting a WCF service using IIS or WAS is that each automatically creates an instance of the ServiceHost class when a client calls the service. You simply need to specify what service the host should activate. You do this in a .svc file by setting the Service property of the ServiceHost directive. The endpoints are defined in the Web.config file.
<%@ ServiceHost Service=
"InventoryServiceLibrary.InventoryService" %>
If you self-host a service, you must create an instance of the ServiceHost class and configure it in code. You can then define endpoints in code or in a configuration file. You will see how to take these steps in this tutorial.
Review the Sample Application
Open the SelfHostingServicesDemo solution that is included in the tutorial’s download. The ProductServiceLibrary project represents a WCF service that clients can call to retrieve information on a product. The IProductService file contains the following service contract:
[ServiceContract]
public interface IProductService
{
[OperationContract]
Product GetProduct(int productId);
}
<ServiceContract()> _
Public Interface IProductService
<OperationContract()> _
Function GetProduct(ByVal productId As Integer) As Product
End Interface
The service has a method to retrieve product information. The method returns an instance of the Product class, which has properties for ProductId, ProductName and UnitPrice.
The InventoryServiceLibrary project represents a WCF service that clients can call to manage inventory. The IInventoryService file contains the following service contract:
[ServiceContract]
public interface IInventoryService
{
[OperationContract]
Inventory GetInventory(int productId);
[OperationContract]
bool UpdateInventory(Inventory inventory);
}
<ServiceContract()> _
Public Interface IInventoryService
<OperationContract()> _
Function GetInventory(ByVal productId As Integer) As Inventory
<OperationContract()> _
Function UpdateInventory(ByVal _inventory As Inventory) _
As Boolean
End Interface
The service has methods to retrieve and update inventory information. The GetInventory method returns an instance of the Inventory class, which has properties for ProductId, UnitsInStock and UnitsOnOrder. The UpdateInventory class receives an instance of that class and returns a Boolean indicating whether you successfully saved your changes.
The WindowsClient project contains the Manage Inventory form (see Figure 1). When the user clicks the Get product button, the form will call the GetProduct method of the ProductService service to retrieve the product name and price. The form will also call the GetInventory method of the InventoryService service to retrieve the units in stock and on order. When the user clicks the Update product button, the form will call the UpdateInventory method of the InventoryService service to update the units in stock and on order.
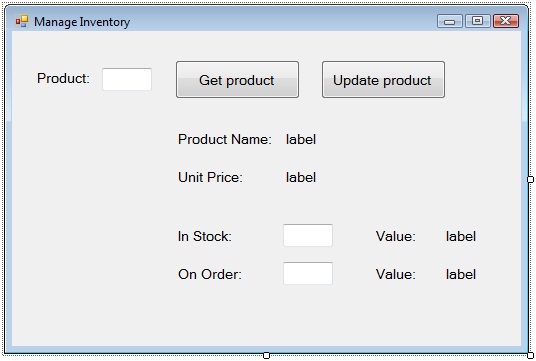
Figure 1. Use this form to call the WCF service.
Self Host WCF Services Using a Console Application
In this section, you will create a console application to host these WCF services. You will then write code to call the services from the form. You will typically not use a console application in production, but it is an easy and convenient way to host WCF services during development and testing.
In the Solution Explorer, right-click the SelfHostingServicesDemo solution and select Add | New Project to display the Add New Project dialog box. Select Console Application in the Templates list. Name your project ConsoleHost. Click OK. Right-click the ConsoleHost project and select Set as Startup Project.
Right-click the ConsoleHost project, and select Add Reference from the context menu. In the .NET tab of the Add Reference dialog box, select System.ServiceModel. Click OK to add the reference to the assembly that contains the WCF classes.
Right-click the ConsoleHost project, and select Add Reference from the context menu. In the Projects tab of the Add Reference dialog box, select InventoryServiceLibrary and ProductServiceLibrary. Click OK to add the reference to the two services.
At the top of the Program.cs or Module1.vb file, add the following statements:
using System.ServiceModel;
using System.ServiceModel.Description;
using InventoryServiceLibrary;
using ProductServiceLibrary;
Imports System.ServiceModel
Imports System.ServiceModel.Description
Imports InventoryServiceLibrary
Imports ProductServiceLibrary
Add the following code to the Main method to host the ProductService WCF service:
ServiceHost productHost = null;
ServiceHost inventoryHost = null;
try
{
productHost = new ServiceHost(typeof(ProductService));
ServiceEndpoint productEndpoint =
productHost.AddServiceEndpoint(typeof(IProductService),
new NetTcpBinding(),
"net.tcp://localhost:9010/ProductService");
productHost.Faulted += new EventHandler(ProductHost_Faulted);
productHost.Open();
Console.WriteLine(
"The Product service is running and is listening on:");
Console.WriteLine("{0} ({1})",
productEndpoint.Address.ToString(),
productEndpoint.Binding.Name);
Console.WriteLine("\nPress any key to stop the service.");
Console.ReadKey();
}
finally
{
if (productHost.State == CommunicationState.Faulted)
{
productHost.Abort();
}
else
{
productHost.Close();
}
}
Dim productHost As ServiceHost = Nothing
Dim inventoryHost As ServiceHost = Nothing
Try
productHost = New ServiceHost(GetType(ProductService))
Dim productEndpoint As ServiceEndpoint = _
productHost.AddServiceEndpoint(GetType(IProductService), _
New NetTcpBinding(), _
"net.tcp://localhost:9010/ProductService")
AddHandler productHost.Faulted, AddressOf ProductHost_Faulted
productHost.Open()
Console.WriteLine( _
"The Product service is running and is listening on:")
Console.WriteLine("{0} ({1})", _
productEndpoint.Address.ToString(), _
productEndpoint.Binding.Name)
Console.WriteLine(vbCrLf & "Press any key to stop the service.")
Console.ReadKey()
Finally
If productHost.State = CommunicationState.Faulted Then
productHost.Abort()
Else
productHost.Close()
End If
End Try
In the code above, productHost is an instance of the ServiceHost class. This class has several constructors. The one you used takes the type of service as a parameter. To host a service you need to define one or more endpoints. In the code above, you used the AddServiceEndpoint method of the ServiceHost class. This method has several overloads, but all of them take as parameters the three components of an endpoint: contract, binding and address. In the code above, you are hosting the service using TCP and an address of net.tcp://localhost:9010/ProductService.
When you call the Open method of the ServiceHost class, the host starts listening for client calls. When you call Close, the host stops listening. The code above calls the Abort method if the host faults.
The field productEndpoint is an instance of the ServiceEndpoint class in the System.ServiceModel.Description namespace. This field represents the endpoint you added using AddServiceEndpoint. After the host starts, the code displays the address and the binding the host is using.
Add the following method to handle the host faulting:
static void ProductHost_Faulted(object sender, EventArgs e)
{
Console.WriteLine("The ProductService host has faulted.");
}
Sub ProductHost_Faulted(ByVal sender As Object, _
ByVal e As EventArgs)
Console.WriteLine("The ProductService host has faulted.")
End Sub
Save your changes and build the solution. Press F5. You may see a Windows Security Alert (see Figure 2). Click Unblock to enable the service host to listen for client requests over TCP.
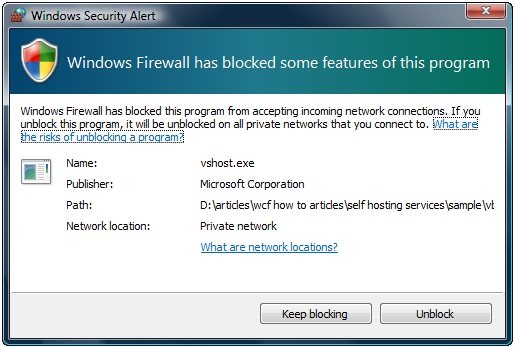
Figure 2. Click Unblock to enable the service host to listen for requests.
You should see the following displayed in the console window:
The Product service is running and is listening on:
net.tcp://localhost:9010/ProductService (NetTcpBinding)
Press any key to stop the service.
Press any key to stop the service.
You may have noticed the WcfSvcHost popup and two WCF Service Host icons in the Notification Area. You have WCF services in the same solution as your host. Therefore, when you run the application in debug mode, Visual Studio automatically starts an instance of the WCF Service host for each service. To avoid this, you can start the application by pressing Ctrl+F5.
Return to the Program.cs or Module1.vb file. To host the InventoryService service using both HTTP and TCP, add the following code inside the try block in the Main method:
Console.WriteLine(
"The Product service is running and is listening on:");
Console.WriteLine("{0} ({1})",
productEndpoint.Address.ToString(),
productEndpoint.Binding.Name);
inventoryHost = new ServiceHost(typeof(InventoryService));
ServiceEndpoint inventoryHttpEndpoint =
inventoryHost.AddServiceEndpoint(typeof(IInventoryService),
new WSHttpBinding(),
"https://localhost:8080/InventoryService");
ServiceEndpoint inventoryTcpEndpoint =
inventoryHost.AddServiceEndpoint(typeof(IInventoryService),
new NetTcpBinding(),
"net.tcp://localhost:9020/InventoryService");
inventoryHost.Faulted += new EventHandler(InventoryHost_Faulted);
inventoryHost.Open();
Console.WriteLine(
"\nThe Inventory service is running and is listening on:");
foreach (ServiceEndpoint endpoint in
inventoryHost.Description.Endpoints)
{
Console.WriteLine("{0} ({1})",
endpoint.Address.ToString(), endpoint.Binding.Name);
}
Console.WriteLine("\nPress any key to stop the service.");
Console.ReadKey();
Console.WriteLine( _
"The Product service is running and is listening on:")
Console.WriteLine("{0} ({1})", _
productEndpoint.Address.ToString(), _
productEndpoint.Binding.Name)
inventoryHost = New ServiceHost(GetType(InventoryService))
Dim inventoryHttpEndpoint As ServiceEndpoint = _
inventoryHost.AddServiceEndpoint(GetType(IInventoryService), _
New WSHttpBinding(), _
"https://localhost:8080/InventoryService")
Dim inventoryTcpEndpoint As ServiceEndpoint = _
inventoryHost.AddServiceEndpoint(GetType(IInventoryService), _
New NetTcpBinding(), _
"net.tcp://localhost:9020/InventoryService")
AddHandler inventoryHost.Faulted, AddressOf InventoryHost_Faulted
inventoryHost.Open()
Console.WriteLine(vbCrLf & _
"The Inventory service is running and is listening on:")
For Each endpoint In inventoryHost.Description.Endpoints
Console.WriteLine("{0} ({1})", _
endpoint.Address.ToString(), endpoint.Binding.Name)
Next
Console.WriteLine(vbCrLf & "Press any key to stop the service.")
Console.ReadKey()
Add the following code to the finally block:
if (inventoryHost.State == CommunicationState.Faulted)
{
inventoryHost.Abort();
}
else
{
inventoryHost.Close();
}
If inventoryHost.State = CommunicationState.Faulted Then
inventoryHost.Abort()
Else
inventoryHost.Close()
End If
Add the following method to handle the host faulting:
static void InventoryHost_Faulted(object sender, EventArgs e)
{
Console.WriteLine("The InventoryService host has faulted.");
}
Sub InventoryHost_Faulted(ByVal sender As Object, _
ByVal e As EventArgs)
Console.WriteLine("The InventoryService host has faulted.")
End Sub
Save your changes and build the solution. Press Ctrl+F5. You should see the following displayed in the console window:
The Product service is running and is listening on:
net.tcp://localhost:9010/ProductService (NetTcpBinding)
The Inventory service is running and is listening on:
https://localhost:8080/InventoryService (WSHttpBinding)
net.tcp://localhost:9020/InventoryService (NetTcpBinding)
Press any key to stop the service.
The console host application now hosts two services, one communicating using TCP and the other communicating using HTTP. Press any key to stop the service.
Call the Services from the Client Application
The next step is to call the WCF services from the client application. In the previous tutorials in this series, you added service references at this point. You will see later on how to do that. For now, you will take a different approach.
Right-click the solution and select Set Startup Projects to display the Solution ‘SelfHostingServicesDemo’ Property Pages dialog box. Select Multiple startup projects. Select Start from the Action drop-down list for the ConsoleHost and WindowsClient projects. Click OK.
Right-click the WindowsClient project, and select Add Reference from the context menu. In the .NET tab of the Add Reference dialog box, select System.ServiceModel. Click OK to add the reference to the assembly that contains the WCF classes.
Right-click the WindowsClient project, and select Add Reference from the context menu. In the Projects tab of the Add Reference dialog box, select InventoryServiceLibrary and ProductServiceLibrary. Click OK to add the reference to the two services.
In the Solution Explorer, double-click Form1, opening the form in the form designer. Select View | Code. At the top of the file, add the following statements:
using System.ServiceModel;
using InventoryServiceLibrary;
using ProductServiceLibrary;
Imports System.ServiceModel
Imports InventoryServiceLibrary
Imports ProductServiceLibrary
In the form’s class, add the following variable declarations:
private Inventory inventory = null;
private Product product = null;
private IProductService productChannel = null;
private IInventoryService inventoryChannel = null;
private decimal inStockValue = 0M;
private decimal onOrderValue = 0M;
Private _inventory As Inventory = Nothing
Private _product As Product = Nothing
Private inventoryChannel As IInventoryService = Nothing
Private productChannel As IProductService = Nothing
Private inStockValue As Decimal = 0D
Private onOrderValue As Decimal = 0D
In the Form1_Load event handler, add the following code to create a channel for communicating with each service:
var productAddress = new EndpointAddress(
"net.tcp://localhost:9010/ProductService");
productChannel = ChannelFactory<IProductService>.
CreateChannel(new NetTcpBinding(), productAddress);
var inventoryAddress = new EndpointAddress(
"https://localhost:8080/InventoryService");
inventoryChannel = ChannelFactory<IInventoryService>.
CreateChannel(new WSHttpBinding(), inventoryAddress);
Dim productAddress As New EndpointAddress( _
"net.tcp://localhost:9010/ProductService")
productChannel = ChannelFactory( _
Of IProductService).CreateChannel( _
New NetTcpBinding, productAddress)
Dim inventoryAddress As New EndpointAddress( _
"https://localhost:8080/ProductService")
inventoryChannel = ChannelFactory( _
Of IInventoryService).CreateChannel( _
New WSHttpBinding, inventoryAddress)
Clients and services communicate by passing messages across a communication channel. The ServiceHost object in the host application automatically creates the necessary channels. Clients must also create channels to communicate with the host. In the previous tutorial, you added a service reference and that creates a proxy class. The proxy class wraps a channel the client can use to communicate with the service. Later in this tutorial, you will see how you can use such a proxy class to communicate with a self-hosted service.
As an alternative to using a proxy class, you can use the ChannelFactory<T> class, where T represents a service contract. To create the channel, you call the CreateChannel method and pass a binding and address. The CreateChannel method returns a channel which has methods corresponding to the service’s operations.
In the getProductButton_Click event handler, add the following code to retrieve and display the product and inventory information for a product:
product = new Product();
product = productChannel.GetProduct(
Convert.ToInt32(productIdTextBox.Text));
productNameLabel.Text = product.ProductName;
unitPricelabel.Text = product.UnitPrice.ToString("C");
inventory = new Inventory();
inventory = inventoryChannel.GetInventory(
Convert.ToInt32(productIdTextBox.Text));
inStockTextBox.Text = inventory.UnitsInStock.ToString();
inStockValue = product.UnitPrice *
Convert.ToDecimal(inventory.UnitsInStock);
inStockValueLabel.Text = inStockValue.ToString("C");
onOrderTextBox.Text = inventory.UnitsOnOrder.ToString();
onOrderValue = product.UnitPrice *
Convert.ToDecimal(inventory.UnitsOnOrder);
onOrderValueLabel.Text = onOrderValue.ToString("C");
_product = New Product()
_product = productChannel.GetProduct( _
Convert.ToInt32(productIdTextBox.Text))
productNameLabel.Text = _product.ProductName
unitPricelabel.Text = _product.UnitPrice.ToString("C")
_inventory = New Inventory()
_inventory = inventoryChannel.GetInventory( _
Convert.ToInt32(productIdTextBox.Text))
inStockTextBox.Text = _inventory.UnitsInStock.ToString()
inStockValue = _product.UnitPrice * _
Convert.ToDecimal(_inventory.UnitsInStock)
inStockValueLabel.Text = inStockValue.ToString("C")
onOrderTextBox.Text = _inventory.UnitsOnOrder.ToString()
onOrderValue = _product.UnitPrice * _
Convert.ToDecimal(_inventory.UnitsOnOrder)
onOrderValueLabel.Text = onOrderValue.ToString("C")
In the updateProductButton_Click event handler, add the following code to update inventory information for a product:
inventory.UnitsInStock = Convert.ToInt16(inStockTextBox.Text);
inventory.UnitsOnOrder = Convert.ToInt16(onOrderTextBox.Text);
if (inventoryChannel.UpdateInventory(inventory))
{
MessageBox.Show("Your changes were saved");
inStockValue = product.UnitPrice *
Convert.ToDecimal(inventory.UnitsInStock);
inStockValueLabel.Text = inStockValue.ToString("C");
onOrderValue = product.UnitPrice *
Convert.ToDecimal(inventory.UnitsOnOrder);
onOrderValueLabel.Text = onOrderValue.ToString("C");
}
else
{
MessageBox.Show("Your changes were not saved");
}
_inventory.UnitsInStock = Convert.ToInt16(inStockTextBox.Text)
_inventory.UnitsOnOrder = Convert.ToInt16(onOrderTextBox.Text)
If inventoryChannel.UpdateInventory(_inventory) Then
MessageBox.Show("Your changes were saved")
inStockValue = _product.UnitPrice * _
Convert.ToDecimal(_inventory.UnitsInStock)
inStockValueLabel.Text = inStockValue.ToString("C")
onOrderValue = _product.UnitPrice * _
Convert.ToDecimal(_inventory.UnitsOnOrder)
onOrderValueLabel.Text = onOrderValue.ToString("C")
Else
MessageBox.Show("Your changes were not saved")
End If
Save your changes and build the solution. Press Ctrl+F5 to run the application. Wait for the console window to indicate the two services are running. In the Manage Inventory form, enter 1 in the Product text box and click Get product. The form calls the GetProduct method of the ProductService WCF service and retrieves the product’s information. The form then calls the GetInventory method of the InventoryService WCF service and retrieves the inventory information (see Figure 3).
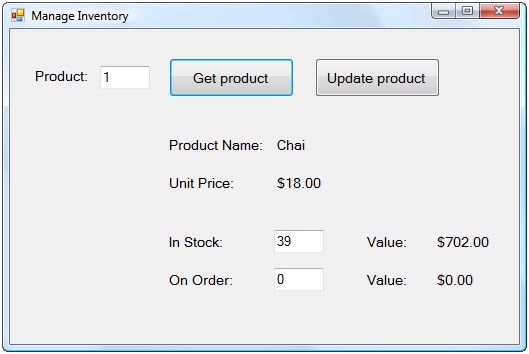
Figure 3. You called two WCF services to retrieve product and inventory information.
Enter 10 in the On Order text box and click Update product. Dismiss the dialog box informing you your changes were saved. Close the form. Press any key in the console window to stop the services.
The console application hosts the InventoryService service using both HTTP and TCP. You are currently calling it over HTTP. Return to the form’s code file. Make the following change in the Form1_Load method to switch to calling the service using TCP:
var inventoryAddress = new EndpointAddress(
"net.tcp://localhost:9020/InventoryService");
inventoryChannel = ChannelFactory<IInventoryService>.
CreateChannel(new NetTcpBinding(), inventoryAddress);
Dim inventoryAddress As New EndpointAddress( _
"net.tcp://localhost:9020/InventoryService")
inventoryChannel = ChannelFactory( _
Of IInventoryService).CreateChannel( _
New NetTcpBinding, inventoryAddress)
Save your changes and build the solution. Press Ctrl+F5 to run the application. In the Manage Inventory form, enter 1 in the Product text box and click Get product. You should see the product and inventory information you saw previously.
Enter 20 in the On Order text box and click Update product. Dismiss the dialog box informing you your changes were saved. Close the form. Press any key in the console window to stop the services.
Define Endpoints in Configuration Files
If you are hosting a WCF service using IIS or WAS, you define endpoints in a Web.config file. You saw how to do this in the previous tutorials in this series. If you are hosting a service in a managed application, you can define endpoints in code, as you just did, or in a configuration file.
Defining endpoints in code gives you complete control over them. However, all changes to an endpoint require you to rebuild the application. If you define endpoints in configuration files, you can change them without rebuilding. This is more flexible and is typically the approach you will take.
For this part of the tutorial, open the SelfHostingServicesDemo2 solution that is included in the tutorial’s download. This solution is a copy of the completed version of the SelfHostingServicesDemo solution.
In the Solution Explorer, right-click the ConsoleHost project and select Add | New Item to display the Add New Item dialog box. Select General in the Categories list and select Application Configuration File in the Templates list. In the app.config file, add the following XML inside the configuration element:
<system.serviceModel>
<services>
<service name="ProductServiceLibrary.ProductService">
<endpoint
address="net.tcp://localhost:9010/ProductService"
binding="netTcpBinding"
contract="ProductServiceLibrary.IProductService"/>
</service>
<service name="InventoryServiceLibrary.InventoryService">
<endpoint
address="https://localhost:8080/InventoryService"
binding="wsHttpBinding"
contract="InventoryServiceLibrary.IInventoryService"/>
<endpoint
address="net.tcp://localhost:9020/InventoryService"
binding="netTcpBinding"
contract="InventoryServiceLibrary.IInventoryService"/>
</service>
</services>
</system.serviceModel>
This XML defines the same endpoints you previously defined in code.
Return to the Program.cs or Module1.vb file. Replace the contents of the try block in the Main method with the following:
productHost = new ServiceHost(typeof(ProductService));
productHost.Faulted += new EventHandler(ProductHost_Faulted);
productHost.Open();
Console.WriteLine(
"\nThe Product service is running and is listening on:");
foreach (ServiceEndpoint endpoint in
productHost.Description.Endpoints)
{
Console.WriteLine("{0} ({1})",
endpoint.Address.ToString(), endpoint.Binding.Name);
}
inventoryHost = new ServiceHost(typeof(InventoryService));
inventoryHost.Faulted += new EventHandler(InventoryHost_Faulted);
inventoryHost.Open();
Console.WriteLine(
"\nThe Inventory service is running and is listening on:");
foreach (ServiceEndpoint endpoint in
inventoryHost.Description.Endpoints)
{
Console.WriteLine("{0} ({1})",
endpoint.Address.ToString(), endpoint.Binding.Name);
}
Console.WriteLine("\nPress any key to stop the service.");
Console.ReadKey();
productHost = New ServiceHost(GetType(ProductService))
AddHandler productHost.Faulted, AddressOf ProductHost_Faulted
productHost.Open()
Console.WriteLine(vbCrLf & _
"The Product service is running and is listening on:")
For Each endpoint In productHost.Description.Endpoints
Console.WriteLine("{0} ({1})", _
endpoint.Address.ToString(), endpoint.Binding.Name)
Next
inventoryHost = New ServiceHost(GetType(InventoryService))
AddHandler inventoryHost.Faulted, AddressOf InventoryHost_Faulted
inventoryHost.Open()
Console.WriteLine(vbCrLf & _
"The Inventory service is running and is listening on:")
For Each endpoint In inventoryHost.Description.Endpoints
Console.WriteLine("{0} ({1})", _
endpoint.Address.ToString(), endpoint.Binding.Name)
Next
Console.WriteLine(vbCrLf & "Press any key to stop the service.")
Console.ReadKey()
Save your changes and build the solution. Press Ctrl+F5 to run the application. Confirm that the console window displays that the services are hosted as before. At runtime, the ServiceHost object first checks for a configuration file. If there is one and it contains endpoint definitions, the ServiceHost object uses those. Note that if you have also defined endpoints in code, those endpoints would override the ones defined in the configuration file. Close the form and press any key in the console window.
You will next define the same endpoints in the client application. In the Solution Explorer, right-click the WindowsClient project and select Add | New Item to display the Add New Item dialog box. Select General in the Categories list and select Application Configuration File in the Templates list. In the app.config file, add the following XML inside the configuration element:
<system.serviceModel>
<client>
<endpoint address="net.tcp://localhost:9010/ProductService"
binding="netTcpBinding"
contract="ProductServiceLibrary.IProductService"
name="NetTcpBinding_IProductService" />
<endpoint address="https://localhost:8080/InventoryService"
binding="wsHttpBinding"
contract="InventoryServiceLibrary.IInventoryService"
name="WSHttpBinding_IInventoryService" />
<endpoint address="net.tcp://localhost:9020/InventoryService"
binding="netTcpBinding"
contract="InventoryServiceLibrary.IInventoryService"
name="NetTcpBinding_IInventoryService" />
</client>
</system.serviceModel>
Return to the Form1 code file. Replace the contents of the Form1_Load method with the following:
productChannel = new ChannelFactory<IProductService>
("NetTcpBinding_IProductService").CreateChannel();
inventoryChannel = new ChannelFactory<IInventoryService>
("NetTcpBinding_IInventoryService").CreateChannel();
productChannel = New ChannelFactory(Of IProductService) _
("NetTcpBinding_IProductService").CreateChannel
inventoryChannel = New ChannelFactory(Of IInventoryService) _
("NetTcpBinding_IInventoryService").CreateChannel
In this code, rather than specify the binding and address, you reference an endpoint in the configuration file.
Save your changes and build the solution. Press Ctrl+F5 to run the application. In the Manage Inventory form, enter 1 in the Product text box and click Get product. You should see the product and inventory information you saw previously.
Enter 10 in the On Order text box and click Update product. Dismiss the dialog box informing you your changes were saved. Close the form and press any key in the console window.
Add a Service Reference to a Self-Hosted Service
In the previous tutorial, you added a service reference to WCF services hosted in IIS and WAS. Visual Studio then created a proxy class you could use to communicate with the services. In this section, you will configure the self-hosted WCF services to support service references.
Open the ConsoleHost project’s App.config file. Add the following XML:
<system.serviceModel>
<services>
<service name="ProductServiceLibrary.ProductService"
behaviorConfiguration="ServiceBehavior1">
<endpoint
address="net.tcp://localhost:9010/ProductService"
binding="netTcpBinding"
contract="ProductServiceLibrary.IProductService"/>
<endpoint address="net.tcp://localhost:9011/mex"
binding="mexTcpBinding"
contract="IMetadataExchange"/>
</service>
<service name="InventoryServiceLibrary.InventoryService"
behaviorConfiguration="ServiceBehavior2">
<endpoint
address="https://localhost:8080/InventoryService"
binding="wsHttpBinding"
contract="InventoryServiceLibrary.IInventoryService"/>
<endpoint address="mex"
binding="mexHttpBinding"
contract="IMetadataExchange"/>
<host>
<baseAddresses>
<add baseAddress="https://localhost:8080/"/>
</baseAddresses>
</host>
<endpoint
address="net.tcp://localhost:9020/InventoryService"
binding="netTcpBinding"
contract="InventoryServiceLibrary.IInventoryService"/>
<endpoint address="net.tcp://localhost:9021/mex"
binding="mexTcpBinding"
contract="IMetadataExchange"/>
</service>
</services>
<behaviors>
<serviceBehaviors>
<behavior name="ServiceBehavior1">
<serviceMetadata httpGetEnabled="false"/>
</behavior>
<behavior name="ServiceBehavior2">
<serviceMetadata httpGetEnabled="true"/>
</behavior>
</serviceBehaviors>
</behaviors>
</system.serviceModel>
When you add a service reference, Visual Studio sends a request to the service for metadata. That request uses the WS-MetadataExchange standard protocol. By adding the endpoints above, these services now support the metadata query. The service behavior ServiceBehavior1 specifies that the ProductService service will respond to metadata requests that come via TCP .. The service behavior ServiceBehavior2 specifies that the InventoryService will respond to metadata requests that come via TCP and HTTP.
Notice that the XML above adds a base address below the endpoint that uses themexHttpBinding. This is required for clients that will retrieve service metadata over HTTP.
Save your changes and rebuild the solution. In the Windows Explorer, navigate to the folder where you downloaded the sample application. Navigate to the ConsoleHost project’s output folder. Double click ConsoleHost.exe to start the console host application. You should see the following displayed in the console window:
The Product service is running and is listening on:
net.tcp://localhost:9010/ProductService (NetTcpBinding)
net.tcp://localhost:9011/mex (MetadataExchangeTcpBinding)
The Inventory service is running and is listening on:
https://localhost:8080/InventoryService (WSHttpBinding)
https://localhost:8080/mex (MetadataExchangeHttpBinding)
net.tcp://localhost:9020/InventoryService (NetTcpBinding)
net.tcp://localhost:9021/mex (MetadataExchangeTcpBinding)
Press any key to stop the service.
Return to Visual Studio. If you are using Visual Basic, select the project and click Show All Files. Expand the References node in the WndowsClient project. Delete the references to InventoryServiceLibrary and ProductServiceLibrary. Delete the app.config file. Note that you could use both a channel and a proxy class in the same project to communicate with services. However, here you are switching from using a channel to using a proxy class so it is cleaner to remove the references to the services and the existing configuration file.
Next you will be adding a service reference to both services. In order to do that ConsoleHost.exe must be running. Open up a new command prompt with Administrator privileges and run ConsoleHost.exe In the Solution Explorer window, right-click on the WindowsClient project and select Add Service Reference to display the Add Service Reference dialog box. Enter net.tcp://localhost:9011/mex in the Address text box and click Go. In the Services pane, select ProductService. Expand the ProductService node and select IProductService. You should see the available operations/methods in the Operations pane (see Figure 4). Enter ProductService in the Namespace text box and click OK.
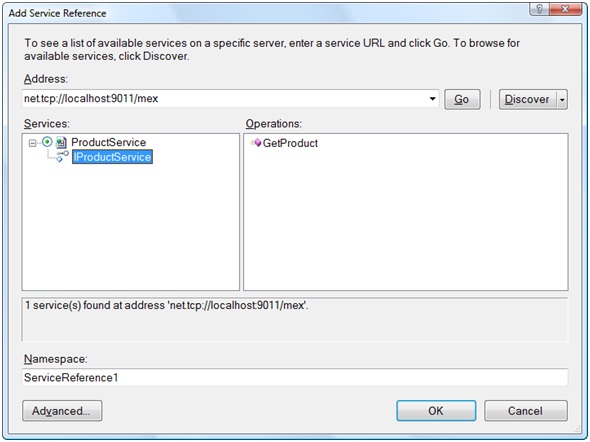
Figure 4. Select the WCF service that you want to use.
Add a second service reference for the other service. Enter https://localhost:8080/mex in the Address text box and click Go. In the Services pane, select InventoryService. Expand the InventoryService node and select IProductService. Enter InventoryService in the Namespace text box and click OK. You should have two service references in the WindowsClient project (see Figure 5).
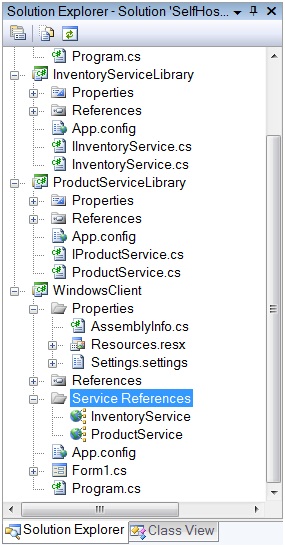
Figure 5. You have added service references to two self-hosted WCF services.
Press any key in the console window to stop the console host application. Return to the Form1 code file. Replace the using statements for InventoryServiceLibrary and ProductServiceLibrary with the following using statements:
using WindowsClient.InventoryService;
using WindowsClient.ProductService;
Imports WindowsClient.InventoryService
Imports WindowsClient.ProductService
Replace the productChannel and inventoryChannel variables with the following variables:
private ProductServiceClient productProxy = null;
private InventoryServiceClient inventoryProxy = null;
Private inventoryProxy As InventoryServiceClient = Nothing
Private productProxy As ProductServiceClient = Nothing
Replace the contents of the Form1_Load method with the following:
productProxy = new ProductServiceClient(
"NetTcpBinding_IProductService");
inventoryProxy = new InventoryServiceClient(
"WSHttpBinding_IInventoryService");
productProxy = New ProductServiceClient( _
"NetTcpBinding_IProductService")
inventoryProxy = New InventoryServiceClient( _
"WSHttpBinding_IInventoryService")
In the getProductButton_Click method, replace inventoryChannel with inventoryProxy and productChannel with productProxy. In the updateProductButton_Click method, replace inventoryChannel with inventoryProxy.
Save your changes and build the solution. Press Ctrl+F5 to run the application. In the Manage Inventory form, enter 1 in the Product text box and click Get product. You should see the product and inventory information you saw previously.
Enter 20 in the On Order text box and click Update product. Dismiss the dialog box informing you your changes were saved. Close the form and press any key in the console window.
Using a Proxy Class or ChannelFactory
To communicate with a service, you can add a service reference and use a generated proxy class or you can use the ChannelFactory class. Both create channels and both supply methods for each service operation.
It is more convenient to add a service reference and use the generated proxy class. This is also your only option if you don’t own the service code and therefore can’t add references to the service’s assemblies.
A benefit to using the ChannelFactory class is that you are guaranteed that you use the same object model as the service. You may find scenarios where the generated proxy class does not use the exact same object model. For example, by default the generated proxy class uses arrays for collections, even if the service uses generic lists. In that case, you should click the Advanced button in the Add Service Reference dialog to display the service reference settings. You can then specify that you want to use lists (see Figure 6).
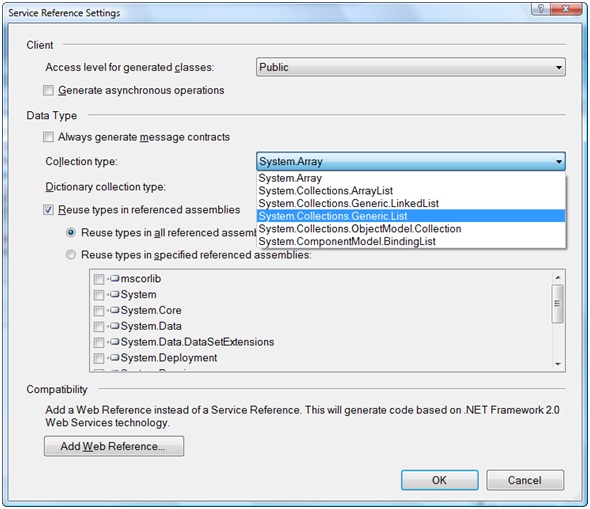
Figure 6. Use this dialog to control how the proxy class works with collections.
Conclusion
In this tutorial, you explored self-hosting WCF services. You saw how to create an instance of the ServiceHost class in code and to start listening for client requests. You saw how to define endpoints both in code and in configuration files. You also saw how to configure the client to communicate with the service, both using the ChannelFactory class and generated proxy classes.
You used a console application to host services here. In production, you would use a Windows service. You would put the code to create the ServiceHost object and call the Open method in the OnStart method of the Windows service. You would put the code to call the Close method in the OnStop method of the Windows service.
At this point in the tutorials, you have covered the basics of building, hosting and calling WCF services. In the next several tutorials, you will explore WCF services in more depth and detail.
About the Author
Robert Green is a developer, writer, and trainer. He is a senior consultant with MCW Technologies. Robert is a Visual Studio Tools for the Office system MVP and is a co-author of AppDev courseware for Microsoft Visual Basic, Microsoft Visual C#, LINQ and Microsoft Windows Workflow Foundation. Before joining MCW, Robert worked at Microsoft as a Product Manager and also a Program Manager.