Transactions in WCF Services
Robert Green
MCW Technologies
Download
Articles in this series
- Introduction to Windows Communication Foundation
- Hosting Windows Communication Foundation Services
- Self Hosting Windows Communication Foundation Services
- Creating and Maintaining Service and Data Contracts
- Fault Handling in WCF Services
- Sessions, Instancing and Concurrency in WCF Services
- Transactions in WCF Services
- Message Patterns in WCF Services
- Authentication and Authorization in WCF Services - Part 1
- Authentication and Authorization in WCF Services - Part 2
Introduction
A transaction is a logical unit of work consisting of multiple activities that need to all succeed or all fail. A very popular example of a transaction is transferring $100 from a savings account to a checking account. This activity actually consists of two activities:
- Decrease the amount of money in the savings account by $100.
- Increase the amount of money in the checking account by $100.
Both of these activities need to succeed, and if either one fails, the other should fail too. Clearly, if the first activity succeeds and the second does not, the customer is very unhappy. Just as clearly, if the second activity succeeds and the first does not, the bank is very unhappy. Either way, you, as the developer who wrote the application that allowed this to happen, are very unhappy.
If both activities succeed, you commit this transaction. If either fails, you roll back this transaction and reverse the activity that failed. You could write the logic to detect if one of these failed and, if so, reverse the other one. However, why do that when you can use the built-in transaction support in the .NET Framework and Windows Communication Foundation?
In code, you can use the TransactionScope class in the System.Transactions namespace to mark a block of code as participating in a transaction. To commit the transaction you simply call the Complete method of that class. If any exception occurs in the block of code, the transaction rolls back.
In this tutorial, you will see how you can configure a WCF service to support transactions.
Review the Sample Application
The sample application includes a WCF service that supports placing an order. To manage customer, product and order information, the service uses a simple SQL Server database. To create this database, open SQL Server Management Studio. Click the New Query button. This displays the Connect to Server dialog box. If you are using Windows Authentication, click Connect. If you are using SQL Server Authentication, enter your user name and password and click Connect.
In the new query window, type the following command:
CREATE DATABASE TransactionsDemo
Press F5 to create the database. Right-click on Databases in the Object Explorer and select Refresh. The TransactionsDemo database should appear in the Databases node. To make your database the current database, select it from the Available Databases drop-down list in the toolbar.
Select File | Open | File to display the Open File dialog box. Navigate to the folder when you downloaded this tutorial’s sample project. Select TransactionsDemo.sql and click OK to open the file. Press F5 to execute the script.
The script will create the Customers, Products and Orders tables in the TransactionsDemo database. To see these tables, expand the TransactionsDemo node in the Object Explorer. Then expand the Tables node. To see the sample data in the Customers table, right-click on dbo.Customers and select Open Table. You should see the data shown in Figure 1. To see the sample data in the Products table, right-click on dbo.Products and select Open Table. You should see the data shown in Figure 2. The Orders table is empty.

Figure 1. Sample data in the Customers table.

Figure 2. Sample data in the Products table.
You are now ready to get started with the tutorial. In Visual Studio 2008 select File | Open | Project/Solution to display the Open Project dialog box. Navigate to the folder when you downloaded this tutorial’s sample project. Select TransactionsDemo.sln and click OK to open the project. The sample application includes three projects. The OrdersServiceLibrary project represents a WCF service that clients can call to place an order. The WebHost project uses the ASP.NET Development Server to host the service. The WindowsClient project contains the user interface.
The WCF service provides the following five operations, which you will find in the IOrdersService file:
// C#
[OperationContract]
List<Customer> GetCustomers();
[OperationContract]
List<Product> GetProducts();
[OperationContract]
string PlaceOrder(Order order);
[OperationContract]
string AdjustInventory(int productId, int quantity);
[OperationContract]
string AdjustBalance(int customerId, decimal amount);
' Visual Basic
<OperationContract()> _
Function GetCustomers() As List(Of Customer)
<OperationContract()> _
Function GetProducts() As List(Of Product)
<OperationContract()> _
Function PlaceOrder(ByVal _order As Order) As String
<OperationContract()> _
Function AdjustInventory(ByVal productId As Integer, _
ByVal quantity As Integer) As String
<OperationContract()> _
Function AdjustBalance(ByVal customerId As Integer, _
ByVal amount As Decimal) As String
When the Order form starts, it calls the GetCustomers and GetProducts methods to retrieve and then display a list of customers and products. The user selects a customer and a product, enters a quantity to purchase and clicks the Place order button. The form code calls the PlaceOrder method to place the order. It next calls the AdjustInventory method to reduce the on hand amount for the product. The code then calls the AdjustBalance method to reduce the customer’s credit balance.
The OrdersService file contains the implementation code for the service contract. All of the methods connect to the TransactionsDemo database and either retrieve or modify data. Each method returns a string indicating whether the data modification succeeded.
Press F5 to run the application. In the Orders form (see Figure 3), select Contoso in the customers grid and Wood in the products grid. Enter 10 in the Quantity text box and click Place order.
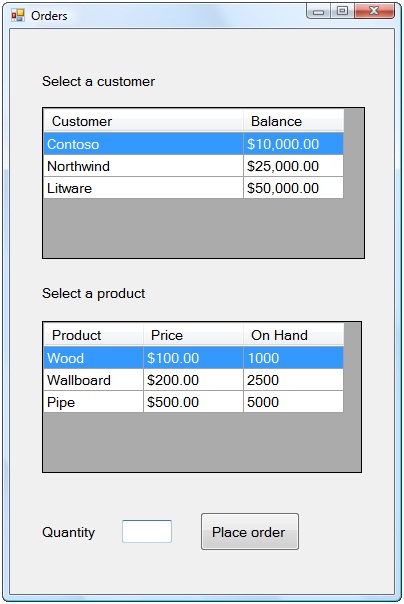
Figure 3. Use this form to place an order.
You should see a message informing you that you placed order 1. Click OK to dismiss this message. You should then see a message informing you that the product’s inventory was updated. Click OK to dismiss this message. You should see a message informing you that the customer’s balance was updated. Click OK to dismiss this message. The form then calls the GetCustomers and GetProducts methods of the service to display updated customer and product information. You should see that the customer’s balance is $1,000 lower and the product’s on hand amount is ten lower (see Figure 4). Close the form.
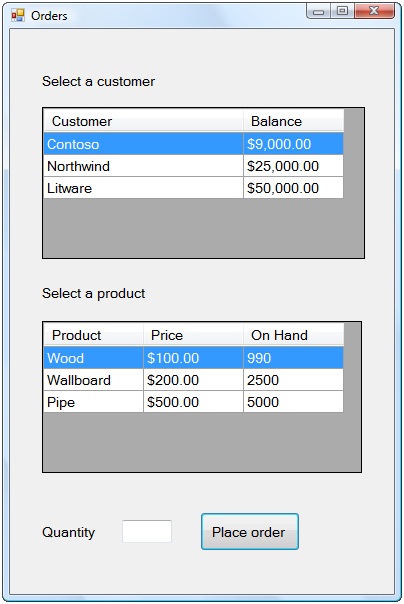
Figure 4. After you place an order, the form refreshes the customer and product information.
In this example, everything worked. What happens if something doesn’t work? What if one of the database calls fails? To see the problem, modify the AdjustBalance method so that it fails to properly update the customer row. The easiest way to do this is to misspell the name of the table in the Update statement. In the Solution Explorer, double click the OrdersService file and make the following change to the AdjustBalance method:
// C#
var cmd = new SqlCommand(
"Update Customer Set Balance = " +
"Balance - @amount " +
"Where CustomerId = @customerId", conn);
' Visual Basic
Dim cmd As New SqlCommand( _
"Update Customer Set Balance = " & _
"Balance - @amount " & _
"Where CustomerId = @customerId", conn)
Save your changes and build the solution. Press CTRL+F5 to run the application in release mode. You have introduced an error that will cause the WCF service to throw an exception. Rather than see the Exception Assistant in Visual Studio, you will let the form catch the exception and display an error message to you. Note that if you stopped the ASP.NET Development Server, the application will not work because nothing will be hosting the WCF service. Close the form. To start the Development Server, you can right-click on OrdersService.svc in the Solution Explorer and select View in Browser. The press CTRL+F5 to run the application.
In the Orders form, select Northwind in the customers grid and Wallboard in the products grid. Enter 10 in the Quantity text box and click Place order. You should see a message informing you that you placed order 2. Click OK to dismiss this message. You should then see a message informing you that the product’s inventory was updated. Click OK to dismiss this message. You should see the message shown in Figure 5. Click OK to dismiss this message.
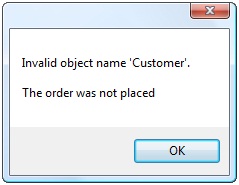
Figure 5. When the client calls the AdjustBalance method, an error occurs.
To confirm that you successfully placed the order, return to the SQL Server Management Studio. In the Object Explorer, right-click on Orders in the Tables node and select Open Table. You should see the contents of the table (see Figure 6).

Figure 6. You successfully placed the order.
The form shows that the customer’s balance remains the same and the product’s on hand amount is ten lower (see Figure 7). Close the form.
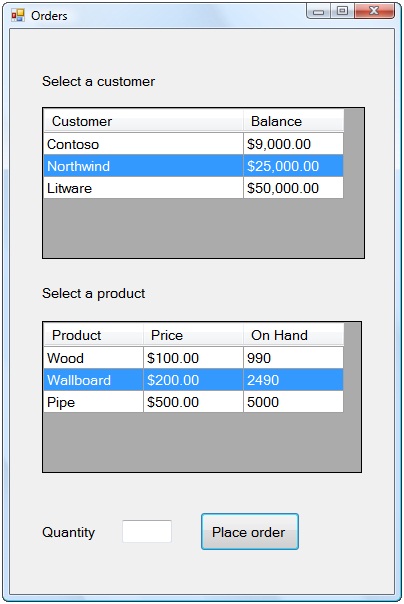
Figure 7. The product’s inventory was adjusted but not the customer’s balance.
Add Transaction Support to the WCF Service
In the example you just ran, the service executed the PlaceOrder and AdjustInventory methods, both of which changed data in the database. The service then executed the AdjustBalance method, which failed. The net result is invalid data.
The three methods occur in the desired order, but they are independent of each other. You want them to be dependent in the sense that if one fails, the following methods should not execute and any work performed by previous methods should be undone. The way to accomplish this is to make them part of a transaction.
To add transaction support to a WCF service, you will take the following actions:
- Add transaction support to the service contract. This is required.
- Add transaction support to the code that implements the service contract. This is required.
- Configure transactions in the implementation code. This is optional.
- Enable transactions on the binding. This is required.
In the Solution Explorer, right-click the OrdersServiceLibrary project and select Add Reference. In the .NET Tab of the Add Reference dialog box, select System.Transactions in the Component Name list and click OK to add the reference.
Add Transaction Support to the Service Contract
In the Solution Explorer, double-click the IOrdersService file. Add the following code to the interface to add transaction support to the service contract:
// C#
[OperationContract]
[TransactionFlow(TransactionFlowOption.NotAllowed)]
List<Customer> GetCustomers();
[OperationContract]
[TransactionFlow(TransactionFlowOption.NotAllowed)]
List<Product> GetProducts();
[OperationContract]
[TransactionFlow(TransactionFlowOption.Mandatory)]
string PlaceOrder(Order order);
[OperationContract]
[TransactionFlow(TransactionFlowOption.Mandatory)]
string AdjustInventory(int productId, int quantity);
[OperationContract]
[TransactionFlow(TransactionFlowOption.Mandatory)]
string AdjustBalance(int customerId, decimal amount);
' Visual Basic
<OperationContract()> _
<TransactionFlow(TransactionFlowOption.NotAllowed)> _
Function GetCustomers() As List(Of Customer)
<OperationContract()> _
<TransactionFlow(TransactionFlowOption.NotAllowed)> _
Function GetProducts() As List(Of Product)
<OperationContract()> _
<TransactionFlow(TransactionFlowOption.Mandatory)> _
Function PlaceOrder(ByVal _order As Order) As String
<OperationContract()> _
<TransactionFlow(TransactionFlowOption.Mandatory)> _
Function AdjustInventory(ByVal productId As Integer, _
ByVal quantity As Integer) As String
<OperationContract()> _
<TransactionFlow(TransactionFlowOption.Mandatory)> _
Function AdjustBalance(ByVal customerId As Integer, _
ByVal amount As Decimal) As String
The TransactionFlow attribute specifies whether the operation supports transactions. There are three possible values for this attribute:
- NotAllowed : The operation cannot participate in a transaction. This is the default value for this attribute.
- Allowed : The operation will participate in a transaction if the client creates one.
- Mandatory : In order to call this operation, the client must create a transaction.
The client calls the GetCustomers and GetProducts methods to retrieve lists of customers and products. There is no need to wrap these in a transaction. Note the you do not need to add the TransactionFlow attribute to these methods since these operations do not participate in a transaction. However, being explicit makes your code more understandable.
You want calls to the PlaceOrder, AdjustInventory and AdjustBalance methods to be part of a transaction, so you set the TransactionFlow attribute to Mandatory. To call these methods, the client application must create a transaction.
Add Transaction Support to the Code that Implements the Service Contract
In the Solution Explorer, double-click the OrdersService file. Add the following code to add transaction support to the PlaceOrder, AdjustInventory and AdjustBalance methods:
// C#
[OperationBehavior(TransactionScopeRequired=true,
TransactionAutoComplete=true)]
public string PlaceOrder(Order order)
[OperationBehavior(TransactionScopeRequired = true,
TransactionAutoComplete = true)]
public string AdjustInventory(int productId, int quantity)
[OperationBehavior(TransactionScopeRequired = true,
TransactionAutoComplete = true)]
public string AdjustBalance(int customerId, decimal amount)
' Visual Basic
<OperationBehavior(TransactionScopeRequired:=True, _
TransactionAutoComplete:=True)> _
Public Function PlaceOrder(ByVal _order As Order) As String _
Implements IOrdersService.PlaceOrder
<OperationBehavior(TransactionScopeRequired:=True, _
TransactionAutoComplete:=True)> _
Public Function AdjustInventory(ByVal productId As Integer, _
ByVal quantity As Integer) As String _
Implements IOrdersService.AdjustInventory
<OperationBehavior(TransactionScopeRequired:=True, _
TransactionAutoComplete:=True)> _
Public Function AdjustBalance(ByVal customerId As Integer, _
ByVal amount As Decimal) As String _
Implements IOrdersService.AdjustBalance
When you added the TransactionFlow attribute to the service contract, you enabled clients to start a transaction. Here, you are instructing the WCF runtime to include these methods in transactions. Both steps are required to add transaction support to the service.
Setting the TransactionScopeRequired property to true specifies that clients cannot call these methods unless they are part of a transaction. Setting the TransactionAutoComplete property to true specifies that the transaction will complete automatically if no exceptions occur. This is the default value for this property.
Configure Transactions in the Implementation Code
In the OrdersService file, add the following code to use the ServiceBehavior attribute to control the behavior of transactions:
// C#
[ServiceBehavior(
TransactionIsolationLevel=
System.Transactions.IsolationLevel.Serializable,
TransactionTimeout="00:00:30")]
public class OrdersService : IOrdersService
' Visual Basic
<ServiceBehavior( _
TransactionIsolationLevel:= _
System.Transactions.IsolationLevel.Serializable, _
TransactionTimeout:="00:00:30")> _
Public Class OrdersService
Implements IOrdersService
The TransactionIsolationLevel property of the ServiceBehavior attribute specifies the locking behavior for the workflow. The isolation levels you will use most often are:
- Serializable. This is the default level of isolation used by the .NET Framework. It is also the most restrictive level. Other transactions cannot change any data read by this transaction until the transaction completes. The transaction can safely reread its data, knowing that other transactions have not changed it. This provides the most protection for the transaction, but can cause performance problems due to excessive locking of database records. This is a good choice for short transactions, but if your transactions are longer, you may want to use another level of isolation.
- RepeatableRead. Other transactions cannot update any data read by this transaction. However, they can insert rows. If the transaction needs to reread rows, there is a risk of additional data being present. This may cause unexpected results in some cases, but will improve performance.
- ReadCommitted. Other transactions can change data read by the transaction. However, they cannot read data changed by the transaction until it commits. This is the default isolation level in SQL Server.
- ReadUncommitted. Other transactions can change data read by the transaction. They can also read data changed by the transaction before it commits. This may cause the other transactions to read incomplete or inaccurate data.
- Unspecified. The service does not know ahead of time what level of isolation the transaction will use. This is the default value for the TransactionIsolationLevel property in a WCF service.
The other isolation levels are Snapshot and Chaos. For more information on these, see the help topic for TransactionIsolationLevel Enumeration in the .NET Framework documentation.
The TransactionTimeout property of the ServiceBehavior attribute specifies the period of time that, if it elapses, will cause the transaction to fail and rollback. The default value for this property is 60 seconds. In the code above, you changed the timeout to 30 seconds.
The ServiceBehavior attribute has two other transaction related properties. These are:
- TransactionAutoCompleteOnSessionClose. Use this to specify whether pending transactions complete when the current session closes without error.
- ReleaseServiceInstanceOnTransactionComplete. Use this to specify whether the WCF runtime releases the service object when the current transaction completes.
Enable Transactions on the Binding
Your final step in configuring the WCF service to support transactions is to configure the binding(s) to support transactions. Before you do that, be aware that you must use a binding that supports transactions. All of the WCF supplied bindings support transactions, with the exception of the BasicHttpBinding and NetPeerTcpBinding bindings.
In the Solution Explorer, double-click the Web.config file. Add the following code to configure the WSHttpBinding binding to support transactions:
</serviceBehaviors>
</behaviors>
<bindings>
<wsHttpBinding>
<binding name="wsHttpBinding"
transactionFlow="true" />
</wsHttpBinding>
</bindings>
</system.serviceModel>
Add the following code to apply this setting to the binding specified in the endpoint:
<services>
<service name="OrdersServiceLibrary.OrdersService"
behaviorConfiguration="ServiceBehavior">
<!-- Service Endpoints -->
<endpoint address="" binding="wsHttpBinding"
bindingConfiguration="wsHttpBinding"
contract="OrdersServiceLibrary.IOrdersService">
Save your changes and rebuild the solution.
Start a Transaction in the Client
You have now configured the WCF service to support transactions. The service does not start transactions. The client application is responsible for that. To start a transaction in the client application, you must take the following actions:
- Add transaction support to the proxy class.
- Enable transactions on the binding.
- Use the TransactionScope class to start a transaction.
Add Transaction Support to the Proxy Class and Enable Transactions on the Binding
You have modified the service’s service contract, so you will need to update the service reference in the client. In the Solution Explorer, expand the Service References node in the WindowsClient project if necessary. Right-click on OrdersService and select Update Service Reference. Visual Studio updates the proxy class to include support for transactions.
In the Solution Explorer, double click the App.config file in the WindowsClient project. Visual Studio added the following code to enable transactions on the binding:
<wsHttpBinding>
<binding name="WSHttpBinding_IOrdersService"
closeTimeout="00:01:00" openTimeout="00:01:00"
receiveTimeout="00:10:00" sendTimeout="00:01:00"
bypassProxyOnLocal="false" transactionFlow="true"
hostNameComparisonMode="StrongWildcard"
maxBufferPoolSize="524288" maxReceivedMessageSize="65536"
messageEncoding="Text" textEncoding="utf-8"
useDefaultWebProxy="true" allowCookies="false">
You have configured the service to require transactions for the methods you call to place an order. Before you do that, run the application to see what happens if you don’t start a transaction. Start the ASP.NET Development Server if necessary. Press CTRL+F5 to run the application. In the Orders form, select Northwind in the customers grid and Wallboard in the products grid. Enter 10 in the Quantity text box and click Place order. You should see a message shown in Figure 8. Click OK to dismiss the message. Close the form.
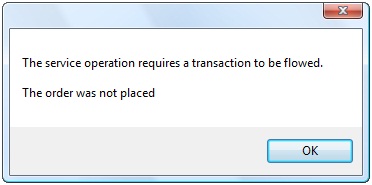
Figure 8. You must start a transaction before you place an order.
When you called the PlaceOrder method, an exception occurred because you did not start a transaction first.
Use the TransactionScope Class to Start a Transaction
You will now add code to start a transaction when you click the Place order button on the form. In the Solution Explorer, right-click the WindowsClient project and select Add Reference. In the .NET Tab of the Add Reference dialog box, select System.Transactions in the Component Name list and click OK to add the reference.
In the Solution Explorer, right-click the Form1 file and select View Code. Add the following code to the top of the file:
// C#
using System.Transactions;
' Visual Basic
Imports System.Transactions
Add the following code to the placeOrderButton_Click method:
// C#
using (var tranScope = new TransactionScope())
{
try
{
result = proxy.PlaceOrder(order);
MessageBox.Show(result);
result = proxy.AdjustInventory(product.ProductId, quantity);
MessageBox.Show(result);
result = proxy.AdjustBalance(customer.CustomerId,
Convert.ToDecimal(quantity) * order.Price);
MessageBox.Show(result);
tranScope.Complete();
}
catch (FaultException faultEx)
{
MessageBox.Show(faultEx.Message);
}
catch (ProtocolException protocolEx)
{
MessageBox.Show(protocolEx.Message);
}
}
quantityTextBox.Clear();
' Visual Basic
Using tranScope As New TransactionScope
Try
result = proxy.PlaceOrder(_order)
MessageBox.Show(result)
result = proxy.AdjustInventory(_product.ProductId, quantity)
MessageBox.Show(result)
result = proxy.AdjustBalance(_customer.CustomerId, _
Convert.ToDecimal(quantity) * _order.Price)
MessageBox.Show(result)
tranScope.Complete()
Catch faultEx As FaultException
MessageBox.Show(faultEx.Message)
Catch protocolEx As ProtocolException
MessageBox.Show(protocolEx.Message)
End Try
End Using
quantityTextBox.Clear()
The code starts a transaction and then calls the PlaceOrder, AdjustInventory and AdjustBalance methods. The code then signals to the service to commit the transaction.
Before you run the application, return to the OrdersService file and make the following change to the AdjustBalance method to fix the error you introduced earlier:
// C#
var cmd = new SqlCommand(
"Update Customers Set Balance = " +
"Balance - @amount " +
"Where CustomerId = @customerId", conn);
' Visual Basic
Dim cmd As New SqlCommand( _
"Update Customers Set Balance = " & _
"Balance - @amount " & _
"Where CustomerId = @customerId", conn)
Save your changes and build the solution. Press CTRL+F5 to run the application. In the Orders form, select Litware in the customers grid and Pipe in the products grid. Enter 10 in the Quantity text box and click Place order.
You should see a message informing you that you placed order 3. Click OK to dismiss this message. You should then see a message informing you that the product’s inventory was updated. Click OK to dismiss this message. You should see a message informing you that the customer’s balance was updated. Click OK to dismiss this message. You should see in the form that the customer’s balance is $5,000 lower and the product’s on hand amount is ten lower. Close the form.
Return to the the OrdersService file and reintroduce the error in the AdjustBalance method. Save your changes and build the solution. Start the ASP.NET Development Server if necessary. Press CTRL+F5 to run the application. In the Orders form, select Contoso in the customers grid and Wood in the products grid. Enter 10 in the Quantity text box and click Place order.
You should see a message informing you that you placed order 4. Click OK to dismiss this message. You should then see a message informing you that the product’s inventory was updated. Click OK to dismiss this message. You should see the Invalid object name message you saw earlier (see Figure 5). Click OK to dismiss this message.
To confirm that you did not place the order, return to the SQL Server Management Studio. In the Object Explorer, right-click on Orders in the Tables node and select Open Table. You should see the contents of the table (see Figure 9).You should see in the form that the customer’s balance and the product’s on hand amount did not change. Close the form.

Figure 9. You did not place order 4.
Add Transaction Support to a Stateful Service
The WCF service in the sample application is stateless. If it were stateful, you would need to take some additional actions to enable transaction support. By default, when you add support for transactions to a service, the WCF runtime creates a new service object for each call to the service. As you saw in the Sessions, Instancing and Concurrency tutorial, this is equivalent to setting the InstanceContextMode property of the ServiceBehavior attribute to PerCall. The service does not maintain state.
You will next configure the sample WCF service to use sessions and to support transactions. Return to the IOrderService file and add the following code to require sessions:
// C#
[ServiceContract(SessionMode=SessionMode.Required)]
public interface IOrdersService
' Visual Basic
<ServiceContract(SessionMode:=SessionMode.Required)> _
Public Interface IOrdersService
Return to the OrdersService file and add the following code to change the instancing to PerSession and to complete the transaction when the session ends:
// C#
[ServiceBehavior(
TransactionIsolationLevel=
System.Transactions.IsolationLevel.Serializable,
TransactionTimeout="00:00:30",
InstanceContextMode=InstanceContextMode.PerSession,
TransactionAutoCompleteOnSessionClose=true)]
public class OrdersService : IOrdersService
' Visual Basic
<ServiceBehavior( _
TransactionIsolationLevel:= _
System.Transactions.IsolationLevel.Serializable, _
TransactionTimeout:="00:00:30", _
InstanceContextMode:=InstanceContextMode.PerSession, _
TransactionAutoCompleteOnSessionClose:=True)> _
Public Class OrdersService
Implements IOrdersService
Make the following changes to the PlaceOrder, AdjustInventory and AdjustBalance methods:
// C#
[OperationBehavior(TransactionScopeRequired=true,
TransactionAutoComplete=false)]
public string PlaceOrder(Order order)
[OperationBehavior(TransactionScopeRequired = true,
TransactionAutoComplete = false)]
public string AdjustInventory(int productId, int quantity)
[OperationBehavior(TransactionScopeRequired = true,
TransactionAutoComplete = false)]
public string AdjustBalance(int customerId, decimal amount)
' Visual Basic
<OperationBehavior(TransactionScopeRequired:=True, _
TransactionAutoComplete:=False)> _
Public Function PlaceOrder(ByVal _order As Order) As String _
Implements IOrdersService.PlaceOrder
<OperationBehavior(TransactionScopeRequired:=True, _
TransactionAutoComplete:= False)> _
Public Function AdjustInventory(ByVal productId As Integer, _
ByVal quantity As Integer) As String _
Implements IOrdersService.AdjustInventory
<OperationBehavior(TransactionScopeRequired:=True, _
TransactionAutoComplete:= False)> _
Public Function AdjustBalance(ByVal customerId As Integer, _
ByVal amount As Decimal) As String _
Implements IOrdersService.AdjustBalance
The transaction completes when the session ends, so you do not want any of these methods to complete the transaction.
Save your changes and rebuild the solution. You have modified the service’s service contract, so you will need to update the service reference in the client. In the Solution Explorer, expand the Service References node in the WindowsClient project if necessary. Right-click on OrdersService and select Update Service Reference. Visual Studio updates the proxy class to include support for transactions.
Return to the Form1 file and add the following code to the placeOrderButton_Click method:
// C#
using (var tranScope = new TransactionScope())
{
proxy = new OrdersServiceClient("WSHttpBinding_IOrdersService");
try
{
result = proxy.PlaceOrder(order);
MessageBox.Show(result);
result = proxy.AdjustInventory(product.ProductId, quantity);
MessageBox.Show(result);
result = proxy.AdjustBalance(customer.CustomerId,
Convert.ToDecimal(quantity) * order.Price);
MessageBox.Show(result);
proxy.Close();
tranScope.Complete();
}
' Visual Basic
Using tranScope As New TransactionScope
proxy = New OrdersServiceClient("WSHttpBinding_IOrdersService")
Try
result = proxy.PlaceOrder(_order)
MessageBox.Show(result)
result = proxy.AdjustInventory(_product.ProductId, quantity)
MessageBox.Show(result)
result = proxy.AdjustBalance(_customer.CustomerId, _
Convert.ToDecimal(quantity) * _order.Price)
MessageBox.Show(result)
proxy.Close()
tranScope.Complete()
Before starting the transaction, this code will create a new instance of the proxy class each time you place a new order. When the code calls the Complete method of the TransactionScope the WCF runtime completes the transaction. Note that before you can complete the transaction, you must end the session. The code above closes the proxy class, ending the session, before it calls the Complete method.
Start the ASP.NET Development Server if necessary. Press CTRL+F5 to run the application. In the Orders form, select Litware in the customers grid and Pipe in the products grid. Enter 10 in the Quantity text box and click Place order.
You should see a message informing you that you placed order 5. Click OK to dismiss this message. You should then see a message informing you that the product’s inventory was updated. Click OK to dismiss this message. You should see the Invalid object name message you saw earlier (see Figure 5). Click OK to dismiss this message.
Conclusion
Anytime you have a number of activities that should all work or all not work you will want to wrap them in a transaction. This is true whether you are writing client code, building a workflow using Windows Workflow Foundation or building a WCF service.
In this tutorial, you saw how to add transaction support to a WCF service and how to start a transaction in a client application. You also saw how to add transaction support to stateful WCF services.
About the Author
Robert Green is a developer, writer, and trainer. He is a senior consultant with MCW Technologies. Robert is a Visual Studio Tools for the Office system MVP and is a co-author of AppDev courseware for Microsoft Visual Basic, Microsoft Visual C#, LINQ and Microsoft Windows Workflow Foundation. Before joining MCW, Robert worked at Microsoft as a Product Manager and also a Program Manager.