Investigate insider risk management activities
Important
Microsoft Purview Insider Risk Management correlates various signals to identify potential malicious or inadvertent insider risks, such as IP theft, data leakage and security violations. Insider risk management enables customers to create policies to manage security and compliance. Built with privacy by design, users are pseudonymized by default, and role-based access controls and audit logs are in place to help ensure user-level privacy.
Investigating potentially risky user activities is an important first step in minimizing insider risks for your organization. These risks may be activities that generate alerts from insider risk management policies. They can also be risks from compliance-related activities that are detected by policies, but don't immediately create insider risk management alerts for users. You can investigate these types of activities by using the User activity reports (preview) or with the Alert dashboard.
Tip
If you're not an E5 customer, use the 90-day Microsoft Purview solutions trial to explore how additional Purview capabilities can help your organization manage data security and compliance needs. Start now at the Microsoft Purview compliance portal trials hub. Learn details about signing up and trial terms.
User activity reports
User activity reports allow you to examine potentially risky activities (for specific users and for a defined time period) without having to assign these activities, temporarily or explicitly, to an insider risk management policy. In most insider risk management scenarios, users are explicitly defined in policies, and they may have policy alerts (depending on triggering events) and risk scores associated with the activities. But in some scenarios, you may want to examine the activities for users that aren't explicitly defined in a policy. These activities may be for users that you've received a tip about the user and potentially risky activities, or users that typically don't need to be assigned to an insider risk management policy.
After you've configured indicators on the insider risk management Settings page, user activity is detected for potentially risky activity associated with the selected indicators. This configuration means that all detected activity for users is available for review, regardless if it has a triggering event or if it creates an alert. Reports are created on a per-user basis and can include all activities for a custom 90-day period. Multiple reports for the same user aren't supported.
After examining potentially risky activities, investigators can dismiss individual user's activities as benign. They can also share or email a link to the report with other investigators, or choose to assign users (temporarily or explicitly) to an insider risk management policy. Users must be assigned to the Insider Risk Management Investigators role group to view the User activity reports page.
To get started, select Manage reports in the Investigate user activity section on the insider risk management Overview page.
To view activities for a user, first select Create user activity report and complete the following fields in the New user activity report pane:
- User: Search for a user by name or email address.
- Start date: Use the calendar control to select the start date for user activities.
- End date: Use the calendar control to select the end date for user activities. The end date selected must be greater than two days after the selected start date and no greater than 90 days from the selected start date.
Note
Data outside of the selected range may be included if the user was previously included in an alert.
User activity data is available for reporting approximately 48 hours after the activity occurred. For example, to review user activity data for December 1, you'll need to make sure at least 48 hours have elapsed before creating the report (you'd create a report on December 3 at the earliest).
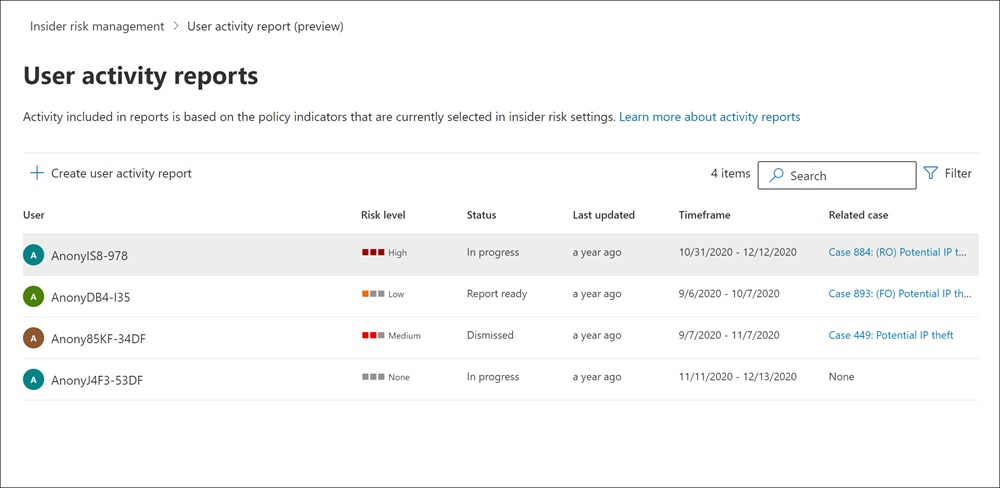
New reports typically take up to 10 hours before they're ready for review. When the report is ready, Report ready appears in the Status column on the User activity report page. Select the user to view the detailed report:
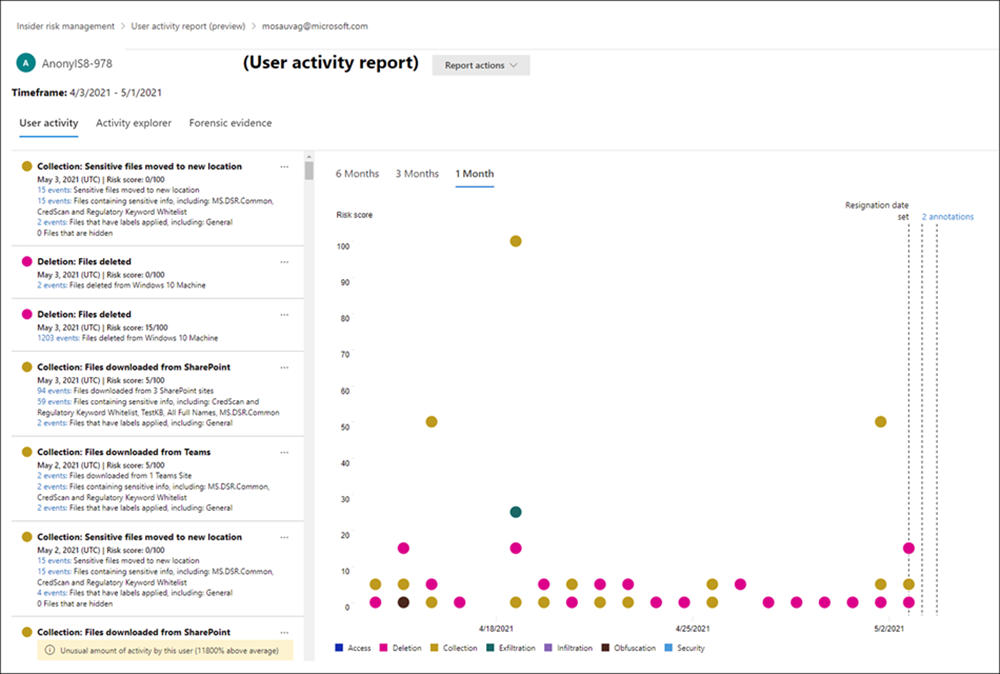
The User activity report for the selected user contains the User activity, Activity explorer, and Forensic evidence tabs:
- User activity: Use this chart view to investigate potentially risky activities and view potentially related activities that occur in sequences. This tab is structured to enable quick review of a case, including a historical timeline of all activities, activity details, the current risk score for the user in the case, the sequence of risk events, and filtering controls to help with investigative efforts.
- Activity explorer: This tab provides risk investigators with a comprehensive analytics tool that provides detailed information about activities. With the Activity explorer, reviewers can quickly review a timeline of detected risky activity and identify and filter all potentially risky activities associated with alerts. To learn more about using the Activity explorer, see the Activity explorer section later in this article.
Alert dashboard
Insider risk management alerts are automatically generated by risk indicators that are defined in insider risk management policies. These alerts give compliance analysts and investigators an all-up view of the current risk status and allow your organization to triage and take actions for discovered potential risks. By default, policies generate a certain amount of low, medium, and high severity alerts, but you can increase or decrease the alert volume to suit your needs. Additionally, you can configure the alert threshold for policy indicators when creating a new policy with the policy creation tool.
Note
For any alerts that are generated, insider risk management generates a single aggregated alert per user. Any new insights for that user are added to the same alert.
Check out the Insider Risk Management Alerts Triage Experience video for an overview of how alerts provide details, context, and related content for risky activity and how to make your investigation process more effective.
Note
If your policies are scoped by one or more administrative units, you can only see alerts for the users you're scoped for. For example, if an administrative scope applies to just users in Germany, you can only see alerts for users in Germany. Unrestricted administrators can see all alerts for all users in the organization.
The insider risk Alert dashboard allows you to view and act on alerts generated by insider risk policies. Each report widget displays information for the last 30 days.
- Total alerts that need review: The total number of alerts needing review and triage are listed, including a breakdown by alert severity.
- Open alerts over past 30 days: The total number of alerts created by policy matches over the last 30 days, sorted by high, medium, and low alert severity levels.
- Average time to resolve alerts: A summary of useful alert statistics:
- Average time to resolve high severity alerts, listed in hours, days, or months.
- Average time to resolve medium severity alerts, listed in hours, days, or months.
- Average time to resolve low severity alerts, listed in hours, days, or months.

Note
Insider risk management uses built-in alert throttling to help protect and optimize your risk investigation and review experience. This throttling guards against issues that might result in an overload of policy alerts, such as misconfigured data connectors or data loss prevention policies. As a result, there might be a delay in displaying new alerts for a user.
Alert status and severity
You can triage alerts into one of the following statuses:
- Confirmed: An alert confirmed and assigned to a new or existing case.
- Dismissed: An alert dismissed as benign in the triage process. You can provide a reason for the alert dismissal and include notes that are available in the user's alert history to provide additional context for future reference or for other reviewers. Reasons could range from expected activities, nonimpactful events, simply reducing the number of alert activities for the user, or a reason related to the alert notes. Reason classification choices include Activity is expected for this user, Activity is impactful enough for me to investigate further, and Alerts for this user contain too much activity.
- Needs review: A new alert where triage actions haven't yet been taken.
- Resolved: An alert that is part of a closed and resolved case.
Alert risk scores are automatically calculated from several risk activity indicators. These indicators include the type of risk activity, the number and frequency of the activity occurrence, the history of users' risk activity, and the addition of activity risks that may boost the seriousness of the potentially risky activity. The alert risk score drives the programmatic assignment of a risk severity level for each alert and can't be customized. If alerts remain untriaged and risk activities continue to accrue to the alert, the risk severity level can increase. Risk analysts and investigators can use alert risk severity to help triage alerts in accordance with your organization's risk policies and standards.
Alert risk severity levels are:
- High severity: The potentially risky activities and indicators for the alert pose significant risk. The associated risk activities are serious, repetitive, and corelate strongly to other significant risk factors.
- Medium severity: The potentially risky activities and indicators for the alert pose a moderate risk. The associated risk activities are moderate, frequent, and have some correlation to other risk factors.
- Low severity: The potentially risky activities and indicators for the alert pose a minor risk. The associated risk activities are minor, more infrequent, and don't corelate to other significant risk factors.
Use the Copilot button to summarize an alert
You can use the Copilot button to quickly summarize an alert without even opening the alert. When you summarize an alert with Microsoft Copilot in Purview (preview), a Copilot pane appears on the right side of the screen with an alert summary.
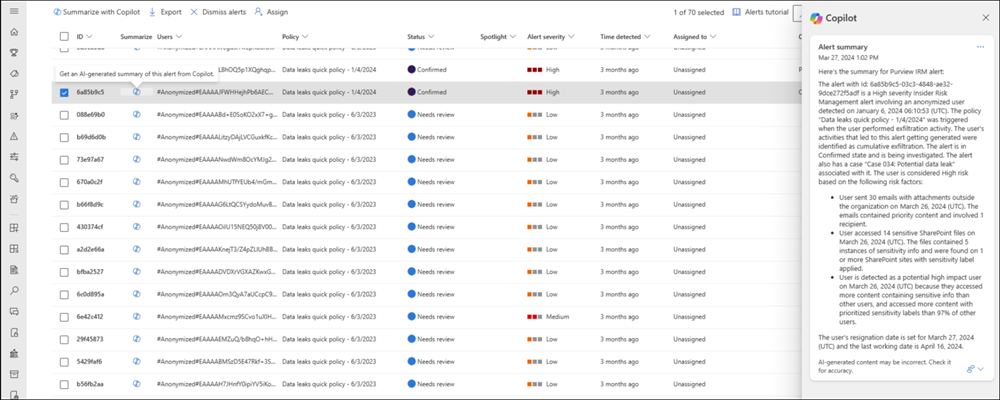
The alert summary includes all the essential details about the alert, such as the policy that was triggered, the activity that generated the alert, the triggering event, the user involved, their last working date (if applicable), any key user attributes, and the user's top risk factors. Copilot in Purview (preview) consolidates information about the user from all their alerts and in-scope policies and emphasizes the user's top risk factors.
Use the Copilot button to quickly summarize each alert in the Alerts queue and prioritize the alerts that need further investigation. For false positives, you can select multiple alerts and dismiss them in bulk by selecting Dismiss alerts.
Tip
You can also use the standalone version of Microsoft Copilot for Security to investigate insider risk management, Microsoft Purview data loss prevention (DLP), and Microsoft Defender XDR alerts.
Filter alerts, save a view of a filter set, customize columns, or search for alerts
Depending on the number and type of active insider risk management policies in your organization, reviewing a large queue of alerts can be challenging. To help you keep track of alerts, you can:
- Filter alerts by various attributes.
- Save a view of a filter set to reuse later.
- Display or hide columns.
- Search for an alert.
Filter alerts
Select Add filter.
Select one or more of the following attributes:
Attribute Description Activity that generated the alert Displays the top potentially risky activity and policy match during the activity evaluation period that led to the alert being generated. This value can be updated over time. Alert dismissal reason The reason for dismissing the alert. Assigned to The admin that the alert is assigned to for triaging (if assigned). Policy The name of the policy. Risk factors The risk factors that help determine how risky a user's activity might be. The possible values are Cumulative exfiltration activities, Activities include priority content, Sequence activities, Activities include unallowed domains, Member of a priority user group, and Potential high impact user. Severity The user's risk severity level. The options are High, Medium, and Low. Status Status of the alert. The options are Confirmed, Dismissed, Needs review, and Resolved. Time detected (UTC) The start and end dates for when the alert was created. The filter searches for alerts between UTC 00:00 on the start date and UTC 00:00 on the end date. Triggering event The event that brought the user into scope of the policy. The triggering event can change over time. The attributes that you select are added to the filter bar.
Select an attribute in the filter bar, and then select a value to filter by. For example, select the Time detected (UTC) attribute, enter or select the dates in the Start date and End date fields, and then select Apply.
Tip
If you want to start over at any point, select Reset all on the filter bar.
Save a view of a filter set to reuse later
After applying the filters as described in the preceding procedure, select Save above the filter bar, enter a name for the filter set, and then select Save.
The filter set is added as a card above the filter bar. It includes a number that shows the count of alerts that meet the criteria in the filter set.
Note
You can save up to five filter sets. If you need to delete a filter set, select the ellipsis (three dots) button in the upper-right corner of the card, and then select Delete.
To reapply a saved filter set, simply select the card for the filter set.
Display or hide columns
On the right side of the page, select Customize columns.
Select or clear the checkbox(es) for the columns you want to display or hide.
The column settings are saved across sessions and across browsers.
Search for alerts
Use the Search control to search for a user principal name (UPN), an assigned admin name, or an Alert ID.
Dismiss multiple alerts (preview)
It may help save triage time for analysts and investigators to immediately dismiss multiple alerts at once. The Dismiss alerts command bar option allows you to select one or more alerts with a Needs review status on the dashboard and quickly dismiss these alerts as benign as appropriate in your triage process. You can select up to 400 alerts to dismiss at one time.
Dismiss an insider risk alert
Select the appropriate tab for the portal you're using. To learn more about the Microsoft Purview portal, see Microsoft Purview portal. To learn more about the Compliance portal, see Microsoft Purview compliance portal.
- Sign in to the Microsoft Purview portal using credentials for an admin account in your Microsoft 365 organization.
- Go to the Insider Risk Management solution.
- Select Alerts in the left navigation.
- On the Alerts dashboard, select the alert (or alerts) that has a Needs review status.
- On the Alerts command bar, select Dismiss alerts.
- On the Dismiss alerts detail pane, review the user and policy details associated with the selected alerts.
- Select Dismiss alerts to resolve the alerts as benign.
Assign an alert
If you're an administrator, and you're a member of the Insider Risk Management, Insider Risk Management Analysts, or Insider Risk Management Investigators role group, you can assign ownership of an alert to yourself or to an insider risk management user with one of the same roles. After an alert is assigned, you can also reassign it to a user with any of the same roles. You can only assign an alert to one admin at a time.
Note
If your policies are scoped by one or more administrative units, ownership of an alert can only be given to insider risk management users with the appropriate role group permissions, and the user highlighted in the alert must be in scope of the admin unit. For example, if an administrative scope applies to just users in Germany, the insider risk management user can only see alerts for users in Germany. Unrestricted administrators can see all alerts for all users in the organization.
After an admin is assigned, you can search by admin.
Note
Admins contained within a Microsoft Entra security group are not supported for alert assignment. Admins must be directly assigned to one of the required roles.
Assign an alert from the Alerts dashboard
Select the appropriate tab for the portal you're using. To learn more about the Microsoft Purview portal, see Microsoft Purview portal. To learn more about the Compliance portal, see Microsoft Purview compliance portal.
- Sign in to the Microsoft Purview portal using credentials for an admin account in your Microsoft 365 organization.
- Go to the Insider Risk Management solution.
- Select Alerts in the left navigation.
- On the Alerts dashboard, select the alert(s) that you want to assign.
- In the button bar above the alerts queue, select Assign.
- In the Assign owner pane on the right side of the screen, search for an admin with the appropriate permissions, and then select the checkbox for that admin.
- Select Assign.
Assign an alert from the Alerts detail page
Select the appropriate tab for the portal you're using. To learn more about the Microsoft Purview portal, see Microsoft Purview portal. To learn more about the Compliance portal, see Microsoft Purview compliance portal.
- Sign in to the Microsoft Purview portal using credentials for an admin account in your Microsoft 365 organization.
- Go to the Insider Risk Management solution.
- Select Alerts in the left navigation.
- Select an alert.
- In the detail pane for the alert, in the upper-right corner of the page, select Assign.
- In the Suggested contacts list, select the appropriate admin.
Triage alerts
Select the appropriate tab for the portal you're using. To learn more about the Microsoft Purview portal, see Microsoft Purview portal. To learn more about the Compliance portal, see Microsoft Purview compliance portal.
- Sign in to the Microsoft Purview portal using credentials for an admin account in your Microsoft 365 organization.
- Go to the Insider Risk Management solution.
- Select Alerts in the left navigation.
- On the Alerts dashboard, select the alert you want to triage.
- On the Alert detail page, you can review information about the alert. You can confirm the alert and create a new case, confirm the alert and add to an existing case, or dismiss the alert. This page also includes the current status for the alert and the alert risk severity level, listed as High, Medium, or Low. The severity level may increase or decrease over time if the alert isn't triaged.
Header/Summary section
This section contains general information about the user and alert. This information is available for context while reviewing detailed information about the detected risk management activity included in the alert for the user:
- Activity that generated this alert: Displays the top potentially risky activity and policy match during the activity evaluation period that led to the alert being generated.
- Triggering event: Displays the most recent triggering event that prompted the policy to start assigning risk scores to the user's activity. If you've configured integration with communication compliance for Data leaks by risky users or Security policy violations by risky users policies, the triggering event for these alerts is scoped to communication compliance activity.
- User details: Displays general information about the user assigned to the alert. If anonymization is enabled, the username, email address, alias, and organization fields are anonymized.
- User alert history: Displays a list of alerts for the user for the last 30 days. Includes a link to view the complete alert history for the user.
Note
When a user is detected as a potential high impact user, this information is highlighted in the alert header in the User details page. The user details also include a summary with the reasons the user has been detected as such. To learn more about setting policy indicators for potential high impact users, see Insider risk management settings.
Alerts generated from policies scoped to only activities that include priority content include the Only activity with priority content was scored for this alert notification in this section.
Tip
To get a quick overview of an alert, select the Summarize button on the alert details page. When you select the Summarize button, a Copilot pane appears on the right side of the page with an alert summary. The alert summary includes all the essential details about the alert, such as the policy that was triggered, the activity that generated the alert, the triggering event, the user involved, their last working date (if applicable), any key user attributes, and the user's top risk factors. Copilot in Purview (preview) consolidates information about the user from all their alerts and in-scope policies and emphasizes the user's top risk factors. You can also summarize the alert from the Alerts queue without having to open the alert by using the Copilot button. Or use the standalone version of Microsoft Copilot for Security to investigate insider risk management, Microsoft Purview data loss prevention (DLP), and Microsoft Defender XDR alerts.
All risk factors
This tab opens the summary of risk factors for the user's alert activity. Risk factors can help you determine how risky this user's risk management activity is during your review. The risk factors include summaries for:
- Top exfiltration activities: Displays exfiltration activities with the highest number or events for the alert.
- Cumulative exfiltration activities: Displays events associated with cumulative exfiltration activities.
- Sequences of activities: Displays the detected potentially risky activities associated with risk sequences.
- Unusual activity for this user: Displays specific activities for the user that are considered potentially risky, as they're unusual and a departure from their typical activities.
- Priority content: Displays potentially risky activities associated with priority content.
- Unallowed domains: Displays potentially risky activities for events associated with unallowed domains.
- Health record access: Displays potentially risky activities for events associated with accessing health records.
- Risky browser usage: Displays potentially risky activities for events associated with browsing to potentially inappropriate websites.
With these filters, you only see alerts with the above risk factors, but the activity that generated an alert might not fall into any of these categories. For example, an alert containing sequence activities might have been generated simply because the user copied a file to a USB device.
Content detected
The section on the All risk factors tab includes content associated with the risk activities for the alert and summarizes activity events by key areas. Selecting an activity link opens the Activity explorer and displays more details about the activity.
Activity explorer
This tab opens the Activity explorer. For more information, see the Activity explorer section in this article.
User activity
The User activity chart is one of the most powerful tools for internal risk analysis and investigation for alerts and cases in the insider risk management solution. This tab is structured to enable quick review of all activities for a user, including a historical timeline of all alerts, alert details, the current risk score for the user, and the sequence of risk events.
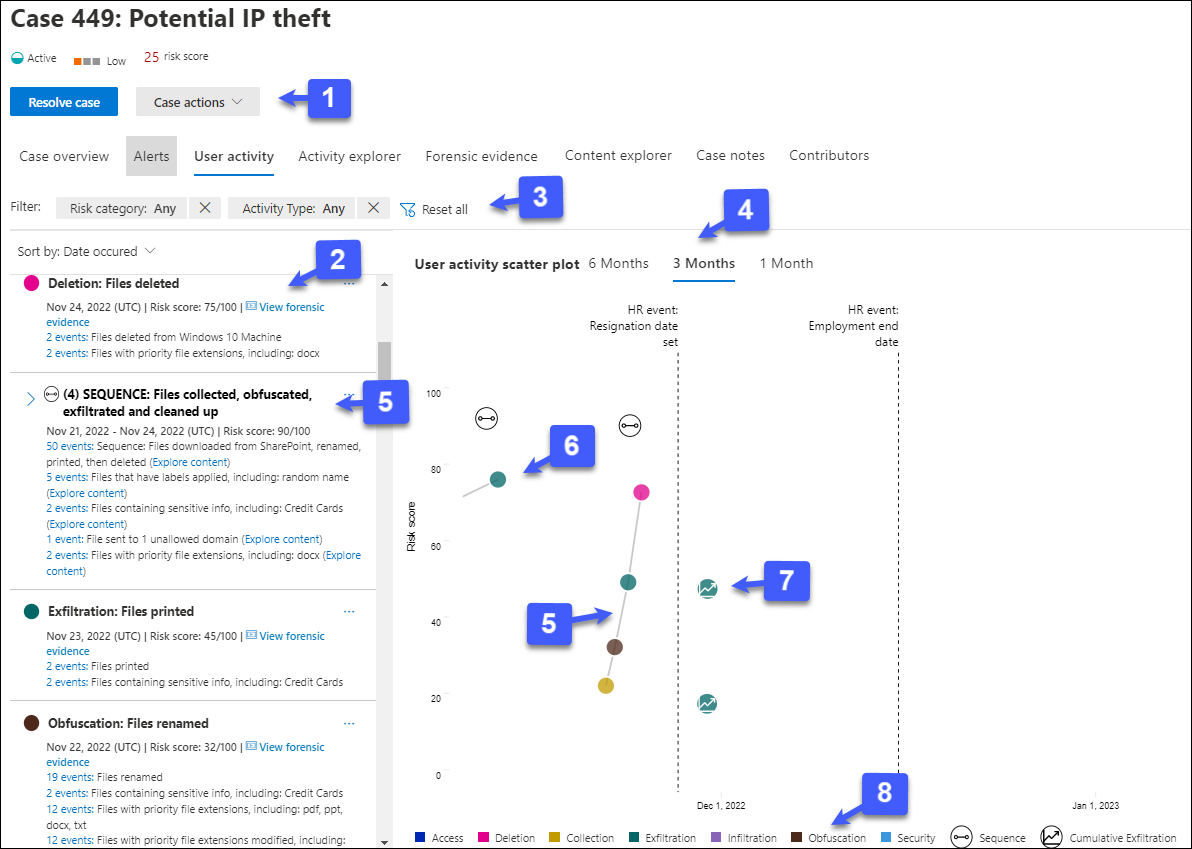
Case actions: Options for resolving the case are on the case action toolbar. When viewing in a case, you can resolve a case, send an email notice to the user, or escalate the case for a data or user investigation.
Risk activity chronology: The full chronology of all risk alerts associated with the case are listed, including all the details available in the corresponding alert bubble.
Filters and sorting (preview):
- Risk category: Filter activities by the following risk categories: Activities with risk scores > 15 (unless in a sequence) and Sequence activities.
- Activity Type: Filter activities by the following types: Access, Deletion, Collection, Exfiltration, Infiltration, Obfuscation, and Security.
- Sort by: List the timeline of potentially risky activities by Date occurred or Risk score.
Time filters: By default, the last three months of potentially risky activities are displayed in the User activity chart. You can easily filter the chart view by selecting the 6 Months, 3 Months, or 1 Month tabs on the bubble chart.
Risk sequence: The chronological order of potentially risky activities is an important aspect of risk investigation and identifying these related activities is an important part of evaluating overall risk for your organization. Alert activities that are related are displayed with connecting lines to highlight that these activities are associated with a larger risk area. Sequences are also identified in this view by an icon positioned above the sequence activities relative to the risk score for the sequence. Hover over the icon to see the date and time of the risky activity associated with this sequence. This view of activities can help investigators literally 'connect the dots' for risk activities that could have been viewed as isolated or one-off events. Select the icon or any bubble in the sequence to display details for all the associated risk activities. Details include:
- Name of the sequence.
- Date or Date range of the sequence.
- Risk score for the sequence. This score is the numerical score for the sequence of the combined alert risk severity levels for each related activity in the sequence.
- Number of events associated with each alert in the sequence. Links to each file or email associated with each potentially risky activity are also available.
- Show activities in sequence. Displays the sequence as a highlight line on the bubble chart and expands the alert details to display all related alerts in the sequence.
Risk alert activity and details: Potentially risky activities are visually displayed as colored bubbles in the User activity chart. Bubbles are created for different categories of risk. Select a bubble to display the details for each potentially risky activity. Details include:
- Date of the risk activity.
- The risk activity category. For example, Email(s) with attachments sent outside the organization or File(s) downloaded from SharePoint Online.
- Risk score for the alert. This score is the numerical score for the alert risk severity level.
- Number of events associated with the alert. Links to each file or email associated with the risk activity are also available.
Cumulative exfiltration activities: Select this button to view a visual chart of how activity is building over time for the user.
Risk activity legend: Across the bottom of the user activity chart, a color-coded legend helps you quickly determine risk category for each alert.
Activity explorer
Note
Activity explorer is available in the alert management area for users with triggering events after this feature is available in your organization.
The Activity explorer provides risk investigators and analysts with a comprehensive analytics tool that provides detailed information about alerts. With the Activity explorer, reviewers can quickly review a timeline of detected potentially risky activity and identify and filter all risk activities associated with alerts.
Use the Activity explorer
Select the appropriate tab for the portal you're using. To learn more about the Microsoft Purview portal, see Microsoft Purview portal. To learn more about the Compliance portal, see Microsoft Purview compliance portal.
- Sign in to the Microsoft Purview portal using credentials for an admin account in your Microsoft 365 organization.
- Go to the Insider Risk Management solution.
- Select Alerts in the left navigation.
- On the Alerts dashboard, select the alert you want to triage.
- On the Alerts detail pane, select Open expanded view.
- On the page for the selected alert, select the Activity explorer tab.
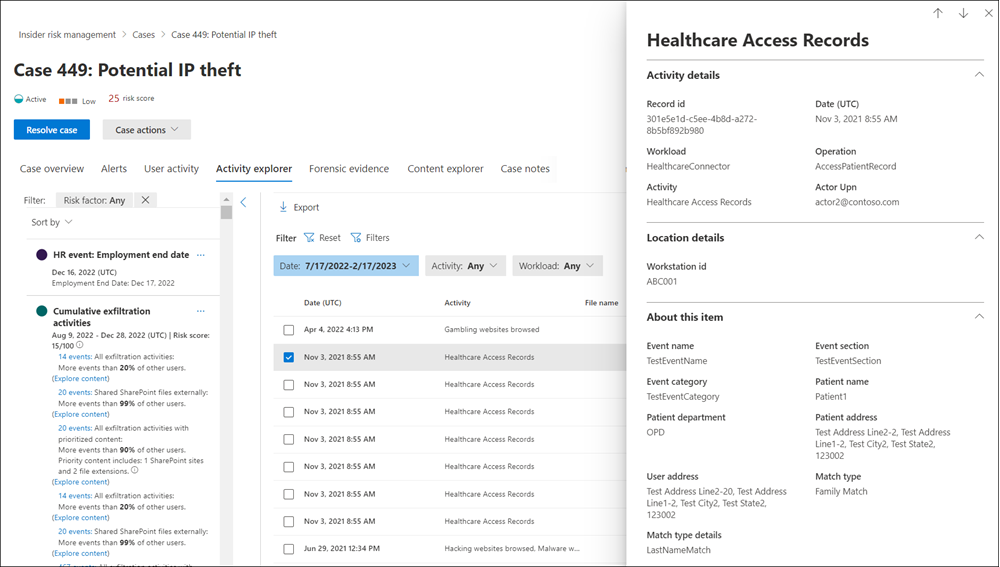
When reviewing activities in the Activity explorer, investigators and analysts can select a specific activity and open the activity details pane. The pane displays detailed information about the activity that investigators and analysts can use during the alert triage process. Detailed information may provide context for the alert and assist with identifying the full scope of the risk activity that triggered the alert.
When selecting an activity's events from the activity timeline, the number of activities displayed in the explorer might not match the number of activity events listed in the timeline. Examples of why this difference may occur:
- Cumulative exfiltration detection: Cumulative exfiltration detection analyzes event logs, but applies a model that includes deduplicating similar activities to compute cumulative exfiltration risk. Additionally, there may also be a difference in the number of potentially risky activities displayed in the Activity explorer if you have made changes to your existing policy or settings. For example, if you modify allowed/unallowed domains or add new file type exclusions after a policy has been created and potentially risky activity matches have occurred, the cumulative exfiltration detection activities will differ from the results before the policy or settings changes. Cumulative exfiltration detection activity totals are based on the policy and settings configuration at the time of computation and don't include activities prior to the policy and settings changes.
- Emails to external recipients: Potentially risky activity for emails sent to external recipients is assigned a risk score based on the number of emails sent, which may not match the activity event logs.
Sequences that contain events excluded from risk scoring
A sequence might contain one or more events that are excluded from risk scoring based on your settings configuration. For example, your organization might use the Intelligent detections setting to exclude .png files from risk scoring since .png files aren't normally risky. But a .png file could be used to obfuscate a malicious activity. For this reason, if an event that's excluded from risk scoring is part of a sequence due to an obfuscation activity, the event is included in the sequence since it may be interesting in the context of the sequence.
The Activity explorer displays the following information for excluded events in sequences:
- If a sequence contains a step where all events are excluded, the insight includes just the activity name and date. Select the View the excluded events link to filter for the excluded events in the Activity explorer. The User activity scatter plot icon has a risk score of 0 if all events are excluded.
- If a sequence has an insight where some events are excluded, the event information for the nonexcluded event(s) is displayed, but the event count doesn't include the excluded event(s). Select the View the excluded events link to filter for the excluded events in the Activity explorer.
- If you select a sequence link for an insight, you can drill down into the sequence of events in the activity details pane, including any events that were excluded from scoring. An event excluded from scoring is marked as Excluded.
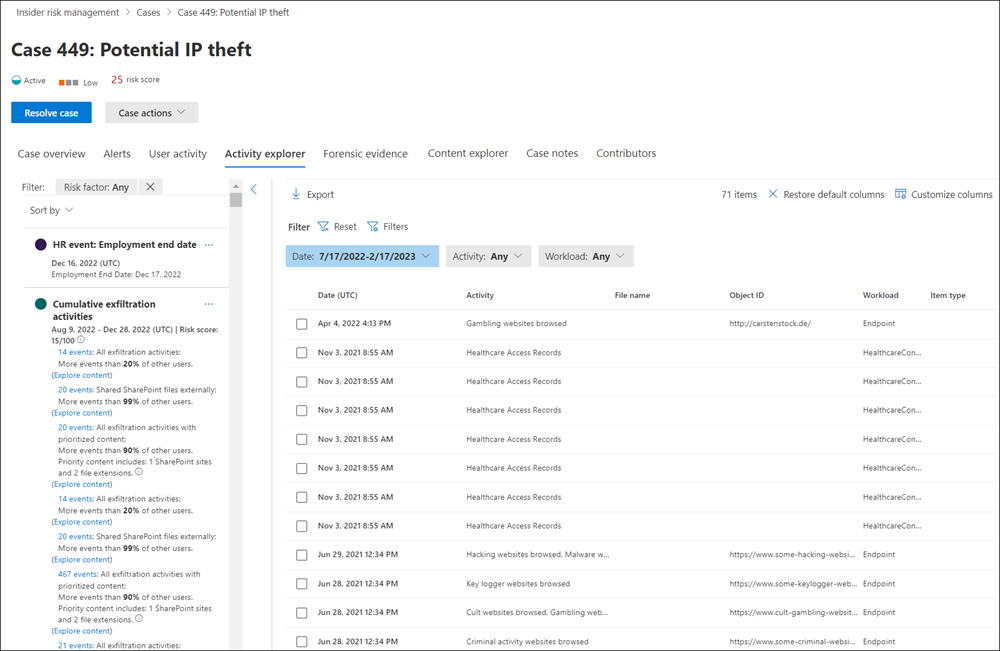
Filter alerts in the Activity explorer
To filter alerts in the Activity explorer for column information, select Filters. You can filter alerts by one or more attributes listed in the details pane for the alert. Activity explorer also supports customizable columns to help investigators and analysts focus the dashboard on the information most important to them.
Use the Activity scope, Risk factor, and Review status filters to display and sort activities and insights for the following areas.
Activity scope: Filters all scored activities for the user.
- All scored activity for this user
- Only scored activity in this alert
Risk factor: Filters for risk factor activity applicable for all policies assigning risk scores This includes all activity for all policies for in-scope users.
- Unusual activity
- Includes events with priority content
- Includes events with unallowed domain
- Sequence activities
- Cumulative exfiltration activities
- Health record access activities
- Risky browser usage
Review status: Filters activity review status.
- All
- Not yet reviewed (filters out any activity that was part of a dismissed or resolved alert)
Save a view of a filter to reuse later
If you create a filter and customize columns for the filter, you can save a view of your changes so that you or others can quickly filter for the same changes again later. When you save a view, you save both the filters and columns. When you load the view, it loads both saved filters and columns.
- Create a filter and customize columns.
Tip
If you want to start over at any point, select Reset. To change columns that you've customized, select Reset columns.
- When you have the filter the way you want it, select Save this view, enter a name for the view, and then select Save.
Note
The maximum length for a view name is 40 characters and you can't use any special characters.
- To reuse the view of the filter later, select Views, and then select the view you want to open from the Recommended views tab (shows the most-used views) or the Custom views tab (the most frequently used filters are displayed at the top of the list).
When you select a view this way, it resets all the existing filters and replace them with the view that you selected.
Create a case for an alert
You can create a case for an alert if you want to further investigate potentially risky activity.
Select the appropriate tab for the portal you're using. To learn more about the Microsoft Purview portal, see Microsoft Purview portal. To learn more about the Compliance portal, see Microsoft Purview compliance portal.
- Sign in to the Microsoft Purview portal using credentials for an admin account in your Microsoft 365 organization.
- Go to the Insider Risk Management solution.
- Select Alerts in the left navigation.
- On the Alerts dashboard, select the alert you want to confirm and create a new case for.
- On the Alerts details pane, select Actions > Confirm alerts & create case.
- In the Confirm alert and create insider risk case dialog box, enter a name for the case, select users to add as contributors, and add comments as applicable. Comments are automatically added to the case as a case note.
- Select Create case to create a new case.
After the case is created, investigators and analysts can manage and act on the case. For more information, see the Insider risk management case article.
Retention and item limits
As insider risk management alerts age, their value to minimize potentially risky activity diminishes for most organizations. Conversely, active cases and associated artifacts (alerts, insights, activities) are always valuable to organizations and shouldn't have an automatic expiration date. This includes all future alerts and artifacts in an active status for any user associated with an active case.
To help minimize the number of older items that provide limited current value, the following retention and limits apply for insider risk management alerts, cases, and user reports:
| Item | Retention/Limit |
|---|---|
| Alerts with Needs review status | 120 days from alert creation, then automatically deleted |
| Active cases (and associated artifacts) | Indefinite retention, never expire |
| Resolved cases (and associated artifacts) | 120 days from case resolution, then automatically deleted |
| Maximum number of active cases | 100 |
| User activities reports | 120 days from report creation, then automatically deleted |
Get help managing your insider risk alert queue
Reviewing, investigating, and acting on potentially risky insider alerts are important parts of minimizing insider risks in your organization. Quickly taking action to minimize the impact of these risks can potentially save time, money, and regulatory or legal ramifications for your organization. In this remediation process, the first step of reviewing alerts can seem like the most difficult task for many analysts and investigators. Depending on your circumstances, you may be facing some minor obstacles when acting on potentially risky insider alerts. Review the following recommendations and learn how to optimize the alert review process.
Too few alerts to review
If you're receiving too few alerts:
Update your settings. Changes that you make to settings apply globally across all of your policies.
Enable more indicators. Selecting more indicators gives your policies a larger group of activities to detect.
Go to Settings > Policy indicators, and then enable all available and relevant indicators.
Generate more alerts by adjusting the Alert volume slider. Use this slider to see all medium and high severity alerts, and most low severity alerts. Note: Adjusting the slider may result in more false positives.
Go to Settings > Intelligent detections > Alert volume, and move the slider to More alerts.
Identify the policy that isn’t generating enough alerts:
Increase the user coverage in the policy. Policies with few users included in the scope are less likely to generate alerts. If applicable, consider increasing the number of users in scope for your policy.
Select a specific policy on the Policies page, select Edit policy, and then go to the Users and groups page to increase the number of in-scope users.
Lower the trigger thresholds in the policy. Policies based on the Data leaks and Risky Browser Usage (preview) templates allow you to customize some trigger thresholds. These thresholds define when you will start to detect user activities. If you lower trigger thresholds, you lower the criteria for a user to start being evaluated for risky activity. Note: If a user doesn’t appear in the Users and groups page, it means that triggering event criteria hasn't been met yet.
Go to the specific policy on the Policies page, select Edit policy, go to the Trigger thresholds page, select the Use custom thresholds option, and then set your thresholds.
Edit indicators in the policy. Indicators are the activities a user must do to be considered risky. If you don’t have many indicators (activities considered to be risky) selected in your policy, alerts are less likely to be generated.
Go to the specific policy on the Policies page, select Edit policy, and then go to the Indicators page.
Lower indicator thresholds in the policy. After your users begin getting evaluated (have a triggering event), an alert will only be generated for those users if they do activities above a certain threshold that may indicate that their activity is risky. Lowering the indicator thresholds will lower the threshold that users must surpass to generate an alert.
Go to the specific policy on the Policies page, select Edit policy, go to the Indicator thresholds page, select the Customize thresholds option, and then set your thresholds.
Too many alerts to review
If you're receiving too many valid alerts or have too many stale low-risk alerts, consider taking the following actions:
Enable analytics: Enabling analytics can help you quickly identify potential risk areas for your users and help determine the type and scope of insider risk management policies that you might want to configure. To learn more about analytics insights, see Insider risk management settings: Analytics. You can also get real-time insights from analytics if you want to take advantage of a guided (data-driven) threshold configuration experience to help you configure the appropriate thresholds when you create a new policy or tune an existing one. These insights can help you efficiently adjust the selection of indicators and thresholds of activity occurrence so that you don’t receive too few or too many policy alerts. For more information, see Use real-time analytics to help manage alert volume.
Adjust your insider risk policies: Selecting and configuring the correct insider risk policy is the most basic method to address the type and volume of alerts. Starting with the appropriate policy template helps focus the types of risk activities and alerts you see. Other factors that may impact alert volume are the size of the in-scope user and groups and the content and channels that are prioritized. Consider adjusting policies to refine these areas to what is most important for your organization.
Modify your insider risk settings: Insider risk settings include a wide variety of configuration options that can impact the volume and types of alerts you receive. Make sure to review and understand the following settings to filter out alert noise:
Enable inline alert customization: Enabling inline alert customization allows analysts and investigators to quickly edit policies when reviewing alerts. They can update thresholds for activity detection with Microsoft recommendations, configure custom thresholds, or choose to ignore the type of activity that created the alert. If this isn't enabled, then only users assigned to the Insider Risk Management role group can use inline alert customization.
Bulk deletion of alerts where applicable: It may help save triage time for your analysts and investigators to immediately dismiss multiple alerts at once. You can select up to 400 alerts to dismiss at one time.
Not familiar with the alert triage process
Investigating and acting on alerts in insider risk management is straightforward:
- Review the Alert dashboard for alerts with a status of Needs review. Filter by alert Status if needed to help locate these types of alerts.
- Start with the alerts with the highest severity. Filter by alert Severity if needed to help locate these types of alerts.
- Select an alert to discover more information and to review the alert details. If needed, use the Activity explorer to review a timeline of the associated potentially risky behavior and to identify all risk activities for the alert.
- Act on the alert. You can either confirm and create a case for the alert or dismiss and resolve the alert.
Resource constraints in my organization
Modern workplace users often have a wide variety of responsibilities and demands on their time. There are several actions you can take to help address resource constraints:
- Focus analyst and investigator efforts on the highest risk alerts first. Depending on your policies, you may be capturing user activities and generating alerts with varying degrees of potential impact to your risk mitigation efforts. Filter alerts by severity and prioritize High severity alerts.
- Assign users as analysts and investigators. Having the right user assigned to the proper roles is an important part of the insider risk alert review process. Make sure you've assigned the appropriate users to the Insider Risk Management Analysts and Insider Risk Management Investigators role groups.
- Use automated insider risk features to help discover the highest risk activities.
- Use insider risk management sequence detection and cumulative exfiltration detection to quickly discover harder to find risks in your organization.
- Consider fine-tuning your risk score boosters, and use intelligent-detections, detection groups, and variants.
- Fine tune minimum indicator threshold settings for your policies.
Feedback
Coming soon: Throughout 2024 we will be phasing out GitHub Issues as the feedback mechanism for content and replacing it with a new feedback system. For more information see: https://aka.ms/ContentUserFeedback.
Submit and view feedback for