Sample adaptor for Channel Integration Framework 2.0 and Dynamics 365 Customer Service
Applies to: Dynamics 365 Customer Service
This article outlines the process for configuring and setting up an adaptor so that Dynamics 365 Channel Integration Framework can receive notifications from external applications.
The sample adaptor that this article describes shows how an external application can use Channel Integration Framework API V2.0 to notify a user about incoming notifications. This article showcases the adaptor code as a sample and offers insights into the seamless integration of an existing application with Channel Integration Framework. The aim of this article is to help developers understand one of the patterns for integration with Channel Integration Framework.
Important
In an implementation that includes voice or integration with a third-party telephony provider, we recommend that you consider the first-party voice channel from Dynamics 365. Alternatively, integrate any third-party telephony provider by using Channel Integration Framework.
The purpose of the sample adaptor is to help you understand the interactions between an external application and a Dynamics 365 app that uses Channel Integration Framework.
Prerequisites
Azure components:
Architecture
The sample adaptor uses the SignalR Serverless component with Azure Functions. When a client signs in to Dynamics 365, Channel Integration Framework connects to SignalR. Microsoft Entra ID authorizes the users, and their connection details are stored in Azure Storage Table.
The SignalR client manages user connection and disconnection events, and keeps a list of active users for notifications. External applications such as softphones or telephony servers can send messages to Azure Functions. Azure Functions then uses the SignalR API to send messages based on SignalR connection IDs. Notifications that are received through SignalR are shown to agents for acceptance or rejection by using Channel Integration Framework API V2.0.

Communication flow sequence
When a user signs in, the Channel Integration Framework simulator instructs Azure Functions to create a link between the user and SignalR. An indicator appears gray or green, depending on the status of the connection.
The user's active connection is stored in Azure Storage by using the interface through Azure Functions. When a call comes in on the telephony system, the system uses the recorded connection information to send a message to the user who is connected.

Deployment and configuration steps
Create an Azure app registration. Learn more in Quickstart: Register an application with the Microsoft identity platform.
After the app registration is created, update the redirection URL with the Azure Functions URL. In addition, under Select the tokens you would like to be issued by the authorization endpoint, select the Access tokens and ID tokens checkboxes as shown in the following screenshot.

Learn more in Quickstart: Configure an application to expose a web API. The following screenshot shows an example of an edited API scope.

Add API permissions by searching for the preceding API scope.

Create a SignalR resource in Azure. Learn more in Create an Azure SignalR resource.
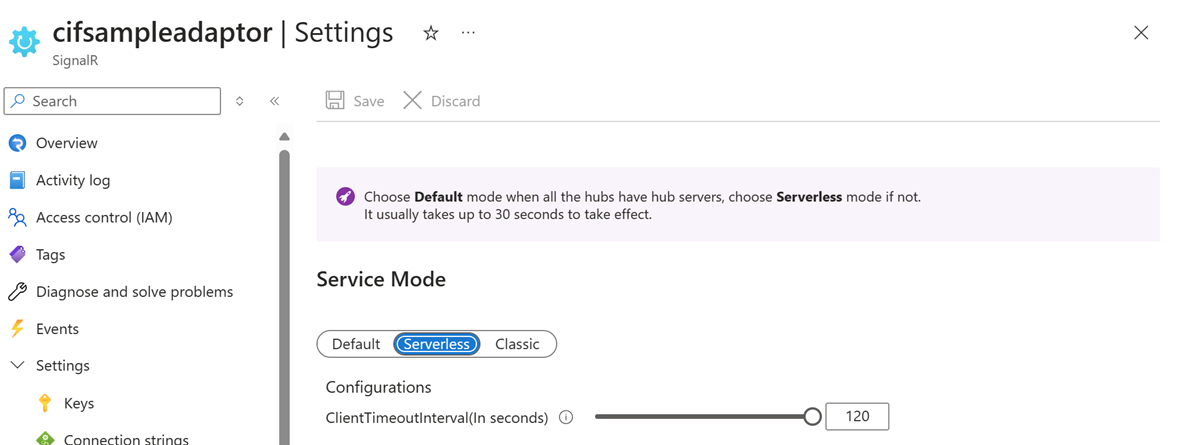
Select your SignalR Service resource, select Settings, and change the setting to Serverless.
Select your SignalR Service resource, and add cross-origin resource sharing (CORS) in SignalR Service. For this sample, all origins are allowed. However, you can configure specific URLs.

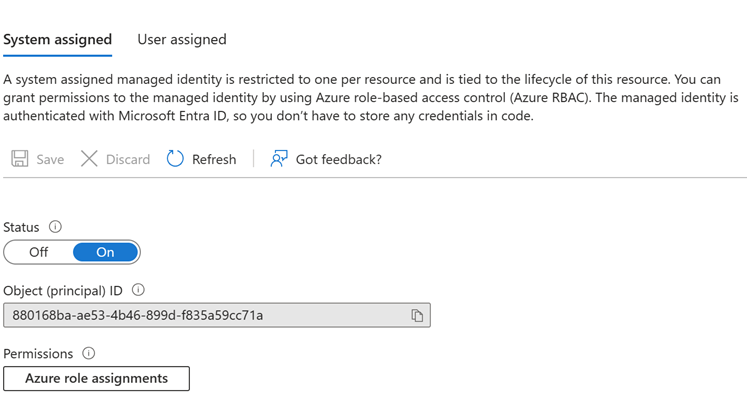
Select your SignalR Service resource, select Identity, and enable a SignalR Service system-assigned managed identity.
Create table storage in Azure. Learn more in Quickstart: Create a table in the Azure portal. You must update the storage connection information and table name in the Azure Functions configuration.
Get the Deploy Azure Functions sample code on GitHub.
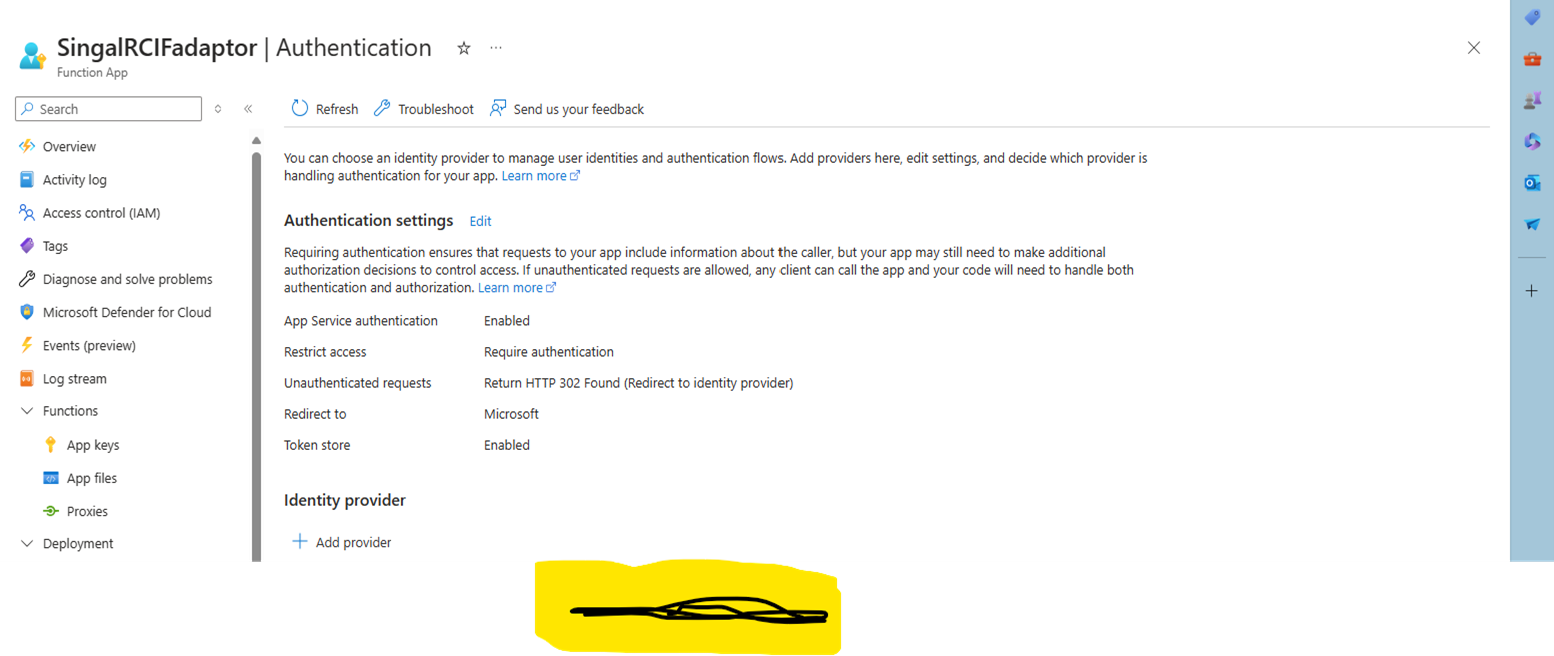
Enable authentication in Azure Functions. Add the identity provider that you specified as part of app registration in the earlier step.
In the Azure portal, update the configuration of Azure Functions.
Configuration key Description Sample value ApiScope The API permission that was provided for the app registration. You created it as part of app registration. Example: functionuser APPLICATIONINSIGHTS_CONNECTION_STRING The connection string of Application Insights for Azure Functions. Authority The URL for Active Directory authentication with tenant id. AzureAd:ClientId The client ID value from the app registration. AzureAd:ClientSecret The client secret from the app registration. AzureAd:TenantId The tenant ID from the app registration. AzureSignalRConnectionString The connection string of SignalR Service that you created earlier. AzureWebJobsStorage The connection string of Azure Table Storage that you created earlier. HubName The SignalR hub name. Example: myhub StorageUserTable The table name of the storage container. Example: ConnectionEntity Update upstream settings in SignalR. Learn more in Upstream endpoints in Azure SignalR Service. The following screenshot shows the Azure Functions URL
<your Azure Functions URL>/runtime/webhooks/signalr?code=<your API key>.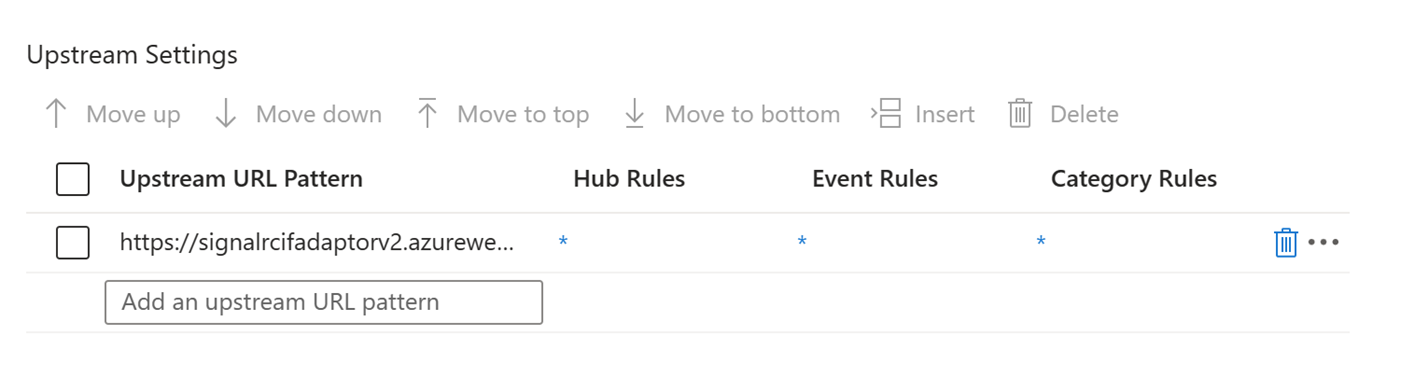
You can find the API key in Azure Functions. The following illustration shows the Deployed Azure Functions > App Keys sample.

Download the package from the Solutions folder on GitHub.
When you import the solution, update the environment variables.
Name Value ClientId The client ID that is used to get the authentication token. AdaptorFunctionUrl The SignalRCIFAdaptorFunction App URL that you created as part of an earlier deployment step. Authority The authority URL. Scope The name of the scope that you specified as part of the Expose an API step during app registration.


Note
If you haven't already followed the steps to set up Simulator for Channel Integration Framework v. 2.0 and Dynamics 365 Customer Service, follow the configuration steps now, so that the Channel Integration Framework simulator works. As the linked article mentions, you need a session template, notification template, and application tab template when the call is initialized.
Sample adaptor Azure Functions implementation details
Methods used in Azure Functions
The following table outlines the mthods that are used in the Azure Function code in the eariler section.
| Function name | Description | Trigger | Authorization | Parameters | Returns |
|---|---|---|---|---|---|
| negotiate | Manages the negotiation of a SignalR connection. | HTTP GET request | Requires authentication. | req: HttpRequest object, connectionInfo: SignalRConnectionInfo object, log: ILogger object |
SignalRConnectionInfo object |
| userclient | Stores connection information for a user client. | HTTP POST request | Requires authentication. | req: HttpRequest object, log: ILogger object |
IActionResult |
| SendMessageToUser | Sends a message to a specific user. | HTTP POST request | Requires authentication. | req: HttpRequest object, signalRMessages: IAsyncCollector object, connectionInfo: SignalRConnectionInfo object, log: ILogger object |
IActionResult |
| OnClientConnected | Manages the event when a client is connected. | SignalR connection event | invocationContext: InvocationContext object, log: ILogger object |
IActionResult | |
| OnClientDisconnect | Manages the event when a client is disconnected | SignalR connection event | invocationContext: InvocationContext object, log: ILogger object |
IActionResult | |
| SendMessageAcknowlegement | Acknowledges receipt of a message that a client sent. It can be extended to tailor the business requirement. | SignalR message event | invocationContext: InvocationContext object, content: Content of the message, log: ILogger object |
void | |
| StoreUserInformation | Stores user connection information in Azure Table Storage. | Requires authentication. | userId: User ID, connectionId: Connection ID, hubName: Name of the SignalR hub, table: CloudTable object, connectionStatus: Status of the connection, log: ILogger object |
SignalRConnectionInfo object |
Client-side signalRadaptor.js file
The signalRadaptor.js JavaScript file sets up a SignalR client for communication with a SignalR hub by using Microsoft Entra ID authentication. Here is a summary of the file's main components and functionalities.
- Configuration: Defines constants such as
functionUrl,clientId,authority,scopes, andredirectUrifor Microsoft Entra ID authentication and SignalR connection. - MSAL setup: Configures the Microsoft Authentication Library (MSAL) with the provided settings for authentication.
Methods in signalRadaptor
- SignalR client initialization: Initializes the SignalR client and defines methods in an Actions object for various actions that are related to SignalR communication.
- Authentication: Provides an
acquireTokenSilentmethod that silently acquires authentication tokens by using MSAL, to handle scenarios where users are already authenticated or must be prompted for authentication. - SignalR connection management: Includes functions to start and manage the SignalR connection. Examples include
startConnection, which initiates the connection, andconnectToSignalR, which manages the negotiation process with Azure Functions and connects to the SignalR hub. - Message handling: Defines methods to manage the sending of messages to the server (
acknowledgeMessageReceived) and registration of the client with the server (registerClient).
Related resources
Comentarios
Próximamente: A lo largo de 2024 iremos eliminando gradualmente GitHub Issues como mecanismo de comentarios sobre el contenido y lo sustituiremos por un nuevo sistema de comentarios. Para más información, vea: https://aka.ms/ContentUserFeedback.
Enviar y ver comentarios de