Muistiinpano
Tämän sivun käyttö edellyttää valtuutusta. Voit yrittää kirjautua sisään tai vaihtaa hakemistoa.
Tämän sivun käyttö edellyttää valtuutusta. Voit yrittää vaihtaa hakemistoa.
When you create cloud applications, developers typically prefer to test code on their local workstations before deploying that code to a cloud environment like Azure. Local development gives you the advantage of a wider variety of tools along with a familiar environment.
This article provides setup instructions to create and validate a local development environment that's suitable for JavaScript with Azure.
One-time subscription creation
Azure resources are created within a subscription and resource group.
Type
Description
Trial subscription
Create a free trial subscription.
Existing subscription
If you already have a subscription, access your existing subscription with:
Across multiple subscriptions
If you need to manage multiple subscriptions, learn how to create a management group with JavaScript.
One-time software installation
Azure development with JavaScript on your local workstation, we suggest you install the following tools:
| Name/Installer | Description |
|---|---|
| Node.js LTS | Install latest long-term support (LTS) runtime environment for local workstation development. Learn more about selecting a version of Node.js for Azure. |
| Visual Studio Code | Visual Studio Code gives you a great JavaScript integration and coding experience but it isn't required. You can use any code editor. |
| Visual Studio Code extensions | Install any relevant extensions for Azure services you intend to use. |
Azure hosting runtime
When you use an Azure resource as the hosting environment for your application, such as an Azure web app or Azure Functions, verify your local Node.js development environment runtime version of Node.js matches the Azure resource runtime you plan to use.
Recommended local installations
The following common local workstation installations are recommended to help with your local development tasks.
| Name | Description |
|---|---|
| Azure CLI | Local or cloud-based CLI to create and use Azure resources. |
| Azure Developer CLI | Developer-centric command-line tool for building cloud apps in developer workflow. |
| Visual Studio Code extensions for Azure | VS Code extensions to the IDE. |
| Git or Git for Windows | Command-line tools for source control. You can use a different source control tool if you prefer. |
| Docker for Windows or Mac | Use Development containers for consistent development environments. |
| Node.js LTS | Learn more |
Install Node.js
Azure supports LTS versions of Node.js. Learn more about selecting a version of Node.js for Azure.
One-time configuration for authentication
To use the same authentication code in local development and the remote Azure hosting environment, use the DefaultAzureCredential. Learn more about this managed identity.
Create a resource group for your project
Open the Azure portal in a web browser.
In the search bar, enter resource groups and select it.
Select + Create.
Enter your resource group settings:
Property Value Subscription Select your subscription. Resource group Enter your resource group name. This resource group name is used as part of a resources URI when you access the Resource Manager (management plane). The name isn't used for control (such as creating a database) or data plane (inserting data into a table). Region Select a geographical region for the resource group. Select Review + create to begin validation.
When validation successes, select Create.
Working with Azure and the Azure SDK client libraries
The Azure client libraries are provided individually for each service. You install each library based on the Azure service you need to use.
Each new project using Azure should:
- Create Azure resources.
- Install Azure client libraries from a package manager such as NPM.
- Use managed identity to authenticate with the Azure client library, then use configuration information to access specific services.
Securing configuration information
You have several options to store configuration information:
- Azure Key Vault to create and maintain secrets, keys, and certificates that access cloud resources, which don't yet offer managed identity access.
- Dotenv is a popular npm package to read environment variables from a
.envfile. Make sure to add the.envfile to the.gitignorefile so the.envfile isn't checked into to source control.
Create environment variables
To use the Azure settings needed by the Azure SDK libraries to access the Azure cloud, set the most common values to environment variables. The following commands set the environment variables for the local workstation.
In the following examples, the client ID is the service principal ID and service principal secret.
AZURE_SUBSCRIPTION_ID="<REPLACE-WITH-YOUR-AZURE-SUBSCRIPTION-ID>"
AZURE_TENANT_ID="<REPLACE-WITH-YOUR-AZURE-TENANT-ID>"
AZURE_CLIENT_ID="<REPLACE-WITH-YOUR-AZURE-CLIENT-ID>"
AZURE_CLIENT_SECRET="<REPLACE-WITH-YOUR-AZURE-CLIENT-SECRET>"
Replace the values in <> brackets in these commands with those of your specific environment variable.
Create .env file
Another common mechanism is to use the DOTENV NPM package to create a .env file for these settings. If you plan to use a .env, make sure to add the file to the .gitignore so you don't check in the file to source control. Add the .env file to git's .ignore file is the standard way to ensure those settings are checked into source control.
Install npm packages
For every project, we recommend that you always create a separate folder, and its own package.json file using the following steps:
Open a terminal, command prompt, or bash shell and create a new folder to the project. Then move into that new folder.
mkdir MY-NEW-PROJECT && cd MY-NEW-PROJECTInitialize the package file:
npm init -yThis command creates the package.json file and initializes the minimum properties.
Install the Azure client libraries you need, such as this authentication client library example:
npm install @azure/identity
Use source control with Visual Studio Code
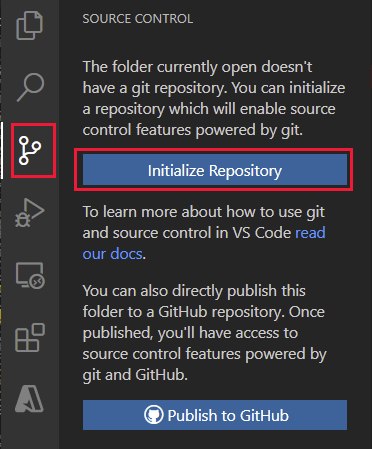
We recommend that you get into the habit of creating a source control repository whenever you start a project. You can do this from Visual Studio Code.
In Visual Studio Code, select the source control icon to open the Source Control explorer, then select Initialize Repository to initialize a local Git repository:
After the repository is initialized, and you have files to store in source control, enter the message
Initial commitand select the checkmark to create the initial commit of your source files.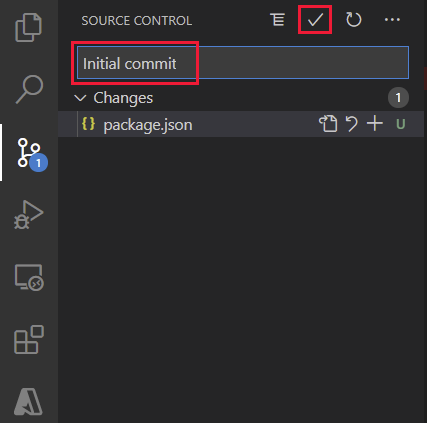
Create a new repository on GitHub and copy the repository URL for the next few step.
In the Visual Studio integrated terminal, use the following git command to add your remote repository to your local repository. Replace
<YOUR-ACCOUNT>and<REPOSITORY>with your own values.git remote add origin https://github.com/<YOUR-ACCOUNT>/<REPOSITORY>
Visual Studio Code includes many built-in git features. For more information, see Using Version Control in VS Code.