Manage Azure OpenAI Service quota
Quota provides the flexibility to actively manage the allocation of rate limits across the deployments within your subscription. This article walks through the process of managing your Azure OpenAI quota.
Prerequisites
Important
Viewing quota and deploying models requires the Cognitive Services Usages Reader role. This role provides the minimal access necessary to view quota usage across an Azure subscription. To learn more about this role and the other roles you will need to access Azure OpenAI, consult our Azure role-based access (Azure RBAC) guide.
This role can be found in the Azure portal under Subscriptions > Access control (IAM) > Add role assignment > search for Cognitive Services Usages Reader.This role must be applied at the subscription level, it does not exist at the resource level.
If you do not wish to use this role, the subscription Reader role will provide equivalent access, but it will also grant read access beyond the scope of what is needed for viewing quota and model deployment.
Introduction to quota
Azure OpenAI's quota feature enables assignment of rate limits to your deployments, up-to a global limit called your “quota.” Quota is assigned to your subscription on a per-region, per-model basis in units of Tokens-per-Minute (TPM). When you onboard a subscription to Azure OpenAI, you'll receive default quota for most available models. Then, you'll assign TPM to each deployment as it is created, and the available quota for that model will be reduced by that amount. You can continue to create deployments and assign them TPM until you reach your quota limit. Once that happens, you can only create new deployments of that model by reducing the TPM assigned to other deployments of the same model (thus freeing TPM for use), or by requesting and being approved for a model quota increase in the desired region.
Note
With a quota of 240,000 TPM for GPT-35-Turbo in East US, a customer can create a single deployment of 240K TPM, 2 deployments of 120K TPM each, or any number of deployments in one or multiple Azure OpenAI resources as long as their TPM adds up to less than 240K total in that region.
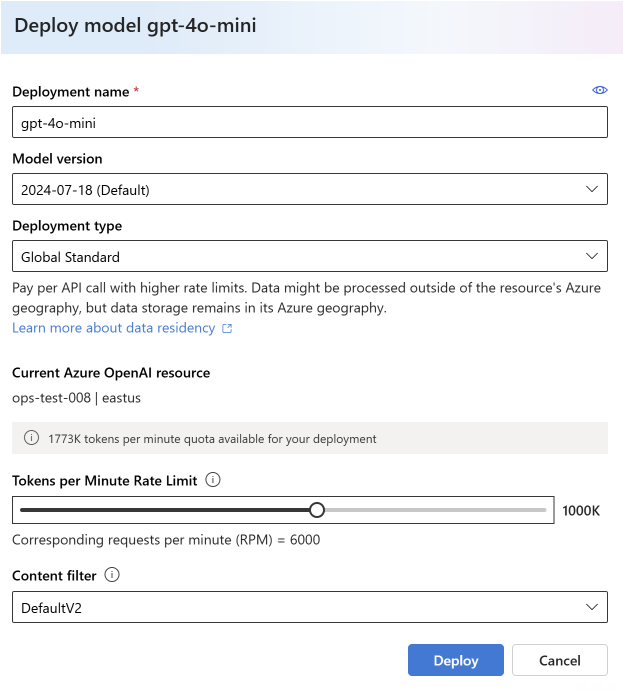
When a deployment is created, the assigned TPM will directly map to the tokens-per-minute rate limit enforced on its inferencing requests. A Requests-Per-Minute (RPM) rate limit will also be enforced whose value is set proportionally to the TPM assignment using the following ratio:
6 RPM per 1000 TPM.
The flexibility to distribute TPM globally within a subscription and region has allowed Azure OpenAI Service to loosen other restrictions:
- The maximum resources per region are increased to 30.
- The limit on creating no more than one deployment of the same model in a resource has been removed.
Assign quota
When you create a model deployment, you have the option to assign Tokens-Per-Minute (TPM) to that deployment. TPM can be modified in increments of 1,000, and will map to the TPM and RPM rate limits enforced on your deployment, as discussed above.
To create a new deployment from within the Azure AI Studio select Deployments > Deploy model > Deploy base model > Select Model > Confirm.
Post deployment you can adjust your TPM allocation by selecting and editing your model from the Deployments page in Azure AI Studio. You can also modify this setting from the Management > Model quota page.
Important
Quotas and limits are subject to change, for the most up-date-information consult our quotas and limits article.
Model specific settings
Different model deployments, also called model classes have unique max TPM values that you're now able to control. This represents the maximum amount of TPM that can be allocated to that type of model deployment in a given region.
All other model classes have a common max TPM value.
Note
Quota Tokens-Per-Minute (TPM) allocation is not related to the max input token limit of a model. Model input token limits are defined in the models table and are not impacted by changes made to TPM.
View and request quota
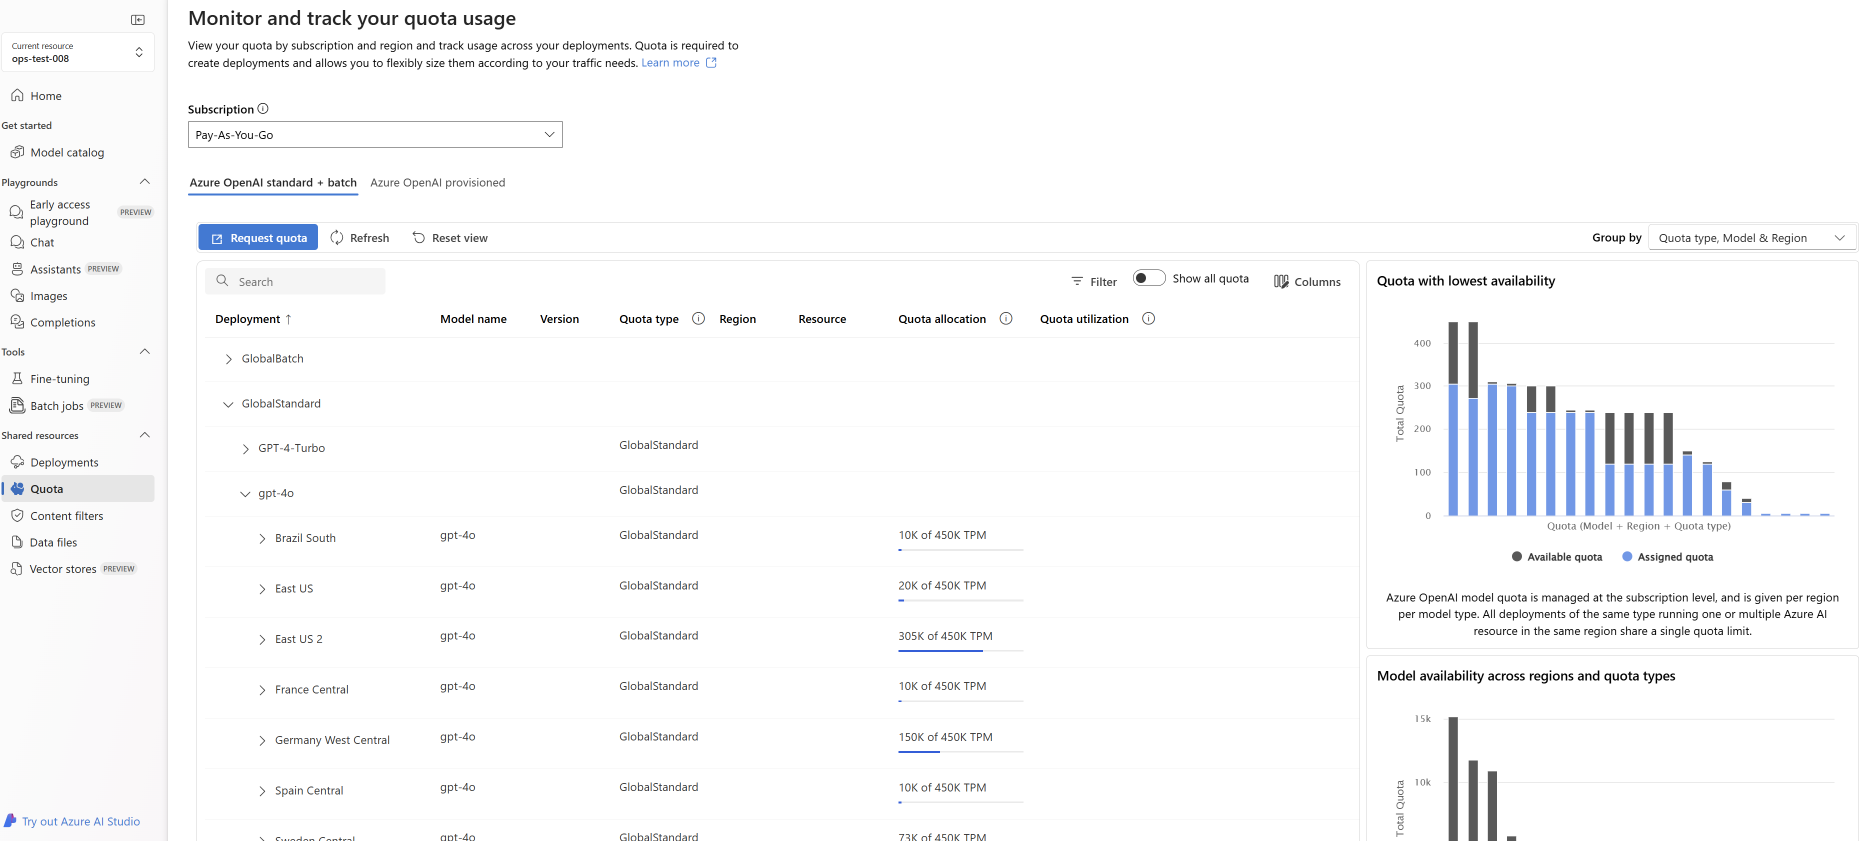
For an all up view of your quota allocations across deployments in a given region, select Management > Quota in Azure AI Studio:
- Deployment: Model deployments divided by model class.
- Quota type: There's one quota value per region for each model type. The quota covers all versions of that model.
- Quota allocation: For the quota name, this shows how much quota is used by deployments and the total quota approved for this subscription and region. This amount of quota used is also represented in the bar graph.
- Request Quota: The icon navigates to a form where requests to increase quota can be submitted.
Migrating existing deployments
As part of the transition to the new quota system and TPM based allocation, all existing Azure OpenAI model deployments have been automatically migrated to use quota. In cases where the existing TPM/RPM allocation exceeds the default values due to previous custom rate-limit increases, equivalent TPM were assigned to the impacted deployments.
Understanding rate limits
Assigning TPM to a deployment sets the Tokens-Per-Minute (TPM) and Requests-Per-Minute (RPM) rate limits for the deployment, as described above. TPM rate limits are based on the maximum number of tokens that are estimated to be processed by a request at the time the request is received. It isn't the same as the token count used for billing, which is computed after all processing is completed.
As each request is received, Azure OpenAI computes an estimated max processed-token count that includes the following:
- Prompt text and count
- The max_tokens parameter setting
- The best_of parameter setting
As requests come into the deployment endpoint, the estimated max-processed-token count is added to a running token count of all requests that is reset each minute. If at any time during that minute, the TPM rate limit value is reached, then further requests will receive a 429 response code until the counter resets.
Important
The token count used in the rate limit calculation is an estimate based in part on the character count of the API request. The rate limit token estimate is not the same as the token calculation that is used for billing/determining that a request is below a model's input token limit. Due to the approximate nature of the rate limit token calculation, it is expected behavior that a rate limit can be triggered prior to what might be expected in comparison to an exact token count measurement for each request.
RPM rate limits are based on the number of requests received over time. The rate limit expects that requests be evenly distributed over a one-minute period. If this average flow isn't maintained, then requests may receive a 429 response even though the limit isn't met when measured over the course of a minute. To implement this behavior, Azure OpenAI Service evaluates the rate of incoming requests over a small period of time, typically 1 or 10 seconds. If the number of requests received during that time exceeds what would be expected at the set RPM limit, then new requests will receive a 429 response code until the next evaluation period. For example, if Azure OpenAI is monitoring request rate on 1-second intervals, then rate limiting will occur for a 600-RPM deployment if more than 10 requests are received during each 1-second period (600 requests per minute = 10 requests per second).
Rate limit best practices
To minimize issues related to rate limits, it's a good idea to use the following techniques:
- Set max_tokens and best_of to the minimum values that serve the needs of your scenario. For example, don’t set a large max-tokens value if you expect your responses to be small.
- Use quota management to increase TPM on deployments with high traffic, and to reduce TPM on deployments with limited needs.
- Implement retry logic in your application.
- Avoid sharp changes in the workload. Increase the workload gradually.
- Test different load increase patterns.
Automate deployment
This section contains brief example templates to help get you started programmatically creating deployments that use quota to set TPM rate limits. With the introduction of quota you must use API version 2023-05-01 for resource management related activities. This API version is only for managing your resources, and does not impact the API version used for inferencing calls like completions, chat completions, embedding, image generation etc.
Deployment
PUT https://management.azure.com/subscriptions/{subscriptionId}/resourceGroups/{resourceGroupName}/providers/Microsoft.CognitiveServices/accounts/{accountName}/deployments/{deploymentName}?api-version=2023-05-01
Path parameters
| Parameter | Type | Required? | Description |
|---|---|---|---|
accountName |
string | Required | The name of your Azure OpenAI Resource. |
deploymentName |
string | Required | The deployment name you chose when you deployed an existing model or the name you would like a new model deployment to have. |
resourceGroupName |
string | Required | The name of the associated resource group for this model deployment. |
subscriptionId |
string | Required | Subscription ID for the associated subscription. |
api-version |
string | Required | The API version to use for this operation. This follows the YYYY-MM-DD format. |
Supported versions
2023-05-01Swagger spec
Request body
This is only a subset of the available request body parameters. For the full list of the parameters, you can refer to the REST API reference documentation.
| Parameter | Type | Description |
|---|---|---|
| sku | Sku | The resource model definition representing SKU. |
| capacity | integer | This represents the amount of quota you are assigning to this deployment. A value of 1 equals 1,000 Tokens per Minute (TPM). A value of 10 equals 10k Tokens per Minute (TPM). |
Example request
curl -X PUT https://management.azure.com/subscriptions/00000000-0000-0000-0000-000000000000/resourceGroups/resource-group-temp/providers/Microsoft.CognitiveServices/accounts/docs-openai-test-001/deployments/gpt-35-turbo-test-deployment?api-version=2023-05-01 \
  -H "Content-Type: application/json" \
  -H 'Authorization: Bearer YOUR_AUTH_TOKEN' \
  -d '{"sku":{"name":"Standard","capacity":10},"properties": {"model": {"format": "OpenAI","name": "gpt-35-turbo","version": "0613"}}}'
Note
There are multiple ways to generate an authorization token. The easiest method for initial testing is to launch the Cloud Shell from the Azure portal. Then run az account get-access-token. You can use this token as your temporary authorization token for API testing.
For more information, refer to the REST API reference documentation for usages and deployment.
Usage
To query your quota usage in a given region, for a specific subscription
GET https://management.azure.com/subscriptions/{subscriptionId}/providers/Microsoft.CognitiveServices/locations/{location}/usages?api-version=2023-05-01
Path parameters
| Parameter | Type | Required? | Description |
|---|---|---|---|
subscriptionId |
string | Required | Subscription ID for the associated subscription. |
location |
string | Required | Location to view usage for ex: eastus |
api-version |
string | Required | The API version to use for this operation. This follows the YYYY-MM-DD format. |
Supported versions
2023-05-01Swagger spec
Example request
curl -X GET https://management.azure.com/subscriptions/00000000-0000-0000-0000-000000000000/providers/Microsoft.CognitiveServices/locations/eastus/usages?api-version=2023-05-01 \
  -H "Content-Type: application/json" \
  -H 'Authorization: Bearer YOUR_AUTH_TOKEN'
Resource deletion
When an attempt to delete an Azure OpenAI resource is made from the Azure portal if any deployments are still present deletion is blocked until the associated deployments are deleted. Deleting the deployments first allows quota allocations to be properly freed up so they can be used on new deployments.
However, if you delete a resource using the REST API or some other programmatic method, this bypasses the need to delete deployments first. When this occurs, the associated quota allocation will remain unavailable to assign to a new deployment for 48 hours until the resource is purged. To trigger an immediate purge for a deleted resource to free up quota, follow the purge a deleted resource instructions.
Next steps
- To review quota defaults for Azure OpenAI, consult the quotas & limits article

