Securely use Azure OpenAI On Your Data
Note
As of June 2024, the application form for the Microsoft managed private endpoint to Azure AI Search is no longer needed.
The managed private endpoint will be deleted from the Microsoft managed virtual network at July 2025. If you have already provisioned a managed private endpoint through the application process before June 2024, enable Azure AI Search trusted service as early as possible to avoid service disruption.
Use this article to learn how to use Azure OpenAI On Your Data securely by protecting data and resources with Microsoft Entra ID role-based access control, virtual networks, and private endpoints.
This article is only applicable when using Azure OpenAI On Your Data with text. It does not apply to Azure OpenAI On Your Data with images.
Data ingestion architecture
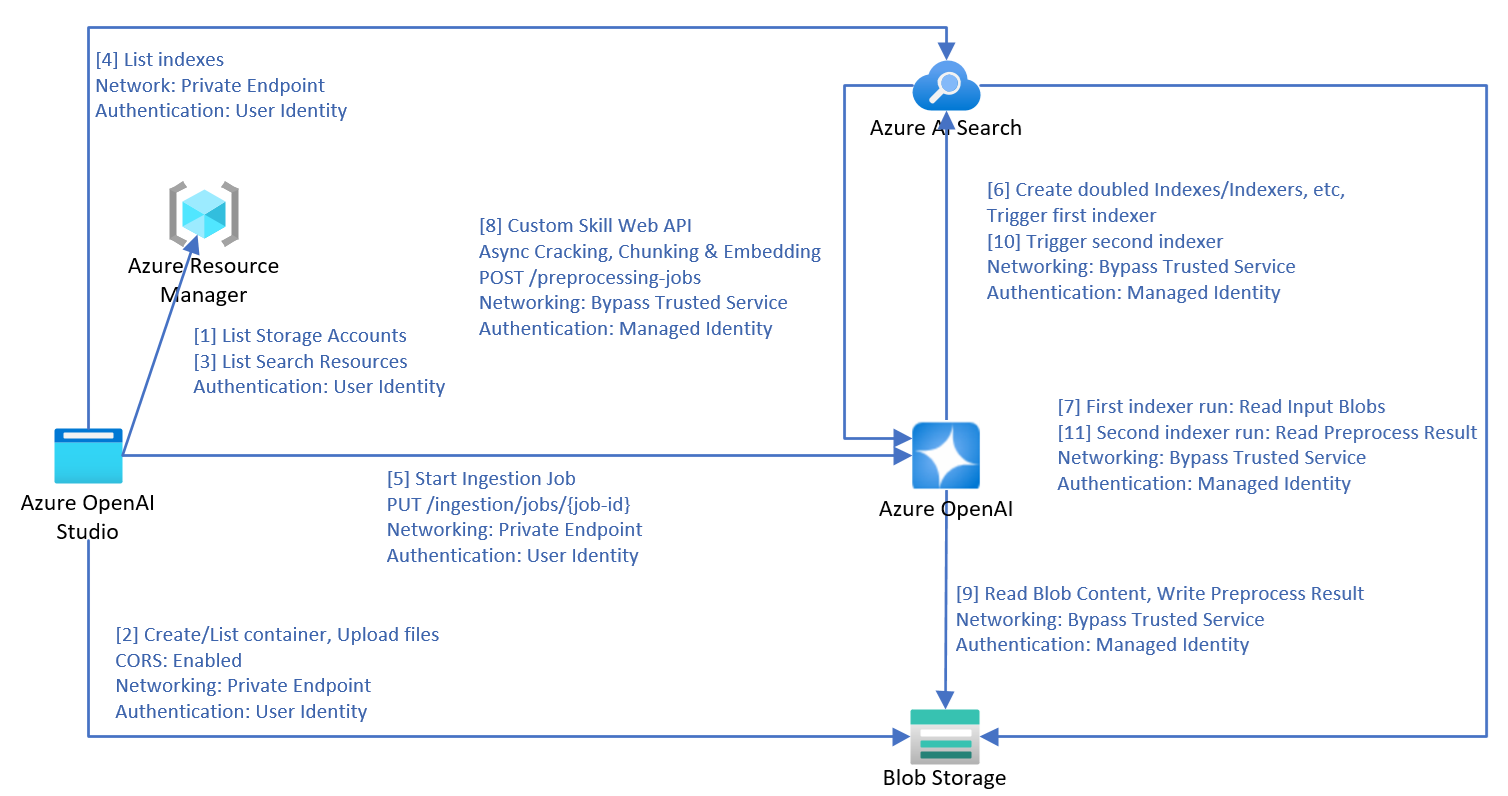
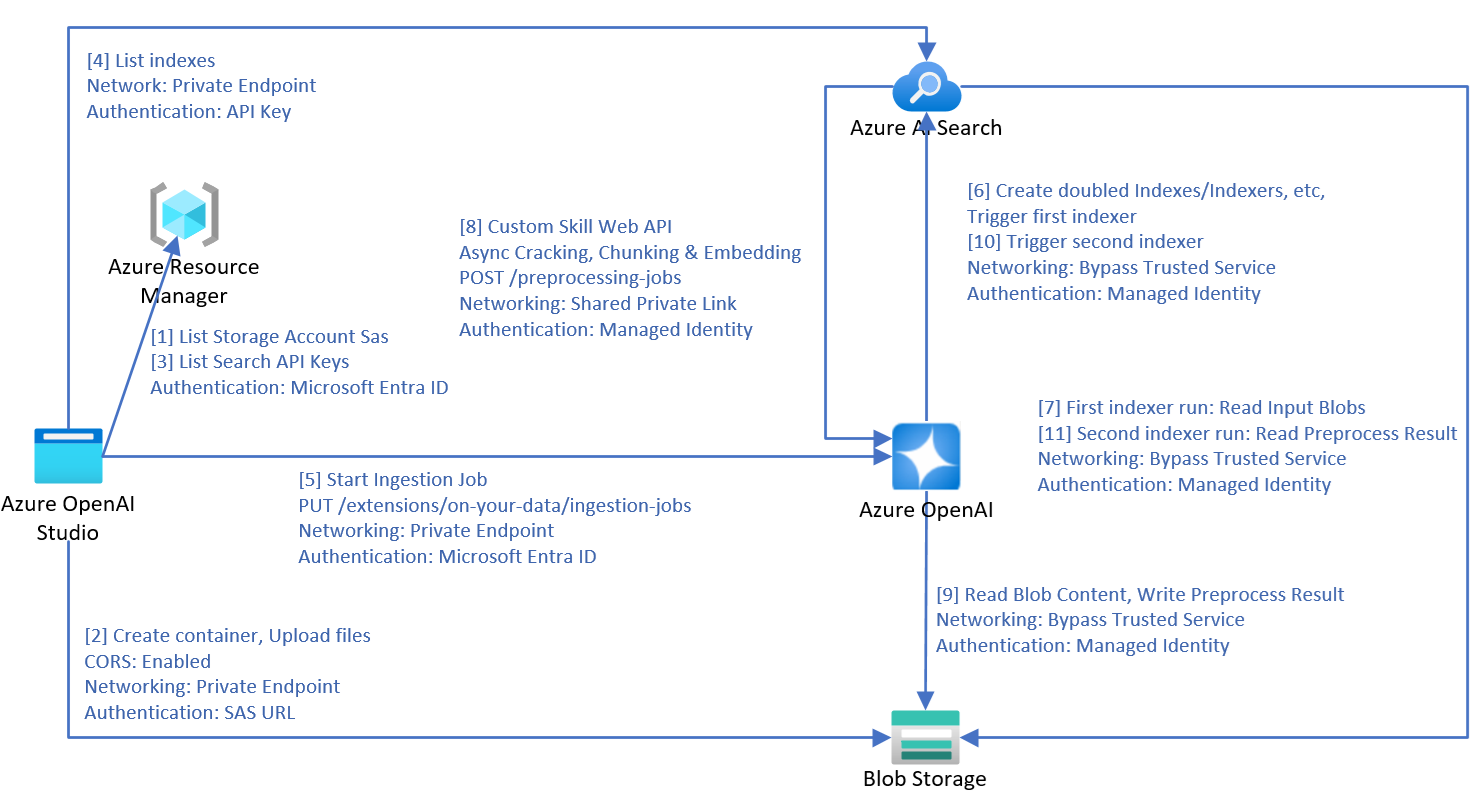
When you use Azure OpenAI On Your Data to ingest data from Azure blob storage, local files or URLs into Azure AI Search, the following process is used to process the data.
- Steps 1 and 2 are only used for file upload.
- Downloading URLs to your blob storage is not illustrated in this diagram. After web pages are downloaded from the internet and uploaded to blob storage, steps 3 onward are the same.
- Two indexers, two indexes, two data sources and a custom skill are created in the Azure AI Search resource.
- The chunks container is created in the blob storage.
- If the schedule triggers the ingestion, the ingestion process starts from step 7.
- Azure OpenAI's
preprocessing-jobsAPI implements the Azure AI Search customer skill web API protocol, and processes the documents in a queue. - Azure OpenAI:
- Internally uses the first indexer created earlier to crack the documents.
- Uses a heuristic-based algorithm to perform chunking. It honors table layouts and other formatting elements in the chunk boundary to ensure the best chunking quality.
- If you choose to enable vector search, Azure OpenAI uses the selected embedding setting to vectorize the chunks.
- When all the data that the service is monitoring are processed, Azure OpenAI triggers the second indexer.
- The indexer stores the processed data into an Azure AI Search service.
For the managed identities used in service calls, only system assigned managed identities are supported. User assigned managed identities aren't supported.
Inference architecture
When you send API calls to chat with an Azure OpenAI model on your data, the service needs to retrieve the index fields during inference to perform fields mapping. Therefore the service requires the Azure OpenAI identity to have the Search Service Contributor role for the search service even during inference.
If an embedding dependency is provided in the inference request, Azure OpenAI will vectorize the rewritten query, and both query and vector are sent to Azure AI Search for vector search.
Document-level access control
Note
Document-level access control is supported for Azure AI search only.
Azure OpenAI On Your Data lets you restrict the documents that can be used in responses for different users with Azure AI Search security filters. When you enable document level access, Azure AI Search will trim the search results based on user Microsoft Entra group membership specified in the filter. You can only enable document-level access on existing Azure AI Search indexes. To enable document-level access:
To register your application and create users and groups, follow the steps in the Azure AI Search documentation.
Index your documents with their permitted groups. Be sure that your new security fields have the schema:
{"name": "group_ids", "type": "Collection(Edm.String)", "filterable": true }group_idsis the default field name. If you use a different field name likemy_group_ids, you can map the field in index field mapping.Make sure each sensitive document in the index has this security field value set to the permitted groups of the document.
In Azure OpenAI Studio, add your data source. in the index field mapping section, you can map zero or one value to the permitted groups field, as long as the schema is compatible. If the permitted groups field isn't mapped, document level access is disabled.
Azure OpenAI Studio
Once the Azure AI Search index is connected, your responses in the studio have document access based on the Microsoft Entra permissions of the logged in user.
Web app
If you are using a published web app, you need to redeploy it to upgrade to the latest version. The latest version of the web app includes the ability to retrieve the groups of the logged in user's Microsoft Entra account, cache it, and include the group IDs in each API request.
API
When using the API, pass the filter parameter in each API request. For example:
Important
The following is for example only. If you use an API key, store it securely somewhere else, such as in Azure Key Vault. Don't include the API key directly in your code, and never post it publicly.
For more information about AI services security, see Authenticate requests to Azure AI services.
{
    "messages": [
        {
            "role": "user",
            "content": "who is my manager?"
        }
    ],
    "data_sources": [
        {
            "type": "azure_search",
            "parameters": {
                "endpoint": "<AZURE_AI_SEARCH_ENDPOINT>",
                "key": "<AZURE_AI_SEARCH_API_KEY>",
                "index_name": "<AZURE_AI_SEARCH_INDEX>",
                "filter": "my_group_ids/any(g:search.in(g, 'group_id1, group_id2'))"
            }
        }
    ]
}
my_group_idsis the field name that you selected for Permitted groups during fields mapping.group_id1, group_id2are groups attributed to the logged in user. The client application can retrieve and cache users' groups.
Resource configuration
Use the following sections to configure your resources for optimal secure usage. Even if you plan to only secure part of your resources, you still need to follow all the steps.
This article describes network settings related to disabling public network for Azure OpenAI resources, Azure AI search resources, and storage accounts. Using selected networks with IP rules is not supported, because the services' IP addresses are dynamic.
Create resource group
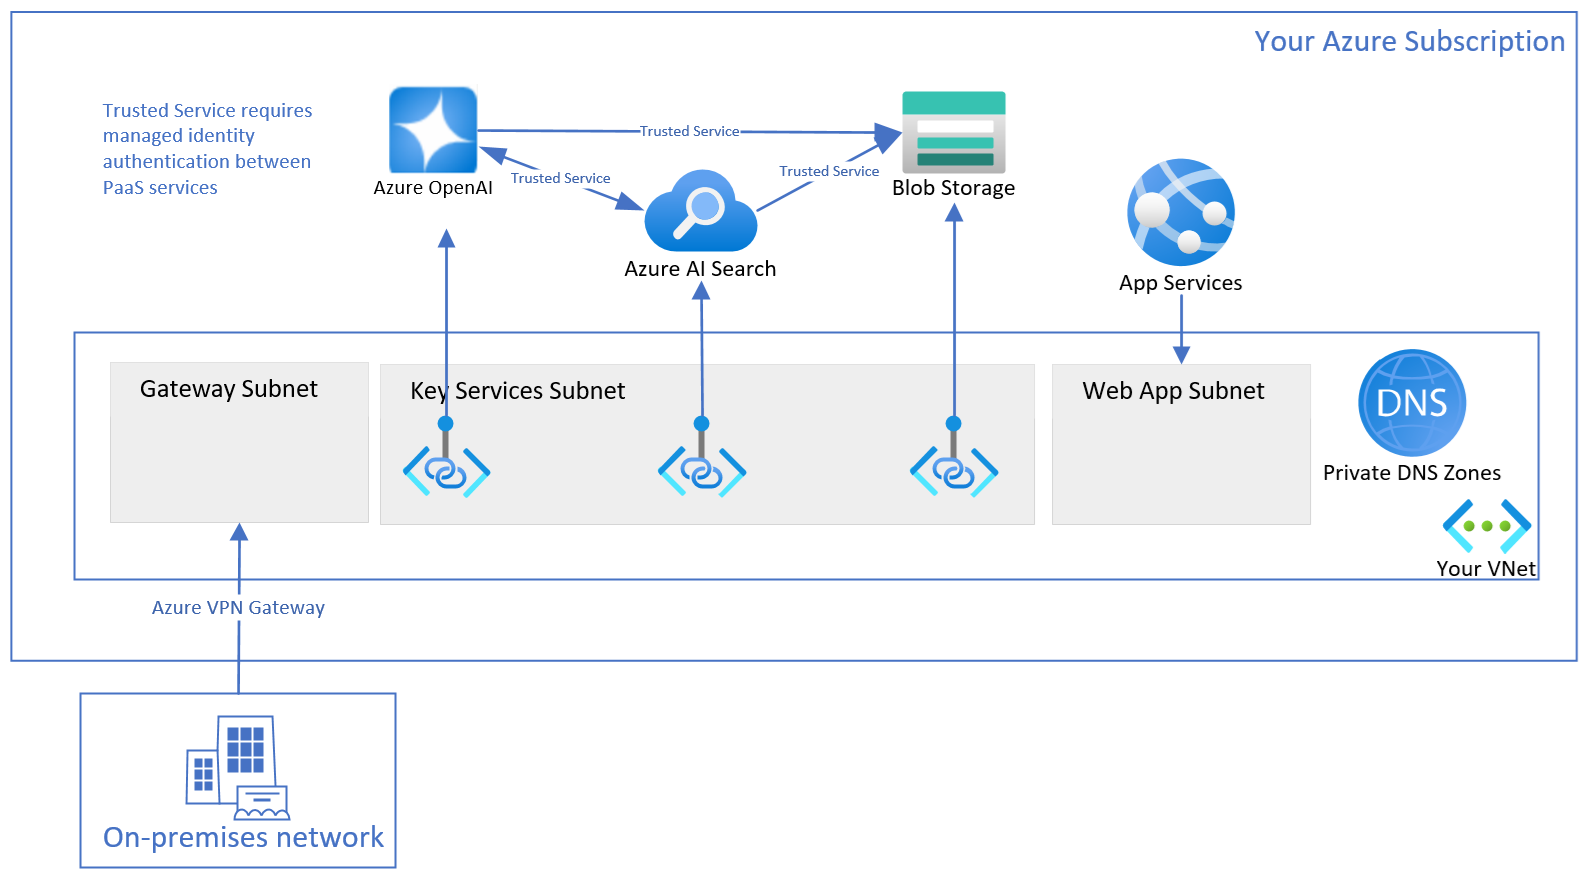
Create a resource group, so you can organize all the relevant resources. The resources in the resource group include but are not limited to:
- One Virtual network
- Three key services: one Azure OpenAI, one Azure AI Search, one Storage Account
- Three Private endpoints, each is linked to one key service
- Three Network interfaces, each is associated with one private endpoint
- One Virtual network gateway, for the access from on-premises client machines
- One Web App with virtual network integrated
- One Private DNS zone, so the Web App finds the IP of your Azure OpenAI
Create virtual network
The virtual network has three subnets.
- The first subnet is used for the virtual network gateway.
- The second subnet is used for the private endpoints for the three key services.
- The third subnet is empty, and used for Web App outbound virtual network integration.
Configure Azure OpenAI
Enabled custom subdomain
The custom subdomain is required for Microsoft Entra ID based authentication, and private DNS zone. If the Azure OpenAI resource is created using ARM template, the custom subdomain must be specified explicitly.
Enable managed identity
To allow your Azure AI Search and Storage Account to recognize your Azure OpenAI Service via Microsoft Entra ID authentication, you need to assign a managed identity for your Azure OpenAI Service. The easiest way is to toggle on system assigned managed identity on Azure portal.
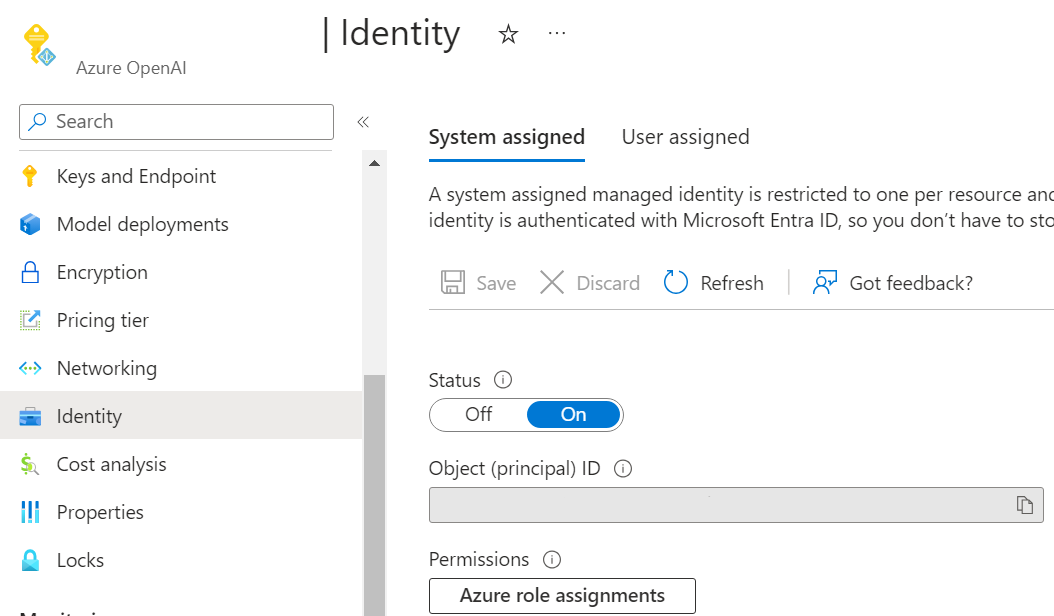
To set the managed identities via the management API, see the management API reference documentation.
"identity": {
  "principalId": "<YOUR-PRINCIPAL-ID>",
  "tenantId": "<YOUR-TENNANT-ID>",
  "type": "SystemAssigned, UserAssigned",
  "userAssignedIdentities": {
    "/subscriptions/<YOUR-SUBSCIRPTION-ID>/resourceGroups/my-resource-group",
    "principalId": "<YOUR-PRINCIPAL-ID>",
    "clientId": "<YOUR-CLIENT-ID>"
  }
}
Enable trusted service
To allow your Azure AI Search to call your Azure OpenAI preprocessing-jobs as custom skill web API, while Azure OpenAI has no public network access, you need to set up Azure OpenAI to bypass Azure AI Search as a trusted service based on managed identity. Azure OpenAI identifies the traffic from your Azure AI Search by verifying the claims in the JSON Web Token (JWT). Azure AI Search must use the system assigned managed identity authentication to call the custom skill web API.
Set networkAcls.bypass as AzureServices from the management API. For more information, see Virtual networks article.
This step can be skipped only if you have a shared private link for your Azure AI Search resource.
Disable public network access
You can disable public network access of your Azure OpenAI resource in the Azure portal.
To allow access to your Azure OpenAI Service from your client machines, like using Azure OpenAI Studio, you need to create private endpoint connections that connect to your Azure OpenAI resource.
Configure Azure AI Search
You can use basic pricing tier and higher for the search resource. It's not necessary, but if you use the S2 pricing tier, advanced options are available.
Enable managed identity
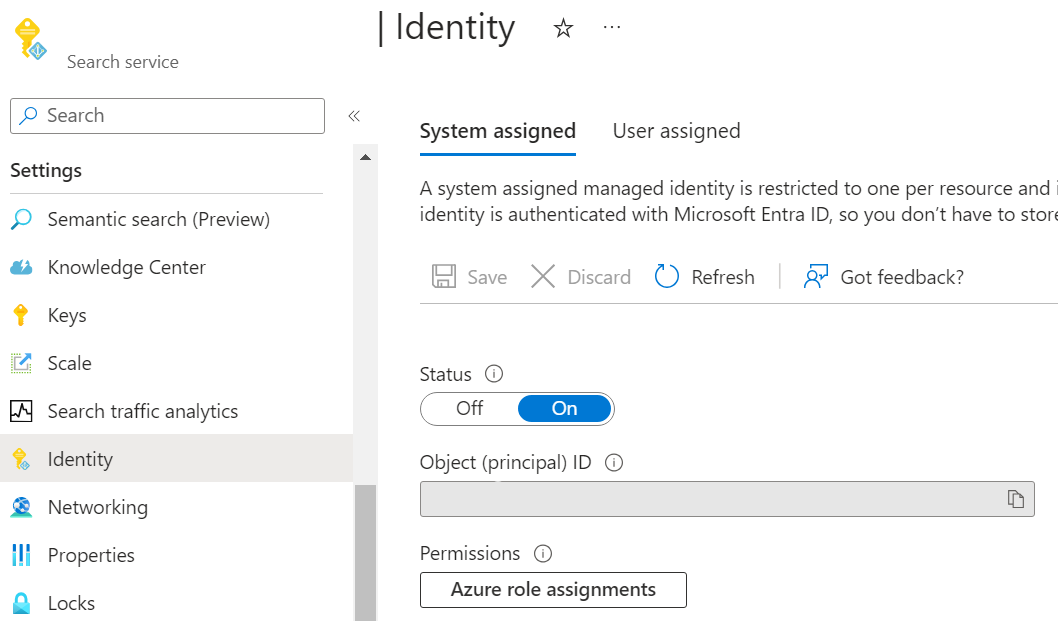
To allow your other resources to recognize the Azure AI Search using Microsoft Entra ID authentication, you need to assign a managed identity for your Azure AI Search. The easiest way is to toggle on the system assigned managed identity in the Azure portal.
Enable role-based access control
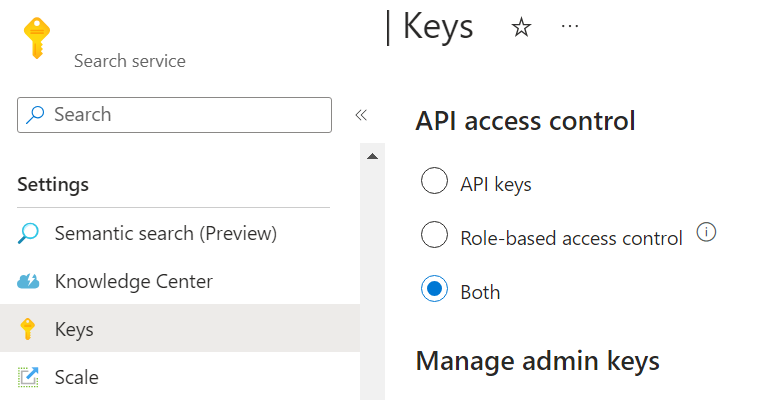
As Azure OpenAI uses managed identity to access Azure AI Search, you need to enable role-based access control in your Azure AI Search. To do it on Azure portal, select Both or Role-based access control in the Keys tab in the Azure portal.
For more information, see the Azure AI Search RBAC article.
Disable public network access
You can disable public network access of your Azure AI Search resource in the Azure portal.
To allow access to your Azure AI Search resource from your client machines, like using Azure OpenAI Studio, you need to create private endpoint connections that connect to your Azure AI Search resource.
Enable trusted service
You can enable trusted service of your search resource from Azure portal.
Go to your search resource's network tab. With the public network access set to disabled, select Allow Azure services on the trusted services list to access this search service.
You can also use the REST API to enable trusted service. This example uses the Azure CLI and the jq tool.
rid=/subscriptions/<YOUR-SUBSCRIPTION-ID>/resourceGroups/<YOUR-RESOURCE-GROUP>/providers/Microsoft.Search/searchServices/<YOUR-RESOURCE-NAME>
apiVersion=2024-03-01-Preview
#store the resource properties in a variable
az rest --uri "https://management.azure.com$rid?api-version=$apiVersion" > search.json

#replace bypass with AzureServices using jq
jq '.properties.networkRuleSet.bypass = "AzureServices"' search.json > search_updated.json

#apply the updated properties to the resource
az rest --uri "https://management.azure.com$rid?api-version=$apiVersion" \
    --method PUT \
    --body @search_updated.json
Create shared private link
Tip
If you are using a basic or standard pricing tier, or if it is your first time to setup all of your resources securely, you should skip this advanced topic.
This section is only applicable for S2 pricing tier search resource, because it requires private endpoint support for indexers with a skill set.
To create shared private link from your search resource connecting to your Azure OpenAI resource, see the search documentation. Select Resource type as Microsoft.CognitiveServices/accounts and Group ID as openai_account.
With shared the private link, step 8 of the data ingestion architecture diagram is changed from bypass trusted service to shared private link.
Configure Storage Account
Enable trusted service
To allow access to your Storage Account from Azure OpenAI and Azure AI Search, you need to set up Storage Account to bypass your Azure OpenAI and Azure AI Search as trusted services based on managed identity.
In the Azure portal, navigate to your storage account networking tab, choose "Selected networks", and then select Allow Azure services on the trusted services list to access this storage account and click Save.
Disable public network access
You can disable public network access of your Storage Account in the Azure portal.
To allow access to your Storage Account from your client machines, like using Azure OpenAI Studio, you need to create private endpoint connections that connect to your blob storage.
Role assignments
So far you have already setup each resource work independently. Next you need to allow the services to authorize each other.
| Role | Assignee | Resource | Description |
|---|---|---|---|
Search Index Data Reader |
Azure OpenAI | Azure AI Search | Inference service queries the data from the index. |
Search Service Contributor |
Azure OpenAI | Azure AI Search | Inference service queries the index schema for auto fields mapping. Data ingestion service creates index, data sources, skill set, indexer, and queries the indexer status. |
Storage Blob Data Contributor |
Azure OpenAI | Storage Account | Reads from the input container, and writes the preprocessed result to the output container. |
Cognitive Services OpenAI Contributor |
Azure AI Search | Azure OpenAI | Custom skill. |
Storage Blob Data Reader |
Azure AI Search | Storage Account | Reads document blobs and chunk blobs. |
Cognitive Services OpenAI User |
Web app | Azure OpenAI | Inference. |
In the above table, the Assignee means the system assigned managed identity of that resource.
The admin needs to have the Owner role on these resources to add role assignments.
See the Azure RBAC documentation for instructions on setting these roles in the Azure portal. You can use the available script on GitHub to add the role assignments programmatically.
To enable the developers to use these resources to build applications, the admin needs to add the developers' identity with the following role assignments to the resources.
| Role | Resource | Description |
|---|---|---|
Cognitive Services OpenAI Contributor |
Azure OpenAI | Call public ingestion API from Azure OpenAI Studio. The Contributor role is not enough, because if you only have Contributor role, you cannot call data plane API via Microsoft Entra ID authentication, and Microsoft Entra ID authentication is required in the secure setup described in this article. |
Cognitive Services User |
Azure OpenAI | List API-Keys from Azure OpenAI Studio. |
Contributor |
Azure AI Search | List API-Keys to list indexes from Azure OpenAI Studio. |
Contributor |
Storage Account | List Account SAS to upload files from Azure OpenAI Studio. |
Contributor |
The resource group or Azure subscription where the developer need to deploy the web app to | Deploy web app to the developer's Azure subscription. |
Role Based Access Control Administrator |
Azure OpenAI | Permission to configure the necessary role assignment on the Azure OpenAI resource. Enables the web app to call Azure Open AI. |
Configure gateway and client
To access the Azure OpenAI Service from your on-premises client machines, one of the approaches is to configure Azure VPN Gateway and Azure VPN Client.
Follow this guideline to create virtual network gateway for your virtual network.
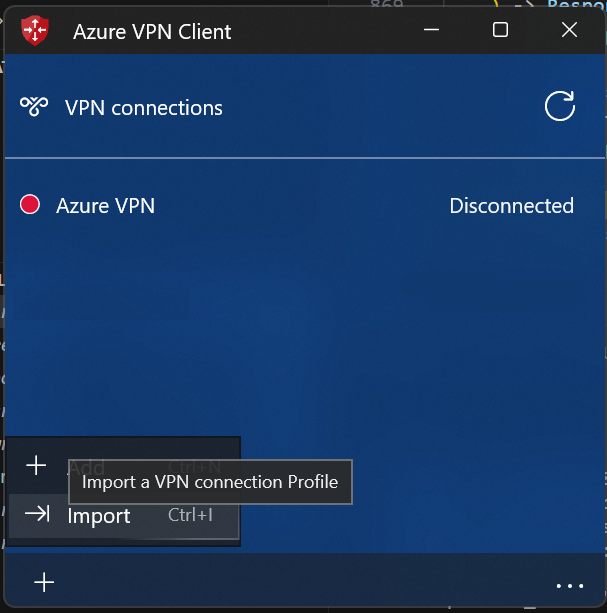
Follow this guideline to add point-to-site configuration, and enable Microsoft Entra ID based authentication. Download the Azure VPN Client profile configuration package, unzip, and import the AzureVPN/azurevpnconfig.xml file to your Azure VPN client.
Configure your local machine hosts file to point your resources host names to the private IPs in your virtual network. The hosts file is located at C:\Windows\System32\drivers\etc for Windows, and at /etc/hosts on Linux. Example:
10.0.0.5 contoso.openai.azure.com
10.0.0.6 contoso.search.windows.net
10.0.0.7 contoso.blob.core.windows.net
Azure OpenAI Studio
You should be able to use all Azure OpenAI Studio features, including both ingestion and inference, from your on-premises client machines.
Web app
The web app communicates with your Azure OpenAI resource. Since your Azure OpenAI resource has public network disabled, the web app needs to be set up to use the private endpoint in your virtual network to access your Azure OpenAI resource.
The web app needs to resolve your Azure OpenAI host name to the private IP of the private endpoint for Azure OpenAI. So, you need to configure the private DNS zone for your virtual network first.
- Create private DNS zone in your resource group.
- Add a DNS record. The IP is the private IP of the private endpoint for your Azure OpenAI resource, and you can get the IP address from the network interface associated with the private endpoint for your Azure OpenAI.
- Link the private DNS zone to your virtual network so the web app integrated in this virtual network can use this private DNS zone.
When deploying the web app from Azure OpenAI Studio, select the same location with the virtual network, and select a proper SKU, so it can support the virtual network integration feature.
After the web app is deployed, from the Azure portal networking tab, configure the web app outbound traffic virtual network integration, choose the third subnet that you reserved for web app.
Using the API
Make sure your sign-in credential has Cognitive Services OpenAI Contributor role on your Azure OpenAI resource, and run az login first.
Ingestion API
See the ingestion API reference article for details on the request and response objects used by the ingestion API.
Inference API
See the inference API reference article for details on the request and response objects used by the inference API.
Use Microsoft Defender for Cloud
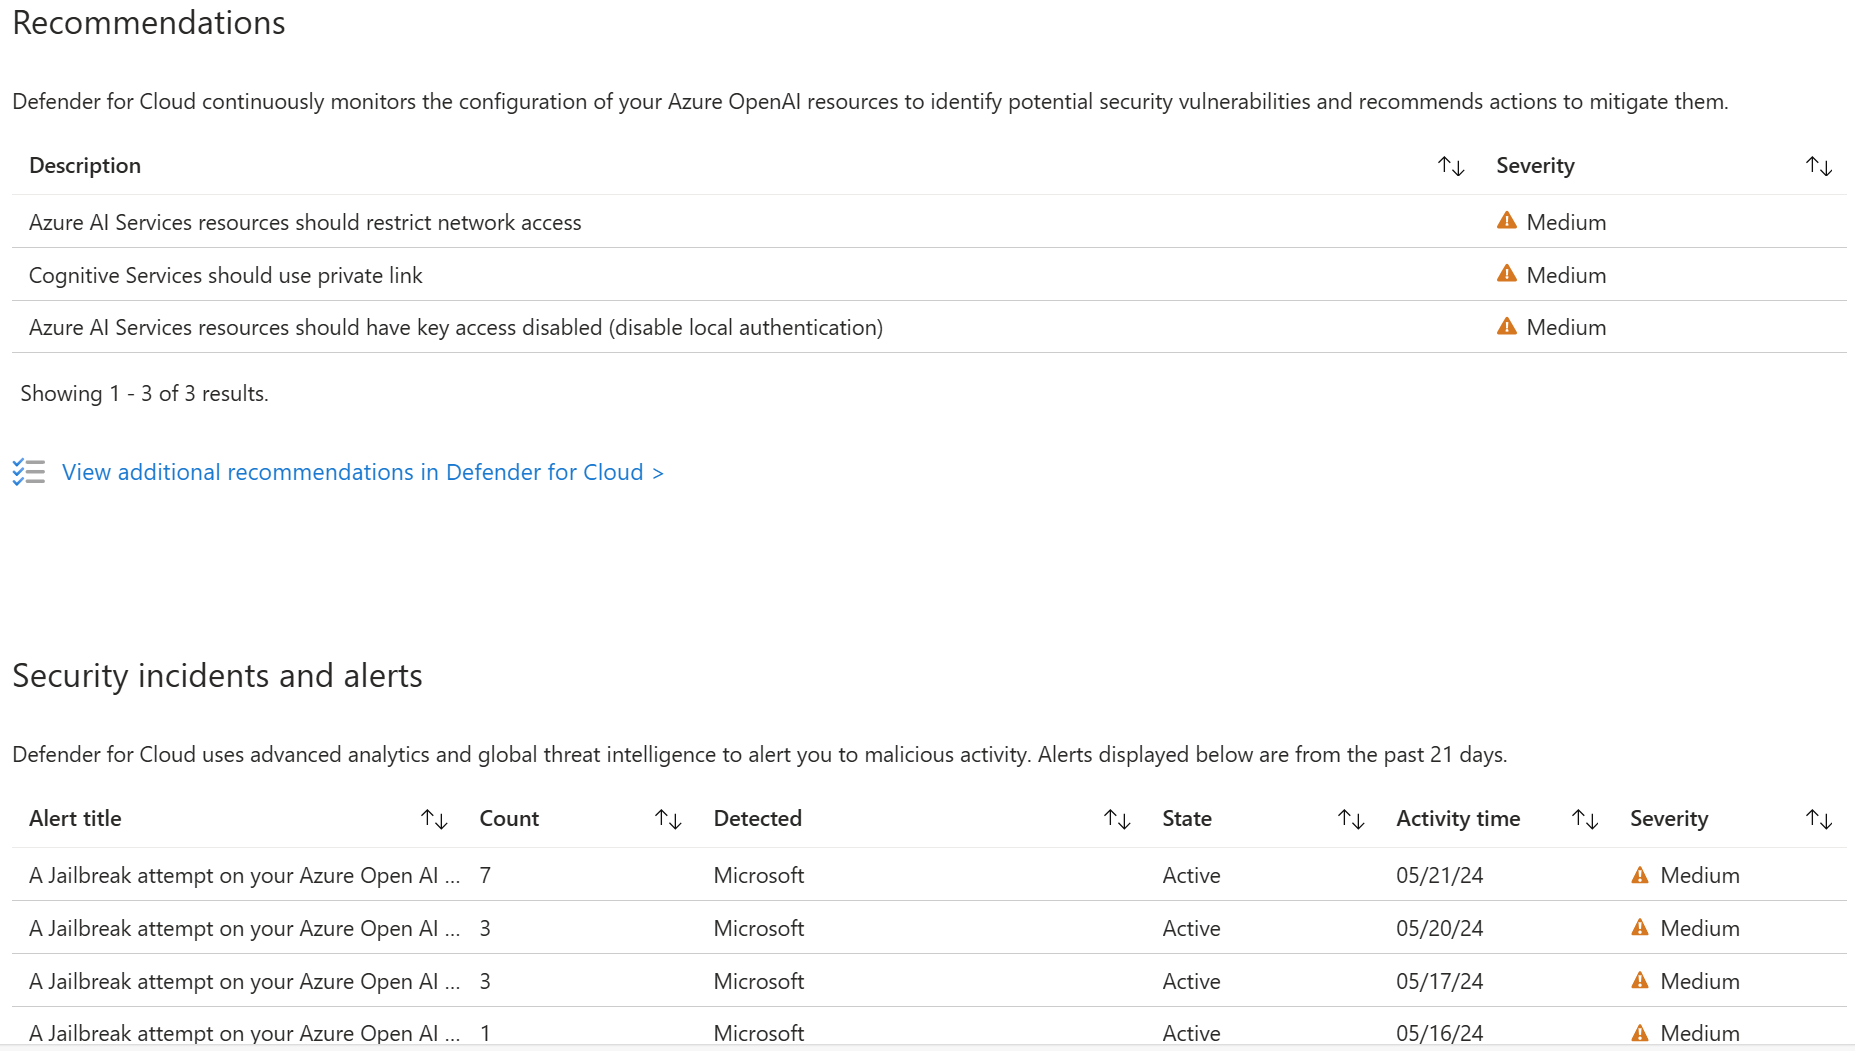
You can now integrate Microsoft Defender for Cloud (preview) with your Azure resources to protect your applications. Microsoft Defender for Cloud protects your applications with threat protection for AI workloads , providing teams with evidence-based security alerts enriched with Microsoft threat intelligence signals and enables teams to strengthen their security posture with integrated security best-practice recommendations.
Use this form to apply for access.
