הערה
הגישה לדף זה מחייבת הרשאה. באפשרותך לנסות להיכנס או לשנות מדריכי כתובות.
הגישה לדף זה מחייבת הרשאה. באפשרותך לנסות לשנות מדריכי כתובות.
חשוב להעלות יומן רישום באופן ידני ולתן ל- יישומי ענן של Microsoft Defender לנתח אותו לפני שתנסה להשתמש במלקט יומני הרישום האוטומטי. לקבלת מידע אודות אופן הפעולה של מלקט יומני הרישום ותבנית יומן הרישום הצפויה, ראה שימוש ביומני תעבורה לגילוי ענן.
אם עדיין אין לך יומן רישום וברצונך לראות דוגמה של מראה יומן הרישום שלך, הורד קובץ יומן רישום לדוגמה. בצע את ההליך שלהלן כדי לראות כיצד יומן הרישום שלך אמור להיראות.
כדי ליצור דוח תמונה:
אסוף קבצי יומן רישום בחומת האש ומה- Proxy שלך, ששבהם משתמשים בארגון שלך ניגשים לאינטרנט. הקפד לאסוף יומני רישום בזמנים של תעבורת שיא שהם מייצגים את כל פעילות המשתמשים בארגון שלך.
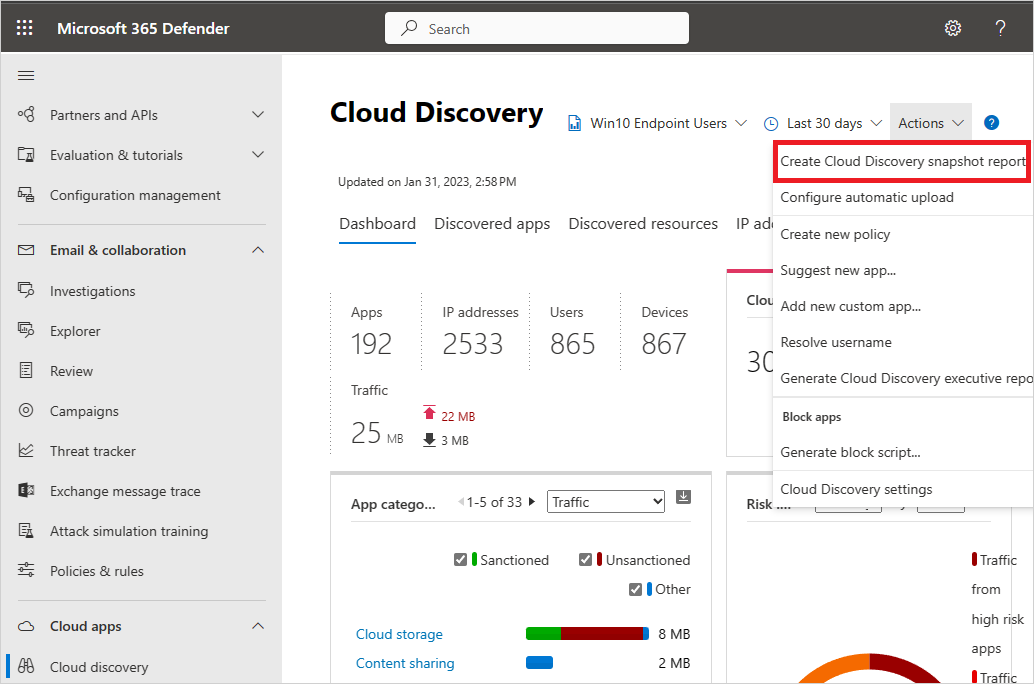
בפורטל Microsoft Defender, תחת אפליקציות ענן, בחר גילוי ענן.
בפינה השמאלית העליונה, פתח את פעולות ובחר צור דוח תמונה של גילוי ענן.

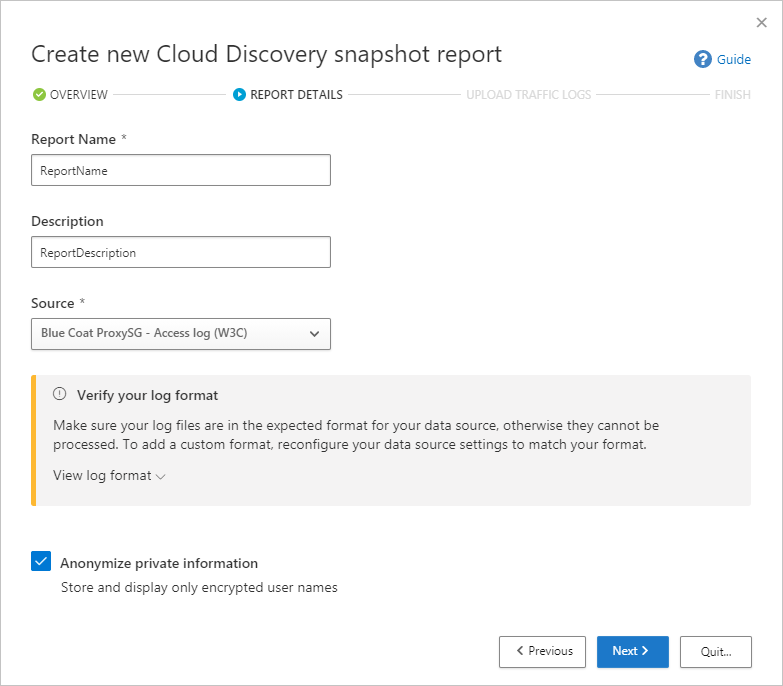
בחר באפשרות הבא.
הזן שם דוחותיאור

בחר את המקור ממנו ברצונך להעלות את קבצי יומן הרישום. אם המקור שלך אינו נתמך (ראה חומות אש ו- Proxy נתמכים עבור הרשימה המלאה), באפשרותך ליצור מנתח מותאם אישית. לקבלת מידע נוסף, ראה שימוש במנתח יומן רישום מותאם אישית.
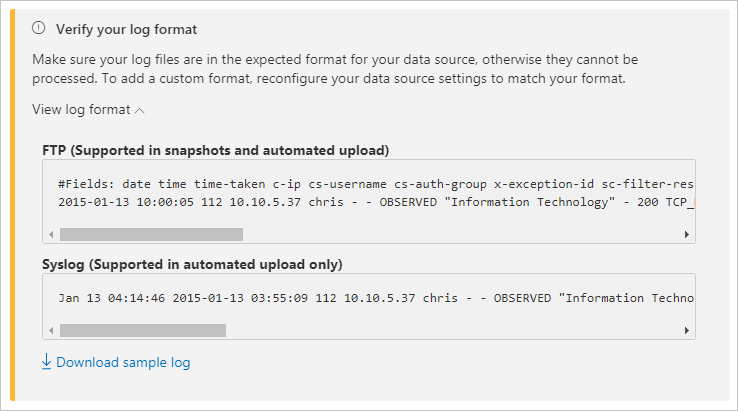
אמת את תבנית יומן הרישום כדי לוודא שהיא מעוצבת כראוי בהתאם ליומן הרישום לדוגמה שבאפשרותך להוריד. תחת אמת את תבנית יומן הרישום שלך, בחר הצג תבנית יומן רישום ולאחר מכן בחר הורד יומן רישום לדוגמה. השווה את יומן הרישום שלך למדגם שסופק כדי לוודא שהוא תואם.

הערה
התבנית לדוגמה של FTP נתמכת בתמונות ובהעלאה אוטומטית בזמן ש- syslog נתמך בהעלאה אוטומטית בלבד. הורדת יומן רישום לדוגמה תוריד יומן FTP לדוגמה.
העלה יומני תעבורה שברצונך להעלות. באפשרותך להעלות עד 20 קבצים בבת אחת. גם קבצים דחוסים ודחוסים נתמכים.

בחר העלה יומני רישום.
לאחר השלמת ההעלאה, הודעת המצב תופיע בפינה השמאלית העליונה של המסך כדי שתדע ש יומן הרישום שלך הועלה בהצלחה.
לאחר העלאת קבצי יומן הרישום, ניתוח וניתוח שלהם יחלפו זמן מה. לאחר השלמת העיבוד של קבצי יומן הרישום שלך, תקבל הודעת דואר אלקטרוני כדי ליידע אותך שהתהליך הסתיים.
תופיע כרזת הודעה בשורת המצב בחלק העליון של לוח המחוונים של גילוי ענן . הכרזה מעדעדכן אותך במצב העיבוד של קבצי יומן הרישום שלך.

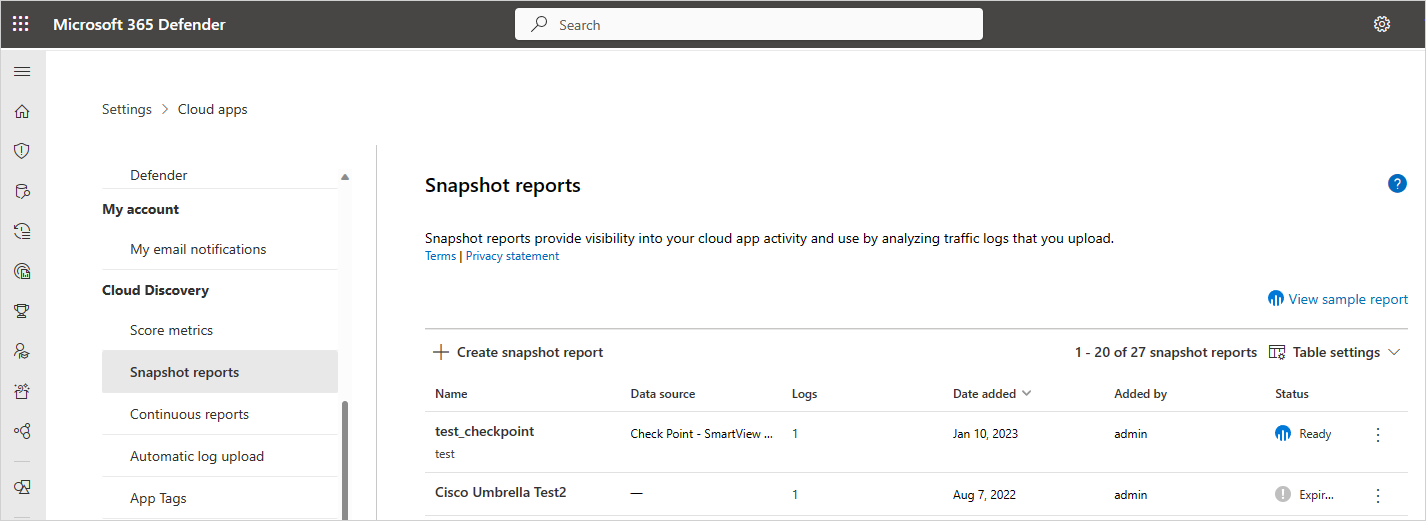
לאחר העלאת יומני הרישום בהצלחה, אתה אמור לראות הודעה המודיעה לך שהעיבוד של קובץ יומן הרישום הושלם בהצלחה. בשלב זה, באפשרותך להציג את הדוח על-ידי בחירת הקישור בשורת המצב. לחלופין, בפורטל Microsoft Defender, בחר הגדרות.
לאחר מכן , תחת גילוי ענן, בחר דוחות תמונה ובחר את דוח התמונה שלך.

שימוש ביומני תעבורה לגילוי ענן
גילוי ענן משתמש בנתונים ביומני התעבורה שלך. ככל שהלוג שלך מפורט יותר, כך אתה מקבל ניראות טובה יותר. גילוי ענן דורש נתוני תעבורת אינטרנט עם התכונות הבאות:
- תאריך העסקה
- כתובת IP של מקור
- משתמש מקור - מומלץ ביותר
- כתובת IP של יעד
- כתובת URL של יעד מומלצת (כתובות URL מספקות דיוק גבוה יותר עבור זיהוי אפליקציות בענן מאשר כתובות IP)
- כמות הנתונים הכוללת (מידע הנתונים חשוב מאוד)
- כמות הנתונים שהועלו או הורדו (מספקת תובנות לגבי דפוסי השימוש של אפליקציות הענן)
- הפעולה שבוצעה (מותרת/נחסמה)
גילוי ענן אינו יכול להציג או לנתח תכונות שאינן נכללות ביומני הרישום שלך. לדוגמה, תבנית יומן הרישום הרגילה של חומת האש של Cisco ASA אינה מכילה את מספר הבתים שהועלו לכל טרנזקציה, שם משתמש וכתובת URL של יעד (IP המשמש כיעד בלבד). לכן, תכונות אלה לא יוצגו בענן נתוני גילוי עבור יומני רישום אלה, והניראות של אפליקציות הענן תהיה מוגבלת. עבור חומות אש של Cisco ASA, יש להגדיר את רמת המידע ל- 6.
כדי ליצור בהצלחה דוח גילוי בענן, יומני התעבורה שלך חייבים לעמוד בתנאים הבאים:
- מקור הנתונים נתמך.
- תבנית יומן הרישום תואמת לתבנית הרגילה הצפויה (התבנית מסומנת בעת ההעלאה באמצעות הכלי יומן רישום).
- אירועים הם לא יותר מ- 90 יום.
- קובץ יומן הרישום חוקי וכולל פרטי תעבורה יוצאת.
השלבים הבאים
אם אתה נתקל בבעיות כלשהן, אנחנו כאן כדי לעזור. לקבלת סיוע או תמיכה עבור בעיית המוצר שלך, פתח כרטיס תמיכה.