Use sensitivity labels to protect content in Microsoft Teams, Microsoft 365 groups, and SharePoint sites
In addition to using sensitivity labels to protect documents and emails, you can also use sensitivity labels to protect content in the following containers: Microsoft Teams sites, Microsoft 365 groups (formerly Office 365 groups), and SharePoint sites. For this container-level protection, use the following label settings:
- Privacy (public or private) of teams sites and Microsoft 365 groups
- External user access
- External sharing from SharePoint sites
- Access from unmanaged devices
- Authentication contexts
- Prevent discovery of private teams for users who have this capability
- Shared channels control for team invitations
- Default sharing link for a SharePoint site (PowerShell-only configuration)
- Site sharing settings (PowerShell-only configuration)
- Default label for channel meetings
Important
The settings for unmanaged devices and authentication contexts work in conjunction with Microsoft Entra Conditional Access. You must configure this dependent feature if you want to use a sensitivity label for these settings. Additional information is included in the instructions that follow.
When you apply this sensitivity label to a supported container, the label automatically applies the sensitivity category and configured protection settings to the site or group.
Be aware that some label options can extend configuration settings to site owners that are otherwise restricted to administrators. When you configure and publish the label settings for external sharing options and the authentication context, a site owner can now set and change these options for a site by applying or changing the sensitivity label for a team or site. Don't configure these specific label settings if you don't want site owners to be able to make these changes.
Content in these containers however, do not inherit the labels for the sensitivity category or settings for files and emails, such as content markings and encryption. So that users can label their documents in SharePoint sites or team sites, make sure you've enabled sensitivity labels for Office files in SharePoint and OneDrive.
Container labels don't support displaying other languages and display the original language only for the label name and description.
Tip
If you're not an E5 customer, use the 90-day Microsoft Purview solutions trial to explore how additional Purview capabilities can help your organization manage data security and compliance needs. Start now at the Microsoft Purview compliance portal trials hub. Learn details about signing up and trial terms.
Using sensitivity labels for Microsoft Teams, Microsoft 365 groups, and SharePoint sites
Before you enable sensitivity labels for containers and configure sensitivity labels for the new settings, users can see and apply sensitivity labels in their apps. For example, from Word:

After you enable and configure sensitivity labels for containers, users can additionally see and apply sensitivity labels to Microsoft team sites, Microsoft 365 groups, and SharePoint sites. For example, when you create a new team site from SharePoint:

After a sensitivity label has been applied to a site, you must have the following role to change that label in SharePoint or Teams:
- For a group-connect site: Microsoft 365 group Owners
- For a site that isn't group-connected: SharePoint site admin
Note
Sensitivity labels for containers support Teams shared channels. If a team has any shared channels, they automatically inherit sensitivity label settings from their parent team, and that label can't be removed or replaced with a different label.
How to enable sensitivity labels for containers and synchronize labels
If you haven't yet enabled sensitivity labels for containers, do the following set of steps as a one-time procedure:
Because this feature uses Microsoft Entra functionality, follow the instructions from the Microsoft Entra documentation to enable sensitivity label support: Assign sensitivity labels to Microsoft 365 groups in Microsoft Entra ID.
You now need to synchronize your sensitivity labels to Microsoft Entra ID. First, connect to Security & Compliance PowerShell.
For example, in a PowerShell session that you run as administrator, sign in with a global administrator account.
Then run the following command to ensure your sensitivity labels can be used with Microsoft 365 groups:
Execute-AzureAdLabelSync
How to configure groups and site settings
After sensitivity labels are enabled for containers as described in the previous section, you can then configure protection settings for groups and sites in the sensitivity labeling configuration. Until sensitivity labels are enabled for containers, the settings are visible but you can't configure them.
Follow the general instructions to create or edit a sensitivity label and make sure you select Groups & sites for the label's scope:

When only this scope is selected for the label, the label won't be displayed in Office apps that support sensitivity labels and can't be applied to files and emails. Having this separation of labels can be helpful for both users and administrators, but can also add to the complexity of your label deployment.
For example, you need to carefully review your label ordering because SharePoint detects when a labeled document is uploaded to a labeled site. In this scenario, an audit event and email are automatically generated when the document has a higher priority sensitivity label than the site's label. For more information, see the Auditing sensitivity label activities section on this page.
Then, on the Define protection settings for groups and sites page, select the options you want to configure:
- Privacy and external user access settings to configure the Privacy and External users access settings.
- External sharing and Conditional Access settings to configure the Control external sharing from labeled SharePoint sites and Use Microsoft Entra Conditional Access to protect labeled SharePoint sites setting.
- Private teams discoverability and shared channel controls to configure the settings to prevent users who can discover private teams from finding a private team with this sensitivity label applied, and channel sharing controls for invitations to other teams.
Additionally, if you are editing an existing label where the scope includes items and meetings, and you've configured labels to protect meetings, you can select a default label for channel meetings and all channel chats. For non-channel meetings, you can select a default label as a policy setting.
If you selected Privacy and external user access settings, now configure the following settings:
Privacy: Keep the default of Public if you want anyone in your organization to access the team site or group where this label is applied.
Select Private if you want access to be restricted to only approved members in your organization.
Select None when you want to protect content in the container by using the sensitivity label, but still let users configure the privacy setting themselves.
The settings of Public or Private set and lock the privacy setting when you apply this label to the container. Your chosen setting replaces any previous privacy setting that might be configured for the team or group, and locks the privacy value so it can be changed only by first removing the sensitivity label from the container. After you remove the sensitivity label, the privacy setting from the label remains and users can now change it again.
External user access: Control whether the group owner can add guests to the group.
If you selected External sharing and Conditional Access settings, now configure the following settings:
Control external sharing from labeled SharePoint sites: Select this option to then select either external sharing for anyone, new and existing guests, existing guests, or only people in your organization. For more information about this configuration and settings, see the SharePoint documentation, Turn external sharing on or off for a site.
Use Microsoft Entra Conditional Access to protect labeled SharePoint sites: Select this option only if your organization has configured and is using Microsoft Entra Conditional Access. Then, select one of the following settings:
Determine whether users can access SharePoint sites from unmanaged devices: This option uses the SharePoint feature that uses Microsoft Entra Conditional Access to block or limit access to SharePoint and OneDrive content from unmanaged devices. For more information, see Control access from unmanaged devices from the SharePoint documentation. The option you specify for this label setting is the equivalent of running a PowerShell command for a site, as described in steps 3-5 from the Block or limit access to a specific SharePoint site or OneDrive section from the SharePoint instructions.
For additional configuration information, see More information about the dependencies for the unmanaged devices option at the end of this section.
Choose an existing authentication context: This option lets you enforce more stringent access conditions when users access SharePoint sites that have this label applied. These conditions are enforced when you select an existing authentication context that has been created and published for your organization's Conditional Access deployment. If users don't meet the configured conditions or if they use apps that don't support authentication contexts, they are denied access.
For additional configuration information, see More information about the dependencies for the authentication context option at the end of this section.
Examples for this label configuration:
You choose an authentication context that is configured to require multifactor authentication (MFA). This label is then applied to a SharePoint site that contains highly confidential items. As a result, when users from an untrusted network attempt to access a document in this site, they see the MFA prompt that they must complete before they can access the document.
You choose an authentication context that is configured for terms-of-use (ToU) policies. This label is then applied to a SharePoint site that contains items that require a terms-of-use acceptance for legal or compliance reasons. As a result, when users attempt to access a document in this site, they see a terms-of-use document that they must accept before they can access the original document.
If you selected Private teams discoverability and shared channel controls:
For Private teams discoverability, use the Allow users to discover private teams that have this label applied checkbox when you've configured a Teams policy that allows private teams discovery:
- When the checkbox is selected (the default setting), a private team with the sensitivity label applied will be discoverable for a user who is allowed to discover private teams.
- When the checkbox is cleared, a private team with the sensitivity label applied will remain hidden and won't be discoverable for all users.
For Teams shared channels, when a team has a sensitivity label applied, you can allow or prevent other teams from being invited to the original team's shared channels. For more information about shared channels, see Shared channels in Microsoft Teams.
Important
These options for Teams shared channels have a dependency on the settings on the previous Privacy and external user access page. If you select an option that's not compatible with these previous settings, you see a validation message to change your selection. Alternatively, you can go back in the configuration to change the dependent setting.
Options include Internal only, Same label only, and Private team only. Only the last option can potentially remove previously invited teams, and none of the options affect invitations to individual users.
The site and group settings take effect when you apply the label to a team, group, or site. If the label's scope includes files and emails, other label settings such as encryption and content marking aren't applied to the content within the team, group, or site.
If your sensitivity label isn't already published, now publish it by adding it to a sensitivity label policy. The users who are assigned a sensitivity label policy that includes this label will be able to select it for sites and groups.
More information about the dependencies for the unmanaged devices option
If you don't configure the dependent conditional access policy for SharePoint as documented in Use app-enforced restrictions, the option you specify here will have no effect. Additionally, it will have no effect if it's less restrictive than a configured setting at the tenant level. If you have configured an organization-wide setting for unmanaged devices, choose a label setting that's either the same or more restrictive
For example, if your tenant is configured for Allow limited, web-only access, the label setting that allows full access will have no effect because it's less restrictive. For this tenant-level setting, choose the label setting to block access (more restrictive) or the label setting for limited access (the same as the tenant setting).
Because you can configure the SharePoint settings separately from the label configuration, there's no check in the sensitivity label configuration that the dependencies are in place. These dependencies can be configured after the label is created and published, and even after the label is applied. However, if the label is already applied, the label setting won't take effect until after the user next authenticates.
More information about the dependencies for the authentication context option
To display in the drop-down list for selection, authentication contexts must be created, configured, and published as part of your Microsoft Entra Conditional Access configuration. For more information and instructions, see the Configure authentication contexts section from the Microsoft Entra Conditional Access documentation.
Not all apps support authentication contexts. If a user with an unsupported app connects to the site that's configured for an authentication context, they see either an access denied message or they are prompted to authenticate but rejected. The apps that currently support authentication contexts:
Office for the web, which includes Outlook for the web
Microsoft Teams for Windows and macOS (excludes Teams web app)
Microsoft Planner
Microsoft 365 Apps for Word, Excel, and PowerPoint; minimum versions:
- Windows: 2103
- macOS: 16.45.1202
- iOS: 2.48.303
- Android: 16.0.13924.10000
Microsoft 365 Apps for Outlook; minimum versions:
- Windows: 2103
- macOS: 16.45.1202
- iOS: 4.2109.0
- Android: 4.2025.1
OneDrive sync app, minimum versions:
- Windows: 21.002
- macOS: 21.002
- iOS: 12.30
- Android: Not yet supported
Known limitations:
For the OneDrive sync app, supported for OneDrive only and not for other sites.
The following features and apps might be incompatible with authentication contexts, so we encourage you to check that these continue to work after a user successfully accesses a site by using an authentication context:
- Workflows that use Power Apps or Power Automate
- Third-party apps
Configure settings for the default sharing link type for a site by using PowerShell advanced settings
In addition to the label settings for sites and groups that you can configure from the Microsoft Purview portal or the Microsoft Purview compliance portal, you can also configure the default sharing link type for a site. Sensitivity labels for documents can also be configured for a default sharing link type. These settings that help to prevent over-sharing are automatically selected when users select the Share button in their Office apps.
For more information and instructions, see Use sensitivity labels to configure the default sharing link type for sites and documents in SharePoint and OneDrive.
Configure site sharing permissions by using PowerShell advanced settings
Another PowerShell advanced setting that you can configure for the sensitivity label to be applied to a SharePoint site is MembersCanShare. This setting is the equivalent configuration that you can set from the SharePoint admin center > Site permissions > Site Sharing > Change how members can share > Sharing permissions.
The three options are listed with the equivalent values for the PowerShell advanced setting MembersCanShare:
| Option from the SharePoint admin center | Equivalent PowerShell value for MembersCanShare |
|---|---|
| Site owners and members can share files, folders, and the site. People with Edit permissions can share files and folders. | MemberShareAll |
| Site owners and members, and people with Edit permissions can share files and folders, but only site owners can share the site. | MemberShareFileAndFolder |
| Only site owners can share files, folders, and the site. | MemberShareNone |
For more information about these configuration options, see Change how members can share from the SharePoint community documentation.
Example, where the sensitivity label GUID is 8faca7b8-8d20-48a3-8ea2-0f96310a848e:
Set-Label -Identity 8faca7b8-8d20-48a3-8ea2-0f96310a848e -AdvancedSettings @{MembersCanShare="MemberShareNone"}
For more help in specifying PowerShell advanced settings, see PowerShell tips for specifying the advanced settings.
Sensitivity label management
Use the following guidance for when you create, modify, or delete sensitivity labels that are configured for sites and groups.
Creating and publishing labels that are configured for sites and groups
Use the following guidance to publish a label for your users when that label is configured for site and group settings:
After you create and configure the sensitivity label, add this label to a label policy that applies to just a few test users.
Wait for the change to replicate:
- New label: Wait at least one hour, unless your configured settings include Teams shared channel controls. If that's the case, wait at least 24 hours.
- Existing label: Wait at least 24 hours.
For more information about the timing of labels, see When to expect new labels and changes to take effect.
After this wait period, use one of the test user accounts to create a team, Microsoft 365 group, or SharePoint site with the label that you created in step 1.
If there are no errors during this creation operation, you know it's safe to publish the label to all users in your tenant.
Modifying published labels that are configured for sites and groups
As a best practice, don't change the site and group settings for a sensitivity label after the label has been applied to teams, groups, or sites. If you do, remember to wait at least 24 hours for the changes to replicate to all containers that have the label applied.
In addition, if your changes include the External users access setting:
The new setting applies to new users but not to existing users. For example, if this setting was previously selected and as a result, guest users accessed the site, these guest users can still access the site after this setting is cleared in the label configuration.
The privacy settings for the group properties hiddenMembership and roleEnabled aren't updated.
Deleting published labels that are configured for sites and groups
If you delete a sensitivity label that has the site and group settings enabled, and that label is included in one or more label policies, this action can result in creation failures for new teams, groups, and sites. To avoid this situation, use the following guidance:
Remove the sensitivity label from all label policies that include the label.
Wait at least one hour.
After this wait period, try creating a team, group, or site and confirm that the label is no longer visible.
If the sensitivity label isn't visible, you can now safely delete the label.
How to apply sensitivity labels to containers
You're now ready to apply the sensitivity label or labels to the following containers:
- Microsoft 365 group in Microsoft Entra ID
- Microsoft Teams team site
- Microsoft 365 group in Outlook on the web
- SharePoint site
You can use PowerShell if you need to apply a sensitivity label to multiple sites.
Apply sensitivity labels to Microsoft 365 groups
You're now ready to apply the sensitivity label or labels to Microsoft 365 groups. Return to the Microsoft Entra documentation for instructions:
Apply a sensitivity label to a new team
Users can select sensitivity labels when they create new teams in Microsoft Teams. When they select the label from the Sensitivity dropdown, the privacy setting might change to reflect the label configuration. Depending on the external users access setting you selected for the label, users can or can't add people outside the organization to the team.
Learn more about sensitivity labels for Teams

After you create the team, the sensitivity label appears in the upper-right corner of all channels.
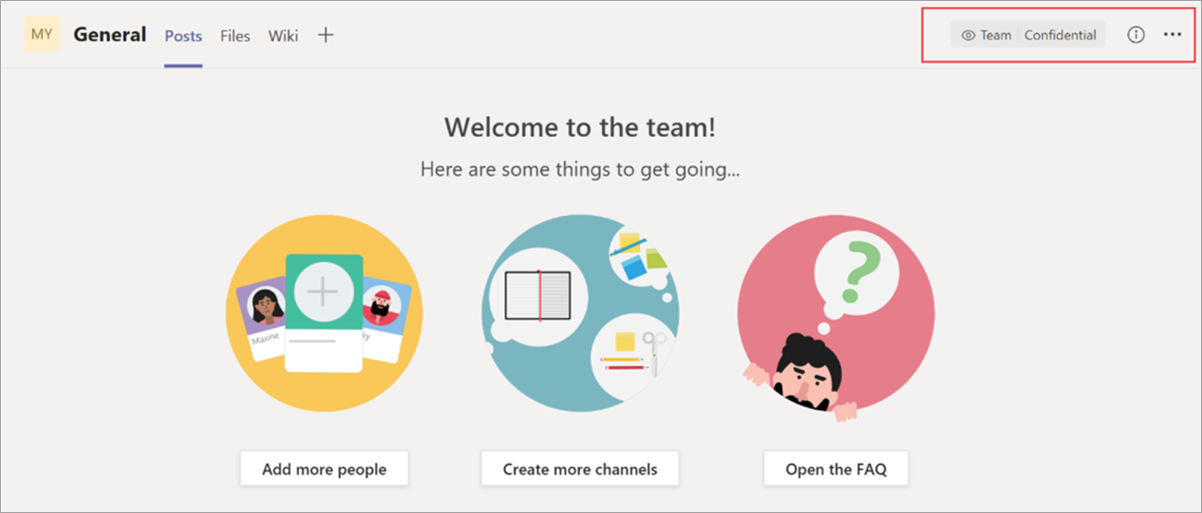
The service automatically applies the same sensitivity label to the Microsoft 365 group and the connected SharePoint team site.
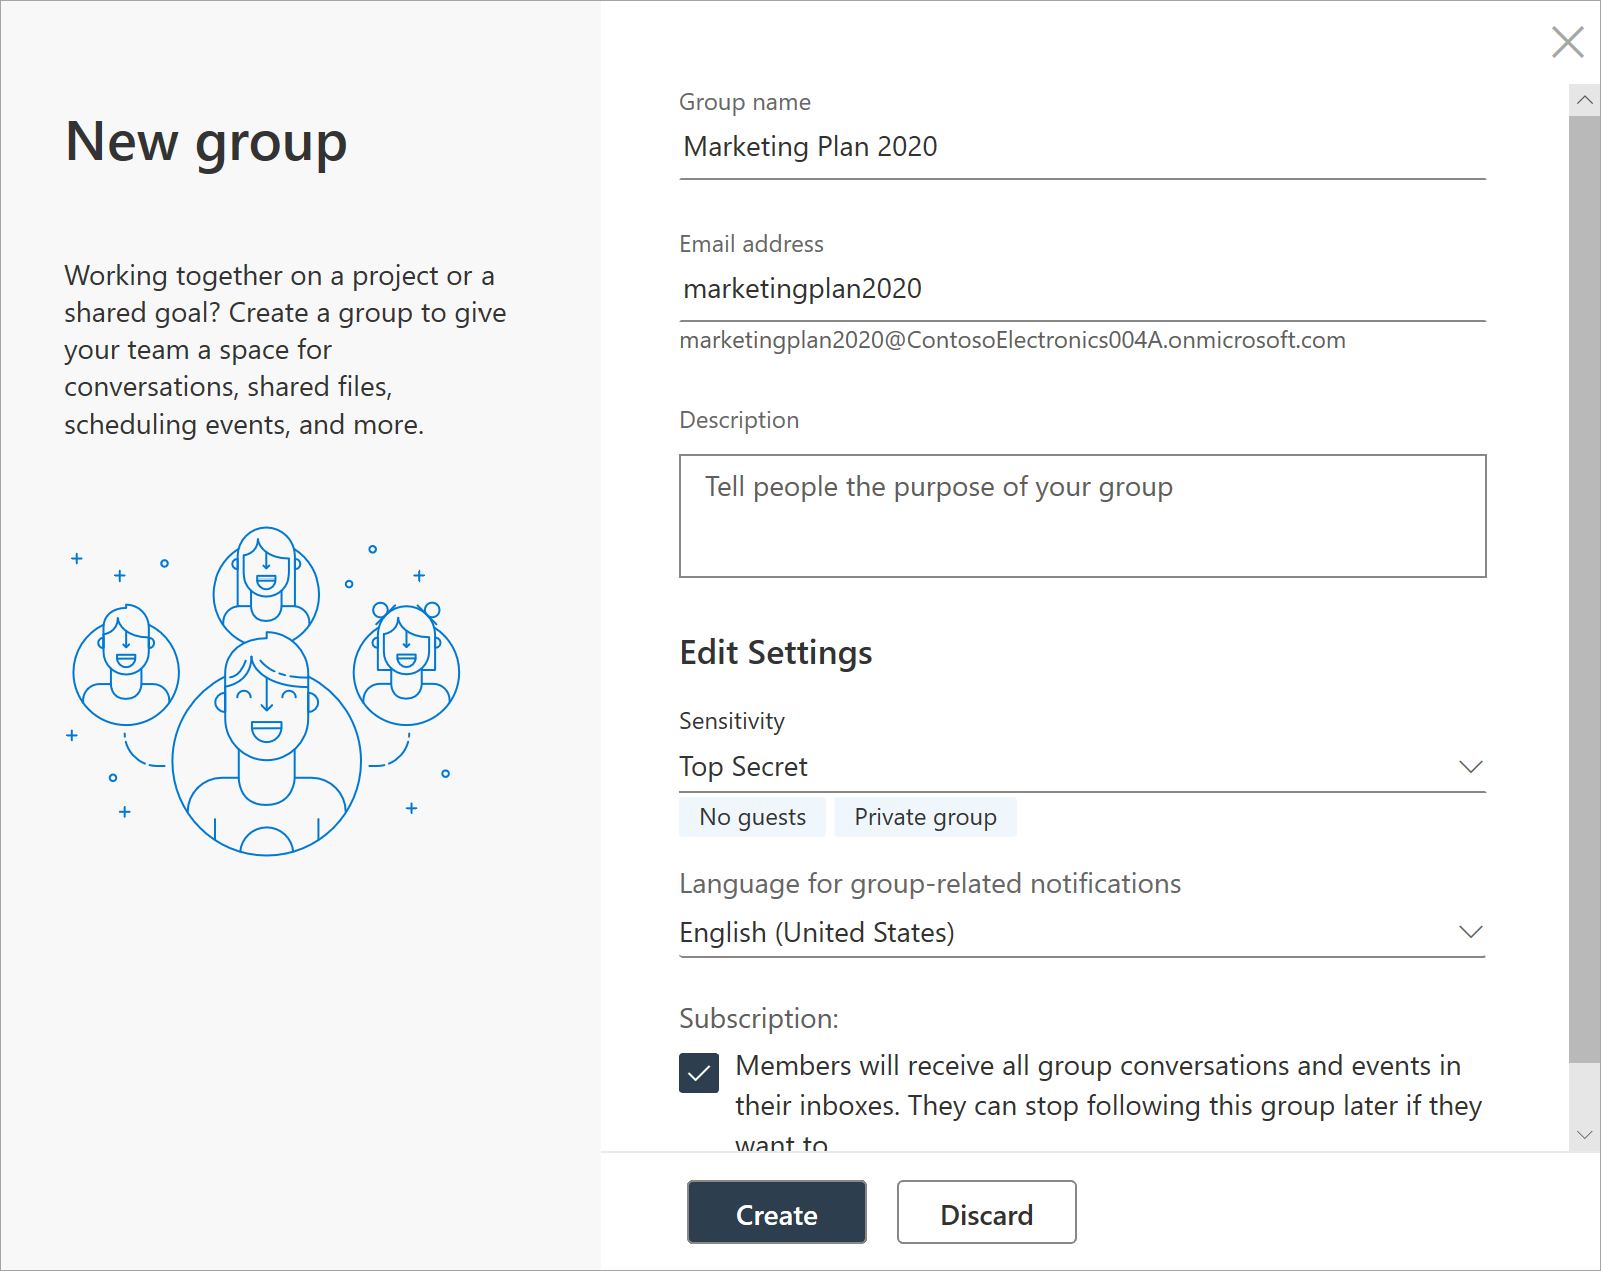
Apply a sensitivity label to a new group in Outlook on the web
In Outlook on the web, when you create a new group, you can select or change the Sensitivity option for published labels:
Apply a sensitivity label to a new site
Admins and end users can select sensitivity labels when they create modern team sites and communication sites, and expand Advanced settings:
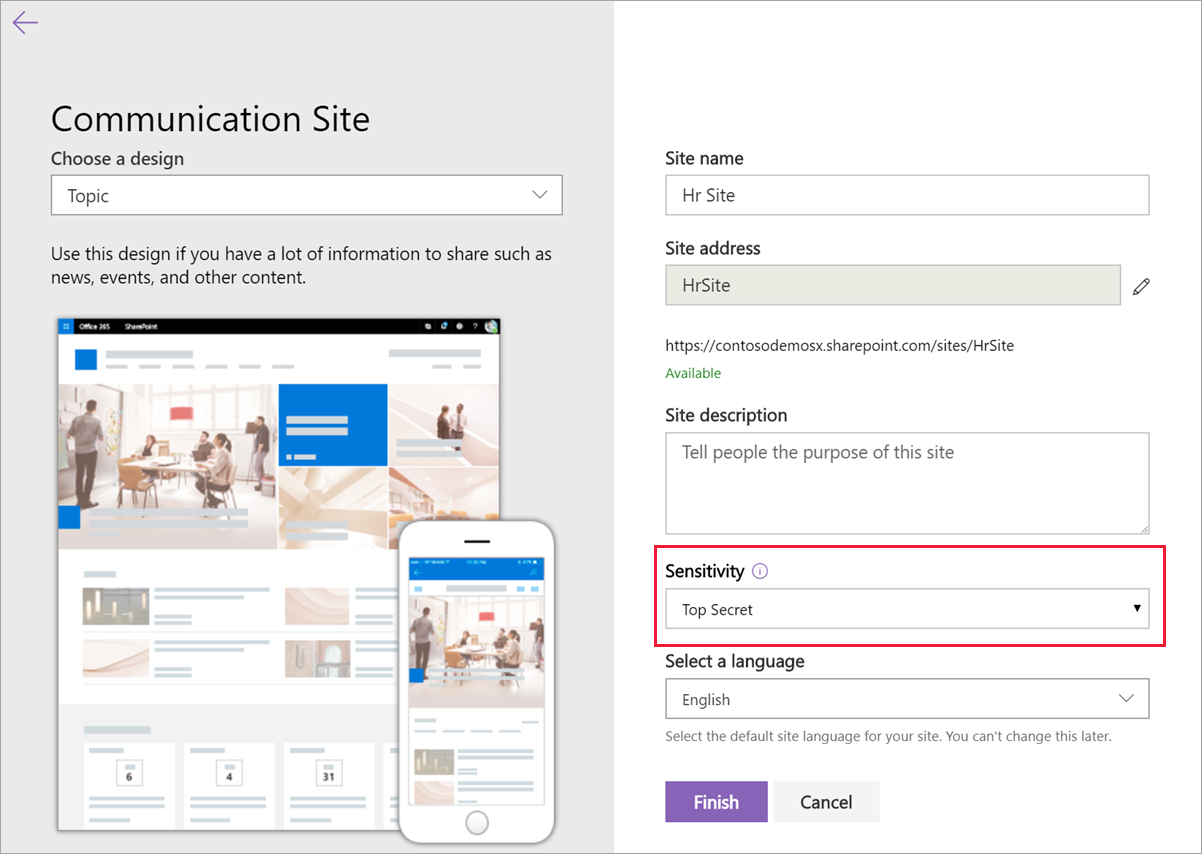
The dropdown box displays the label names for the selection, and the help icon displays all the label names with their tooltip, which can help users determine the correct label to apply.
When the label is applied, and users browse to the site, they see the name of the label and applied policies. For example, this site has been labeled as Confidential, and the privacy setting is set to Private:

Use PowerShell to apply a sensitivity label to multiple sites
You can use the Set-SPOSite and Set-SPOTenant cmdlet with the SensitivityLabel parameter from the current SharePoint Online Management Shell to apply a sensitivity label to many sites. You can use the same procedure to replace an existing label. The sites can be any SharePoint site collection, or a OneDrive site.
Make sure you have version 16.0.19418.12000 or later of the SharePoint Online Management Shell.
Open a PowerShell session with the Run as Administrator option.
If you don't know your label GUID: Connect to Security & Compliance PowerShell and get the list of sensitivity labels and their GUIDs.
Get-Label |ft Name, GuidNow connect to SharePoint Online PowerShell and store your label GUID as a variable. For example:
$Id = [GUID]("e48058ea-98e8-4940-8db0-ba1310fd955e")Create a new variable that identifies multiple sites that have an identifying string in common in their URL. For example:
$sites = Get-SPOSite -IncludePersonalSite $true -Limit all -Filter "Url -like 'documents"Run the following command to apply the label to these sites. Using our examples:
$sites | ForEach-Object {Set-SPOTenant $_.url -SensitivityLabel $Id}
This series of commands lets you label multiple sites across your tenant with the same sensitivity label, which is why you use the Set-SPOTenant cmdlet, rather than the Set-SPOSite cmdlet that's for per-site configuration. However, use the Set-SPOSite cmdlet when you need to apply a different label to specific sites by repeating the following command for each of these sites: Set-SPOSite -Identity <URL> -SensitivityLabel "<labelguid>"
View and manage sensitivity labels in the SharePoint admin center
To view, sort, and search the applied sensitivity labels, use Active sites in the new SharePoint admin center. You might need to first add the Sensitivity column:

For more information about managing sites from the Active sites page, including how to add a column, see Manage sites in the new SharePoint admin center.
You can also change and apply a label from this page:
Select the site name to open the details pane.
Select the Policies tab, and then select Edit for the Sensitivity setting.
From the Edit sensitivity setting pane, select the sensitivity label you want to apply to the site. Unlike user apps, where sensitivity labels can be assigned to specific users, the admin center displays all container labels for your tenant. After you've chosen a sensitivity label, select Save.
Support for sensitivity labels
When you use admin centers that support sensitivity labels, with the exception of the Microsoft Entra admin center, you see all sensitivity labels for your tenant. In comparison, user apps and services that filter sensitivity labels according to publishing policies can result in you seeing a subset of those labels. The Microsoft Entra admin center also filters the labels according to publishing policies.
The following apps and services support sensitivity labels configured for sites and group settings:
Admin centers:
- SharePoint admin center
- Teams admin center
- Microsoft 365 admin center
- Microsoft Purview portal
- Microsoft Purview compliance portal
User apps and services:
- SharePoint
- Teams
- Outlook on the web and for Windows, macOS, iOS, and Android
- Forms
- Stream
- Planner
The following apps and services don't currently support sensitivity labels configured for sites and group settings:
Admin centers:
- Exchange admin center
User apps and services:
- Dynamics 365
- Viva Engage
- Project
- Power BI
- My Apps portal
Classic Microsoft Entra group classification
After you enable sensitivity labels for containers, the group classifications from Microsoft Entra ID are no longer supported by Microsoft 365 and won't display on sites that support sensitivity labels. However, you can convert your old classifications to sensitivity labels.
As an example of how you might have used the old group classification for SharePoint, see SharePoint "modern" sites classification.
These classifications were configured by using Microsoft Graph PowerShell or the PnP Core library and defining values for the ClassificationList setting.
($setting["ClassificationList"])
To convert your old classifications to sensitivity labels, do one of the following:
Use existing labels: Specify the label settings you want for sites and groups by editing existing sensitivity labels that are already published.
Create new labels: Specify the label settings you want for sites and groups by creating and publishing new sensitivity labels that have the same names as your existing classifications.
Then:
Use PowerShell to apply the sensitivity labels to existing Microsoft 365 groups and SharePoint sites by using name mapping. See the next section for instructions.
Remove the old classifications from the existing groups and sites.
Although you can't prevent users from creating new groups in apps and services that don't yet support sensitivity labels, you can run a recurring PowerShell script to look for new groups that users have created with the old classifications, and convert these to use sensitivity labels.
To help you manage the coexistence of sensitivity labels and Microsoft Entra classifications for sites and groups, see Microsoft Entra classification and sensitivity labels for Microsoft 365 groups.
Use PowerShell to convert classifications for Microsoft 365 groups to sensitivity labels
First, connect to Security & Compliance PowerShell with a compliance administrator account.
Get the list of sensitivity labels and their GUIDs by using the Get-Label cmdlet:
Get-Label |ft Name, GuidMake a note of the GUIDs for the sensitivity labels you want to apply to your Microsoft 365 groups.
Now connect to Exchange Online PowerShell in a separate Windows PowerShell window.
Use the following command as an example to get the list of groups that currently have the classification of "General":
$Groups= Get-UnifiedGroup | Where {$_.classification -eq "General"}For each group, add the new sensitivity label GUID. For example:
foreach ($g in $groups)
{Set-UnifiedGroup -Identity $g.Identity -SensitivityLabelId "457fa763-7c59-461c-b402-ad1ac6b703cc"}
Repeat steps 5 and 6 for your remaining group classifications.
Auditing sensitivity label activities
Important
If you use label separation by selecting just the Groups & sites scope for labels that protect containers: Because of the Detected document sensitivity mismatch audit event and email described in this section, consider ordering labels before labels that have a scope for Items.
If somebody uploads a document to a site that's protected with a sensitivity label and their document has a higher priority sensitivity label than the sensitivity label applied to the site, this action isn't blocked. For example, you've applied the General label to a SharePoint site, and somebody uploads to this site a document labeled Confidential. Because a sensitivity label with a higher priority identifies content that is more sensitivity than content that has a lower priority order, this situation could be a security concern.
Although the action isn't blocked, it is audited and by default, automatically generates an email to the person who uploaded the document and the site administrator. As a result, both the user and administrators can identify documents that have this misalignment of label priority and take action if needed. For example, delete or move the uploaded document from the site.
It wouldn't be a security concern if the document has a lower priority sensitivity label than the sensitivity label applied to the site. For example, a document labeled General is uploaded to a site labeled Confidential. In this scenario, an auditing event and email aren't generated.
Note
Just as for the policy option that requires users to provide a justification for changing a label to a lower classification, sublabels for the same parent label are all considered to have the same priority.
To search the audit log for this event, look for Detected document sensitivity mismatch from the File and page activities category.
The automatically generated email has the subject Incompatible sensitivity label detected and the email message explains the labeling mismatch with a link to the uploaded document and site. It also contains a line for your own internal documentation: HelpLink : Troubleshooting Guide. You must configure the hyperlink for the troubleshooting guide by using the Set-SPOTenant cmdlet with the LabelMismatchEmailHelpLink parameter. For example:
Set-SPOTenant –LabelMismatchEmailHelpLink "https://support.contoso.com"
The email message also has a Microsoft documentation link that provides basic information for users to change the sensitivity label: Apply sensitivity labels to your files and email in Office
Except for the internal URL that you must specify, these automated emails cannot be customized. However, you can prevent them from being sent when you use the following PowerShell command from Set-SPOTenant:
Set-SPOTenant -BlockSendLabelMismatchEmail $True
When somebody adds or removes a sensitivity label to or from a site or group, these activities are also audited but without automatically generating an email.
All these auditing events can be found in the Sensitivity label activities section from the audit log activities documentation.
How to disable sensitivity labels for containers
You can turn off sensitivity labels for Microsoft Teams, Microsoft 365 groups, and SharePoint sites by using the same instructions from Enable sensitivity label support in PowerShell. However, to disable the feature, in step 5, specify $setting["EnableMIPLabels"] = "False".
In addition to making all the settings unavailable for groups and sites when you create or edit sensitivity labels, this action reverts which property the containers use for their configuration. Enabling sensitivity labels for Microsoft Teams, Microsoft 365 groups, and SharePoint sites switches the property used from Classification (used for Microsoft Entra group classification) to Sensitivity. When you disable sensitivity labels for containers, the containers ignore the Sensitivity property and use the Classification property again.
This means that any label settings from sites and groups previously applied to containers won't be enforced, and containers no longer display the labels.
If these containers have Microsoft Entra classification values applied to them, the containers revert to using the classifications again. Be aware that any new sites or groups that were created after enabling the feature won't display a label or have a classification. For these containers, and any new containers, you can now apply classification values. For more information, see SharePoint "modern" sites classification and Create classifications for Office groups in your organization.
Additional resources
For more information about managing Teams connected sites and channel sites, see Manage Teams connected sites and channel sites.
Saran dan Komentar
Segera hadir: Sepanjang tahun 2024 kami akan menghentikan penggunaan GitHub Issues sebagai mekanisme umpan balik untuk konten dan menggantinya dengan sistem umpan balik baru. Untuk mengetahui informasi selengkapnya, lihat: https://aka.ms/ContentUserFeedback.
Kirim dan lihat umpan balik untuk