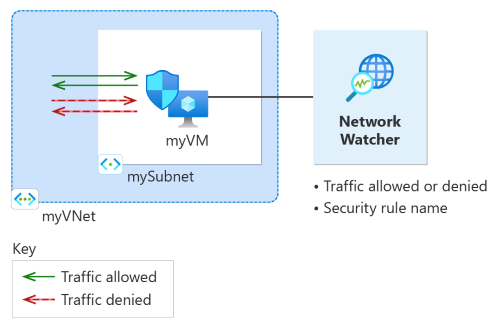
このクイックスタートでは、仮想マシンをデプロイし、Network Watcher の IP フローの確認を使用して、さまざまな IP アドレスとの間の接続をテストします。 IP フロー検証の結果を使用して、トラフィックのブロックと通信エラーの原因となっているセキュリティ規則を特定し、それを解決する方法を確認します。 また、ネットワーク インターフェイスの有効なセキュリティ規則を使用して、セキュリティ規則でトラフィックが許可または拒否されている理由を判断する方法についても説明します。

Azure サブスクリプションをお持ちでない場合は、開始する前に 無料アカウント を作成してください。
[前提条件]
アクティブなサブスクリプションを持つ Azure アカウント。
Azure Cloud Shell または Azure CLI。
この記事の手順では、Azure Cloud Shell で Azure CLI コマンドを対話型で実行します。 Cloud Shell でコマンドを実行するには、コード ブロックの右上隅にある [Cloud Shell を開く] を選択します。 [コピー] を選択してコードをコピーし、Cloud Shell に貼り付けて実行します。 Azure portal 内から Cloud Shell を実行することもできます。
また、Azure CLI をローカルにインストールしてコマンドを実行することもできます。 このクイックスタートには、バージョン 2.0 以降の Azure CLI が必要です。 Azure CLI をローカルで実行する場合は、az login コマンドを使用して Azure にサインインします。
仮想マシンを作成する
このセクションでは、米国東部リージョンに仮想ネットワークとサブネットを作成します。 その後、既定のネットワーク セキュリティ グループを使用して、サブネットに仮想マシンを作成します。
az group create を使用してリソース グループを作成します。 Azure リソース グループとは、Azure リソースのデプロイと管理に使用する論理コンテナーです。
# Create a resource group.
az group create --name 'myResourceGroup' --location 'eastus'
az network vnet create を使用して仮想ネットワークを作成します。
# Create a virtual network and a subnet.
az network vnet create --resource-group 'myResourceGroup' --name 'myVNet' --subnet-name 'mySubnet' --subnet-prefixes 10.0.0.0/24
az network nsg create を使用して、既定のネットワーク セキュリティ グループを作成します。
# Create a default network security group.
az network nsg create --name 'myVM-nsg' --resource-group 'myResourceGroup' --location 'eastus'
az vm create を使用して仮想マシンを作成します。 プロンプトが表示されたら、ユーザー名とパスワードを入力します。
# Create a Linux virtual machine using the latest Ubuntu 20.04 LTS image.
az vm create --resource-group 'myResourceGroup' --name 'myVM' --location 'eastus' --vnet-name 'myVNet' --subnet 'mySubnet' --public-ip-address '' --nsg 'myVM-nsg' --image 'Canonical:0001-com-ubuntu-server-focal:20_04-lts-gen2:latest'
IP フローの確認を使用してネットワーク通信をテストする
このセクションでは、Network Watcher の IP フローの確認機能を使用して、仮想マシンとの間のネットワーク通信をテストします。
az network watcher test-ip-flow コマンドを使用して、IP フロー検証 ( は で使用されるパブリック IP アドレスの 1 つです) を使用して
13.107.21.200からwww.bing.comへの送信通信をテストします。# Start the IP flow verify session to test outbound flow to www.bing.com. az network watcher test-ip-flow --direction 'outbound' --protocol 'TCP' --local '10.0.0.4:60000' --remote '13.107.21.200:80' --vm 'myVM' --nic 'myVmVMNic' --resource-group 'myResourceGroup' --out 'table'数秒後、次の例と同様の出力が得られます。
Access  RuleName
------  --------
Allow   defaultSecurityRules/AllowInternetOutBound
このテスト結果は、既定のセキュリティ規則 AllowInternetOutBound が原因で 13.107.21.200 へのアクセスが許可されていることを示しています。 既定では、Azure 仮想マシンはインターネットにアクセスできます。
RemoteIPAddress を「10.0.1.10」に変更し、テストを繰り返します。 10.0.1.10 は、myVNet アドレス空間内のプライベート IP アドレスです。
# Start the IP flow verify session to test outbound flow to 10.0.1.10.
az network watcher test-ip-flow --direction 'outbound' --protocol 'TCP' --local '10.0.0.4:60000' --remote '10.0.1.10:80' --vm 'myVM' --nic 'myVmVMNic' --resource-group 'myResourceGroup' --out 'table'
数秒後、次の例と同様の出力が得られます。
Access RuleName
------ --------
Allow  defaultSecurityRules/AllowVnetOutBound
2 番目のテスト結果は、既定のセキュリティ規則 AllowVnetOutBound が原因で 10.0.1.10 へのアクセスが許可されていることを示しています。 既定では、Azure 仮想マシンは、その仮想ネットワークのアドレス空間内のすべての IP アドレスにアクセスできます。
RemoteIPAddress を「10.10.10.10」に変更し、テストを繰り返します。 10.10.10.10 は、myVNet のアドレス空間には含まれていないプライベート IP アドレスです。
# Start the IP flow verify session to test outbound flow to 10.10.10.10.
az network watcher test-ip-flow --direction 'outbound' --protocol 'TCP' --local '10.0.0.4:60000' --remote '10.10.10.10:80' --vm 'myVM' --nic 'myVmVMNic' --resource-group 'myResourceGroup' --out 'table'
数秒後、次の例と同様の出力が得られます。
Access RuleName
------ --------
Allow  defaultSecurityRules/DenyAllOutBound
3 番目のテストの結果は、既定のセキュリティ規則 DenyAllOutBound が原因で 10.10.10.10 へのアクセスが拒否されていることを示しています。
方向を inbound に変更し、ローカル ポートを 80 に、リモート ポートを 60000 に変更し、テストを繰り返します。
# Start the IP flow verify session to test inbound flow from 10.10.10.10.
az network watcher test-ip-flow --direction 'inbound' --protocol 'TCP' --local '10.0.0.4:80' --remote '10.10.10.10:6000' --vm 'myVM' --nic 'myVmVMNic' --resource-group 'myResourceGroup' --out 'table'
数秒後に、次の例と類似した出力が表示されます。
Access RuleName
------ --------
Allow  defaultSecurityRules/DenyAllInBound
4 番目のテストの結果は、既定のセキュリティ規則 DenyAllInBound が原因で 10.10.10.10 からのアクセス拒否されていることを示しています。 既定では、仮想ネットワーク外部からの Azure 仮想マシンへのアクセスはすべて拒否されます。
セキュリティ規則の詳細を表示する
前のセクションのルールで通信が許可または拒否される理由を判断するには、az network nic list-effective-nsg コマンドを使用して、myVM 仮想マシンのネットワーク インターフェイスの有効なセキュリティ規則を確認します。
# Get the effective security rules for the network interface of myVM.
az network nic list-effective-nsg --resource-group 'myResourceGroup' --name 'myVmVMNic'
返される出力には、 への送信アクセスを許可した www.bing.com 規則に関する次の情報が含まれます。
{
  "access": "Allow",
  "destinationAddressPrefix": "Internet",
  "destinationAddressPrefixes": [
	"Internet"
  ],
  "destinationPortRange": "0-65535",
  "destinationPortRanges": [
	"0-65535"
  ],
  "direction": "Outbound",
  "expandedDestinationAddressPrefix": [
	"1.0.0.0/8",
	"2.0.0.0/7",
	"4.0.0.0/9",
	"4.144.0.0/12",
	"4.160.0.0/11",
	"4.192.0.0/10",
	"5.0.0.0/8",
	"6.0.0.0/7",
	"8.0.0.0/7",
	"11.0.0.0/8",
	"12.0.0.0/8",
	"13.0.0.0/10",
	"13.64.0.0/11",
	"13.104.0.0/13",
	"13.112.0.0/12",
	"13.128.0.0/9",
	"14.0.0.0/7",
	...
	...
	...
	"200.0.0.0/5",
	"208.0.0.0/4"
  ],
  "name": "defaultSecurityRules/AllowInternetOutBound",
  "priority": 65001,
  "protocol": "All",
  "sourceAddressPrefix": "0.0.0.0/0",
  "sourceAddressPrefixes": [
	"0.0.0.0/0",
	"0.0.0.0/0"
  ],
  "sourcePortRange": "0-65535",
  "sourcePortRanges": [
	"0-65535"
  ]
},
出力を見ると、アドレスのプレフィックス「13.104.0.0/13」が AllowInternetOutBound 規則のアドレスのプレフィックスの中にあることがわかります。 このプレフィックスには、 への送信通信をテストするために使用した IP アドレス「www.bing.com」が含まれます。
同様に、他の規則をチェックして、各規則におけるソースと宛先の IP アドレスのプレフィックスを確認できます。
リソースをクリーンアップする
不要になった場合は、 az group delete を使用して、 myResourceGroup リソース グループとそれに含まれるすべてのリソースを削除します。
# Delete the resource group and all resources it contains.
az group delete --name 'myResourceGroup' --yes