パス グラデーションの作成
PathGradientBrush クラスを使用すると、徐々に変化する色で図形を塗りつぶす方法をカスタマイズできます。 PathGradientBrush オブジェクトには、境界パスと中心点があります。 中心点に 1 つの色を指定し、境界に別の色を指定できます。 境界に沿って複数のポイントごとに個別の色を指定することもできます。
Note
GDI+ では、パスは GraphicsPath オブジェクトによって維持される一連の線と曲線です。 GDI+ パスの詳細については、「 パス 」および「 パスの構築と描画」を参照してください。
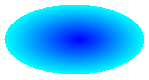
次の例では、パス グラデーション ブラシで楕円を塗りつぶします。 中心の色が青、境界の色が水色に設定されています。
// Create a path that consists of a single ellipse.
GraphicsPath path;
path.AddEllipse(0, 0, 140, 70);

// Use the path to construct a brush.
PathGradientBrush pthGrBrush(&path);

// Set the color at the center of the path to blue.
pthGrBrush.SetCenterColor(Color(255, 0, 0, 255));

// Set the color along the entire boundary of the path to aqua.
Color colors[] = {Color(255, 0, 255, 255)};
int count = 1;
pthGrBrush.SetSurroundColors(colors, &count);

graphics.FillEllipse(&pthGrBrush, 0, 0, 140, 70);
次の図に、塗りつぶされた楕円を示します。
既定では、パス グラデーション ブラシはパスの境界の外側には拡張されません。 パス グラデーション ブラシを使用して、パスの境界を越えて拡張する図形を塗りつぶした場合、パスの外側の画面領域は塗りつぶされません。 次の図は、前のコードで Graphics::FillEllipse 呼び出しを に graphics.FillRectangle(&pthGrBrush, 0, 10, 200, 40)変更した場合の動作を示しています。

境界上のポイントの指定
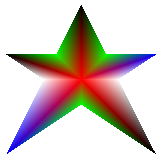
次の例では、星形のパスに基づいてパス グラデーション ブラシを作成します。 このコードは PathGradientBrush::SetCenterColor メソッドを呼び出して、starの重心の色を赤に設定します。 次に、PathGradientBrush::SetSurroundColors メソッドを呼び出して、points 配列内の個々のポイントでさまざまな色 (colors 配列に格納) を指定します。 コードの最後のステートメントによって、星形のパスがパス グラデーション ブラシで塗りつぶされます。
// Put the points of a polygon in an array.
Point points[] = {Point(75, 0),    Point(100, 50),
                  Point(150, 50),  Point(112, 75),
                  Point(150, 150), Point(75, 100),
                  Point(0, 150),   Point(37, 75),
                  Point(0, 50),    Point(50, 50)};

// Use the array of points to construct a path.
GraphicsPath path;
path.AddLines(points, 10);

// Use the path to construct a path gradient brush.
PathGradientBrush pthGrBrush(&path);

// Set the color at the center of the path to red.
pthGrBrush.SetCenterColor(Color(255, 255, 0, 0));

// Set the colors of the points in the array.
Color colors[] = {Color(255, 0, 0, 0),   Color(255, 0, 255, 0),
                  Color(255, 0, 0, 255), Color(255, 255, 255, 255),
                  Color(255, 0, 0, 0),   Color(255, 0, 255, 0),
                  Color(255, 0, 0, 255), Color(255, 255, 255, 255),
                  Color(255, 0, 0, 0),   Color(255, 0, 255, 0)};

int count = 10;
pthGrBrush.SetSurroundColors(colors, &count);

// Fill the path with the path gradient brush.
graphics.FillPath(&pthGrBrush, &path);
次の図は、塗りつぶされたstarを示しています。
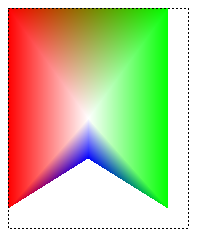
次の例では、ポイントの配列に基づいてパス グラデーション ブラシを構築します。 配列内の 5 つのポイントのそれぞれに色が割り当てられます。 5 つのポイントを直線で接続すると、5 辺の多角形が得られます。 色は、その多角形の中心 (重心) にも割り当てられます。この例では、中心 (80,75) が白に設定されています。 この例の最後のコード ステートメントは、パス グラデーション ブラシで四角形を塗りつぶします。
四角形の塗りつぶしに使用される色は (80, 75) の白で、(80, 75) から配列内のポイントに向かって離れるにつれて徐々に変化します。 たとえば、(80, 75) から (0, 0) に移動すると、色は白から赤に徐々に変化し、(80, 75) から (160, 0) に移動すると、色は白から緑に徐々に変化します。
// Construct a path gradient brush based on an array of points.
PointF ptsF[] = {PointF(0.0f, 0.0f),
                 PointF(160.0f, 0.0f),
                 PointF(160.0f, 200.0f),
                 PointF(80.0f, 150.0f),
                 PointF(0.0f, 200.0f)};

PathGradientBrush pBrush(ptsF, 5);

// An array of five points was used to construct the path gradient
// brush. Set the color of each point in that array.
Color colors[] = {Color(255, 255, 0, 0),  // (0, 0) red
                  Color(255, 0, 255, 0),  // (160, 0) green
                  Color(255, 0, 255, 0),  // (160, 200) green
                  Color(255, 0, 0, 255),  // (80, 150) blue
                  Color(255, 255, 0, 0)}; // (0, 200) red

int count = 5;
pBrush.SetSurroundColors(colors, &count);

// Set the center color to white.
pBrush.SetCenterColor(Color(255, 255, 255, 255));

// Use the path gradient brush to fill a rectangle.
graphics.FillRectangle(&pBrush, Rect(0, 0, 180, 220));
上記のコードには GraphicsPath オブジェクトがないことに注意してください。 この例の特定の PathGradientBrush コンストラクターは、ポイントの配列へのポインターを受け取りますが、 GraphicsPath オブジェクトは必要ありません。 また、パス グラデーション ブラシは、パスではなく四角形を塗りつぶすために使用されることに注意してください。 四角形はブラシの定義に使用されるパスよりも大きいので、一部の四角形はブラシによって描画されません。 次の図は、四角形 (点線) と、パス グラデーション ブラシによって描画された四角形の部分を示しています。
パス グラデーションのカスタマイズ
パス グラデーション ブラシをカスタマイズする方法の 1 つは、フォーカス スケールを設定する方法です。 フォーカス スケールによって、メイン パス内に内部パスが指定されます。 中心の色は、中心点だけではなく、内部パス内のすべての場所に表示されます。 パス グラデーション ブラシのフォーカス スケールを設定するには、 PathGradientBrush::SetFocusScales メソッドを 呼び出します。
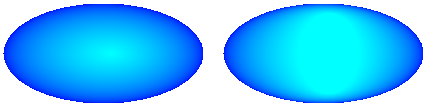
次の例では、楕円のパスに基づいてパス グラデーション ブラシを作成します。 コードでは、境界の色を青に設定し、中心の色を水色に設定して、パス グラデーション ブラシを使用して楕円のパスを塗りつぶします。
次に、パス グラデーション ブラシのフォーカス スケールを設定します。 x フォーカス スケールが 0.3、y フォーカス スケールが 0.8 に設定されます。 このコードは、Graphics オブジェクトの Graphics::TranslateTransform メソッドを呼び出して、Graphics::FillPath の後続の呼び出しが最初の楕円の右側にある楕円を埋めるようにします。
フォーカス スケールの効果を確認するには、メインの楕円と中心が重なる小さな楕円を想像してください。 小さい (内側の) 楕円は、メインの楕円 (の中心部) を水平方向に係数 0.3、垂直方向に係数 0.8 でスケールしたものです。 外側の楕円の境界から、内側の楕円の境界に向けて、色が青から水色に徐々に変化します。 内側の楕円の境界から共通の中心までは水色のままです。
// Create a path that consists of a single ellipse.
GraphicsPath path;
path.AddEllipse(0, 0, 200, 100);

// Create a path gradient brush based on the elliptical path.
PathGradientBrush pthGrBrush(&path);
pthGrBrush.SetGammaCorrection(TRUE);

// Set the color along the entire boundary to blue.
Color color(Color(255, 0, 0, 255));
INT num = 1;
pthGrBrush.SetSurroundColors(&color, &num);

// Set the center color to aqua.
pthGrBrush.SetCenterColor(Color(255, 0, 255, 255));

// Use the path gradient brush to fill the ellipse.
graphics.FillPath(&pthGrBrush, &path);

// Set the focus scales for the path gradient brush.
pthGrBrush.SetFocusScales(0.3f, 0.8f);

// Use the path gradient brush to fill the ellipse again.
// Show this filled ellipse to the right of the first filled ellipse.
graphics.TranslateTransform(220.0f, 0.0f);
graphics.FillPath(&pthGrBrush, &path);
次の図は、上記のコードの出力を示しています。 左側の楕円は中心点のみが水色です。 右側の楕円は、内部パスの内側全体が水色です。
パス グラデーション ブラシをカスタマイズするもう 1 つの方法は、事前設定された色の配列と補間位置の配列を指定することです。
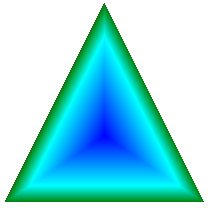
次の例では、三角形に基づいてパス グラデーション ブラシを作成します。 このコードでは、パス グラデーション ブラシの PathGradientBrush::SetInterpolationColors メソッドを呼び出して、補間の色の配列 (濃い緑、アクア、青) と補間位置の配列 (0, 0.25, 1) を指定します。 三角形の境界から中心点に向かって、色が濃い緑から水色に徐々に変化し、さらに水色から青に変化します。 濃い緑から水色への変化は、濃い緑から青までの距離の 25% で行われます。
// Vertices of the triangle
Point points[] = {Point(100, 0),
                  Point(200, 200),
                  Point(0, 200)};

// No GraphicsPath object is created. The PathGradient
// brush is constructed directly from the array of points.
PathGradientBrush pthGrBrush(points, 3);

Color presetColors[] = {
   Color(255, 0, 128, 0),    // Dark green
   Color(255, 0, 255, 255),  // Aqua
   Color(255, 0, 0, 255)};   // Blue

REAL interpPositions[] = {
   0.0f,   // Dark green is at the boundary of the triangle.
   0.25f,  // Aqua is 25 percent of the way from the boundary
           // to the center point.
   1.0f};  // Blue is at the center point.

pthGrBrush.SetInterpolationColors(presetColors, interpPositions, 3);

// Fill a rectangle that is larger than the triangle
// specified in the Point array. The portion of the
// rectangle outside the triangle will not be painted.
graphics.FillRectangle(&pthGrBrush, 0, 0, 200, 200);
次の図は、上記のコードの出力を示しています。
中心点の設定
既定では、パス グラデーション ブラシの中心点は、ブラシの作成に使用されるパスの重心にあります。 中心点の位置を変更するには、PathGradientBrush クラスの PathGradientBrush::SetCenterPoint メソッドを呼び出します。
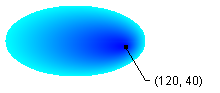
次の例では、楕円に基づいてパス グラデーション ブラシを作成します。 楕円の中心は (70, 35) ですが、パス グラデーション ブラシの中心点は (120, 40) に設定されています。
// Create a path that consists of a single ellipse.
GraphicsPath path;
path.AddEllipse(0, 0, 140, 70);

// Use the path to construct a brush.
PathGradientBrush pthGrBrush(&path);

// Set the center point to a location that is not the centroid of the path.
pthGrBrush.SetCenterPoint(Point(120, 40));

// Set the color at the center point to blue.
pthGrBrush.SetCenterColor(Color(255, 0, 0, 255));

// Set the color along the entire boundary of the path to aqua.
Color colors[] = {Color(255, 0, 255, 255)};
int count = 1;
pthGrBrush.SetSurroundColors(colors, &count);

graphics.FillEllipse(&pthGrBrush, 0, 0, 140, 70);
次の図は、塗りつぶされた楕円とパス グラデーション ブラシの中心点を示しています。
パス グラデーション ブラシの中心点を、そのブラシの作成に使用されたパスの外側に設定できます。 前のコードでは、 PathGradientBrush::SetCenterPointpthGrBrush.SetCenterPoint(Point(145, 35))の呼び出しを に置き換えると、次の結果が得られます。
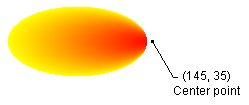
直前の図では、楕円の右端のポイントは純粋な青ではありません (きわめて近い色ですが)。 グラデーションの色は、塗りつぶしがポイント (145、35) に達したかのように配置され、色は純粋な青 (0、0、255) に達します。 ただし、パス グラデーション ブラシではパスの内側のみが描画されるため、塗りつぶしが (145, 35) まで達することはありません。
フィードバック
以下は間もなく提供いたします。2024 年を通じて、コンテンツのフィードバック メカニズムとして GitHub の issue を段階的に廃止し、新しいフィードバック システムに置き換えます。 詳細については、「https://aka.ms/ContentUserFeedback」を参照してください。
フィードバックの送信と表示