Android 앱에 푸시 알림 추가
개요
이 자습서에서는 푸시 알림을 Android 빠른 시작 프로젝트에 추가하여 레코드가 삽입될 때마다 디바이스에 푸시 알림이 전송됩니다.
다운로드한 빠른 시작 서버 프로젝트를 사용하지 않는 경우 푸시 알림 확장 패키지가 필요합니다. 자세한 내용은 Azure Mobile Apps용 .NET 백 엔드 서버 SDK 사용을 참조하세요.
필수 구성 요소
다음이 필요합니다.
프로젝트의 백 엔드에 따른 IDE
- 이 앱에 Node.js 백 엔드가 있는 경우 Android Studio
- 이 앱에 Microsoft .Net 백 엔드가 있는 경우 Visual Studio Community 2013 이상
Firebase Cloud Messaging의 경우 Android 2.3 이상, Google Repository 개정 27 이상 및 Google Play Services 9.0.2 이상
Android 빠른 시작을 완료합니다.
Firebase Cloud Messaging을 지원하는 프로젝트 만들기
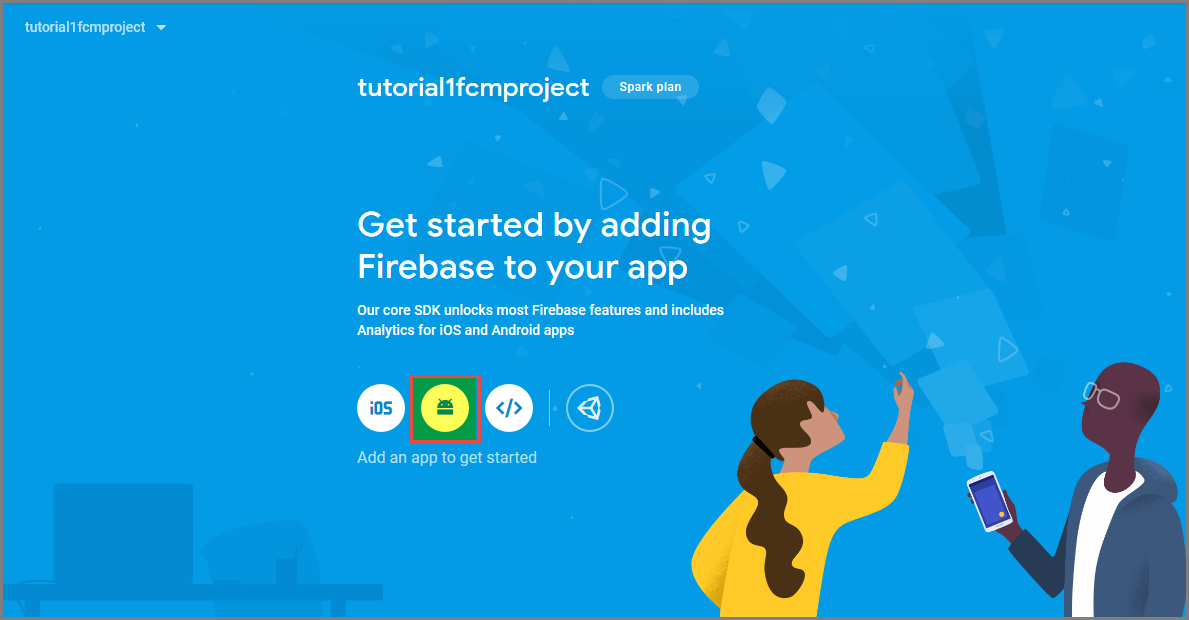
Firebase 콘솔에 로그인합니다. 아직 없는 경우 새 Firebase 프로젝트를 만듭니다.
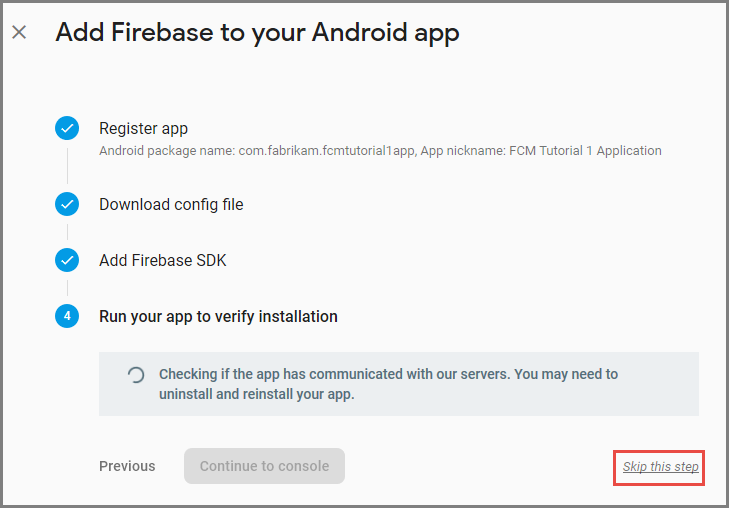
프로젝트를 만든 후 Android 앱에 Firebase 추가를 선택합니다.
Android 앱에 Firebase 추가 페이지에서 다음 단계를 수행합니다.
Android 패키지 이름에서 애플리케이션의 build.gradle 파일에 있는 applicationId 값을 복사합니다. 이 예에서는
com.fabrikam.fcmtutorial1app입니다.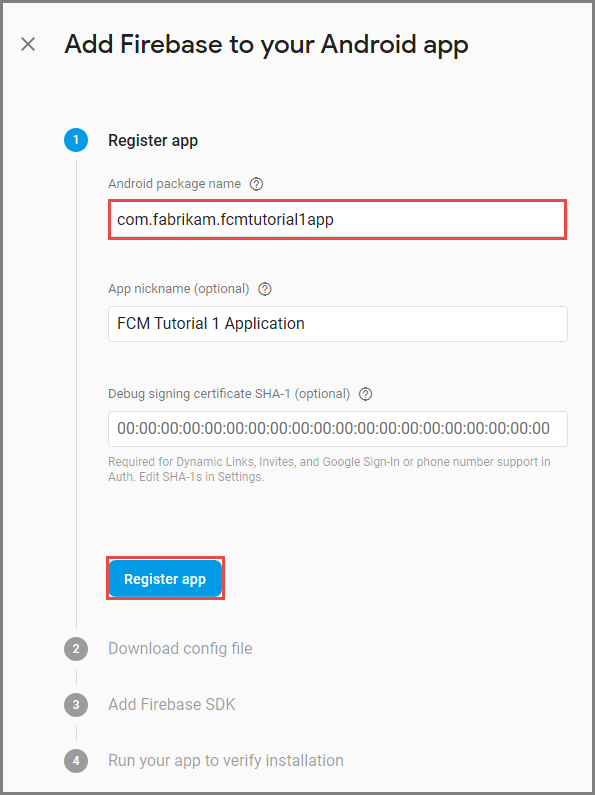
앱 등록을 선택합니다.
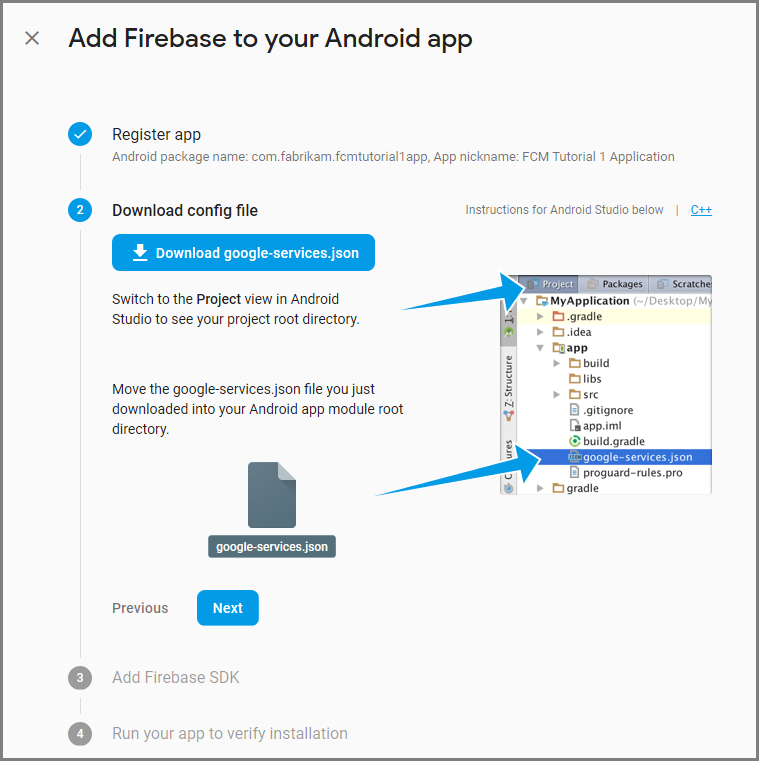
google-services.json 다운로드를 선택하고 프로젝트의 app 폴더에 파일을 저장한 후 다음을 선택합니다.
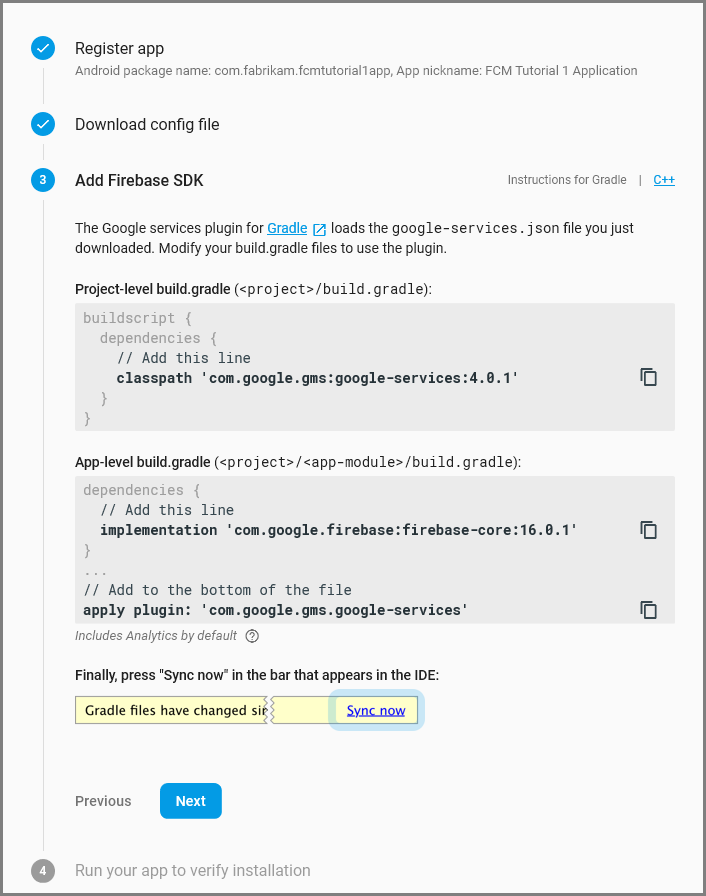
Android Studio의 프로젝트에서 다음과 같은 구성 변경 작업을 수행합니다.
project-level build.gradle 파일(<project>/build.gradle)에서 dependencies 섹션에 다음 명령문을 추가합니다.
classpath 'com.google.gms:google-services:4.0.1'app-level build.gradle 파일(<project>/<app-module>/build.gradle)에서 dependencies 섹션에 다음 명령문을 추가합니다.
implementation 'com.google.firebase:firebase-core:16.0.8'
implementation 'com.google.firebase:firebase-messaging:17.3.4'
app-level build.gradle 파일 끝부분에서 dependenices 섹션 다음에 다음 줄을 추가합니다.
apply plugin: 'com.google.gms.google-services'도구 모음에서 지금 동기화를 선택합니다.
다음을 선택합니다.
이 단계 건너뛰기를 선택합니다.
Firebase 콘솔에서 프로젝트의 톱니바퀴를 선택합니다. 그런 후 프로젝트 설정을 선택합니다.
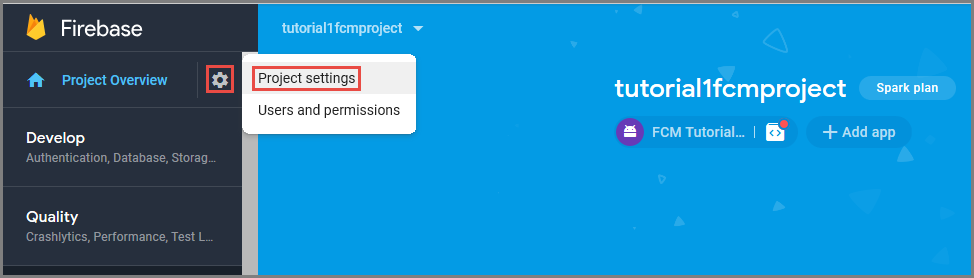
Android Studio 프로젝트의 app 폴더에 google-services.json 파일을 다운로드하지 않은 경우 이 페이지에서 다운로드할 수 있습니다.
맨 위에 있는 클라우드 메시징 탭으로 전환합니다.
나중에 사용하기 위해 서버 키를 복사하고 저장합니다. 이 값을 사용하여 허브를 구성합니다.
알림 허브 구성
Azure App Service의 Mobile Apps 기능은 Azure Notification Hubs를 사용하여 푸시를 보내므로 모바일 앱에 대해 알림 허브가 구성됩니다.
Azure Portal에서 App Services로 이동한 다음, 앱 백 엔드를 선택합니다. 설정에서 푸시를 선택합니다.
앱에 알림 허브 리소스를 추가하려면 연결을 선택합니다. 허브를 만들거나 기존 허브에 연결할 수 있습니다.
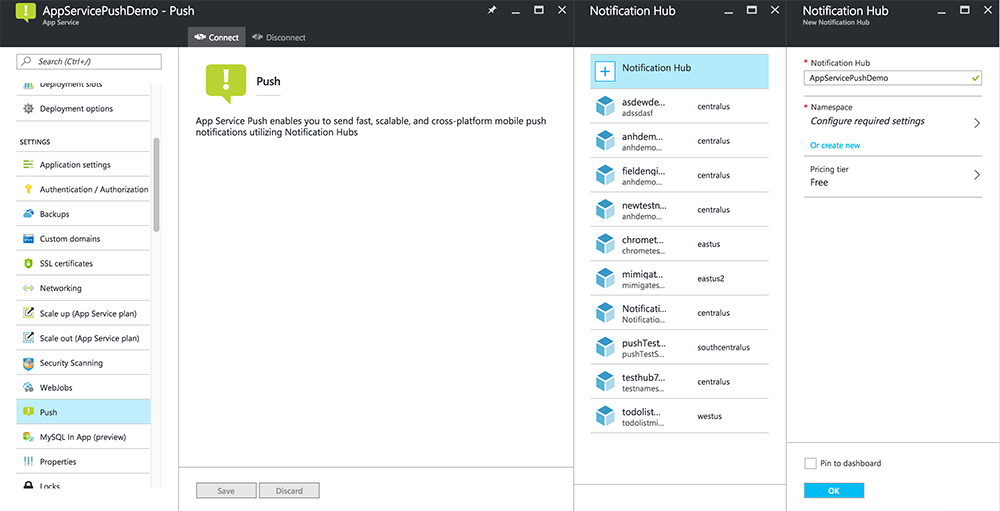
이제 알림 허브를 Mobile Apps 백 엔드 프로젝트에 연결했습니다. 나중에 디바이스에 푸시하는 PNS(플랫폼 알림 시스템)에 연결하도록 이 알림 허브를 구성합니다.
푸시 알림을 전송하도록 Azure 구성
Azure Portal에서 모두 찾아보기>App Services > Mobile Apps 백 엔드를 클릭합니다. 설정 아래에서 App Service 푸시를 클릭한 후 알림 허브 이름을 클릭합니다.
Google(GCM)로 이동하고, 이전 절차에서 Firebase로부터 얻은 Server Key 값을 입력한 다음 저장을 클릭합니다.
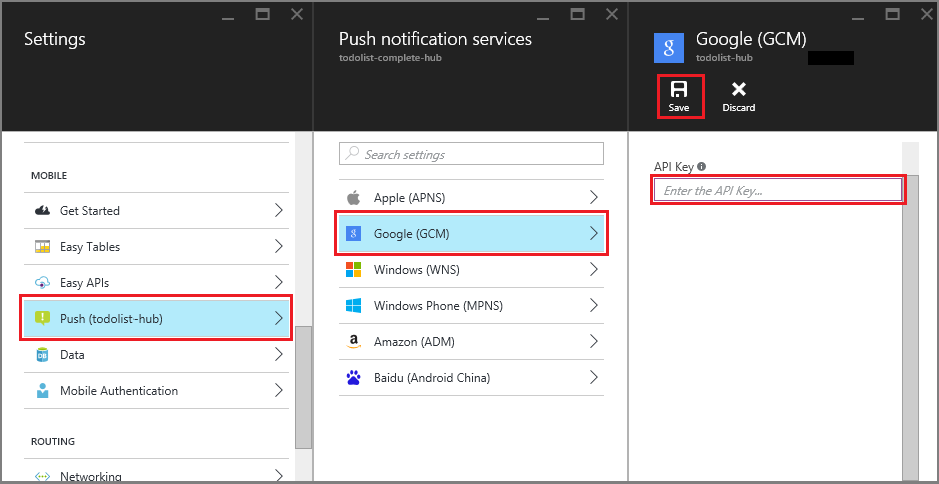
이제 Mobile Apps 백 엔드가 Firebase Cloud Messaging을 사용하도록 구성됩니다. 알림 허브를 사용하여 Android 디바이스에서 실행 중인 앱에 푸시 알림을 보낼 수 있습니다.
서버 프로젝트에 푸시 알림 사용
백 엔드 프로젝트 유형( .NET 백 엔드 또는 Node.js 백 엔드)을 일치시키는 절차를 사용합니다.
.NET 백 엔드 프로젝트
Visual Studio에서 서버 프로젝트를 마우스 오른쪽 단추로 클릭하고 NuGet 패키지 관리를 클릭합니다.
Microsoft.Azure.NotificationHubs를 검색한 다음 설치를 클릭합니다. Notification Hubs 클라이언트 라이브러리를 설치합니다.컨트롤러 폴더에서 TodoItemController.cs를 열고 다음
using문을 추가합니다.using Microsoft.Azure.Mobile.Server.Config; using Microsoft.Azure.NotificationHubs;PostTodoItem메서드를 다음 코드로 바꿉니다.public async Task<IHttpActionResult> PostTodoItem(TodoItem item) { TodoItem current = await InsertAsync(item); // Get the settings for the server project. HttpConfiguration config = this.Configuration; MobileAppSettingsDictionary settings = this.Configuration.GetMobileAppSettingsProvider().GetMobileAppSettings(); // Get the Notification Hubs credentials for the Mobile App. string notificationHubName = settings.NotificationHubName; string notificationHubConnection = settings .Connections[MobileAppSettingsKeys.NotificationHubConnectionString].ConnectionString; // Create a new Notification Hub client. NotificationHubClient hub = NotificationHubClient .CreateClientFromConnectionString(notificationHubConnection, notificationHubName); // Android payload var androidNotificationPayload = "{ \"data\" : {\"message\":\"" + item.Text + "\"}}"; try { // Send the push notification and log the results. var result = await hub.SendGcmNativeNotificationAsync(androidNotificationPayload); // Write the success result to the logs. config.Services.GetTraceWriter().Info(result.State.ToString()); } catch (System.Exception ex) { // Write the failure result to the logs. config.Services.GetTraceWriter() .Error(ex.Message, null, "Push.SendAsync Error"); } return CreatedAtRoute("Tables", new { id = current.Id }, current); }서버 프로젝트를 다시 게시합니다.
백 엔드 프로젝트 Node.js
백 엔드 프로젝트를 설정합니다.
todoitem.js 파일의 기존 코드를 다음으로 바꿉니다.
var azureMobileApps = require('azure-mobile-apps'),
promises = require('azure-mobile-apps/src/utilities/promises'),
logger = require('azure-mobile-apps/src/logger');

var table = azureMobileApps.table();

table.insert(function (context) {
// For more information about the Notification Hubs JavaScript SDK,
// see https://aka.ms/nodejshubs
logger.info('Running TodoItem.insert');

// Define the GCM payload.
var payload = {
    "data": {
        "message": context.item.text
    }
};

// Execute the insert.  The insert returns the results as a Promise,
// Do the push as a post-execute action within the promise flow.
return context.execute()
    .then(function (results) {
        // Only do the push if configured
        if (context.push) {
            // Send a GCM native notification.
            context.push.gcm.send(null, payload, function (error) {
                if (error) {
                    logger.error('Error while sending push notification: ', error);
                } else {
                    logger.info('Push notification sent successfully!');
                }
            });
        }
        // Don't forget to return the results from the context.execute()
        return results;
    })
    .catch(function (error) {
        logger.error('Error while running context.execute: ', error);
    });
});

module.exports = table;
이는 새 todo 항목이 삽입된 경우 item.text가 포함된 GCM 알림을 보냅니다.
로컬 컴퓨터에서 파일을 편집할 때 서버 프로젝트를 다시 게시합니다.
앱에 푸시 알림 추가
이 섹션에서는 푸시 알림을 처리하도록 클라이언트 Android 앱을 업데이트합니다.
Android SDK 버전 확인
지속적인 개발로 인해 Android Studio에 설치된 Android SDK가 코드의 버전과 일치하지 않을 수도 있습니다. 이 자습서에서 언급한 Android SDK 버전은 이 문서 작성 시 최신 버전인 26입니다. 버전 번호는 SDK의 새 릴리스가 공개되면 높아질 수 있으며, 사용 가능한 최신 버전을 사용하는 것이 좋습니다.
버전 불일치의 두 가지 증상은 다음과 같습니다.
- 프로젝트를 빌드하거나 다시 빌드할 때
Gradle sync failed: Failed to find target with hash string 'android-XX'와 같은 Gradle 오류 메시지가 나타날 수 있습니다. -
import문을 기반으로 확인되는 코드의 표준 Android 개체에서 오류 메시지를 생성할 수 있습니다.
위와 같은 증상 중 하나가 나타나는 경우 Android Studio에 설치된 Android SDK의 버전이 다운로드한 프로젝트의 SDK 대상과 일치하지 않을 수 있습니다. 버전을 확인하려면 다음을 변경하십시오.
Android Studio에서 도구>Android>SDK Manager를 클릭합니다. 최신 버전의 SDK 플랫폼을 설치하지 않은 경우 클릭하여 설치합니다. 버전 번호를 기록해 둡니다.
프로젝트 탐색기 탭의 Gradle 스크립트에서 build.gradle (Module: app) 파일을 엽니다. compileSdkVersion 및 targetSdkVersion이 설치된 최신 SDK 버전으로 설정되어 있는지 확인합니다.
build.gradle이 다음과 같이 표시될 수 있습니다.android { compileSdkVersion 26 defaultConfig { targetSdkVersion 26 } }
다음 단계에서는 Google Play Services를 설치합니다. Firebase Cloud Messaging에는 매니페스트의 minSdkVersion 속성이 준수해야 하는 개발 및 테스트의 최소 API 수준 요구 사항이 있습니다.
오래된 디바이스로 테스트하는 경우 Android 프로젝트에 Firebase 추가에서 이 값의 허용되는 최소값과 제대로 설정하는 방법을 참조하세요.
프로젝트에 Firebase Cloud Messaging 추가
Android Studio에서 파일>프로젝트 구조를 선택합니다. 알림을 선택하고 Firebase Cloud Messaging을 선택한 다음 확인을 클릭합니다.
코드 추가
앱 프로젝트에서
AndroidManifest.xml파일을 엽니다. 다음 코드를application시작 태그 뒤에 추가합니다.<service android:name=".ToDoMessagingService"> <intent-filter> <action android:name="com.google.firebase.MESSAGING_EVENT"/> </intent-filter> </service> <service android:name=".ToDoInstanceIdService"> <intent-filter> <action android:name="com.google.firebase.INSTANCE_ID_EVENT"/> </intent-filter> </service>ToDoActivity.java파일을 열어 다음과 같이 변경합니다.Import 문 추가:
import com.google.firebase.iid.FirebaseInstanceId;MobileServiceClient정의를 private에서 private static으로 변경하면 이제 다음과 같이 표시됩니다.private static MobileServiceClient mClient;registerPush메서드 추가:public static void registerPush() { final String token = FirebaseInstanceId.getInstance().getToken(); if (token != null) { new AsyncTask<Void, Void, Void>() { protected Void doInBackground(Void... params) { mClient.getPush().register(token); return null; } }.execute(); } }ToDoActivity클래스의 onCreate 메서드를 업데이트합니다.MobileServiceClient가 인스턴스화된 후에 이 코드를 추가해야 합니다.registerPush();
알림을 처리하는 새 클래스를 추가합니다. 프로젝트 탐색기에서 앱>java>your-project-namespace 노드를 열고 패키지 이름 노드를 마우스 오른쪽 단추로 클릭합니다. 새로 만들기를 클릭한 후 Java Class를 클릭합니다. 이름에
ToDoMessagingService를 입력하고 [확인]을 클릭합니다. 그런 다음 클래스 선언을 다음으로 바꿉니다.import android.app.Notification; import android.app.NotificationManager; import android.app.PendingIntent; import android.content.Context; import android.content.Intent; import com.google.firebase.messaging.FirebaseMessagingService; import com.google.firebase.messaging.RemoteMessage; public class ToDoMessagingService extends FirebaseMessagingService { private static final int NOTIFICATION_ID = 1; @Override public void onMessageReceived(RemoteMessage remoteMessage) { String message = remoteMessage.getData().get("message"); if (message != null) { sendNotification("Notification Hub Demo", message); } } private void sendNotification(String title, String messageBody) { PendingIntent contentIntent = PendingIntent.getActivity(this, 0, new Intent(this, ToDoActivity.class), 0); Notification.Builder notificationBuilder = new Notification.Builder(this) .setSmallIcon(R.drawable.ic_launcher) .setContentTitle(title) .setContentText(messageBody) .setContentIntent(contentIntent); NotificationManager notificationManager = (NotificationManager) getSystemService(Context.NOTIFICATION_SERVICE); if (notificationManager != null) { notificationManager.notify(NOTIFICATION_ID, notificationBuilder.build()); } } }토큰 업데이트를 처리할 다른 클래스를 추가합니다.
ToDoInstanceIdServicejava 클래스를 만들고 클래스 선언을 다음으로 바꿉니다.import com.google.firebase.iid.FirebaseInstanceIdService; public class ToDoInstanceIdService extends FirebaseInstanceIdService { @Override public void onTokenRefresh() { ToDoActivity.registerPush(); } }
이제 푸시 알림을 지원하도록 앱이 업데이트됩니다.
게시된 모바일 서비스에 대해 앱 테스트
USB 케이블로 Android 휴대폰을 직접 연결하거나 에뮬레이터에서 가상 디바이스를 사용하여 앱을 테스트할 수 있습니다.
다음 단계
이 자습서를 완료했으므로 다음 자습서 중 하나를 계속하는 것을 고려해보세요.
- Android 앱에 인증을 추가합니다. 지원되는 ID 공급자를 사용하여 Android의 할 일 모음 빠른 시작 프로젝트에 인증을 추가하는 방법을 알아봅니다.
- Android 앱에 대해 오프라인 동기화를 사용합니다. Mobile Apps 백 엔드를 사용하여 앱에 오프라인 지원을 추가하는 방법을 알아봅니다. 오프라인 동기화를 사용하면 네트워크 연결이 없는 경우에도 사용자가 모바일 앱(데이터 보기, 추가 또는 수정)과 상호 작용할 수 있습니다.