Microsoft Defender for Office 365 permissions in the Microsoft Defender portal
Tip
Did you know you can try the features in Microsoft Defender for Office 365 Plan 2 for free? Use the 90-day Defender for Office 365 trial at the Microsoft Defender portal trials hub. Learn about who can sign up and trial terms on Try Microsoft Defender for Office 365.
Global roles in Microsoft Entra ID allow you to manage permissions and access to capabilities in all of Microsoft 365, which also includes Microsoft Defender for Office 365. But, if you need to limit permissions and capabilities to security features in Defender for Office 365 only, you can assign Email & collaboration permissions in the Microsoft Defender portal.
To manage Defender for Office 365 permissions in the Microsoft Defender portal, go to Permissions > Email & collaboration roles > Roles or go directly to https://security.microsoft.com/emailandcollabpermissions.
You need to be member of the Global Administrator* role in Microsoft Entra ID or a member of the Organization Management role group in Defender for Office 365 permissions. Specifically, the Role Management role in Defender for Office 365 allows users to view, create, and modify Defender for Office 365 role groups. By default, that role is assigned only to the Organization Management role group (and by extension, global administrators).
- Some Defender for Office 365 features require additional permissions in Exchange Online. For more information, see Permissions in Exchange Online.
- Microsoft Defender XDR has its own Unified role-based access control (RBAC). This model provides a single permissions management experience in one central location where admins can control permissions across different security solutions. These permissions are different from the permissions described in this article. For more information, see Microsoft Defender XDR role-based access control (RBAC).
- If you activate Defender XDR RBAC for Email & collaboration, the permissions page at https://security.microsoft.com/emailandcollabpermissions is no longer available in the Defender portal.
- For information about permissions in the Microsoft Purview compliance portal, see Permissions in the Microsoft Purview compliance portal.
Important
* Microsoft recommends that you use roles with the fewest permissions. Using lower permissioned accounts helps improve security for your organization. Global Administrator is a highly privileged role that should be limited to emergency scenarios when you can't use an existing role.
Relationship of members, roles, and role groups
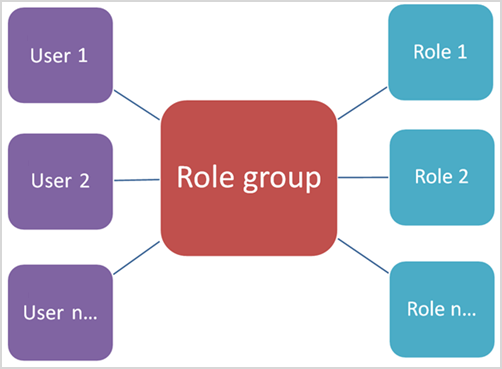
Defender for Office 365 permissions in the Microsoft Defender portal are based on the role-based access control (RBAC) permissions model. RBAC is the same permissions model that's used by most Microsoft 365 services, so if you're familiar with the permission structure in these services, granting permissions in the Microsoft Defender portal should be familiar.
A role grants the permissions to do a set of tasks.
A role group is a set of roles that lets people do their jobs in the Microsoft Defender portal.
Defender for Office 365 permissions in the Microsoft Defender portal includes default role groups for the most common tasks and functions that you need to assign. Generally, we recommend simply adding individual users as members to the default role groups.
Roles and role groups in the Microsoft Defender portal
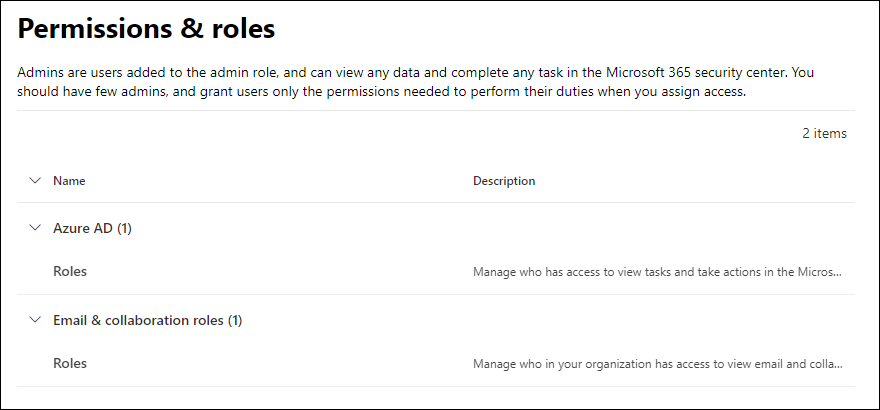
On the Permissions page in the Defender portal at https://security.microsoft.com/securitypermissions, the following types of roles and role groups are available:
Microsoft Entra roles: You can view the roles and assigned users, but you can't manage them directly in the Microsoft Defender portal. Microsoft Entra roles are central roles that assign permissions for all Microsoft 365 services.
Email & collaboration roles: You can view and manage these role groups directly in the Microsoft Defender portal. These permissions are specific to the Microsoft Defender portal and the Microsoft Purview compliance portal. These permissions don't cover all of the permissions that you need in other Microsoft 365 workloads.
Microsoft Entra roles in the Microsoft Defender portal
Microsoft Entra roles that are described in this section are available in the Defender portal > Permissions > Microsoft Entra ID > Roles or directly at https://security.microsoft.com/aadpermissions.
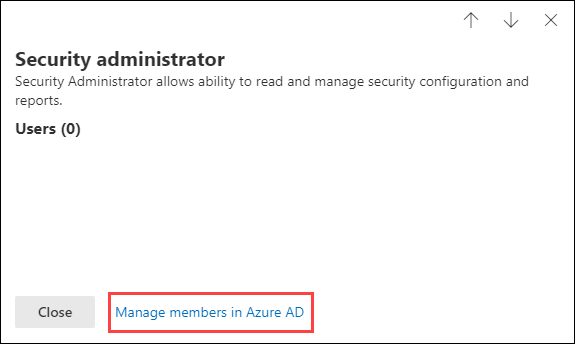
When you select a role, a details flyout opens that contains the description of the role and the user assignments. But to manage those assignments, you need to select Manage members in Microsoft Entra ID at the bottom of the flyout.
For more information, see Assign Microsoft Entra roles to users and Manage access to Microsoft Defender XDR with Microsoft Entra global roles.
| Role | Description |
|---|---|
| Global Administrator | Access to all administrative features in all Microsoft 365 services. Only global administrators can assign other administrator roles. For more information, see Global Administrator / Company Administrator. |
| Compliance Data Administrator | Keep track of your organization's data across Microsoft 365, make sure it's protected, and get insights into any issues to help mitigate risks. For more information, see Compliance Data Administrator. |
| Compliance Administrator | Help your organization stay compliant with any regulatory requirements, manage eDiscovery cases, and maintain data governance policies across Microsoft 365 locations, identities, and apps. For more information, see Compliance Administrator. |
| Security Operator | View, investigate, and respond to active threats to your Microsoft 365 users, devices, and content. For more information, see Security Operator. |
| Security Reader | View and investigate active threats to your Microsoft 365 users, devices, and content, but (unlike the Security operator) they don't have permissions to respond by taking action. For more information, see Security Reader. |
| Security Administrator | Control your organization's overall security by managing security policies, reviewing security analytics and reports across Microsoft 365 products, and staying up-to-speed on the threat landscape. For more information, see Security Administrator. |
| Global Reader | The read-only version of the Global administrator role. View all settings and administrative information across Microsoft 365. For more information, see Global Reader. |
| Attack Simulation Administrator | Create and manage all aspects of attack simulation creation, launch/scheduling of a simulation, and the review of simulation results. For more information, see Attack Simulation Administrator. |
| Attack Payload Author | Create attack payloads but not actually launch or schedule them. For more information, see Attack Payload Author. |
Email & collaboration roles in the Microsoft Defender portal
The same role groups and roles are available in the Defender portal and in the Purview compliance portal:
- Defender portal: Permissions > Email & collaboration roles > Roles or directly at https://security.microsoft.com/emailandcollabpermissions
- Purview compliance portal: Roles & Scopes > Permissions > Microsoft Purview solutions > Roles or directly at https://compliance.microsoft.com/compliancecenterpermissions
For complete information about these role groups, see Roles and role groups in the Microsoft Defender XDR and Microsoft Purview compliance portals
Note
Defender for Office 365 data that's available in the Microsoft Defender portal isn't affected by adaptive scopes that are configured in the Microsoft Purview compliance portal. For more information about adaptive scopes, see Adaptive scopes.
The following actions are available for Email & collaboration role groups in the Defender portal:
- Create role groups
- Copy role groups
- Modify role group membership
- Modify role assignments (custom role groups only)
- Remove role groups (custom role groups only)
Create Email & collaboration role groups in the Microsoft Defender portal
In the Microsoft Defender portal at https://security.microsoft.com, go to Permissions > Email & collaboration roles > Roles. Or, to go directly to the Permissions page, use https://security.microsoft.com/emailandcollabpermissions.
On the Permissions page, select
 Create to start the new role group wizard.
On the Name your role group page, enter the following information:
- Name: Enter a unique name for the role group.
- Description: Enter an optional description for the role group.
When you're finished on the Name your role group page, select Next.
On the Choose roles page, select Choose roles.
In the Chose roles flyout that opens, select Add at the top of the flyout.
In the new Choose roles flyout that opens, select one or more roles. Select the Name column header to sort the list by name, or use the
 Search box to find the role.
After you've selected one or more roles to add, select Add at the bottom of the flyout.
Back on the original Choose roles flyout, the roles you added are listed on the page. To add more roles, repeat the previous step. Roles that you already selected are grayed out.
To remove roles, select Remove. In the new Choose roles flyout that opens, select one or more roles, and then select Remove.
When you're finished on the original Choose roles flyout, select Done.
Back on the Choose roles page, the roles are shown in the Selected roles section.
When you're finished on the Choose roles page, select Next.
On the Choose members page, select Choose members.
In the Choose members flyout that opens, select Add at the top of the flyout.
In the new Choose members flyout that opens, select one or more users. Select a column header to sort the list by Name or Email address, or use the
 Search box to find the user.
After you've selected one or more users to add, select Add at the bottom of the flyout.
Back on the original Choose members flyout, the members you added are listed on the page. To add more members, repeat the previous step. Members that you already selected are grayed out.
To remove members, select Remove. In the new Choose members flyout that opens, select one or more members, and then select Remove.
When you're finished on the original Choose roles flyout, select Done.
Back on the Choose members page, the members are shown in the Selected members section.
When you're finished on the Choose members page, select Next.
On the Review your settings page, review your settings. You can select Edit in each section to modify the settings within the section. Or you can select Back or the specific page in the wizard.
When you're finished on the Review your settings page, select Create role group.
Back on the Permissions page, the new role group is listed.
Copy Email & collaboration role groups in the Microsoft Defender portal
In the Microsoft Defender portal at https://security.microsoft.com, go to Permissions > Email & collaboration roles > Roles. Or, to go directly to the Permissions page, use https://security.microsoft.com/emailandcollabpermissions.
On the Permissions page, select the role group from the list. Use the Name column header to sort the list by name, or the
 Search box to find the role group.
In the role group details flyout that opens, select Copy role group at the top of the flyout.
The new role group wizard opens as previously described for creating a new role group.
The default name of the new role group is Copy of <original role group name>, but you can change it.
The roles and members are populated with the values from the role you're copying, but you can change them.
Modify Email & collaboration role group membership in the Microsoft Defender portal
In the Microsoft Defender portal at https://security.microsoft.com, go to Permissions > Email & collaboration roles > Roles. Or, to go directly to the Permissions page, use https://security.microsoft.com/emailandcollabpermissions.
On the Permissions page, select the role group from the list. Use the Name column header to sort the list by name, or the
 Search box to find the role group.
In the role group details flyout that opens, do one of the following steps:
- Select
 Edit role group at the top of the flyout. In the edit role group wizard that opens, select the Choose members tab.
 - In the Members section of the flyout, select Edit.
- Select
On the Choose members tab of the edit role group wizard that opens, do one of the following steps:
- If there are no role group members, select Choose members.
- If there are existing role group members, select Edit
In the Choose members flyout that opens, do one of the following steps:
Add members: Select Add at the top of the flyout. In the new Choose members flyout that opens, select one or more users. Select a column header to sort the list by Name or Email address, or use the
 Search box to find the user.
After you've selected one or more users to add, select Add at the bottom of the flyout.
Back in the original Choose members flyout, the added users are shown in the Members section.
Remove members: Select Remove at the top of the flyout. In the new Choose members flyout that opens, select one or more users. Select a column header to sort the list by Name or Email address, or use the
 Search box to find the user.
After you've selected one or more users to remove, select Remove.
Back on the original Choose members flyout, the removed users are no longer shown in the Members section.
When you're finished in the original Choose members flyout, select Done.
Back on the Choose members tab of the wizard, select Save.
Back on the role group details flyout, select Done.
Modify Email & collaboration role group role assignments in the Microsoft Defender portal
Note
You can modify the role assignments for custom role groups only. You can't modify the role assignments for built-in role groups.
In the Microsoft Defender portal at https://security.microsoft.com, go to Permissions > Email & collaboration roles > Roles. Or, to go directly to the Permissions page, use https://security.microsoft.com/emailandcollabpermissions.
On the Permissions page, select the role group from the list. Select the Name column header to sort the list by name, or use the
 Search box to find the role group.
In the role group details flyout that opens, do one of the following steps:
- Select
 Edit role group at the top of the flyout. In the edit role group wizard that opens, select the Choose roles tab.
 - In the Assigned roles section of the flyout, select Edit.
- Select
On the Choose roles tab of the edit role group wizard that opens, do one of the following steps:
- If there are no assigned roles, select Choose roles.
- If there are existing roles assigned, select Edit
In the Choose roles flyout that opens, do one of the following steps:
Add roles: Select Add at the top of the flyout. In the new Choose roles flyout that opens, select one or more roles. Roles that are already assigned are grayed out. Select the Name column header to sort the list by name, or use the
 Search box to find the role.
After you've selected one or more roles to add, select Add at the bottom of the flyout.
Back in the original Choose roles flyout, the added roles are shown in the Roles section.
Remove roles: Select Remove at the top of the flyout. In the new Choose roles flyout that opens, select one or more roles. Select a column header to sort the list by Name, or use the
 Search box to find the role.
After you've selected one or more roles to remove, select Remove.
Back on the original Choose roles flyout, the removed roles are no longer shown in the Roles section.
When you're finished in the original Choose roles flyout, select Done.
Back on the Choose roles tab of the wizard, select Save.
Back on the role group details flyout, select Done.
Remove Email & collaboration role groups in the Microsoft Defender portal
Note
You can remove custom role groups only. You can't remove built-in role groups.
In the Microsoft Defender portal at https://security.microsoft.com, go to Permissions > Email & collaboration roles > Roles. Or, to go directly to the Permissions page, use https://security.microsoft.com/emailandcollabpermissions.
On the Permissions page, select the role group from the list. Select the Name column header to sort the list by name, or use the
 Search box to find the role group.
In the role group details flyout that opens, select Delete role group at the top of the flyout.
Select Yes in the warning dialog that opens.
Back on the Permissions page, the role group is no longer listed.


