Merk
Tilgang til denne siden krever autorisasjon. Du kan prøve å logge på eller endre kataloger.
Tilgang til denne siden krever autorisasjon. Du kan prøve å endre kataloger.
Unlike automated flows that run automatically when an event occurs, instant flows are run on-demand by users from inside Business Central or Power Automate.
Note
To use Power Automate with Business Central, you must have a valid account.
About instant flows
There are two approaches to creating instant flows, as described in this section:
- Instant flows that use the "For a selected record" trigger
- Instant flows that use other manual triggers
Instant flows that use the "For a selected record" trigger
You create these flows by using the "For a selected record (V3)" trigger of the Business Central connector. They're designed to run on records in a page, although they don't have to. For users, these flows are available from the Automate action group on most list, card, and document pages. They allow users to run the flow in the context of a specific Business Central record—without leaving the page. This approach is recommended for flows related to Business Central data.

You can choose to make the flow available in the Automate action group for all environments, companies, and pages or only a specific environment, company, or pages.
When run, the trigger returns information about the selected record. The connection between Business Central and Power Automate allows instant flows to:
- Pass context or parameters to Power Automate
- Environment name, such as PRODUCTION
- Company, such as Contoso
- Table ID, such as the table underlying the current page
- System ID, such as a specific record ID
- Page ID, meaning the page that the flow was triggered from
- WebClientURL to open a specific page object
- Specify the type of input to add from the options given by the flow.
To learn more about this trigger, see Manual trigger "For a selected record (V3)".
Instead of creating instant flows from scratch, you can also choose from several templates that are available for specific scenarios.
As an AL developer, you can also add or promote instant flows to other places in the action bar by using the customaction keyword in AL. Learn more at Run Power Automate flows from page actions.
Note
These instant flows can't be run manually from Power Automate because they rely on a selected record in Business Central.
Instant flows that use other manual triggers
You create these flows by using an instant trigger from a connector other than the Business Central connection. These flows can use actions of the Business Central connector, but you don't have access to Business Central data like the System ID and Page ID, because these parameters are only available via the For a selected record (V3) trigger. These flows aren't included in the Automate group on the action bar, but they can be run from Power Automate.
Use multiple Power Automate environments
You store the flows you create in one of your Power Automate environments. Learn more at Using environments within Power Automate.
You can create different flows in different environments. For example, you might want to build and test a flow in a sandbox environment before using it in your production environment. In Business Central, you specify the environment from which want to get flows from.
It's easy to switch between environments in Business Central. On the Assisted Setup page, run the Power Automate Environment assisted setup guide. The guide finds your environments for you, and you pick the one you want to use.
After you choose an environment, Business Central updates right away. The flows in that environment are available in the Automate group on the action bar.

Tip
If you sign up for the Power Apps Developer plan, you can try out the full range of features in Power Automate for free. The plan includes the ability to create environments. Learn more about the plan at Create a developer environment.
Prerequisites
Power Automate premium license or a license that includes premium connectors.
For more information, see Power Automate licenses.
To create or run instant flows from inside Business Central, Power Automate integration must be enabled.
For more information, see Set Up Power Automate Integration.
Create a flow that uses "For a selected record (V3)" trigger
You can build your own flow that uses the "For a selected record (V3)" trigger or start from a template provided by Business Central.
Create from scratch
This procedure outlines the steps required to create an instant flow from scratch that uses the For a selected record (V3) trigger of the Business Central connector. When completed, the flow appears in the Automate group in the action bar. To illustrate the process, the steps create a basic flow example for sending an email reminder about a sales invoice. When done, the flow will be available from all pages that use table 26 Sales Header, which includes, for example, the Sales Invoices list and Sales Invoice card.
The flow in Power Automate will look like the following figure:
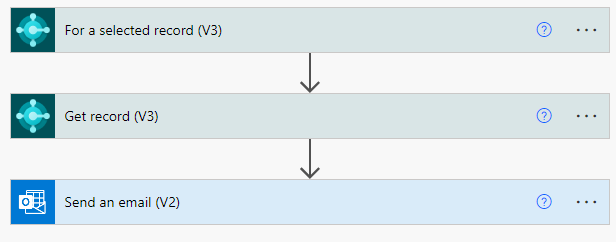
Complete the following steps:
Add a new flow from Business Central or Power Automate by completing the following steps.
Tip
The advantage of creating from Business Central is that the "For a selected record (V3)" trigger is automatically added to the flow for you.
- Sign in to Business Central.
- Open the list, card, or document page.
- In the action bar, select Automate > Power Automate > Create action based on a flow > Create from blank.
You're automatically signed in to Power Automate.
The Business Central connector shows the For a selected record (V3) trigger.
] in Power Automate.](../developer/media/power-automate-for-selected-record-trigger.png)
Set the filter fields on the connector to limit the flow to a specific environment, company, and tables or pages. If you fill in any of the filter fields, the flow will only be shown on environments/companies/pages that match the filter and have the Automate action. If you leave all fields, the flow will be shown on all pages that have the Automate action.
Field Description Environment name The name of the Business Central environment where this flow can be run. The Business Central connector for Power Automate supports multiple production and sandbox environments. If you haven't created multiple production or sandbox environments, Production is the only available option you can choose. Company name The name of the Business Central company where this flow can be run. Page or table The Business Central page or table that this flow will run on. Specify a table using the format tableID, like table18 for the Customer table. Specify a page using the format pageID, like page21. You can specify more than one table or page, just separate each entry with a comma, for example, page21,page22. This field determines which page the flow will appear on under the Automate action. If you specify a table, then the flow will appear on all pages the use the table as its source. For example, page 21 and 22 use table 18, so you could specify only table18 to show the flow on both page.
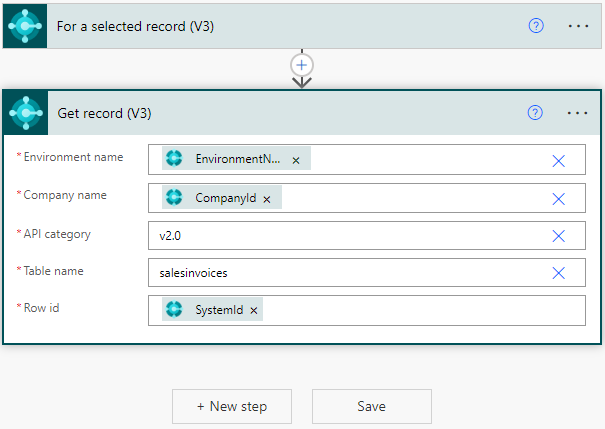
For this example, set Page or table to table36, so the flow can only be run on pages that use the Sales Header table as the source. If you're in doubt about which ID a specific page or table is using, you can use the inspect pages and data feature in the Business Central web client.Select the + New step to add actions and other triggers to design the flow. A flow must contain at least one action. For this example, will add the Get record (V3) for Business Central to get information about the record.
- In the Choose an operation step, select Actions.
- Search for and select the Get record (V3) action for Business Central.
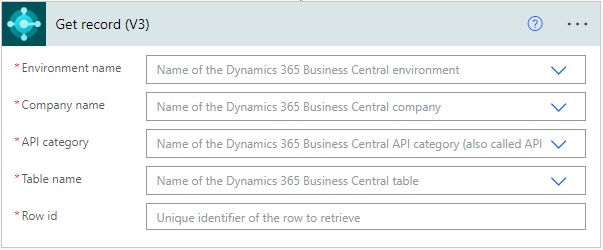
On the Get record (V3), fill in the information you want from the record. For this example, you use static value and dynamic content.
- For example, select the Environment name field, then select Add custom value > Add dynamics content.
- In the Dynamic content pane, select EnvironmentName. For Company name, do the same but select CompanyId. For Row ID, select SystemId.
- Set API category to v2.0.
- Set Table name to salesinvoices.
The Get record (V3) will look similar to the following figure:
Add an action to send an email.
Select + New step.
In the Choose an operation step, select Office 365 Outlook.
In the Office 365 Outlook step, select Send email (v2) action.
In the Send email (v2) action, add the email address of a recipient, subject, and body.
In the body, for example, add some text and then the dynamic content WebClientUrl to include a link to the invoice in Business Central.
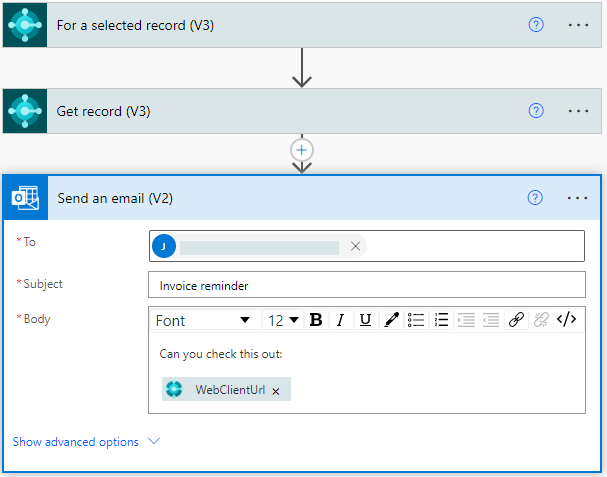
Select Save.
Create from template
Like with automated flows, Microsoft also provides instant flow templates that you can use to build your own templates. The templates provide a fast way to create flows, because the trigger and some actions are automatically created and configured for you. Templates are also a good way to learn how to build your own flows.
There are several templates that cover most of the entities in Business Central, like customers, items, sales orders, and so on. Each template is typically specific to the records in the page's source table. So, for example, if you create a flow based on the template named Block the selected customer in Dynamics 365 Business Central, the flow will appear on customer-related pages, like Customers list and Customer card.
To create an instant flow from a template, complete the following steps:
Add a new flow from Business Central or Power Automate:
In this way, you work only in Business Central, but you have the option during the setup to open the flow in Power Automate.
Sign in to Business Central.
Open the list, card, or document page.
In the action bar, select Automate > Power Automate > Create action based on a flow.
The Create a flow page opens and lists all the available Business Central templates related to the page. Select the template you want.
Tip
When you select a template, an introductory page explaining the template appears, letting you continue or go back.
By default, the Create a flow page is filtered to list only those templates that create flows that will appear in the Automate action group. If you want a template that's not shown or want to find out what other templates are available, select Filtered templates > All templates to clear the filter or use the Search templates... box. If you clear the filter, the Create a flow page will list all Power Automate templates regardless of whether they connect to Business Central. So, remember that only flows that use the "For a selected record (V3)" trigger will be available from the Automate action group in Business Central.
If you're presented with any fields that need input, fill them in.
Tip
You can always select the Edit in advanced mode link to exit the template and continue creating the flow in the full experience in Power Automate. If you're working in Business Central, you'll be signed in to Power Automate.
Any changes you've made up until this point will be saved. Switching to the advanced mode lets you make changes to the flow, for example, by adding or changing steps. There are typically a few parameters that you'll need to fill in before saving the flow as one of your own.
Select Create when done.
Create a flow using other manual triggers
Creating an instant flow for general use is similar to how you create a flow for a selected record. The difference is that you have to choose manual trigger.
Note
These flows won't show in the Automate group on the action bar in Business Central; even if the flow uses Business Central actions. Only flows that use the "For a selected record (V3)" trigger appear in the Automate group.
- Sign in to Power Automate.
- Select Create from the left side.
- Select Instant cloud flow.
- Give your flow a name in the Flow name field.
- Under Choose how to trigger this flow, select Manually trigger a flow.
- Select Create.
- Select the + New step to add actions and other triggers for the flow.
- To add Business Central actions and triggers, search for the Dynamics 365 Business Central connector, then select the action or trigger you want to use.
Troubleshoot instant flows
The following table includes the most common problems that prevent instant flows from running or appearing in the Automation group for you or another user. If you get a message like Workflow add, but not yet enabled when creating an instant flow from Business Central, this information can help you fix the problem.
Tip
There can also be other reasons why the flow isn't showing. One way to help determine why is to open the flow details page in Power Automate. Power Automate will sometimes indicate the reason the flow isn't working. Use the Flow checker action to help identify problems. To learn more about flow checker, go to Find and fix errors with Flow Checker.
| Cause | Fix | Reason |
|---|---|---|
| You don't have a premium Power Automate license | Get a premium license. For more information, see Buy Power Automate licenses. | The owner of the flow must have Power Automate premium license. |
| The flow doesn't use the "For a selected record (V3)" trigger | Change the flow to use the "For a selected record (V3)" trigger | Only flows that use the "For a selected record" trigger appear in the Automate action group. |
| The "For a selected record (V3)" trigger parameter settings for environment, company, page, or tables don't match what user is currently on. | Check that the parameter settings in the "For a selected record" trigger match the environment, company, page, or table that the user has open. | A mismatch in parameters is preventing the flow from being displayed. |
| The flow is turned off in Power Automate | Open the flow Power Automate and verify the flow is turned on. For more information, see Turn flows on or off. If the flow can't be turned on because of an error, then fix the error, save the flow, and ensure that the flow is turned on. | Business Central doesn't show flows that are turned off in Power Automate. |
| The user isn't the owner of the flow. | Share ownership of the flow with the user. For more information, see Share a cloud flow. | Business Central only supports displaying flows owned by the current user; flows shared as "Run-only" can't be displayed. |
| The flow isn't in the Power Platform environment that Business Central is connected to |
|
Business Central connects to a specific Power Platform environment. |
| The flow that was shared with you but with read-only permissions | Ask the owner of the flow to add you as an owner of the flow. For more information, see Share a flow in Power Automate. | Flows shared to users as read-only don't appear in the Automate action group for the users. |
| Using service-to-service (S2S) authentication | S2S authentication isn't currently supported by the Business Central connector. This limitation also applies to Power Automate, Azure Logic Apps, and Power Apps. Partners interested in such scenarios must rely on the OData connector for now. |
Next steps
- Run the flow from Business Central. For more information, see Run Instant Flows.
- Promote the flow action to more prominent locations on the page. Learn more at Run Power Automate flows from page actions.
Related information
Manage Power Automate Flows
Troubleshoot Your Business Central Automated Workflows
Use Business Central in an Automated Workflow