Merk
Tilgang til denne siden krever autorisasjon. Du kan prøve å logge på eller endre kataloger.
Tilgang til denne siden krever autorisasjon. Du kan prøve å endre kataloger.
Gjelder for:✅ Fabric Data Engineering og Data Science
Lær hvordan du sender inn Spark-batchjobber ved hjelp av Livy API for Fabric Data Engineering. Livy API støtter for øyeblikket ikke Azure Service Principal (SPN).
Forutsetning
Fabric Premium eller Prøvekapasitet med et Lakehouse.
En ekstern klient som Visual Studio Code med Jupyter Notebooks, PySpark, og Microsoft Authentication Library (MSAL) for Python.
En Microsoft Entra app-token kreves for å få tilgang til Fabric Rest API. Registrer en søknad hos Microsoft identity platform.
Noen data i lakehouse, dette eksemplet bruker NYC Taxi &Limousine Commission green_tripdata_2022_08 en parkett fil lastet til lakehouse.
Livy-API-en definerer et enhetlig endepunkt for operasjoner. Erstatt plassholderne {Entra_TenantID}, {Entra_ClientID}, {Fabric_WorkspaceID} og {Fabric_LakehouseID} med de riktige verdiene når du følger eksemplene i denne artikkelen.
Konfigurer Visual Studio Code for din Livy API-batch
Velg Lakehouse Settings i din Fabric Lakehouse.

Gå til livy-endepunktinndelingen.
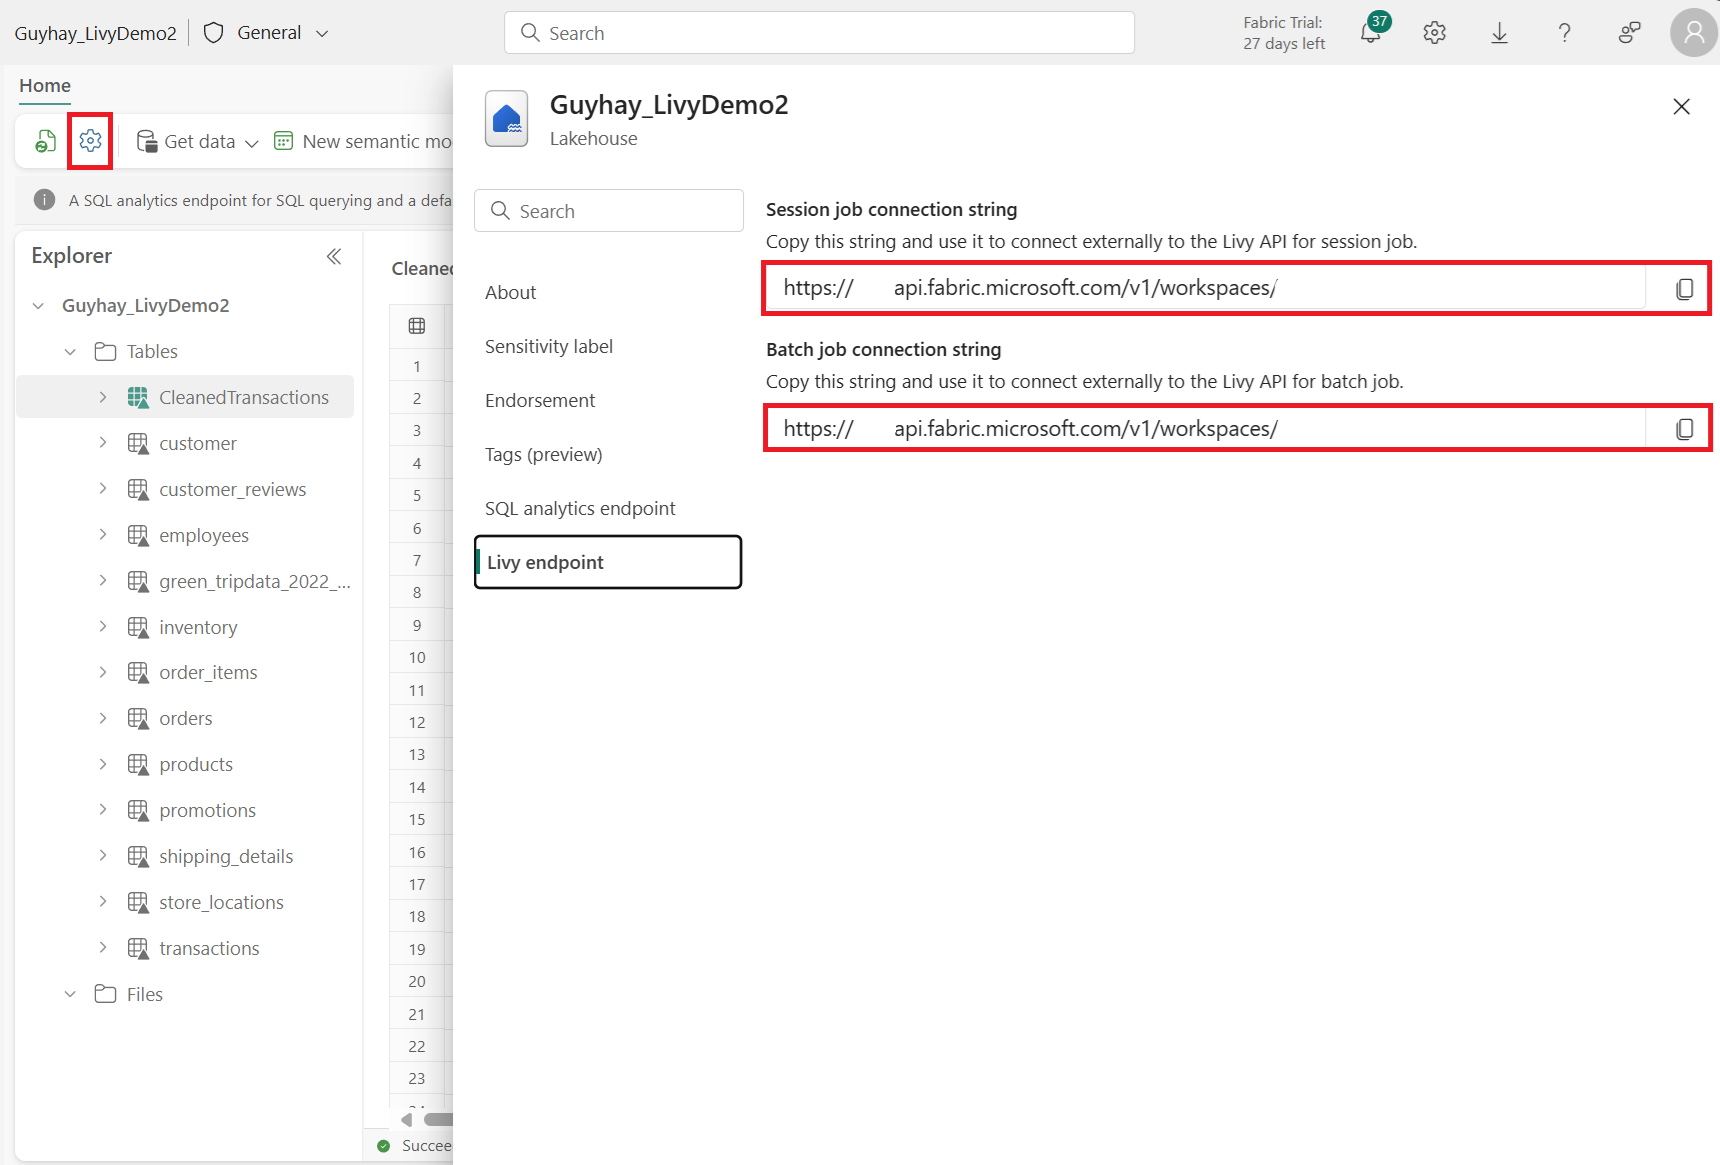
Kopier batchjobbens connection string (den andre røde boksen i bildet) til koden din.
Naviger til Microsoft Entra admin center og kopier både applikasjons-ID-en (klient-ID-en) og katalog-ID-en (leietaker-ID-en til koden din).


Opprett en Spark Batch-kode og last opp til Lakehouse
Lag en
.ipynbnotatbok i Visual Studio Code og sett inn følgende kodeimport sys import os from pyspark.sql import SparkSession from pyspark.conf import SparkConf from pyspark.sql.functions import col if __name__ == "__main__": #Spark session builder spark_session = (SparkSession .builder .appName("batch_demo") .getOrCreate()) spark_context = spark_session.sparkContext spark_context.setLogLevel("DEBUG") tableName = spark_context.getConf().get("spark.targetTable") if tableName is not None: print("tableName: " + str(tableName)) else: print("tableName is None") df_valid_totalPrice = spark_session.sql("SELECT * FROM green_tripdata_2022 where total_amount > 0") df_valid_totalPrice_plus_year = df_valid_totalPrice.withColumn("transaction_year", col("lpep_pickup_datetime").substr(1, 4)) deltaTablePath = f"Tables/{tableName}CleanedTransactions" df_valid_totalPrice_plus_year.write.mode('overwrite').format('delta').save(deltaTablePath)Lagre Python-filen lokalt. Denne Python-kodepayloaden inneholder to Spark-setninger som fungerer på data i en Lakehouse og må lastes opp til din Lakehouse. Du trenger ABFS-stien (Azure Blob File System) for payloaden å referere til i Livy API-batchjobben i Visual Studio Code og Lakehouse-tabellnavnet ditt i SQL-setningen
SELECT.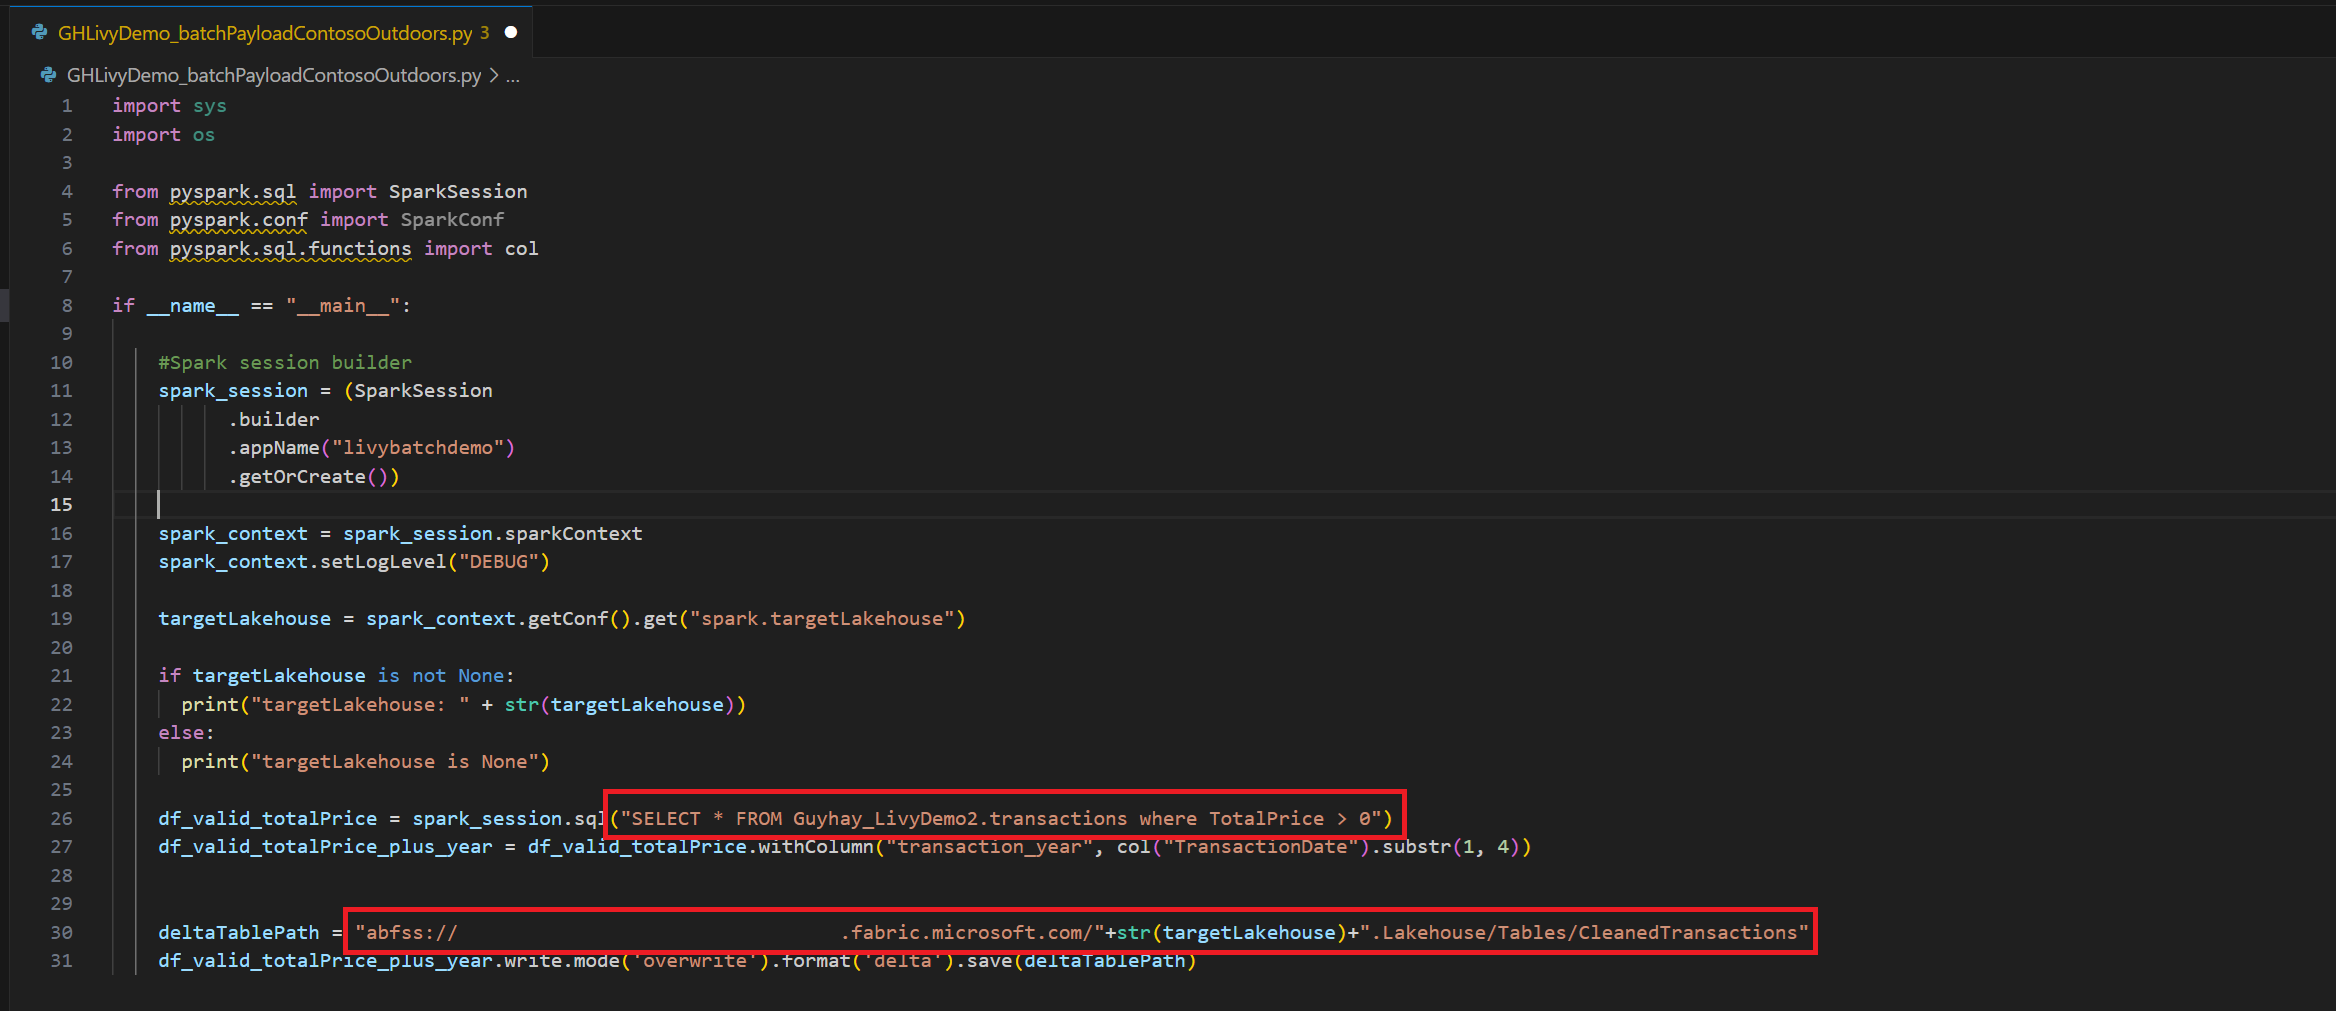
Last opp Python-nyttelasten til filseksjonen i Lakehouse-en din. I Lakehouse-utforskeren velger du Filer. Velg deretter >Hent data>Last opp filer. Velg filer via filvelgeren.

Etter at filen er i Filer-seksjonen i Lakehouse-en din, velg de tre prikkene (ellipse) til høyre for nyttelastfilnavnet ditt og velg Egenskaper.
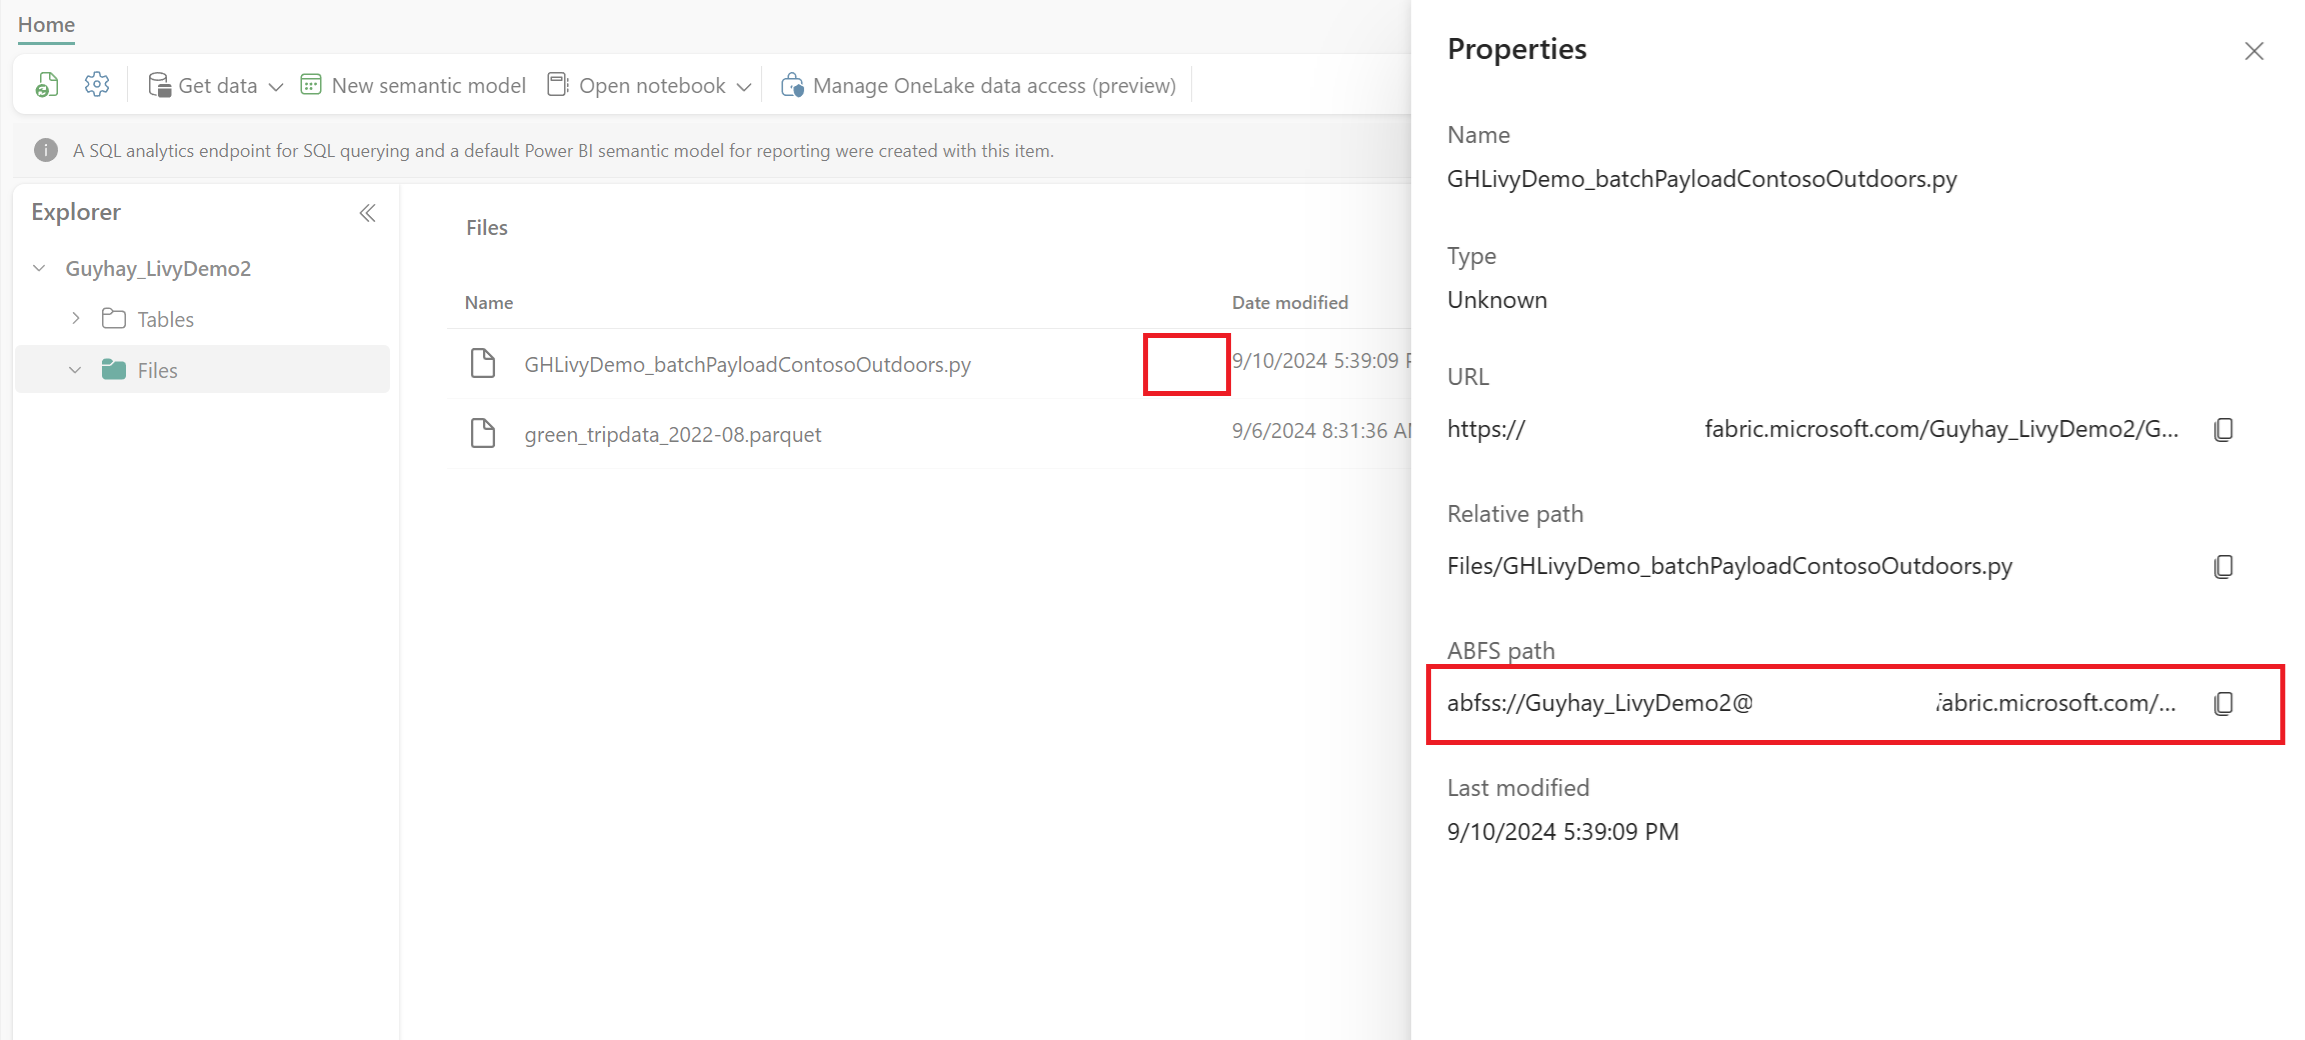
Kopier denne ABFS-banen til notatblokkcellen i trinn 1.


Autentiser en Livy API Spark batch-økt ved å bruke enten en Microsoft Entra-brukertoken eller en Microsoft Entra SPN-token
Autentiser en Livy API Spark batch-økt ved hjelp av en Microsoft Entra SPN-token
Opprett en
.ipynbnotatbok i Visual Studio Code og sett inn følgende kode.import sys from msal import ConfidentialClientApplication # Configuration - Replace with your actual values tenant_id = "Entra_TenantID" # Microsoft Entra tenant ID client_id = "Entra_ClientID" # Service Principal Application ID # Certificate paths - Update these paths to your certificate files certificate_path = "PATH_TO_YOUR_CERTIFICATE.pem" # Public certificate file private_key_path = "PATH_TO_YOUR_PRIVATE_KEY.pem" # Private key file certificate_thumbprint = "YOUR_CERTIFICATE_THUMBPRINT" # Certificate thumbprint # OAuth settings audience = "https://analysis.windows.net/powerbi/api/.default" authority = f"https://login.windows.net/{tenant_id}" def get_access_token(client_id, audience, authority, certificate_path, private_key_path, certificate_thumbprint=None): """ Get an app-only access token for a Service Principal using OAuth 2.0 client credentials flow. This function uses certificate-based authentication which is more secure than client secrets. Args: client_id (str): The Service Principal's client ID audience (str): The audience for the token (resource scope) authority (str): The OAuth authority URL certificate_path (str): Path to the certificate file (.pem format) private_key_path (str): Path to the private key file (.pem format) certificate_thumbprint (str): Certificate thumbprint (optional but recommended) Returns: str: The access token for API authentication Raises: Exception: If token acquisition fails """ try: # Read the certificate from PEM file with open(certificate_path, "r", encoding="utf-8") as f: certificate_pem = f.read() # Read the private key from PEM file with open(private_key_path, "r", encoding="utf-8") as f: private_key_pem = f.read() # Create the confidential client application app = ConfidentialClientApplication( client_id=client_id, authority=authority, client_credential={ "private_key": private_key_pem, "thumbprint": certificate_thumbprint, "certificate": certificate_pem } ) # Acquire token using client credentials flow token_response = app.acquire_token_for_client(scopes=[audience]) if "access_token" in token_response: print("Successfully acquired access token") return token_response["access_token"] else: raise Exception(f"Failed to retrieve token: {token_response.get('error_description', 'Unknown error')}") except FileNotFoundError as e: print(f"Certificate file not found: {e}") sys.exit(1) except Exception as e: print(f"Error retrieving token: {e}", file=sys.stderr) sys.exit(1) # Get the access token token = get_access_token(client_id, audience, authority, certificate_path, private_key_path, certificate_thumbprint)Kjør notebook-cellen, du skal se Microsoft Entra-tokenet returnert.


Autentiser en Livy API Spark-økt ved å bruke en Microsoft Entra-brukertoken
Opprett en
.ipynbnotatbok i Visual Studio Code og sett inn følgende kode.from msal import PublicClientApplication import requests import time # Configuration - Replace with your actual values tenant_id = "Entra_TenantID" # Microsoft Entra tenant ID client_id = "Entra_ClientID" # Application ID (can be the same as above or different) # Required scopes for Livy API access scopes = [ "https://api.fabric.microsoft.com/Lakehouse.Execute.All", # Required — execute operations in lakehouses "https://api.fabric.microsoft.com/Lakehouse.Read.All", # Required — read lakehouse metadata "https://api.fabric.microsoft.com/Code.AccessFabric.All", # Required — general Fabric API access from Spark Runtime "https://api.fabric.microsoft.com/Code.AccessStorage.All", # Required — access OneLake and Azure storage from Spark Runtime ] # Optional scopes — add these only if your Spark jobs need access to the corresponding services: # "https://api.fabric.microsoft.com/Code.AccessAzureKeyvault.All" # Optional — access Azure Key Vault from Spark Runtime # "https://api.fabric.microsoft.com/Code.AccessAzureDataLake.All" # Optional — access Azure Data Lake Storage Gen1 from Spark Runtime # "https://api.fabric.microsoft.com/Code.AccessAzureDataExplorer.All" # Optional — access Azure Data Explorer from Spark Runtime # "https://api.fabric.microsoft.com/Code.AccessSQL.All" # Optional — access Azure SQL audience tokens from Spark Runtime def get_access_token(tenant_id, client_id, scopes): """ Get an access token using interactive authentication. This method will open a browser window for user authentication. Args: tenant_id (str): The Azure Active Directory tenant ID client_id (str): The application client ID scopes (list): List of required permission scopes Returns: str: The access token, or None if authentication fails """ app = PublicClientApplication( client_id, authority=f"https://login.microsoftonline.com/{tenant_id}" ) print("Opening browser for interactive authentication...") token_response = app.acquire_token_interactive(scopes=scopes) if "access_token" in token_response: print("Successfully authenticated") return token_response["access_token"] else: print(f"Authentication failed: {token_response.get('error_description', 'Unknown error')}") return None # Uncomment the lines below to use interactive authentication token = get_access_token(tenant_id, client_id, scopes) print("Access token acquired via interactive login")Kjør notatblokkcellen, et popup-vindu skal vises i nettleseren, slik at du kan velge identiteten du vil logge på med.
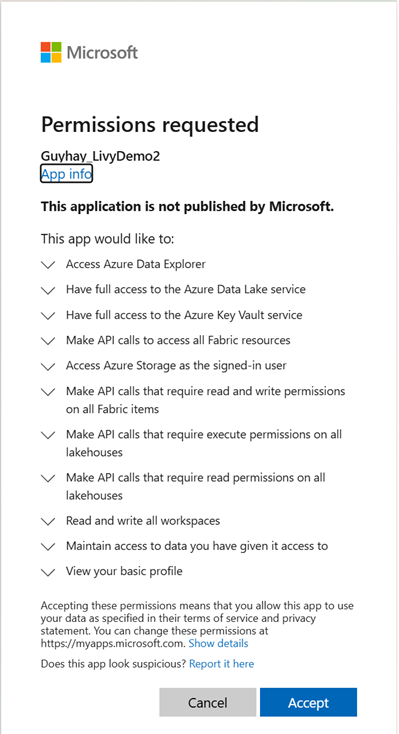
Etter at du har valgt identiteten du vil logge inn med, må du godkjenne Microsoft Entra appregistrerings-API-tillatelsene.
Lukk nettleservinduet etter at godkjenningen er fullført.

I Visual Studio Code skal du se Microsoft Entra-tokenet returnert.


Forståelse av Code.*-omfang for Livy API-et
Når Spark-jobbene dine kjører via Livy-API-et, kontrollerer scopene Code.* hvilke eksterne tjenester Spark Runtime kan få tilgang til på vegne av den autentiserte brukeren. To er påkrevd; Resten er valgfritt, avhengig av arbeidsmengden din.
Påkrevd Code.* omfang
| Omfang | Beskrivelse |
|---|---|
Code.AccessFabric.All |
Gjør det mulig å få tilgang til Microsoft Fabric. Påkrevd for alle Livy API-operasjoner. |
Code.AccessStorage.All |
Gjør det mulig å få tilgang til OneLake og Azure-lagring. Påkrevd for å lese og skrive data i innsjøhus. |
Valgfrie kode.* omfang
Legg til disse scopene kun hvis Spark-jobbene dine trenger tilgang til de tilsvarende Azure-tjenestene under kjøring.
| Omfang | Beskrivelse | Når den brukes |
|---|---|---|
Code.AccessAzureKeyvault.All |
Gjør det mulig å få tilgang til Azure Key Vault. | Din Spark-kode henter hemmeligheter, nøkler eller sertifikater fra Azure Key Vault. |
Code.AccessAzureDataLake.All |
Gjør det mulig å få tilgang til Azure Data Lake Storage Gen1. | Spark-koden din leser fra eller skriver til Azure Data Lake Storage Gen1-kontoer. |
Code.AccessAzureDataExplorer.All |
Gjør det mulig å få tilgang til Azure Data Explorer (Kusto). | Spark-koden din spør eller importerer data til/fra Azure Data Explorer-klynger. |
Code.AccessSQL.All |
Gjør det mulig å få tilgang til Azure SQL. | Spark-koden din må kobles til Azure SQL-databaser. |
Bemerkning
Og-skopiene Lakehouse.Execute.AllLakehouse.Read.All er også påkrevd, men er ikke en del av Code.* familien. De gir tillatelse til å utføre operasjoner i og lese metadata fra Fabric-innsjøhus henholdsvis.
Send inn en Livy Batch og overvåk satsvis jobb.
Legg til en annen notatblokkcelle, og sett inn denne koden.
# submit payload to existing batch session

import requests
import time
import json

api_base_url = "https://api.fabric.microsoft.com/v1"  # Base URL for Fabric APIs

# Fabric Resource IDs - Replace with your workspace and lakehouse IDs
workspace_id = "Fabric_WorkspaceID"
lakehouse_id = "Fabric_LakehouseID"

# Construct the Livy Batch API URL
# URL pattern: {base_url}/workspaces/{workspace_id}/lakehouses/{lakehouse_id}/livyApi/versions/{api_version}/batches
livy_base_url = f"{api_base_url}/workspaces/{workspace_id}/lakehouses/{lakehouse_id}/livyApi/versions/2023-12-01/batches"

# Set up authentication headers
headers = {"Authorization": f"Bearer {token}"}

print(f"Livy Batch API URL: {livy_base_url}")

new_table_name = "TABLE_NAME"  # Name for the new table

# Configure the batch job
print("Configuring batch job parameters...")

# Batch job configuration - Modify these values for your use case
payload_data = {
    # Job name - will appear in the Fabric UI
    "name": f"livy_batch_demo_{new_table_name}",

    # Path to your Python file in the lakehouse
    "file": "<ABFSS_PATH_TO_YOUR_PYTHON_FILE>",  # Replace with your Python file path

    # Optional: Spark configuration parameters
    "conf": {
        "spark.targetTable": new_table_name,  # Custom configuration for your application
    },
}

print("Batch Job Configuration:")
print(json.dumps(payload_data, indent=2))

try:
    # Submit the batch job
    print("\nSubmitting batch job...")
    post_batch = requests.post(livy_base_url, headers=headers, json=payload_data)

    if post_batch.status_code == 202:
        batch_info = post_batch.json()
        print("Livy batch job submitted successfully!")
        print(f"Batch Job Info: {json.dumps(batch_info, indent=2)}")

        # Extract batch ID for monitoring
        batch_id = batch_info['id']
        livy_batch_get_url = f"{livy_base_url}/{batch_id}"

        print(f"\nBatch Job ID: {batch_id}")
        print(f"Monitoring URL: {livy_batch_get_url}")

    else:
        print(f"Failed to submit batch job. Status code: {post_batch.status_code}")
        print(f"Response: {post_batch.text}")

except requests.exceptions.RequestException as e:
    print(f"Network error occurred: {e}")
except json.JSONDecodeError as e:
    print(f"JSON decode error: {e}")
    print(f"Response text: {post_batch.text}")
except Exception as e:
    print(f"Unexpected error: {e}")
Kjør notatblokkcellen, du bør se flere linjer som skrives ut når Livy Batch-jobben opprettes og kjøres.

For å se endringene, naviger tilbake til Lakehouse.

Integrasjon med Fabric-miljøer
Som standard kjører denne Livy API-økten mot standard startutvalg for arbeidsområdet. Alternativt kan du bruke Fabric miljøer Create, configur og bruk et miljø i Microsoft Fabric for å tilpasse Spark-poolen som Livy API-sesjonen bruker for disse Spark-jobbene. For å bruke ditt Fabric Environment, oppdater den forrige notatblokkcellen med denne ene linjeendringen.
payload_data = {
    "name":"livybatchdemo_with"+ newlakehouseName,
    "file":"abfss://YourABFSPathToYourPayload.py",
    "conf": {
        "spark.targetLakehouse": "Fabric_LakehouseID",
        "spark.fabric.environmentDetails" : "{\"id\" : \""EnvironmentID"\"}"  # remove this line to use starter pools instead of an environment, replace "EnvironmentID" with your environment ID
        }
    }
Vise jobbene dine i overvåkingshuben
Du kan få tilgang til overvåkingshuben for å vise ulike Apache Spark-aktiviteter ved å velge Monitor i navigasjonskoblingene til venstre.
Når den satsvise jobben er fullført, kan du vise øktstatusen ved å navigere til Overvåking.
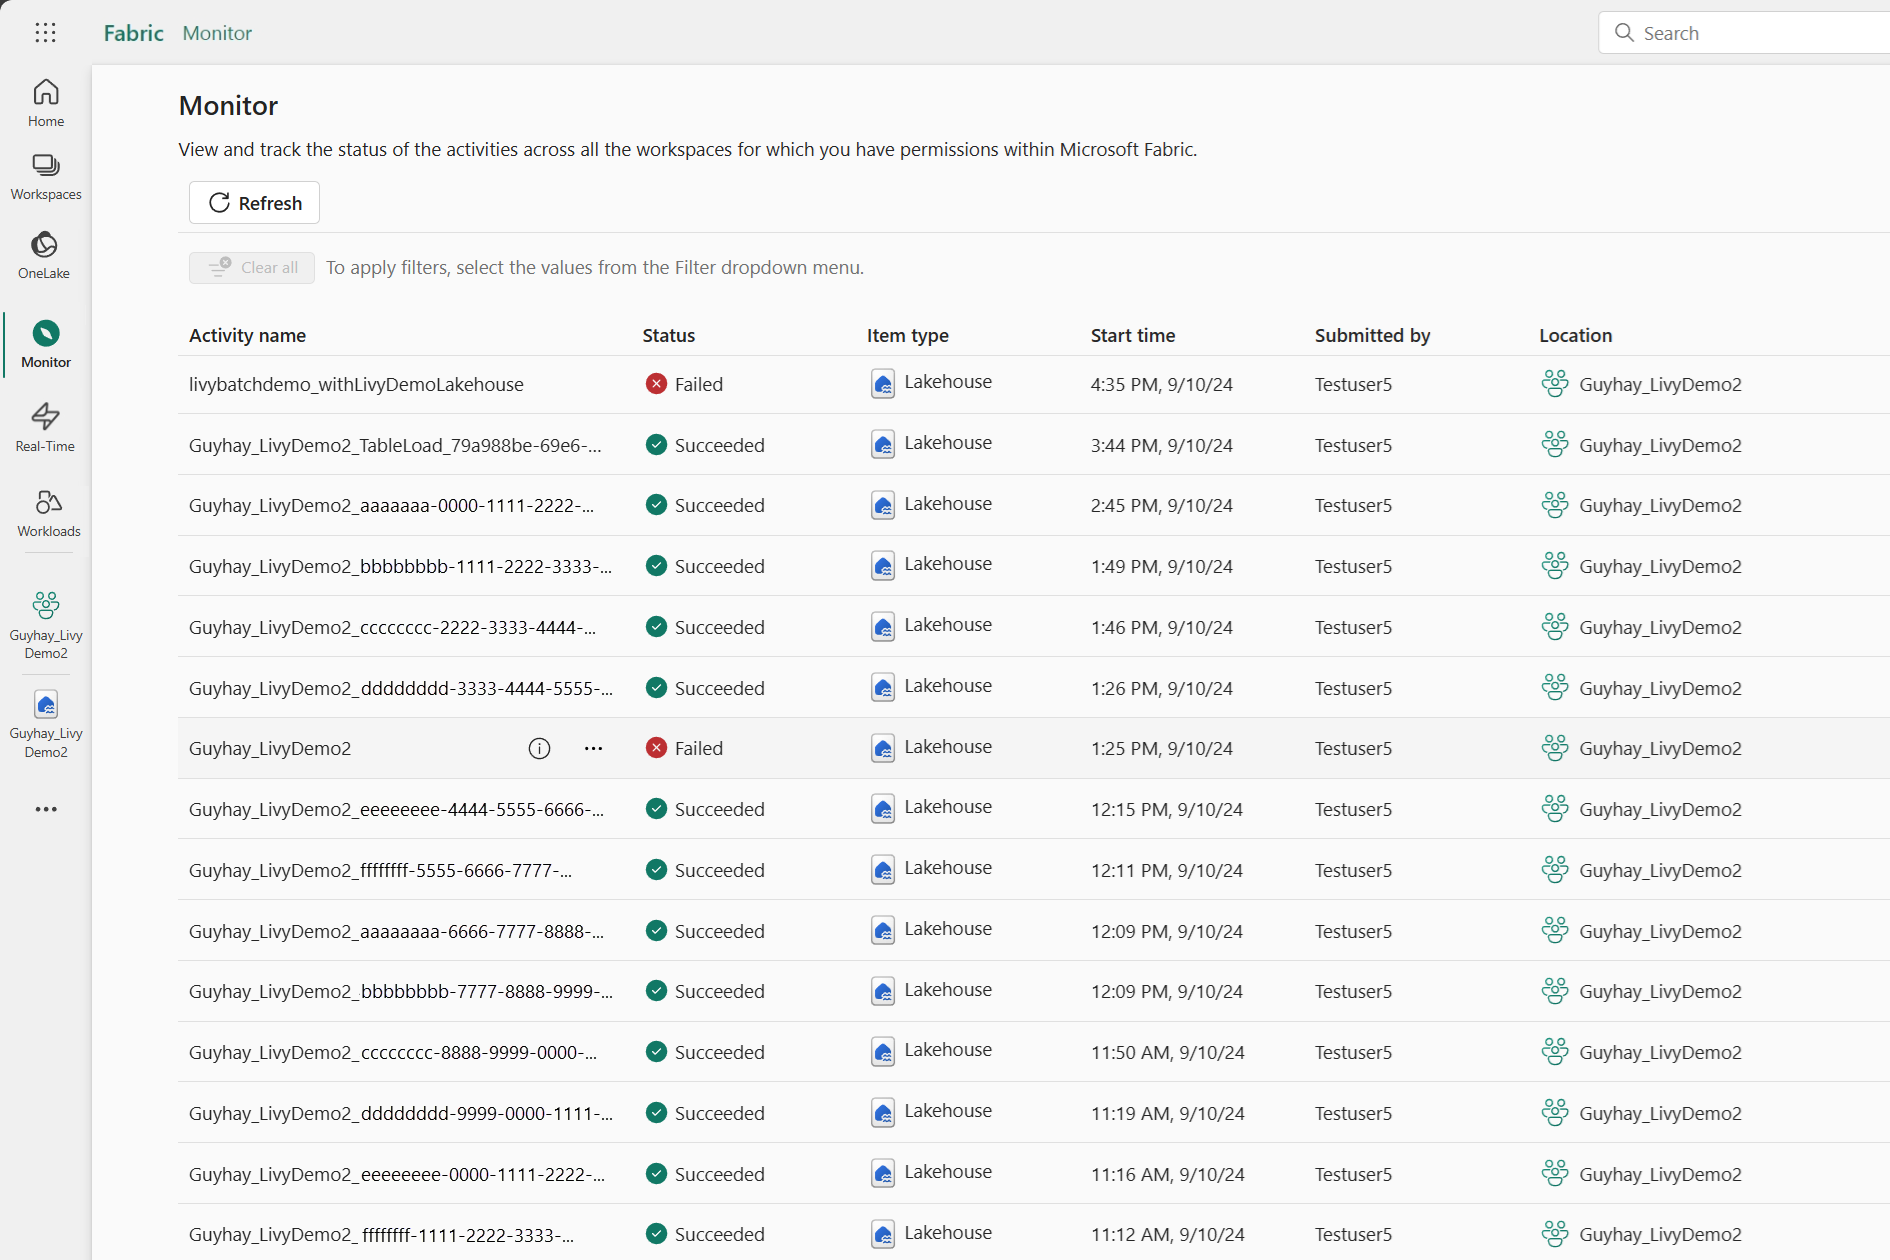
Velg og åpne det nyeste aktivitetsnavnet.
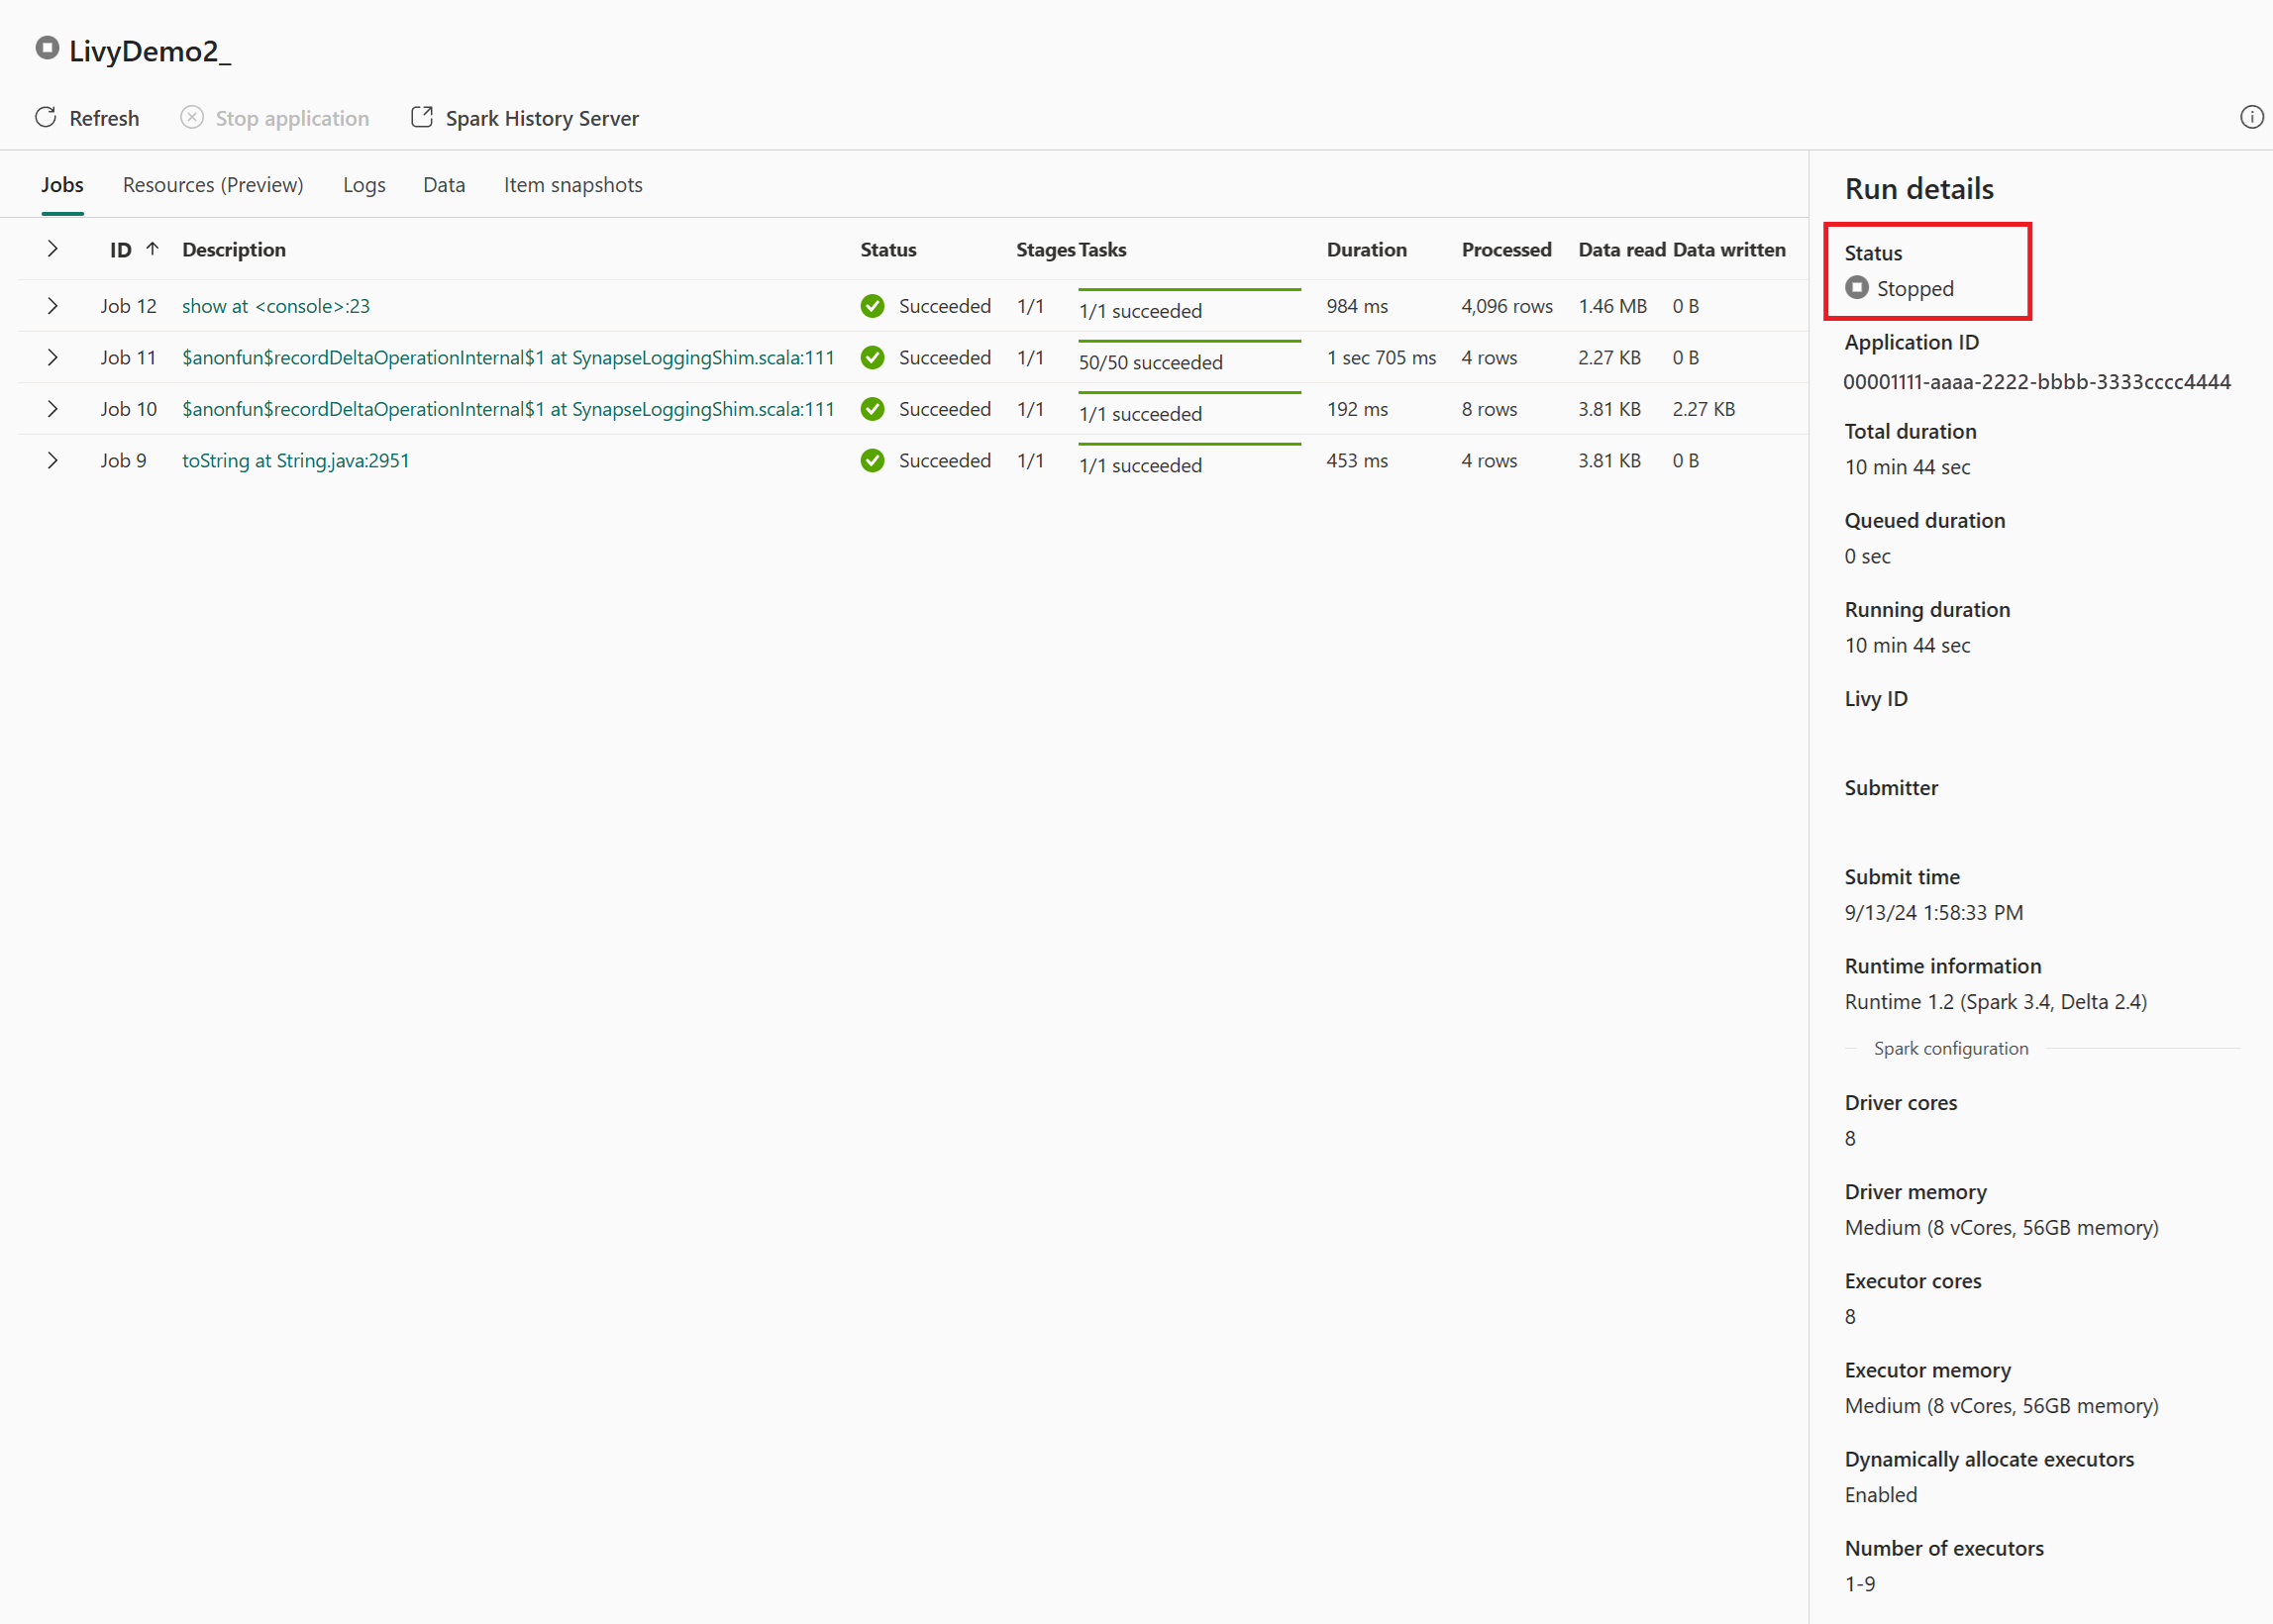
I dette livy API-økttilfellet kan du se den forrige satsvise innsendingen, kjøre detaljer, Spark-versjoner og konfigurasjon. Legg merke til stoppet status øverst til høyre.


For å oppsummere hele prosessen, trenger du en ekstern klient som Visual Studio Code, en Microsoft Entra app-token, Livy API-endepunkts-URL, autentisering mot Lakehouse-en din, en Spark-nyttelast i Lakehouse-en din, og til slutt en batch-Livy API-økt.