Customize and edit the Viva Connections experience
The new Viva Connections desktop design serves as a new experience that centers essential job tasks, personalized content, easy access to other Viva experiences, and better aligns with the mobile experience. Learn more about the new Viva Connections desktop experience.
Elements of the new Viva Connections experience can be customized to fit your organization’s brand and the needs of your end users. Learn more about how to customize the banner, Dashboard content, and navigational links in Resources. Then, learn how to influence content in the Feed. Finally, learn how to manage access and permissions.
Note
- If you already have Viva Connections set up, the new experience design uses current content and settings (like audience targeting) from your Dashboard and Resources and there will not be any impact to the mobile experience.
- If your organization has a SharePoint home site, you can choose to use it as the default landing destination.
- If you haven’t set up Viva Connections yet, the default experience includes cards on the dashboard but otherwise doesn’t impact the mobile experience.
- The new Viva Connections experience uses a similar permission model to SharePoint and can be managed from Microsoft Teams.
- You must have member level permissions or higher to edit the new desktop experience.
About the updated Viva Connections experience
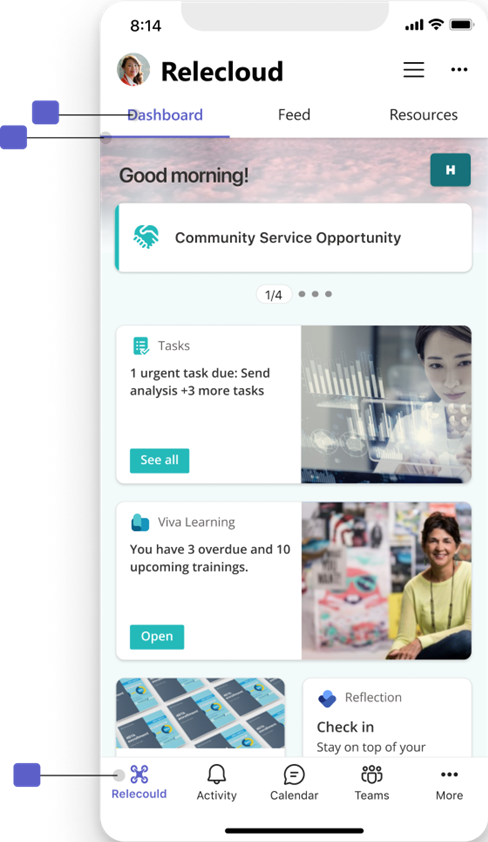
The Connections experience has been redesigned to highlight news across your organization and still provide easy access to the top tasks, tools, and resources that help people in your organization get their jobs done. The updated design prominently features the following key elements to the Viva Connections experience - Announcements, Feed & Spotlight, Dashboard, Resources, and Viva suite footer. Content for some of these elements can be filtered using audience targeting to create a personalized experience.

Announcements: Announcements from the organization display at the top of the Viva Connections experience and convey time-sensitive information to employees.
Feed: The Feed now has two areas:
- The spotlight dynamically displays content from the home site, news from SharePoint sites, or links to articles or sites. The spotlight can be customized to display up to 11 items.
- The Feed tab provides access to more content that offers a personalized feed based on post-level targeting of groups that an employee belongs to, more updates and other organizational news content.
Dashboard: The Dashboard is your employee’s digital toolset. It brings together the tools your employees need, enabling quick and easy access whether they are in the office or in the field.
Resources: The Resources experience enables navigation across portals and destinations.
Viva Suite footer: Information and links to other Viva Suite apps licensed and enabled by your organization appear at the bottom of the experience.
Navigational elements: The navigational elements located in the top-right and top-left corners help viewers easily get to-and-from other landing pages and other Viva experiences.
Get started customizing the experience
Note
- You must have member level permissions (or higher) to edit the new desktop experience.
- If your organization has a SharePoint home site, you can choose to use it as the default Connections experience.
How to edit the Viva Connections desktop experience for the first time
If you already have Viva Connections setup, editors who have site owner or member permissions to the SharePoint home site automatically have owner or member permissions to the new Connections experience in Teams. People with member permissions or higher can see Edit buttons in the Connections experience.
If you're setting up Viva Connections for the first time, only owners of the SharePoint root site can edit. When the home experience is edited for the first time, a special site container gets created on the backend. You want to assign (at least two) owners and members from this site to give permissions to others so they can edit the experience for the rest of the organization.
How to switch between multiple Viva Connections experiences
If your organization created multiple Connections experiences, you can switch between enabled and draft experiences from within Connections in order to edit them.
Navigate to the Viva Connections app in Teams.
Select the ellipsis in the upper-right of your experience.
Then select Switch Experience.

Note
Only users with edit privileges will be able to see the Switch Experience option in the menu.
A list of created experiences display along with their status (enabled or draft). Select an Experience to switch to.
Select Switch.

Note
Users are required to have a Microsoft Viva suite or Viva Communications and Communities license in order to create two or more experiences (up to 50). See Microsoft Viva plans and pricing for more info.
Give permission to edit from Viva Connections in Teams
If you're setting up Viva Connections for the first time, navigate to the Viva Connections app in Teams to assign owners and members who can edit the Viva Connections desktop experience.
Navigate to the Viva Connections app in Teams.
Select the ellipsis in the upper-right of your experience.
Then select Manage access.
Select Grant access.
Under Site Access add users and select their level of permission from visitor, member, or owner.
Select Add.
Choose default cards for the intended audience
When you set up Viva Connections for the first time in Teams, you're asked to choose a set of default cards. The default cards help you get started creating a dashboard and don’t need anything to get set-up. Default cards can be removed and edited after the initial selection.
| Card descriptions | Frontline worker | Information worker |
|---|---|---|
| Audience description | This audience consists of employees who are customer-facing, or don’t work primarily at a desk with a computer. Sometimes these roles are referred to as essential workers. Popular roles for frontline workers are retail sales associates, nurses, line workers, and teachers. | This audience consists of employees who usually get their work done from a desk using a computer. Popular roles for information workers are project managers, finance associates, administrative personnel, and business executives. |
| Default cards | Approvals, Assigned tasks, Shifts, and Top news. | Assigned tasks, Top news, Viva Learning, and Viva Topics. |
Summary of default dashboard cards and how to set them up
By default, cards will already be on the dashboard and require minimal setup. Edit and preview the dashboard until you're ready to share with others. To edit existing cards, select the pencil icon to Edit the card. In the property pane that opens to the right of your experience, choose your card size from the Card size drop-down list.
Apply Audience targeting so this card is filtered to specific roles, regions, or departments. Learn more about audience targeting for Viva Connections.
| Dashboard cards | How to use the card | Default card by audience |
|---|---|---|
| Approvals | Request time off, approve expense reports, and sign documents. | Frontline worker |
| Assigned tasks | Review and complete daily tasks assigned by your manager or team. | Frontline worker and Information worker |
| Shifts | Clock-in and clock-out of shifts and view upcoming shifts and break times. | Frontline worker |
| News | View the most important news from inside your organization. Use Boosted news to get news posts from organizational news sites to display in this card. | Frontline worker and Information worker |
| Viva Learning | View recommended and required training courses. | Information worker |
| Topics | Share and contribute to your organization’s knowledge base. | Information worker |
Summary of customizable elements

App icon and label in the Teams app bar: Customize the app name and label in the Teams admin center.
Entry point to secondary landing page: A link to the preferred default desktop experience automatically displays here.
Change the look: Access the settings to apply themes to reflect your organizational brand colors consistently across experiences.
Announcements: Create important time-sensitive notices targeted to members within your organization.
Banner image: Upload a banner image and set the focal point to create a branded look consistent across desktop and mobile.
Dashboard: Customize with cards and content specific to roles, regions, departments, and popular tasks.
Resources: Create a list of navigational links and icons to useful sites and information.
Summary of noncustomizable elements

Shared Viva navigation: Helps viewers navigate between Viva experiences. Viva apps will automatically display in this menu when Viva licenses are detected.
Feed tab: Content in the Feed is dynamically generated based on user interests, organizational news, and industry news. Learn more about how content in the Feed is sourced.
Scoped Search: Users can search within Viva Connections when using the search bar while in the Connections experience. As users type, the option to search for results within Connections (or Teams) displays.
Ellipses menu: Access more information about the Connections experience depending on your level of permissions.
Spotlight: The banner dynamically displays content from the home site, news from SharePoint sites, or links to articles or sites. The spotlight can be customized to display up to 11 items.
Viva navigational bar: The Viva navigational bar provides an opportunity to discover more Viva experiences and gets automatically generated when Viva licenses are detected.
Customize the app icon and label in the Teams app bar
Note
For customers with at least one F license:
The Viva Connections app is automatically pinned in the Teams app bar. If you don’t want the app pre-pinned, either turn off tailored apps for frontline workers, change the app settings, or edit how apps in Teams are managed.
Your organization’s Viva Connections app can display a custom icon and label in the Teams app bar. This customization takes place in the Teams admin center, which requires Teams admin permissions or higher. It's recommended that you also apply app settings that prepin and preinstall the app. Doing so makes sure people in your organization can more easily discover the Viva Connections app and start using it. Learn more about customizing the Viva Connections icon, label, and app settings.
Customize announcements
Create targeted, time-sensitive messages that display at the top of your Viva Connections experience to members of your organization. Learn more about using announcements in Viva Connections.
Customize the banner image
Change the banner image in the header and set the focal point for the image. The banner image and focal point can only be set on the desktop app but is visible across desktop and mobile.
Note
- The greeting is automatically generated and cannot be customized.
- Depending on your organization’s license type, you may see additional dynamic information displayed in the banner.
- The banner image and focal point will resize when viewed via the tablet and mobile app.
To change the banner image:
Start by selecting Edit and then select Change image.
Select the image you’d like to use and then select Reposition.
Once you're satisfied with the focal point, select Set focal point and then Save. There's no draft state for the banner image. It's displayed for all users when you select Save.
Manage spotlight settings
Experience owners and admins can dynamically populate extra content in the spotlight by pinning links to content items or selecting SharePoint sites to automatically pull news posts from. Using the spotlight settings allows you to curate news without needing to have SharePoint news on a home site as a prerequisite (which Experience owners can still do if they choose).
Note
The spotlight has space to display up to 11 items (pinned links and news posts from SharePoint sites) at a time.
Adding a pinned item
You can add a link to any source of content (blog, post, site, etc.) to display it in the spotlight. Up to 11 links can be pinned at a time. Pinned links display first in the spotlight before any news from SharePoint sites (if space is available).
Select Edit above the spotlight, then Settings.
In the Spotlight settings, select Pin item.

The Pin an item panel appears. In the Link field, enter the URL of the SharePoint news post or external source.
Additional information populates based on the information from the news source.
- Title: Edit the title or keep the populated entry from the news source.
- Preview Image: Select Change image to select your own, or keep the image used from the news source.
- Alternative Text: Enter descriptive text for the image to be used by screen readers.
Select Add to add your pinned item and return to the spotlight settings.

Select Save to save your changes and close the spotlight settings pane.
Editing a pinned item
You can make changes to existing pinned links or rearrange the order that the pinned links appear in the spotlight.
Select Edit above the spotlight, then Settings.
Under Pinned items, select the edit icon for the pinned item you want to edit.

Make any necessary changes to the link, title, image, or alternative text as needed. When finished, select Update to apply your changes.
To reorder a pinned item, hover your mouse over the six vertical dots to the left of the item. Select and drag the item to its new location within your list of news items.

You can also reorder items by selecting the three vertical dots to the right of the item. Use the number field to indicate the new location for the item, then select Update.

When finished making your changes, select Save.
Selecting news sources
SharePoint news sources will display in the spotlight section after any pinned links, and news posts from these sources will automatically populate if there's remaining space. To select a source:
Select Edit above the spotlight, then Settings.
Under SharePoint News, select a news source:
- This site: Only displays news posts that have been posted to this SharePoint home site.
- Select sites: Display all available SharePoint sites within the organization that an owner or admin has access to.
- Search all sites: Search for a site by name or URL.
Note
If you created your Connections experience without a home site, the this site option will still show but will not allow you to save since no home site is detected.
If selecting a source other than your current site, extra sources display from available SharePoint sources:
- Sites selected: lists any currently selected SharePoint sites.
- Frequent sites: lists SharePoint sites you've frequently visited.
- Recent sites: lists SharePoint sites you've recently visited.
Select the sites you want to pull news from.
Select Save to save your changes.

News from selected SharePoint sites will display after any pinned links and if there's space available.
Customize the look
Further customize your Connections experience and SharePoint home site by applying pre-existing SharePoint themes or a custom theme to reflect your organizational brand colors consistently across all instances of your desktop, tablet, and mobile experiences. Users can apply themes from within their Connections experience, or SharePoint home site. Only users who have permissions to edit the Connections experience can apply themes.
Note
If you have never selected a theme for your home site, the default SharePoint theme will be used for the home site and Connections experience.
To apply a SharePoint or custom theme:
Select the ellipsis, then select Change the look.
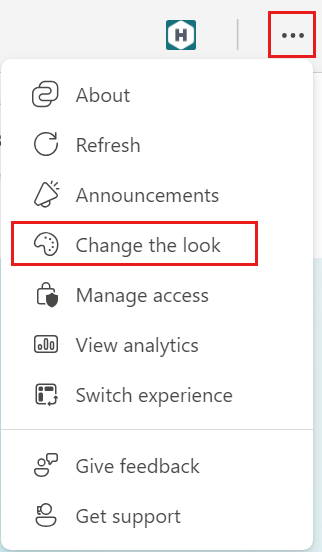
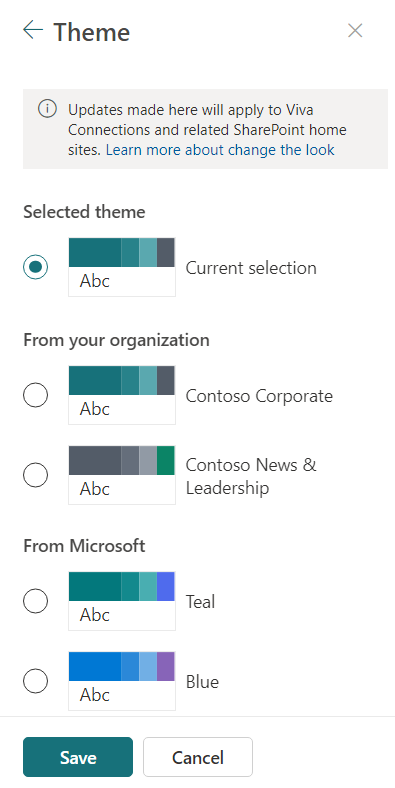
Select Theme.
Make a selection from the list of available themes.
- Themes from your organization can't be customized.
- SharePoint themes from Microsoft can be customized.
Note
- If an end user has selected dark mode on their mobile or tablet device, the dashboard and other Connections components will render in dark mode with the default color and will not apply the theme colors.
- Dark themes (has the property
isInverted=True), won’t be applied to the mobile experience. If the dark theme is selected, mobile will continue showing Connections with the user’s selected mode (light or dark) and the default colors.
Select Save.
The home site color theme reflects automatically in the Viva Connections desktop experience.
Note
Using accent colors under the app customization feature will only apply to the app icon outline color on the Teams chrome, and will not apply all colors to the Connections experience. For consistency of theming, it is a best practice to set the accent color same as the theme primary color from SharePoint.
Customize the dashboard
The Viva Connections dashboard provides fast and easy access to information and job-related tasks. Add and edit cards that help users quickly access the tools and resources they use in their day-to-day role. Cards on the dashboard can be targeted to users based on specific roles, regions, and interests. Edits (including audience targeting settings) made to cards on the dashboard are also automatically applied to the Dashboard web part and the mobile experience.
Note
- If your organization already has Viva Connections set up, you’ll see your existing cards and settings displayed in the new home experience.
- If your organization doesn’t already have Viva Connections set up, you’ll see a set of default cards that need minimal configuration.
Learn more about adding third-party cards and creating custom cards
In addition to the core set of dashboard cards, cards from third-party partner solutions can be added to the card toolbox from the SharePoint store. Learn more about third-party cards and how to request them. Additionally, customers can create custom cards for the Viva Connections dashboard by using the SharePoint Framework (SPFx) to create Adaptive Card Extensions (ACEs). Learn more about this framework and view the ACE solution gallery.
Preview the dashboard before sharing with others
After creating or editing cards on the Dashboard, make sure you preview the experience for each audience. Select Preview in the top-right corner of the editing experience, then choose to preview the desktop or mobile view. What you see in preview mode approximates how the Dashboard displays for certain audiences and devices. When you apply audience targeting to cards, you can preview how different people view the Dashboard depending on the audience or device.
Customize resources
Resources provide links to the most popular portals and destinations at your organization and can be found below the dashboard of the Connections experience. Operators and members can import navigational links from a SharePoint home site or global navigation bar, or create their own links, which can all be targeted to specific audiences. Any edits made to the resource section will also show in the mobile experience.
Note
- Global navigation can be accessed by clicking on the Connections icon in the Teams app bar. Refer to this document if you're setting up global navigation for the first time.
- You must manually save your changes when finished editing resource links.
To edit Resources
Start by selecting Edit.
To add a new link, select + Add Link.
In the Add a Link window that opens, paste the link to the site in the URL field.
- Only modern SharePoint sites and certain Microsoft 365 experiences display in Teams. All other types of content open in a separate browser window.
Enter a Display name.
Under Thumbnail, select a choice to represent your resource link.
Auto-selected: the icon is generated based on the URL, if applicable (a link icon displays by default if one can't be autogenerated).
Custom: upload your own image as an icon by selecting Change and uploading your image (the image will auto-size to fit the icons dimensions).
Icon: choose an icon from a pre-existing list by selecting edit icon.
To apply audience targeting to this resource, enter one or more Microsoft 365 groups in the Audiences to target field (up to 10 audiences can be targeted). Learn more about audience targeting for resources.
Select Save.

The new resource appears. If audience targeting is active, you’ll see an icon in the upper left of the resource link.

Continue editing your resource links. When finished, select Save to confirm your changes.
Import SharePoint links
You can import navigational links from a SharePoint home site and the SharePoint global navigation bar into your resources.
Start by selecting Edit in the Resources section of your Connections experience.
Select Import SharePoint links.
Select which navigation you want to import from (unavailable navigation is greyed out).
Select which links to import.
Select Keep audience targeting if you want to enable existing audience targeting settings for your selected imported links.
Select Import.

The selected links are added to your resources.
Continue editing your resource links. When finished, select Save to confirm your changes.
Edit an existing resource link
Start by selecting Edit in the Resources section of your Connections experience.
Hover over the resource link and select the ellipsis.
Select Edit to open the resource link and change its settings.

When finished editing the resource link, select Save in the edit link window.
Continue editing your resource links. When finished, select Save to confirm your changes.
Delete an existing resource link
Start by selecting Edit in the Resources section of your Connections experience.
Hover over the resource link and select the ellipsis.
Select Delete.

When asked to confirm, select Delete.
Continue editing your resource links. When finished, select Save to confirm your changes.
Reorder existing resource links
Start by selecting Edit in the Resources section of your Connections experience.
Select a resource link and drag it to its new location.
Continue editing your resource links. When finished, select Save to confirm your changes.
Learn more about how to influence content in the feed
Note
Starting September 1, 2024, the feed for Viva Connection web part and the video news link will be removed and unavailable for SharePoint site editors to add to their sites. On November 5, 2024, support for the feed for Viva Connections web part and video news links will end and no longer display content.
Site owners are encouraged to use the News, Viva Engage, File and Media, and Highlighted content web parts, and Video pages as alternatives to using the feed for Viva Connections web part and the video news link. For more information, refer to the Viva Connections Feed web part retirement support guidance documentation.
There’s no configuration required to get the Feed working in the desktop or mobile apps. Content in the Feed can’t be edited because content is aggregated from across your Microsoft 365 environment. Content comes from multiple sources: organizational news published in SharePoint, industry news, meeting insights, and files and information from frequent collaborators.
The Feed web part for Viva Connections displays the same content and can be added to other SharePoint sites. Content that is displayed in the Feed can’t be edited but the ranking can be influenced with the following actions:
- Promote important ‘official’ communications - Use News boost to raise the visibility of crucial news posts from organizational news sites.
- Highlight community discussions - Feature posts in public Viva Engage communities that you’d like seen by the entire organization.
- Publish from official news sources - Like organizational news sites or SharePoint home sites. Where content is from impacts the ranking.
- Follow colleagues within your organization – Users can see information and posts added to their own feed that made by colleagues they followed.
- Learn more about how the feed works here: Discover and learn with Microsoft Feed.
Language and multilingual settings
The Viva Connections experience can be set in more than one language. Learn more about how different elements of the experience can be edited to display in more than one language and how to create a multilingual dashboard.
Note
Viva Connections desktop applies the users’ SharePoint preferred language but not the Microsoft Teams language setting. However, for the mobile app, Viva Connections applies the device settings.
Manage permissions
The permissions model for the new Viva Connections landing experience is like the permissions in SharePoint. Certain levels of permission grant access to specific editing tools and the ability to manage permissions and sharing.
Note
At least two people should be assigned Owner level permissions.
| Owner | Member | Visitor |
|---|---|---|
| Can edit content in the banner, Dashboard, and Resources. Can add or remove owners, members, and visitors. |
Can edit content in the banner, Dashboard, and Resources. | Visitors are the end users in your organization. They can view and interact with content but can’t edit content or share the page with others. |
If you already have Viva Connections setup, editors who have site owner or member permissions to the SharePoint home site will automatically have owner or member permissions to edit the new Connections experience in Teams.
- People with member permissions or higher can see the Edit buttons in the Connections experience.
- People with member permissions or higher can view permissions to the page by navigating to the ellipsis menu in the top-right and selecting Manage permissions.
If you're setting it up for the first time, only the SharePoint root site owners are able to edit the Connections experience in Teams. When the Connections experience is edited for the first time, a SharePoint site on the backend gets created. Assign owners and members from this site to give permissions to others so they can edit the experience for the rest of the organization. Manage permissions from the Viva Connections app in Teams to assign owner or member level permissions. Once permission levels are assigned, people with owner or member permissions can see the Edit buttons in the Connections experience.
How to add, view, and edit permissions
If you have member permissions or higher, you can view who has permission to view and edit the Connections experience. Access permissions by navigating to the ellipsis menu (...) in the top-right corner and then select Manage permissions.
If you have owner permissions or higher, you can give access to new people and change the roles of the people who already have access. Select Share to give access to new people. Edit the roles of existing people by selecting the drop-down arrow and then select a new role. Changes are applied immediately.
Help end users in your organization learn more
If your organization already has a SharePoint home site and you want to keep it as the landing experience for the Connections desktop experience, use the PowerShell command listed in the following section to use the SharePoint home site. Learn more about setting up Viva Connections in the Microsoft 365 admin center.
Note
For customers who already have Viva Connections setup, your end users will be automatically routed to the new Viva Connections home experience in Teams if your organization decides to use the new design as the default experience. If your organization has a SharePoint home site, you can choose to keep it as the default home experience when the new experience is available.
Choose the default landing experience for Viva Connections desktop
If your organization already has a SharePoint home site and you want to keep it as the landing experience for the Connections desktop experience, use the PowerShell command listed below in this section. If you decide to change the default experience from a home site back to the Viva Connections home experience, run this command again using the $false parameter. To run this cmdlet, you must be a SharePoint admin.
Download the latest SharePoint Online Management Shell.
Note
- If you installed a previous version of SharePoint Online Management Shell, go to Add, or Remove programs and uninstall "SharePoint Online Management Shell".
- Run the command as a SharePoint Administrator.
- This command allows you to choose the default experience for the desktop app and doesn't impact the mobile experience.
Connect to SharePoint as a SharePoint Administrator in Microsoft 365. Refer to Getting started with SharePoint Online Management Shell for more information.
Run
Set-SPOHomeSite -HomeSiteUrl <homesiteURL> -VivaConnectionsDefaultStart <$true/$false>.- The parameter should be set to
$falseto use the new Connections desktop experience as the default landing experience. - The parameter should be set to
$trueto use a SharePoint home site as the default landing experience.
Example:
Contoso’s SharePoint home site URL is
https://contoso.sharepoint.com/sites/homeSitein this example.To set the default landing to the SharePoint home site:
Set-SPOHomeSite -HomeSiteUrl "https://contoso.sharepoint.com/sites/homeSite" -VivaConnectionsDefaultStart $trueTo set the default landing to the new Viva Connections desktop experience:
Set-SPOHomeSite -HomeSiteUrl "https://contoso.sharepoint.com/sites/homeSite" -VivaConnectionsDefaultStart $false- The parameter should be set to
Note
- It may take up to 15 minutes to see the updated default landing experience.
- If you change the SharePoint home site to a different SharePoint home site, it may take up to a week for users in Viva Connections to be directed to the new site. However, users can logout and log back in to clear the cache to view the new SharePoint home site sooner.
Make the experience available to the end user
Once finished customizing your Viva Connections experience, follow the steps to enable the experience to make it visible to your audience.
Learn more
More options coming soon for the Viva Connections desktop experience
Use audience targeting in Viva Connections to personalize the experience.