Een GitHub-account. Als u geen account hebt, kunt u zich registreren voor een gratis account.
Implementatie van GitHub Actions instellen bij het maken van de app
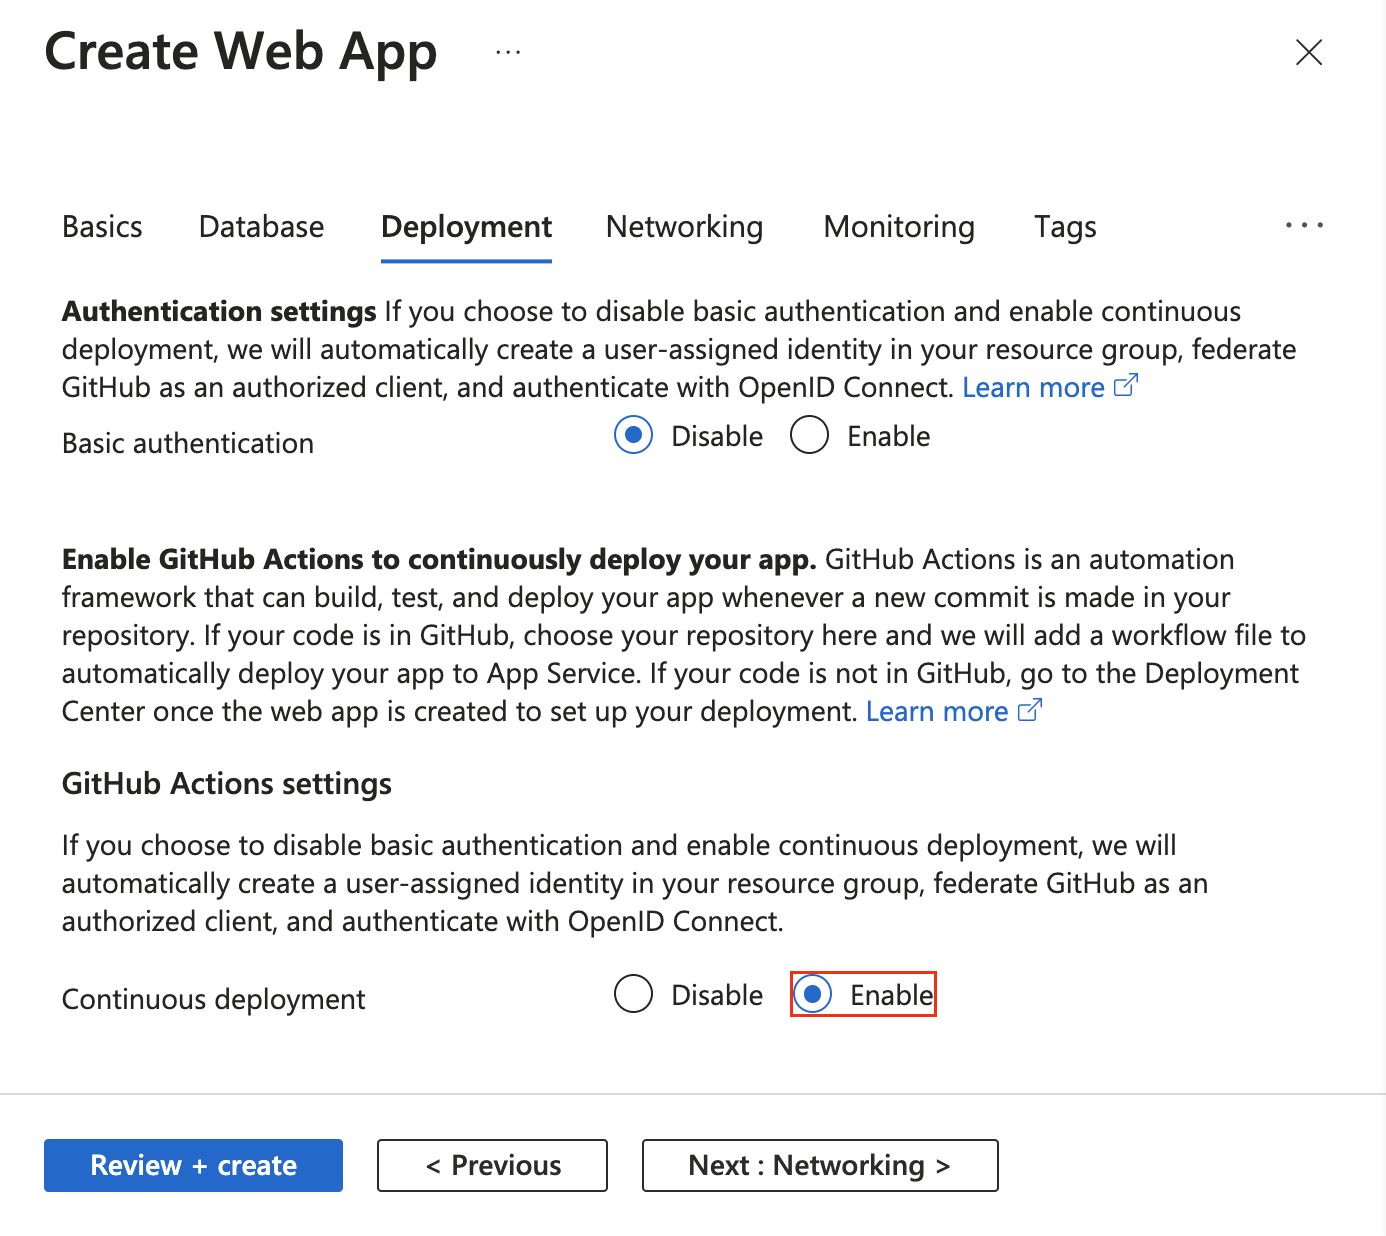
GitHub Actions-implementatie is geïntegreerd in de standaardwizard voor het maken van apps. U hoeft alleen continue implementatie in te stellen op het tabblad Implementatie en de gewenste organisatie, opslagplaats en vertakking te configureren.
Wanneer u continue implementatie inschakelt, kiest de wizard voor het maken van apps automatisch de verificatiemethode op basis van de basisverificatieselectie en configureert u uw app en uw GitHub-opslagplaats dienovereenkomstig:
Implementatie van GitHub Actions instellen vanuit het Implementatiecentrum
Voor een bestaande app kunt u snel aan de slag met GitHub Actions met behulp van het App Service Deployment Center. Met deze turn-key-methode wordt automatisch een Werkstroombestand voor GitHub Actions gegenereerd op basis van uw toepassingsstack en wordt dit doorgevoerd in uw GitHub-opslagplaats.
Als uw Azure-account over de benodigde machtigingen beschikt, kunt u ervoor kiezen om een door de gebruiker toegewezen identiteit te maken. Anders kunt u een bestaande door de gebruiker toegewezen beheerde identiteit selecteren in de vervolgkeuzelijst Identiteit . U kunt samenwerken met uw Azure-beheerder om een door de gebruiker toegewezen beheerde identiteit te maken met de rol Inzender voor websites.
De aanbevolen manier om te verifiëren met Azure-app Services voor GitHub Actions is met OpenID Connect. Dit is een verificatiemethode die gebruikmaakt van kortdurende tokens. Het instellen van OpenID Connect met GitHub Actions is complexer, maar biedt beperkte beveiliging.
U kunt ook verifiëren met een door de gebruiker toegewezen beheerde identiteit, een service-principal of een publicatieprofiel.
Hieronder wordt u door de stappen geleid voor het maken van een Active Directory-toepassing, service-principal en federatieve referenties met behulp van Azure CLI-instructies. Zie Connect GitHub en Azure voor meer informatie over het maken van een Active Directory-toepassing, service-principal en federatieve referenties in Azure Portal.
Met deze opdracht wordt een JSON uitgevoerd met een JSON appId die uw client-id. Sla de waarde op die u later wilt gebruiken als het AZURE_CLIENT_ID GitHub-geheim.
U gebruikt de waarde bij het objectId maken van federatieve referenties met Graph API en verwijst ernaar als de APPLICATION-OBJECT-ID.
Een service-principal maken. Vervang de door de $appID appId uit uw JSON-uitvoer.
Met deze opdracht wordt JSON-uitvoer gegenereerd met een andere objectId en wordt in de volgende stap gebruikt. Het nieuwe objectId is de assignee-object-id.
Kopieer het appOwnerTenantId te gebruiken als gitHub-geheim voor AZURE_TENANT_ID later gebruik.
az ad sp create --id $appId
Maak een nieuwe roltoewijzing per abonnement en object. De roltoewijzing is standaard gekoppeld aan uw standaardabonnement. Vervang $subscriptionId door uw abonnements-id, $resourceGroupName door de naam van uw resourcegroep, $webappName door de naam van uw web-app en $assigneeObjectId door de gegenereerde idnaam. Meer informatie over het beheren van Azure-abonnementen met de Azure CLI.
az role assignment create --role contributor --subscription $subscriptionId --assignee-object-id $assigneeObjectId --scope /subscriptions/$subscriptionId/resourceGroups/$resourceGroupName/providers/Microsoft.Web/sites/$webappName --assignee-principal-type ServicePrincipal
Voer de volgende opdracht uit om een nieuwe federatieve identiteitsreferentie te maken voor uw Active Directory-toepassing.
Vervang door APPLICATION-OBJECT-ID de appId (gegenereerd tijdens het maken van de app) voor uw Active Directory-toepassing.
Stel een waarde in om CREDENTIAL-NAME later te verwijzen.
Stel de subject in. De waarde wordt gedefinieerd door GitHub, afhankelijk van uw werkstroom:
Taken in uw GitHub Actions-omgeving: repo:< Organization/Repository >:environment:< Name >
Voor taken die niet zijn gekoppeld aan een omgeving, moet u het referentiepad voor vertakkingen/tags opnemen op basis van het referentiepad dat wordt gebruikt voor het activeren van de werkstroom: repo:< Organization/Repository >:ref:< ref path>. Bijvoorbeeld repo:n-username/ node_express:ref:refs/heads/my-branch of repo:n-username/ node_express:ref:refs/tags/my-tag.
Voor werkstromen die door een pull-aanvraaggebeurtenis zijn geactiveerd: repo:< Organization/Repository >:pull_request.
az ad app federated-credential create --id <APPLICATION-OBJECT-ID> --parameters credential.json
("credential.json" contains the following content)
{
    "name": "<CREDENTIAL-NAME>",
    "issuer": "https://token.actions.githubusercontent.com",
    "subject": "repo:organization/repository:ref:refs/heads/main",
    "description": "Testing",
    "audiences": [
        "api://AzureADTokenExchange"
    ]
}
Een publicatieprofiel is een referentie op app-niveau. Stel uw publicatieprofiel in als een GitHub-geheim.
Ga naar uw app-service in Azure Portal.
Selecteer Op de pagina Overzicht het profiel Publiceren ophalen.
Sla het gedownloade bestand op. U gebruikt de inhoud van het bestand om een GitHub-geheim te maken.
Notitie
Vanaf oktober 2020 moet voor Linux-web-apps de app-instelling WEBSITE_WEBDEPLOY_USE_SCM zijn ingesteld truevoordat het publicatieprofiel wordt gedownload. Deze vereiste wordt in de toekomst verwijderd.
az ad sp create-for-rbac --name "myApp" --role contributor \
                            --scopes /subscriptions/<subscription-id>/resourceGroups/<group-name>/providers/Microsoft.Web/sites/<app-name> \
                            --json-auth
Vervang in het vorige voorbeeld de tijdelijke aanduidingen door uw abonnements-id, resourcegroepnaam en app-naam. De uitvoer is een JSON-object met de roltoewijzingsreferenties die toegang bieden tot uw App Service-app, vergelijkbaar met het volgende JSON-fragment. Kopieer dit JSON-object voor later gebruik.
Het is altijd een goed idee om minimale toegang te verlenen. Het bereik in het vorige voorbeeld is beperkt tot de specifieke App Service-app en niet de hele resourcegroep.
U moet de client-id, tenant-id en abonnements-id van uw toepassing opgeven voor de azure-/aanmeldingsactie. Deze waarden kunnen rechtstreeks in de werkstroom worden opgegeven of kunnen worden opgeslagen in GitHub-geheimen en waarnaar wordt verwezen in uw werkstroom. Het opslaan van de waarden als GitHub-geheimen is de veiligere optie.
Open uw GitHub-opslagplaats en ga naar Beveiligingsgeheimen > > > en variabelen Acties > nieuwe opslagplaats.
Geheimen maken voor AZURE_CLIENT_ID, AZURE_TENANT_IDen AZURE_SUBSCRIPTION_ID. Gebruik deze waarden uit uw Active Directory-toepassing voor uw GitHub-geheimen:
GitHub Secret
Active Directory-toepassing
AZURE_CLIENT_ID
Client-id van toepassing
AZURE_TENANT_ID
Id van directory (tenant)
AZURE_SUBSCRIPTION_ID
Abonnements-id
Sla elk geheim op door Geheim toevoegen te selecteren.
In GitHub, bladert u in uw opslagplaats. Selecteer Beveiligingsgeheimen > > en variabelen Instellingen Voor nieuwe > opslagplaatsgeheimen>.
Als u referenties op app-niveau wilt gebruiken, plakt u de inhoud van het gedownloade publicatieprofielbestand in het waardeveld van het geheim. Geef het geheim AZURE_WEBAPP_PUBLISH_PROFILEeen naam.
Wanneer u het GitHub-werkstroombestand later configureert, gebruikt u de AZURE_WEBAPP_PUBLISH_PROFILE actie Azure Web App implementeren. Voorbeeld:
In GitHub, bladert u in uw opslagplaats. Selecteer Beveiligingsgeheimen > > en variabelen Instellingen Voor nieuwe > opslagplaatsgeheimen>.
Als u referenties op gebruikersniveau wilt gebruiken, plakt u de volledige JSON-uitvoer van de Azure CLI-opdracht in het waardeveld van het geheim. Geef het geheim AZURE_CREDENTIALSeen naam.
Wanneer u het GitHub-werkstroombestand later configureert, gebruikt u het geheim voor de invoer creds van Azure /login. Voorbeeld:
3. Voeg het werkstroombestand toe aan uw GitHub-opslagplaats
Een werkstroom wordt gedefinieerd door een YAML-bestand (.yml) in het /.github/workflows/ pad in uw GitHub-opslagplaats. Deze definitie bevat de verschillende stappen en parameters die deel uitmaken van de werkstroom.
Het werkstroombestand zou minimaal de volgende afzonderlijke stappen hebben:
Verifieer met App Service met behulp van het GitHub-geheim dat u hebt gemaakt.
Bouw de web-app.
Implementeer de web-app.
Als u uw code wilt implementeren in een App Service-app, gebruikt u de actie azure/webapps-deploy@v3 . De actie vereist de naam van uw web-app en app-name , afhankelijk van uw taalstack, het pad van een *.zip, *.war, *.jar of map om in packagete implementeren. Zie de definitie action.yml voor een volledige lijst met mogelijke invoer voor de azure/webapps-deploy@v3 actie.
In de volgende voorbeelden ziet u het deel van de werkstroom waarmee de web-app wordt gebouwd, in verschillende ondersteunde talen.
Als u wilt implementeren met OpenID Connect met behulp van de beheerde identiteit die u hebt geconfigureerd, gebruikt u de azure/login@v1 actie met de client-id, tenant-iden sleutels en subscription-id verwijst u naar de GitHub-geheimen die u eerder hebt gemaakt.
name: .NET Core
on: [push]
permissions:
id-token: write
contents: read
env:
AZURE_WEBAPP_NAME: my-app # set this to your application's name
AZURE_WEBAPP_PACKAGE_PATH: '.' # set this to the path to your web app project, defaults to the repository root
DOTNET_VERSION: '6.0.x' # set this to the dot net version to use
jobs:
build:
runs-on: ubuntu-latest
steps:
# Checkout the repo
- uses: actions/checkout@main
- uses: azure/login@v1
with:
client-id: ${{ secrets.AZURE_CLIENT_ID }}
tenant-id: ${{ secrets.AZURE_TENANT_ID }}
subscription-id: ${{ secrets.AZURE_SUBSCRIPTION_ID }}
# Setup .NET Core SDK
- name: Setup .NET Core
uses: actions/setup-dotnet@v3
with:
dotnet-version: ${{ env.DOTNET_VERSION }}
# Run dotnet build and publish
- name: dotnet build and publish
run: |
dotnet restore
dotnet build --configuration Release
dotnet publish -c Release --property:PublishDir='${{ env.AZURE_WEBAPP_PACKAGE_PATH }}/myapp'
# Deploy to Azure Web apps
- name: 'Run Azure webapp deploy action using publish profile credentials'
uses: azure/webapps-deploy@v3
with:
app-name: ${{ env.AZURE_WEBAPP_NAME }} # Replace with your app name
package: '${{ env.AZURE_WEBAPP_PACKAGE_PATH }}/myapp'
- name: logout
run: |
az logout
Bouw en implementeer een ASP.NET MVC-app in Azure met behulp van een Azure-service-principal. In het voorbeeld worden GitHub-geheimen gebruikt voor de client-id, tenant-iden subscription-id waarden. U kunt deze waarden ook rechtstreeks doorgeven in de aanmeldingsactie.
name: Deploy ASP.NET MVC App deploy to Azure Web App
on: [push]
permissions:
id-token: write
contents: read
env:
AZURE_WEBAPP_NAME: my-app # set this to your application's name
AZURE_WEBAPP_PACKAGE_PATH: '.' # set this to the path to your web app project, defaults to the repository root
NUGET_VERSION: '5.3.x' # set this to the dot net version to use
jobs:
build-and-deploy:
runs-on: windows-latest
steps:
# checkout the repo
- uses: actions/checkout@main
- uses: azure/login@v1
with:
client-id: ${{ secrets.AZURE_CLIENT_ID }}
tenant-id: ${{ secrets.AZURE_TENANT_ID }}
subscription-id: ${{ secrets.AZURE_SUBSCRIPTION_ID }}
- name: Install Nuget
uses: nuget/setup-nuget@v1
with:
nuget-version: ${{ env.NUGET_VERSION}}
- name: NuGet to restore dependencies as well as project-specific tools that are specified in the project file
run: nuget restore
- name: Add msbuild to PATH
uses: microsoft/setup-msbuild@v1.0.2
- name: Run MSBuild
run: msbuild .\SampleWebApplication.sln
- name: 'Run Azure webapp deploy action using publish profile credentials'
uses: azure/webapps-deploy@v3
with:
app-name: ${{ env.AZURE_WEBAPP_NAME }} # Replace with your app name
package: '${{ env.AZURE_WEBAPP_PACKAGE_PATH }}/SampleWebApplication/'
# Azure logout
- name: logout
run: |
az logout
Bouw en implementeer een Java Spring-app in Azure met behulp van een Azure-service-principal. In het voorbeeld worden GitHub-geheimen gebruikt voor de client-id, tenant-iden subscription-id waarden. U kunt deze waarden ook rechtstreeks doorgeven in de aanmeldingsactie.
name: Build and deploy WAR app to Azure Web App using OpenID Connect
env:
JAVA_VERSION: '11' # set this to the Java version to use
DISTRIBUTION: microsoft # set this to the Java distribution
AZURE_WEBAPP_NAME: sampleapp # set this to the name of your web app
on: [push]
permissions:
id-token: write
contents: read
jobs:
build:
runs-on: ubuntu-latest
steps:
- uses: actions/checkout@v4
- name: Set up Java version
uses: actions/setup-java@v3.0.0
with:
java-version: ${{ env.JAVA_VERSION }}
distribution: ${{ env.DISTRIBUTION }}
cache: 'maven'
- name: Build with Maven
run: mvn clean install
- name: Login to Azure
uses: azure/login@v2
with:
client-id: ${{ secrets.AZURE_CLIENT_ID }}
tenant-id: ${{ secrets.AZURE_TENANT_ID }}
subscription-id: ${{ secrets.AZURE_SUBSCRIPTION_ID }}
- name: Deploy to Azure Web App
id: deploy-to-webapp
uses: azure/webapps-deploy@v3
with:
app-name: ${{ env.AZURE_WEBAPP_NAME }}
package: '*.war'
U vindt dit volledige voorbeeld met behulp van meerdere taken voor het bouwen en implementeren hier ook.
name: JavaScript CI
on: [push]
permissions:
id-token: write
contents: read
name: Node.js
env:
AZURE_WEBAPP_NAME: my-app # set this to your application's name
AZURE_WEBAPP_PACKAGE_PATH: 'my-app-path' # set this to the path to your web app project, defaults to the repository root
NODE_VERSION: '18.x' # set this to the node version to use
jobs:
build-and-deploy:
runs-on: ubuntu-latest
steps:
# checkout the repo
- name: 'Checkout GitHub Action'
uses: actions/checkout@main
- uses: azure/login@v1
with:
client-id: ${{ secrets.AZURE_CLIENT_ID }}
tenant-id: ${{ secrets.AZURE_TENANT_ID }}
subscription-id: ${{ secrets.AZURE_SUBSCRIPTION_ID }}
- name: Setup Node ${{ env.NODE_VERSION }}
uses: actions/setup-node@v4
with:
node-version: ${{ env.NODE_VERSION }}
- name: 'npm install, build, and test'
run: |
npm install
npm run build --if-present
npm run test --if-present
working-directory: my-app-path
# deploy web app using Azure credentials
- uses: azure/webapps-deploy@v3
with:
app-name: ${{ env.AZURE_WEBAPP_NAME }}
package: ${{ env.AZURE_WEBAPP_PACKAGE_PATH }}
# Azure logout
- name: logout
run: |
az logout
name: Python application
on:
[push]
permissions:
id-token: write
contents: read
env:
AZURE_WEBAPP_NAME: my-app # set this to your application's name
AZURE_WEBAPP_PACKAGE_PATH: '.' # set this to the path to your web app project, defaults to the repository root
jobs:
build:
runs-on: ubuntu-latest
steps:
- uses: actions/checkout@v4
- uses: azure/login@v1
with:
client-id: ${{ secrets.AZURE_CLIENT_ID }}
tenant-id: ${{ secrets.AZURE_TENANT_ID }}
subscription-id: ${{ secrets.AZURE_SUBSCRIPTION_ID }}
- name: Set up Python 3.x
uses: actions/setup-python@v4
with:
python-version: 3.x
- name: Install dependencies
run: |
python -m pip install --upgrade pip
pip install -r requirements.txt
- name: Deploy web App using GH Action azure/webapps-deploy
uses: azure/webapps-deploy@v3
with:
app-name: ${{ env.AZURE_WEBAPP_NAME }}
package: ${{ env.AZURE_WEBAPP_PACKAGE_PATH }}
- name: logout
run: |
az logout
De publish-profile invoer moet verwijzen naar het AZURE_WEBAPP_PUBLISH_PROFILE GitHub-geheim dat u eerder hebt gemaakt.
name: .NET Core CI
on: [push]
env:
AZURE_WEBAPP_NAME: my-app-name # set this to your application's name
AZURE_WEBAPP_PACKAGE_PATH: '.' # set this to the path to your web app project, defaults to the repository root
DOTNET_VERSION: '6.0.x' # set this to the dot net version to use
jobs:
build:
runs-on: ubuntu-latest
steps:
# Checkout the repo
- uses: actions/checkout@main
# Setup .NET Core SDK
- name: Setup .NET Core
uses: actions/setup-dotnet@v3
with:
dotnet-version: ${{ env.DOTNET_VERSION }}
# Run dotnet build and publish
- name: dotnet build and publish
run: |
dotnet restore
dotnet build --configuration Release
dotnet publish -c Release --property:PublishDir='${{ env.AZURE_WEBAPP_PACKAGE_PATH }}/myapp'
# Deploy to Azure Web apps
- name: 'Run Azure webapp deploy action using publish profile credentials'
uses: azure/webapps-deploy@v3
with:
app-name: ${{ env.AZURE_WEBAPP_NAME }} # Replace with your app name
publish-profile: ${{ secrets.AZURE_WEBAPP_PUBLISH_PROFILE }} # Define secret variable in repository settings as per action documentation
package: '${{ env.AZURE_WEBAPP_PACKAGE_PATH }}/myapp'
Bouw en implementeer een ASP.NET MVC-app die gebruikmaakt van NuGet en publish-profile voor verificatie.
name: Deploy ASP.NET MVC App deploy to Azure Web App
on: [push]
env:
AZURE_WEBAPP_NAME: my-app # set this to your application's name
AZURE_WEBAPP_PACKAGE_PATH: '.' # set this to the path to your web app project, defaults to the repository root
NUGET_VERSION: '5.3.x' # set this to the dot net version to use
jobs:
build-and-deploy:
runs-on: windows-latest
steps:
- uses: actions/checkout@main
- name: Install Nuget
uses: nuget/setup-nuget@v1
with:
nuget-version: ${{ env.NUGET_VERSION}}
- name: NuGet to restore dependencies as well as project-specific tools that are specified in the project file
run: nuget restore
- name: Add msbuild to PATH
uses: microsoft/setup-msbuild@v1.0.2
- name: Run MSBuild
run: msbuild .\SampleWebApplication.sln
- name: 'Run Azure webapp deploy action using publish profile credentials'
uses: azure/webapps-deploy@v3
with:
app-name: ${{ env.AZURE_WEBAPP_NAME }} # Replace with your app name
publish-profile: ${{ secrets.AZURE_WEBAPP_PUBLISH_PROFILE }} # Define secret variable in repository settings as per action documentation
package: '${{ env.AZURE_WEBAPP_PACKAGE_PATH }}/SampleWebApplication/'
Bouw en implementeer een Java Spring-app in Azure met behulp van een Azure-publicatieprofiel. De publish-profile invoer verwijst naar het AZURE_WEBAPP_PUBLISH_PROFILE geheim dat u eerder hebt gemaakt.
name: Java CI with Maven
on: [push]
jobs:
build:
runs-on: ubuntu-latest
steps:
- uses: actions/checkout@v4
- name: Set up JDK 1.8
uses: actions/setup-java@v3
with:
java-version: 1.8
- name: Build with Maven
run: mvn -B package --file pom.xml
working-directory: my-app-path
- name: Azure WebApp
uses: Azure/webapps-deploy@v3
with:
app-name: my-app-name
publish-profile: ${{ secrets.AZURE_WEBAPP_PUBLISH_PROFILE }}
package: my/target/*.jar
Als u een war in plaats van een jarwilt implementeren, wijzigt u de package waarde.
Bouw en implementeer een Tomcat-app in Azure met behulp van een Azure-publicatieprofiel. De publish-profile invoer verwijst naar het AZURE_WEBAPP_PUBLISH_PROFILE geheim dat u eerder hebt gemaakt.
name: Build and deploy WAR app to Azure Web App using publish profile
env:
JAVA_VERSION: '11' # set this to the Java version to use
DISTRIBUTION: microsoft # set this to the Java distribution
AZURE_WEBAPP_NAME: sampleapp # set this to the name of your web app
on: [push]
permissions:
id-token: write
contents: read
jobs:
build:
runs-on: ubuntu-latest
steps:
- uses: actions/checkout@v4
- name: Set up Java version
uses: actions/setup-java@v3.0.0
with:
java-version: ${{ env.JAVA_VERSION }}
distribution: ${{ env.DISTRIBUTION }}
cache: 'maven'
- name: Build with Maven
run: mvn clean install
- name: Deploy to Azure Web App
id: deploy-to-webapp
uses: azure/webapps-deploy@v3
with:
app-name: ${{ env.AZURE_WEBAPP_NAME }}
publish-profile: ${{ secrets.AZURE_WEBAPP_PUBLISH_PROFILE }}
package: '*.war'
U vindt dit volledige voorbeeld met behulp van meerdere taken voor het bouwen en implementeren hier ook.
Bouw en implementeer een Node.js-app in Azure met behulp van het publicatieprofiel van de app. De publish-profile invoer verwijst naar het AZURE_WEBAPP_PUBLISH_PROFILE geheim dat u eerder hebt gemaakt.
# File: .github/workflows/workflow.yml
name: JavaScript CI
on: [push]
env:
AZURE_WEBAPP_NAME: my-app-name # set this to your application's name
AZURE_WEBAPP_PACKAGE_PATH: 'my-app-path' # set this to the path to your web app project, defaults to the repository root
NODE_VERSION: '18.x' # set this to the node version to use
jobs:
build-and-deploy:
name: Build and Deploy
runs-on: ubuntu-latest
steps:
- uses: actions/checkout@main
- name: Use Node.js ${{ env.NODE_VERSION }}
uses: actions/setup-node@v4
with:
node-version: ${{ env.NODE_VERSION }}
- name: npm install, build, and test
run: |
# Build and test the project, then
# deploy to Azure Web App.
npm install
npm run build --if-present
npm run test --if-present
working-directory: my-app-path
- name: 'Deploy to Azure WebApp'
uses: azure/webapps-deploy@v3
with:
app-name: ${{ env.AZURE_WEBAPP_NAME }}
publish-profile: ${{ secrets.AZURE_WEBAPP_PUBLISH_PROFILE }}
package: ${{ env.AZURE_WEBAPP_PACKAGE_PATH }}
Bouw en implementeer een Python-app in Azure met behulp van het publicatieprofiel van de app. Let op hoe de publish-profile invoer verwijst naar het AZURE_WEBAPP_PUBLISH_PROFILE geheim dat u eerder hebt gemaakt.
name: Python CI
on:
[push]
env:
AZURE_WEBAPP_NAME: my-web-app # set this to your application's name
AZURE_WEBAPP_PACKAGE_PATH: '.' # set this to the path to your web app project, defaults to the repository root
jobs:
build:
runs-on: ubuntu-latest
steps:
- uses: actions/checkout@v4
- name: Set up Python 3.x
uses: actions/setup-python@v4
with:
python-version: 3.x
- name: Install dependencies
run: |
python -m pip install --upgrade pip
pip install -r requirements.txt
- name: Building web app
uses: azure/appservice-build@v2
- name: Deploy web App using GH Action azure/webapps-deploy
uses: azure/webapps-deploy@v3
with:
app-name: ${{ env.AZURE_WEBAPP_NAME }}
publish-profile: ${{ secrets.AZURE_WEBAPP_PUBLISH_PROFILE }}
package: ${{ env.AZURE_WEBAPP_PACKAGE_PATH }}
Als u wilt implementeren met de service-principal die u hebt geconfigureerd, gebruikt u de azure/login@v1 actie met de creds sleutel en verwijst u naar het AZURE_CREDENTIALS geheim dat u eerder hebt gemaakt.
name: .NET Core
on: [push]
env:
AZURE_WEBAPP_NAME: my-app # set this to your application's name
AZURE_WEBAPP_PACKAGE_PATH: '.' # set this to the path to your web app project, defaults to the repository root
DOTNET_VERSION: '6.0.x' # set this to the dot net version to use
jobs:
build:
runs-on: ubuntu-latest
steps:
# Checkout the repo
- uses: actions/checkout@main
- uses: azure/login@v1
  with:
    creds: ${{ secrets.AZURE_CREDENTIALS }}
# Setup .NET Core SDK
- name: Setup .NET Core
uses: actions/setup-dotnet@v3
with:
dotnet-version: ${{ env.DOTNET_VERSION }}
# Run dotnet build and publish
- name: dotnet build and publish
run: |
dotnet restore
dotnet build --configuration Release
dotnet publish -c Release --property:PublishDir='${{ env.AZURE_WEBAPP_PACKAGE_PATH }}/myapp'
# Deploy to Azure Web apps
- name: 'Run Azure webapp deploy action using Azure Credentials'
uses: azure/webapps-deploy@v3
with:
app-name: ${{ env.AZURE_WEBAPP_NAME }} # Replace with your app name
package: '${{ env.AZURE_WEBAPP_PACKAGE_PATH }}/myapp'
- name: logout
run: |
az logout
Bouw en implementeer een ASP.NET MVC-app in Azure met behulp van een Azure-service-principal. Let op hoe de creds invoer verwijst naar het AZURE_CREDENTIALS geheim dat u eerder hebt gemaakt.
name: Deploy ASP.NET MVC App deploy to Azure Web App

on: [push]

env:
  AZURE_WEBAPP_NAME: my-app    # set this to your application's name
  AZURE_WEBAPP_PACKAGE_PATH: '.'      # set this to the path to your web app project, defaults to the repository root
  NUGET_VERSION: '5.3.x'           # set this to the dot net version to use

jobs:
  build-and-deploy:
    runs-on: windows-latest
    steps:

    # checkout the repo
    - uses: actions/checkout@main

    - uses: azure/login@v1
      with:
        creds: ${{ secrets.AZURE_CREDENTIALS }}

    - name: Install Nuget
      uses: nuget/setup-nuget@v1
      with:
        nuget-version: ${{ env.NUGET_VERSION}}
    - name: NuGet to restore dependencies as well as project-specific tools that are specified in the project file
      run: nuget restore

    - name: Add msbuild to PATH
      uses: microsoft/setup-msbuild@v1.0.2

    - name: Run MSBuild
      run: msbuild .\SampleWebApplication.sln

    - name: 'Run Azure webapp deploy action using Azure Credentials'
      uses: azure/webapps-deploy@v3
      with:
        app-name: ${{ env.AZURE_WEBAPP_NAME }} # Replace with your app name
        package: '${{ env.AZURE_WEBAPP_PACKAGE_PATH }}/SampleWebApplication/'

    # Azure logout
    - name: logout
      run: |
        az logout
Bouw en implementeer een Java Spring-app in Azure met behulp van een Azure-service-principal. Let op hoe de creds invoer verwijst naar het AZURE_CREDENTIALS geheim dat u eerder hebt gemaakt.
name: Java CI with Maven

on: [push]

jobs:
  build:

    runs-on: ubuntu-latest

    steps:
    - uses: actions/checkout@v4
    - uses: azure/login@v1
      with:
        creds: ${{ secrets.AZURE_CREDENTIALS }}
    - name: Set up JDK 1.8
      uses: actions/setup-java@v3
      with:
        java-version: 1.8
    - name: Build with Maven
      run: mvn -B package --file pom.xml
      working-directory: complete
    - name: Azure WebApp
      uses: Azure/webapps-deploy@v3
      with:
        app-name: my-app-name
        package: my/target/*.jar

    # Azure logout
    - name: logout
      run: |
        az logout
Bouw en implementeer een Tomcat-app in Azure met behulp van een Azure-service-principal. Let op hoe de creds invoer verwijst naar het AZURE_CREDENTIALS geheim dat u eerder hebt gemaakt.
name: Build and deploy WAR app to Azure Web App using Service Principal Connect

env:
  JAVA_VERSION: '11'                  # set this to the Java version to use
  DISTRIBUTION: microsoft             # set this to the Java distribution
  AZURE_WEBAPP_NAME: sampleapp        # set this to the name of your web app

on: [push]

permissions:
  contents: read

jobs:
  build:
    runs-on: ubuntu-latest

    steps:
      - uses: actions/checkout@v4

      - name: Set up Java version
        uses: actions/setup-java@v3.0.0
        with:
          java-version: ${{ env.JAVA_VERSION }}
          distribution: ${{ env.DISTRIBUTION }}
          cache: 'maven'

      - name: Build with Maven
        run: mvn clean install

      - name: Login to Azure
        uses: azure/login@v2
        with:
          creds: ${{ secrets.AZURE_CREDENTIALS }}

      - name: Deploy to Azure Web App
        id: deploy-to-webapp
        uses: azure/webapps-deploy@v3
        with:
          app-name: ${{ env.AZURE_WEBAPP_NAME }}
          package: '*.war'
U vindt dit volledige voorbeeld met behulp van meerdere taken voor het bouwen en implementeren hier ook.
Bouw en implementeer een Node.js-app in Azure met behulp van een Azure-service-principal. Let op hoe de creds invoer verwijst naar het AZURE_CREDENTIALS geheim dat u eerder hebt gemaakt.
name: JavaScript CI

on: [push]

name: Node.js

env:
  AZURE_WEBAPP_NAME: my-app   # set this to your application's name
  AZURE_WEBAPP_PACKAGE_PATH: 'my-app-path'      # set this to the path to your web app project, defaults to the repository root
  NODE_VERSION: '18.x'                # set this to the node version to use

jobs:
  build-and-deploy:
    runs-on: ubuntu-latest
    steps:
    # checkout the repo
    - name: 'Checkout GitHub Action'
      uses: actions/checkout@main

    - uses: azure/login@v1
      with:
        creds: ${{ secrets.AZURE_CREDENTIALS }}

    - name: Setup Node ${{ env.NODE_VERSION }}
      uses: actions/setup-node@v4
      with:
        node-version: ${{ env.NODE_VERSION }}

    - name: 'npm install, build, and test'
      run: |
        npm install
        npm run build --if-present
        npm run test --if-present
      working-directory:  my-app-path

    # deploy web app using Azure credentials
    - uses: azure/webapps-deploy@v3
      with:
        app-name: ${{ env.AZURE_WEBAPP_NAME }}
        package: ${{ env.AZURE_WEBAPP_PACKAGE_PATH }}

    # Azure logout
    - name: logout
      run: |
        az logout
Bouw en implementeer een Python-app in Azure met behulp van een Azure-service-principal. Let op hoe de creds invoer verwijst naar het AZURE_CREDENTIALS geheim dat u eerder hebt gemaakt.
name: Python application

on:
  [push]

env:
  AZURE_WEBAPP_NAME: my-app # set this to your application's name
  AZURE_WEBAPP_PACKAGE_PATH: '.' # set this to the path to your web app project, defaults to the repository root

jobs:
  build:
    runs-on: ubuntu-latest
    steps:
    - uses: actions/checkout@v4

    - uses: azure/login@v1
      with:
        creds: ${{ secrets.AZURE_CREDENTIALS }}

    - name: Set up Python 3.x
      uses: actions/setup-python@v4
      with:
        python-version: 3.x
    - name: Install dependencies
      run: |
        python -m pip install --upgrade pip
        pip install -r requirements.txt
    - name: Deploy web App using GH Action azure/webapps-deploy
      uses: azure/webapps-deploy@v3
      with:
        app-name: ${{ env.AZURE_WEBAPP_NAME }}
        package: ${{ env.AZURE_WEBAPP_PACKAGE_PATH }}
    - name: logout
      run: |
        az logout
Hoe kan ik een WAR-bestand implementeren via de Maven-invoegtoepassing en OpenID Connect
Als u uw Java Tomcat-project hebt geconfigureerd met de Maven-invoegtoepassing, kunt u ook implementeren naar Azure-app Service via deze invoegtoepassing. Als u de Azure CLI GitHub-actie gebruikt, worden uw Azure-aanmeldingsreferenties gebruikt.
Meer informatie over de GitHub Action voor CLI en hoe u deze kunt gebruiken en configureren, vindt u in de Azure CLI GitHub-actie.
Meer informatie over de opdracht az webapp deploy, how to use and the parameter details is te vinden in de az webapp deploy documentation.
Hoe kan ik implementeren in een container
Met de actie Azure Web Deploy kunt u uw werkstroom automatiseren om aangepaste containers te implementeren in App Service met behulp van GitHub Actions. Gedetailleerde informatie over de stappen voor implementatie met behulp van GitHub Actions vindt u in de implementatie in een container.
Hoe kan ik de Tomcat-configuratie bijwerken na de implementatie
Als u de instellingen van uw web-apps na de implementatie wilt bijwerken, kunt u de actie App Service-instellingen gebruiken.
    - uses: azure/appservice-settings@v1
      with:
        app-name: 'my-app'
        slot-name: 'staging'  # Optional and needed only if the settings have to be configured on the specific deployment slot
        app-settings-json: '[{ "name": "CATALINA_OPTS", "value": "-Dfoo=bar" }]'
        connection-strings-json: '${{ secrets.CONNECTION_STRINGS }}'
        general-settings-json: '{"alwaysOn": "false", "webSocketsEnabled": "true"}' #'General configuration settings as Key Value pairs'
      id: settings
Binnenkort beschikbaar: In de loop van 2024 zullen we GitHub-problemen geleidelijk uitfaseren als het feedbackmechanisme voor inhoud en deze vervangen door een nieuw feedbacksysteem. Zie voor meer informatie: https://aka.ms/ContentUserFeedback.