Notitie
Voor toegang tot deze pagina is autorisatie vereist. U kunt proberen u aan te melden of de directory te wijzigen.
Voor toegang tot deze pagina is autorisatie vereist. U kunt proberen de mappen te wijzigen.
In dit artikel leert u hoe u de Azure SDK-beheerbibliotheken in een Python-script gebruikt om een resourcegroep te maken die een virtuele Linux-machine bevat.
De equivalente Azure CLI-opdrachten worden verderop in dit artikel vermeld. Als u liever Azure Portal gebruikt, raadpleegt u Een Virtuele Linux-machine maken en een Windows-VM maken.
Opmerking
Het maken van een virtuele machine via code is een proces met meerdere stappen waarbij een aantal andere resources worden ingericht die nodig zijn voor de virtuele machine. Als u dergelijke code gewoon vanaf de opdrachtregel uitvoert, is het veel eenvoudiger om de az vm create opdracht te gebruiken, waardoor deze secundaire resources automatisch worden voorzien van standaardinstellingen voor elke instelling die u wilt weglaten. De enige vereiste argumenten zijn een resourcegroep, een VM-naam, een installatiekopienaam en verificatiegegevens. Zie Snel een virtuele machine maken met de Azure CLI voor meer informatie.
1: Uw lokale ontwikkelomgeving instellen
Als u dit nog niet hebt gedaan, stelt u een omgeving in waarin u deze code kunt uitvoeren. Hieronder volgen een aantal opties:
#!/bin/bash
# Create a virtual environment
python -m venv .venv
# Activate the virtual environment
source .venv/Scripts/activate # only required for Windows (Git Bash)
Gebruik een conda-omgeving. Zie Miniconda installeren om Conda te installeren.
Gebruik een Dev Container- in Visual Studio Code- of GitHub Codespaces.
2: De benodigde Azure-bibliotheekpakketten installeren
Maak een requirements.txt-bestand waarin de Azure SDK-beheerpakketten worden opgegeven die vereist zijn voor dit script.
azure-mgmt-resource
azure-mgmt-compute
azure-mgmt-network
azure-identity
Installeer vervolgens de beheerbibliotheken die zijn opgegeven in requirements.txt:
pip install -r requirements.txt
3: Code schrijven om een virtuele machine te maken
Maak een Python-bestand met de naam provision_vm.py met de volgende code. In de opmerkingen worden de details uitgelegd:
# Import the needed credential and management objects from the libraries.
import os

from azure.identity import DefaultAzureCredential
from azure.mgmt.compute import ComputeManagementClient
from azure.mgmt.network import NetworkManagementClient
from azure.mgmt.resource import ResourceManagementClient

print(
    "Provisioning a virtual machine...some operations might take a \
minute or two."
)

# Acquire a credential object.
credential = DefaultAzureCredential()

# Retrieve subscription ID from environment variable.
subscription_id = os.environ["AZURE_SUBSCRIPTION_ID"]


# Step 1: Provision a resource group

# Obtain the management object for resources.
resource_client = ResourceManagementClient(credential, subscription_id)

# Constants we need in multiple places: the resource group name and
# the region in which we provision resources. You can change these
# values however you want.
RESOURCE_GROUP_NAME = "PythonAzureExample-VM-rg"
LOCATION = "westus2"

# Provision the resource group.
rg_result = resource_client.resource_groups.create_or_update(
    RESOURCE_GROUP_NAME, {"location": LOCATION}
)

print(
    f"Provisioned resource group {rg_result.name} in the \
{rg_result.location} region"
)

# For details on the previous code, see Example: Provision a resource
# group at https://learn.microsoft.com/azure/developer/python/
# azure-sdk-example-resource-group

# Step 2: provision a virtual network

# A virtual machine requires a network interface client (NIC). A NIC
# requires a virtual network and subnet along with an IP address.
# Therefore we must provision these downstream components first, then
# provision the NIC, after which we can provision the VM.

# Network and IP address names
VNET_NAME = "python-example-vnet"
SUBNET_NAME = "python-example-subnet"
IP_NAME = "python-example-ip"
IP_CONFIG_NAME = "python-example-ip-config"
NIC_NAME = "python-example-nic"

# Obtain the management object for networks
network_client = NetworkManagementClient(credential, subscription_id)

# Provision the virtual network and wait for completion
poller = network_client.virtual_networks.begin_create_or_update(
    RESOURCE_GROUP_NAME,
    VNET_NAME,
    {
        "location": LOCATION,
        "address_space": {"address_prefixes": ["10.0.0.0/16"]},
    },
)

vnet_result = poller.result()

print(
    f"Provisioned virtual network {vnet_result.name} with address \
prefixes {vnet_result.address_space.address_prefixes}"
)

# Step 3: Provision the subnet and wait for completion
poller = network_client.subnets.begin_create_or_update(
    RESOURCE_GROUP_NAME,
    VNET_NAME,
    SUBNET_NAME,
    {"address_prefix": "10.0.0.0/24"},
)
subnet_result = poller.result()

print(
    f"Provisioned virtual subnet {subnet_result.name} with address \
prefix {subnet_result.address_prefix}"
)

# Step 4: Provision an IP address and wait for completion
poller = network_client.public_ip_addresses.begin_create_or_update(
    RESOURCE_GROUP_NAME,
    IP_NAME,
    {
        "location": LOCATION,
        "sku": {"name": "Standard"},
        "public_ip_allocation_method": "Static",
        "public_ip_address_version": "IPV4",
    },
)

ip_address_result = poller.result()

print(
    f"Provisioned public IP address {ip_address_result.name} \
with address {ip_address_result.ip_address}"
)

# Step 5: Provision the network interface client
poller = network_client.network_interfaces.begin_create_or_update(
    RESOURCE_GROUP_NAME,
    NIC_NAME,
    {
        "location": LOCATION,
        "ip_configurations": [
            {
                "name": IP_CONFIG_NAME,
                "subnet": {"id": subnet_result.id},
                "public_ip_address": {"id": ip_address_result.id},
            }
        ],
    },
)

nic_result = poller.result()

print(f"Provisioned network interface client {nic_result.name}")

# Step 6: Provision the virtual machine

# Obtain the management object for virtual machines
compute_client = ComputeManagementClient(credential, subscription_id)

VM_NAME = "ExampleVM"
USERNAME = "azureuser"
PASSWORD = "ChangePa$$w0rd24"

print(
    f"Provisioning virtual machine {VM_NAME}; this operation might \
take a few minutes."
)

# Provision the VM specifying only minimal arguments, which defaults
# to an Ubuntu 18.04 VM on a Standard DS1 v2 plan with a public IP address
# and a default virtual network/subnet.

poller = compute_client.virtual_machines.begin_create_or_update(
    RESOURCE_GROUP_NAME,
    VM_NAME,
    {
        "location": LOCATION,
        "storage_profile": {
            "image_reference": {
                "publisher": "Canonical",
                "offer": "UbuntuServer",
                "sku": "16.04.0-LTS",
                "version": "latest",
            }
        },
        "hardware_profile": {"vm_size": "Standard_DS1_v2"},
        "os_profile": {
            "computer_name": VM_NAME,
            "admin_username": USERNAME,
            "admin_password": PASSWORD,
        },
        "network_profile": {
            "network_interfaces": [
                {
                    "id": nic_result.id,
                }
            ]
        },
    },
)

vm_result = poller.result()

print(f"Provisioned virtual machine {vm_result.name}")
Verificatie in de code
Verderop in dit artikel meldt u zich aan bij Azure met behulp van de Azure CLI om de voorbeeldcode uit te voeren. Als uw account over voldoende machtigingen beschikt om resourcegroepen en opslagresources in uw Azure-abonnement te maken, wordt het script zonder extra configuratie uitgevoerd.
Als u deze code in een productieomgeving wilt gebruiken, moet u verifiëren met behulp van een service-principal en omgevingsvariabelen instellen. Deze aanpak maakt veilige, geautomatiseerde toegang mogelijk zonder te vertrouwen op interactief aanmelden. Zie Python-apps verifiëren met Azure-services voor gedetailleerde richtlijnen.
Zorg ervoor dat aan de service-principal een rol is toegewezen met voldoende machtigingen voor het maken van resourcegroepen en opslagaccounts. Als u bijvoorbeeld de rol Inzender op abonnementsniveau toewijst, krijgt u de benodigde toegang. Zie op rollen gebaseerd toegangsbeheer (RBAC) in Azure voor meer informatie over roltoewijzingen.
Referentiekoppelingen voor klassen die in de code worden gebruikt
- DefaultAzureCredential (azure.identity)
- ResourceManagementClient (azure.mgmt.resource)
- NetworkManagementClient (azure.mgmt.network)
- ComputeManagementClient (azure.mgmt.compute)
4. Voer het script uit
Als u dat nog niet hebt gedaan, meldt u zich aan bij Azure met behulp van de Azure CLI:
az loginStel de
AZURE_SUBSCRIPTION_IDomgevingsvariabele in op uw abonnements-id. (Voer de opdracht az account show uit en haal uw abonnements-id op uit deideigenschap in de uitvoer):export AZURE_SUBSCRIPTION_ID=$(az account show --query id -o tsv)Voer het script uit:
python provision_vm.py
Het inrichten duurt enkele minuten.
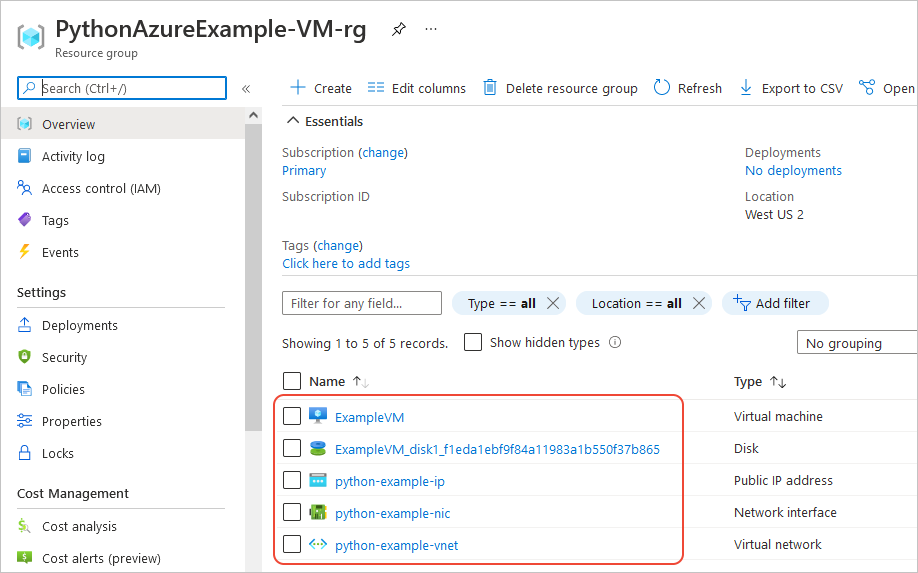
5. Controleer de middelen
Open de Azure-portal, ga naar de resourcegroep PythonAzureExample-VM-rg en noteer de virtuele machine, de virtuele schijf, de netwerkbeveiligingsgroep, het openbare IP-adres, de netwerkinterface en het virtuele netwerk.
U kunt ook de Azure CLI gebruiken om te controleren of de virtuele machine bestaat met behulp van de opdracht az vm list:
az vm list --resource-group PythonAzureExample-VM-rg
Equivalente Azure CLI-opdrachten
# Provision the resource group

az group create -n PythonAzureExample-VM-rg -l westus2

# Provision a virtual network and subnet

az network vnet create -g PythonAzureExample-VM-rg -n python-example-vnet \
    --address-prefix 10.0.0.0/16 --subnet-name python-example-subnet \
    --subnet-prefix 10.0.0.0/24

# Provision a public IP address

az network public-ip create -g PythonAzureExample-VM-rg -n python-example-ip \
    --allocation-method Dynamic --version IPv4

# Provision a network interface client

az network nic create -g PythonAzureExample-VM-rg --vnet-name python-example-vnet \
    --subnet python-example-subnet -n python-example-nic \
    --public-ip-address python-example-ip

# Provision the virtual machine

az vm create -g PythonAzureExample-VM-rg -n ExampleVM -l "westus2" \
    --nics python-example-nic --image UbuntuLTS --public-ip-sku Standard \
    --admin-username azureuser --admin-password ChangePa$$w0rd24
Als u een foutmelding krijgt over capaciteitsbeperkingen, probeert u een andere grootte of regio. Zie Fouten oplossen voor SKU niet beschikbaar voor meer informatie.
6: Hulpmiddelen opruimen
Als u de virtuele machine en het netwerk dat u in dit artikel hebt gemaakt, wilt blijven gebruiken, verwijdert u de resources niet. Voer anders de opdracht az group delete uit om de resourcegroep te verwijderen.
Voor resourcegroepen worden geen lopende kosten in uw abonnement in rekening gebracht, maar de resources in de groep, zoals virtuele machines, kunnen nog steeds kosten met zich meebrengen. Schoon alle resourcegroepen op die u niet actief gebruikt. Met --no-wait het argument wordt de opdracht onmiddellijk geretourneerd in plaats van te wachten tot de bewerking is voltooid.
az group delete -n PythonAzureExample-VM-rg --no-wait
U kunt ook de methode ResourceManagementClient.resource_groups.begin_delete gebruiken om een resourcegroep uit code te verwijderen. De code in voorbeeld: Een resourcegroep maken laat het gebruik zien.
Zie ook
- Voorbeeld: Een resourcegroep maken
- voorbeeld: resourcegroepen weergeven in een abonnement
- voorbeeld: Azure Storage- maken
- voorbeeld: Azure Storage- gebruiken
- Voorbeeld: Een web-app maken en code implementeren
- Voorbeeld: Een database maken en er query's op uitvoeren
- Azure Managed Disks gebruiken met virtuele machines
- Voltooi een korte enquête over de Azure SDK voor Python
De volgende resources bevatten uitgebreidere voorbeelden die gebruikmaken van Python om een virtuele machine te maken:
- Azure Virtuele Machines Beheervoorbeelden - Python (GitHub). In het voorbeeld ziet u meer beheerbewerkingen, zoals het starten en opnieuw opstarten van een virtuele machine, het stoppen en verwijderen van een VIRTUELE machine, het vergroten van de schijfgrootte en het beheren van gegevensschijven.