Poznámka
Na prístup k tejto stránke sa vyžaduje oprávnenie. Môžete sa skúsiť prihlásiť alebo zmeniť adresáre.
Na prístup k tejto stránke sa vyžaduje oprávnenie. Môžete skúsiť zmeniť adresáre.
This article outlines the process to register an Azure SQL database source in Microsoft Purview. It includes instructions to authenticate and interact with the SQL database.
Supported capabilities
Scanning capabilities
| Metadata Extraction | Full Scan | Incremental Scan | Scoped Scan |
|---|---|---|---|
| Yes | Yes | Yes | Yes |
When you're scanning Azure SQL Database, Microsoft Purview supports extracting technical metadata from these sources:
- Server
- Database
- Schemas
- Tables, including columns
- Views, including columns
- Stored procedures (with lineage extraction enabled)*
- Stored procedure runs (with lineage extraction enabled)*
When you're setting up a scan, you can further scope it after providing the database name by selecting tables and views as needed.
* Stored procedure lineage extraction scan has some limitations. Refer to the Known limitations section on this page for details.
Other capabilities
For classifications, sensitivity labels, policies, data lineage, and live view, see the list of supported capabilities.
Known limitations
For stored procedures (SP) lineage extraction:
SP lineage extraction scan isn't supported if your logical server in Azure disables public access or doesn't allow Azure services to access it.
SP lineage extraction scan is currently not supported if your stored procedures contain an INSERT or a DROP query.
SP lineage extraction scan isn't supported if your Microsoft Purview account disables public access.
- SP lineage extraction scan is scheduled to run every six hours by default. The frequency can't be changed.
- Lineage is captured only when the stored procedure execution transfers data from one table to another. And it's not supported for temporary tables.
- Lineage extraction isn't supported for functions or triggers.
- Due to the following limitations, you could see duplicate assets in the catalog if you have scenarios such as:
- The object names in assets and fully qualified names follow the case used in stored procedure statements, which might not align with the object case in original data source.
- When SQL views are referenced in stored procedures, they're currently captured as SQL tables.
For scanned assets:
For a full scan, instead of INT and NUMERIC data type, DECIMAL is displayed as a data type for SQL asset properties. If length of the field is MAX, it is displayed as zero (0).
For nchar data type, column length is displayed in character count.
Note
Lineage is also supported if Azure SQL tables or views are used as a source/sink in Azure Data Factory Copy and Data Flow activities.
Prerequisites
An Azure account with an active subscription. Create an account for free.
An active Microsoft Purview account.
Data Source Administrator and Data Reader permissions, so you can register a source and manage it in the Microsoft Purview governance portal. For details, see Access control in the Microsoft Purview governance portal.
Register the data source
Before you scan, it's important to register the data source in Microsoft Purview:
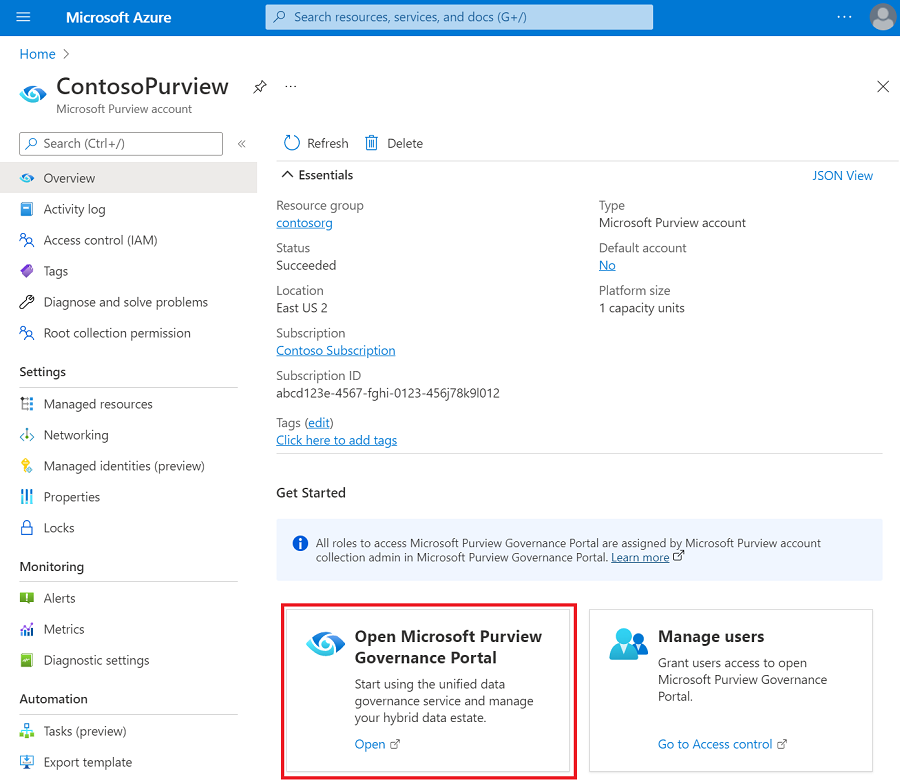
Open the Microsoft Purview governance portal by:
- Browsing directly to https://web.purview.azure.com and selecting your Microsoft Purview account.
- Opening the Azure portal, searching for and selecting the Microsoft Purview account. Select the the Microsoft Purview governance portal button.
Navigate to the Data Map.
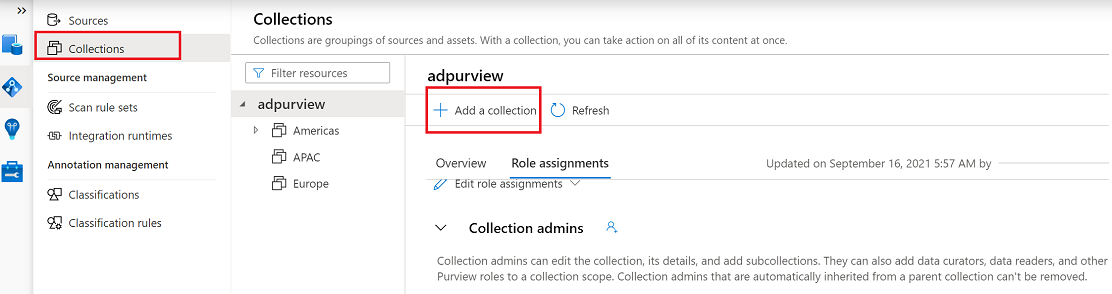
Create the collection hierarchy by going to Collections and then selecting Add a collection. Assign permissions to individual subcollections as required.
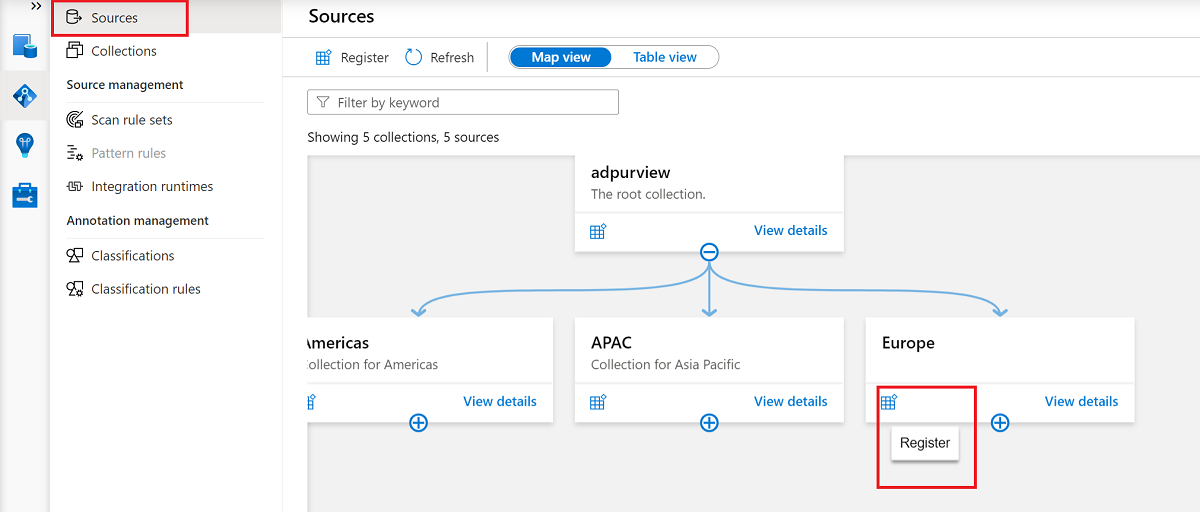
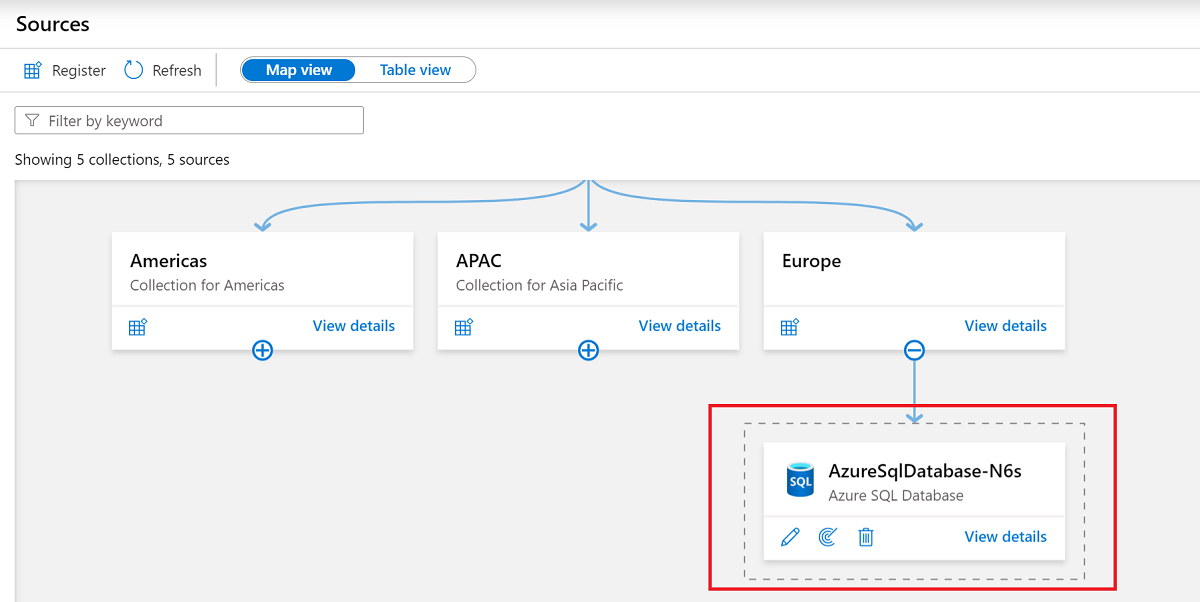
Go to the appropriate collection under Sources, and then select the Register icon to register a new SQL database.
Select the Azure SQL Database data source, and then select Continue.
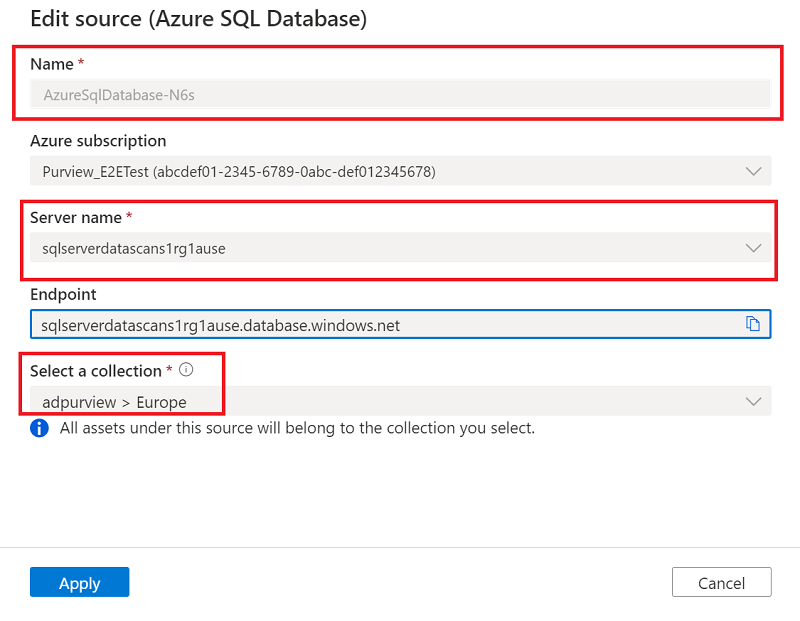
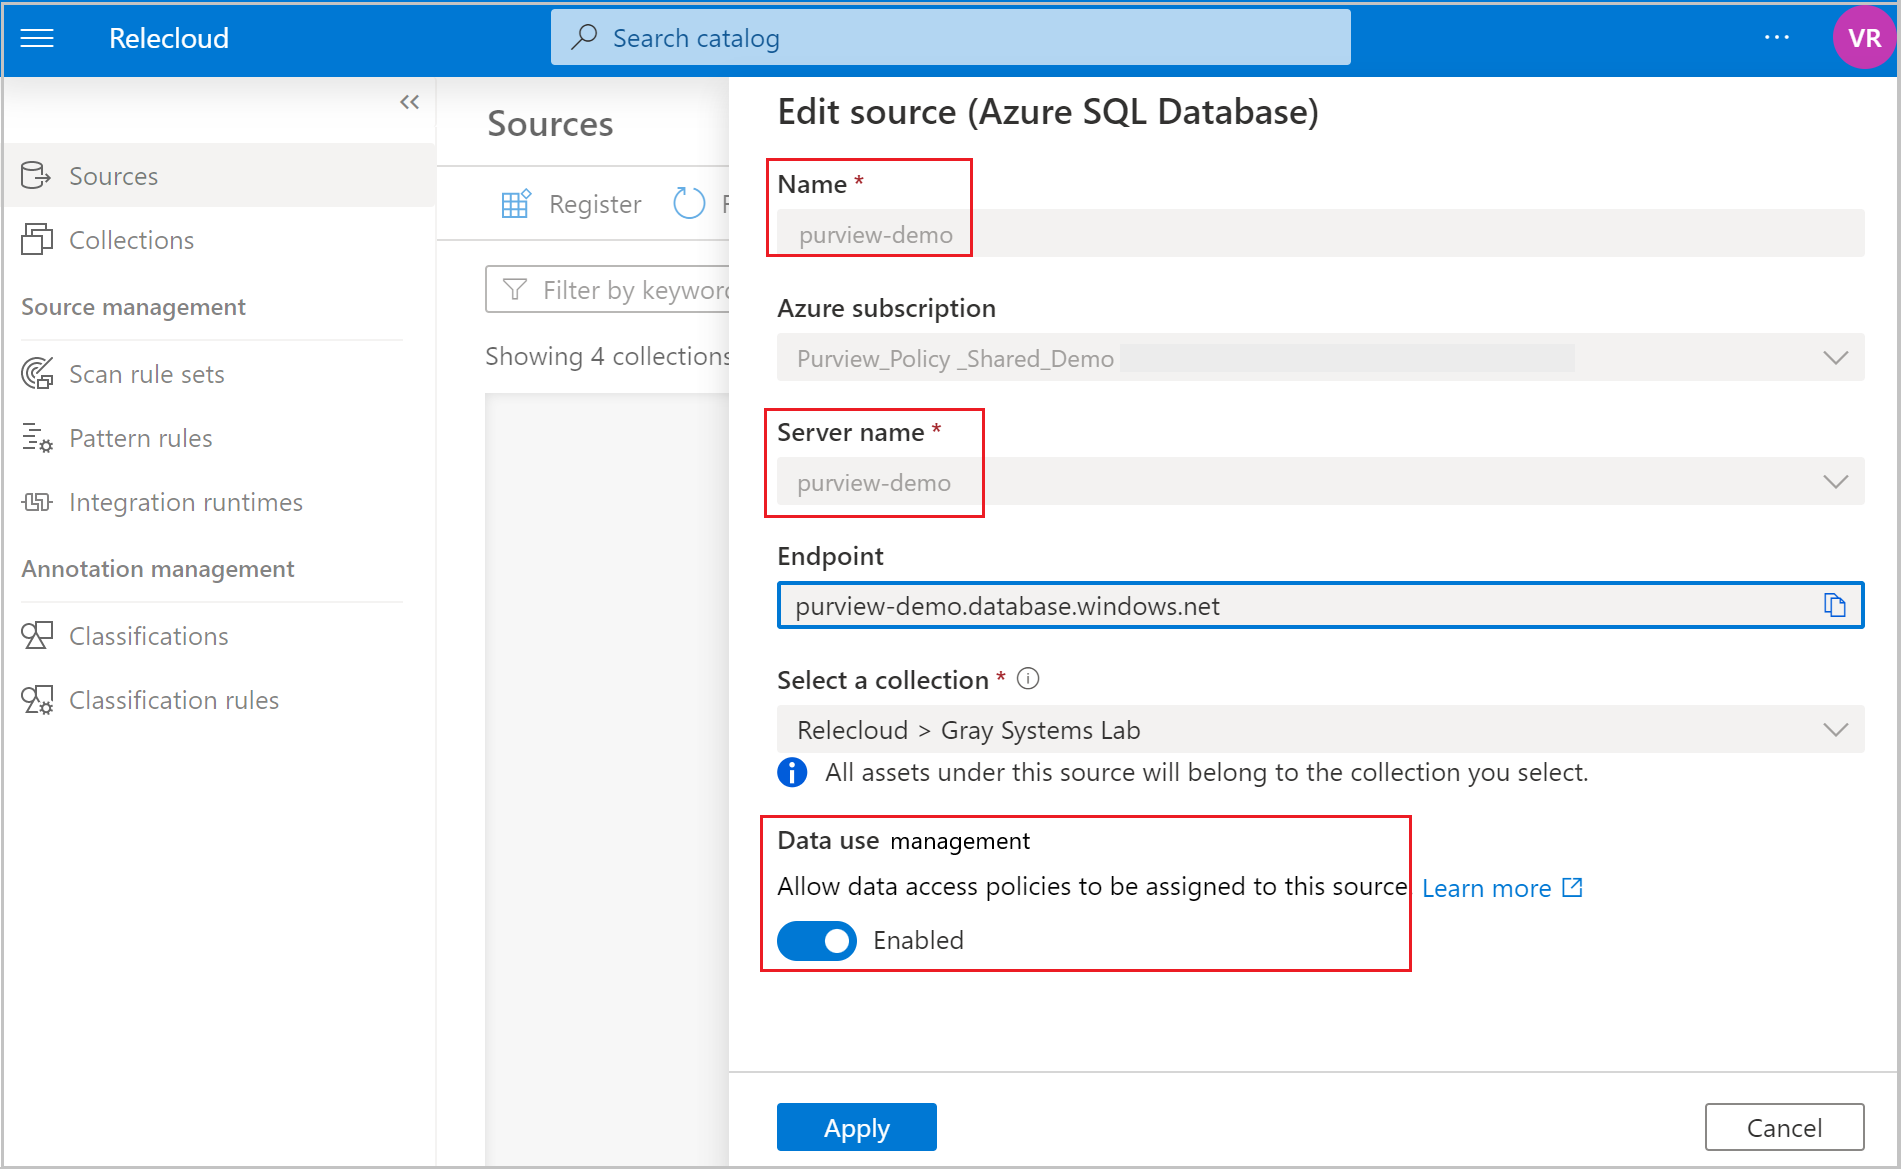
For Name, provide a suitable name for the data source. Select relevant names for Azure subscription, Server name, and Select a collection, and then select Apply.
Confirm that the SQL database appears under the selected collection.
Update firewall settings
If your database server has a firewall enabled, you need to update the firewall to allow access in one of the following ways:
- Allow Azure connections through the firewall. This is a straightforward option to route traffic through Azure networking, without needing to manage virtual machines.
- Install a self-hosted integration runtime on a machine in your network and give it access through the firewall. If you have a private virtual network set up within Azure, or have any other closed network set up, using a self-hosted integration runtime on a machine within that network will allow you to fully manage traffic flow and utilize your existing network.
- Use a managed virtual network. Setting up a managed virtual network with your Microsoft Purview account allows you to connect to Azure SQL by using the Azure integration runtime in a closed network.
For more information about the firewall, see the Azure SQL Database firewall documentation.
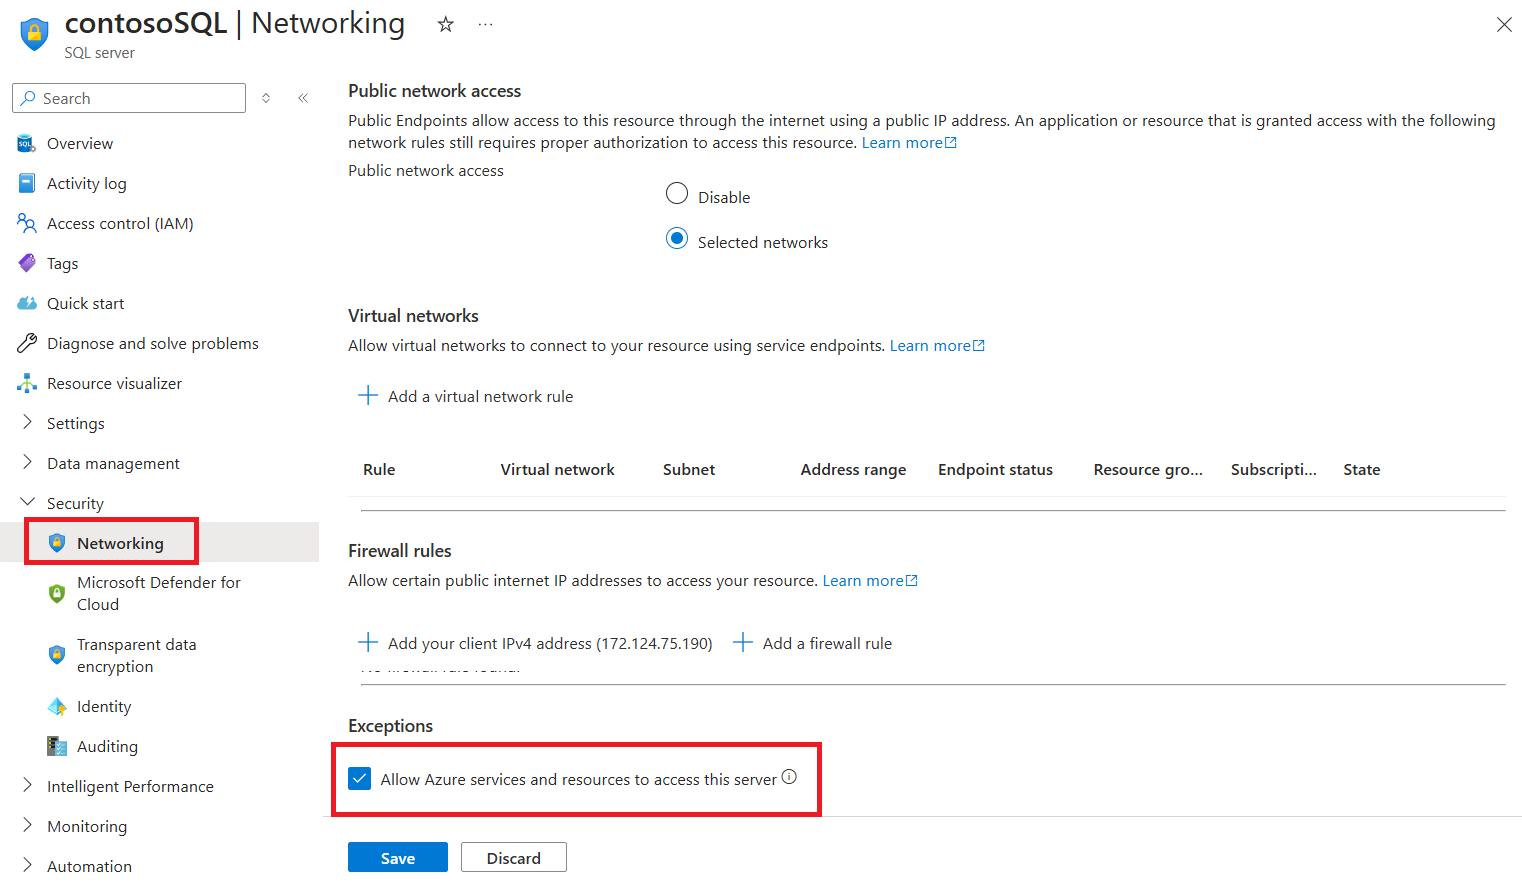
Allow Azure connections
Enabling Azure connections allows Microsoft Purview to connect to the server without requiring you to update the firewall itself.
- Go to your database account.
- On the Overview page, select the server name.
- Select Security > Networking.
- For Allow Azure services and resources to access this server, select Yes.
For more information about allowing connections from inside Azure, see the how-to guide.
Install a self-hosted integration runtime
You can install a self-hosted integration runtime on a machine to connect with a resource in a private network:
- Choose the right integration runtime for your scenario
- Create and install your integration runtime:
- To use a self-hosted integration runtime: Follow the article to create and configure a self-hosted integration runtime.
- To use a kubernetes supported self-hosted integration runtime: Follow the article to create and configure a kubernetes supported integration runtime.
- Check your database server's networking configuration to confirm that a private endpoint is accessible to the machine that contains the self-hosted integration runtime. Add the IP address of the machine if it doesn't already have access.
- If your logical server is behind a private endpoint or in a virtual network, you can use an ingestion private endpoint to ensure end-to-end network isolation.
Configure authentication for a scan
To scan your data source, you need to configure an authentication method in Azure SQL Database.
Important
If you're using a self-hosted integration runtime to connect to your resource, system-assigned and user-assigned managed identities won't work. You need to use service principal authentication or SQL authentication.
Microsoft Purview supports the following options:
System-assigned managed identity (SAMI) (recommended). This is an identity that is associated directly with your Microsoft Purview account. It allows you to authenticate directly with other Azure resources without needing to manage a go-between user or credential set.
The SAMI is created when your Microsoft Purview resource is created. The SAMI is managed by Azure and uses your Microsoft Purview account's name. The SAMI can't currently be used with a self-hosted integration runtime for Azure SQL.
For more information, see the managed identity overview.
User-assigned managed identity (UAMI) (preview). Similar to a SAMI, a UAMI is a credential resource that allows Microsoft Purview to authenticate against Microsoft Entra ID.
The UAMI is managed by users in Azure, rather than by Azure itself, which gives you more control over security. The UAMI can't currently be used with a self-hosted integration runtime for Azure SQL.
For more information, see the guide for user-assigned managed identities.
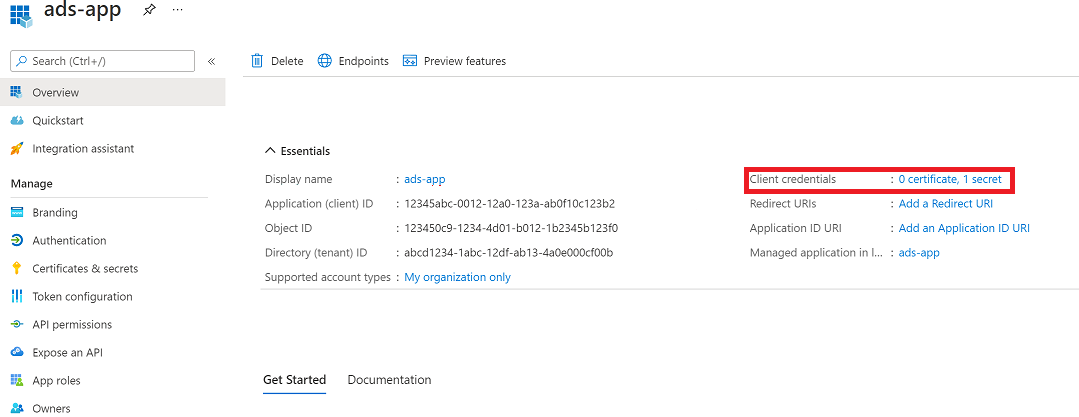
Service principal. A service principal is an application that can be assigned permissions like any other group or user, without being associated directly with a person. Authentication for service principals has an expiration date, so it can be useful for temporary projects.
For more information, see the service principal documentation.
SQL authentication. Connect to the SQL database with a username and password. For more information, see the SQL authentication documentation.
If you need to create a login, follow this guide to query a SQL database. Use this guide to create a login by using T-SQL.
Note
Be sure to select the Azure SQL Database option on the page.
For steps to authenticate with your SQL database, select your chosen method of authentication from the following tabs.
Note
Only the server-level principal login (created by the provisioning process) or members of the loginmanager database role in the master database can create new logins. The Microsoft Purview account should be able to scan the resources about 15 minutes after it gets permissions.
You need a SQL login with at least
db_datareaderpermissions to be able to access the information that Microsoft Purview needs to scan the database. You can follow the instructions in CREATE LOGIN to create a login for Azure SQL Database. Save the username and password for the next steps.Go to your key vault in the Azure portal.
Select Settings > Secrets, and then select + Generate/Import.
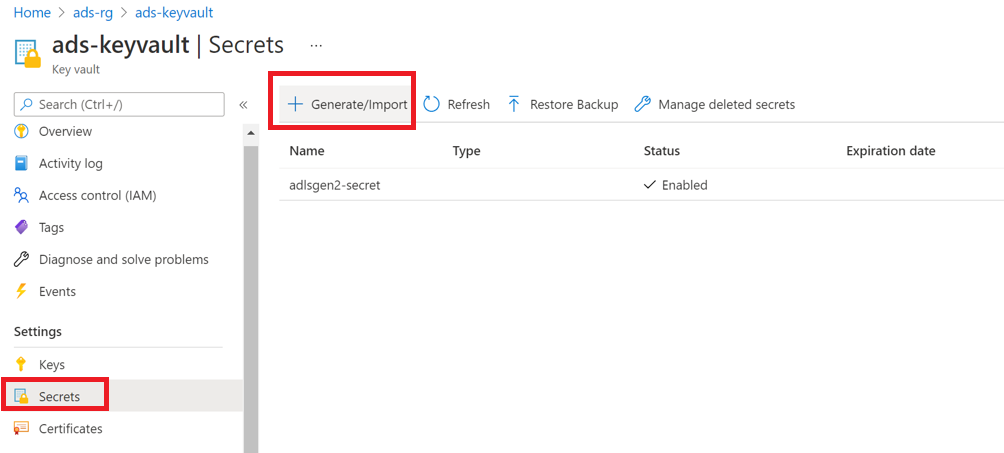
For Name and Value, use the username and password (respectively) from your SQL database.
Select Create.
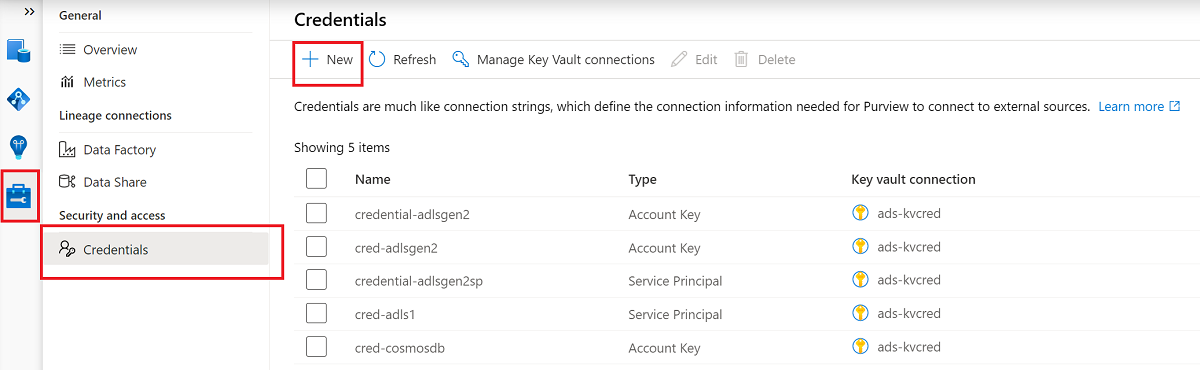
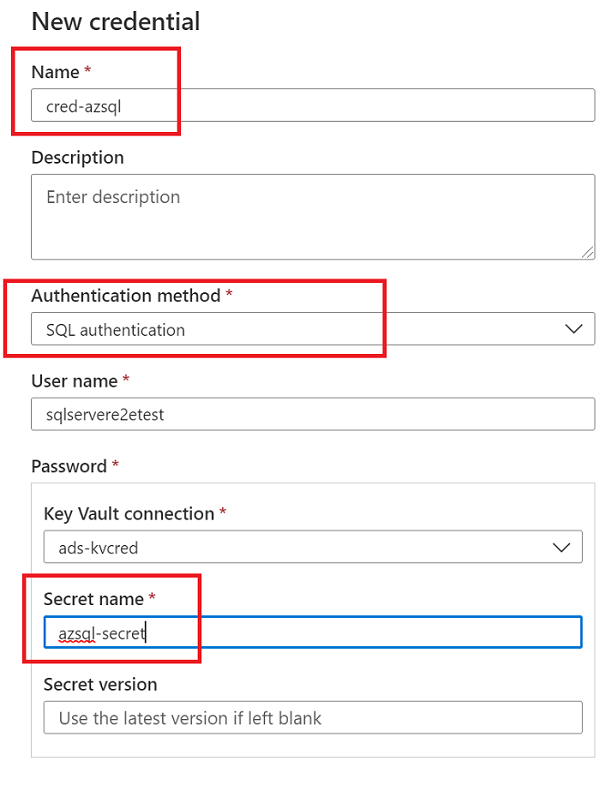
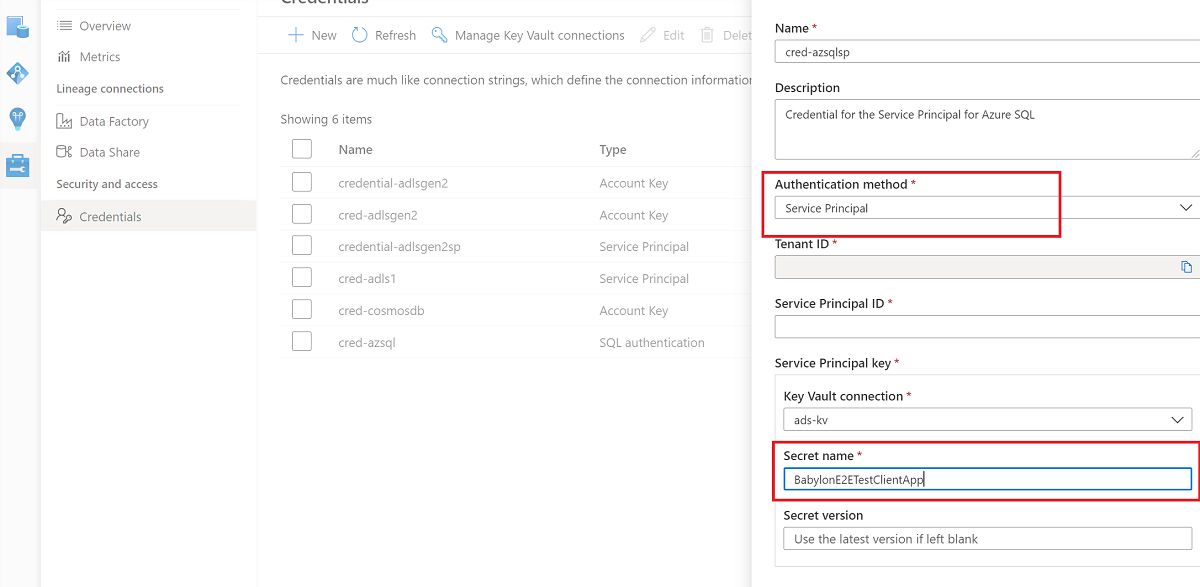
If your key vault isn't connected to Microsoft Purview yet, create a new key vault connection.
Create a new credential by using the key to set up your scan.
Create the scan
Open your Microsoft Purview account and select Open Microsoft Purview governance portal.
Go to Data map > Sources to view the collection hierarchy.
Select the New Scan icon under the SQL database that you registered earlier.
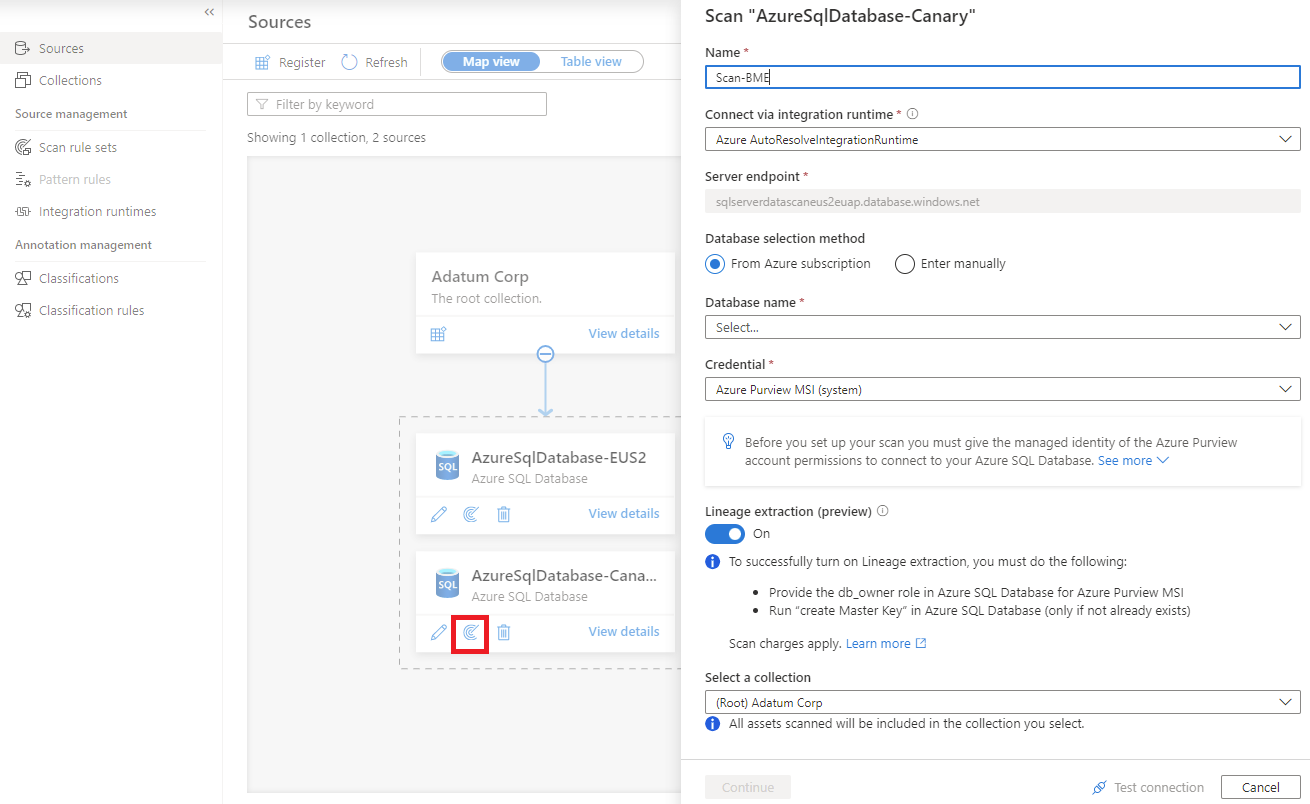
To learn more about stored procedure data lineage in Azure SQL Database, see the Extract lineage (preview) section of this article.
For scanning steps, select your method of authentication from the following tabs.
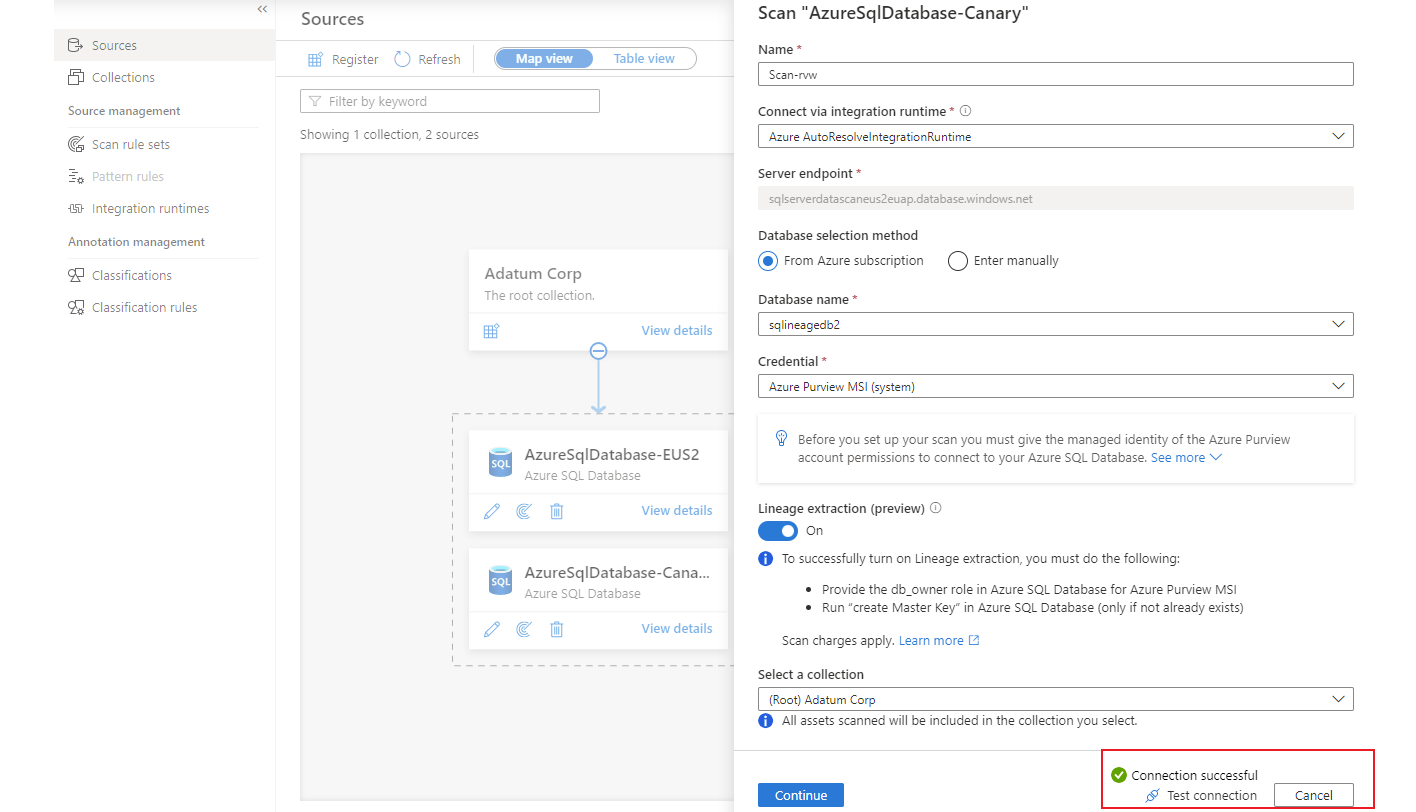
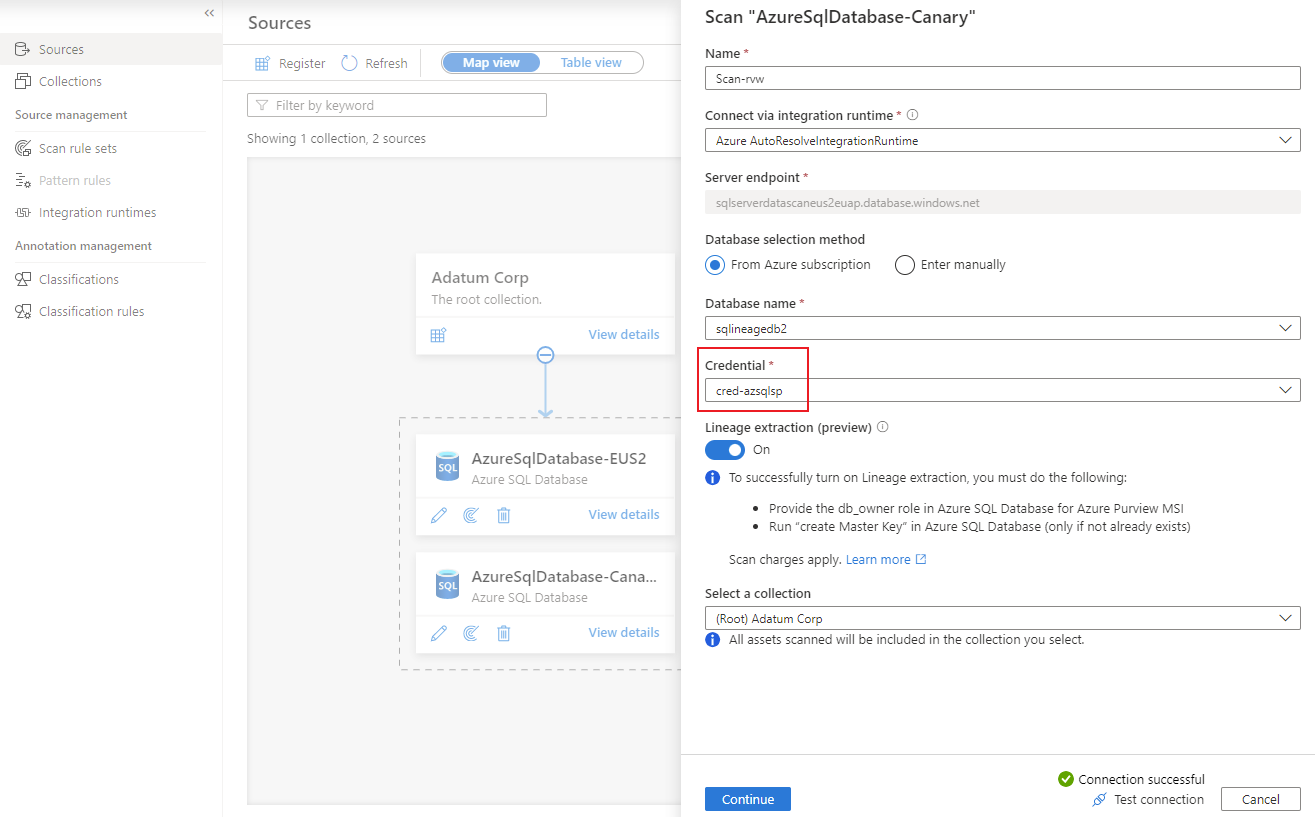
For Name, provide a name for the scan.
For Database selection method, select Enter manually.
For Database name and Credential, enter the values that you created earlier.
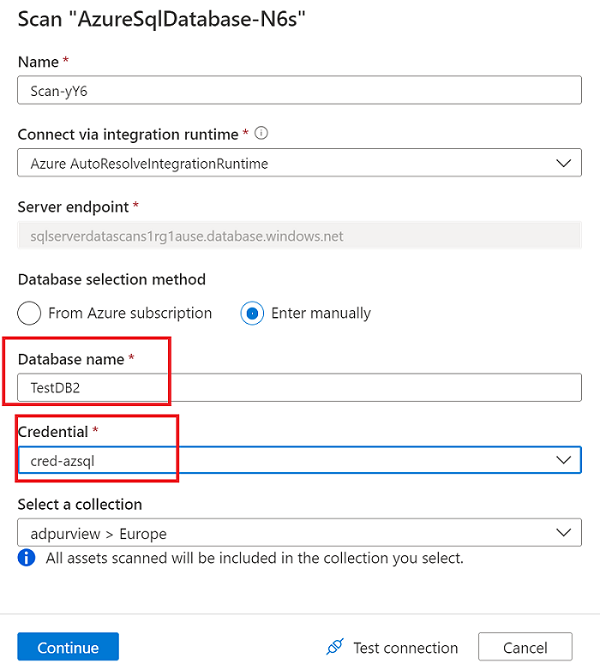
For Select a connection, choose the appropriate collection for the scan.
Select Test connection to validate the connection. After the connection is successful, select Continue.

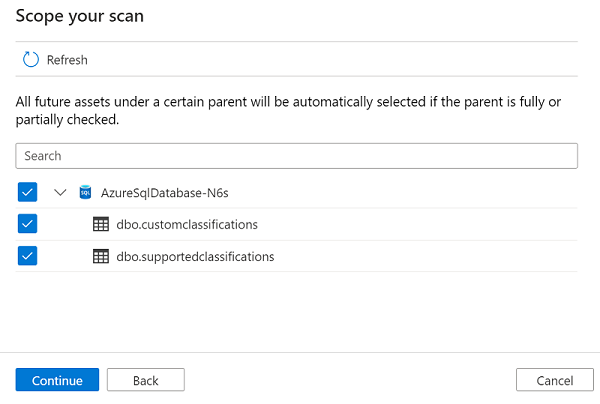
Scope and run the scan
You can scope your scan to specific database objects by choosing the appropriate items in the list.
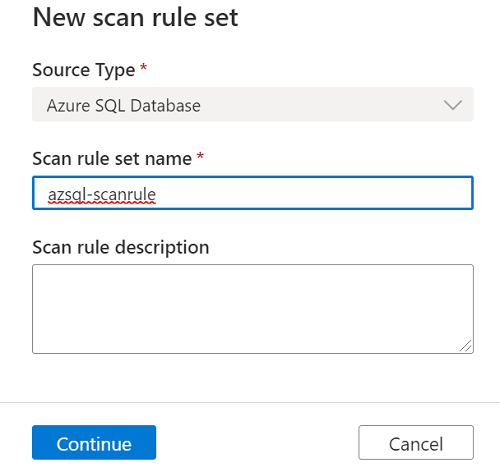
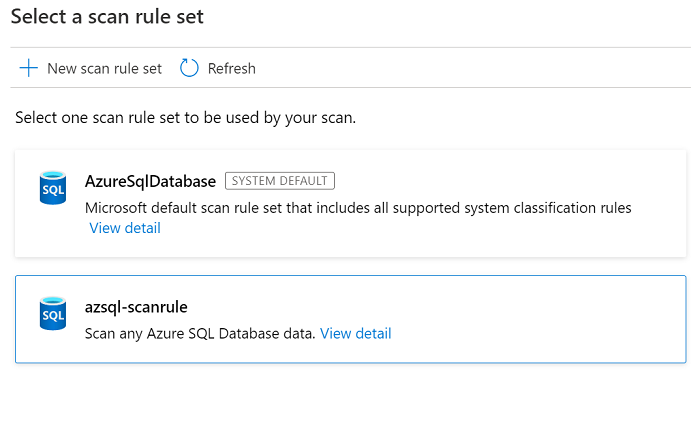
Select a scan rule set. You can use the system default, choose from existing custom rule sets, or create a new rule set inline. Select Continue when you're finished.

If you select New scan rule set, a pane opens so that you can enter the source type, the name of the rule set, and a description. Select Continue when you're finished.
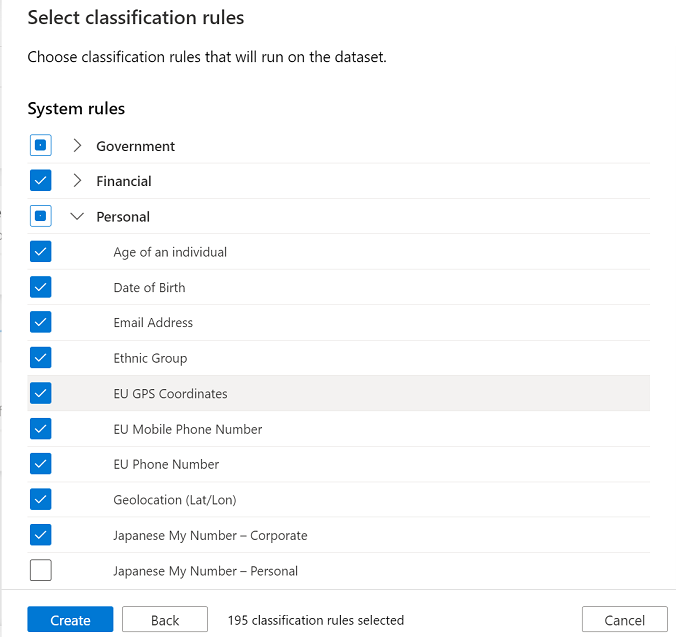
For Select classification rules, choose the classification rules that you want to include in the scan rule set, and then select Create.
The new scan rule set then appears in the list of available rule sets.
Choose your scan trigger. You can set up a schedule or run the scan once.
Review your scan, and then select Save and run.
View a scan
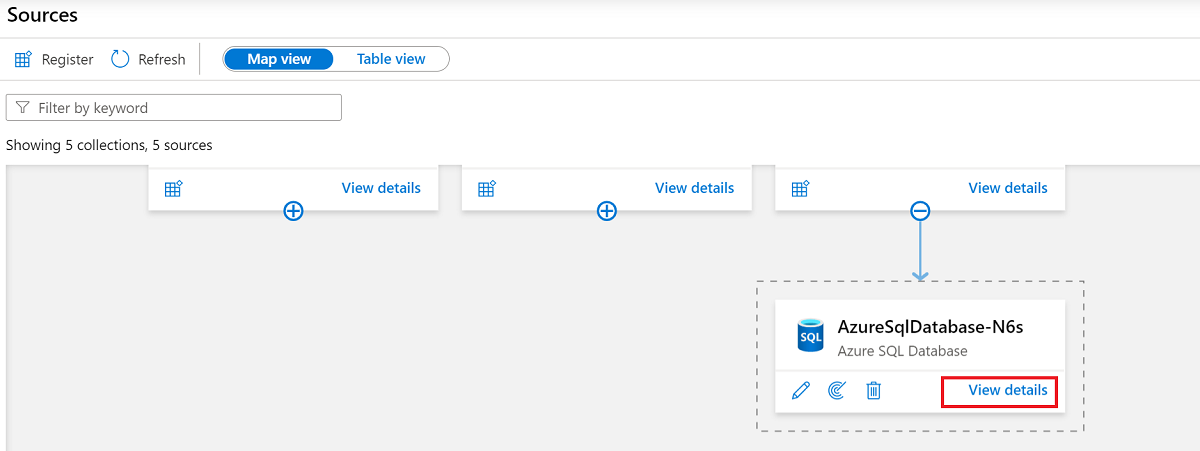
To check the status of a scan, go to the data source in the collection, and then select View details.
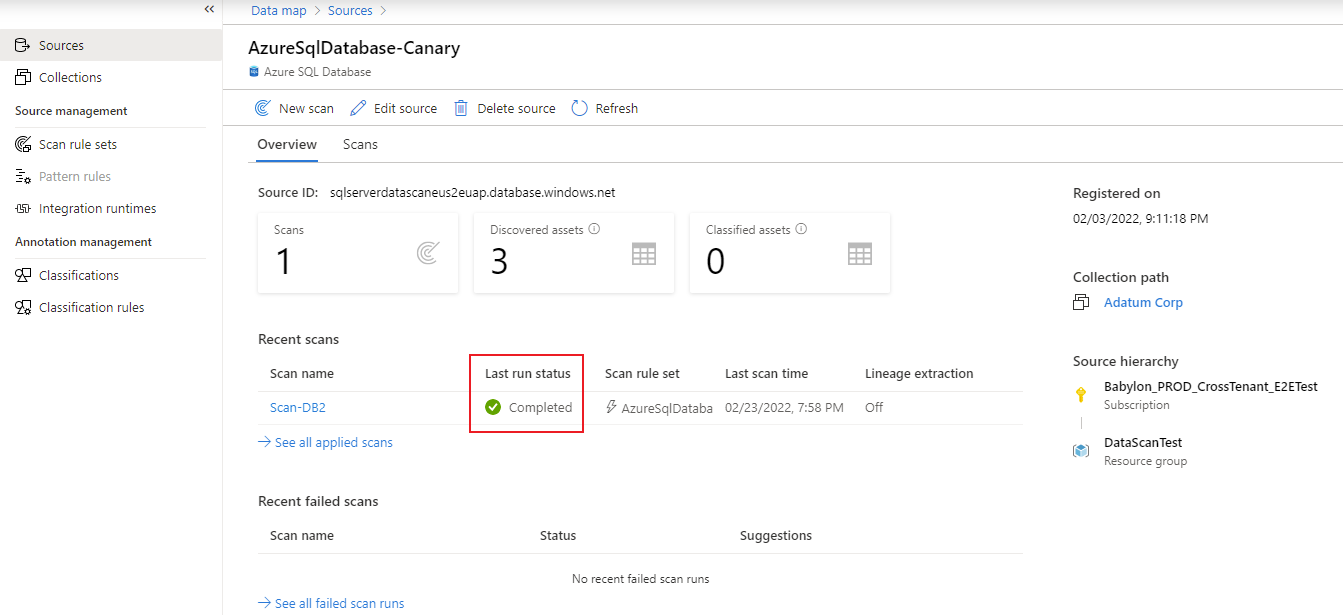
The scan details indicate the progress of the scan in Last run status, along with the number of assets scanned and classified. Last run status is updated to In progress and then Completed after the entire scan has run successfully.
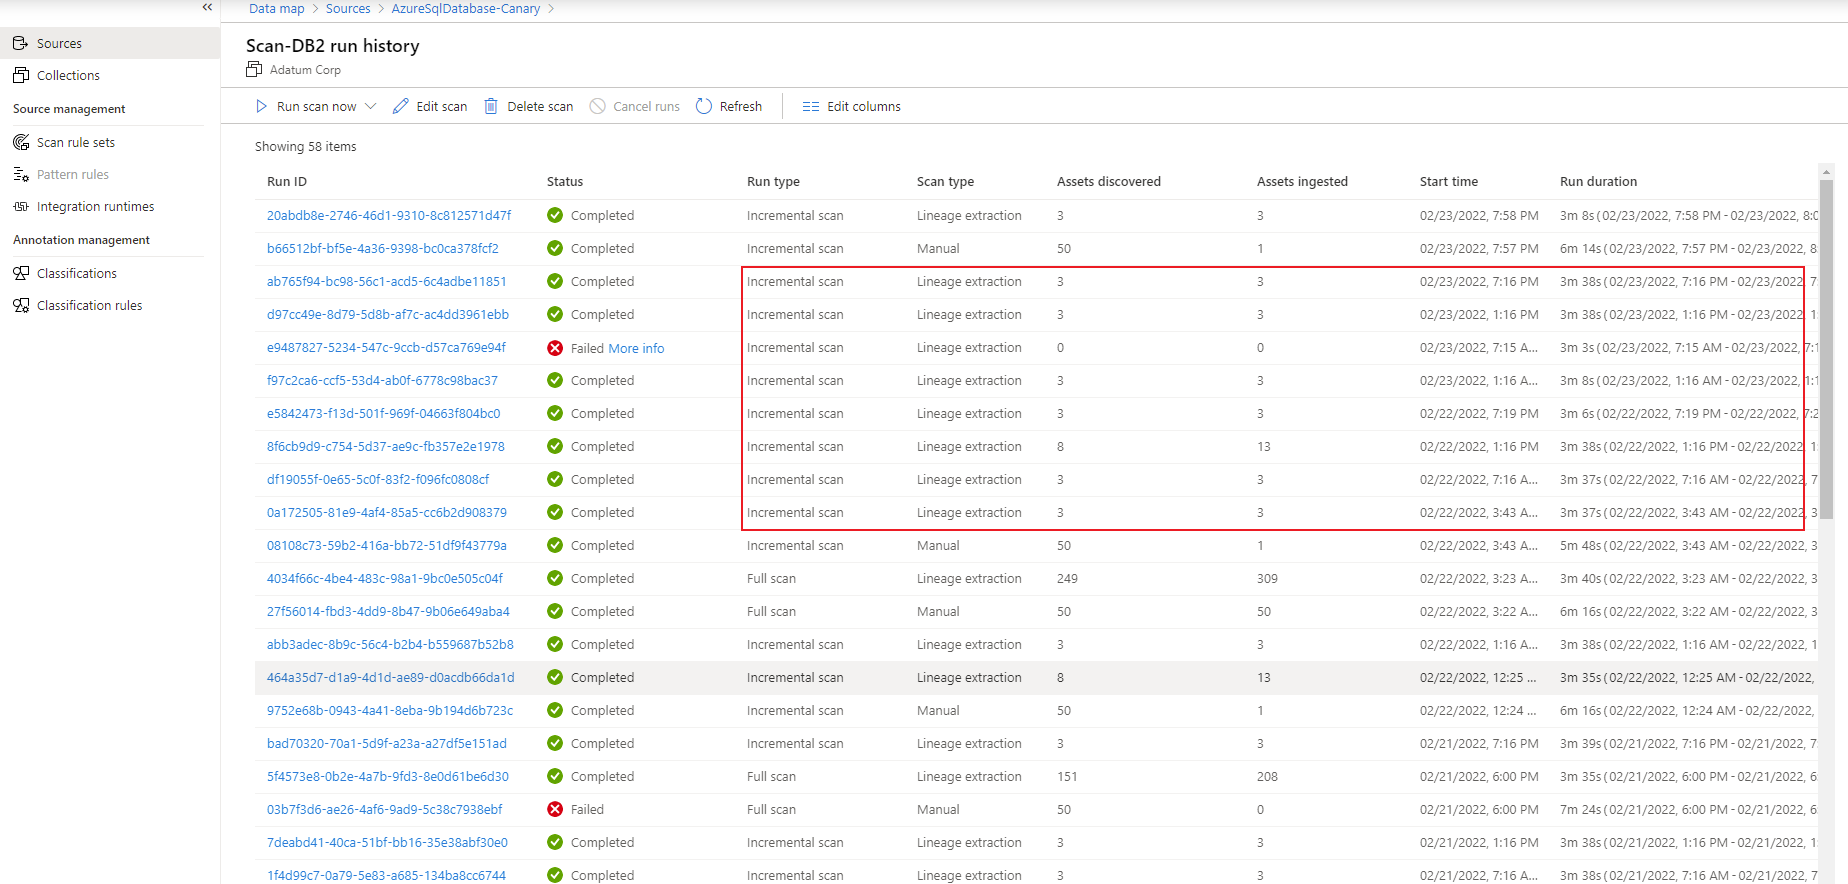
Manage a scan
After you run a scan, you can use the run history to manage it:
Under Recent scans, select a scan.

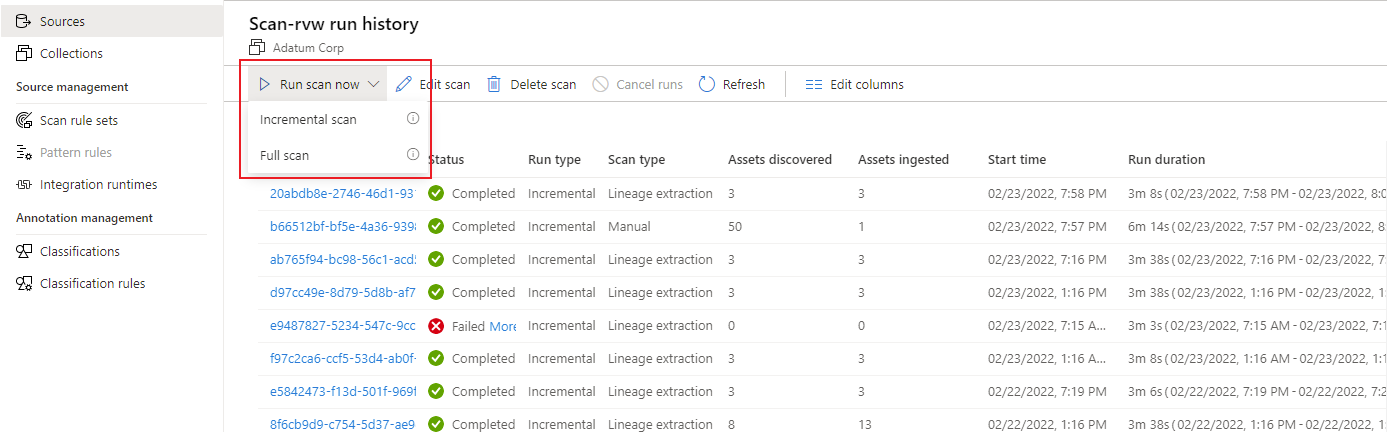
In the run history, you have options for running the scan again, editing it, or deleting it.
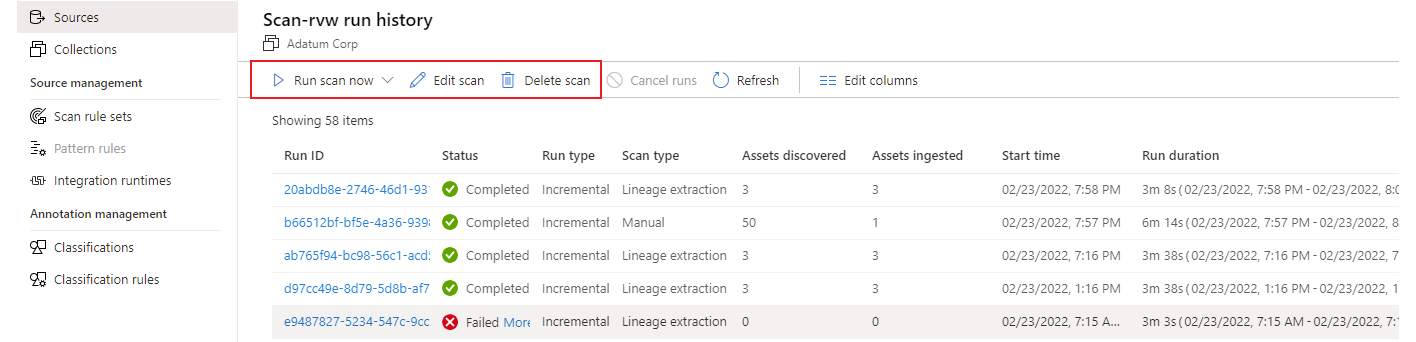
If you select Run scan now to rerun the scan, you can then choose either Incremental scan or Full scan.
Troubleshoot scanning
If you have problems with scanning, try these tips:
- Confirm that you followed all prerequisites.
- Check the network by confirming firewall, Azure connections, or integration runtime settings.
- Confirm that authentication is properly set up.
For more information, review Troubleshoot your connections in Microsoft Purview.
Set up policies
The following types of Microsoft Purview policies are supported on this data resource:
- Data owner policies - a set of policy statements that allow you to grant users and groups access to data sources.
- Self-service policies - policy that allows users to request access to data sources registered to Microsoft Purview.
- Protection policies - denies access to data tagged with sensitivity labels to all users except those specified by the policy.
- DevOps policies - grants access to database system metadata across multiple sources. They simplify access provisioning for IT operations and security auditing personnel. They only grant access, and don't deny access.
Access policy prerequisites on Azure SQL Database
- Create a new Azure SQL Database instance, or use an existing one, in one of the currently available regions for this feature. You can follow this guide to create an Azure SQL Database instance.
Region support
All Microsoft Purview regions are supported.
Enforcement of Microsoft Purview policies is available only in the following regions for Azure SQL Database:
Public cloud:
- East US
- East US2
- South Central US
- West Central US
- West US3
- Canada Central
- Brazil South
- West Europe
- North Europe
- France Central
- UK South
- South Africa North
- Central India
- South East Asia
- East Asia
- Australia East
Sovereign clouds:
- USGov Virginia
- China North 3
Configure the Azure SQL Database instance for policies from Microsoft Purview
For the logical server associated with Azure SQL Database to honor policies from Microsoft Purview, you need to configure a Microsoft Entra admin. In the Azure portal, go to the logical server that hosts the Azure SQL Database instance. On the side menu, select Microsoft Entra ID. Set an admin name to any Microsoft Entra user or group that you prefer, and then select Save.
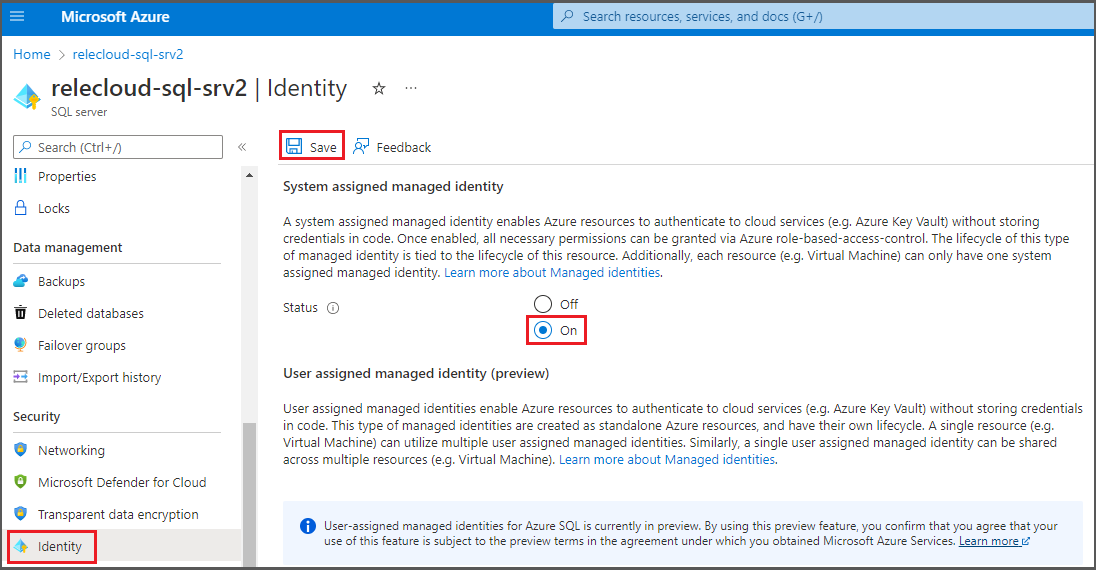
Then, on the side menu, select Identity. Under System assigned managed identity, turn the status to On, and then select Save.
Configure the Microsoft Purview account for policies
Register the data source in Microsoft Purview
Before a policy can be created in Microsoft Purview for a data resource, you must register that data resource in Microsoft Purview Studio. You will find the instructions related to registering the data resource later in this guide.
Note
Microsoft Purview policies rely on the data resource ARM path. If a data resource is moved to a new resource group or subscription it will need to be de-registered and then registered again in Microsoft Purview.
Configure permissions to enable Data policy enforcement on the data source
Once a resource is registered, but before a policy can be created in Microsoft Purview for that resource, you must configure permissions. A set of permissions are needed to enable the Data policy enforcement. This applies to data sources, resource groups, or subscriptions. To enable Data policy enforcement, you must have both specific Identity and Access Management (IAM) privileges on the resource as well as specific Microsoft Purview privileges:
You must have either one of the following IAM role combinations on the resource's Azure Resource Manager path or any parent of it (that is, using IAM permission inheritance):
- IAM Owner
- Both IAM Contributor and IAM User Access Administrator
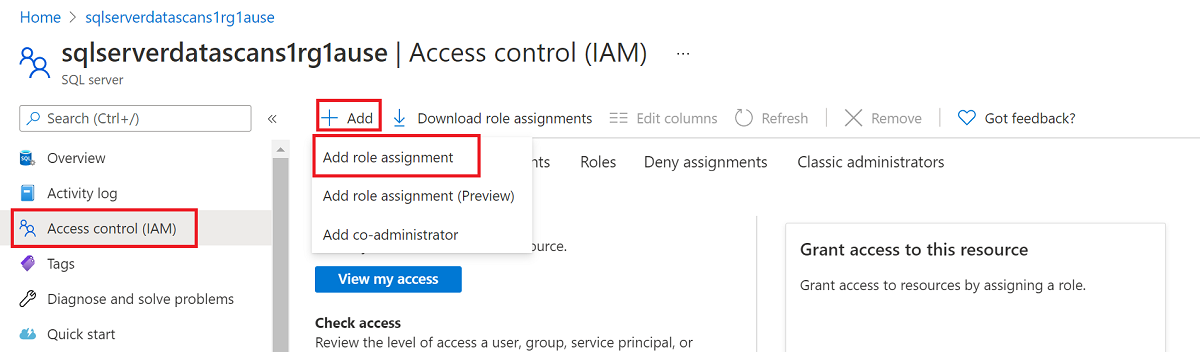
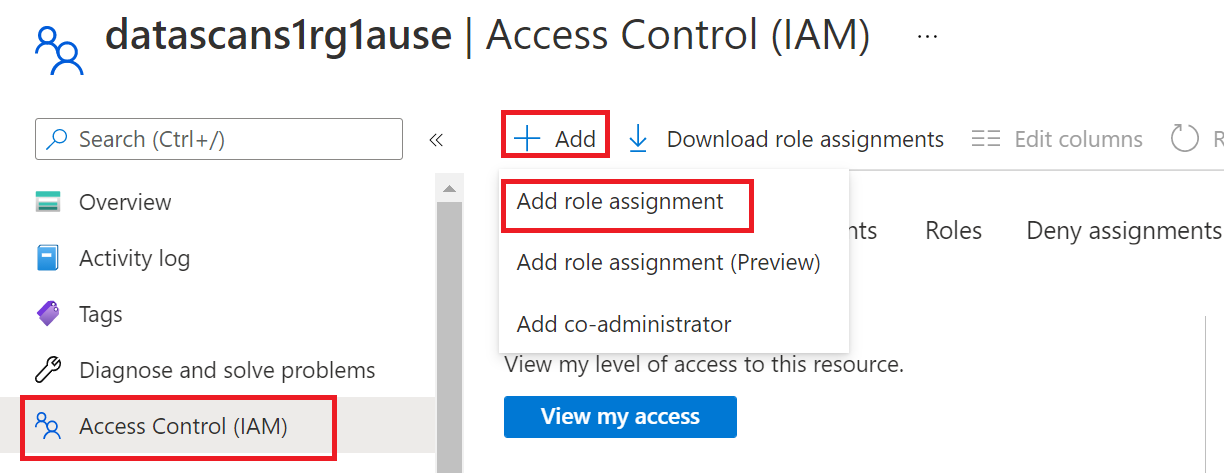
To configure Azure role-based access control (RBAC) permissions, follow this guide. The following screenshot shows how to access the Access Control section in the Azure portal for the data resource to add a role assignment.
Note
The IAM Owner role for a data resource can be inherited from a parent resource group, a subscription, or a subscription management group. Check which Microsoft Entra users, groups, and service principals hold or are inheriting the IAM Owner role for the resource.
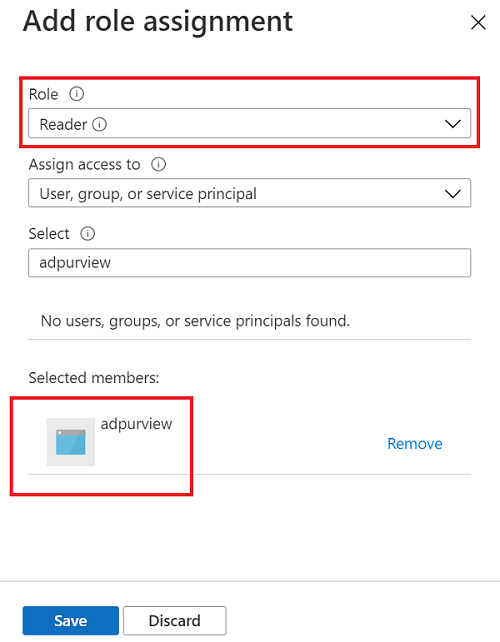
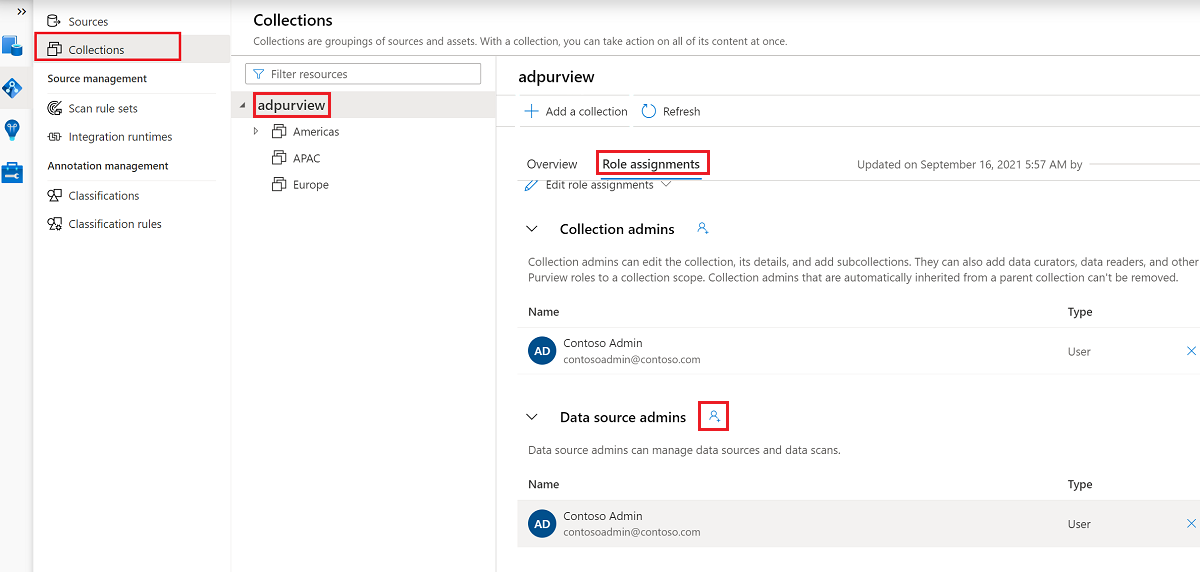
You also need to have the Microsoft Purview Data source admin role for the collection or a parent collection (if inheritance is enabled). For more information, see the guide on managing Microsoft Purview role assignments.
The following screenshot shows how to assign the Data source admin role at the root collection level.


Configure Microsoft Purview permissions to create, update, or delete access policies
To create, update or delete policies, you need to get the Policy author role in Microsoft Purview at root collection level:
- The Policy author role can create, update, and delete DevOps and Data Owner policies.
- The Policy author role can delete self-service access policies.
For more information about managing Microsoft Purview role assignments, see Create and manage collections in the Microsoft Purview Data Map.
Note
Policy author role must be configured at the root collection level.
In addition, to easily search Microsoft Entra users or groups when creating or updating the subject of a policy, you can greatly benefit from getting the Directory Readers permission in Microsoft Entra ID. This is a common permission for users in an Azure tenant. Without the Directory Reader permission, the Policy Author will have to type the complete username or email for all the principals included in the subject of a data policy.
Configure Microsoft Purview permissions for publishing Data Owner policies
Data Owner policies allow for checks and balances if you assign the Microsoft Purview Policy author and Data source admin roles to different people in the organization. Before a Data owner policy takes effect, a second person (Data source admin) must review it and explicitly approve it by publishing it. This does not apply to DevOps or Self-service access policies as publishing is automatic for them when those policies are created or updated.
To publish a Data owner policy you need to get the Data source admin role in Microsoft Purview at root collection level.
For more information about managing Microsoft Purview role assignments, see Create and manage collections in the Microsoft Purview Data Map.
Note
To publish Data owner policies, the Data source admin role must be configured at the root collection level.
Delegate access provisioning responsibility to roles in Microsoft Purview
After a resource has been enabled for Data policy enforcement, any Microsoft Purview user with the Policy author role at the root collection level can provision access to that data source from Microsoft Purview.
Note
Any Microsoft Purview root Collection admin can assign new users to root Policy author roles. Any Collection admin can assign new users to a Data source admin role under the collection. Minimize and carefully vet the users who hold Microsoft Purview Collection admin, Data source admin, or Policy author roles.
If a Microsoft Purview account with published policies is deleted, such policies will stop being enforced within an amount of time that depends on the specific data source. This change can have implications on both security and data access availability. The Contributor and Owner roles in IAM can delete Microsoft Purview accounts. You can check these permissions by going to the Access control (IAM) section for your Microsoft Purview account and selecting Role Assignments. You can also use a lock to prevent the Microsoft Purview account from being deleted through Resource Manager locks.
Register the data source and enable Data policy enforcement
The Azure SQL Database resource needs to be registered with Microsoft Purview before you can create access policies. To register your resources, follow the "Prerequisites" and "Register the data source" sections in Enable Data policy enforcement on your Microsoft Purview sources.
After you register the data source, you need to enable Data policy enforcement. This is a prerequisite before you can create policies on the data source. Data policy enforcement can affect the security of your data, because it delegates to certain Microsoft Purview roles that manage access to the data sources. Go through the security practices in Enable Data policy enforcement on your Microsoft Purview sources.
After your data source has the Data policy enforcement option set to Enabled, it will look like this screenshot:
Return to the Azure portal for Azure SQL Database to verify it's now governed by Microsoft Purview:
Sign in to the Azure portal through this link.
Select the Azure SQL Server that you want to configure.
Go to Microsoft Entra ID on the left pane.
Scroll down to Microsoft Purview access policies.
Select the button to Check for Microsoft Purview Governance. Wait while the request is processed, which could take a few minutes.

Confirm that the Microsoft Purview Governance Status shows Governed. Note that it could take a few minutes after you enable Data policy enforcement in Microsoft Purview for the correct status to be reflected.

Note
If you disable data policy enforcement for this Azure SQL Database data source in Microsoft Purview, select Check for Microsoft Purview Governance for the Microsoft Purview Governance Status to be updated to Not Governed. This step must be done for the impacted data source each time data policy enforcement status is changed for an existing or new access policy in Microsoft Purview. Before you enable Data policy enforcement for the data source in another Microsoft Purview account, ensure that the Purview Governance Status shows as Not Governed. Then repeat the steps above with the new Microsoft Purview account.
Create an access policy
To create an access policy for Azure SQL Database, follow these guides:
- Provision access to system health, performance, and audit information in Azure SQL Database. Use this guide to apply a DevOps policy on a single SQL database.
- Provision read/modify access on a single Azure SQL Database. Use this guide to provision access on a single SQL database account in your subscription.
- Self-service access policies for Azure SQL Database. Use this guide to allow data consumers to request access to data assets by using a self-service workflow.
To create policies that cover all data sources inside a resource group or Azure subscription, see Discover and govern multiple Azure sources in Microsoft Purview.
Protection policy
Protection access control policies (protection policies) enable organizations to automatically protect sensitive data across data sources. Microsoft Purview already scans data assets and identifies sensitive data elements, and this feature allows you to automatically restrict access to that data using sensitivity labels from Microsoft Purview Information Protection. Learn how to create a protection policy.
Extract lineage (preview)
Microsoft Purview supports lineage for views and stored procedures from Azure SQL Database. While lineage for views is supported as part of scanning, you'll need to turn on the Lineage extraction toggle to extract stored procedure lineage when you're setting up a scan.
Note
Lineage isn't supported using a self-hosted integration runtime or managed VNET runtime and an Azure SQL private endpoint. You need to enable Azure services to access the server under network settings for your Azure SQL Database, and your Microsoft Purview account needs to allow public access. Learn more about the known limitations in lineage extraction scan.
Lineage for SQL DB views
SQL DB metadata scan includes lineage extraction for views. Only new scans include the view lineage extraction. Lineage is extracted at all scan levels (L1/L2/L3). In case of an incremental scan, whatever metadata is scanned as part of incremental scan, the corresponding static lineage for tables/views will be extracted.
Prerequisites for setting up a scan with SP lineage extraction
Follow the steps in the Configure authentication for a scan section of this article to authorize Microsoft Purview to scan your SQL database.
Sign in to Azure SQL Database with your Microsoft Entra account, and assign
db_ownerpermissions to the Microsoft Purview managed identity.Note
The 'db_owner' permissions is needed because lineage is based on XEvent sessions. So Microsoft Purview needs the permission to manage the XEvent sessions in SQL.
Use the following example SQL syntax to create a user and grant permission. Replace
<purview-account>with your account name.Create user <purview-account> FROM EXTERNAL PROVIDER GO EXEC sp_addrolemember 'db_owner', <purview-account> GORun the following command on your SQL database to create a master key:
Create master key
Go
Ensure that Allow Azure services and resources to access this server is enabled under networking/firewall for your Azure SQL resource.
Create a scan with lineage extraction turned on
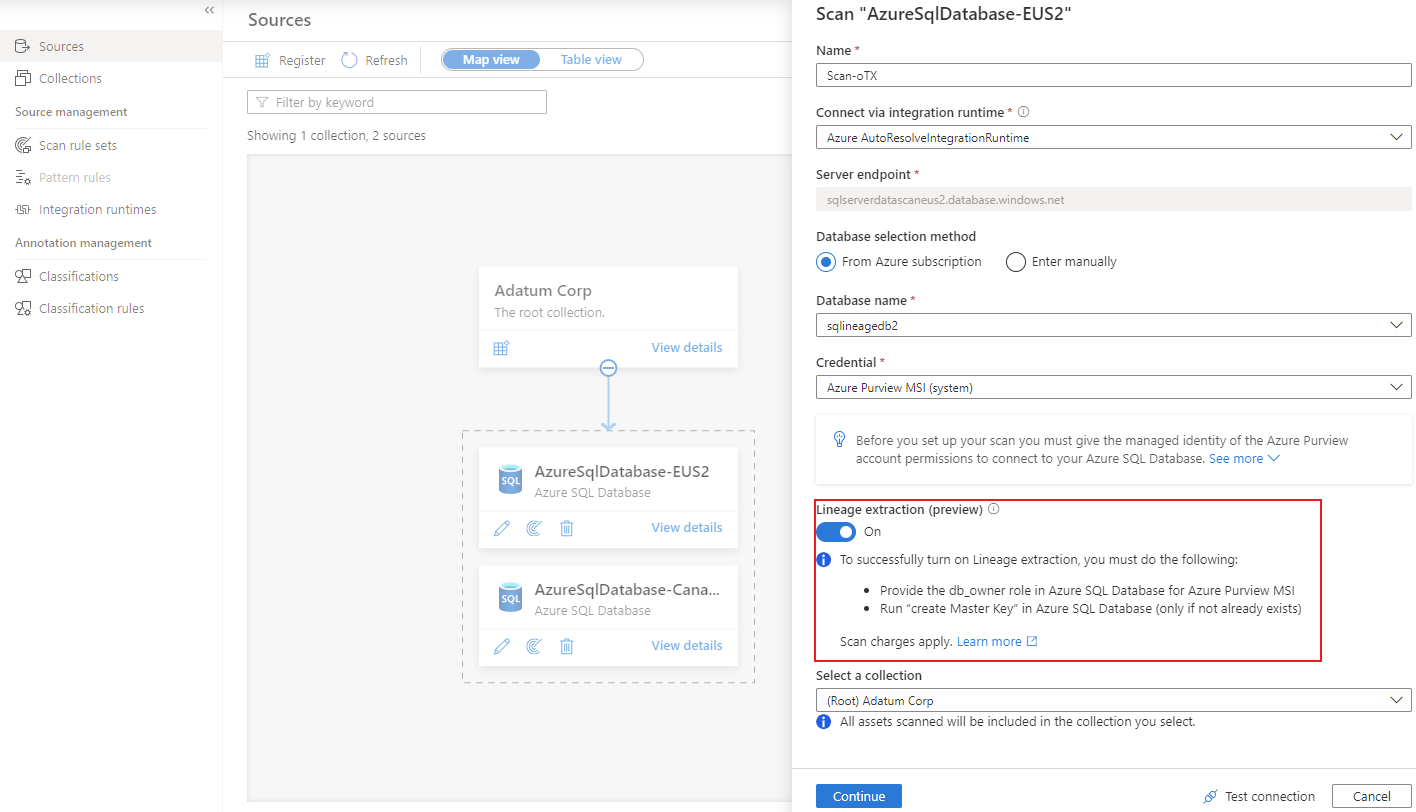
On the pane for setting up a scan, turn on the Enable lineage extraction toggle.
Select your method of authentication by following the steps in the Create the scan section of this article.
After you successfully set up the scan, a new scan type called Lineage extraction will run incremental scans every six hours to extract lineage from Azure SQL Database. Lineage is extracted based on the stored procedure runs in the SQL database.


Search Azure SQL Database assets and view runtime lineage
You can browse through the Unified Catalog or search the Unified Catalog to view asset details for Azure SQL Database. The following steps describe how to view runtime lineage details:
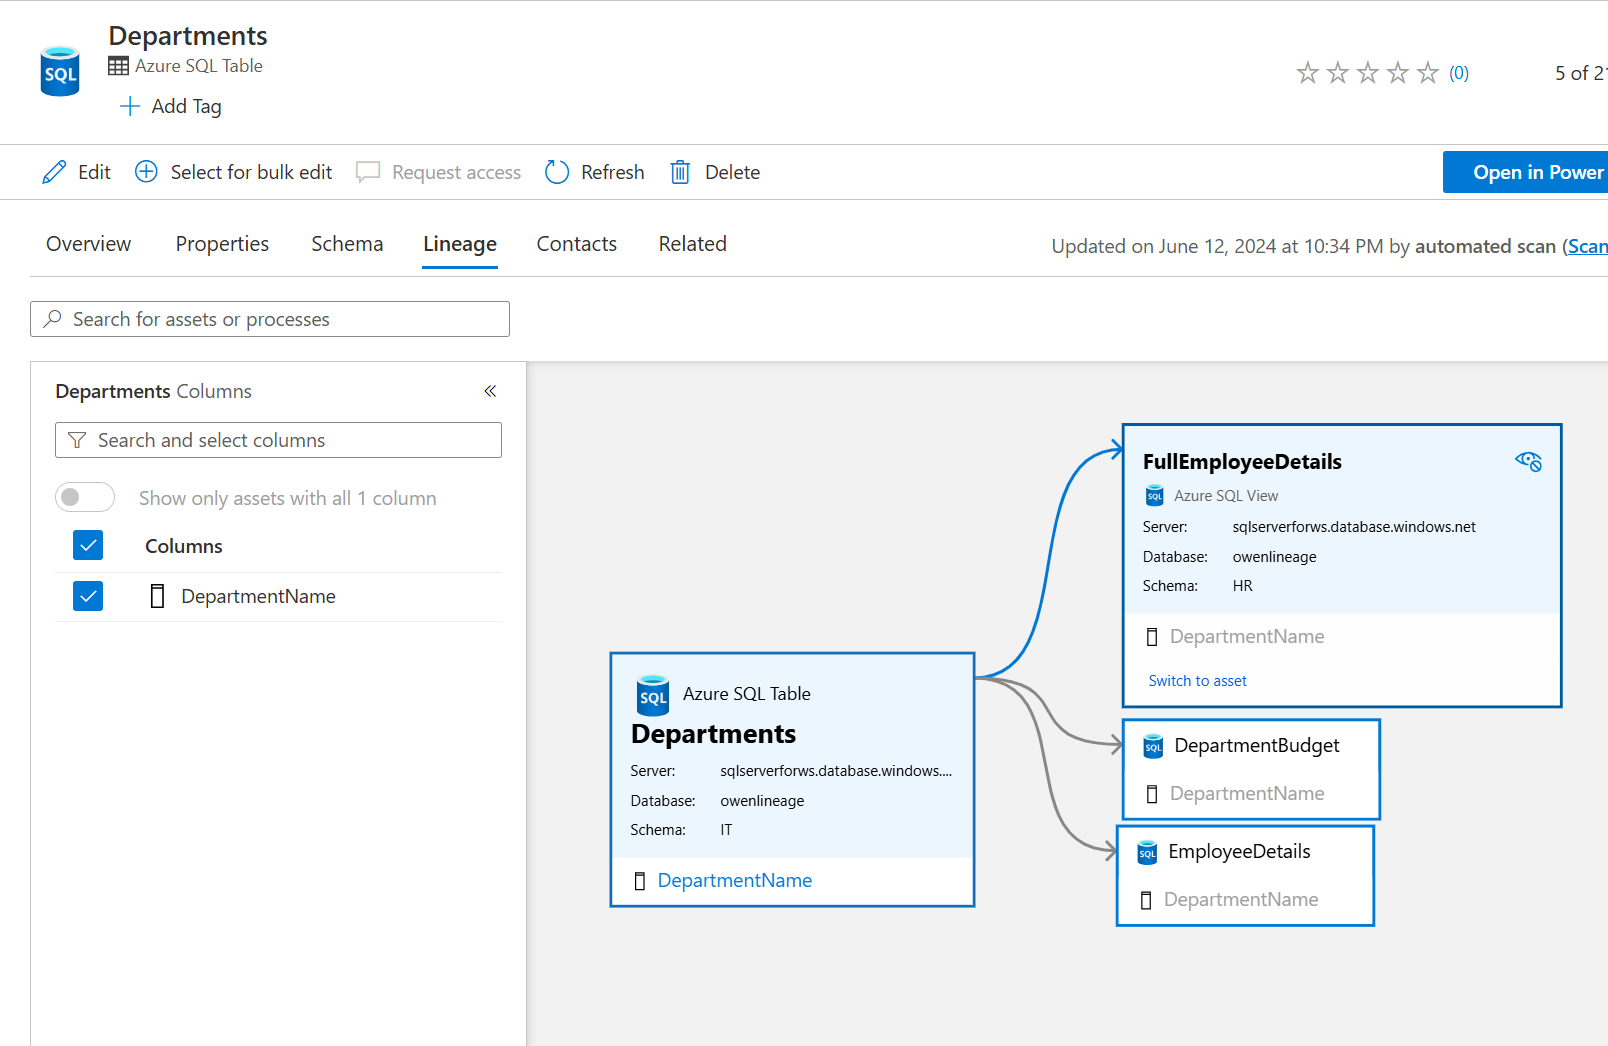
Go to the Lineage tab for the asset. When applicable, the asset lineage appears here.
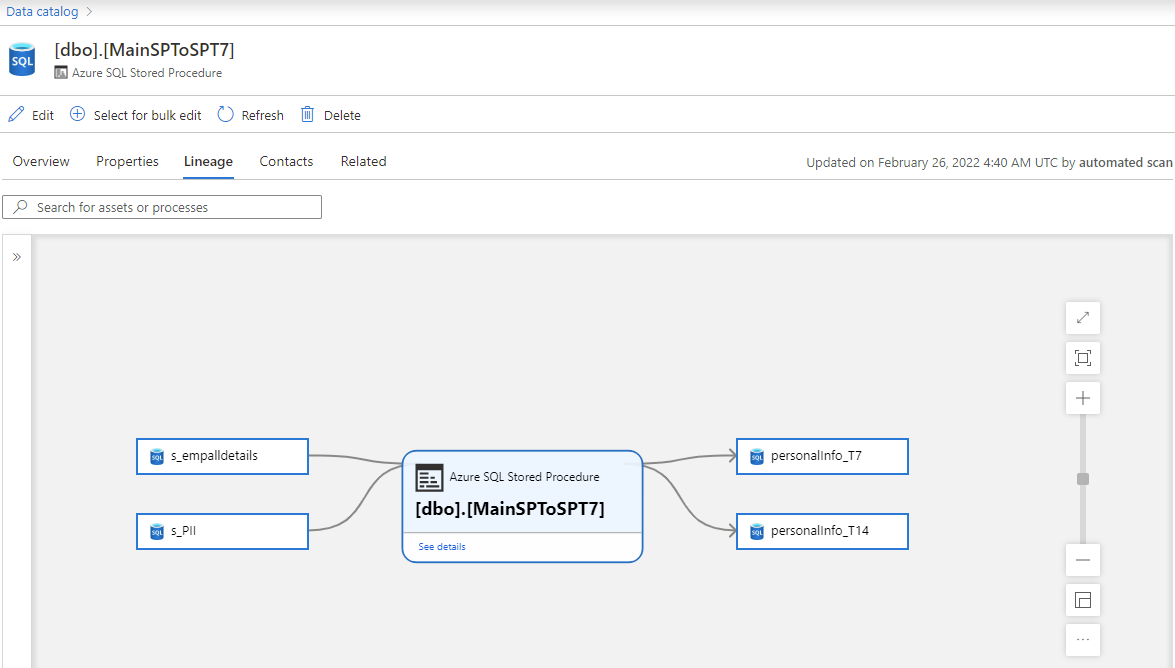
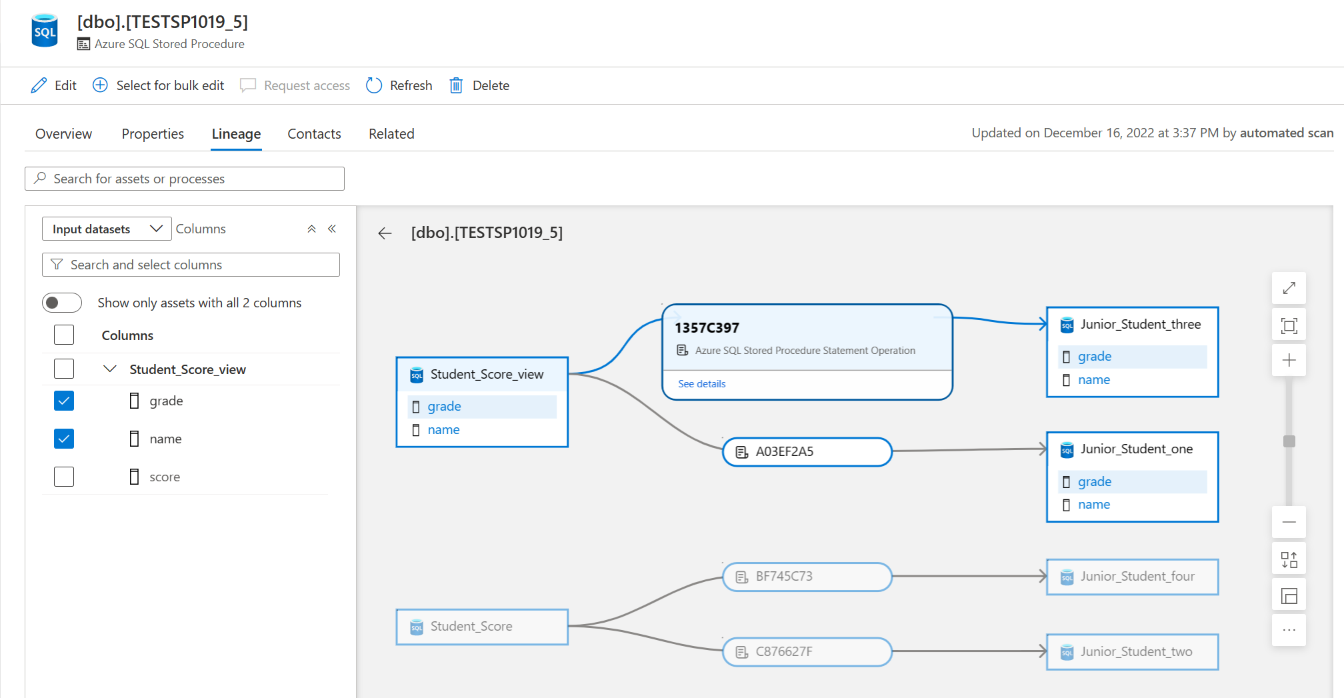
When applicable, you can further drill down to see the lineage at SQL statement level within a stored procedure, along with column level lineage. When using Self-hosted Integration Runtime for scan, retrieving the lineage drilldown information during scan is supported since version 5.25.8374.1.
For information about supported Azure SQL Database lineage scenarios, refer to the Supported capabilities section of this article. For more information about lineage in general, see Data lineage in Microsoft Purview and Microsoft Purview lineage user guide.
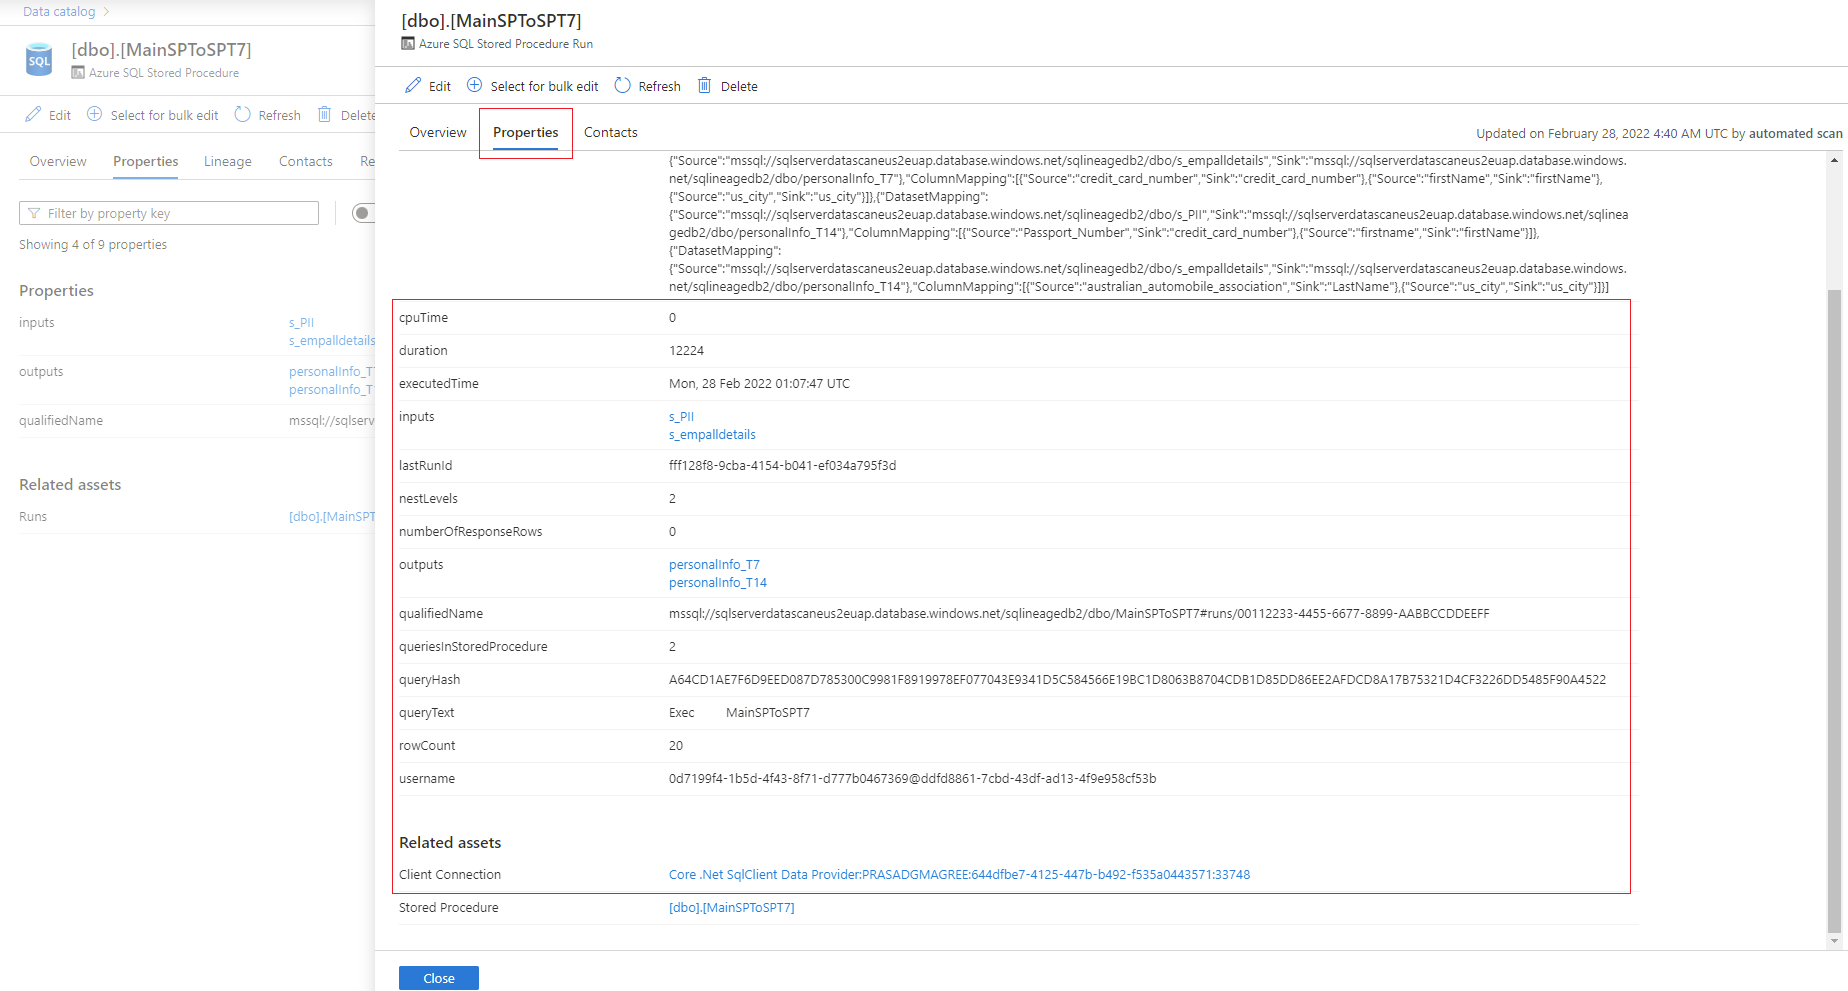
Go to the stored procedure asset. On the Properties tab, go to Related assets to get the latest run details of stored procedures.

Select the stored procedure hyperlink next to Runs to see the Azure SQL Stored Procedure Run overview. Go to the Properties tab to see enhanced runtime information from the stored procedure, such as executedTime, rowCount, and Client Connection.

Troubleshoot lineage extraction for Stored Procedures
The following tips can help you solve problems related to lineage:
- If no lineage is captured after a successful Lineage extraction run, it's possible that no stored procedures have run at least once since you set up the scan.
- Lineage is captured for stored procedure runs that happen after a successful scan is set up. Lineage from past stored procedure runs isn't captured.
- If your database is processing heavy workloads with lots of stored procedure runs, lineage extraction filters only the most recent runs. Stored procedure runs early in the six-hour window, or the run instances that create heavy query load, won't be extracted. Contact support if you're missing lineage from any stored procedure runs.
- If a stored procedure contains drop or create statements, they aren't currently captured in lineage
Next steps
To learn more about Microsoft Purview and your data, use these guides: