Not
Åtkomst till den här sidan kräver auktorisering. Du kan prova att logga in eller ändra kataloger.
Åtkomst till den här sidan kräver auktorisering. Du kan prova att ändra kataloger.
This article describes how to configure Microsoft Azure Backup Server (MABS) to protect SQL Server databases on Azure Stack.
SQL Server databases protection workflow
Management of the SQL Server database backup to Azure and recovery from Azure involves:
- Create a backup policy to protect SQL Server databases
- Create on-demand backup copies
- Recover the database from Disks, and from Azure
Scenarier och begränsningar som stöds
Before you back up SQL Server on Azure Stack, review the following supported scenarios and limitations:
- Om du har en databas med filer på en fjärrfilresurs misslyckas skyddet med fel-ID 104. MABS stöder inte skydd för SQL Server-data på en fjärrfilresurs.
- MABS kan inte skydda databaser som lagras på fjärranslutna SMB-resurser.
- Ensure that the availability group replicas are configured as read-only.
- Du måste uttryckligen lägga till systemkontot NTAuthority\System i sysadmin-gruppen på SQL Server.
- När du utför en alternativ platsåterställning för en delvis innesluten databas måste du se till att SQL-målinstansen har funktionen Inneslutna databaser aktiverad.
- När du utför en alternativ platsåterställning för en filströmsdatabas måste du se till att SQL-målinstansen har filströmsdatabas funktionen aktiverad.
- Skydd för SQL Server AlwaysOn:
- MABS identifierar tillgänglighetsgrupper när den kör en sökning vid skapande av skyddsgrupper.
- MABS upptäcker övergången och fortsätter att skydda databasen.
- MABS stöder klusterkonfigurationer med flera platser för en instans av SQL Server.
- När du skyddar databaser som använder funktionen AlwaysOn har MABS följande begränsningar:
- MABS följer säkerhetskopieringsprincipen för tillgänglighetsgrupper som anges i SQL Server baserat på säkerhetskopieringsinställningarna enligt följande:
- Föredrar sekundär – Säkerhetskopieringar bör ske på en sekundär replik, förutom när den primära repliken är den enda repliken online. Om det finns flera tillgängliga sekundära repliker, kommer noden med högsta prioritet att väljas för säkerhetskopiering. If only the primary replica is available, then the backup should occur on the primary replica.
- Endast sekundär – Säkerhetskopiering ska inte utföras på den primära repliken. Om den primära repliken är den enda online ska säkerhetskopieringen inte ske.
- Primär – Säkerhetskopieringar bör alltid ske på den primära repliken.
- Any Replica - Backups can happen on any of the availability replicas in the availability group. Noden som ska säkerhetskopieras från baseras på säkerhetskopieringsprioriteterna för var och en av noderna.
-
Anmärkning
- Säkerhetskopior kan ske från alla läsbara repliker, det vill säga: primär, synkron sekundär, asynkron sekundär.
- Om en replik exkluderas från säkerhetskopiering, till exempel Exkludera replik är aktiverad eller markeras som inte läsbar, väljs inte den repliken för säkerhetskopiering under något av alternativen.
- Om flera repliker är tillgängliga och läsbara väljs noden med högsta prioritet för säkerhetskopiering.
- Om säkerhetskopieringen misslyckas på den valda noden misslyckas säkerhetskopieringen.
- Återställning till den ursprungliga platsen stöds inte.
- MABS följer säkerhetskopieringsprincipen för tillgänglighetsgrupper som anges i SQL Server baserat på säkerhetskopieringsinställningarna enligt följande:
- Problem med säkerhetskopiering av SQL Server 2014 eller senare:
- SQL server 2014 added a new feature to create a database for on-premises SQL Server on Microsoft Azure Blob storage. MABS kan inte användas för att skydda den här konfigurationen.
- Det finns några kända problem med alternativet "Föredrar sekundär" säkerhetskopiering för alternativet SQL AlwaysOn. MABS tar alltid en säkerhetskopia från den sekundära källan. Om ingen sekundär kan hittas misslyckas säkerhetskopieringen.
Förutsättningar
Before you back up SQL Server on Azure Stack, install and prepare Azure Backup Server.
Skapa en säkerhetskopieringspolicy
To create a backup policy to protect SQL Server databases to Azure, follow these steps:
On the Azure Backup Server, select the Protection workspace.
On the tool menu, select New to create a new protection group.
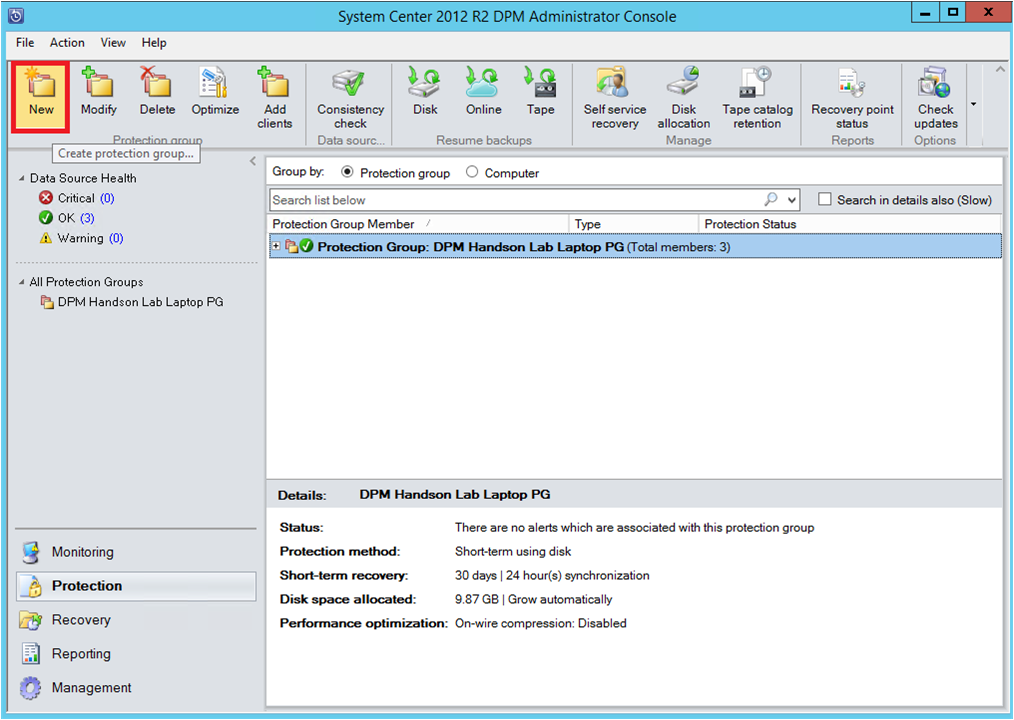
Azure Backup Server starts the Protection Group wizard, which leads you through creating a Protection Group. Välj Nästa.
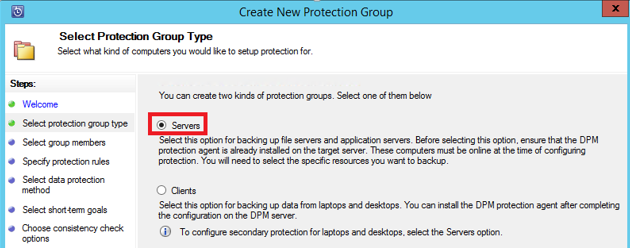
On the Select Protection Group Type blade, select Servers.
On the Select Group Members blade, the Available members list displays the various data sources. Select + to expand a folder and reveal the subfolders. Select the checkbox to select an item.
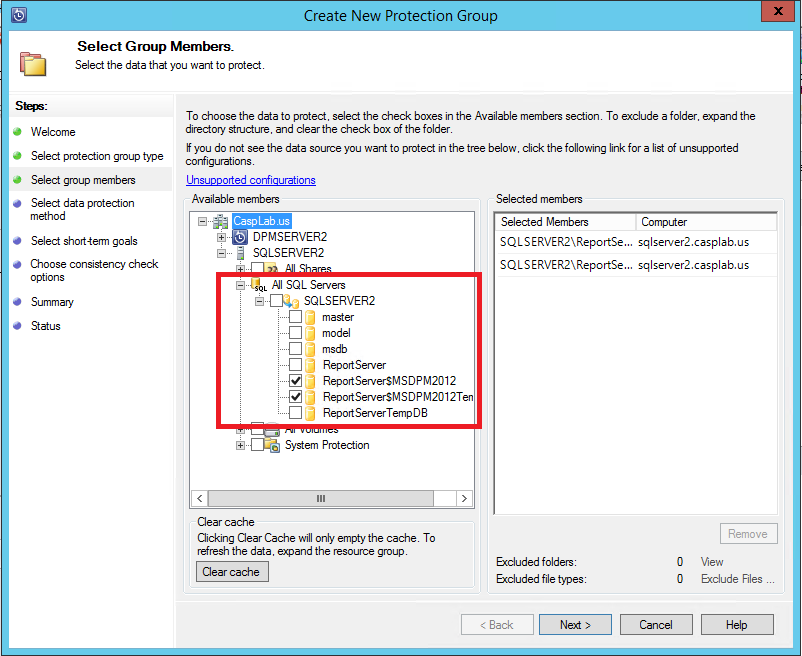
All selected items appear in the Selected members list. After selecting the servers or databases you want to protect, select Next.
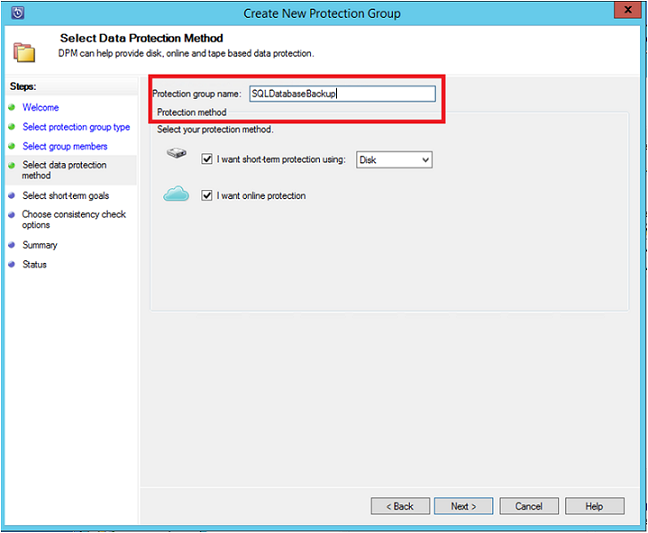
On the Select Data Protection Method blade, provide a name for the protection group and select the I want online Protection checkbox.
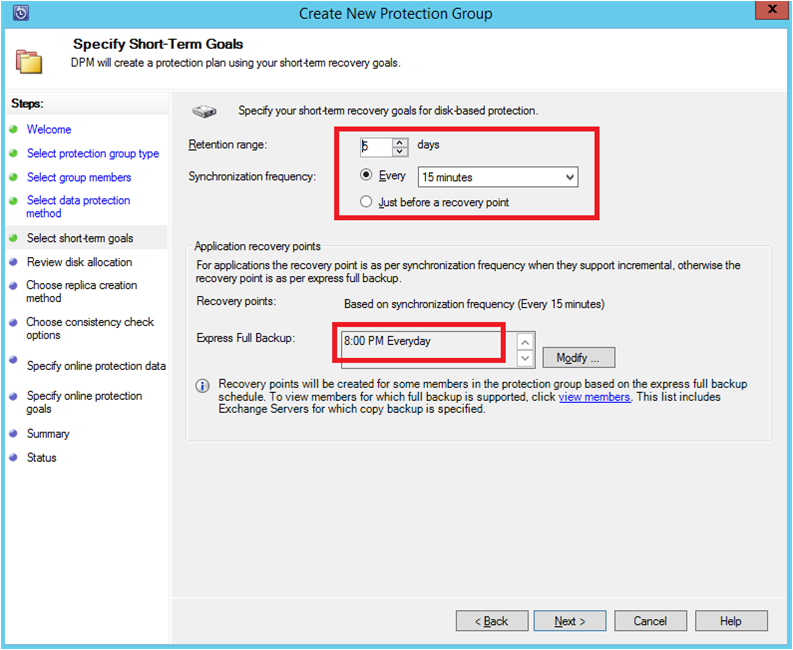
On the Specify Short-Term Goals blade, include the necessary inputs to create backup points to disk, and select Next.
In the example, Retention range is 5 days, Synchronization frequency is once every 15 minutes, which is the backup frequency. Express Full Backup is set to 8:00 P.M.
Anmärkning
In the example shown, at 8:00 PM every day a backup point is created by transferring the modified data from the previous day’s 8:00 PM backup point. This process is called Express Full Backup. Transaction logs are synchronized every 15 minutes. If you need to recover the database at 9:00 PM, the point is created from the logs from the last express full backup point (8PM in this case).
On the Review disk allocation blade, verify the overall storage space available, and the potential disk space. Välj Nästa.
On the Choose Replica Creation Method, choose how to create your first recovery point. You can transfer the initial backup manually (off network) to avoid bandwidth congestion or over the network. If you choose to wait to transfer the first backup, you can specify the time for the initial transfer. Välj Nästa.
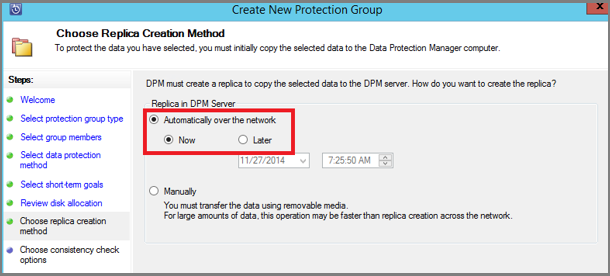
The initial backup copy requires transferring the entire data source (SQL Server database) from production server (SQL Server computer) to Azure Backup Server. This data might be large, and transferring the data over the network could exceed bandwidth. For this reason, you can choose to transfer the initial backup: Manually (using removable media) to avoid bandwidth congestion, or Automatically over the network (at a specified time).
Once the initial backup is complete, the rest of the backups are incremental backups on the initial backup copy. Inkrementella säkerhetskopior brukar vara små och överförs enkelt över nätverket.
Choose when you want the consistency check to run and select Next.
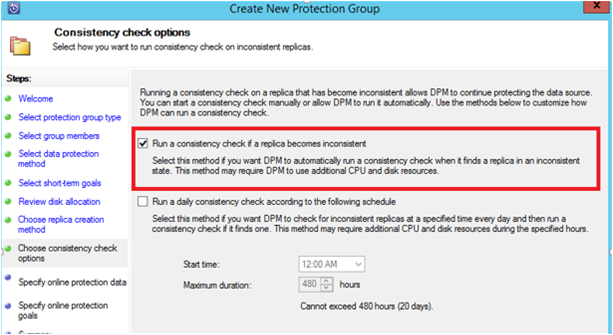
Azure Backup Server performs a consistency check on the integrity of the backup point. Azure Backup Server calculates the checksum of the backup file on the production server (SQL Server computer in this scenario) and the backed-up data for that file. If there's a conflict, it's assumed the backed-up file on Azure Backup Server is corrupt. Azure Backup Server rectifies the backed-up data by sending the blocks corresponding to the checksum mismatch. Because consistency checks are performance-intensive, you can schedule the consistency check or run it automatically.
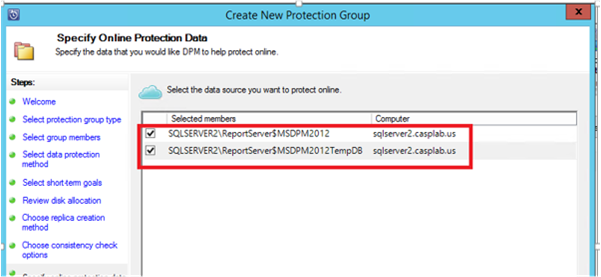
To specify online protection of the datasources, select the databases to be protected to Azure and select Next.
Choose backup schedules and retention policies that suit the organization policies.
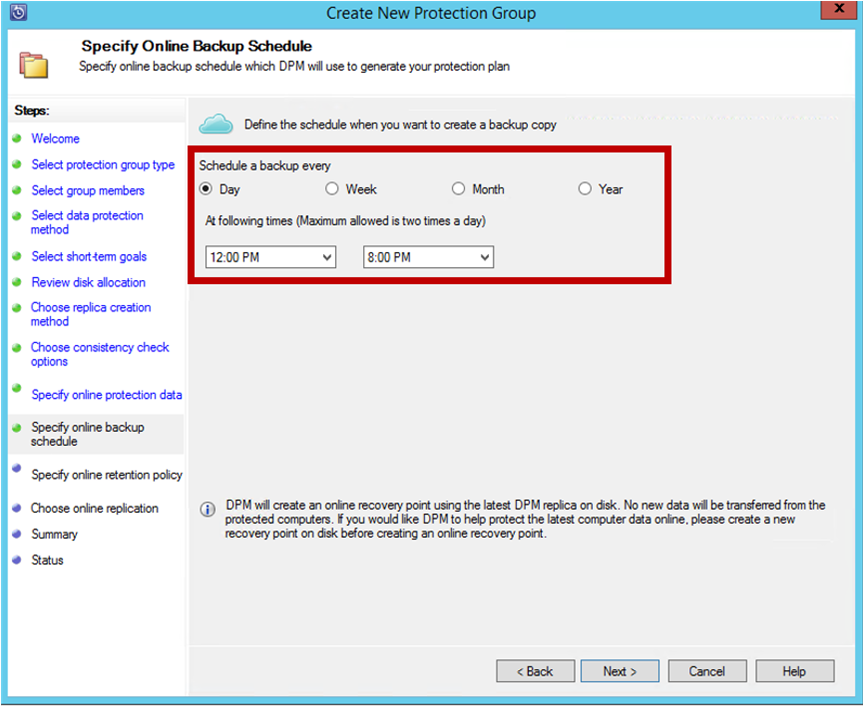
In this example, backups are taken once a day at 12:00 PM and 8 PM.
Anmärkning
It’s a good practice to have a few short-term recovery points on disk, for quick recovery. Dessa återställningspunkter används för driftåterställning. Azure serves as a good offsite location with higher SLAs and guaranteed availability.
Best Practice: If you schedule backups to Azure to start after the local disk backups complete, the latest disk backups are always copied to Azure.
Välj tidsschemat för lagringspolicy. The details on how the retention policy works are provided at Use Azure Backup to replace your tape infrastructure article.
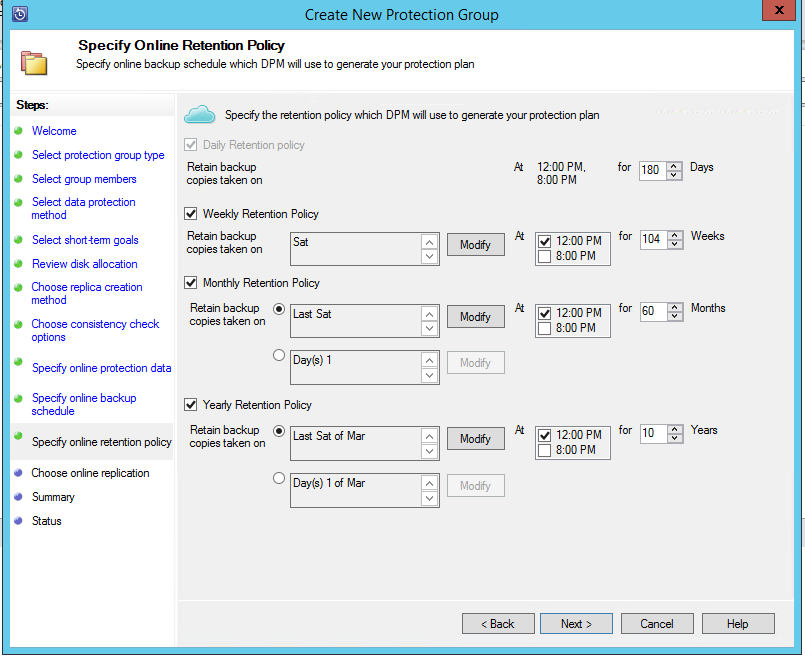
I det här exemplet:
- Backups are taken once a day at 12:00 PM and 8 PM and are retained for 180 days.
- The backup on Saturday at 12:00 P.M. is retained for 104 weeks
- The backup on Last Saturday at 12:00 P.M. is retained for 60 months
- The backup on Last Saturday of March at 12:00 P.M. is retained for 10 years
Select Next and select the appropriate option for transferring the initial backup copy to Azure. You can choose Automatically over the network
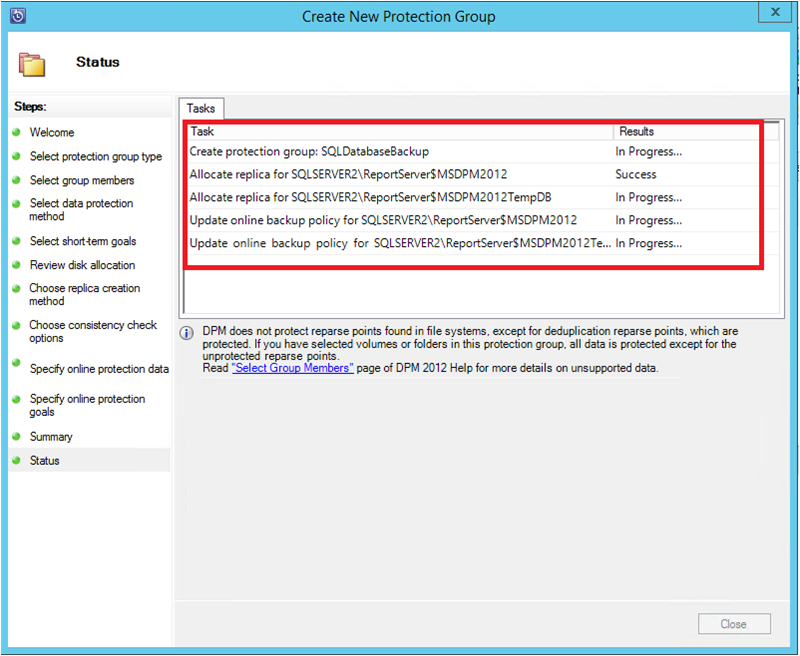
Once you review the policy details in the Summary blade, select Create group to complete the workflow. You can select Close and monitor the job progress in Monitoring workspace.
Köra en säkerhetskopiering på begäran
A recovery point is created only when the first backup occurs. After creating a backup policy, you can trigger the creation of a recovery point manually, rather than waiting for the scheduler to take the backup.
To run an on-demand backup of a SQL Server database, follow these steps:
Wait until the protection group status shows OK for the database before creating the recovery point.
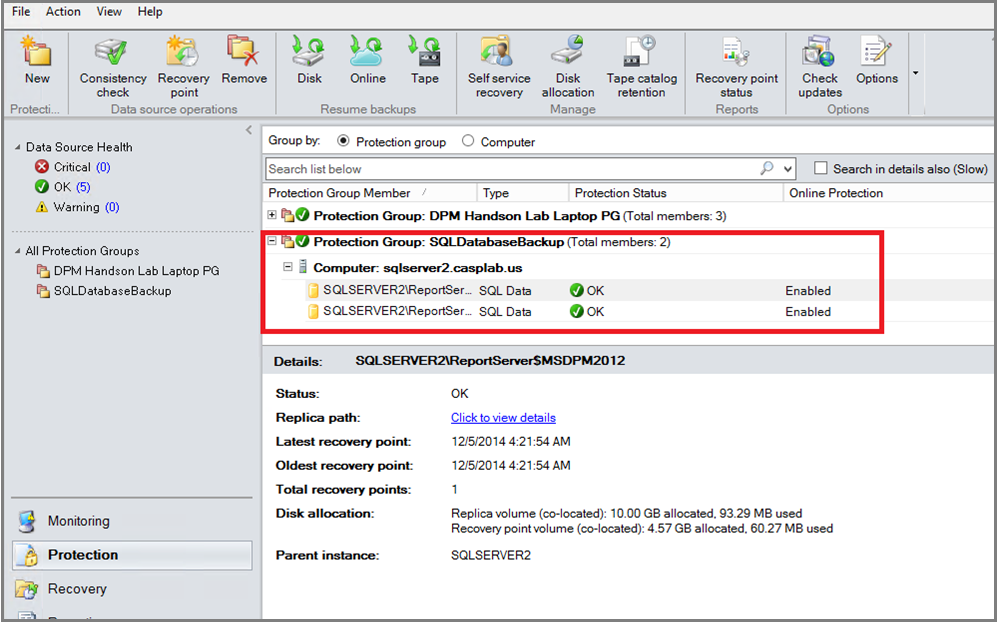
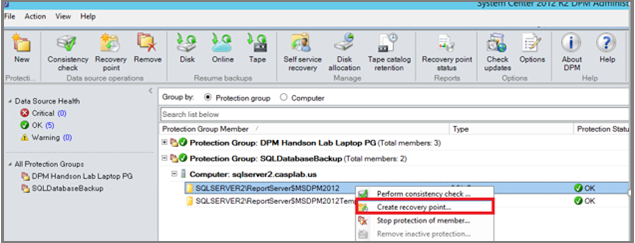
Right-click the database and select Create Recovery Point.
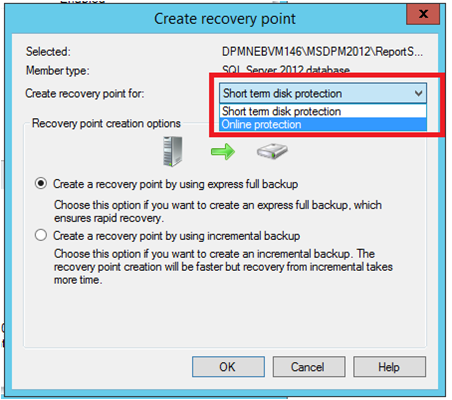
Choose Online Protection in the drop-down menu and select OK to start creation of a recovery point in Azure.
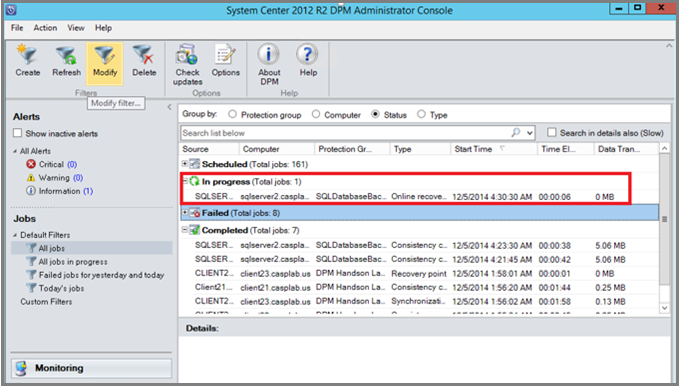
View the job progress in the Monitoring workspace.
Recover the database from Azure
To recover a protected entity (SQL Server database) from Azure, follow these steps:
Open the Azure Backup Server Management Console. Navigate to Recovery workspace where you can see the protected servers. Browse the required database (in this case ReportServer$MSDPM2012). Select a Recovery from time that's specified as an Online point.
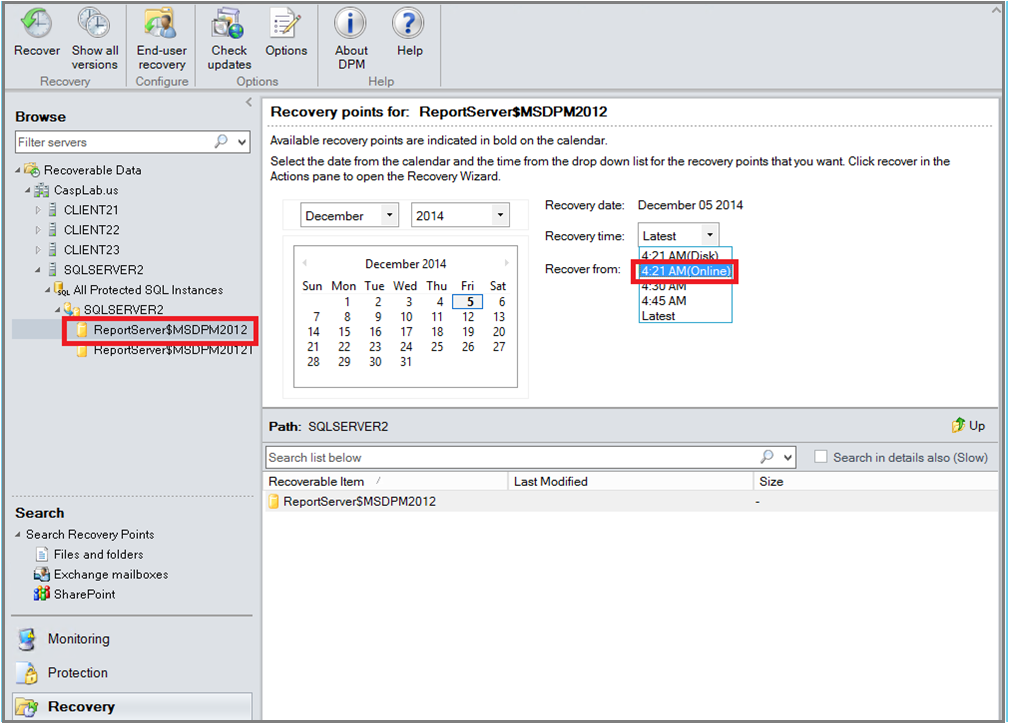
Högerklicka på databasnamnet och välj Återställ.
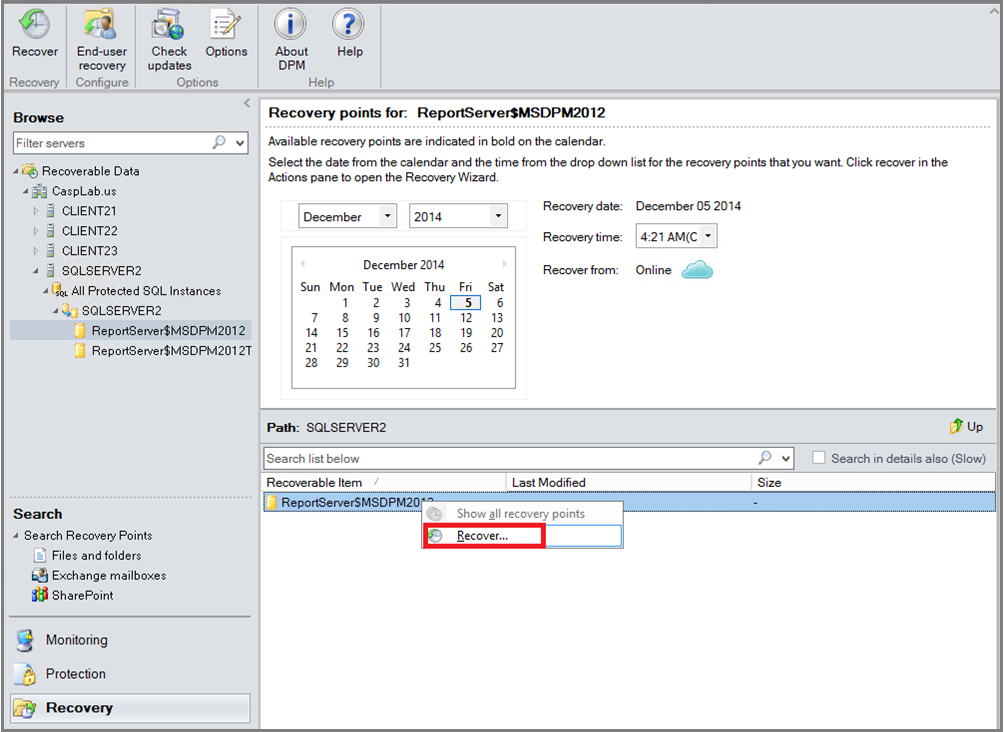
MABS shows the details of the recovery point. Välj Nästa. Om du vill skriva över databasen väljer du återställningstypen Återställ till den ursprungliga instansen av SQL Server. Välj Nästa.
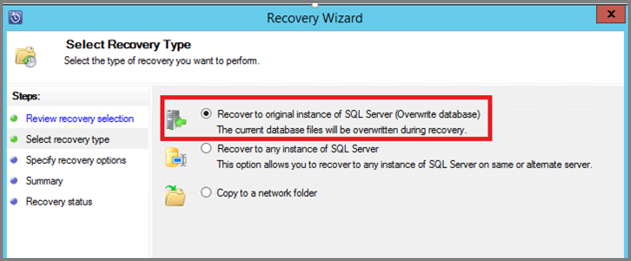
In this example, MABS recovers the database to another SQL Server instance, or to a standalone network folder.
On the Specify Recovery options blade, you can select the recovery options like Network bandwidth usage throttling to throttle the bandwidth used by recovery. Välj Nästa.
On the Summary blade, you see all the recovery configurations provided so far. Välj Återställ.
The Recovery status shows the database being recovered. You can select Close to close the wizard and view the progress in the Monitoring workspace.
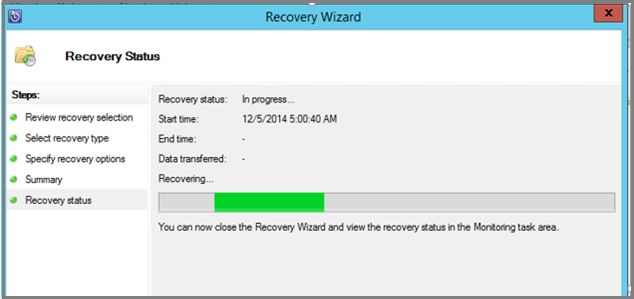
Once the recovery is completed, the restored database is application consistent.