หมายเหตุ
การเข้าถึงหน้านี้ต้องได้รับการอนุญาต คุณสามารถลอง ลงชื่อเข้าใช้หรือเปลี่ยนไดเรกทอรีได้
การเข้าถึงหน้านี้ต้องได้รับการอนุญาต คุณสามารถลองเปลี่ยนไดเรกทอรีได้
Network protection in Microsoft Defender for Endpoint helps prevent applications and nonbrowser processes on macOS devices from connecting to dangerous domains. It extends web protection beyond Microsoft Defender SmartScreen in Microsoft Edge to supported browsers and other processes.
Use this article to review requirements, choose an enforcement level, deploy network protection, and understand the supported web protection and Microsoft Defender for Cloud Apps scenarios.
Note
- We don't recommend controlling network protection from macOS System Settings. Instead, use the configuration methods described in this article.
- To evaluate the effectiveness of web threat protection on macOS, test it in a browser other than Microsoft Edge for macOS, such as Safari. Microsoft Edge for macOS has built-in web threat protection through SmartScreen, regardless of the network protection state.
- There's a known application incompatibility with the VMware Per-App Tunnel feature. This incompatibility might prevent network protection from blocking traffic that goes through the tunnel.
- There's a known application incompatibility with Blue Coat Proxy. This incompatibility might cause network-layer crashes in unrelated applications when Blue Coat Proxy and network protection are enabled.
Prerequisites
Before you configure network protection, make sure your environment meets the following requirements:
- A Microsoft Defender for Endpoint Plan 1, Microsoft Defender for Endpoint Plan 2, trial, or Microsoft Defender for Business license.
- An onboarded device that runs a supported macOS version and Defender for Endpoint version
101.94.13(January 2023) or later. - A supported browser:
- A non-Microsoft browser, such as Brave, Chrome, Firefox, Opera, or Safari.
- Microsoft Edge for macOS.
Note
SmartScreen in Microsoft Edge for macOS does not currently support web content filtering, custom indicators, or other enterprise features. However, network protection provides this protection to Microsoft Edge for macOS if network protection is enabled.
Browser configuration requirements
In processes other than Microsoft Edge, network protection determines the fully qualified domain name for each HTTPS connection by examining the Transport Layer Security (TLS) handshake that occurs after a TCP/IP handshake. The HTTPS connection must use TCP/IP instead of User Datagram Protocol (UDP) or Quick UDP Internet Connections (QUIC), and the ClientHello message must not be encrypted. To disable QUIC and Encrypted Client Hello, see the following articles:
- Google Chrome: QuicAllowed and EncryptedClientHelloEnabled.
- Mozilla Firefox: Disable EncryptedClientHello and network.http.http3.enable.
Plan your rollout
Network protection for macOS is available for all onboarded Defender for Endpoint devices that meet the minimum requirements. Network protection on macOS supports the following security, investigation, and application control capabilities:
- Custom indicators of compromise for domains and IP addresses.
- Web content filtering policies that block website categories for device groups in supported browsers, including Microsoft Edge for macOS.
- Advanced hunting and the device timeline, which provide network event data for security investigations.
- Microsoft Defender for Cloud Apps controls that discover cloud app use, warn users about Monitored apps, and block Unsanctioned apps. These scenarios have more licensing and product requirements.
- Corporate virtual private network (VPN) use. Currently, no VPN conflicts are identified. If you experience conflicts, contact Microsoft Support through the Microsoft 365 admin center.
All configured network protection and web threat protection policies are enforced on macOS devices where network protection is in block mode. To reduce deployment risk:
- Create a device group with a small set of devices to test network protection.
- Evaluate how web threat protection, custom indicators, web content filtering, and Defender for Cloud Apps enforcement policies affect macOS devices in block mode.
- Deploy an audit-mode or block-mode policy to the device group, and verify that the policy doesn't disrupt workflows.
- Gradually deploy network protection to larger device groups.
Configure network protection
Install the most recent product version through Microsoft AutoUpdate. To open Microsoft AutoUpdate, run the following command in Terminal:
open /Library/Application\ Support/Microsoft/MAU2.0/Microsoft\ AutoUpdate.app
Network protection is disabled by default. You can configure one of the following enforcement levels:
- Audit: Evaluate how network protection affects line-of-business applications and how often blocks occur.
- Block: Prevent connections to malicious websites.
- Disabled: Disable all network protection components.
Deploy network protection manually, with Jamf Pro, with Microsoft Intune, or with a .mobileconfig file.
Configure network protection manually
To configure the enforcement level, run the following command in Terminal:
mdatp config network-protection enforcement-level --value <disabled | audit | block>
For example, the following command configures network protection in block mode:
mdatp config network-protection enforcement-level --value block
To confirm that network protection started successfully, run the following command in Terminal and verify that it returns started:
mdatp health --field network_protection_status
Configure network protection with Jamf Pro
Jamf Pro is a separate third-party product that isn't part of Defender for Endpoint and isn't included with Defender for Endpoint subscriptions. To use Jamf Pro, your organization needs a separate Jamf Pro subscription. For product and subscription information, see Jamf Pro. If your organization doesn't use Jamf Pro, use another configuration method in this article, if available.
A Jamf Pro deployment requires a configuration profile that sets the network protection enforcement level.
After you create this configuration profile, assign it to the devices where you want to enable network protection.
Note
If you already configured Defender for Endpoint on macOS by using a property list (plist) file, update the deployed file with the content in this section, and then redeploy it from Jamf Pro.
Follow the Jamf instructions to deploy a custom computer configuration profile. Set Preference Domain to com.microsoft.wdav, and upload the following property list to configure network protection in block mode:
<?xml version="1.0" encoding="UTF-8"?>
<!DOCTYPE plist PUBLIC "-//Apple//DTD PLIST 1.0//EN" "http://www.apple.com/DTDs/PropertyList-1.0.dtd">
<plist version="1.0">
<dict>
    <key>networkProtection</key>
    <dict>
        <key>enforcementLevel</key>
        <string>block</string>
    </dict>
</dict>
</plist>
Configure network protection in Microsoft Intune
Note
If you previously configured Defender for Endpoint on macOS by using an XML file, create and assign the settings catalog policy, confirm that it applies successfully, and then remove the previous custom configuration policy.
Microsoft Intune is the recommended tool for configuring and distributing Defender for Endpoint features to devices. However, Intune is a separate product that isn't part of Defender for Endpoint, and it isn't included in all subscriptions. To use Intune, you need a subscription that includes it, or you can buy it separately as a standalone subscription or add-on. If you don't have Intune, you can use any of the other methods in this article. For more information, see Microsoft Intune licensing.
To configure network protection in Microsoft Intune, create or modify a settings catalog policy. For detailed instructions, see Create a policy using settings catalog in Microsoft Intune.
On the Devices | Configuration page in the Microsoft Intune admin center at https://intune.microsoft.com/#view/Microsoft_Intune_DeviceSettings/DevicesMenu/~/configuration, select the Policies tab, and then select  Create. Select New policy, and use these settings:
- Platform: Select macOS.
- Profile type: Select Settings catalog.
When you create or modify the policy, configure these specific settings on the Configuration settings tab:
- Microsoft Defender > Network protection > Enforcement level: Select Block.
Deploy a mobile configuration profile
To deploy the configuration with a .mobileconfig file, use a non-Microsoft mobile device management (MDM) solution or distribute the file directly to devices:
Save the following payload as
com.microsoft.wdav.mobileconfig.<?xml version="1.0" encoding="utf-8"?> <!DOCTYPE plist PUBLIC "-//Apple//DTD PLIST 1.0//EN" "http://www.apple.com/DTDs/PropertyList-1.0.dtd"> <plist version="1"> <dict> <key>PayloadUUID</key> <string>C4E6A782-0C8D-44AB-A025-EB893987A295</string> <key>PayloadType</key> <string>Configuration</string> <key>PayloadOrganization</key> <string>Microsoft</string> <key>PayloadIdentifier</key> <string>com.microsoft.wdav</string> <key>PayloadDisplayName</key> <string>Microsoft Defender ATP settings</string> <key>PayloadDescription</key> <string>Microsoft Defender ATP configuration settings</string> <key>PayloadVersion</key> <integer>1</integer> <key>PayloadEnabled</key> <true/> <key>PayloadRemovalDisallowed</key> <true/> <key>PayloadScope</key> <string>System</string> <key>PayloadContent</key> <array> <dict> <key>PayloadUUID</key> <string>99DBC2BC-3B3A-46A2-A413-C8F9BB9A7295</string> <key>PayloadType</key> <string>com.microsoft.wdav</string> <key>PayloadOrganization</key> <string>Microsoft</string> <key>PayloadIdentifier</key> <string>com.microsoft.wdav</string> <key>PayloadDisplayName</key> <string>Microsoft Defender ATP configuration settings</string> <key>PayloadDescription</key> <string/> <key>PayloadVersion</key> <integer>1</integer> <key>PayloadEnabled</key> <true/> <key>networkProtection</key> <dict> <key>enforcementLevel</key> <string>block</string> </dict> </dict> </array> </dict> </plist>Verify that the file was copied correctly. In Terminal, run the following command and verify that it returns
OK:plutil -lint com.microsoft.wdav.mobileconfig
Network protection scenarios
The following scenarios are supported.
Web threat protection
Web threat protection is part of web protection in Defender for Endpoint. It uses network protection to help protect devices from web threats in Microsoft Edge for macOS and non-Microsoft browsers, such as Brave, Chrome, Firefox, Opera, and Safari. It doesn't require a web proxy and protects devices on-premises and away from the organization. For browser requirements, see Prerequisites.
Web threat protection stops access to the following types of sites:
- Phishing sites.
- Malware vectors.
- Exploit sites.
- Untrusted or low-reputation sites.
- Sites blocked by a custom indicator.
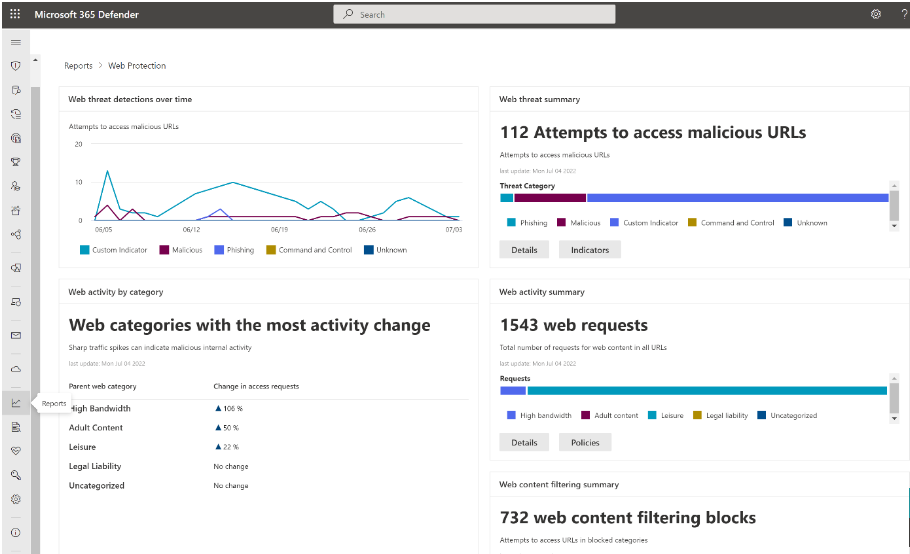
For more information, see Protect your organization against web threats.
Custom indicators of compromise
Indicator of compromise (IoC) matching lets security operations (SecOps) teams create a list of indicators for detection or blocking.
Create indicators that define the detection, prevention, and exclusion of entities. For each indicator, define the action, how long to apply the action, and the scope of the device group.
Currently supported sources are the cloud detection engine of Defender for Endpoint, the automated investigation and remediation engine, and the endpoint prevention engine (Microsoft Defender Antivirus).

For more information, see Create indicators for IP addresses, URLs, or domains.
Web content filtering
Web content filtering is part of web protection in Defender for Endpoint and Microsoft Defender for Business. It helps your organization track and control access to websites based on content categories. Even websites that aren't malicious might be problematic because of compliance requirements, bandwidth usage, or other concerns.
Configure policies for device groups to block specific categories. Blocking a category prevents users in those groups from accessing associated URLs. URLs in categories that aren't blocked are automatically audited. Users can access the URLs without disruption, and you can use the access statistics to refine your policies. Users receive a notification when a webpage element calls a blocked resource.
Web content filtering supports major web browsers, including Brave, Chrome, Firefox, Opera, and Safari. Network protection enforces the blocks.
For more information about browser support, see Prerequisites.
Note
- Removing a policy while changing device groups might delay policy deployment.
- You can deploy a policy without selecting a category for a device group. This configuration creates an audit-only policy that helps you understand user behavior before you create a block policy.
- Device group creation is supported in Defender for Endpoint Plan 1 and Plan 2.

For more information about reporting, see Web content filtering.
Microsoft Defender for Cloud Apps
Microsoft Defender for Cloud Apps can warn users when they access apps tagged as Monitored and block apps tagged as Unsanctioned. This section focuses on the warning experience for monitored apps. For more information about both controls, see Govern discovered apps using Microsoft Defender for Endpoint.
Important
The Defender for Cloud Apps integration requires a Defender for Cloud Apps license and either Defender for Endpoint Plan 2 or Microsoft Defender for Business. For macOS discovery and enforcement, devices must run Defender for Endpoint version 20.123072.25.0 or later and have network protection enabled. Discovery covers TCP connection-close events. UDP traffic isn't covered.
In the Cloud App Catalog, identify apps that should display a warning when users access them, and mark the apps as Monitored. The domains for monitored apps are then synchronized to Defender for Endpoint.

Usually within a few minutes, the domains appear on the Indicators page in the Microsoft Defender portal at https://security.microsoft.com/securitysettings/endpoints/custom_ti_indicators. On the URLs/Domains tab, the Action value is Warn. Within the enforcement service-level agreement (SLA), users receive warnings when they try to access the domains.

When a user tries to access a monitored domain, Defender for Endpoint temporarily blocks the access attempt and displays a warning. The operating system notification includes the name of the affected application. For example, the notification might identify Blogger.com.

The user can bypass the warning or open an educational webpage.
User bypass
In the notification, select Unblock, and then reload the webpage. The user can access the cloud app for the bypass duration configured in Defender for Cloud Apps. After the duration expires, the warning appears the next time the user accesses the app.
User education
Select the notification to open the custom redirect URL configured globally in Defender for Cloud Apps.
Note
On the Application page in Defender for Cloud Apps, you can track how many users bypassed the warning for each app.
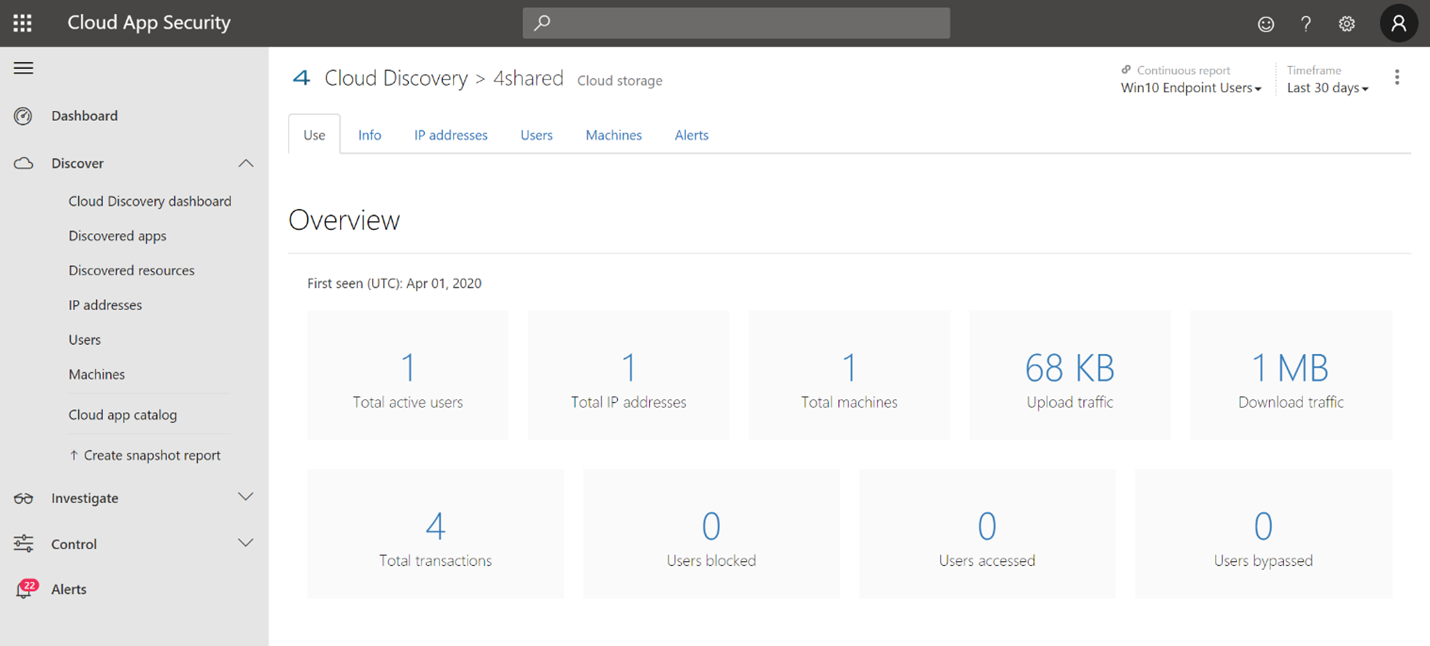
Create an end-user education center
Use the cloud controls in Defender for Cloud Apps to set limitations when needed and to educate users about:
- The specific incident.
- Why the incident occurred.
- The reason for the decision.
- How users can avoid blocked sites.
Give users enough information to understand what happened and make informed choices the next time they select a cloud app. For example, include:
- Your organization's security and compliance policies for internet and cloud use.
- Approved or recommended cloud apps.
- Restricted or blocked cloud apps.
Understand deployment timing and limitations
It can take up to two hours for app domains to propagate to endpoint devices after you mark an app as Monitored.
Unless you apply a scoped profile, the action applies to all apps and domains marked as Monitored for all onboarded endpoints in the organization.
Full URLs are currently unsupported and aren't sent from Defender for Cloud Apps to Defender for Endpoint. If monitored apps contain full URLs, users aren't warned when they try to access the sites. For example,
google.com/driveisn't supported, butdrive.google.comis supported.When testing, disable Encrypted Client Hello and QUIC so sites are blocked correctly. For browser configuration instructions, see Browser configuration requirements.
Tip
If notifications don't appear for non-Microsoft browsers, on the Notifications page in macOS System Settings, allow notifications from Microsoft Defender.