Prepare Power Platform connector and plugin files for certification
This process is for both verified and independent publishers.
After you finish developing your custom connector and/or plugin, follow these steps to prepare it for certification and generate the connector and/or plugin files to submit to Microsoft.
Note
This article provides information for certifying custom connectors in Azure Logic Apps, Power Automate, and Power Apps and plugins in Copilot. Before following the steps in this article, read Get your connector and/or plugin certified.
Step 1: Register your connector and/or plugin (Only applicable for independent publishers)
This section doesn't apply to verified publishers.
You don't need to finish development on your custom connector and/or plugin to apply for certification. To begin the certification process, register your connector and/or plugin for certification by filling out our registration form.
Expect an email within two business days from a Microsoft contact, who:
- Understands your custom connector, connector, and/or plugin.
- Learns about your development progress.
- Emails you about the certification process.
Step 2: Meet submission requirements for connectors
To maintain a high standard of quality and consistency among our certified connectors, Microsoft has a set of requirements and guidelines that your custom connector must adhere to for certification.
Give your connector a title
The title must meet the following requirements.
- Must exist and be written in English.
- Must be unique and distinguishable from any existing connector and/or plugin title.
- Should be the name of your product or organization.
- Should follow existing naming patterns for certified connector and/or plugin. For independent publishers, the connector name should follow the pattern,
Connector and/or plugin Name (Independent Publisher). - Can't be longer than 30 characters.
- Can't contain the words API, Connector, or any of our Power Platform product names (for example, Power Apps).
- Can't end in a nonalphanumeric character, including carriage return, new line, or blank space.
Examples
- Good connector and/or plugin titles:
Azure Sentinel*, *Office 365 Outlook - Poor connector and/or plugin titles:
Azure Sentinel's Power Apps Connector,Office 365 Outlook API
Write a description for your connector
The description must meet the following requirements.
- Must exist and be written in English.
- Must be free of grammatical and spelling errors.
- Should describe concisely the main purpose and value offered by your connector.
- Can't be shorter than 30 characters or longer than 500 characters.
- Can't contain any Power Platform product names (for example, 'Power Apps').
Design an icon for your connector (Only applicable for verified publishers)
This section doesn't apply to independent publishers.
- Create a logo of with 1:1 dimensions within a range of 100 x 100 to 230 × 230 pixels (no rounded edges).
- Use a non-transparent, nonwhite color (#ffffff) background, and not-default color (#007ee5) that matches your specified icon background color.
- Ensure the icon is unique to any other certified connector icon.
- Submit the logo in PNG format as
<icon>.png. - Set logo dimensions below 70% for the image's height & width with a consistent background.
- Ensure brand color is a valid hexadecimal color and shouldn't be white (#ffffff) or default (#007ee5).
Define operation and parameter summaries and descriptions
The summaries and descriptions must meet the following requirements.
- Must exist and be written in English.
- Must be free of grammatical and spelling errors.
- Operation and parameter summaries should be phrases of 80 characters or shorter, and contain only alphanumeric characters or parentheses.
- Operation and parameter descriptions should be full, descriptive sentences, and end in punctuation.
- Can't contain any of the Microsoft Power Platform product names (for example, "Power Apps").
Define exact operation responses
The operation responses must meet the following requirements.
- Define operation responses with an exact schema only with expected responses.
- Don't use default responses with an exact schema definition.
- Provide valid response schema definitions for all operations in the swagger.
- Empty response schemas aren't allowed except in special cases where the response schema is dynamic. This means no dynamic content is shown in the output and makers must use JSON to parse the response.
- Empty operations aren't allowed.
- Remove empty properties unless they're required.
Verify swagger properties
The properties must meet the following requirements.
- Ensure the "openapidefinition" is in a correctly formatted JSON file.
- Ensure swagger definition complies with the OpenAPI 2.0 standard and the connectors’ extended standard.
Verify connection parameters
The parameters must meet the following requirements.
Ensure the property is updated with appropriate values for "UIDefinition" (display name, description).
If your connection parameter uses Basic authentication, ensure JSON is formatted correctly as the following example.
{
  "username": {
    "type": "securestring",
    "uiDefinition": {
      "displayName": "YourUsernameLabel",
      "description": "The description of YourUsernameLabel for this api",
      "tooltip": "Provide the YourUsernameLabel tooltip text",
      "constraints": {
        "tabIndex": 2,
        "clearText": true,
        "required": "true"
        }
  }
},
  "password": {
    "type": "securestring",
    "uiDefinition": {
      "displayName": "YourPasswordLabel",
      "description": "The description of YourPasswordLabel for this api",
      "tooltip": "Provide the YourPasswordLabel tooltip text",
      "constraints": {
        "tabIndex": 3,
        "clearText": false,
        "required": "true"
      }
    }
  }
}
If your connection parameter has APIKey as authentication, ensure JSON is formatted correctly as the following example.
{
  "api_key": {
    "type": "securestring",
    "uiDefinition": {
      "displayName": "YourApiKeyParameterLabel",
      "tooltip": "Provide your YourApiKeyParameterLabel tooltip text",
      "constraints": {
        "tabIndex": 2,
        "clearText": false,
        "required": "true"
      }
    }
  }
}
If your connection parameter has Generic OAuth as authentication, ensure JSON is formatted correctly as the following example.
{
  "token": {
    "type": "oAuthSetting",
    "oAuthSettings": {
      "identityProvider": "oauth2",
      "scopes": [
        "scope1"
      ],
      "redirectMode": "GlobalPerConnector",
      "customParameters": {
        "AuthorizationUrl": {
          "value": "https://contoso.com"
        },
        "TokenUrl": {
          "value": "https://contoso.com"
        },
        "RefreshUrl": {
          "value": "https://contoso.com"
        }
      },
      "clientId": "YourClientID"
    },
    "uiDefinition": null
  }
}
If your connection parameter has OAuth2 identity provider, ensure the identity provider is from the list of supported OAuth2 providers. Following is the example of GitHub OAuth2 identity provider:
{
  "token": {
    "type": "oAuthSetting",
    "oAuthSettings": {
      "identityProvider": "github",
      "scopes": [
        "scope1"
      ],
      "redirectMode": "GlobalPerConnector",
      "customParameters": {},
      "clientId": "YourClientId"
    },
    "uiDefinition": null
  }
}
If your connection parameter has Microsoft Entra ID as authentication, ensure JSON is formatted correctly as the following example.
{
  "token": {
    "type": "oAuthSetting",
    "oAuthSettings": {
      "identityProvider": "aad",
      "scopes": [
        "scope1"
      ],
      "redirectMode": "GlobalPerConnector",
      "customParameters": {
        "LoginUri": {
          "value": "https://login.microsoftonline.com"
        },
        "TenantId": {
          "value": "common"
        },
        "ResourceUri": {
          "value": "resourceUri"
        },
        "EnableOnbehalfOfLogin": {
          "value": false
        }
      },
      "clientId": "AzureActiveDirectoryClientId"
    },
    "uiDefinition": null
  }
}
Create quality English language strings
Connectors are localized as part of Power Automate localization; therefore, when you develop a connector, the quality of the English language strings is key to the translation quality. Here are some major areas to focus on as you create the values of the strings you provide.
To ensure all string values are free of typographical errors, make sure to run a spell check program. If there's any incomplete English language string, the translation result is incomplete or incorrect in context.
Make sure the sentence is in complete form. If the sentence isn't complete, that can also generate lower quality translations.
Make sure the meaning of the sentence is clear. If the meaning of the sentence is ambiguous, that can also generate lower quality or incorrect translations.
Make sure summaries, x-ms-summaries, and descriptions are grammatically correct. Don't copy and paste them. To learn how they're shown within the product, go to Connector string guidance.
Avoid runtime composite strings, if possible. Use fully formed sentences instead. Concatenated strings or sentences make it difficult to translate, or can cause a wrong translation.
If you use abbreviations, make sure to capitalize them to make it clear. This reduces the chance of it being mistaken for a typographical error.
Strings in CaMel form (for example, minimizeHighways or MinimizeHighways) are typically considered nontranslatable. If you want to localize the string value, you should fix the CaMel form string.
Step 3: Run the Solution Checker to validate your connector
Solution Checker is a mechanism to conduct static analysis to ensure your connector is adhering to the standards required by Microsoft for certification. Add your connector to a solution in Power Automate or Power Apps and run the solution checker by following the instructions at Validate a custom connector with solution checker.
Watch this video to learn how to run the Solution Checker!
Step 4: Add metadata
Your connector artifacts (files) must contain specific metadata describing the connector and its end service. The information provided in metadata is published in our connector documentation and is publicly accessible by all users. Don't provide any private or confidential information, and let us know through your Microsoft contact if there are any issues in providing us with this information. To learn how the metadata is documented, visit any one of the connector-specific documentation pages under Connector reference.
Step 4a: publisher and stackOwner properties
- "publisher" is the name of your company or organization. Provide the full company name (for example, "Contoso Corporation"). This must be in alphanumeric format.
- "stackOwner" is the owning company or organization of the back-end service stack that the connector is connecting to. This must be in alphanumeric format.
| Publisher | Description | Example |
|---|---|---|
| Verified | The publisher and stackOwner are the same, unless the ISV is building a connector on behalf of a stackOwner. | "publisher": "Tesla", "stackOwner": "Tesla" |
| Independent | You must provide stack owner and publisher owner. | "publisher": "Nirmal Kumar", "stackOwner": "ITGlue" |
File Location: openapidefinition.json
Syntax: The publisher and stackOwner properties exist as top-level properties within the openapidefinition.json file. Add the following highlighted lines as shown. Ensure that you enter the property name and schema exactly as shown.
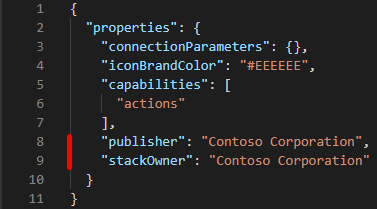
Code showing the block defining the contact object highlighted in red. This block must be located directly under the description. Another block, x-ms-connector-metadata, is also highlighted in red. This block must be located directly under paths: {}.
Step 4c: Sample code snippets
You can use the following code snippets to copy and enter your information. Ensure that you add the snippets to the correct files in the correct locations as described in the preceding section.
    "publisher": "_____",
    "stackOwner": "_____"
    "contact": {
      "name": "_____",
      "url": "_____",
      "email": "_____"
    }
    "x-ms-connector-metadata": [
      {
        "propertyName": "Website",
        "propertyValue": "_____"
      },
      {
        "propertyName": "Privacy policy",
        "propertyValue": "_____"
      },
      {
        "propertyName": "Categories",
        "propertyValue": "_____;_____"
      }
    ]
Note
There is a current limitation in the use of the stackOwner property and the Paconn CLI tool. To learn more, go to Limitations in the README file.
Step 4d: JSON file formatting and limitations
Make sure your properties are correctly aligned.
Paste your JSON into Visual Studio Code. Feel free to use extensions such as spell checkers, and plugins such as JSON plugins.
Swagger files shouldn't be greater than 1 MB.
- Consider the design of your connector before your start building it. Evaluate if the connector should be broken down into two (2) or more connectors.
- Larger swagger files might cause a delay when using the connector.
For example, there are three (3) different HubSpot connectors on the platform.

Step 5: Meet submission requirements for plugins
This section applies if you're also submitting the associated connector plugin for certification.
- Ensure you authored the plugin as per the guidelines in Create AI plugins for Microsoft Copilot (preview).
- All the AI plugins submitted should comply to the standards highlighted in 100.10 Inappropriate content.
- All the AI plugins follow the Responsible AI guidelines.
- Plugin must not generate, contain, or provide access to inappropriate, harmful, or offensive Artificial intelligence (AI) generated content consistent with existing commercial marketplace policies outlined in 100.10 Inappropriate content.
Step 6: Prepare the connector and/or plugin artifacts
Note
- Ensure that you've followed the specifications and have ensured the quality of your connector and/or plugin before certification. Failure to do so will result in delays in certification because you'll be asked to make changes.
- Provide a production version of the host URL. Staging, dev, and test host URLs aren't allowed.
You're submitting to Microsoft a set of files, which is a Solution generation from maker portal or Microsoft Copilot Studio. To package your files, follow the steps in this section.
Connector and plugin packaging guide
The procedures in this section guide you through various scenarios of packaging. If you want to package only a custom connector, use the first scenario. If you want to package both a custom connector and plugins, use the second scenario. If you want to package an existing connector and plugins, use the last scenario.
- Package your custom connector and submit for certification
- Package your custom connector and plugin for certification
- Package existing certified connector and plugin for certification
Package your custom connector and submit for certification
Run solution checker on your connector solution in step 1.
Export the connector solution.
Create a flow (testing) using the newly created custom connector and add the flow to a solution.
Export the flow solution.
Create a package with the solutions from steps 3 and 5.
Create the final package as a zip file, which is in the following format:
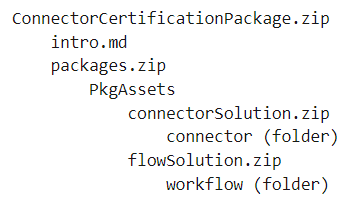
Upload the package to a storage blob and generate SAS URL. Ensure that your SAS URI is valid for at least 15 days.
Submit your package to Partner Center.
Package your custom connector and plugin for certification
Follow steps 1 through 5 in Package your custom connector and submit for certification in this article.
Create a plugin in the Microsoft Copilot Studio portal and export it as a solution.
Create a package from the following:
- Run solution checker (step 2 in Package your custom connector and submit for certification).
- Export the flow solution (step 5 in Package your custom connector and submit for certification).
- Create a plugin in Microsoft Copilot Studio and export it as a solution (step 2 in this procedure).
Create the final package as a zip file, which is in the following format.
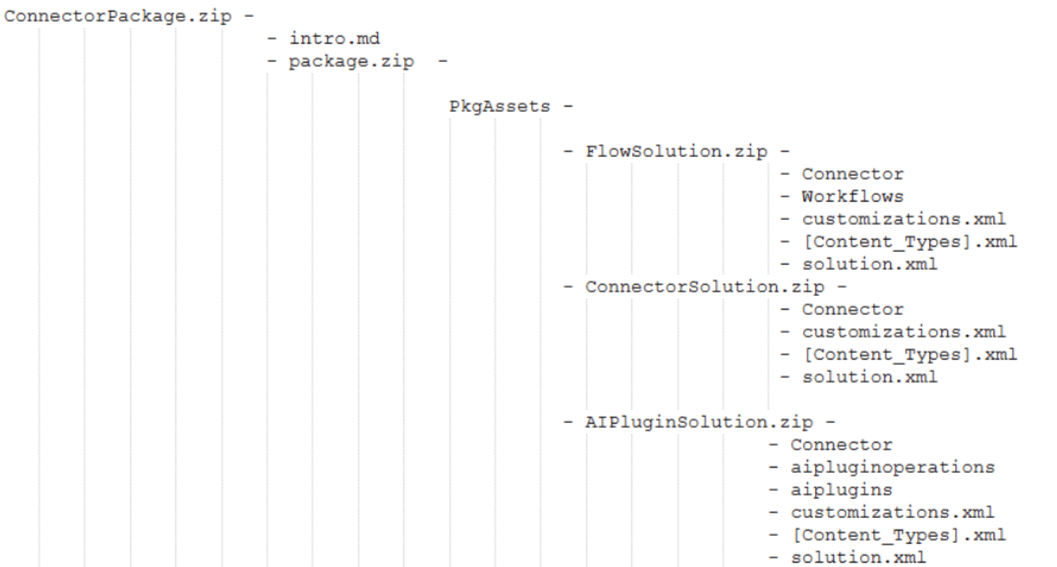
Upload the package to a storage blob and generate SAS URL. Ensure that your SAS URI is valid for at least 15 days.
Submit your package to Partner Center.
Package existing certified connector and plugin for certification
Create a solution in Power Automate and add the already certified connector in it.
Follow steps 2 through 4 in Package your custom connector and submit for certification in this article.
Create a plugin in Copilot Studio and export it as a solution.
Export the plugin as solution.
Create a package from the following:
- Run solution checker on your connector solution (step 2 in Package your custom connector and submit for certification in this article).
- Create a plugin in Copilot Studio and export it as a solution (step 3 in this procedure).
- Create a plugin in Copilot Studio and export it as a solution (step 4 in this procedure).
Create the final package as a zip file, which is in the following format.
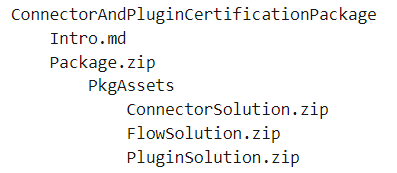
Upload the package to a storage blob and generate SAS URL. Ensure that your SAS URI is valid for at least 15 days.
Submit your package to Partner Center.
Both verified publishers and independent publishers download openapidefinition.json in their artifacts. You need to set the IconBrandColor in this file.
- Verified publishers: Set iconBrandColor to your brand color in the openapidefinition file.
- Independent publishers: Set iconBrandColor to "#da3b01" in the openapidefinition file.
 icon")
Create an intro.md artifact
An intro.md file is necessary for both independent publishers and verified publishers. You need to create an intro.md file to document your connector's features and functionality. For an example of documentation to include, go to the Readme.md example. To learn about writing an intro.md file, look at other intro.md files (also known as Readme.md files) in our GitHub repository.
If you’re an independent publisher and your connector uses OAuth, make sure you include instructions for how to obtain credentials.
Tip
Known Issues and Limitations is a great section to maintain to keep your users up-to-date.
Step 7: Submit your connector and/or plugin for certification
During the submission process, you open-source your connector and/or plugin to our Microsoft Power Platform Connectors repository.
(For independent publishers) To submit the package to Microsoft for certification, follow the instructions in Independent Publisher Certification process.
(For verified publishers) To submit the package to Microsoft for certification into Partner Center, follow the instructions in Verified Publisher Certification Process.
If you're a verified publisher, you need to submit a script.csx file if you're using custom code.
If your connector has OAuth, provide Client ID and Secret in Partner Center. Also, get the APIname from your connector submission request to update your app.
As part of submission, Microsoft certifies and/or plugin your connector. If you need to troubleshoot swagger errors, go to Fix Swagger Validator errors.
Checklist before submitting
Before moving on to Submit your connector for Microsoft certification, ensure that:
Your connector and/or plugin satisfy all standards set in Step 2: Meet submission requirements for connectors, Step 5: Meet submission requirements for plugins, and Step 4: Add metadata.
No operations are missing a summary, description, or visibility information.
You tested your custom connector and/or plugin to ensure the operations work as expected (at least 10 successful calls per operation).
No runtime or schema validation errors appear in the test section of the custom connector wizard.
Tip