作者 :斯科特·米切尔
在本教程中,我们将了解如何轻松地向数据 Web 控件的 EditItemTemplate 和 InsertItemTemplate 添加验证控件,以便提供一个更易懂的用户界面。
简介
我们过去三个教程中探索的 GridView 和 DetailsView 控件都由 BoundFields 和 CheckBoxFields 组成(将 GridView 或 DetailsView 绑定到智能标记的数据源控件时由 Visual Studio 自动添加的字段类型)。 在 GridView 或 DetailsView 中编辑行时,不只读的 BoundFields 将转换为文本框,最终用户可从中修改现有数据。 同样,在 DetailsView 控件中插入新记录时,属性 InsertVisible 设置为 true (默认值)的 BoundFields 呈现为空文本框,用户可以在其中提供新记录的字段值。 同样,在标准只读接口中禁用的 CheckBoxFields 将转换为编辑和插入接口中的已启用复选框。
虽然 BoundField 和 CheckBoxField 的默认编辑和插入接口非常有用,但接口缺少任何类型的验证。 如果用户犯了数据输入错误(例如省略 ProductName 字段或为 -50)输入无效值 UnitsInStock ,则会在应用程序体系结构的深度内引发异常。 尽管如上一教程所示可以正常处理此异常,但理想情况下,编辑或插入用户界面将包括验证控件,以防止用户首先输入此类无效数据。
为了提供自定义的编辑或插入界面,我们需要将 BoundField 或 CheckBoxField 替换为 TemplateField。 TemplateFields 是 DetailsView 控件教程中使用 TemplateFields 和 DetailsView 控件教程中的 Using TemplateFields 讨论的主题,可以包含多个模板,用于定义不同行状态的单独接口。 在 DetailsView 或 GridView 控件中呈现只读字段或行时,TemplateField ItemTemplate 用于呈现只读字段或行,而EditItemTemplateInsertItemTemplate并指示用于编辑和插入模式的接口。
在本教程中,我们将了解将验证控件添加到 TemplateField 的 EditItemTemplate 简单程度,并提供 InsertItemTemplate 一个更易懂的用户界面。 具体而言,本教程采用在 检查与插入、更新和删除 相关的事件时创建的示例,并扩充编辑和插入接口以包括适当的验证。
步骤 1:从检查与插入、更新和删除关联的事件复制示例
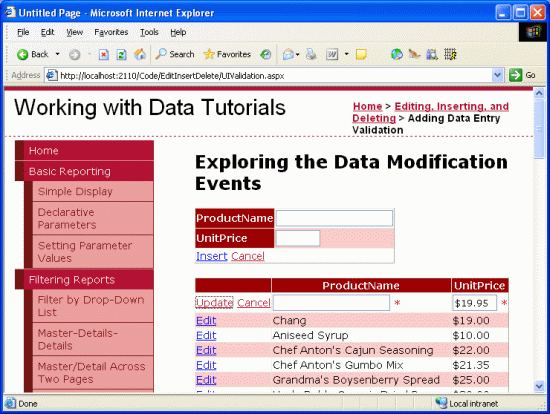
在 “检查与插入、更新和删除 相关的事件”教程中,我们创建了一个页面,其中列出了可编辑 GridView 中产品的名称和价格。 此外,该页面还包含一个 DetailsView,其 DefaultMode 属性设置为 Insert,因此始终以插入模式呈现。 在此 DetailsView 中,用户可以输入新产品的名称和价格,单击“插入”,并将其添加到系统(请参阅图 1)。
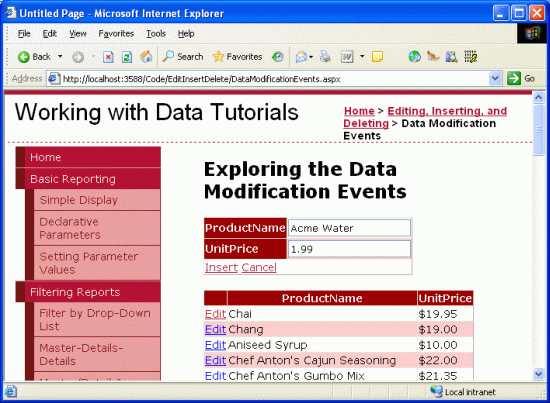
图 1:上一个示例允许用户添加新产品并编辑现有产品(单击可查看全尺寸图像)
本教程的目标是扩充 DetailsView 和 GridView 以提供验证控件。 具体而言,验证逻辑将:
- 要求在插入或编辑产品时提供该名称
- 要求在插入记录时提供价格;编辑记录时,我们仍需要价格,但在前面教程中已存在的 GridView
RowUpdating事件处理程序中使用编程逻辑 - 确保为价格输入的值是有效的货币格式
在查看扩充前一个示例以包含验证之前,首先需要将示例从DataModificationEvents.aspx页面复制到本教程的页面。 UIValidation.aspx 为此,我们需要复制 DataModificationEvents.aspx 页面的声明性标记及其源代码。 首先通过执行以下步骤来复制声明性标记:
-
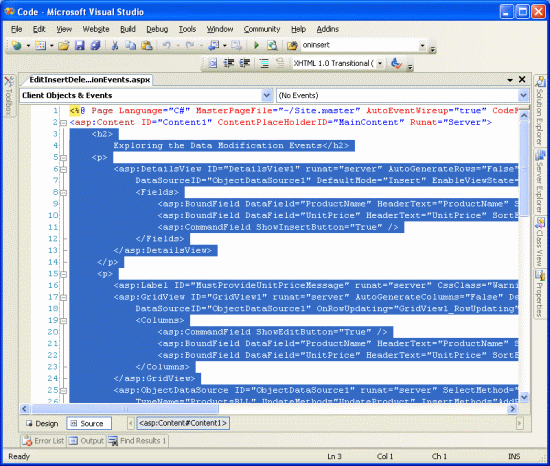
DataModificationEvents.aspx在 Visual Studio 中打开页面 - 转到页面的声明性标记(单击页面底部的“源”按钮)
- 复制文本
<asp:Content>和</asp:Content>标记(第 3 行至 44 行),如图 2 所示。

图 2:复制控件中的 <asp:Content> 文本(单击以查看全尺寸图像)
-
UIValidation.aspx打开页面 - 转到页面的声明性标记
- 将文本粘贴到控件中
<asp:Content>。
若要复制源代码,请打开DataModificationEvents.aspx.cs页面并仅复制类中的。 复制三个事件处理程序(Page_Load和GridView1_RowUpdatingObjectDataSource1_Inserting),但不复制类声明或using语句。 将复制的文本粘贴到EditInsertDelete_UIValidation类中UIValidation.aspx.cs。
在将内容和代码移 DataModificationEvents.aspx 入 UIValidation.aspx以后,花点时间在浏览器中测试进度。 应看到相同的输出并体验这两个页面中的每个页面相同的功能(请参阅图 1 以获取操作的 DataModificationEvents.aspx 屏幕截图)。
步骤 2:将 BoundFields 转换为 TemplateFields
若要将验证控件添加到编辑和插入接口,需要将 DetailsView 和 GridView 控件使用的 BoundFields 转换为 TemplateFields。 为此,请单击 GridView 和 DetailsView 智能标记中的“编辑列”和“编辑字段”链接。 在那里,选择每个 BoundFields,然后单击“将此字段转换为 TemplateField”链接。
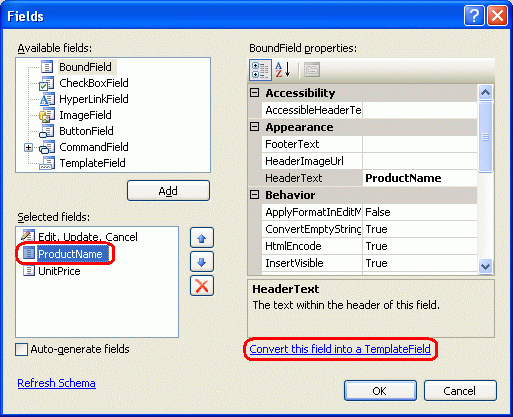
图 3:将 DetailsView 的每个和 GridView 的 BoundFields 转换为 TemplateFields(单击可查看全尺寸图像)
通过“字段”对话框将 BoundField 转换为 TemplateField 将生成一个 TemplateField,该模板字段显示与 BoundField 本身相同的只读、编辑和插入接口。 以下标记显示 DetailsView 中字段在转换为 TemplateField 之后的声明性语法 ProductName :
<asp:TemplateField HeaderText="ProductName" SortExpression="ProductName">
    <EditItemTemplate>
        <asp:TextBox ID="TextBox1" runat="server"
         Text='<%# Bind("ProductName") %>'></asp:TextBox>
    </EditItemTemplate>
    <InsertItemTemplate>
        <asp:TextBox ID="TextBox1" runat="server"
         Text='<%# Bind("ProductName") %>'></asp:TextBox>
    </InsertItemTemplate>
    <ItemTemplate>
        <asp:Label ID="Label1" runat="server"
         Text='<%# Bind("ProductName") %>'></asp:Label>
    </ItemTemplate>
</asp:TemplateField>
请注意,此 TemplateField 自动创建了 ItemTemplate三个模板, EditItemTemplate并且 InsertItemTemplate。 该 ItemTemplate 控件使用标签 Web 控件显示单个数据字段值(ProductName),而 EditItemTemplateInsertItemTemplate TextBox Web 控件中的数据字段值使用双向数据绑定将数据字段与 TextBox Text 的属性相关联。 由于我们只使用此页面中的 DetailsView 进行插入,因此你可以删除和从这两个 TemplateFields 中删除 ItemTemplate , EditItemTemplate 尽管离开它们不会造成任何损害。
由于 GridView 不支持 DetailsView 的内置插入功能,因此将 GridView 的 ProductName 字段转换为 TemplateField 仅生成一个 ItemTemplate 和 EditItemTemplate:
<asp:TemplateField HeaderText="ProductName" SortExpression="ProductName">
    <EditItemTemplate>
        <asp:TextBox ID="TextBox1" runat="server"
         Text='<%# Bind("ProductName") %>'></asp:TextBox>
    </EditItemTemplate>
    <ItemTemplate>
        <asp:Label ID="Label1" runat="server"
          Text='<%# Bind("ProductName") %>'></asp:Label>
    </ItemTemplate>
</asp:TemplateField>
通过单击“将此字段转换为 TemplateField”,Visual Studio 创建了一个 TemplateField,其模板模仿转换的 BoundField 的用户界面。 可以通过浏览器访问此页面来验证这一点。 你会发现,TemplateFields 的外观和行为与使用 BoundFields 时的体验相同。
注意
根据需要随时自定义模板中的编辑界面。 例如,我们可能需要在 TemplateFields 中 UnitPrice 将 TextBox 呈现为比文本框更小的 ProductName 文本框。 为此,可以将 TextBox Columns 的属性设置为适当的值,或通过该属性提供绝对宽度 Width 。 在下一教程中,我们将了解如何通过将 TextBox 替换为备用数据输入 Web 控件来完全自定义编辑界面。
步骤 3:将验证控件添加到 GridView 的EditItemTemplate
构造数据输入表单时,用户必须输入任何必填字段,并且所有提供的输入都是合法且格式正确的值。 为了帮助确保用户的输入有效,ASP.NET 提供了五个内置验证控件,这些控件旨在用于验证单个输入控件的值:
- RequiredFieldValidator 确保已提供值
- CompareValidator 针对另一个 Web 控件值或常量值验证值,或确保该值的格式对于指定的数据类型是合法的
- RangeValidator 确保值在值范围内
- RegularExpressionValidator 针对 正则表达式验证值
- CustomValidator 根据自定义用户定义的方法验证值
有关这五个控件的详细信息,请查看 ASP.NET 快速入门教程的“验证控件”部分。
在本教程中,我们需要在 DetailsView 和 GridView 的 ProductName TemplateField 和 DetailsView 的 TemplateField 中使用 RequiredFieldValidator,并在 DetailsView 的 UnitPrice TemplateField 中使用 RequiredFieldValidator。 此外,我们需要将 CompareValidator 添加到这两个控件的 UnitPrice TemplateFields,以确保输入的价格具有大于或等于 0 的值,并且以有效的货币格式显示。
注意
虽然 ASP.NET 1.x 具有相同的五个验证控件,ASP.NET 2.0 增加了许多改进,但主要两项是 Internet Explorer 以外的浏览器的客户端脚本支持,并且能够将页面上的验证控件分区为验证组。
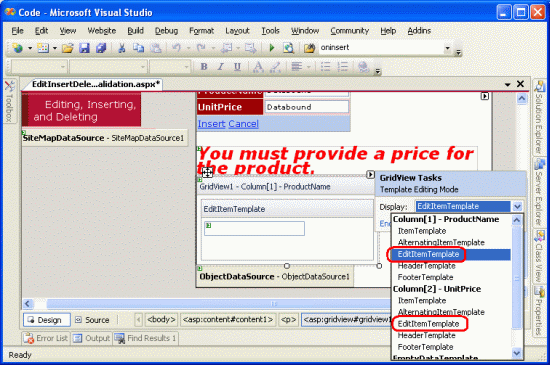
首先,将必要的验证控件添加到 EditItemTemplate GridView 的 TemplateFields 中的控件。 为此,请单击 GridView 智能标记中的“编辑模板”链接,打开模板编辑界面。 在此处,可以从下拉列表中选择要编辑的模板。 由于我们想要增强编辑界面,因此需要向和 ProductName's UnitPrice 添加验证控件EditItemTemplate。

图 4:我们需要扩展 ProductName 和 UnitPrice's EditItemTemplate (单击以查看全尺寸图像)
在ProductNameEditItemTemplate中,通过将 RequiredFieldValidator 从工具箱拖动到模板编辑界面(放置在 TextBox 后面)来添加 RequiredFieldValidator。

图 5:向 添加 RequiredFieldValidator ProductNameEditItemTemplate (单击以查看全尺寸图像)
所有验证控件都通过验证单个 ASP.NET Web 控件的输入来工作。 因此,我们需要指示刚添加的 RequiredFieldValidator 应针对 TextBox 进行 EditItemTemplate验证;这是通过将验证控件的 ControlToValidate 属性 设置为 ID 适当的 Web 控件来实现的。 TextBox 目前具有相当不描述的内容IDTextBox1,但让我们将其更改为更合适的内容。 单击模板中的 TextBox,然后从属性窗口更改为 IDTextBox1EditProductName。

图 6:将 TextBox ID 更改为 EditProductName (单击以查看全尺寸图像)
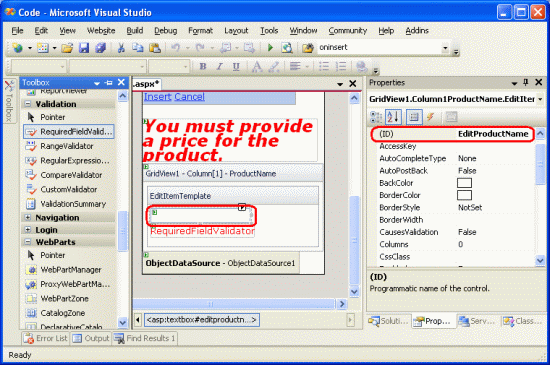
接下来,将 RequiredFieldValidator ControlToValidate 的属性设置为 EditProductName. 最后,将 ErrorMessage 属性 设置为“必须提供产品名称”,并将 Text 属性 设置为“*”。
Text属性值(如果提供)是验证控件在验证失败时显示的文本。
ErrorMessage ValidationSummary 控件使用所需的属性值;如果Text省略属性值,ErrorMessage则属性值也是验证控件在无效输入上显示的文本。
设置 RequiredFieldValidator 这三个属性后,屏幕应类似于图 7。
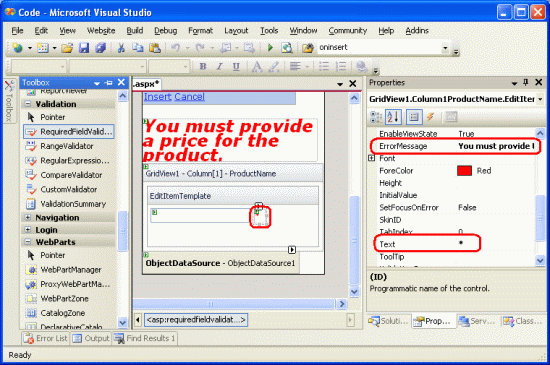
图 7:设置 RequiredFieldValidator 的ControlToValidate和ErrorMessageText属性(单击以查看全尺寸图像)
将 RequiredFieldValidator 添加到 EditItemTemplate/> 后,所有剩余项都是向 UnitPriceEditItemTemplate添加必要的验证。 由于我们已确定,对于此页面, UnitPrice 编辑记录时是可选的,因此无需添加 RequiredFieldValidator。 但是,我们确实需要添加 CompareValidator,以确保 UnitPrice提供的格式正确设置为货币且大于或等于 0。
在将 CompareValidator 添加到 UnitPriceEditItemTemplate 之前,让我们先将 TextBox Web 控件的 ID 从更改为 TextBox2EditUnitPrice。 进行此更改后,添加 CompareValidator,将其ControlToValidate属性EditUnitPriceErrorMessage设置为“价格必须大于或等于零且不能包含货币符号”,其Text属性设置为“*”。
若要指示 UnitPrice 该值必须大于或等于 0,请将 CompareValidator 的 Operator 属性 设置为 GreaterThanEqual,将其 ValueToCompare 属性 设置为“0”,并将 Type 属性 设置为 Currency。 以下声明性语法显示 UnitPrice TemplateField 在 EditItemTemplate 进行这些更改后:
<EditItemTemplate>
    <asp:TextBox ID="EditUnitPrice" runat="server"
      Text='<%# Bind("UnitPrice", "{0:c}") %>'
      Columns="6"></asp:TextBox>
    <asp:CompareValidator ID="CompareValidator1" runat="server"
        ControlToValidate="EditUnitPrice"
        ErrorMessage="The price must be greater than or equal to zero and
                       cannot include the currency symbol"
        Operator="GreaterThanEqual" Type="Currency"
        ValueToCompare="0">*</asp:CompareValidator>
</EditItemTemplate>
进行这些更改后,在浏览器中打开页面。 如果在编辑产品时尝试省略名称或输入无效的价格值,则文本框旁边会显示星号。 如图 8 所示,包含货币符号(如 $19.95)的价格值被视为无效。 CompareValidator 允许CurrencyType数字分隔符(如逗号或句点,具体取决于区域性设置)和前导加号或减号,但不允许货币符号。 此行为可能会使用户感到困惑,因为编辑界面当前呈现 UnitPrice 使用货币格式。
注意
回想一下,在 与插入、更新和删除 相关的事件教程中,我们将 BoundField DataFormatString 的属性 {0:c} 设置为将它的格式设置为货币。 此外,我们将属性设置为 ApplyFormatInEditMode true,导致 GridView 的编辑界面将格式 UnitPrice 设置为货币。 将 BoundField 转换为 TemplateField 时,Visual Studio 会注意到这些设置, Text 并使用数据绑定语法 <%# Bind("UnitPrice", "{0:c}") %>将 TextBox 的属性格式化为货币。

图 8:星号显示在输入无效的文本框旁边(单击以查看全尺寸图像)
虽然验证按原样工作,但编辑记录时,用户必须手动删除货币符号,这是不能接受的。 若要解决此问题,我们有三个选项:
-
EditItemTemplate配置该值,以便UnitPrice该值的格式不是货币。 - 允许用户通过删除 CompareValidator 并将其替换为 RegularExpressionValidator 来输入货币符号,以便正确检查格式正确的货币值。 此处的问题是,验证货币值的正则表达式并不漂亮,如果我们想要合并区域性设置,则需要编写代码。
- 完全删除验证控件,并依赖于 GridView
RowUpdating事件处理程序中的服务器端验证逻辑。
让我们来看看本练习的选项 #1。 目前,由于 UnitPrice TextBox 中的数据绑定表达式在EditItemTemplate以下位置,因此格式为货币。 <%# Bind("UnitPrice", "{0:c}") %> 将 Bind 语句更改为 Bind("UnitPrice", "{0:n2}"),以两位数的精度将结果格式化为数字。 这可以通过声明性语法直接完成,也可以通过单击 TemplateField 中 EditUnitPrice TextBox 中的UnitPrice“编辑 DataBindings”链接EditItemTemplate(请参阅图 9 和 10)。
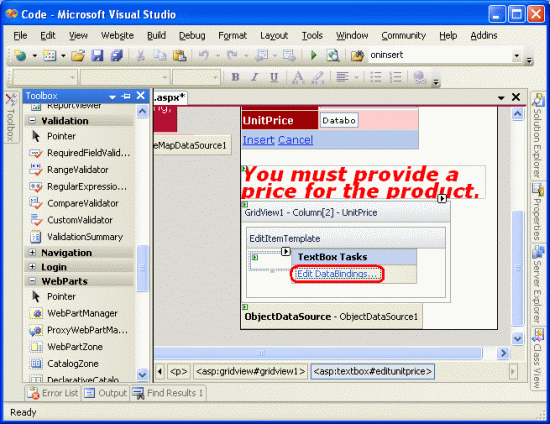
图 9:单击 TextBox 的“编辑 DataBindings”链接(单击以查看全尺寸图像)
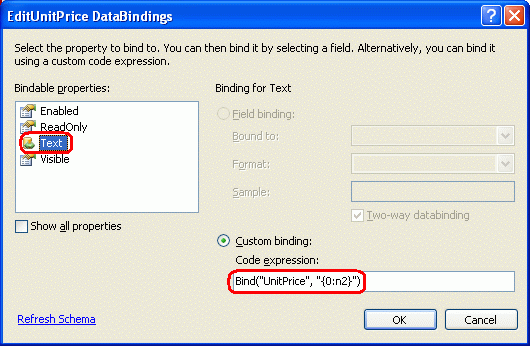
图 10:在语句中 Bind 指定格式说明符(单击以查看全尺寸图像)
通过此更改,编辑界面中的格式化价格包括逗号作为组分隔符和小数分隔符的句点,但会离开货币符号。
注意
不包括 UnitPriceEditItemTemplate RequiredFieldValidator,允许回发进行,以及要启动的更新逻辑。 但是, RowUpdating 从 “检查与插入、更新和删除 相关的事件”教程复制的事件处理程序包括一个编程检查,确保提供该 UnitPrice 事件。 请随意删除此逻辑、按原样保留逻辑,或向 UnitPriceEditItemTemplate 添加 RequiredFieldValidator。
步骤 4:汇总数据输入问题
除了五个验证控件,ASP.NET 还包括 ValidationSummary 控件,该控件显示 ErrorMessage 检测到无效数据的验证控件。 此摘要数据可以显示为网页中的文本或通过模式客户端消息框显示。 让我们增强本教程,以包含汇总任何验证问题的客户端消息框。
为此,请将 ValidationSummary 控件从工具箱拖到设计器上。 验证控件的位置并不重要,因为我们将将其配置为仅将摘要显示为消息框。 添加控件后,将其 ShowSummary 属性设置为false及其 ShowMessageBox 属性。true 此外,客户端消息框中汇总了任何验证错误。
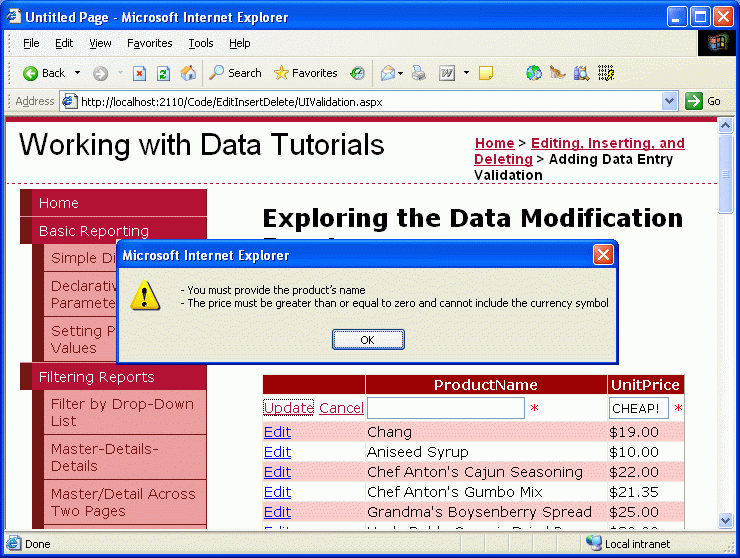
图 11:客户端消息框中汇总了验证错误(单击以查看全尺寸图像)
步骤 5:将验证控件添加到 DetailsViewInsertItemTemplate
本教程剩下的全部操作是将验证控件添加到 DetailsView 的插入界面。 将验证控件添加到 DetailsView 模板的过程与步骤 3 中检查的过程相同;因此,我们将在此步骤中轻松完成任务。 和 GridView 一EditItemTemplate样,我鼓励你将 TextBoxs 的字体从非描述ID和TextBox1重命名TextBox2为和重命名InsertProductNameInsertUnitPrice。
将 RequiredFieldValidator 添加到 .ProductNameInsertItemTemplate 将ControlToValidateID模板中的 TextBox 设置为“*”,其TextErrorMessage属性设置为“必须提供产品名称”。
由于在添加新记录时需要此页,因此请向 UnitPrice 添加 RequiredFieldValidatorUnitPriceInsertItemTemplate,并相应地设置其ControlToValidateText属性和ErrorMessage属性。 最后,将 CompareValidator 添加到UnitPriceInsertItemTemplate其中,配置其ControlToValidate、Text、ErrorMessage、Type、Operator和ValueToCompare属性,就像我们在 GridView UnitPrice中对EditItemTemplate's CompareValidator 所做的那样。
添加这些验证控件后,如果未提供新产品的名称或价格为负数或非法设置格式,则无法将其添加到系统中。
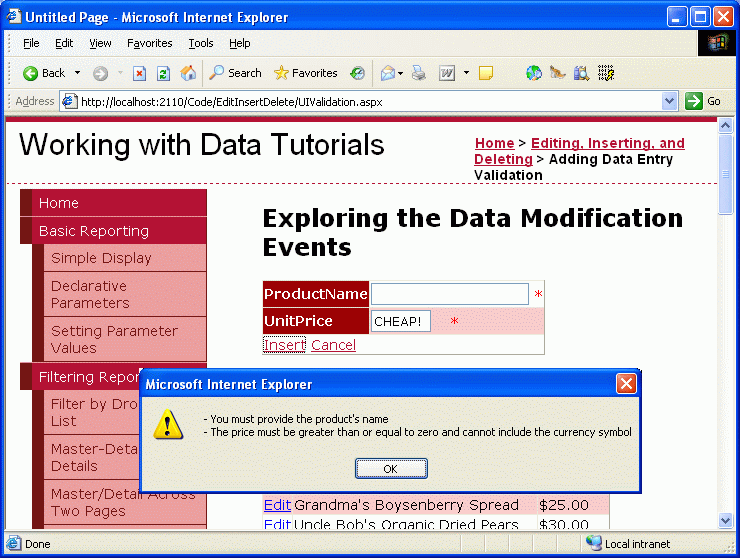
图 12:已将验证逻辑添加到 DetailsView 的插入界面(单击以查看全尺寸图像)
步骤 6:将验证控件分区为验证组
我们的页面由两组逻辑上不同的验证控件组成:对应于 GridView 的编辑界面和对应于 DetailsView 插入接口的控件。 默认情况下,在页面上进行 回发时,将选中所有 验证控件。 但是,编辑记录时,我们不希望 DetailsView 的插入接口的验证控件进行验证。 图 13 说明了用户在编辑具有完全合法值的产品时当前两难境地,单击“更新”会导致验证错误,因为插入界面中的名称和价格值为空。
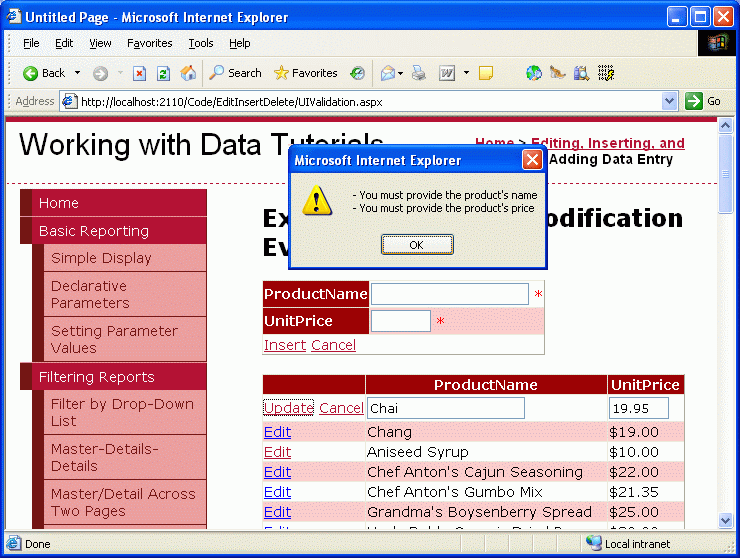
图 13:更新产品会导致插入界面的验证控件触发(单击以查看全尺寸图像)
ASP.NET 2.0 中的验证控件可以通过其 ValidationGroup 属性将其分区为验证组。 若要关联组中的一组验证控件,只需将其 ValidationGroup 属性设置为相同的值。 对于本教程,请将 ValidationGroup GridView 的 TemplateFields EditValidationControlsValidationGroup 中的验证控件的属性和 DetailsView 的 TemplateFields 的属性设置为 InsertValidationControls。 使用设计器的编辑模板界面时,可以直接在声明性标记中或通过属性窗口完成这些更改。
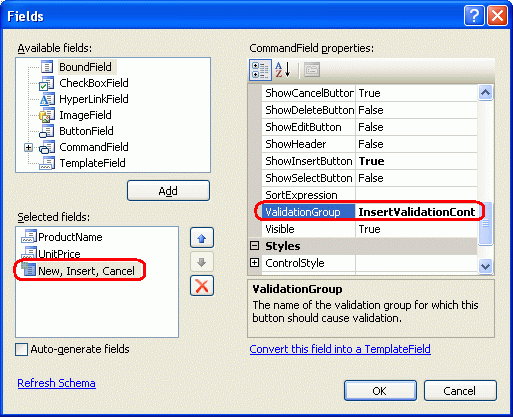
除了验证控件,ASP.NET 2.0 中的 Button 和 Button 相关控件还包括一个 ValidationGroup 属性。 仅当回发由具有相同 ValidationGroup 属性设置的 Button 引发时,才会检查验证组的验证程序的有效性。 例如,为了使 DetailsView 的“插入”按钮触发 InsertValidationControls 验证组,我们需要将 CommandField ValidationGroup 的属性 InsertValidationControls 设置为(请参阅图 14)。 此外,将 GridView 的 CommandField ValidationGroup 属性设置为 EditValidationControls。

图 14:将 DetailsView 的 CommandField ValidationGroup 属性设置为 InsertValidationControls (单击以查看全尺寸图像)
这些更改后,DetailsView 和 GridView 的 TemplateFields 和 CommandFields 应如下所示:
DetailsView 的 TemplateFields 和 CommandField
<asp:TemplateField HeaderText="ProductName"
  SortExpression="ProductName">
    <InsertItemTemplate>
        <asp:TextBox ID="InsertProductName" runat="server"
         Text='<%# Bind("ProductName") %>'></asp:TextBox>
        <asp:RequiredFieldValidator ID="RequiredFieldValidator2"
          runat="server" ControlToValidate="InsertProductName"
            ErrorMessage="You must provide the product name"
            ValidationGroup="InsertValidationControls">*
        </asp:RequiredFieldValidator>
    </InsertItemTemplate>
</asp:TemplateField>
<asp:TemplateField HeaderText="UnitPrice" SortExpression="UnitPrice">
    <InsertItemTemplate>
         <asp:TextBox ID="InsertUnitPrice" runat="server"
           Text='<%# Bind("UnitPrice") %>' Columns="6">
         </asp:TextBox>
         <asp:RequiredFieldValidator ID="RequiredFieldValidator3"
           runat="server" ControlToValidate="InsertUnitPrice"
            ErrorMessage="You must provide the product price"
            ValidationGroup="InsertValidationControls">*
         </asp:RequiredFieldValidator>
        <asp:CompareValidator ID="CompareValidator2" runat="server"
           ControlToValidate="InsertUnitPrice"
           ErrorMessage="The price must be greater than or equal to zero and
                          cannot include the currency symbol"
           Operator="GreaterThanEqual" Type="Currency" ValueToCompare="0"
           ValidationGroup="InsertValidationControls">*
        </asp:CompareValidator>
     </InsertItemTemplate>
 </asp:TemplateField>
<asp:CommandField ShowInsertButton="True"
  ValidationGroup="InsertValidationControls" />
GridView 的 CommandField 和 TemplateFields
<asp:CommandField ShowEditButton="True" ValidationGroup="EditValidationControls" />
<asp:TemplateField HeaderText="ProductName"
  SortExpression="ProductName">
    <EditItemTemplate>
        <asp:TextBox ID="EditProductName" runat="server"
          Text='<%# Bind("ProductName") %>'>
        </asp:TextBox>
        <asp:RequiredFieldValidator ID="RequiredFieldValidator1"
            runat="server" ControlToValidate="EditProductName"
            ErrorMessage="You must provide the product name"
            ValidationGroup="EditValidationControls">*
        </asp:RequiredFieldValidator>
    </EditItemTemplate>
    <ItemTemplate>
        <asp:Label ID="Label1" runat="server"
          Text='<%# Bind("ProductName") %>'></asp:Label>
    </ItemTemplate>
</asp:TemplateField>
<asp:TemplateField HeaderText="UnitPrice" SortExpression="UnitPrice">
    <EditItemTemplate>
        <asp:TextBox ID="EditUnitPrice" runat="server"
          Text='<%# Bind("UnitPrice", "{0:n2}") %>' Columns="6"></asp:TextBox>
        <asp:CompareValidator ID="CompareValidator1" runat="server"
            ControlToValidate="EditUnitPrice"
            ErrorMessage="The price must be greater than or equal to zero and
                           cannot include the currency symbol"
            Operator="GreaterThanEqual" Type="Currency"
            ValueToCompare="0"
            ValidationGroup="EditValidationControls">*
        </asp:CompareValidator>
    </EditItemTemplate>
    <ItemTemplate>
        <asp:Label ID="Label2" runat="server"
            Text='<%# Bind("UnitPrice", "{0:c}") %>'>
        </asp:Label>
    </ItemTemplate>
</asp:TemplateField>
此时,仅当单击 GridView 的“更新”按钮时,编辑特定的验证控件才会触发,仅当单击 DetailsView 的“插入”按钮时,才会触发特定于编辑的验证控件,从而解决图 13 突出显示的问题。 但是,随着此更改,在输入无效数据时,ValidationSummary 控件不再显示。 ValidationSummary 控件还包含一个 ValidationGroup 属性,并且仅显示其验证组中这些验证控件的摘要信息。 因此,我们需要在此页中有两个验证控件,一个用于 InsertValidationControls 验证组,一个用于 EditValidationControls验证组。
<asp:ValidationSummary ID="ValidationSummary1" runat="server"
    ShowMessageBox="True" ShowSummary="False"
    ValidationGroup="EditValidationControls" />
<asp:ValidationSummary ID="ValidationSummary2" runat="server"
    ShowMessageBox="True" ShowSummary="False"
    ValidationGroup="InsertValidationControls" />
此外,本教程已完成!
总结
虽然 BoundFields 可以提供插入和编辑界面,但接口不可自定义。 通常,我们希望将验证控件添加到编辑和插入界面,以确保用户以合法格式输入所需的输入。 为此,必须将 BoundFields 转换为 TemplateFields,并将验证控件添加到相应的模板(s)。 在本教程中,我们扩展了“检查与插入、更新和删除相关的事件”教程的示例,将验证控件添加到 DetailsView 的插入接口和 GridView 的编辑界面。 此外,我们了解了如何使用 ValidationSummary 控件显示摘要验证信息,以及如何将页面上的验证控件分区为不同的验证组。
正如我们在本教程中看到的那样,TemplateFields 允许对接口进行编辑和插入,以包括验证控件。 还可以扩展 TemplateFields 以包含其他输入 Web 控件,使 TextBox 能够替换为更合适的 Web 控件。 在下一教程中,我们将了解如何将 TextBox 控件替换为数据绑定的 DropDownList 控件,这是编辑外键(如CategoryID或SupplierIDProducts表中)时的理想控件。
快乐编程!
关于作者
斯科特·米切尔,七本 ASP/ASP.NET 书籍的作者和 4GuysFromRolla.com 的创始人,自1998年以来一直在与Microsoft Web 技术合作。 斯科特担任独立顾问、教练和作家。 他的最新书是 山姆斯在24小时内 ASP.NET 2.0。 可以通过 mitchell@4GuysFromRolla.com 联系到他。
特别感谢
本教程系列由许多有用的审阅者审阅。 本教程的主要审阅者是 Liz Shulok 和 Zack Jones。 有兴趣查看即将发布的 MSDN 文章? 如果是这样,请给我写信。mitchell@4GuysFromRolla.com