作者 :斯科特·米切尔
本教程介绍如何通过将标准 TextBox 和 CheckBox 控件替换为备用输入 Web 控件来自定义可编辑 GridView 的界面。
简介
GridView 和 DetailsView 控件使用的 BoundFields 和 CheckBoxFields 简化了修改数据的过程,因为他们能够呈现只读、可编辑和可插入的接口。 无需添加任何其他声明性标记或代码即可呈现这些接口。 但是,BoundField 和 CheckBoxField 的接口缺乏现实方案中通常需要的可自定义性。 若要在 GridView 或 DetailsView 中自定义可编辑或可插入的接口,我们需要改用 TemplateField。
在 前面的教程中 ,我们介绍了如何通过添加验证 Web 控件来自定义数据修改接口。 本教程介绍如何自定义实际数据收集 Web 控件,将 BoundField 和 CheckBoxField 的标准 TextBox 和 CheckBox 控件替换为备用输入 Web 控件。 具体而言,我们将生成一个可编辑的 GridView,该视图允许更新产品名称、类别、供应商和已停用状态。 编辑特定行时,类别和供应商字段将以下拉列表的形式呈现,其中包含可供选择的所有类别和供应商。 此外,我们将用 RadioButtonList 控件替换 CheckBoxField 的默认 CheckBox,该控件提供两个选项:“Active”和“Discontinued”。

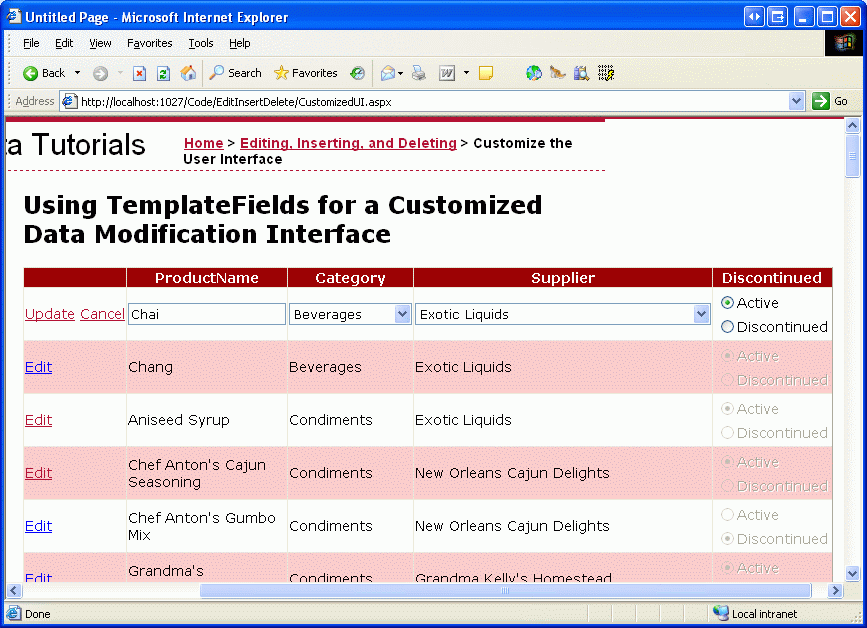
图 1:GridView 的编辑界面包括 DropDownLists 和 RadioButtons(单击以查看全尺寸图像)
步骤 1:创建适当的UpdateProduct重载
在本教程中,我们将生成一个可编辑的 GridView,该视图允许编辑产品的名称、类别、供应商和已停用状态。 因此,我们需要一个重载,它接受五个输入参数,即这四个产品值加上UpdateProductProductID。 就像在以前的重载中一样,此重载将:
- 从数据库中检索指定的
ProductID产品信息, - 请更新
ProductName、CategoryID、SupplierID和Discontinued字段。 - 通过 TableAdapter
Update()的方法将更新请求发送到 DAL。
为了简洁起见,对于此特定重载,我省略了业务规则检查,确保标记为已停用的产品不是其供应商提供的唯一产品。 如果您愿意,可以随意添加;或者更好的是,将逻辑重构为单独的方法。
以下代码展示了UpdateProduct类中的新ProductsBLL重载:
[System.ComponentModel.DataObjectMethodAttribute(System.ComponentModel.DataObjectMethodType.Update, false)]
public bool UpdateProduct(string productName, int? categoryID,
    int? supplierID, bool discontinued, int productID)
{
    Northwind.ProductsDataTable products = Adapter.GetProductByProductID(productID);
    if (products.Count == 0)
        // no matching record found, return false
        return false;
    Northwind.ProductsRow product = products[0];
    product.ProductName = productName;
    if (supplierID == null) product.SetSupplierIDNull();
      else product.SupplierID = supplierID.Value;
    if (categoryID == null) product.SetCategoryIDNull();
      else product.CategoryID = categoryID.Value;
    product.Discontinued = discontinued;
    // Update the product record
    int rowsAffected = Adapter.Update(product);
    // Return true if precisely one row was updated, otherwise false
    return rowsAffected == 1;
}
步骤 2:创建可编辑 GridView
UpdateProduct添加重载后,即可创建可编辑的 GridView。 打开 CustomizedUI.aspx 文件夹中的页面 EditInsertDelete ,并向设计器添加 GridView 控件。 接下来,从 GridView 的智能标记创建新的 ObjectDataSource。 将 ObjectDataSource 配置为通过 ProductBLL 类的 GetProducts() 方法检索产品信息,并使用我们刚刚创建的 UpdateProduct 重载更新产品数据。 在“插入”和“删除”选项卡中,从下拉列表中选择“无”。
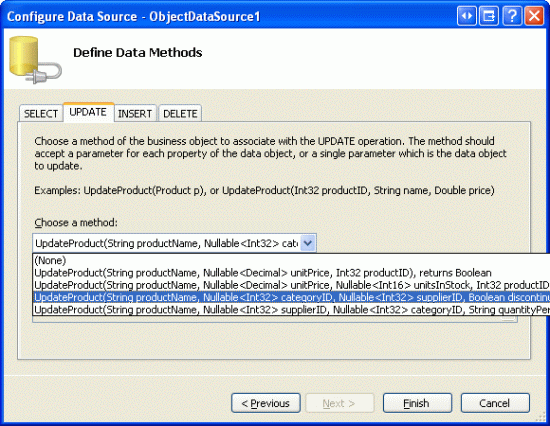
图 2:将 ObjectDataSource 配置为使用 UpdateProduct 刚刚创建的重载(单击以查看全尺寸图像)
正如我们在整个数据修改教程中看到的,由 Visual Studio 创建的 ObjectDataSource 的声明性语法将属性OldValuesParameterFormatString分配给 original_{0} 。 当然,这不适用于业务逻辑层,因为我们的方法不希望传入原始 ProductID 值。 因此,正如我们在前面的教程中所做的那样,请花点时间从声明性语法中删除此属性分配,或者改为将此属性的值设置为 {0}。
此更改后,ObjectDataSource 的声明性标记应如下所示:
<asp:ObjectDataSource ID="ObjectDataSource1" runat="server"
    SelectMethod="GetProducts" TypeName="ProductsBLL"
    UpdateMethod="UpdateProduct">
    <UpdateParameters>
        <asp:Parameter Name="productName" Type="String" />
        <asp:Parameter Name="categoryID" Type="Int32" />
        <asp:Parameter Name="supplierID" Type="Int32" />
        <asp:Parameter Name="discontinued" Type="Boolean" />
        <asp:Parameter Name="productID" Type="Int32" />
    </UpdateParameters>
</asp:ObjectDataSource>
请注意,OldValuesParameterFormatString属性已被删除,并且对于重载期望的每个输入参数,UpdateParameters集合中都有一个Parameter。
虽然 ObjectDataSource 配置为仅更新产品值的子集,但 GridView 当前显示 所有 产品字段。 花点时间编辑 GridView,以便:
- 它仅包括
ProductName、SupplierName、CategoryNameBoundFields 和DiscontinuedCheckBoxField -
CategoryName和SupplierName字段应在Discontinued复选框字段之前(左侧)出现 -
CategoryName和SupplierNameBoundFields 的HeaderText属性分别设置为“Category”和“Supplier” - 已启用编辑支持(选中 GridView 智能标记中的“启用编辑”复选框)
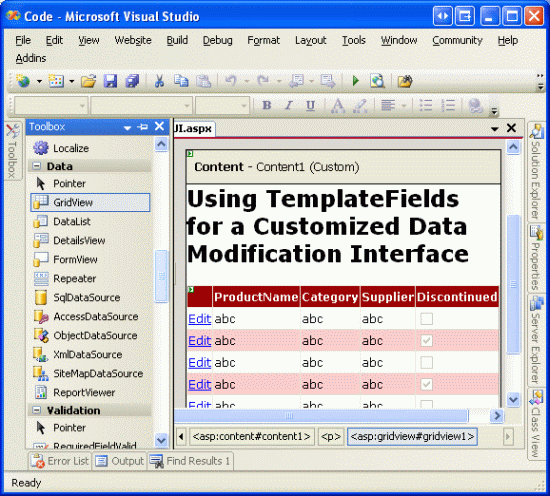
这些更改后,设计器将类似于图 3,GridView 的声明性语法如下所示。

图 3:从 GridView 中删除不需要的字段(单击可查看全尺寸图像)
<asp:GridView ID="GridView1" runat="server" AutoGenerateColumns="False"
    DataKeyNames="ProductID" DataSourceID="ObjectDataSource1">
    <Columns>
        <asp:BoundField DataField="ProductName"
           HeaderText="ProductName" SortExpression="ProductName" />
        <asp:BoundField DataField="CategoryName" HeaderText="Category"
           ReadOnly="True"
           SortExpression="CategoryName" />
        <asp:BoundField DataField="SupplierName" HeaderText="Supplier"
           ReadOnly="True"
           SortExpression="SupplierName" />
        <asp:CheckBoxField DataField="Discontinued"
           HeaderText="Discontinued" SortExpression="Discontinued" />
    </Columns>
</asp:GridView>
此时,GridView 的只读行为已完成。 查看数据时,每个产品在 GridView 中呈现为一行,其中显示了产品的名称、类别、供应商和已停用状态。
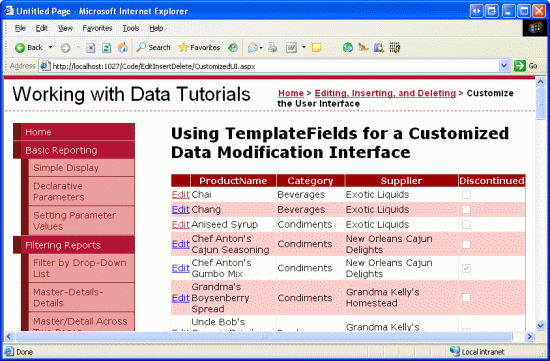
图 4:GridView 的 Read-Only 界面已完成(单击以查看全尺寸图像)
注意
如 “插入、更新和删除数据概述”教程中所述,确保启用 GridView 的视图状态(这是默认行为)是至关重要的。 如果将 GridView 的 EnableViewState 属性设置为 false,可能会导致并发用户无意中删除或编辑他人的记录。
步骤 3:在类别和供应商编辑界面中使用 DropDownList
回想一下,该ProductsRow对象包含CategoryID、CategoryName属性SupplierID和SupplierName属性,它们提供数据库表中的实际外键 ID 值Products以及表中的相应Name值CategoriesSuppliers。
ProductRow的CategoryID和SupplierID属性可以读取和写入,而CategoryName和SupplierName属性标记为只读。
由于CategoryName和SupplierName属性处于只读状态,相应的 BoundFields 的ReadOnly属性已设置为true,从而防止在编辑行时修改这些值。 虽然我们可以将属性 ReadOnly 设置为 false,这样在编辑过程中将 CategoryName 和 SupplierName BoundFields 渲染为 TextBoxes,但当用户尝试更新产品时,此方法会导致异常,因为没有采用 CategoryName 和 SupplierName 输入的 UpdateProduct 重载。 事实上,出于两个原因,我们不想创建这样的重载:
- 该
Products表没有SupplierName或CategoryName字段,而是有SupplierID和CategoryID字段。 因此,我们希望将这些特定的 ID 值传递给我们的方法,而不是它们查找表中的值。 - 要求用户键入供应商或类别的名称并不理想,因为它要求用户知道可用的类别和供应商及其正确的拼写。
当处于只读模式时,供应商和类别字段应显示类别和供应商的名称(如现在所示),并在编辑时显示适用选项的下拉列表。 使用下拉列表,最终用户可以快速查看可在其中选择哪些类别和供应商,并且可以更轻松地进行选择。
为了提供此行为,我们需要将 SupplierNameCategoryName 和 BoundFields 转换为 TemplateFields,其 ItemTemplate 输出 SupplierName 和 CategoryName 的值,而 EditItemTemplate 使用 DropDownList 控件来列出可用的类别和供应商。
Categories添加和Suppliers下拉列表
首先,将SupplierName和CategoryName的BoundField转换为TemplateField,具体步骤如下:在GridView的“Smart Tag”中,点击“编辑列”链接;在左下角的列表中选择BoundField;然后点击“将此字段转换为TemplateField”链接。 转换过程将创建包含一个 ItemTemplate 和一个 EditItemTemplate的 TemplateField,如以下声明性语法所示:
<asp:TemplateField HeaderText="Category" SortExpression="CategoryName">
    <EditItemTemplate>
        <asp:Label ID="Label1" runat="server"
          Text='<%# Eval("CategoryName") %>'></asp:Label>
    </EditItemTemplate>
    <ItemTemplate>
        <asp:Label ID="Label1" runat="server"
          Text='<%# Bind("CategoryName") %>'></asp:Label>
    </ItemTemplate>
</asp:TemplateField>
由于 BoundField 被标记为只读,ItemTemplate 和 EditItemTemplate 都包含一个标签 Web 控件,其 Text 属性绑定到适用的数据字段(在上面的语法中为 CategoryName)。 我们需要修改 EditItemTemplate,将 Label Web 控件替换为 DropDownList Web 控件。
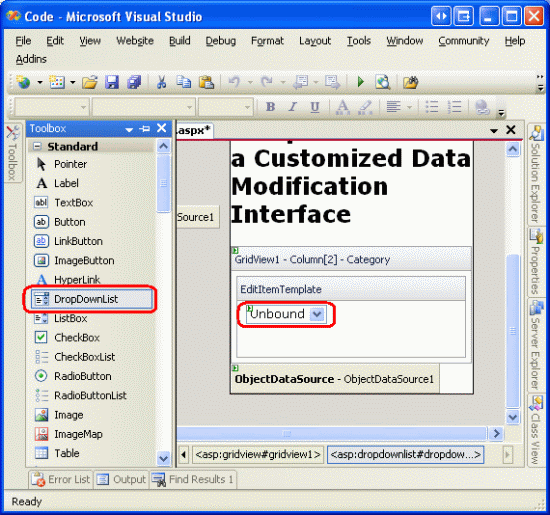
如前面的教程中所述,可以通过设计器或直接从声明性语法编辑模板。 若要通过设计器对其进行编辑,请单击 GridView 智能标记中的“编辑模板”链接,然后选择使用“类别”字段。EditItemTemplate 删除标签 Web 控件并将其替换为 DropDownList 控件,并将 DropDownList 的 ID 属性设置为 Categories。

图 5:删除 TexBox 并将 DropDownList 添加到 EditItemTemplate (单击以查看全尺寸图像)
接下来,我们需要使用可用类别填充 DropDownList。 单击 DropDownList 智能标记中的“选择数据源”链接,并选择创建名为 CategoriesDataSource 的新 ObjectDataSource。
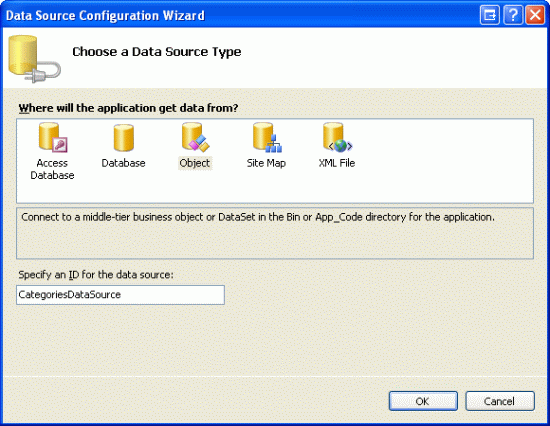
图 6:新建名为 CategoriesDataSource ObjectDataSource 控件(单击以查看全尺寸图像)
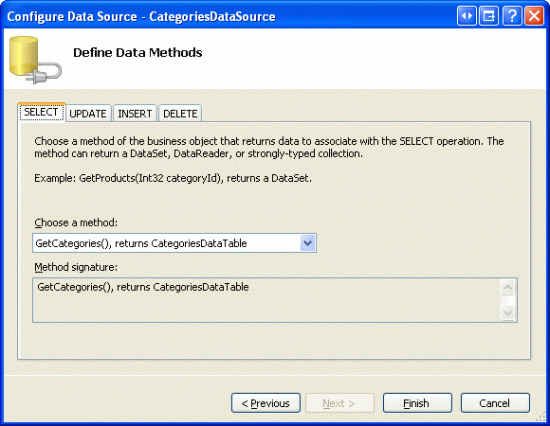
若要让此 ObjectDataSource 返回所有类别,请将其 CategoriesBLL 绑定到类 GetCategories() 的方法。

图 7:将 ObjectDataSource 绑定到 CategoriesBLL's GetCategories() 方法(单击以查看全尺寸图像)
最后,配置 DropDownList 的设置,以便字段 CategoryName 显示在每个 DropDownList ListItem 中,且 CategoryID 字段用作值。
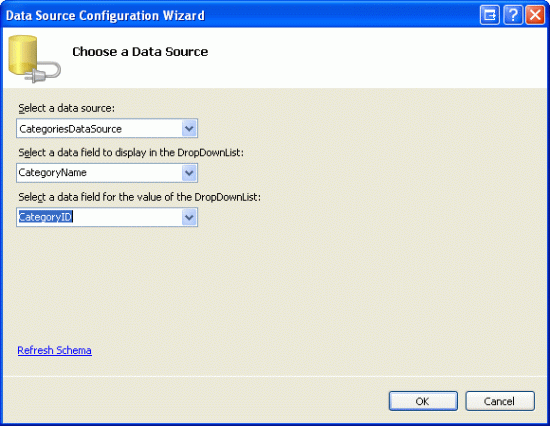
图 8: 将 CategoryName 字段显示并将 CategoryID 用作值(单击以查看全尺寸图像)
进行这些更改后,TemplateField 中的EditItemTemplate声明性标记CategoryName将同时包括 DropDownList 和 ObjectDataSource:
<asp:TemplateField HeaderText="Category" SortExpression="CategoryName">
    <EditItemTemplate>
        <asp:DropDownList ID="Categories" runat="server"
          DataSourceID="CategoriesDataSource"
          DataTextField="CategoryName" DataValueField="CategoryID">
        </asp:DropDownList>
        <asp:ObjectDataSource ID="CategoriesDataSource" runat="server"
            OldValuesParameterFormatString="original_{0}"
            SelectMethod="GetCategories" TypeName="CategoriesBLL">
        </asp:ObjectDataSource>
    </EditItemTemplate>
    <ItemTemplate>
        <asp:Label ID="Label1" runat="server"
          Text='<%# Bind("CategoryName") %>'></asp:Label>
    </ItemTemplate>
</asp:TemplateField>
注意
在 EditItemTemplate 中,DropDownList 必须启用其视图状态。 我们将很快在 DropDownList 的声明性语法中添加数据绑定语法,并且数据绑定命令如 Eval() 和 Bind() 只能出现在启用了视图状态的控件中。
重复这些步骤,将名为 Suppliers 的 DropDownList 添加到 SupplierName TemplateField 的 EditItemTemplate。 这将涉及到将 DropDownList 添加到 EditItemTemplate 中,并创建另一个 ObjectDataSource。
Suppliers但是,应将 DropDownList 的 ObjectDataSource 配置为调用SuppliersBLL类GetSuppliers()的方法。 此外,将 Suppliers DropDownList 配置为显示 CompanyName 字段,并将 SupplierID 字段用作 ListItem 的值。
将 DropDownLists 添加到两个 EditItemTemplate 后,在浏览器中打开页面,然后单击 Chef Anton 的 Cajun 调味品的编辑按钮。 如图 9 所示,产品的类别和供应商列呈现为下拉列表,其中包含可供选择的可用类别和供应商。 但是,请注意,默认情况下,这两个下拉列表中的 第一 个项目(类别为“饮料”,供应商为“异国液体”)都是自动选中的,尽管“厨师安东的卡琼调味”实际上是由“新奥尔良卡琼美味食店”提供的调味品。
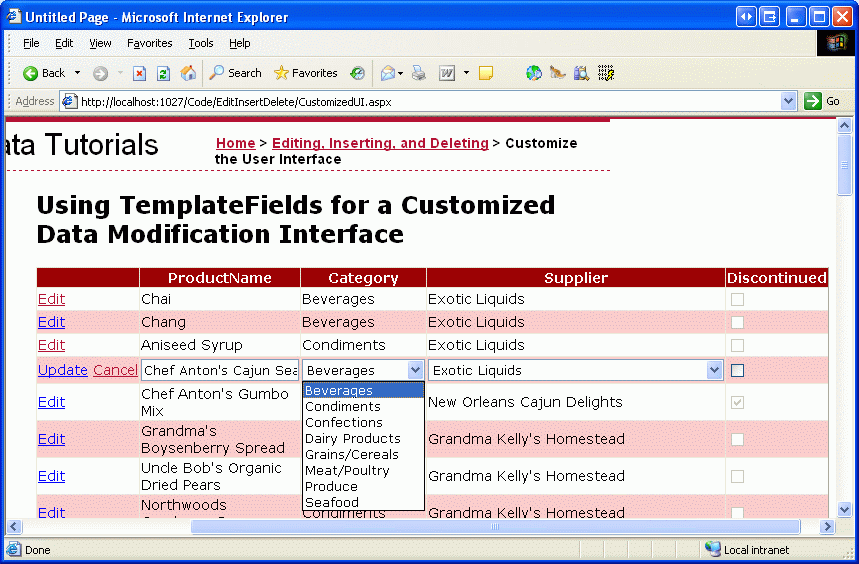
图 9:默认选中 Drop-Down 列表中的第一项(单击以查看全尺寸图像)
此外,如果单击“更新”,你将发现产品的 CategoryID 和 SupplierID 值已设置为 NULL。 这两种不想要的行为都是由于 s 中的 EditItemTemplate DropDownList 不绑定到基础产品数据中的任何数据字段而引起的。
将下拉列表绑定到CategoryID和SupplierID数据字段
为了将已编辑产品的类别和供应商下拉列表设置为适当的值,并在点击“更新”后将这些值传回给 BLL 的 UpdateProduct 方法,我们需要使用双向数据绑定将 DropDownLists 的 SelectedValue 属性绑定到 CategoryID 和 SupplierID 数据字段。 若要通过Categories DropDownList 完成此操作,可以在声明性语法中直接将SelectedValue='<%# Bind("CategoryID") %>'添加到 DropDownList 的声明中。
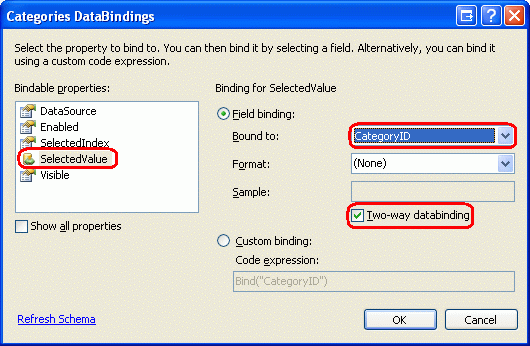
或者,可以通过设计器编辑模板并单击 DropDownList 智能标记中的“编辑 DataBindings”链接来设置 DropDownList 的数据绑定。 接下来,指示 SelectedValue 该属性应使用双向数据绑定绑定到 CategoryID 字段(请参阅图 10)。 重复执行声明性过程或设计器过程,将 SupplierID 数据字段绑定到 Suppliers DropDownList。

图 10:使用 Two-Way 数据绑定将 CategoryID 绑定到 DropDownList 的 SelectedValue 属性(单击以查看全尺寸图像)
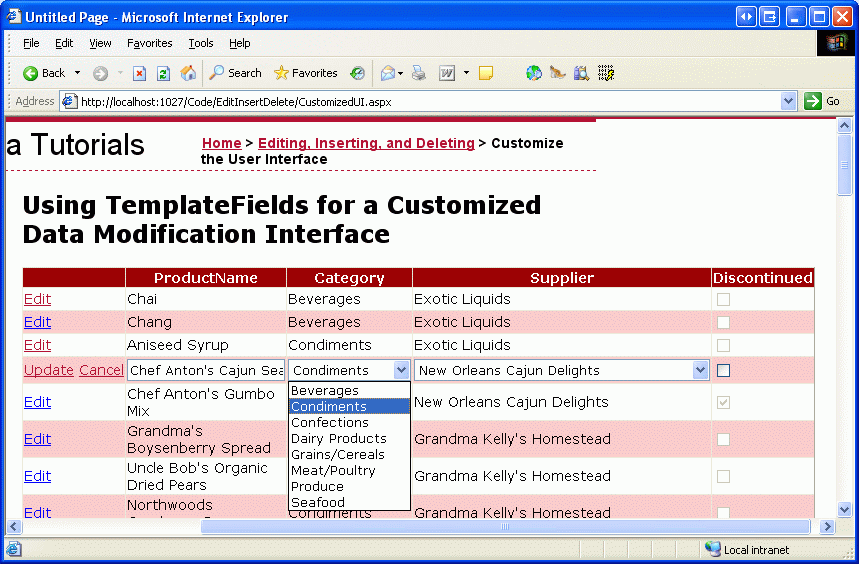
将绑定应用于 SelectedValue 两个 DropDownList 的属性后,编辑的产品类别和供应商列将默认为当前产品的值。 单击“更新”后,CategoryIDSupplierID所选下拉列表项的值将传递给UpdateProduct该方法。 图 11 显示了添加数据绑定语句后的教程,请注意厨师安东的卡琼调味料所选择的下拉列表项是如何分别正确地显示为“调味品”和“新奥尔良卡琼风味美食”的。

图 11:默认情况下已编辑产品的当前类别和供应商值处于选中状态(单击以查看全尺寸图像)
处理NULL值
在Products表中,CategoryID和SupplierID列可以是NULL,但在EditItemTemplate的下拉列表中不包含表示NULL值的列表项。 这有两个后果:
- 用户无法使用界面将产品的类别或供应商从非
NULL值更改为非NULL值 - 如果产品有
NULLCategoryID或SupplierID,单击“编辑”按钮将导致异常。 这是因为在NULL语句中,由CategoryID(或SupplierID)返回的Bind()值无法映射到 DropDownList 中的值(当 DropDownList 的SelectedValue属性设置为列表项集合中不存在的值时,它将引发异常)。
为了支持NULLCategoryID和SupplierID值,我们需要为每个 DropDownList 添加另一个ListItem值来表示NULL值。 在“使用下拉列表进行主/详细信息筛选”教程中,我们学习了如何向数据绑定的下拉列表添加额外的ListItem,具体操作包括将下拉列表的AppendDataBoundItems属性设置为true,并手动添加额外的ListItem。 在上一个教程中,我们添加了一个ListItem,并且用Value的-1。 但是,ASP.NET 中的数据绑定逻辑会自动将空白字符串转换为 NULL 值,反之亦然。 因此,在本教程中,我们希望 ListItem其 Value 为空字符串。
首先将 DropDownLists AppendDataBoundItems 的属性设置为 true. 接下来,通过添加以下<asp:ListItem>元素到每个 DropDownList 来添加 NULLListItem,以便声明的标记如下所示:
<asp:DropDownList ID="Categories" runat="server"
    DataSourceID="CategoriesDataSource" DataTextField="CategoryName"
    DataValueField="CategoryID" SelectedValue='<%# Bind("CategoryID") %>'
    AppendDataBoundItems="True">
    <asp:ListItem Value="">(None)</asp:ListItem>
</asp:DropDownList>
我已选择将“(None)”用作此 ListItem文本值,但如果愿意,则可以将其更改为空白字符串。
注意
正如我们在 Master/Detail Filtering With a DropDownList 教程中看到的那样, ListItem 可以通过设计器将 s 添加到 DropDownList,方法是在“属性”窗口中单击 DropDownList Items 的属性(这将显示 ListItem 集合编辑器)。 但是,请务必通过声明性语法为本教程添加NULLListItem。 如果使用ListItem集合编辑器,则生成的声明性语法将在分配空白字符串时完全省略Value该设置,并创建声明性标记,如下所示。 <asp:ListItem>(None)</asp:ListItem> 虽然这可能看起来无害,但缺少的值会导致 DropDownList 在其位置使用 Text 属性值。 这意味着,如果选择NULLListItem,将尝试把值“(None)”分配给CategoryID,这将导致异常。 通过显式设置Value="",当选择NULLListItem时,会将一个NULL值分配给CategoryID。
对供应商下拉列表重复这些步骤。
ListItem此外,编辑界面现在可以将NULL值分配给产品的CategoryID和SupplierID字段,如图12所示。
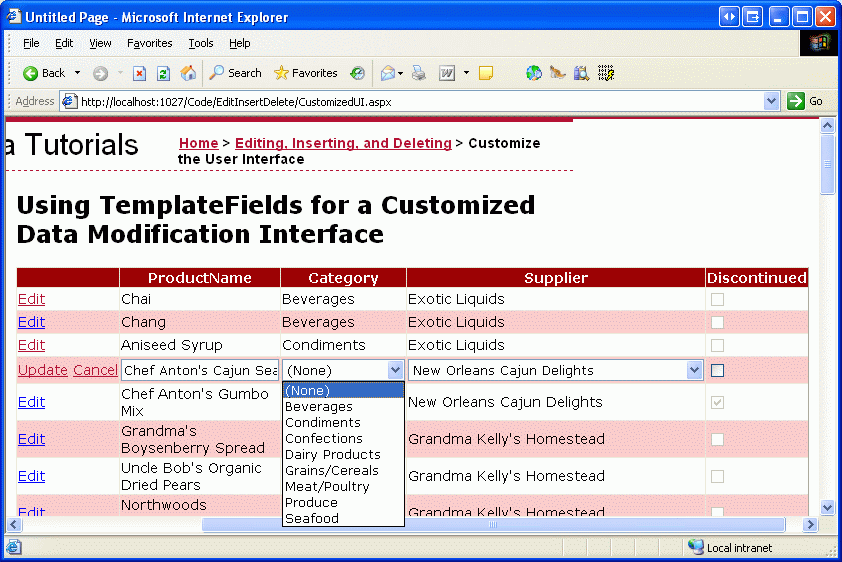
图 12:选择(无)为产品类别或供应商分配 NULL 值(单击以查看全尺寸图像)
步骤 4:对已停止状态使用 RadioButtons
当前,产品 Discontinued 的数据字段使用 CheckBoxField 表示,对只读行显示禁用复选框,而对正在编辑的行显示启用复选框。 虽然此用户界面通常适用,但如果需要,可以使用 TemplateField 对其进行自定义。 在本教程中,让我们将 CheckBoxField 更改为使用 RadioButtonList 控件的 TemplateField,其中包含两个选项“Active”和“Discontinued”,用户可以从中指定产品 Discontinued 的值。
首先,将 Discontinued CheckBoxField 转换为 TemplateField,这将创建一个包含 ItemTemplate 和 EditItemTemplate 的 TemplateField。 这两个模板都包含一个 CheckBox,其 Checked 属性绑定到 Discontinued 数据字段,这两个模板的唯一区别是 ItemTemplate“CheckBox Enabled ”属性设置为 false。
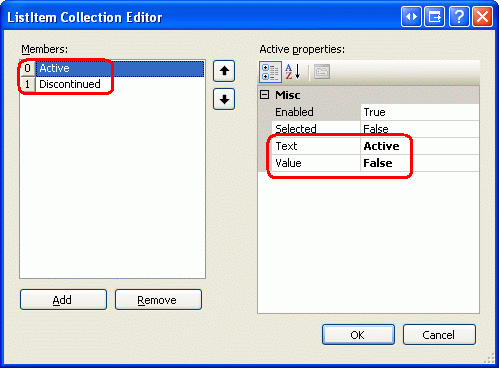
将两者ItemTemplateEditItemTemplate中的 CheckBox 替换为 RadioButtonList 控件,并将 RadioButtonLists ID 的属性设置为 DiscontinuedChoice。 接下来,指示 RadioButtonLists 应包含两个单选按钮,一个标记为“Active”,值为“False”,一个标记为“已停用”,值为“True”。 为此,可以直接通过声明性语法输入 <asp:ListItem> 元素,也可以使用 ListItem 设计器中的集合编辑器。 图 13 显示了在指定了两个单选按钮选项之后的 ListItem 集合编辑器。

图 13:向 RadioButtonList 添加“活动”和“已停用”选项(单击可查看全尺寸图像)
由于 ItemTemplate 中的 RadioButtonList 不应可编辑,请将其 Enabled 属性设置为 false,而对于 EditItemTemplate 中的 RadioButtonList,保留属性 Enabled 为 true(默认值)。 这将将非编辑行中的单选按钮设为只读,但允许用户更改已编辑行的 RadioButton 值。
我们仍然需要分配 RadioButtonList 控件 SelectedValue 的属性,以便根据产品 Discontinued 的数据字段选择相应的单选按钮。 与本教程前面所述的 DropDownLists 一样,此数据绑定语法可以直接添加到声明性标记中,也可以通过 RadioButtonLists 智能标记中的“编辑 DataBindings”链接添加。
添加两个 RadioButtonList 并对其进行配置后, Discontinued TemplateField 的声明性标记应如下所示:
<asp:TemplateField HeaderText="Discontinued" SortExpression="Discontinued">
    <ItemTemplate>
        <asp:RadioButtonList ID="DiscontinuedChoice" runat="server"
          Enabled="False" SelectedValue='<%# Bind("Discontinued") %>'>
            <asp:ListItem Value="False">Active</asp:ListItem>
            <asp:ListItem Value="True">Discontinued</asp:ListItem>
        </asp:RadioButtonList>
    </ItemTemplate>
    <EditItemTemplate>
        <asp:RadioButtonList ID="DiscontinuedChoice" runat="server"
            SelectedValue='<%# Bind("Discontinued") %>'>
            <asp:ListItem Value="False">Active</asp:ListItem>
            <asp:ListItem Value="True">Discontinued</asp:ListItem>
        </asp:RadioButtonList>
    </EditItemTemplate>
</asp:TemplateField>
通过这些更改,该 Discontinued 列已从复选框列表转换为单选按钮对列表(请参阅图 14)。 编辑产品时,会选择相应的单选按钮,并且可以通过选择其他单选按钮并单击“更新”来更新产品的停用状态。

图 14:已停用的复选框已被成对的单选按钮替换(单击可查看全尺寸图像)
注意
由于数据库中的DiscontinuedProducts列不能有NULL值,因此无需担心在接口中捕获NULL信息。 但是,如果Discontinued列可能包含NULL的值,我们希望将第三个单选按钮添加到列表中,并将其Value设置为空字符串(Value=""),就像类别和供应商的下拉列表一样。
总结
虽然 BoundField 和 CheckBoxField 自动呈现只读、编辑和插入接口,但它们缺乏自定义功能。 不过,我们通常需要自定义编辑或插入界面,例如添加验证控件(如前面的教程所示),或通过自定义数据收集用户界面(如本教程所示)。 可以使用 TemplateField 自定义接口,可按以下步骤进行总结:
- 添加 TemplateField 或将现有 BoundField 或 CheckBoxField 转换为 TemplateField
- 根据需要扩充接口
- 使用双向数据绑定将适当的数据字段绑定到新添加的 Web 控件
除了使用内置 ASP.NET Web 控件之外,还可以使用自定义、编译的服务器控件和用户控件自定义 TemplateField 的模板。
快乐编程!
关于作者
斯科特·米切尔,七本 ASP/ASP.NET 书籍的作者和 4GuysFromRolla.com 的创始人,自1998年以来一直在与Microsoft Web 技术合作。 斯科特担任独立顾问、教练和作家。 他的最新书是 Sams 教你自己动手 24 小时精通 ASP.NET 2.0。 可以通过 mitchell@4GuysFromRolla.com 联系到他。