你当前正在访问 Microsoft Azure Global Edition 技术文档网站。 如果需要访问由世纪互联运营的 Microsoft Azure 中国技术文档网站,请访问 https://docs.azure.cn。
添加符号层 (Android SDK)
本文介绍如何使用 Azure Maps Android SDK 将数据源中的点数据呈现为地图上的符号层。 符号层将点呈现为地图上的图像和文本。
注意
Azure Maps Android SDK 停用
适用于 Android 的 Azure Maps 本机 SDK 现已弃用,将于 2025 年 3 月 31 日停用。 为了避免服务中断,请在 2025 年 3 月 31 日之前迁移到 Azure Maps Web SDK。 有关详细信息,请参阅 Azure Maps Android SDK 迁移指南。
提示
默认情况下,符号层将呈现数据源中所有几何图形的坐标。 若要限制层,使其仅呈现点几何图形特征,请将层的 filter 选项设置为 eq(geometryType(), "Point")。 如果还需要包含 MultiPoint 特征,请将层的 filter 选项设置为 any(eq(geometryType(), "Point"), eq(geometryType(), "MultiPoint"))。
先决条件
请务必完成快速入门:创建 Android 应用文档中的步骤。 可以将本文中的代码块插入到地图的 onReady 事件处理程序中。
添加符号层
在可以将符号层添加到地图之前,你需要先执行几个步骤。 首先,创建一个数据源,并将其添加到地图。 创建符号层。 然后,将数据源传入符号层以从数据源中检索数据。 最后,将数据添加到数据源,便可呈现一些内容。
下面的代码演示了在加载地图后应添加到地图的内容。 此示例使用符号层在地图上呈现单个点。
//Create a data source and add it to the map.
DataSource source = new DataSource();
map.sources.add(source);

//Create a point and add it to the data source.
source.add(Point.fromLngLat(0, 0));

//Create a symbol layer to render icons and/or text at points on the map.
SymbolLayer layer = new SymbolLayer(source);

//Add the layer to the map.
map.layers.add(layer);
//Create a data source and add it to the map.
val source = DataSource()
map.sources.add(source)

//Create a point and add it to the data source.
source.add(Point.fromLngLat(0, 0))

//Create a symbol layer to render icons and/or text at points on the map.
val layer = SymbolLayer(source)

//Add the layer to the map.
map.layers.add(layer)
有三种可添加到地图的不同类型的点数据:
- GeoJSON Point 几何 - 此对象仅包含点的坐标,而不包含其他任何内容。 可使用
Point.fromLngLat静态方法轻松创建这些对象。 - GeoJSON MultiPoint 几何 - 此对象仅包含多点的坐标,而不包含其他任何内容。 将点数组传递到
MultiPoint类以创建这些对象。 - GeoJSON Feature - 此对象包含任何 GeoJSON 几何和一组包含与几何关联的元数据的属性。
有关详细信息,请参阅创建数据源文档,了解创建数据并将数据添加到地图。
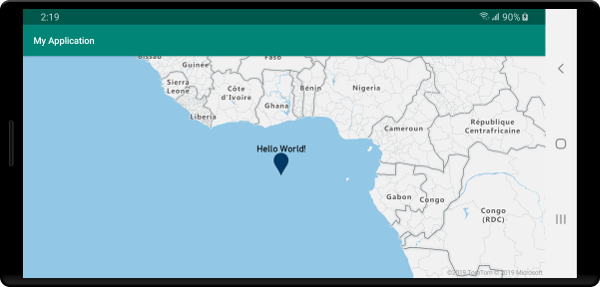
下面的代码示例创建 GeoJSON Point 几何图形,并传递给 GeoJSON Feature,并在其属性中添加 title 值。 title 属性在地图的符号图标上方显示为文本。
//Create a data source and add it to the map.
DataSource source = new DataSource();
map.sources.add(source);

//Create a point feature.
Feature feature = Feature.fromGeometry(Point.fromLngLat(0, 0));

//Add a property to the feature.
feature.addStringProperty("title", "Hello World!");

//Add the feature to the data source.
source.add(feature);

//Create a symbol layer to render icons and/or text at points on the map.
SymbolLayer layer = new SymbolLayer(source,
    //Get the title property of the feature and display it on the map.
    textField(get("title"))
);

//Add the layer to the map.
map.layers.add(layer);
//Create a data source and add it to the map.
val source = DataSource()
map.sources.add(source)

//Create a point feature.
val feature = Feature.fromGeometry(Point.fromLngLat(0, 0))

//Add a property to the feature.
feature.addStringProperty("title", "Hello World!")

//Add the feature to the data source.
source.add(feature)

//Create a symbol layer to render icons and/or text at points on the map.
val layer = SymbolLayer(
    source,  //Get the title property of the feature and display it on the map.
    textField(get("title"))
)

//Add the layer to the map.
map.layers.add(layer)
以下屏幕截图显示使用带有符号层的图标和文本标签来呈现点特征的上述代码。
提示
默认情况下,符号层通过隐藏重叠的符号来优化符号的呈现。 放大时,隐藏的符号将变为可见。 若要禁用此功能并始终呈现所有符号,请将 textAllowOverlap 和 iconAllowOverlap 选项设置为 true。
将自定义图标添加到符号层
符号层是使用 WebGL 呈现的。 因此,所有资源(例如图标图像)必须载入 WebGL 上下文。 此示例演示如何将自定义图标添加到地图资源。 然后,此图标用于使用自定义符号在地图上呈现点数据。 符号层的 textField 属性要求指定一个表达式。 在本例中,我们希望呈现温度属性。 由于温度为数字,因此需要将其转换为字符串。 此外,我们还需要在其后追加“°F”。 表达式可用于执行此串联;concat(Expression.toString(get("temperature")), literal("°F"))。
//Load a custom icon image into the image sprite of the map.
map.images.add("my-custom-icon", R.drawable.showers);

//Create a data source and add it to the map.
DataSource source = new DataSource();
map.sources.add(source);

//Create a point feature.
Feature feature = Feature.fromGeometry(Point.fromLngLat(-73.985708, 40.75773));

//Add a property to the feature.
feature.addNumberProperty("temperature", 64);

//Add the feature to the data source.
source.add(feature);

//Create a symbol layer to render icons and/or text at points on the map.
SymbolLayer layer = new SymbolLayer(source,
    iconImage("my-custom-icon"),
    iconSize(0.5f),

    //Get the title property of the feature and display it on the map.
    textField(concat(Expression.toString(get("temperature")), literal("°F"))),
    textOffset(new Float[]{0f, -1.5f})
);
//Load a custom icon image into the image sprite of the map.
map.images.add("my-custom-icon", R.drawable.showers)

//Create a data source and add it to the map.
val source = DataSource()
map.sources.add(source)

//Create a point feature.
val feature = Feature.fromGeometry(Point.fromLngLat(-73.985708, 40.75773))

//Add a property to the feature.
feature.addNumberProperty("temperature", 64)

//Add the feature to the data source.
source.add(feature)

//Create a symbol layer to render icons and/or text at points on the map.
val layer = SymbolLayer(
    source,
    iconImage("my-custom-icon"),
    iconSize(0.5f),  //Get the title property of the feature and display it on the map.
    textField(concat(Expression.toString(get("temperature")), literal("°F"))),
    textOffset(arrayOf(0f, -1.5f))
)
对于本示例,以下图像加载到应用的可绘制资源文件夹中。
 |
|---|
| showers.png |
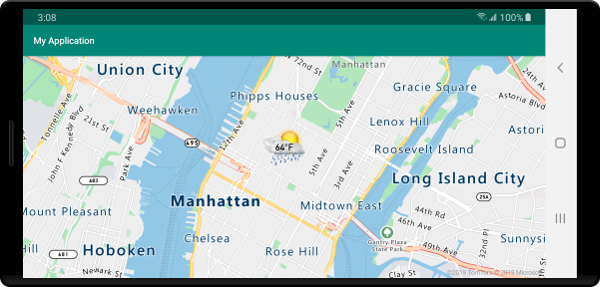
以下屏幕截图显示使用带有符号层的自定义图标和带格式的文本标签来呈现点特征的上述代码。
提示
如果希望使用符号层仅呈现文本,则可以通过将图标选项的 iconImage 属性设置为 "none" 来隐藏该图标。
修改符号颜色
Azure Maps Android SDK 附带了一组默认标记图标的预定义颜色变体。 例如,可以将 marker-red 传递到符号层的 iconImage 选项,以呈现该层中标记图标的红色版本。
SymbolLayer layer = new SymbolLayer(source,
    iconImage("marker-red")
);
val layer = SymbolLayer(source,
    iconImage("marker-red")
)
下表列出了所有可用的内置图标图像名称。 这些标记会从可替代的颜色资源中提取其颜色。 但是,替代其中一个标记的颜色将应用于所有使用该图标图像的层。
| 图标图像名称 | 颜色资源名称 |
|---|---|
marker-default |
azure_maps_marker_default |
marker-black |
azure_maps_marker_black |
marker-blue |
azure_maps_marker_blue |
marker-darkblue |
azure_maps_marker_darkblue |
marker-red |
azure_maps_marker_red |
marker-yellow |
azure_maps_marker_yellow |
还可使用 azure_maps_marker_border 颜色资源名称替代所有标记的边框颜色。 可以通过在应用的 colors.xml 文件中添加同名的颜色来替代这些标记的颜色。 例如,以下 colors.xml 文件会使默认标记颜色为亮绿色。
<?xml version="1.0" encoding="utf-8"?>
<resources>
    <color name="azure_maps_marker_default">#00FF00</color>
</resources>
以下代码是默认标记向量 XML 的修改版本,你可修改它来创建默认标记的自定义版本。 修改后的版本可以添加到应用的 drawable 文件夹中,然后使用 map.images.add 添加到地图图像子画面中,然后与符号层一起使用。
<vector xmlns:android="http://schemas.android.com/apk/res/android"
    android:width="24.5dp"
    android:height="36.5dp"
    android:viewportWidth="24.5"
    android:viewportHeight="36.5">
    <path
        android:pathData="M12.25,0.25a12.2543,12.2543 0,0 0,-12 12.4937c0,6.4436 6.4879,12.1093 11.059,22.5641 0.5493,1.2563 1.3327,1.2563 1.882,0C17.7621,24.8529 24.25,19.1857 24.25,12.7437A12.2543,12.2543 0,0 0,12.25 0.25Z"
        android:strokeWidth="0.5"
        android:fillColor="@color/azure_maps_marker_default"
        android:strokeColor="@color/azure_maps_marker_border"/>
</vector>
后续步骤
有关可向地图添加的更多代码示例,请参阅以下文章: