你当前正在访问 Microsoft Azure Global Edition 技术文档网站。 如果需要访问由世纪互联运营的 Microsoft Azure 中国技术文档网站,请访问 https://docs.azure.cn。
本教程引导你完成使用 Azure Maps 创建简单店铺定位器的过程。
本教程介绍以下操作:
- 使用 Azure Map 控件 API 创建新网页。
- 从文件加载自定义数据并在地图上显示。
- 使用 Azure Maps 搜索服务查找地址或输入查询。
- 从浏览器中获取用户的位置并在地图上显示。
- 组合多个层以在地图上创建自定义符号。
- 聚集数据点。
- 将缩放控件添加到地图。
Prerequisites
- 本教程建议使用 Visual Studio Code,但你可使用任何合适的集成开发环境 (IDE)。
- Azure Maps 帐户
- 订阅密钥
Note
有关 Azure Maps 中身份验证的详细信息,请参阅在 Azure Maps 中管理身份验证。
Sample code
本教程演示如何为名为 Contoso Coffee 的虚构公司创建商店定位器,以及使用其他功能扩展商店定位符的提示。
若要查看将在本教程中创建的内容实时示例,请参阅 Azure Maps 代码示例站点上的简单店铺定位器。
为了更轻松地按照本教程内容执行操作,请下载以下资源:
店铺定位器功能
本部分列出了在本教程中创建的 Contoso Coffee 店铺定位器应用程序中演示的 Azure Maps 功能。
用户界面功能
- 标头上的店铺徽标
- 支持平移和缩放的地图
- 用于搜索用户当前位置的“我的位置”按钮。
- 基于设备屏幕宽度调整的页面布局
- 搜索框和搜索按钮
Functionality features
- 将
keypress事件添加到搜索框后,当用户按 Enter时,就会触发搜索。 - 移动地图时,将重新计算每个位置与地图中心之间的距离。 结果列表将会更新,以便在地图顶部显示最靠近的位置。
- 当用户在结果列表中选择某个结果时,地图将以所选位置作为中心点,有关该位置的信息将显示在弹出窗口中。
- 当用户选择特定位置时,地图会触发弹出窗口。
- 当用户缩小地图时,位置将组合成聚集。 每个聚集由包含一个数字的一个圆表示。 当用户更改缩放级别时,聚集会相应地合并与分离。
- 选择一个聚集会将地图放大两个级别,中心点位于聚集所在位置。
店铺定位器设计
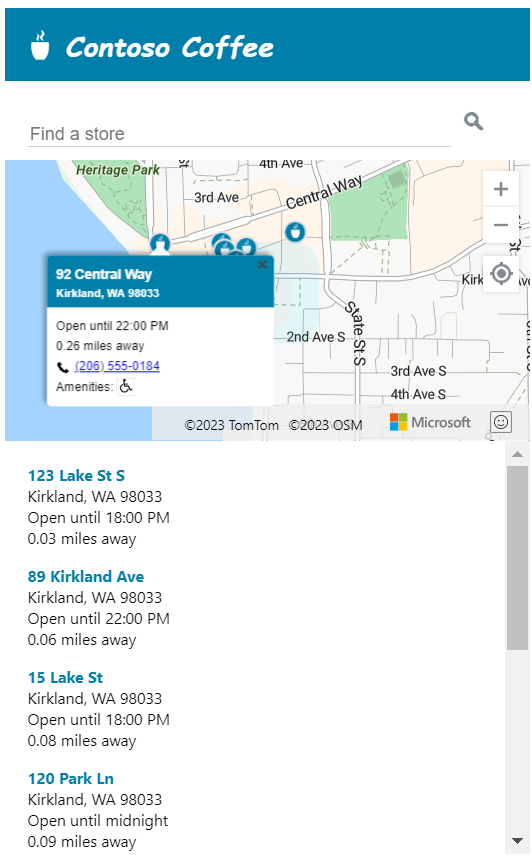
以下屏幕截图显示 Contoso Coffee 店铺定位器应用程序的常规布局。 若要查看实时示例并与之交互,请参阅 Azure Maps 代码示例站点上的简单店铺定位器示例应用程序。

为了最大程度地利用此店铺定位器,我们包含了一种响应式布局,当用户的屏幕宽度小于 700 像素时,该布局可以调整。 在移动设备等的小型屏幕上,响应式布局可让我们轻松使用店铺定位器。 以下屏幕截图显示小屏幕布局的示例:

创建店铺位置数据集
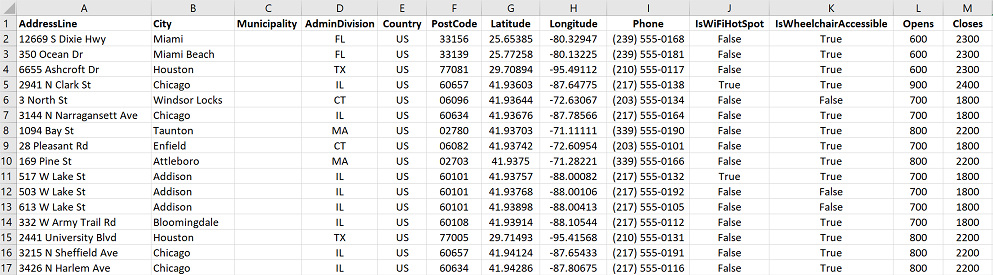
本部分介绍如何创建要在地图上显示的店铺的数据集。 Contoso Coffee 定位器的数据集是在 Excel 工作簿中创建的。 该数据集包含分布在 9 个国家或地区的 10,213 家 Contoso Coffee 咖啡厅位置:美国、加拿大、英国、法国、德国、意大利、荷兰、丹麦和西班牙。 下面是数据外观的屏幕截图:
可以从 GitHub 中 Azure Maps 代码示例存储库的数据文件夹下载包含 Contoso Coffee 定位器示例应用程序的完整数据集的 Excel 文件。
从上面的数据截图中,我们可以发现:
- 位置信息存储在以下六列中:AddressLine、City、Municipality(国家/地区)、AdminDivision(州/省)、PostCode(邮政编码)和 Country。
- Latitude 和 Longitude 列包含每个 Contoso Coffee 位置的坐标。 如果没有坐标信息,可以使用搜索服务来确定位置坐标。
- 其他一些列包含咖啡厅相关的元数据:电话号码、布尔值列,以及营业和停业时间(24 小时格式)。 布尔值列指示是否提供 Wi-Fi 和轮椅通道。 你可以创建自己的列来包含与位置数据更相关的元数据。
Note
Azure Maps 在球面 Mercator 投影“EPSG:3857”中呈现数据,但在使用 WGS84 数据的“EPSG:4326”中读取数据。
加载 Contoso Coffee 店铺定位器数据集
Contoso Coffee shop 定位器数据集很小,因此可以将其转换为制表符分隔的文本文件,浏览器在应用程序加载时会下载该文件。
Tip
如果数据集过大,无法在客户端下载,或者频繁更新,则可以考虑在数据库中存储数据集。 将数据加载到数据库后,可以设置一个 Web 服务,用于接受数据查询,然后将结果发送到用户的浏览器。
将数据转换为制表符分隔的文本文件
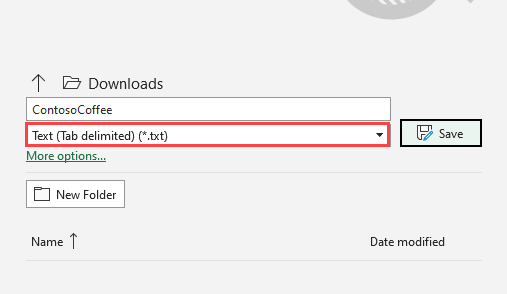
若要将 Contoso Coffee 店铺位置数据从 Excel 工作簿转换为制表符分隔的文本文件,请执行以下操作:
下载 Excel 工作簿 ContosoCoffee.xlsx 并在 Excel 中打开它。
选择“文件”>另存为...”。
在“保存类型”下拉列表中,选择“文本(制表符分隔)(*.txt)”。
将文件命名为 ContosoCoffee。
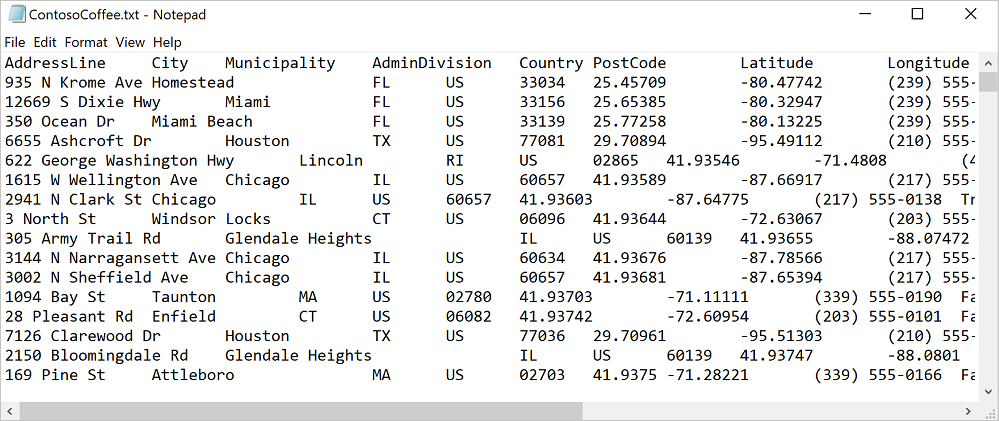
如果在记事本中打开该文本文件,其外观类似于以下文本:
设置项目
打开 Visual Studio Code 或你选择的开发环境。
选择“文件”>“打开工作区…”。
创建名为 ContosoCoffee 的新文件夹。
在资源管理器中选择“ContosoCoffee”。
创建以下三个文件,用于定义应用程序的布局、样式和逻辑:
- index.html
- index.css
- index.js
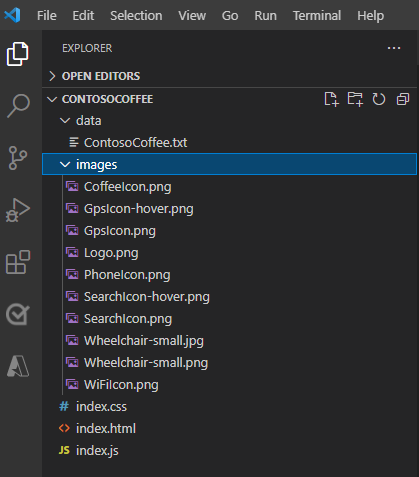
创建名为 data 的文件夹。
将之前从 Excel 工作簿 ContosoCoffee.xlsx 创建的 ContosoCoffee.txt 文件添加到 data 文件夹。
创建名为 images 的另一个文件夹。
如果尚未下载,请从 GitHub 存储库的图像目录下载 10 个地图图像,并将其添加到 images 文件夹中。
现在,你的工作区文件夹应如以下屏幕截图所示:

创建 HTML
若要创建 HTML,请执行以下操作:
将以下
meta标记添加到 index.html 的head:<meta charset="utf-8"> <meta http-equiv="x-ua-compatible" content="IE=Edge"> <meta name="viewport" content="width=device-width, initial-scale=1, shrink-to-fit=no">添加对 Azure Maps Web 控件 JavaScript 和 CSS 文件的引用:
<!-- Add references to the Azure Maps Map control JavaScript and CSS files. -->
<link rel="stylesheet" href="https://atlas.microsoft.com/sdk/javascript/mapcontrol/3/atlas.min.css" type="text/css">
<script src="https://atlas.microsoft.com/sdk/javascript/mapcontrol/3/atlas.min.js"></script>
添加对 index.js 和 index.css 的引用。
<!-- Add references to the store locator JavaScript and CSS files. -->
<link rel="stylesheet" href="index.css" type="text/css">
<script src="index.js"></script>
在文档正文中添加
header标记。 在header标记内部,添加徽标和公司名称。<header> <img src="images/Logo.png" /> <span>Contoso Coffee</span> </header>添加
main标记,并创建一个包含文本框和搜索按钮的搜索面板。 此外,为地图、列表面板和“我的位置”GPS 按钮添加div引用。<main> <div class="searchPanel"> <div> <input id="searchTbx" type="search" placeholder="Find a store" /> <button id="searchBtn" title="Search"></button> </div> </div> <div id="listPanel"></div> <div id="myMap"></div> <button id="myLocationBtn" title="My Location"></button> </main>
完成后,index.html 应类似于教程示例代码中的 Simple Store Locator.html。
定义 CSS 样式
下一步是定义 CSS 样式。 CSS 样式定义应用程序组件的布局和应用程序的外观。
Open index.css.
添加以下 css 代码:
Note
@media样式定义当屏幕宽度小于 700 像素时要使用的备用样式选项。html, body { padding: 0; margin: 0; font-family: Gotham, Helvetica, sans-serif; overflow-x: hidden; } header { width: calc(100vw - 10px); height: 30px; padding: 15px 0 20px 20px; font-size: 25px; font-style: italic; font-family: "Comic Sans MS", cursive, sans-serif; line-height: 30px; font-weight: bold; color: white; background-color: #007faa; } header span { vertical-align: middle; } header img { height: 30px; vertical-align: middle; } .searchPanel { position: relative; width: 350px; } .searchPanel div { padding: 20px; } .searchPanel input { width: calc(100% - 50px); font-size: 16px; border: 0; border-bottom: 1px solid #ccc; } #listPanel { position: absolute; top: 135px; left: 0px; width: 350px; height: calc(100vh - 135px); overflow-y: auto; } #myMap { position: absolute; top: 65px; left: 350px; width: calc(100vw - 350px); height: calc(100vh - 65px); } .statusMessage { margin: 10px; } #myLocationBtn, #searchBtn { margin: 0; padding: 0; border: none; border-collapse: collapse; width: 32px; height: 32px; text-align: center; cursor: pointer; line-height: 32px; background-repeat: no-repeat; background-size: 20px; background-position: center center; z-index: 200; } #myLocationBtn { position: absolute; top: 150px; right: 10px; box-shadow: 0px 0px 4px rgba(0,0,0,0.16); background-color: white; background-image: url("images/GpsIcon.png"); } #myLocationBtn:hover { background-image: url("images/GpsIcon-hover.png"); } #searchBtn { background-color: transparent; background-image: url("images/SearchIcon.png"); } #searchBtn:hover { background-image: url("images/SearchIcon-hover.png"); } .listItem { height: 50px; padding: 20px; font-size: 14px; } .listItem:hover { cursor: pointer; background-color: #f1f1f1; } .listItem-title { color: #007faa; font-weight: bold; } .storePopup { min-width: 150px; } .storePopup .popupTitle { border-top-left-radius: 4px; border-top-right-radius: 4px; padding: 8px; height: 30px; background-color: #007faa; color: white; font-weight: bold; } .storePopup .popupSubTitle { font-size: 10px; line-height: 12px; } .storePopup .popupContent { font-size: 11px; line-height: 18px; padding: 8px; } .storePopup img { vertical-align:middle; height: 12px; margin-right: 5px; } /* Adjust the layout of the page when the screen width is fewer than 700 pixels. */ @media screen and (max-width: 700px) { .searchPanel { width: 100vw; } #listPanel { top: 385px; width: 100%; height: calc(100vh - 385px); } #myMap { width: 100vw; height: 250px; top: 135px; left: 0px; } #myLocationBtn { top: 220px; } } .mapCenterIcon { display: block; width: 10px; height: 10px; border-radius: 50%; background: orange; border: 2px solid white; cursor: pointer; box-shadow: 0 0 0 rgba(0, 204, 255, 0.4); animation: pulse 3s infinite; } @keyframes pulse { 0% { box-shadow: 0 0 0 0 rgba(0, 204, 255, 0.4); } 70% { box-shadow: 0 0 0 50px rgba(0, 204, 255, 0); } 100% { box-shadow: 0 0 0 0 rgba(0, 204, 255, 0); } }
如果此时运行应用程序,则会显示标头、搜索框和搜索按钮。 但看不到地图,因为它尚未加载。 如果尝试执行搜索,不会有任何反应。 下一部分介绍如何添加访问店铺定位器的所有功能所需的 JavaScript 逻辑。
添加 JavaScript 代码
Contoso Coffee 店铺定位器应用中的 JavaScript 代码将启用以下过程:
添加名为 的
ready,以等待页面完成加载过程。 页面加载完成后,事件处理程序将创建更多事件侦听器来监视地图的加载,并为搜索和“我的位置”按钮指定功能。当用户选择搜索按钮时,或者在搜索框中键入位置后按 Enter 时,系统会针对用户的查询开始模糊搜索。 代码会将在国家/地区 ISO 2 值的数组传入
countrySet选项中,以将搜索结果限制为这些国家/地区。 限制搜索的国家/地区有助于提高返回结果的准确性。完成搜索后,第一个位置结果将用作地图的中心焦点。 当用户选择“我的位置”按钮时,代码使用内置于浏览器的 HTML5 地理位置 API 检索用户的位置。 检索到位置后,代码会将用户的位置确定为地图的中心。
若要添加 JavaScript,请执行以下操作:
Open index.js.
添加全局选项,以便更轻松地更新设置。 为地图、弹出窗口、数据源、图标层和 HTML 标记定义变量。 将 HTML 标记设置为表示搜索区域的中心。 定义 Azure Maps 搜索服务客户端的实例。
//The maximum zoom level to cluster data point data on the map.
var maxClusterZoomLevel = 11;

//The URL to the store location data.
var storeLocationDataUrl = 'data/ContosoCoffee.txt';

//The URL to the icon image.
var iconImageUrl = 'images/CoffeeIcon.png';

//An array of country region ISO2 values to limit searches to.
var countrySet = ['US', 'CA', 'GB', 'FR','DE','IT','ES','NL','DK'];

//
var map, popup, datasource, iconLayer, centerMarker;

// Used in function updateListItems
var listItemTemplate = '<div class="listItem" onclick="itemSelected(\'{id}\')"><div class="listItem-title">{title}</div>{city}<br />Open until {closes}<br />{distance} miles away</div>';
添加以下初始化代码。 确保将
<Your Azure Maps Key>替换为你的 Azure Maps 订阅密钥。Tip
使用弹出窗口时,最好是创建单个
Popup实例,并通过更新该实例的内容和位置来重复使用它。 对于添加到代码中的每个Popup实例,会将多个 DOM 元素添加到页面。 页面上的 DOM 元素越多,浏览器要跟踪的信息就越多。 如果项数过多,浏览器可能会变慢。function initialize() { //Initialize a map instance. map = new atlas.Map('myMap', { center: [-90, 40], zoom: 2, //Add your Azure Maps subscription key to the map SDK. authOptions: { authType: 'subscriptionKey', subscriptionKey: '<Your Azure Maps Key>' } }); //Create a pop-up window, but leave it closed so we can update it and display it later. popup = new atlas.Popup(); //If the user selects the search button, geocode the value the user passed in. document.getElementById('searchBtn').onclick = performSearch; //If the user presses Enter in the search box, perform a search. document.getElementById('searchTbx').onkeyup = function(e) { if (e.keyCode === 13) { performSearch(); } }; //If the user selects the My Location button, use the Geolocation API to get the user's location. Center and zoom the map on that location. document.getElementById('myLocationBtn').onclick = setMapToUserLocation; //Wait until the map resources are ready. map.events.add('ready', function() { //Add your maps post load functionality. }); } function performSearch() { var query = document.getElementById('searchTbx').value; //Pass in the array of country/region ISO2 for which we want to limit the search to. var url = `https://atlas.microsoft.com/search/fuzzy/json?api-version=1.0&countrySet=${countrySet}&query=${query}&view=Auto`; //Perform a fuzzy search on the users query. fetch(url, { headers: { "Subscription-Key": map.authentication.getToken() } }) .then((response) => response.json()) .then((response) => { if (Array.isArray(response.results) && response.results.length > 0) { var result = response.results[0]; var bbox = [ result.viewport.topLeftPoint.lon, result.viewport.btmRightPoint.lat, result.viewport.btmRightPoint.lon, result.viewport.topLeftPoint.lat ]; //Set the camera to the bounds of the first result. map.setCamera({ bounds: bbox, padding: 40 }); } else { document.getElementById('listPanel').innerHTML = '<div class="statusMessage">Unable to find the location you searched for.</div>'; } }); } function setMapToUserLocation() { //Request the user's location. navigator.geolocation.getCurrentPosition(function(position) { //Convert the geolocation API position into a longitude/latitude position value the map can understand and center the map over it. map.setCamera({ center: [position.coords.longitude, position.coords.latitude], zoom: maxClusterZoomLevel + 1 }); }, function(error) { //If an error occurs when trying to access the users position information, display an error message. switch (error.code) { case error.PERMISSION_DENIED: alert('User denied the request for geolocation.'); break; case error.POSITION_UNAVAILABLE: alert('Position information is unavailable.'); break; case error.TIMEOUT: alert('The request to get user position timed out.'); break; case error.UNKNOWN_ERROR: alert('An unknown error occurred.'); break; } }); } //Initialize the application when the page is loaded. window.onload = initialize;在地图的
ready事件处理程序中,添加缩放控件和 HTML 标记以显示搜索区域的中心点。//Add a zoom control to the map. map.controls.add(new atlas.control.ZoomControl(), { position: 'top-right' }); //Add an HTML marker to the map to indicate the center to use for searching. centerMarker = new atlas.HtmlMarker({ htmlContent: '<div class="mapCenterIcon"></div>', position: map.getCamera().center }); map.markers.add(centerMarker);在地图的
ready事件处理程序中添加一个数据源。 然后,发出调用来加载和分析数据集。 对数据源启用聚集。 数据源聚集可将重叠的点组合到一个聚集中。 当用户放大地图时,聚集将分离成单独的点。 此行为提供了更好的用户体验,并提高了性能。//Create a data source, add it to the map, and then enable clustering. datasource = new atlas.source.DataSource(null, { cluster: true, clusterMaxZoom: maxClusterZoomLevel - 1 }); map.sources.add(datasource); //Load all the store data now that the data source has been defined. loadStoreData();在地图的
ready事件处理程序中加载数据集后,请定义层集来呈现数据。 气泡层将呈现聚集数据点。 符号层将呈现气泡层上方每个聚集中的点数。 另一个符号层在地图上呈现各个位置的自定义图标。将
mouseover和mouseout事件添加到气泡层和图标层,以便当用户将鼠标悬停在地图上的聚集或图标上时更改鼠标光标。 将click事件添加到聚集气泡层。 当用户选择任一聚集时,此click事件会将地图放大两个级别,并将地图中心点置于某个聚集上。 将click事件添加到图标层。 当用户选择单个位置图标时,此click事件会显示一个弹出窗口,其中显示了咖啡厅的详细信息。 将某个事件添加到地图,以监视地图何时完成移动。 激发此事件时,会更新列表面板中的项。//Create a bubble layer to render clustered data points. var clusterBubbleLayer = new atlas.layer.BubbleLayer(datasource, null, { radius: 12, color: '#007faa', strokeColor: 'white', strokeWidth: 2, filter: ['has', 'point_count'] //Only render data points that have a point_count property; clusters have this property. }); //Create a symbol layer to render the count of locations in a cluster. var clusterLabelLayer = new atlas.layer.SymbolLayer(datasource, null, { iconOptions: { image: 'none' //Hide the icon image. }, textOptions: { textField: ['get', 'point_count_abbreviated'], size: 12, font: ['StandardFont-Bold'], offset: [0, 0.4], color: 'white' } }); map.layers.add([clusterBubbleLayer, clusterLabelLayer]); //Load a custom image icon into the map resources. map.imageSprite.add('myCustomIcon', iconImageUrl).then(function() { //Create a layer to render a coffee cup symbol above each bubble for an individual location. iconLayer = new atlas.layer.SymbolLayer(datasource, null, { iconOptions: { //Pass in the ID of the custom icon that was loaded into the map resources. image: 'myCustomIcon', //Optionally, scale the size of the icon. font: ['SegoeUi-Bold'], //Anchor the center of the icon image to the coordinate. anchor: 'center', //Allow the icons to overlap. allowOverlap: true }, filter: ['!', ['has', 'point_count']] //Filter out clustered points from this layer. }); map.layers.add(iconLayer); //When the mouse is over the cluster and icon layers, change the cursor to a pointer. map.events.add('mouseover', [clusterBubbleLayer, iconLayer], function() { map.getCanvasContainer().style.cursor = 'pointer'; }); //When the mouse leaves the item on the cluster and icon layers, change the cursor back to the default (grab). map.events.add('mouseout', [clusterBubbleLayer, iconLayer], function() { map.getCanvasContainer().style.cursor = 'grab'; }); //Add a click event to the cluster layer. When the user selects a cluster, zoom into it by two levels. map.events.add('click', clusterBubbleLayer, function(e) { map.setCamera({ center: e.position, zoom: map.getCamera().zoom + 2 }); }); //Add a click event to the icon layer and show the shape that was selected. map.events.add('click', iconLayer, function(e) { showPopup(e.shapes[0]); }); //Add an event to monitor when the map has finished rendering. map.events.add('render', function() { //Update the data in the list. updateListItems(); }); });加载咖啡厅数据集后,必须先下载该数据集。 下载完成后,必须将文件拆分为行。 第一行包含标题信息。 为了便于跟踪代码,我们将标题分析成某个对象,然后可以使用该对象来查找每个属性的单元索引。 在第一行后面,循环访问剩余行并创建一个点特征。 将该点特征添加到数据源。 最后,更新列表面板。
function loadStoreData() {

//Download the store location data.
fetch(storeLocationDataUrl)
    .then(response => response.text())
    .then(function(text) {

        //Parse the tab-delimited file data into GeoJSON features.
        var features = [];

        //Split the lines of the file.
        var lines = text.split('\n');

        //Grab the header row.
        var row = lines[0].split('\t');

        //Parse the header row and index each column to make the code for parsing each row easier to follow.
        var header = {};
        var numColumns = row.length;
        for (var i = 0; i < row.length; i++) {
            header[row[i]] = i;
        }

        //Skip the header row and then parse each row into a GeoJSON feature.
        for (var i = 1; i < lines.length; i++) {
            row = lines[i].split('\t');

            //Ensure that the row has the correct number of columns.
            if (row.length >= numColumns) {

                features.push(new atlas.data.Feature(new atlas.data.Point([parseFloat(row[header['Longitude']]), parseFloat(row[header['Latitude']])]), {
                    AddressLine: row[header['AddressLine']],
                    City: row[header['City']],
                    Municipality: row[header['Municipality']],
                    AdminDivision: row[header['AdminDivision']],
                    Country: row[header['Country']],
                    PostCode: row[header['PostCode']],
                    Phone: row[header['Phone']],
                    StoreType: row[header['StoreType']],
                    IsWiFiHotSpot: (row[header['IsWiFiHotSpot']].toLowerCase() === 'true') ? true : false,
                    IsWheelchairAccessible: (row[header['IsWheelchairAccessible']].toLowerCase() === 'true') ? true : false,
                    Opens: parseInt(row[header['Opens']]),
                    Closes: parseInt(row[header['Closes']])
                }));
            }
        }

        //Add the features to the data source.
        datasource.add(new atlas.data.FeatureCollection(features));

        //Initially, update the list items.
        updateListItems();
    });
}
更新列表面板时,会计算距离。 此距离是从地图中心点到当前地图视图中所有点特征的距离。 然后按距离将特征排序。 将生成 HTML 以在列表面板中显示每个位置。
var listItemTemplate = '<div class="listItem" onclick="itemSelected(\'{id}\')"><div class="listItem-title">{title}</div>{city}<br />Open until {closes}<br />{distance} miles away</div>';

function updateListItems() {
    //Hide the center marker.
    centerMarker.setOptions({
        visible: false
    });

    //Get the current camera and view information for the map.
    var camera = map.getCamera();
    var listPanel = document.getElementById('listPanel');

    //Check to see if the user is zoomed out a substantial distance. If they are, tell them to zoom in and to perform a search or select the My Location button.
    if (camera.zoom < maxClusterZoomLevel) {
        //Close the pop-up window; clusters might be displayed on the map.
        popup.close();
        listPanel.innerHTML = '<div class="statusMessage">Search for a location, zoom the map, or select the My Location button to see individual locations.</div>';
    } else {
        //Update the location of the centerMarker property.
        centerMarker.setOptions({
            position: camera.center,
            visible: true
        });

        //List the ten closest locations in the side panel.
        var html = [], properties;

        /*
        Generating HTML for each item that looks like this:
        <div class="listItem" onclick="itemSelected('id')">
            <div class="listItem-title">1 Microsoft Way</div>
            Redmond, WA 98052<br />
            Open until 9:00 PM<br />
            0.7 miles away
        </div>
        */

        //Get all the shapes that have been rendered in the bubble layer.
        var data = map.layers.getRenderedShapes(map.getCamera().bounds, [iconLayer]);

        //Create an index of the distances of each shape.
        var distances = {};

        data.forEach(function (shape) {
            if (shape instanceof atlas.Shape) {

                //Calculate the distance from the center of the map to each shape and store in the index. Round to 2 decimals.
                distances[shape.getId()] = Math.round(atlas.math.getDistanceTo(camera.center, shape.getCoordinates(), 'miles') * 100) / 100;
            }
        });

        //Sort the data by distance.
        data.sort(function (x, y) {
            return distances[x.getId()] - distances[y.getId()];
        });

        data.forEach(function(shape) {
            properties = shape.getProperties();
            html.push('<div class="listItem" onclick="itemSelected(\'', shape.getId(), '\')"><div class="listItem-title">',
            properties['AddressLine'],
            '</div>',
            //Get a formatted addressLine2 value that consists of City, Municipality, AdminDivision, and PostCode.
            getAddressLine2(properties),
            '<br />',

            //Convert the closing time to a format that is easier to read.
            getOpenTillTime(properties),
            '<br />',

            //Get the distance of the shape.
            distances[shape.getId()],
            ' miles away</div>');
        });

        listPanel.innerHTML = html.join('');

        //Scroll to the top of the list panel in case the user has scrolled down.
        listPanel.scrollTop = 0;
    }
}

//This converts a time that's in a 24-hour format to an AM/PM time or noon/midnight string.
function getOpenTillTime(properties) {
    var time = properties['Closes'];
    var t = time / 100;
    var sTime;

    if (time === 1200) {
        sTime = 'noon';
    } else if (time === 0 || time === 2400) {
        sTime = 'midnight';
    } else {
        sTime = Math.round(t) + ':';

        //Get the minutes.
        t = (t - Math.round(t)) * 100;

        if (t === 0) {
            sTime += '00';
        } else if (t < 10) {
            sTime += '0' + t;
        } else {
            sTime += Math.round(t);
        }

        if (time < 1200) {
            sTime += ' AM';
        } else {
            sTime += ' PM';
        }
    }

    return 'Open until ' + sTime;
}

//Create an addressLine2 string that contains City, Municipality, AdminDivision, and PostCode.
function getAddressLine2(properties) {
    var html = [properties['City']];

    if (properties['Municipality']) {
        html.push(', ', properties['Municipality']);
    }

    if (properties['AdminDivision']) {
        html.push(', ', properties['AdminDivision']);
    }

    if (properties['PostCode']) {
        html.push(' ', properties['PostCode']);
    }

    return html.join('');
}
当用户在列表面板中选择某个项时,将从数据源中检索该项的相关形状。 根据形状中存储的属性信息生成弹出窗口。 地图以该形状为中心。 如果地图的宽度小于 700 像素,则地图视图将会偏移,以显示弹出窗口。
//When a user selects a result in the side panel, look up the shape by its ID value and display the pop-up window.
function itemSelected(id) {
    //Get the shape from the data source by using its ID.
    var shape = datasource.getShapeById(id);
    showPopup(shape);

    //Center the map over the shape on the map.
    var center = shape.getCoordinates();
    var offset;

    //If the map is fewer than 700 pixels wide, then the layout is set for small screens.
    if (map.getCanvas().width < 700) {
        //When the map is small, offset the center of the map relative to the shape so that there is room for the popup to appear.
        offset = [0, -80];
    }

    map.setCamera({
        center: center,
        centerOffset: offset
    });
}

function showPopup(shape) {
    var properties = shape.getProperties();

    /* Generating HTML for the pop-up window that looks like this:

        <div class="storePopup">
            <div class="popupTitle">
                3159 Tongass Avenue
                <div class="popupSubTitle">Ketchikan, AK 99901</div>
            </div>
            <div class="popupContent">
                Open until 22:00 PM<br/>
                <img title="Phone Icon" src="images/PhoneIcon.png">
                <a href="tel:1-800-XXX-XXXX">1-800-XXX-XXXX</a>
                <br>Amenities:
                <img title="Wi-Fi Hotspot" src="images/WiFiIcon.png">
                <img title="Wheelchair Accessible" src="images/WheelChair-small.png">
            </div>
        </div>
    */

     //Calculate the distance from the center of the map to the shape in miles, round to 2 decimals.
    var distance = Math.round(atlas.math.getDistanceTo(map.getCamera().center, shape.getCoordinates(), 'miles') * 100)/100;

    var html = ['<div class="storePopup">'];
    html.push('<div class="popupTitle">',
        properties['AddressLine'],
        '<div class="popupSubTitle">',
        getAddressLine2(properties),
        '</div></div><div class="popupContent">',

        //Convert the closing time to a format that's easier to read.
        getOpenTillTime(properties),

        //Add the distance information.
        '<br/>', distance,
        ' miles away',
        '<br /><img src="images/PhoneIcon.png" title="Phone Icon"/><a href="tel:',
        properties['Phone'],
        '">',
        properties['Phone'],
        '</a>'
    );

    if (properties['IsWiFiHotSpot'] || properties['IsWheelchairAccessible']) {
        html.push('<br/>Amenities: ');

        if (properties['IsWiFiHotSpot']) {
            html.push('<img src="images/WiFiIcon.png" title="Wi-Fi Hotspot"/>');
        }

        if (properties['IsWheelchairAccessible']) {
            html.push('<img src="images/WheelChair-small.png" title="Wheelchair Accessible"/>');
        }
    }

    html.push('</div></div>');

    //Update the content and position of the pop-up window for the specified shape information.
    popup.setOptions({

        //Create a table from the properties in the feature.
        content:  html.join(''),
        position: shape.getCoordinates()
    });

    //Open the pop-up window.
    popup.open(map);
}
现已创建一个完全正常运行的店铺定位器。 在 Web 浏览器中打开 index.html 文件。 如果群集出现在地图中,可以使用以下任一方法搜索位置:
- 搜索框。
- 选择“我的位置”按钮
- 选择群集
- 放大地图以查看各个位置。
当用户首次选择“我的位置”按钮时,浏览器会显示一条安全警告,要求提供访问用户位置的权限。 如果用户同意共享其位置,则地图将在用户位置放大,并显示附近的咖啡厅。

如果在包含咖啡厅位置的区域中将地图放到足够大,则聚集将分离成单独的位置。 在地图上选择某个图标或者在侧面板中选择一个项会显示一个弹出窗口。 此弹出窗口显示所选位置的信息。

如果将浏览器窗口宽度调整为小于 700 像素或者在移动设备上打开该应用程序,则布局将会更改,更适合小屏幕。
本教程介绍了如何使用 Azure Maps 创建基本的店铺定位器。 本教程中创建的店铺定位器可能包含你所需的所有功能。 可将功能添加到店铺定位器或使用其他高级功能,以提供更具个性的用户体验:
- 在搜索框中启用键入时显示建议。
- 添加多种语言支持。
- 允许用户筛选路线中的位置。
- 添加设置筛选器的功能。
- 添加使用查询字符串指定初始搜索值的支持。 如果在店铺定位器中包含此选项,则用户可以添加书签和共享搜索。 它还可让你轻松地从另一个页面向此页面传递搜索。
- 将店铺定位器部署为 Azure 应用服务 Web 应用。
- 将数据存储在数据库中,并搜索附近的位置。 有关详细信息,请参阅 SQL Server 空间数据类型概述和查询最近的邻域的空间数据。
Additional information
- 有关完整代码,请参阅 GitHub 上的简单店铺定位器教程。
- 若要实时查看此示例,请参阅 Azure Maps 代码示例站点上的简单店铺定位器。
- 通过使用缩放级别和磁贴网格,详细了解 Azure Maps 的覆盖范围和功能。
- 还可以使用数据驱动的样式表达式(将应用于业务逻辑)。
Next steps
若要查看更多代码示例和交互式编码体验,请参阅: