在本快速入门中,你将创建一个桌面 Windows 应用程序,该应用程序使用 Windows 应用 SDK 发送和接收推送通知。
Prerequisites
- 开始开发 Windows 应用
- 创建一个新项目来使用 Windows 应用 SDK 或者 在现有项目中使用 Windows 应用 SDK
- 需要使用 Azure 帐户 才能使用 Windows 应用 SDK 推送通知。
- 阅读 推送通知概述
示例应用
本快速入门介绍如何在 Windows 应用 SDK 1.7 上向应用添加推送通知支持。 请参阅 GitHub 上的示例应用中与此快速入门类似的代码。 请确保使用 首选版本的 Windows 应用 SDK 查看分支 ,了解最适合项目的示例。
还可以通过在 示例存储库中选择版本分支来查找每个版本的 Windows 应用 SDK 的示例。
API 参考
有关推送通知的 API 参考文档,请参阅 Microsoft.Windows.PushNotifications 命名空间。
在 Azure Active Directory 中配置应用的标识(AAD)
Windows 应用 SDK 中的推送通知使用 Azure Active Directory(AAD)中的标识。 请求 WNS 通道 URI 和请求访问令牌时,需要 Azure 凭据才能发送推送通知。 注意:我们在合作伙伴中心使用 Windows 应用 SDK 推送 Microsoft通知 不 支持。
步骤 1:创建 AAD 应用注册
登录到 Azure 帐户并创建新的 AAD 应用注册 资源。 选择“新注册”。
步骤 2:提供名称并选择多租户选项
提供应用名称。
推送通知需要多租户选项,因此请选择该选项。
- 有关租户的详细信息,请参阅谁可以登录到你的应用?
选择注册
请记下您的 应用程序(客户端)ID,因为这是您在进行激活注册和请求访问令牌时会用到的 Azure 应用 ID。
请记下你的 目录(租户)ID,因为这是你请求访问令牌时将使用的 Azure 租户ID。
Important
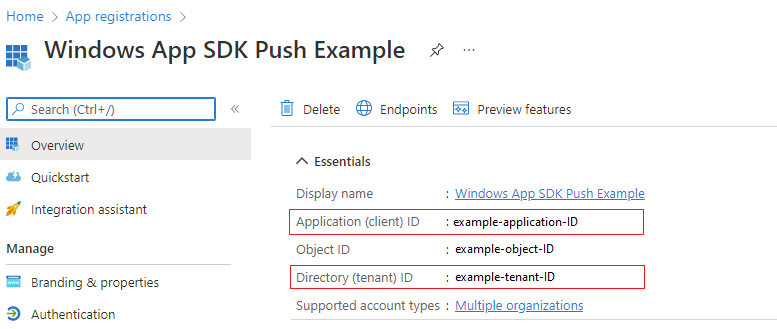 记下您的 应用程序(客户端)ID 和 目录(租户)ID。
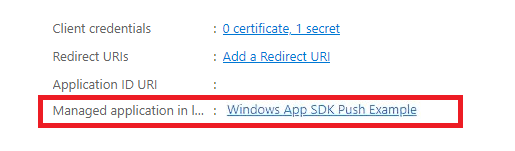
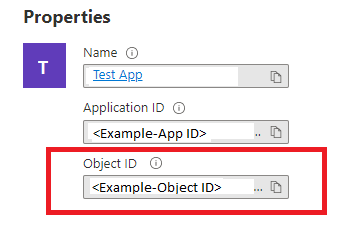
请记下 对象标识符,因为这是在请求通道时将使用的 Azure ObjectId。 请注意,这不是 “概要” 页上列出的对象 ID。 相反,若要查找正确的对象 ID,请在 Essentials 页的本地目录字段中单击托管应用程序中的应用名称:
Note
如果您的应用未关联对象 ID,则获取对象 ID 需要 服务主体。请按照以下任一文章中的步骤,通过 Azure 门户或命令行创建一个:
步骤 3:为应用注册创建机密
在请求用于发送推送通知的访问令牌时,你的密钥将与 Azure AppId/ClientId 一起使用。

导航到 证书和机密 ,然后选择 “新建客户端密码”。
Important
请在创建机密后确保将其复制并存储在安全位置,例如 Azure Key Vault。 创建后,该内容只能查看一次。
步骤 4:将应用的程序包系列名称映射到其 Azure 应用 ID
如果您的应用已打包(包括与外部来源一起打包),您可以使用此流程来映射应用的程序包系列名称(PFN)及其 Azure 应用 ID。
如果您的应用是打包的 Win32 应用,请发送主题为“Windows 应用 SDK 推送通知映射请求”的电子邮件至 Win_App_SDK_Push@microsoft.com ,邮件正文为“PFN:[您的 PFN]”、AppId:[您的 APPId]、ObjectId:[您的 ObjectId],以创建包系列名称(PFN)映射请求。 映射请求每周都会完成。 映射请求完成后,将收到通知。
有了 Azure AppId、ObjectId 和机密后,即可将这些凭据添加到以下示例代码中。
将应用配置为接收推送通知
步骤 1:添加 Windows 应用 SDK 和所需的 NuGet 包
接下来,右键单击解决方案资源管理器中的解决方案,然后选择“ 管理 NuGet 包”。
在包管理器中,添加以下包:
- Microsoft.WindowsAppSDK (最低版本 1.1.0)
- Microsoft.Windows.SDK.BuildTools (最低版本 10.0.22000.194)
- Microsoft.Windows.CppWinRT(最低版本 2.0.210930.14)
- Microsoft.Windows.ImplementationLibrary(最低版本 1.0.210930.1)
如果这是你第一次在项目中使用 Windows 应用 SDK,并且它打包为外部位置或未打包,请通过将以下属性添加到项目文件来初始化 Windows 应用 SDK:
<!-- your .vcxproj or .proj file -->
<PropertyGroup Label="Globals">
    <!-- Other properties -->
    <WindowsPackageType>None</WindowsPackageType>
</PropertyGroup>
或使用引导程序 API。 有关 打包到外部位置或解压缩的应用,请参阅使用 Windows 应用 SDK 运行时 获取更多详细信息。
Note
如果未初始化 SDK,应用将引发 System.Runtime.InteropServices.COMException (0x80040154): Class not registered (0x80040154 (REGDB_E_CLASSNOTREG)) 且不会运行。
步骤 2:添加命名空间
接下来,添加 Windows 应用 SDK 推送通知的 Microsoft.Windows.PushNotifications命名空间。
#include <winrt/Microsoft.Windows.PushNotifications.h>

using namespace winrt::Microsoft::Windows::PushNotifications;
如果收到“找不到 Microsoft.Windows.PushNotifications”错误,则可能意味着尚未生成头文件。 若要解决此问题,请确保已安装上述包,注释掉包含和使用导致错误的语句,并重新生成应用程序以生成头文件。 生成成功后,取消注释包含和使用语句并重新生成项目。 这应该可以解决此错误。
步骤 3:将 COM 激活器添加到应用的清单
Important
如果应用已解压缩(即运行时缺少包标识),请跳到 步骤 4:注册并响应应用启动时的推送通知。
如果你的应用程序已打包(包括与外部位置一起打包),请打开 Package.appxmanifest。 在元素中添加 <Application> 以下内容。 将Id和ExecutableDisplayName值替换为特定于你的应用的值。
<!--Packaged apps only-->
<!--package.appxmanifest-->

<Package
  ...
  xmlns:com="http://schemas.microsoft.com/appx/manifest/com/windows10"
  ...
  <Applications>
    <Application>
      ...
      <Extensions>

        <!--Register COM activator-->
        <com:Extension Category="windows.comServer">
          <com:ComServer>
              <com:ExeServer Executable="SampleApp\SampleApp.exe" DisplayName="SampleApp" Arguments="----WindowsAppRuntimePushServer:">
                <com:Class Id="[Your app's Azure AppId]" DisplayName="Windows App SDK Push" />
            </com:ExeServer>
          </com:ComServer>
        </com:Extension>

      </Extensions>
    </Application>
  </Applications>
 </Package>
Note
本示例已完成的C++类示例可在 步骤 5 之后找到。 步骤 4 和 5 提供了分步指南,用于在最后一个示例中添加每个部分。
步骤 4:在应用启动时注册和响应推送通知
更新应用 main() 的方法以添加以下内容:
- 通过调用 PushNotificationManager::Default().Register()注册应用以接收推送通知。
- 通过调用 AppInstance::GetCurrent().GetActivatedEventArgs()来检查激活请求的源。 如果激活是由推送通知触发的,请根据通知的消息内容进行响应。
Important
必须在调用 AppInstance.GetCurrent.GetActivatedEventArgs之前,调用 PushNotificationManager::Default().Register。
添加前台事件处理程序
若要在前台处理事件,请为 PushNotificationManager.PushReceived 注册处理程序。
Important
在调用 PushNotificationManager.Register()之前,还必须注册任何 PushNotificationManager.PushReceived 事件处理程序。 否则,将引发以下运行时异常:
System.Runtime.InteropServices.COMException: Element not found. Must register event handlers before calling Register().
添加 PushNotificationManager::IsSupported() 检查
接下来,添加 对 PushNotificationManager.IsSupported()是否支持 PushNotification API 的检查。 否则,建议使用轮询或自己的自定义套接字实现。
现在,已确认推送通知支持,请根据 PushNotificationReceivedEventArgs 添加行为。
步骤 5:请求 WNS 通道 URI 并将其注册到 WNS 服务器
WNS 通道 URI 是用于发送推送通知的 HTTP 终结点。 每个客户端必须请求通道 URI 并将其注册到 WNS 服务器以接收推送通知。
Note
WNS 通道 URI 在 30 天后过期。
auto channelOperation{ PushNotificationManager::Default().CreateChannelAsync(winrt::guid("[Your app's Azure ObjectID]")) };
如果遵循教程代码,请在此处添加 Azure 对象 ID:
// To obtain an AAD RemoteIdentifier for your app,
// follow the instructions on https://learn.microsoft.com/azure/active-directory/develop/quickstart-register-app
winrt::guid remoteId{ "00000000-0000-0000-0000-000000000000" }; // Replace this with your own Azure ObjectId
PushNotificationManager 将尝试创建一个通道URI,并且在15分钟内自动重试。 创建事件处理程序以等待调用完成。 调用完成后,如果成功,请向 WNS 服务器注册 URI。
示例代码
#include <iostream>
#include <winrt/Microsoft.Windows.PushNotifications.h>
#include <winrt/Windows.Foundation.h>
#include <winrt/Microsoft.Windows.AppLifecycle.h>
#include <winrt/Windows.ApplicationModel.Background.h>
#include <wil/cppwinrt.h>
#include <wil/result.h>

using namespace winrt::Microsoft::Windows::PushNotifications;
using namespace winrt::Windows::Foundation;
using namespace winrt::Microsoft::Windows::AppLifecycle;

// To obtain an AAD RemoteIdentifier for your app,
// follow the instructions on https://learn.microsoft.com/azure/active-directory/develop/quickstart-register-app
winrt::guid remoteId{ "00000000-0000-0000-0000-000000000000" }; // Replace this with your own Azure ObjectId

winrt::Windows::Foundation::IAsyncOperation<PushNotificationChannel> RequestChannelAsync()
{
    auto channelOperation = PushNotificationManager::Default().CreateChannelAsync(remoteId);

    // Set up the in-progress event handler
    channelOperation.Progress(
        [](auto&& sender, auto&& args)
        {
            if (args.status == PushNotificationChannelStatus::InProgress)
            {
                // This is basically a noop since it isn't really an error state
                std::cout << "Channel request is in progress." << std::endl << std::endl;
            }
            else if (args.status == PushNotificationChannelStatus::InProgressRetry)
            {
                LOG_HR_MSG(
                    args.extendedError,
                    "The channel request is in back-off retry mode because of a retryable error! Expect delays in acquiring it. RetryCount = %d",
                    args.retryCount);
            }
        });

    auto result = co_await channelOperation;

    if (result.Status() == PushNotificationChannelStatus::CompletedSuccess)
    {
        auto channelUri = result.Channel().Uri();

        std::cout << "channelUri: " << winrt::to_string(channelUri.ToString()) << std::endl << std::endl;

        auto channelExpiry = result.Channel().ExpirationTime();

        // Caller's responsibility to keep the channel alive
        co_return result.Channel();
    }
    else if (result.Status() == PushNotificationChannelStatus::CompletedFailure)
    {
        LOG_HR_MSG(result.ExtendedError(), "We hit a critical non-retryable error with channel request!");
        co_return nullptr;
    }
    else
    {
        LOG_HR_MSG(result.ExtendedError(), "Some other failure occurred.");
        co_return nullptr;
    }

};

PushNotificationChannel RequestChannel()
{
    auto task = RequestChannelAsync();
    if (task.wait_for(std::chrono::seconds(300)) != AsyncStatus::Completed)
    {
        task.Cancel();
        return nullptr;
    }

    auto result = task.GetResults();
    return result;
}

void SubscribeForegroundEventHandler()
{
    winrt::event_token token{ PushNotificationManager::Default().PushReceived([](auto const&, PushNotificationReceivedEventArgs const& args)
    {
        auto payload{ args.Payload() };

        std::string payloadString(payload.begin(), payload.end());
        std::cout << "\nPush notification content received in the FOREGROUND: " << payloadString << std::endl;
    }) };

    std::cout << "Push notification foreground event handler registered." << std::endl;
}

int main()
{
    // Set up an event handler, so we can receive notifications in the foreground while the app is running.
    // You must register notification event handlers before calling Register(). Otherwise, the following runtime
    // exception will be thrown: System.Runtime.InteropServices.COMException: 'Element not found. Must register
    // event handlers before calling Register().'
    SubscribeForegroundEventHandler();

    // Register the app for push notifications.
    PushNotificationManager::Default().Register();

    auto args{ AppInstance::GetCurrent().GetActivatedEventArgs() };
    switch (args.Kind())
    {
        case ExtendedActivationKind::Launch:
        {
            std::cout << "App launched by user or from the debugger." << std::endl;
            if (PushNotificationManager::IsSupported())
            {
                std::cout << "Push notifications are supported on this device." << std::endl;

                // Request a WNS Channel URI which can be passed off to an external app to send notifications to.
                // The WNS Channel URI uniquely identifies this app for this user and device.
                PushNotificationChannel channel{ RequestChannel() };
                if (!channel)
                {
                    std::cout << "\nThere was an error obtaining the WNS Channel URI" << std::endl;

                    if (remoteId == winrt::guid{ "00000000-0000-0000-0000-000000000000" })
                    {
                        std::cout << "\nThe ObjectID has not been set. Refer to the readme file accompanying this sample\nfor the instructions on how to obtain and setup an ObjectID" << std::endl;
                    }
                }

                std::cout << "\nPress 'Enter' at any time to exit App." << std::endl;
                std::cin.ignore();
            }
            else
            {
                std::cout << "Push notifications are NOT supported on this device." << std::endl;
                std::cout << "App implements its own custom socket here to receive messages from the cloud since Push APIs are unsupported." << std::endl;
                std::cin.ignore();
            }
        }
        break;

        case ExtendedActivationKind::Push:
        {
            std::cout << "App activated via push notification." << std::endl;
            PushNotificationReceivedEventArgs pushArgs{ args.Data().as<PushNotificationReceivedEventArgs>() };

            // Call GetDeferral to ensure that code runs in low power
            auto deferral{ pushArgs.GetDeferral() };

            auto payload{ pushArgs.Payload() };

            // Do stuff to process the raw notification payload
            std::string payloadString(payload.begin(), payload.end());
            std::cout << "\nPush notification content received in the BACKGROUND: " << payloadString.c_str() << std::endl;
            std::cout << "\nPress 'Enter' to exit the App." << std::endl;

            // Call Complete on the deferral when finished processing the payload.
            // This removes the override that kept the app running even when the system was in a low power mode.

            deferral.Complete();
            std::cin.ignore();
        }
        break;

        default:
            std::cout << "\nUnexpected activation type" << std::endl;
            std::cout << "\nPress 'Enter' to exit the App." << std::endl;
            std::cin.ignore();
            break;
    }
}
步骤 6:生成并安装应用
使用 Visual Studio 生成和安装应用。 右键单击解决方案资源管理器中的解决方案文件,然后选择“ 部署”。 Visual Studio 将生成应用并将其安装在计算机上。 可以通过“开始”菜单或 Visual Studio 调试器启动应用来运行应用。
教程代码的控制台如下所示:

需要令牌才能向 应用发送推送通知。
向应用发送推送通知
此时,所有配置都已完成,WNS 服务器可以将推送通知发送到客户端应用。 在以下步骤中,请参阅 推送通知服务器请求和响应标头 以获取更多详细信息。
步骤 1:请求访问令牌
若要发送推送通知,WNS 服务器首先需要请求访问令牌。 使用 Azure TenantId、Azure AppId 和机密发送 HTTP POST 请求。 有关获取 Azure 租户 ID 和应用程序 ID 的信息,请参阅 获取用于登录的租户 ID 和应用程序 ID 值。
HTTP 示例请求:
POST /{tenantID}/oauth2/v2.0/token Http/1.1
Host: login.microsoftonline.com
Content-Type: application/x-www-form-urlencoded
Content-Length: 160

grant_type=client_credentials&client_id=<Azure_App_Registration_AppId_Here>&client_secret=<Azure_App_Registration_Secret_Here>&scope=https://wns.windows.com/.default/
C# 示例请求:
//Sample C# Access token request
var client = new RestClient("https://login.microsoftonline.com/{tenantID}/oauth2/v2.0");
var request = new RestRequest("/token", Method.Post);
request.AddHeader("Content-Type", "application/x-www-form-urlencoded");
request.AddParameter("grant_type", "client_credentials");
request.AddParameter("client_id", "[Your app's Azure AppId]");
request.AddParameter("client_secret", "[Your app's secret]");
request.AddParameter("scope", "https://wns.windows.com/.default");
RestResponse response = await client.ExecutePostAsync(request);
Console.WriteLine(response.Content);
如果请求成功,将收到一个响应,其中包含 access_token 字段中的令牌。
{
    "token_type":"Bearer",
    "expires_in":"86399",
    "ext_expires_in":"86399",
    "expires_on":"1653771789",
    "not_before":"1653685089",
    "access_token":"[your access token]"
}
步骤 2. 发送原始通知
创建一个 HTTP POST 请求,其中包含在上一步中获取的访问令牌和要发送的推送通知的内容。 推送通知的内容将传送到应用。
POST /?token=[The token query string parameter from your channel URL. E.g. AwYAAABa5cJ3...] HTTP/1.1
Host: dm3p.notify.windows.com
Content-Type: application/octet-stream
X-WNS-Type: wns/raw
Authorization: Bearer [your access token]
Content-Length: 46

{ Sync: "Hello from the Contoso App Service" }
var client = new RestClient("[Your channel URL. E.g. https://wns2-by3p.notify.windows.com/?token=AwYAAABa5cJ3...]");
var request = new RestRequest();
request.Method = Method.Post;
request.AddHeader("Content-Type", "application/octet-stream");
request.AddHeader("X-WNS-Type", "wns/raw");
request.AddHeader("Authorization", "Bearer [your access token]");
request.AddBody("Notification body");
RestResponse response = await client.ExecutePostAsync(request);");
步骤 3:发送云源应用通知
如果只想发送原始通知,请忽略此步骤。 若要发送云源应用通知(也称为推送 Toast 通知),请先遵循 快速入门:Windows 应用 SDK 中的应用通知。 应用通知可以推送(从云发送)或在本地发送。 发送基于云的应用通知类似于在 步骤 2中发送原始通知,但与此不同的是,X-WNS-Type 标头需要 toast,Content-Type 需要 text/xml,并且内容包含应用通知 XML 有效负载。 有关如何构造 XML 有效负载的详细信息,请参阅 通知 XML 架构 。
创建一个 HTTP POST 请求,其中包含访问令牌和要发送的云源应用通知的内容。 推送通知的内容将传送到应用。
POST /?token=AwYAAAB%2fQAhYEiAESPobjHzQcwGCTjHu%2f%2fP3CCNDcyfyvgbK5xD3kztniW%2bjba1b3aSSun58SA326GMxuzZooJYwtpgzL9AusPDES2alyQ8CHvW94cO5VuxxLDVzrSzdO1ZVgm%2bNSB9BAzOASvHqkMHQhsDy HTTP/1.1
Host: dm3p.notify.windows.com
Content-Type: text/xml
X-WNS-Type: wns/toast
Authorization: Bearer [your access token]
Content-Length: 180

<toast><visual><binding template="ToastGeneric"><text>Example cloud toast notification</text><text>This is an example cloud notification using XML</text></binding></visual></toast>
var client = new RestClient("https://dm3p.notify.windows.com/?token=AwYAAAB%2fQAhYEiAESPobjHzQcwGCTjHu%2f%2fP3CCNDcyfyvgbK5xD3kztniW%2bjba1b3aSSun58SA326GMxuzZooJYwtpgzL9AusPDES2alyQ8CHvW94cO5VuxxLDVzrSzdO1ZVgm%2bNSB9BAzOASvHqkMHQhsDy");
client.Timeout = -1;

var request = new RestRequest(Method.POST);
request.AddHeader("Content-Type", "text/xml");
request.AddHeader("X-WNS-Type", "wns/toast");
request.AddHeader("Authorization", "Bearer <AccessToken>");
request.AddParameter("text/xml", "<toast><visual><binding template=\"ToastGeneric\"><text>Example cloud toast notification</text><text>This is an example cloud notification using XML</text></binding></visual></toast>",  ParameterType.RequestBody);
Console.WriteLine(response.Content);
