培训
学习路径
在 Power Apps 中创建画布应用 - Training
是否想创建应用来帮助您的企业提高效率? 如果答案是肯定的,那么这一学习路径就非常适合您。 它向您介绍了 Power Apps,可帮助您创建和自定义应用,然后管理和分发该应用。
可以使用画笔通过图形设备界面 (GDI) 函数绘制几乎任何形状的内部。 这包括矩形、椭圆形、多边形和路径的内部。 根据应用程序的要求,可以使用指定颜色的纯色画笔、库存画笔、阴影画笔或图案画笔。
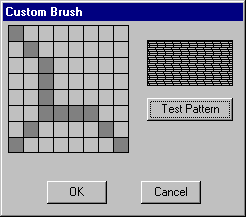
本部分包含演示如何创建自定义画笔对话框的代码示例。 对话框包含一个网格,表示系统用作画笔的位图。 用户可以使用此网格创建图案画笔位图,然后通过单击“ 测试模式 ”按钮查看自定义模式。
下图显示了使用“ 自定义画笔 ”对话框创建的模式。

若要显示对话框,必须先创建对话框模板。 以下对话框模板定义 “自定义画笔 ”对话框。
CustBrush DIALOG 6, 18, 160, 118
STYLE WS_DLGFRAME | WS_POPUP | WS_VISIBLE | WS_CAPTION
CAPTION "Custom Brush"
FONT 8, "MS Sans Serif"
BEGIN
    CONTROL         "", IDD_GRID, "Static", SS_BLACKFRAME |
                    WS_CHILD, 3, 2, 83, 79
    CONTROL         "", IDD_RECT, "Static", SS_BLACKFRAME |
                    WS_CHILD, 96, 11, 57, 28
    PUSHBUTTON      "Test Pattern", IDD_PAINTRECT, 96, 47, 57, 14
    PUSHBUTTON      "OK", IDD_OK, 29, 98, 40, 14
    PUSHBUTTON      "Cancel", IDD_CANCEL, 92, 98, 40, 14
END
“自定义画笔”对话框包含五个控件:位图网格窗口、模式查看窗口和三个按钮,标记为“测试模式”、“确定”和“取消”。 “ 测试模式 ”按钮使用户能够查看模式。 对话框模板指定对话框窗口的总体尺寸,为每个控件分配一个值,指定每个控件的位置,等等。 有关详细信息,请参阅 对话框。
对话框模板中的控件值是在应用程序的头文件中定义的常量,如下所示。
#define IDD_GRID      120
#define IDD_RECT      121
#define IDD_PAINTRECT 122
#define IDD_OK        123
#define IDD_CANCEL    124
创建对话框模板并将其包含在应用程序的资源定义文件中后,必须编写对话过程。 此过程处理系统发送到对话框的消息。 以下应用程序源代码的摘录显示了“ 自定义画笔 ”对话框的对话框过程及其调用的两个应用程序定义函数。
BOOL CALLBACK BrushDlgProc( HWND hdlg, UINT message, LONG wParam,
                            LONG lParam)
{
    static HWND hwndGrid;       // grid-window control
    static HWND hwndBrush;      // pattern-brush control
    static RECT rctGrid;        // grid-window rectangle
    static RECT rctBrush;       // pattern-brush rectangle
    static UINT bBrushBits[8];  // bitmap bits
    static RECT rect[64];       // grid-cell array
    static HBITMAP hbm;         // bitmap handle
    HBRUSH hbrush;              // current brush
    HBRUSH hbrushOld;           // default brush
    HRGN hrgnCell;              // test-region handle
    HDC hdc;                    // device context (DC) handle
    int x, y, deltaX, deltaY;   // drawing coordinates
    POINTS ptlHit;              // mouse coordinates
    int i;                      // count variable

    switch (message)
        {
        case WM_INITDIALOG:

            // Retrieve a window handle for the grid-window and
            // pattern-brush controls.

            hwndGrid = GetDlgItem(hdlg, IDD_GRID);
            hwndBrush = GetDlgItem(hdlg, IDD_RECT);

            // Initialize the array of bits that defines the
            // custom brush pattern with the value 1 to produce a
            // solid white brush.

            for (i=0; i<8; i++)
                bBrushBits[i] = 0xFF;

            // Retrieve dimensions for the grid-window and pattern-
            // brush controls.

            GetClientRect(hwndGrid, &rctGrid);
            GetClientRect(hwndBrush, &rctBrush);

            // Determine the width and height of a single cell.

            deltaX = (rctGrid.right - rctGrid.left)/8;
            deltaY = (rctGrid.bottom - rctGrid.top)/8;

            // Initialize the array of cell rectangles.

            for (y=rctGrid.top, i=0; y < rctGrid.bottom; y += deltaY)
            {
                for(x=rctGrid.left; x < (rctGrid.right - 8) && i < 64;
                        x += deltaX, i++)
                {
                    rect[i].left = x; rect[i].top = y;
                    rect[i].right = x + deltaX;
                    rect[i].bottom = y + deltaY;
                }
            }
            return FALSE;


        case WM_PAINT:

            // Draw the grid.

            hdc = GetDC(hwndGrid);

            for (i=rctGrid.left; i<rctGrid.right;
                 i+=(rctGrid.right - rctGrid.left)/8)
            {
                 MoveToEx(hdc, i, rctGrid.top, NULL);
                 LineTo(hdc, i, rctGrid.bottom);
            }
            for (i=rctGrid.top; i<rctGrid.bottom;
                 i+=(rctGrid.bottom - rctGrid.top)/8)
            {
                 MoveToEx(hdc, rctGrid.left, i, NULL);
                 LineTo(hdc, rctGrid.right, i);
            }
            ReleaseDC(hwndGrid, hdc);
            return FALSE;


        case WM_LBUTTONDOWN:

            // Store the mouse coordinates in a POINT structure.

            ptlHit = MAKEPOINTS((POINTS FAR *)lParam);

            // Create a rectangular region with dimensions and
            // coordinates that correspond to those of the grid
            // window.

            hrgnCell = CreateRectRgn(rctGrid.left, rctGrid.top,
                        rctGrid.right, rctGrid.bottom);

            // Retrieve a window DC for the grid window.

            hdc = GetDC(hwndGrid);

            // Select the region into the DC.

            SelectObject(hdc, hrgnCell);

            // Test for a button click in the grid-window rectangle.

            if (PtInRegion(hrgnCell, ptlHit.x, ptlHit.y))
            {
                // A button click occurred in the grid-window
                // rectangle; isolate the cell in which it occurred.

                for(i=0; i<64; i++)
                {
                    DeleteObject(hrgnCell);

                    hrgnCell = CreateRectRgn(rect[i].left,
                               rect[i].top,
                               rect[i].right, rect[i].bottom);

                    if (PtInRegion(hrgnCell, ptlHit.x, ptlHit.y))
                    {
                        InvertRgn(hdc, hrgnCell);

                        // Set the appropriate brush bits.

                         if (i % 8 == 0)
                            bBrushBits[i/8] = bBrushBits[i/8] ^ 0x80;
                         else if (i % 8 == 1)
                            bBrushBits[i/8] = bBrushBits[i/8] ^ 0x40;
                         else if (i % 8 == 2)
                            bBrushBits[i/8] = bBrushBits[i/8] ^ 0x20;
                         else if (i % 8 == 3)
                            bBrushBits[i/8] = bBrushBits[i/8] ^ 0x10;
                         else if (i % 8 == 4)
                            bBrushBits[i/8] = bBrushBits[i/8] ^ 0x08;
                         else if (i % 8 == 5)
                            bBrushBits[i/8] = bBrushBits[i/8] ^ 0x04;
                         else if (i % 8 == 6)
                            bBrushBits[i/8] = bBrushBits[i/8] ^ 0x02;
                         else if (i % 8 == 7)
                            bBrushBits[i/8] = bBrushBits[i/8] ^ 0x01;

                      // Exit the "for" loop after the bit is set.

                         break;
                    } // end if

                } // end for

            } // end if

            // Release the DC for the control.

            ReleaseDC(hwndGrid, hdc);
            return TRUE;


        case WM_COMMAND:
            switch (wParam)
            {
               case IDD_PAINTRECT:

                    hdc = GetDC(hwndBrush);

                    // Create a monochrome bitmap.

                    hbm = CreateBitmap(8, 8, 1, 1,
                          (LPBYTE)bBrushBits);

                    // Select the custom brush into the DC.

                    hbrush = CreatePatternBrush(hbm);

                    hbrushOld = SelectObject(hdc, hbrush);

                    // Use the custom brush to fill the rectangle.

                    Rectangle(hdc, rctBrush.left, rctBrush.top,
                              rctBrush.right, rctBrush.bottom);

                    // Clean up memory.
                    SelectObject(hdc, hbrushOld);
                    DeleteObject(hbrush);
                    DeleteObject(hbm);

                    ReleaseDC(hwndBrush, hdc);
                    return TRUE;

                case IDD_OK:

                case IDD_CANCEL:
                    EndDialog(hdlg, TRUE);
                    return TRUE;

            } // end switch
            break;
        default:
            return FALSE;
        }
}


int GetStrLngth(LPTSTR cArray)
{
    int i = 0;

    while (cArray[i++] != 0);
    return i-1;

}

DWORD RetrieveWidth(LPTSTR cArray, int iLength)
{
    int i, iTmp;
    double dVal, dCount;

    dVal = 0.0;
    dCount = (double)(iLength-1);
    for (i=0; i<iLength; i++)
    {
        iTmp = cArray[i] - 0x30;
        dVal = dVal + (((double)iTmp) * pow(10.0, dCount--));
    }

    return (DWORD)dVal;
}
自定义画笔对话框的对话框过程处理四条消息,如下表所述。
| 消息 | 操作 |
|---|---|
| WM_INITDIALOG | 检索网格窗口和图案画笔控件的窗口句柄和维度,计算网格窗口控件中单个单元格的维度,并初始化网格单元格坐标数组。 |
| WM_PAINT | 在网格窗口控件中绘制网格模式。 |
| WM_LBUTTONDOWN | 确定当用户按下鼠标左键时光标是否在网格窗口控件中。 如果是这样,对话框过程将反转相应的网格单元格,并在用于为自定义画笔创建位图的位数组中记录该单元格的状态。 |
| WM_COMMAND | 处理三个按钮控件的输入。 如果用户单击“ 测试模式 ”按钮,则对话框过程使用新的自定义画笔模式绘制“测试模式”控件。 如果用户单击“ 确定” 或“ 取消 ”按钮,对话框过程将执行相应的操作。 |
有关消息和消息处理的详细信息,请参阅 消息和消息队列。
编写对话框过程后,在应用程序的头文件中包含该过程的函数定义,然后在应用程序的相应点调用对话框过程。
应用程序头文件中的以下摘录显示了对话框过程的函数定义以及它调用的两个函数。
BOOL CALLBACK BrushDlgProc(HWND, UINT, WPARAM, LPARAM);
int GetStrLngth(LPTSTR);
DWORD RetrieveWidth(LPTSTR, int);
最后,以下代码演示如何从应用程序的源代码文件调用对话框过程。
    DialogBox((HANDLE)GetModuleHandle(NULL),
        (LPTSTR)"CustBrush",
        hWnd,
        (DLGPROC) BrushDlgProc);
此调用通常是为了响应用户从应用程序的菜单中选择一个选项。
培训
学习路径
在 Power Apps 中创建画布应用 - Training
是否想创建应用来帮助您的企业提高效率? 如果答案是肯定的,那么这一学习路径就非常适合您。 它向您介绍了 Power Apps,可帮助您创建和自定义应用,然后管理和分发该应用。