教學課程:使用 Firebase SDK 0.6 將推播通知傳送至 Android 裝置
本教學課程說明如何使用 Azure 通知中樞和 Firebase 雲端通訊 (FCM) SDK 0.6 版,將推播通知傳送到 Android 應用程式。 在本教學課程中,您會建立空白的 Android 應用程式,其可使用 Firebase 雲端通訊 (FCM) 接收推播通知。
重要
Google 將於 2024 年 6 月 20 日停止支援 FCM 舊版 HTTP。 如需詳細資訊,請參閱 Azure 通知中樞和 Google Firebase 雲端通訊移轉。
您可以從 GitHub 下載本教學課程的完整程式碼。
在本教學課程中,您會執行下列步驟:
- 建立 Android Studio 專案。
- 建立支援 Firebase 雲端通訊的 Firebase 專案。
- 建立中樞。
- 將應用程式連線至中樞。
- 測試應用程式。
必要條件
若要完成此教學課程,您必須具備有效的 Azure 帳戶。 如果您沒有帳戶,只需要幾分鐘的時間就可以建立免費試用帳戶。 如需詳細資料,請參閱 Azure 免費試用。
您也需要下列項目:
- 最新版的 Android Studio
- 適用於 Firebase 雲端通訊的 Android 2.3 或更新版本
- 適用於 Firebase 雲端通訊的 Google Repository 修訂版本 27 或更新版本
- 適用於 Firebase 雲端通訊的 Google Play Services 9.0.2 或更新版本
完成本教學課程是進行 Android app 所有其他通知中樞教學課程的先決條件。
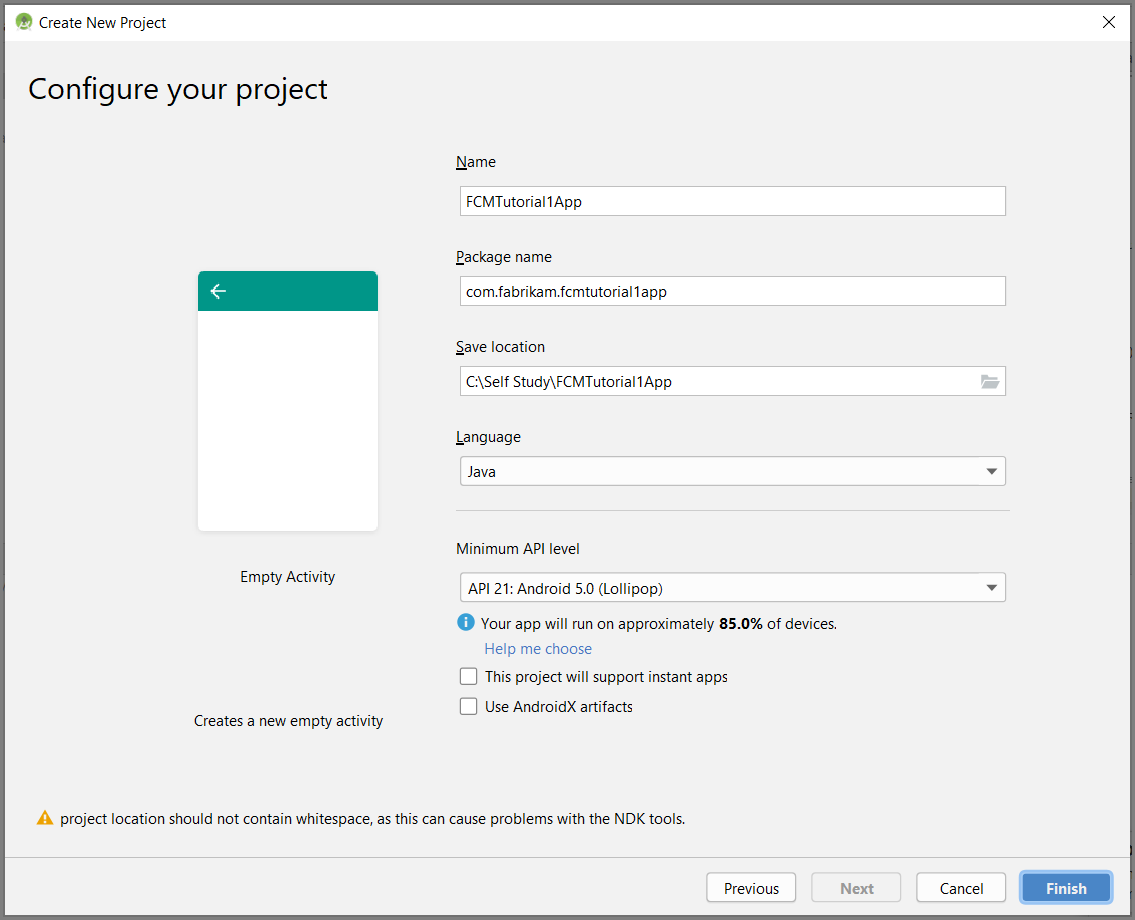
建立 Android Studio 專案
- 啟動 Android Studio。
- 選取 [檔案],指向 [新增],然後選取 [新增專案]。
- 在 [選擇您的專案] 頁面上,選取 [空的活動],然後選取 [下一步]。
- 在 [設定您的專案] 頁面上,採取下列步驟:
輸入應用程式的名稱。
指定要用來儲存專案檔的位置。
選取 [完成]。
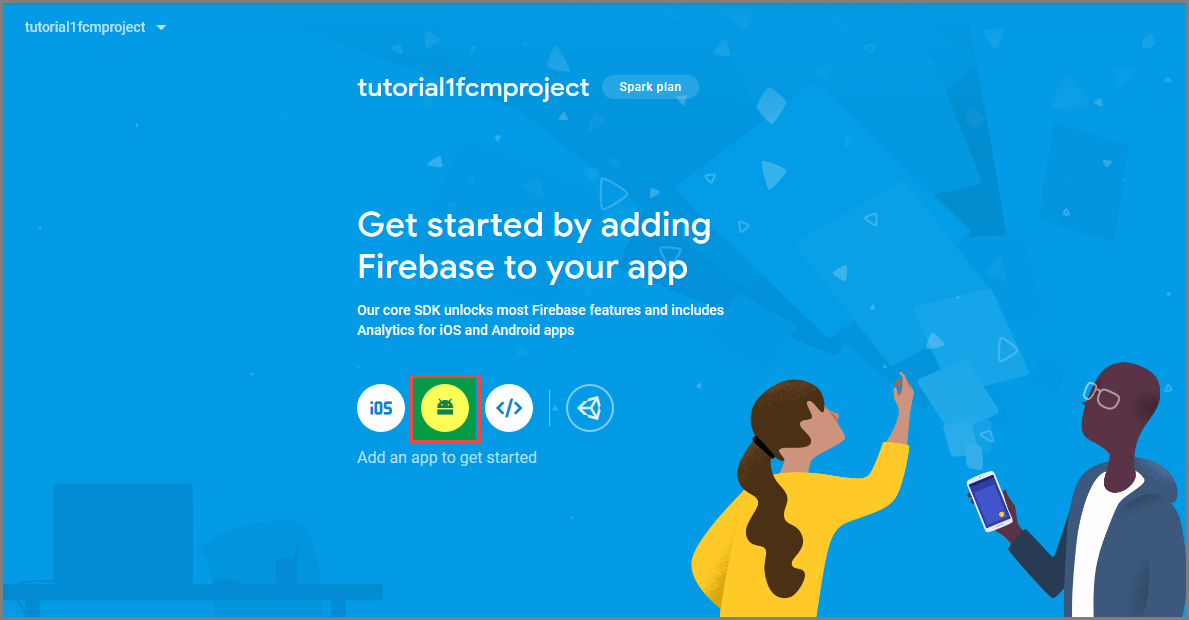
建立支援 FCM 的 Firebase 專案
登入 Firebase 主控台。 建立新的 Firebase 專案 (如果您還沒有 Firebase 專案的話)。
建立專案之後,請選取 [將 Firebase 新增至 Android 應用程式]。
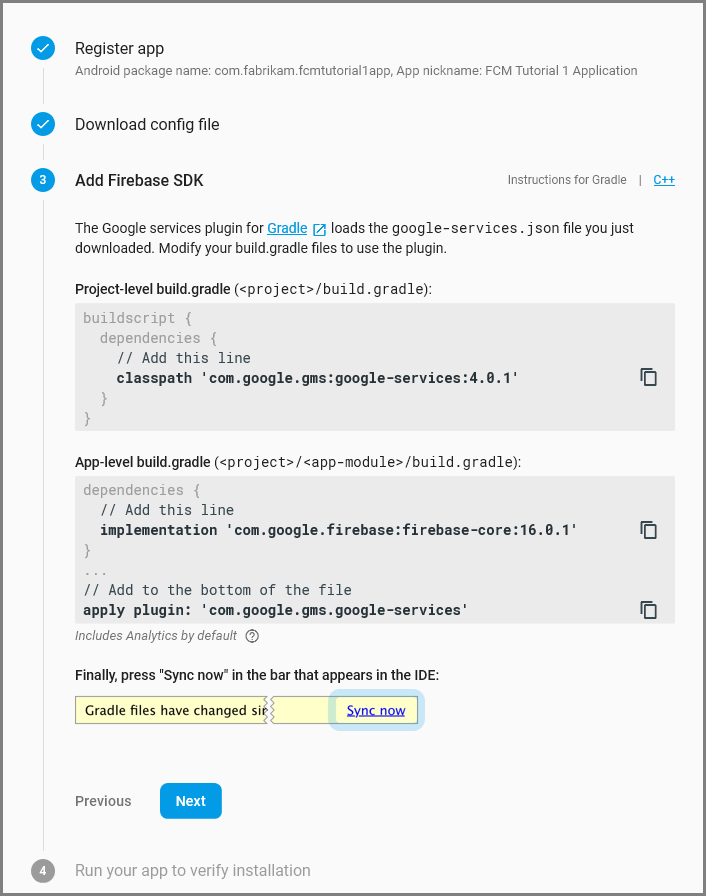
在 [將 Firebase 新增至 Android 應用程式] 頁面上,採取下列步驟:
對於 [Android 套件名稱],複製應用程式 build.gradle 檔案的 applicationId 值。 在此範例中為
com.fabrikam.fcmtutorial1app。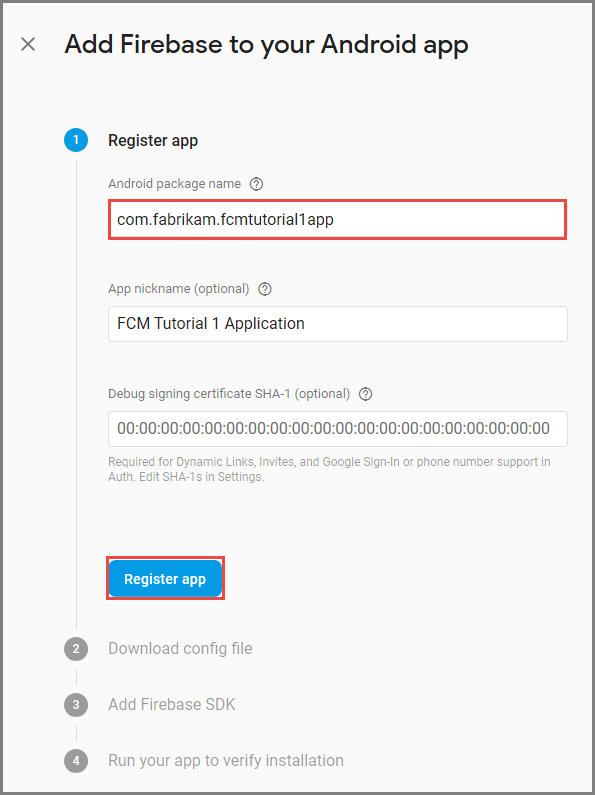
選取 [註冊應用程式]。
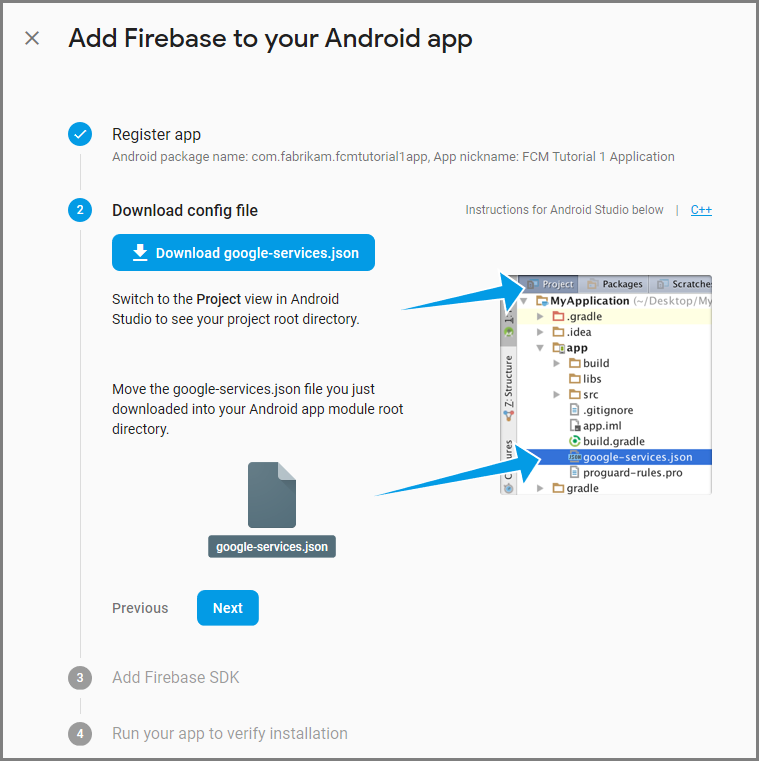
選取 [下載 google-services.json],將檔案儲存到專案的應用程式資料夾,然後選取 [下一步]。
在 Android Studio 中對於專案進行下列設定變更。
在專案層級 build.gradle 檔案 (<project>/build.gradle) 中,將下列陳述式新增至 [相依性] 區段。
classpath 'com.google.gms:google-services:4.0.1'在應用程式層級 build.gradle 檔案 (<project>/<app-module>/build.gradle) 中,將下列陳述式新增至 dependencies 區段。
implementation 'com.google.firebase:firebase-core:16.0.8'
implementation 'com.google.firebase:firebase-messaging:17.3.4'
將下行新增至應用程式層級 build.gradle 檔案結尾的相依性區段之後。
apply plugin: 'com.google.gms.google-services'在工具列上選取 [立即同步]。
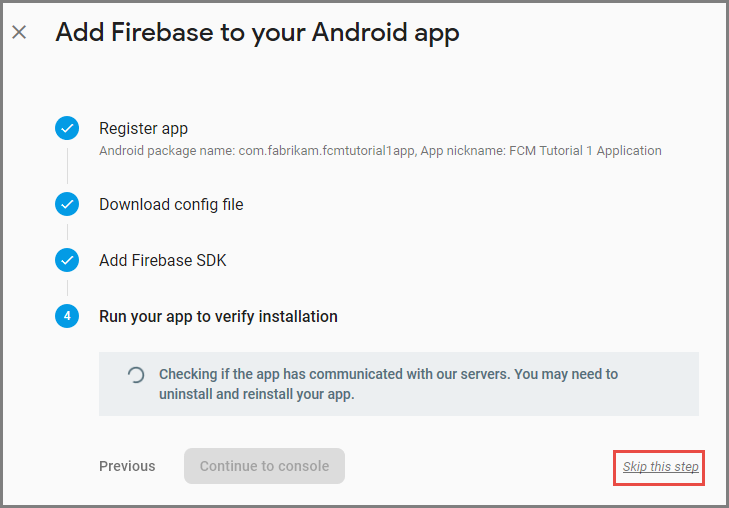
選取 [下一步]。
選取 [略過此步驟]。
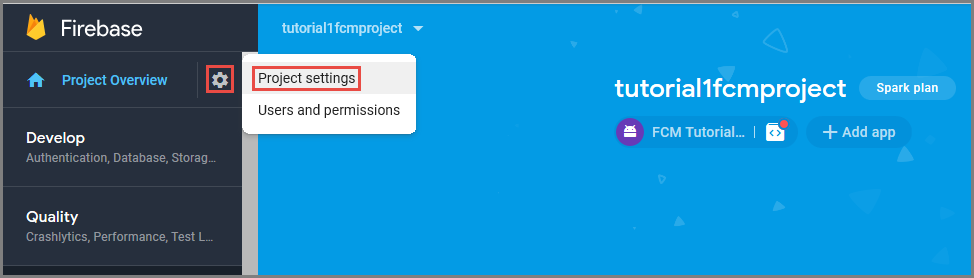
在 Firebase 主控台中,選取您專案的齒輪圖示。 然後選取 [專案設定]。
如果您尚未將 google-services.json 檔案下載到 Android Studio 專案的 app 資料夾,可以在此頁面下載。
切換到頂端的 [雲端通訊] 索引標籤。
複製並儲存伺服器金鑰以供稍後使用。 您可以使用此值來設定中樞。
如果您在 [Firebase Cloud Messaging] 索引標籤上看不到 [伺服器金鑰],則請遵循下列其他步驟。
- 按一下 [Cloud Messaging API (舊版) 🚫 已停用] 標題的三點功能表
- 遵循提供的連結以「在 Google Cloud Console 中管理 API」。
- 在 Google Cloud 主控台中,按可啟用 googlecloudmessaging API 的按鈕。
- 請等待數分鐘。
- 返回 Firebase 主控台專案 [Cloud Messaging] 索引標籤,然後重新整理頁面。
- 查看 Cloud Messaging API 標頭已變更為 [Cloud Messaging API (舊版) ✅ 已啟用],而且現在會顯示 [伺服器金鑰]。
![顯示 [啟用雲端傳訊 API (舊版)] 索引標籤的螢幕擷取畫面。](../includes/media/notification-hubs-enable-firebase-cloud-messaging/notification-hubs-enable-firebase-cloud-messaging-legacy-api.png)
設定中樞
登入 Azure 入口網站。
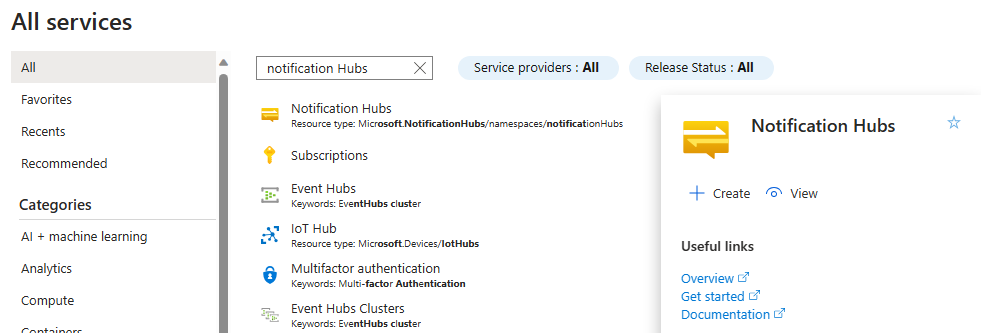
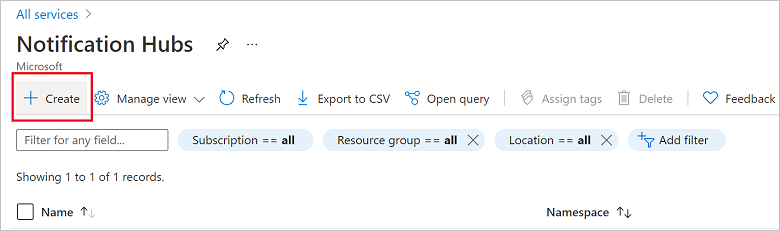
選取左側功能表上的 [所有服務]。
![顯示針對現有命名空間選取 [所有服務] 的螢幕擷取畫面。](media/create-notification-hub-portal/select-all-services.png)
在 [篩選服務] 文字輸入框中,輸入 [通知中樞]。 選取服務名稱旁邊的星號圖示,將服務加到左功能表上的 [我的最愛] 區段。 選取 [通知中樞]。
在 [通知中樞] 頁面上,選取工具列上的 [建立]。
在 [通知中樞] 頁面的 [基本] 索引標籤中,執行下列步驟:
在 [訂用帳戶] 中,選取您想要使用的 Azure 訂用帳戶名稱,然後選取現有資源群組,或建立新的訂用帳戶。
在 [命名空間詳細資料] 中,輸入新命名空間的唯一名稱。
命名空間包含一或多個通知中樞,因此請在 [通知中樞詳細資料] 中輸入中樞的名稱。
從 [位置] 下拉式清單方塊選取值。 此值會指定您要在其中建立中樞的位置。

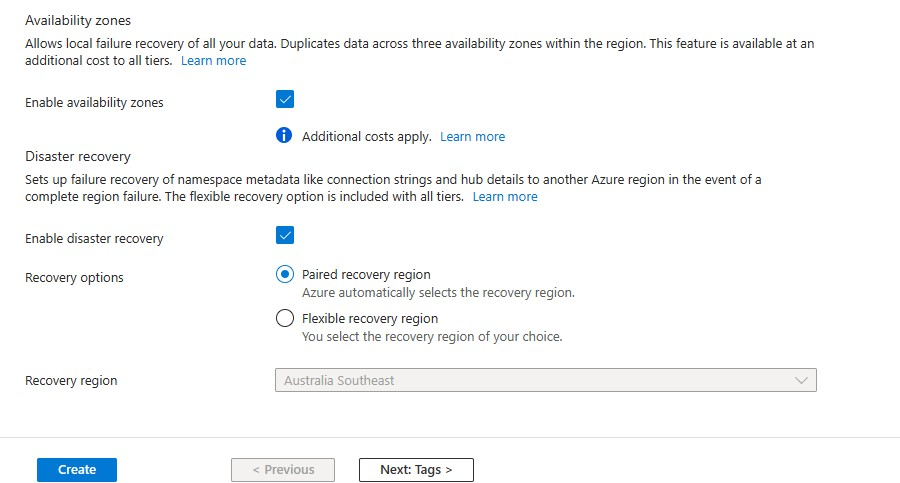
檢閱 [可用性區域] 選項。 如果您選擇具有可用性區域的區域,預設會選取核取方塊。 可用性區域是付費功能,因此會將額外的費用新增至您的階層。
選擇您的 [災害復原] 選項:[無]、[配對復原區域] 或 [彈性復原區域]。 如果您選擇 [配對復原區域],就會顯示容錯移轉區域。 如果您選取 [彈性復原區域],請使用下拉式清單從復原區域清單中選擇。
選取 建立。
部署完成後,請選取 [移至資源]。


設定中樞的 Firebase 雲端通訊設定
在左窗格的 [設定] 下方,選取 [Google (GCM/FCM)]。
針對您稍早儲存的 FCM 專案,輸入其伺服器金鑰。
在工具列上,選取 [儲存]。
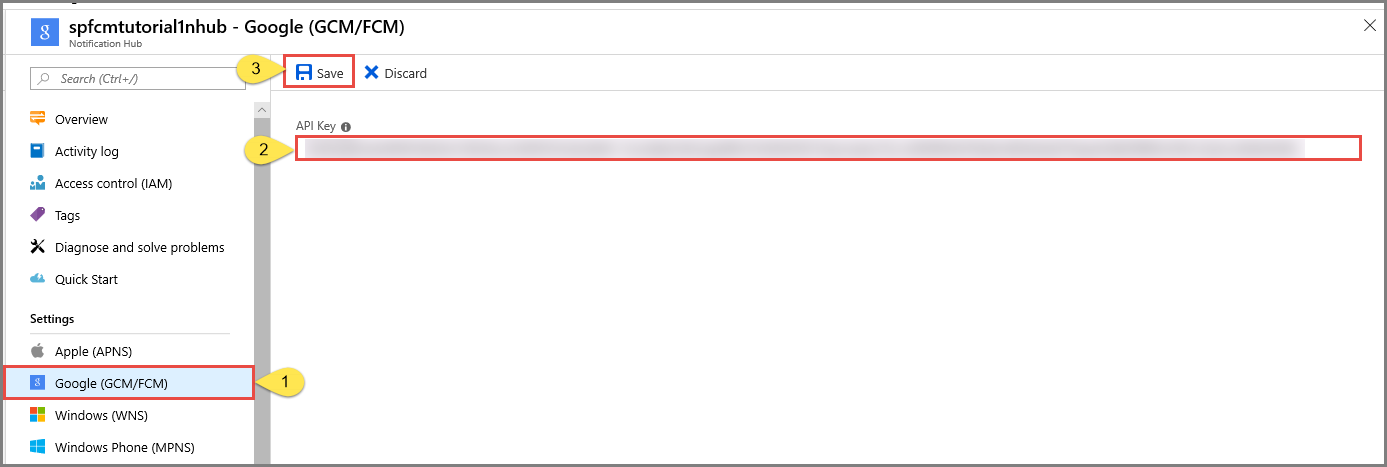
Azure 入口網站會在警示中顯示訊息來指出中樞的更新已成功。 [儲存] 按鈕已停用。
您的中樞現在已設定為與 Firebase 雲端通訊搭配使用。 您也擁有了所需的連接字串,而可將通知傳送給裝置並註冊應用程式來接收通知。
將您的應用程式連接到通知中樞
新增 Google Play 服務至專案
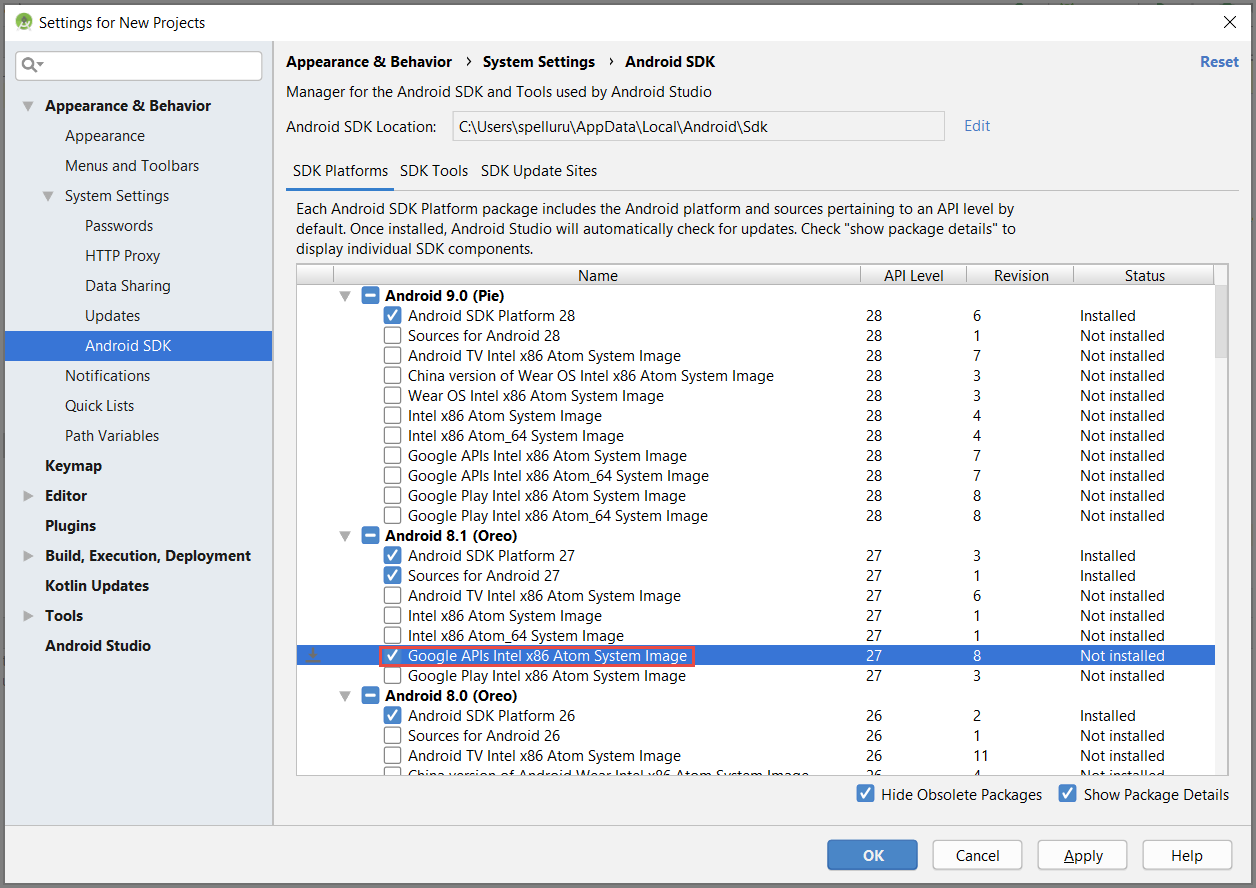
在 Android Studio 中,選取功能表上的 [工具],然後選取 [SDK 管理員]。
選取您專案中使用的 Android SDK 目標版本。 然後選取 [顯示套件詳細資料]。
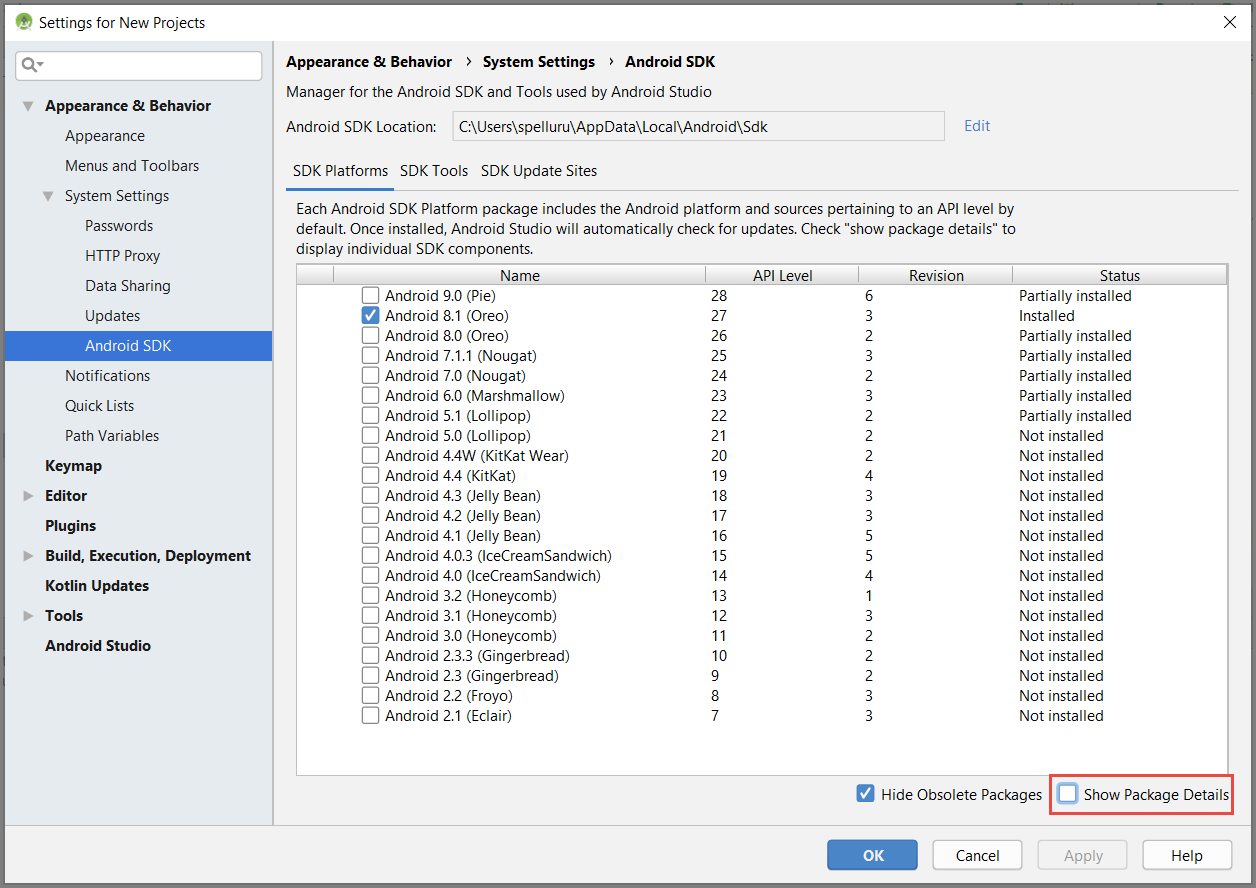
如果尚未安裝 [Google API],請加以選取。
切換到 [SDK 工具] 索引標籤。如果您尚未安裝 Google Play Services,請選取 [Google Play Services],如下圖所示。 然後選取 [套用] 來安裝。 請注意在稍後步驟中使用的 SDK 路徑。
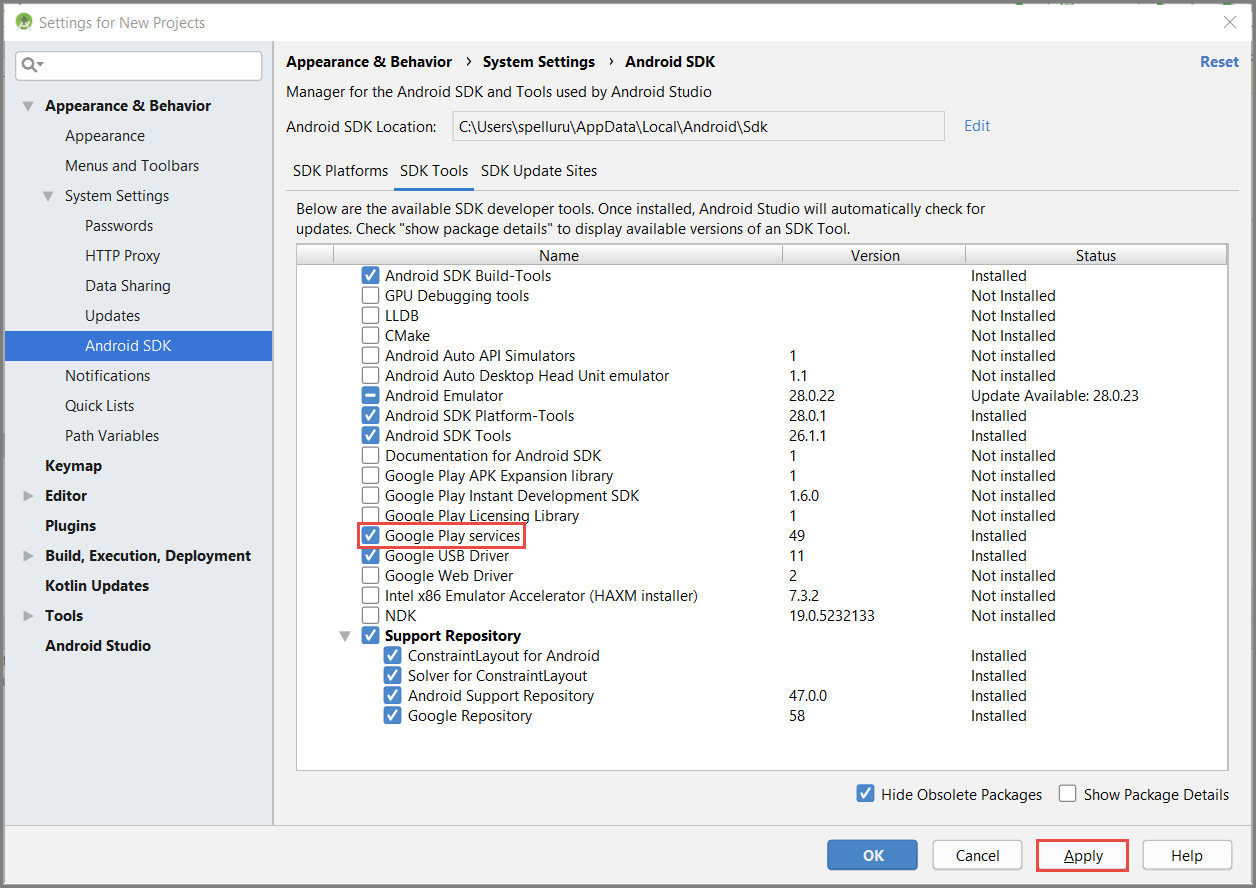
如果您看到 [確認變更] 對話方塊,請選取 [確定]。 元件安裝程式會安裝要求的元件。 在元件安裝完成後選取 [完成]。
選取 [確定] 以關閉 [新專案的設定] 對話方塊。
開啟 AndroidManifest.xml 檔案,然後在application標籤中新增下列標籤。
<meta-data android:name="com.google.android.gms.version"
     android:value="@integer/google_play_services_version" />
新增 Azure 通知中樞程式庫
在應用程式的 Build.Gradle 檔案中,於 [相依性] 區段中新增下列幾行。
implementation 'com.microsoft.azure:notification-hubs-android-sdk:0.6@aar'將下列存放庫新增到 dependencies 區段之後。
repositories {
    maven {
        url "https://dl.bintray.com/microsoftazuremobile/SDK"
    }
}
新增 Google Firebase 支援
在應用程式的 Build.Gradle 檔案中,於 [相依性] 區段中新增下列幾行 (如果還沒有這幾行程式碼的話)。
implementation 'com.google.firebase:firebase-core:16.0.8'
implementation 'com.google.firebase:firebase-messaging:17.3.4'
implementation 'com.google.firebase:firebase-iid:21.1.0'
在檔案結尾處新增下列外掛程式 (如果尚未存在的話)。
apply plugin: 'com.google.gms.google-services'在工具列上選取 [立即同步]。
更新 AndroidManifest.xml 檔案
在收到 FCM 註冊權杖後,請將其用來向 Azure 通知中樞註冊。 您可以使用名為
RegistrationIntentService的IntentService在背景支援此註冊。 此服務也會重新整理 FCM 註冊權杖。 您也可以建立名為FirebaseService的類別作為FirebaseMessagingService的子類別,並覆寫onMessageReceived方法以接收並處理通知。將下列服務定義新增至 AndroidManifest.xml 檔案的
<application>標籤內。<service android:name=".RegistrationIntentService" android:exported="false"> </service> <service android:name=".FirebaseService" android:exported="false"> <intent-filter> <action android:name="com.google.firebase.MESSAGING_EVENT" /> </intent-filter> </service>在
</application>標籤下面新增下列必要的 FCM 相關權限。<uses-permission android:name="android.permission.INTERNET"/> <uses-permission android:name="android.permission.GET_ACCOUNTS"/> <uses-permission android:name="com.google.android.c2dm.permission.RECEIVE" />
新增程式碼
在 [專案檢視] 中,展開 [app]>[src]>[main]>[java]。 以滑鼠右鍵按一下 java 底下您的套件資料夾,並選取 [新增],然後選取 [Java 類別]。 輸入 NotificationSettings 作為名稱,然後選取 [確定]。
請務必在
NotificationSettings類別的下列程式碼中更新這兩個預留位置:HubListenConnectionString:中樞的 DefaultListenAccessSignature 連接字串。 在 Azure 入口網站上的中樞內按一下 [存取原則],即可複製該連接字串。
HubName:使用出現在 Azure 入口網站中樞頁面中的中樞名稱。
NotificationSettings程式碼︰public class NotificationSettings { public static String HubName = "<Your HubName>"; public static String HubListenConnectionString = "<Enter your DefaultListenSharedAccessSignature connection string>"; }重要
請輸入中樞的名稱和 DefaultListenSharedAccessSignature,再繼續進行。
將另一個新類別新增至名為
RegistrationIntentService的專案。 這個類別會實作IntentService介面。 此類別也會處理重新整理 GCM 權杖和向通知中樞註冊的作業。針對此類別使用下列程式碼。
import android.app.IntentService;
import android.content.Intent;
import android.content.SharedPreferences;
import android.preference.PreferenceManager;
import android.util.Log;
import com.google.android.gms.tasks.OnSuccessListener;
import com.google.firebase.iid.FirebaseInstanceId;
import com.google.firebase.iid.InstanceIdResult;
import com.microsoft.windowsazure.messaging.NotificationHub;
import java.util.concurrent.TimeUnit;

public class RegistrationIntentService extends IntentService {

    private static final String TAG = "RegIntentService";
    String FCM_token = null;

    private NotificationHub hub;

    public RegistrationIntentService() {
        super(TAG);
    }

    @Override
    protected void onHandleIntent(Intent intent) {

        SharedPreferences sharedPreferences = PreferenceManager.getDefaultSharedPreferences(this);
        String resultString = null;
        String regID = null;
        String storedToken = null;

        try {
            FirebaseInstanceId.getInstance().getInstanceId().addOnSuccessListener(new OnSuccessListener<InstanceIdResult>() {
                @Override
                public void onSuccess(InstanceIdResult instanceIdResult) {
                    FCM_token = instanceIdResult.getToken();
                    Log.d(TAG, "FCM Registration Token: " + FCM_token);
                }
            });
            TimeUnit.SECONDS.sleep(1);

            // Storing the registration ID that indicates whether the generated token has been
            // sent to your server. If it is not stored, send the token to your server.
            // Otherwise, your server should have already received the token.
            if (((regID=sharedPreferences.getString("registrationID", null)) == null)){

                NotificationHub hub = new NotificationHub(NotificationSettings.HubName,
                        NotificationSettings.HubListenConnectionString, this);
                Log.d(TAG, "Attempting a new registration with NH using FCM token : " + FCM_token);
                regID = hub.register(FCM_token).getRegistrationId();

                // If you want to use tags...
                // Refer to : https://azure.microsoft.com/documentation/articles/notification-hubs-routing-tag-expressions/
                // regID = hub.register(token, "tag1,tag2").getRegistrationId();

                resultString = "New NH Registration Successfully - RegId : " + regID;
                Log.d(TAG, resultString);

                sharedPreferences.edit().putString("registrationID", regID ).apply();
                sharedPreferences.edit().putString("FCMtoken", FCM_token ).apply();
            }

            // Check to see if the token has been compromised and needs refreshing.
           else if (!(storedToken = sharedPreferences.getString("FCMtoken", "")).equals(FCM_token)) {

                NotificationHub hub = new NotificationHub(NotificationSettings.HubName,
                        NotificationSettings.HubListenConnectionString, this);
                Log.d(TAG, "NH Registration refreshing with token : " + FCM_token);
                regID = hub.register(FCM_token).getRegistrationId();

                // If you want to use tags...
                // Refer to : https://azure.microsoft.com/documentation/articles/notification-hubs-routing-tag-expressions/
                // regID = hub.register(token, "tag1,tag2").getRegistrationId();

                resultString = "New NH Registration Successfully - RegId : " + regID;
                Log.d(TAG, resultString);

                sharedPreferences.edit().putString("registrationID", regID ).apply();
                sharedPreferences.edit().putString("FCMtoken", FCM_token ).apply();
            }

            else {
                resultString = "Previously Registered Successfully - RegId : " + regID;
            }
        } catch (Exception e) {
            Log.e(TAG, resultString="Failed to complete registration", e);
            // If an exception happens while fetching the new token or updating registration data
            // on a third-party server, this ensures that we'll attempt the update at a later time.
        }

        // Notify UI that registration has completed.
        if (MainActivity.isVisible) {
            MainActivity.mainActivity.ToastNotify(resultString);
        }
    }
}
在
MainActivity類別中,在類別宣告上面新增下列import陳述式。import com.google.android.gms.common.ConnectionResult; import com.google.android.gms.common.GoogleApiAvailability; import android.content.Intent; import android.util.Log; import android.widget.TextView; import android.widget.Toast;在類別的最上方新增下列成員。 您會使用這些欄位來檢查 Google 所建議的 Google Play 服務可用性。
public static MainActivity mainActivity;
public static Boolean isVisible = false;
private static final String TAG = "MainActivity";
private static final int PLAY_SERVICES_RESOLUTION_REQUEST = 9000;
在
MainActivity類別中,新增下列方法以檢查 Google Play 服務的可用性。/** * Check the device to make sure it has the Google Play Services APK. If * it doesn't, display a dialog box that enables users to download the APK from * the Google Play Store or enable it in the device's system settings. */ private boolean checkPlayServices() { GoogleApiAvailability apiAvailability = GoogleApiAvailability.getInstance(); int resultCode = apiAvailability.isGooglePlayServicesAvailable(this); if (resultCode != ConnectionResult.SUCCESS) { if (apiAvailability.isUserResolvableError(resultCode)) { apiAvailability.getErrorDialog(this, resultCode, PLAY_SERVICES_RESOLUTION_REQUEST) .show(); } else { Log.i(TAG, "This device is not supported by Google Play Services."); ToastNotify("This device is not supported by Google Play Services."); finish(); } return false; } return true; }在
MainActivity類別中加入下列程式碼,以在呼叫IntentService之前檢查 Google Play 服務,進而取得 FCM 註冊權杖並向中樞註冊:public void registerWithNotificationHubs() { if (checkPlayServices()) { // Start IntentService to register this application with FCM. Intent intent = new Intent(this, RegistrationIntentService.class); startService(intent); } }在
MainActivity類別的OnCreate方法中,加入下列程式碼以便在活動建立時開始註冊程序:@Override protected void onCreate(Bundle savedInstanceState) { super.onCreate(savedInstanceState); setContentView(R.layout.activity_main); mainActivity = this; registerWithNotificationHubs(); FirebaseService.createChannelAndHandleNotifications(getApplicationContext()); }為了驗證應用程式狀態及報告您的應用程式狀態,請將上述其他方法新增至
MainActivity:@Override protected void onStart() { super.onStart(); isVisible = true; } @Override protected void onPause() { super.onPause(); isVisible = false; } @Override protected void onResume() { super.onResume(); isVisible = true; } @Override protected void onStop() { super.onStop(); isVisible = false; } public void ToastNotify(final String notificationMessage) { runOnUiThread(new Runnable() { @Override public void run() { Toast.makeText(MainActivity.this, notificationMessage, Toast.LENGTH_LONG).show(); TextView helloText = (TextView) findViewById(R.id.text_hello); helloText.setText(notificationMessage); } }); }ToastNotify方法會使用 "Hello World"TextView控制項持續在應用程式中報告狀態和通知。 在 res>layout>activity_main.xml 配置中,為該控制項新增下列識別碼。android:id="@+id/text_hello"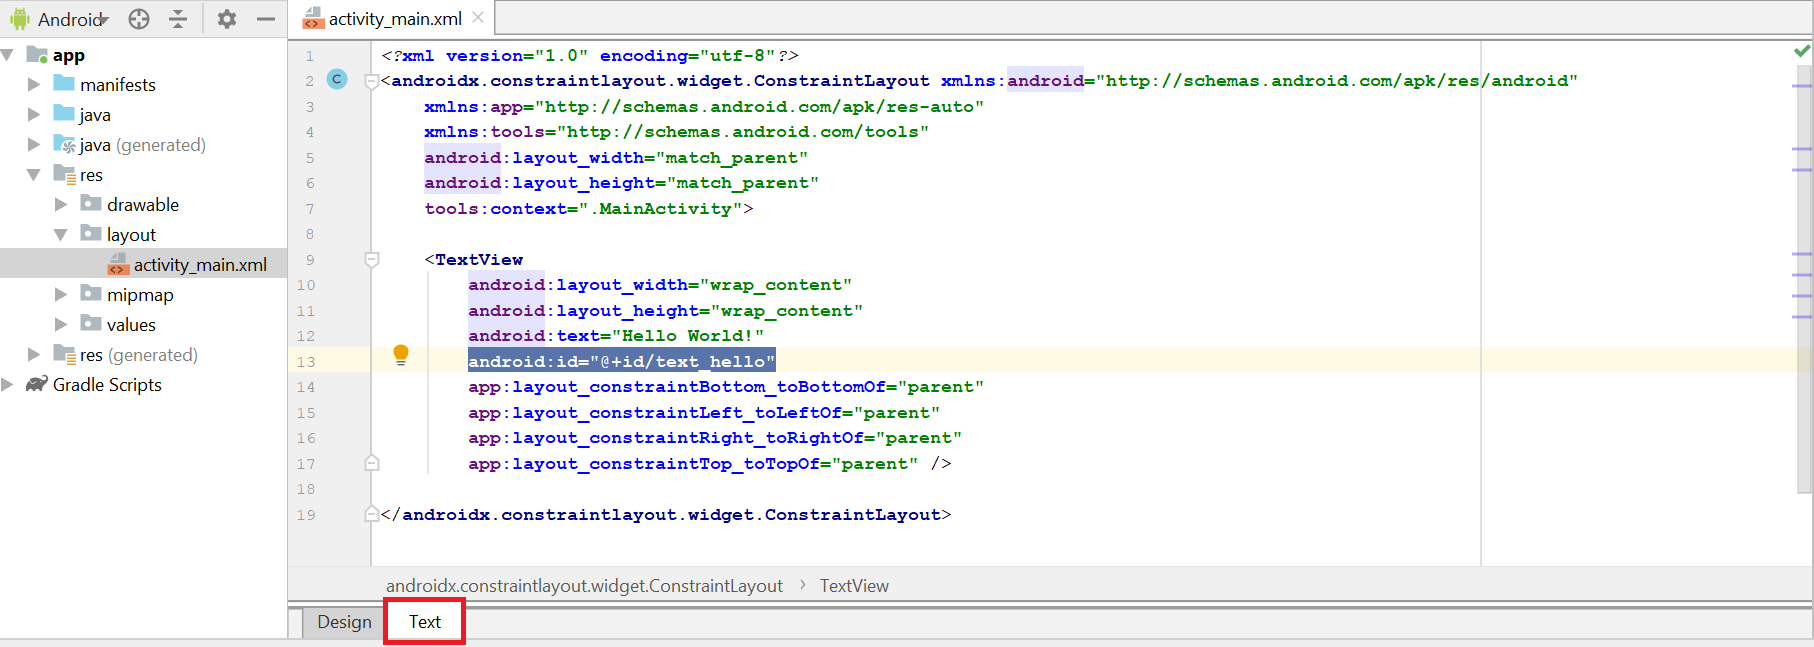
接下來,您會為 AndroidManifest.xml 中所定義的接收者新增子類別。 將另一個新類別新增至名為
FirebaseService的專案。在
FirebaseService.java頂端新增下列 import 陳述式:import com.google.firebase.messaging.FirebaseMessagingService; import com.google.firebase.messaging.RemoteMessage; import android.util.Log; import android.app.NotificationChannel; import android.app.NotificationManager; import android.app.PendingIntent; import android.content.Context; import android.content.Intent; import android.media.RingtoneManager; import android.net.Uri; import android.os.Build; import android.os.Bundle; import androidx.core.app.NotificationCompat;在
FirebaseService類別中新增下列程式碼,使其成為FirebaseMessagingService的子類別。此程式碼會覆寫
onMessageReceived方法,並報告所收到的通知。 它也會使用sendNotification()方法,將推播通知傳送給 Android 通知管理員。 當應用程式並未執行卻收到通知時,請呼叫sendNotification()方法。public class FirebaseService extends FirebaseMessagingService { private String TAG = "FirebaseService"; public static final String NOTIFICATION_CHANNEL_ID = "nh-demo-channel-id"; public static final String NOTIFICATION_CHANNEL_NAME = "Notification Hubs Demo Channel"; public static final String NOTIFICATION_CHANNEL_DESCRIPTION = "Notification Hubs Demo Channel"; public static final int NOTIFICATION_ID = 1; private NotificationManager mNotificationManager; NotificationCompat.Builder builder; static Context ctx; @Override public void onMessageReceived(RemoteMessage remoteMessage) { // ... // TODO(developer): Handle FCM messages here. // Not getting messages here? See why this may be: https://goo.gl/39bRNJ Log.d(TAG, "From: " + remoteMessage.getFrom()); String nhMessage; // Check if message contains a notification payload. if (remoteMessage.getNotification() != null) { Log.d(TAG, "Message Notification Body: " + remoteMessage.getNotification().getBody()); nhMessage = remoteMessage.getNotification().getBody(); } else { nhMessage = remoteMessage.getData().values().iterator().next(); } // Also if you intend on generating your own notifications as a result of a received FCM // message, here is where that should be initiated. See sendNotification method below. if (MainActivity.isVisible) { MainActivity.mainActivity.ToastNotify(nhMessage); } sendNotification(nhMessage); } private void sendNotification(String msg) { Intent intent = new Intent(ctx, MainActivity.class); intent.addFlags(Intent.FLAG_ACTIVITY_CLEAR_TOP); mNotificationManager = (NotificationManager) ctx.getSystemService(Context.NOTIFICATION_SERVICE); PendingIntent contentIntent = PendingIntent.getActivity(ctx, 0, intent, PendingIntent.FLAG_ONE_SHOT); Uri defaultSoundUri = RingtoneManager.getDefaultUri(RingtoneManager.TYPE_NOTIFICATION); NotificationCompat.Builder notificationBuilder = new NotificationCompat.Builder( ctx, NOTIFICATION_CHANNEL_ID) .setContentText(msg) .setPriority(NotificationCompat.PRIORITY_HIGH) .setSmallIcon(android.R.drawable.ic_popup_reminder) .setBadgeIconType(NotificationCompat.BADGE_ICON_SMALL); notificationBuilder.setContentIntent(contentIntent); mNotificationManager.notify(NOTIFICATION_ID, notificationBuilder.build()); } public static void createChannelAndHandleNotifications(Context context) { ctx = context; if (Build.VERSION.SDK_INT >= Build.VERSION_CODES.O) { NotificationChannel channel = new NotificationChannel( NOTIFICATION_CHANNEL_ID, NOTIFICATION_CHANNEL_NAME, NotificationManager.IMPORTANCE_HIGH); channel.setDescription(NOTIFICATION_CHANNEL_DESCRIPTION); channel.setShowBadge(true); NotificationManager notificationManager = context.getSystemService(NotificationManager.class); notificationManager.createNotificationChannel(channel); } } }在 Android Studio 的功能表列上,選取 [建置]>[重新建置專案],來確保程式碼中未沒有任何錯誤。 如果您收到有關
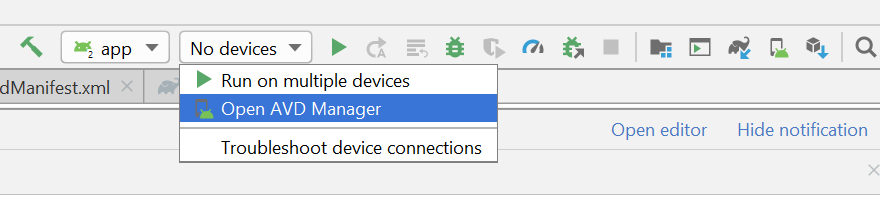
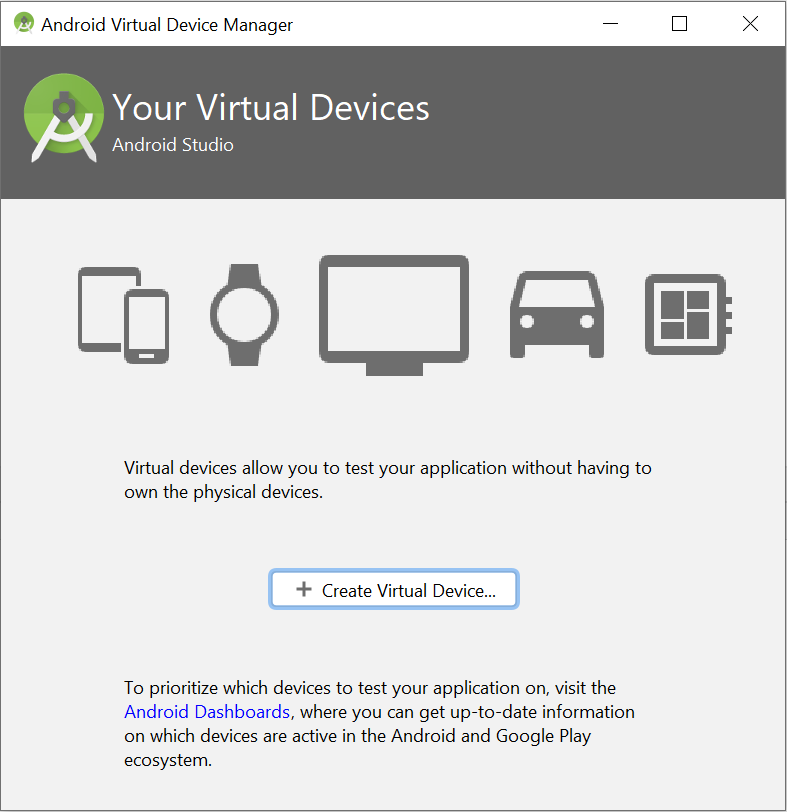
ic_launcher圖示的錯誤,請移除 AndroidManifest.xml 檔案中的下列陳述式:android:icon="@mipmap/ic_launcher"確定您有可供執行應用程式的虛擬裝置。 如果沒有,請如下所示加以新增:
在您所選的裝置上執行應用程式,並確認該應用程式已向中樞註冊成功。
注意
註冊可能會在初始啟動期間失敗,直到呼叫執行個體識別碼服務的
onTokenRefresh()方法為止。 重新整理作業應該會起始向通知中樞註冊的作業並且會成功。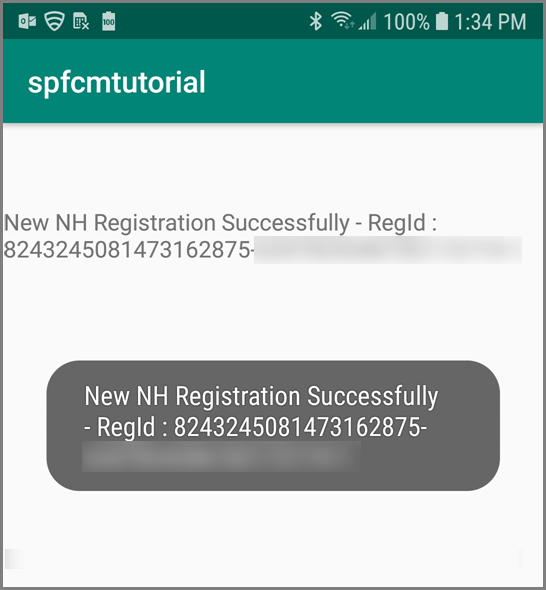
進行從通知中樞傳送通知的測試
您可以採取下列步驟,從 Azure 入口網站傳送推播通知:
在 Azure 入口網站中,於中樞的 [通知中樞] 頁面上,選取 [疑難排解] 區段中的 [測試傳送]。
針對 [平台],選取 [Android]。
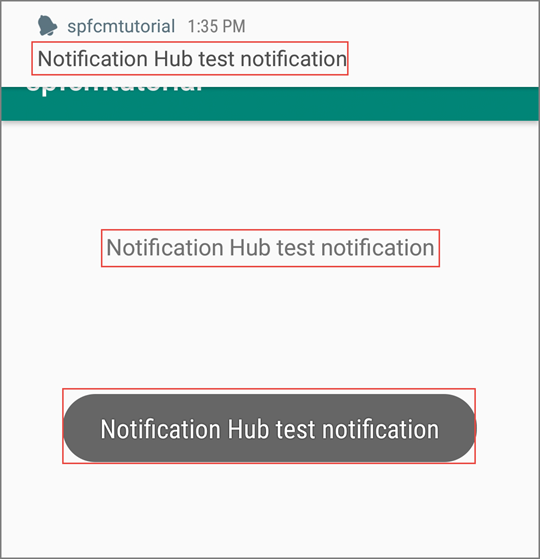
請選取傳送。 您尚未在 Android 裝置上執行行動應用程式,所以不會在裝置上看到通知。 在您執行行動應用程式後,請再次選取 [傳送] 按鈕,以查看通知訊息。
在底部的清單中查看作業的結果。

您會在裝置上看到通知訊息。
推播通知通常會以後端服務傳送,例如 Mobile Apps 或使用相容程式庫的 ASP.NET。 如果您的後端無法使用程式庫,您也可以直接使用 REST API 來傳送通知訊息。
以下是可供您在傳送通知時檢閱的其他教學課程清單:
- Azure Mobile Apps:如需如何從已與通知中樞整合的 Mobile Apps 傳送通知的範例,請參閱將推播通知新增至您的 iOS 應用程式。
- ASP.NET:使用通知中樞將通知推播給使用者。
- Azure 通知中樞 Java SDK:請參閱 如何從 Java 使用通知中樞 ,以便從 Java 傳送通知。 對於 Android 的開發已經在 Eclipse 中測試。
- PHP: 如何從 PHP 使用通知中樞。
在模擬器上執行行動應用程式
在模擬器內測試推播通知之前,請先確定您的模擬器映像支援您為應用程式選擇的 Google API 層級。 如果您的映像不支援原生的 Google API,可能會出現 SERVICE_NOT_AVAILABLE 例外狀況。
此外,請確定已將 Google 帳戶新增至執行中模擬器的 [設定]>[帳戶] 下方。 否則,當您嘗試向 FCM 註冊時,可能會導致 AUTHENTICATION_FAILED 例外狀況。
下一步
在本教學課程中,您已使用 Firebase 雲端通訊將通知廣播至所有向服務註冊的 Android 裝置。 若想了解如何將通知推送至特定裝置,請繼續進行下列教學課程:
意見反應
即將登場:在 2024 年,我們將逐步淘汰 GitHub 問題作為內容的意見反應機制,並將它取代為新的意見反應系統。 如需詳細資訊,請參閱:https://aka.ms/ContentUserFeedback。
提交並檢視相關的意見反應