教學課程:使用通知中樞將推播通知傳送至 Xamarin.Android 應用程式
概觀
注意
如需 Firebase 雲端傳訊取代和移轉步驟的相關信息,請參閱 Google Firebase 雲端傳訊移轉。
本教學課程說明如何使用 Azure 通知中樞將推播通知傳送至 Xamarin.Android 應用程式。 您會建立空白的 Xamarin.Android 應用程式,以使用 Firebase 雲端通訊 (FCM) 接收推播通知。 您可以使用通知中樞,將推播通知廣播到執行應用程式的所有裝置。 已完成的程式代碼可在 NotificationHubs 應用程式範例中使用。
在本教學課程中,您會採取下列步驟:
- 建立 Firebase 專案並啟用 Firebase 雲端傳訊
- 建立通知中樞
- 建立 Xamarin.Android 應用程式,並將其連線至通知中樞
- 從 Azure 入口網站 傳送測試通知
必要條件
- Azure 訂用帳戶。 如果您沒有 Azure 訂用帳戶,請在開始前建立免費 Azure 帳戶。
- 在 Windows 上使用 Xamarin 的 Visual Studio 或 OS X 上的 Visual Studio for Mac 。
- 使用中的Google帳戶
建立 Firebase 專案並啟用 Firebase 雲端傳訊
登入 Firebase 控制台。 如果您還沒有 Firebase 專案,請建立新的 Firebase 專案。
建立項目之後,請選取 [將 Firebase 新增至 Android 應用程式]。
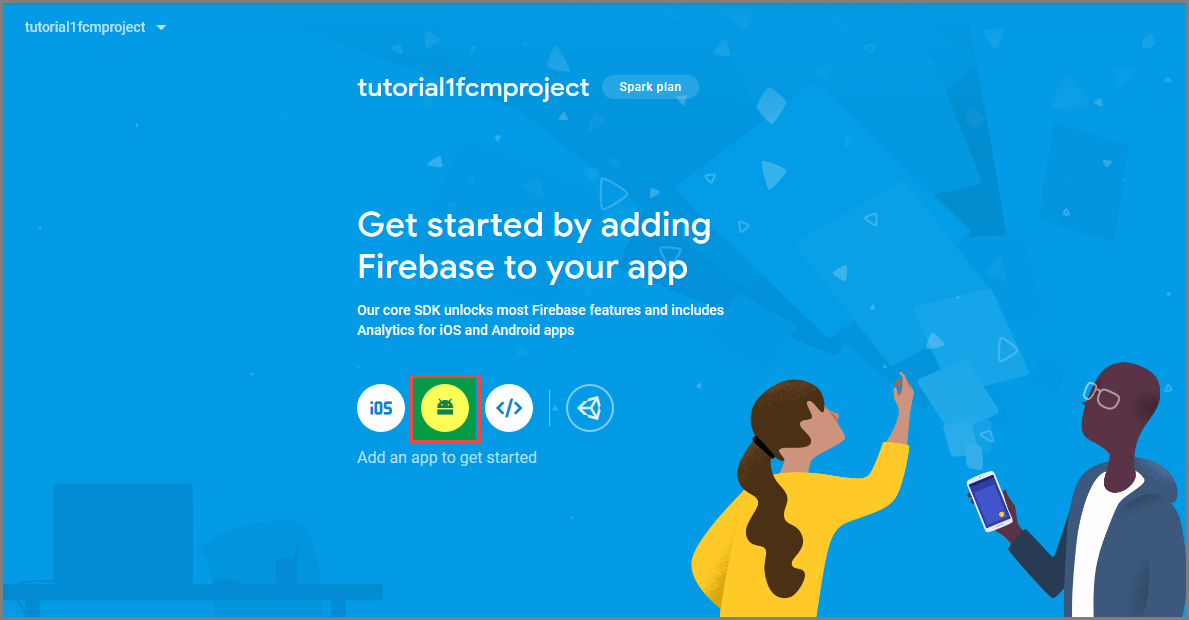
在 [ 將 Firebase 新增至 Android 應用程式] 頁面上,採取下列步驟:
針對Android套件名稱,輸入套件的名稱。 例如:
tutorials.tutoria1.xamarinfcmapp。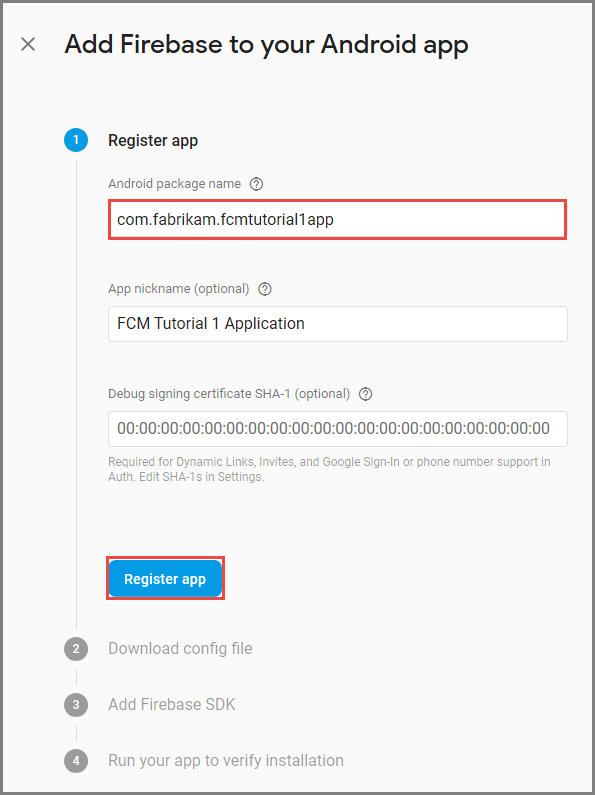
選取 [ 註冊應用程式]。
選取 [ 下載google-services.json]。 然後將檔案儲存到專案的資料夾,然後選取 [ 下一步]。 如果您尚未建立 Visual Studio 專案,您可以在建立項目之後執行此步驟。
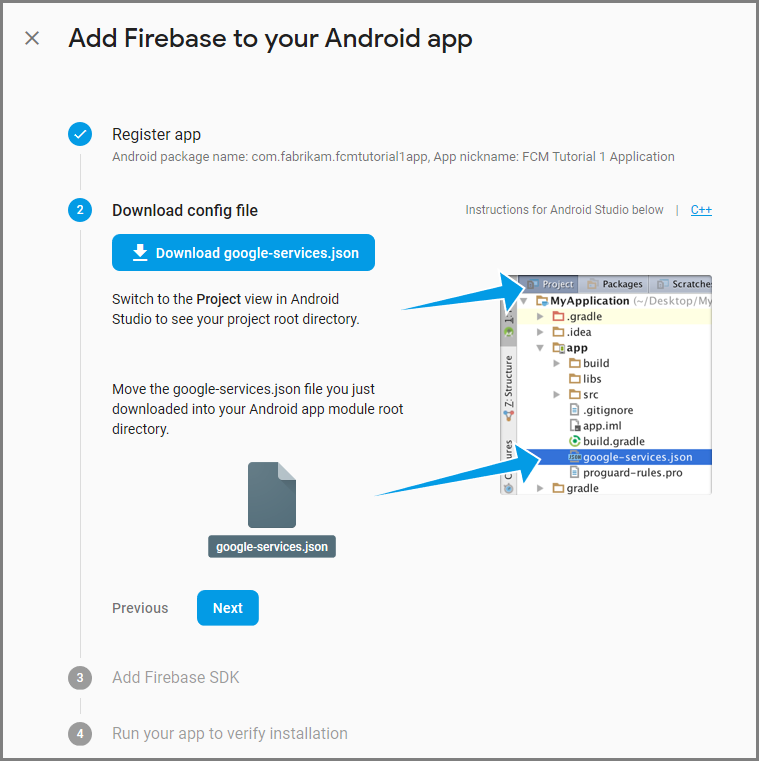
選取 [下一步]。
選取 [ 略過此步驟]。
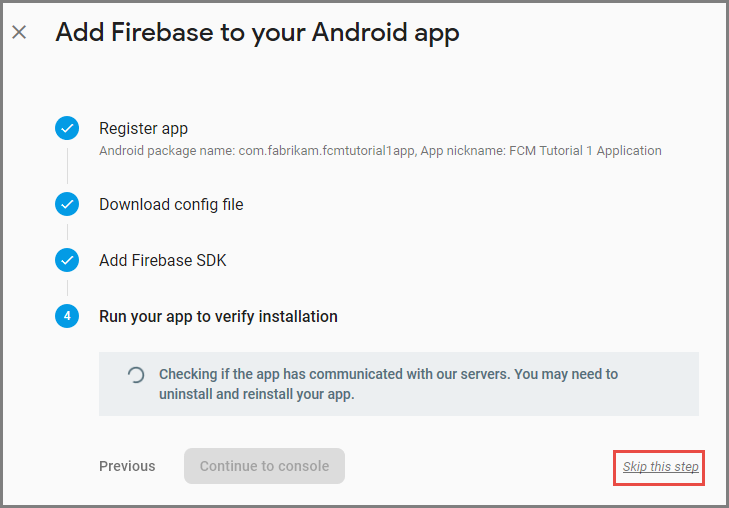
在 Firebase 控制台中,選取項目的齒輪。 然後選取 [專案 設定]。

如果您尚未下載 google-services.json 檔案,您可以在此頁面下載它。
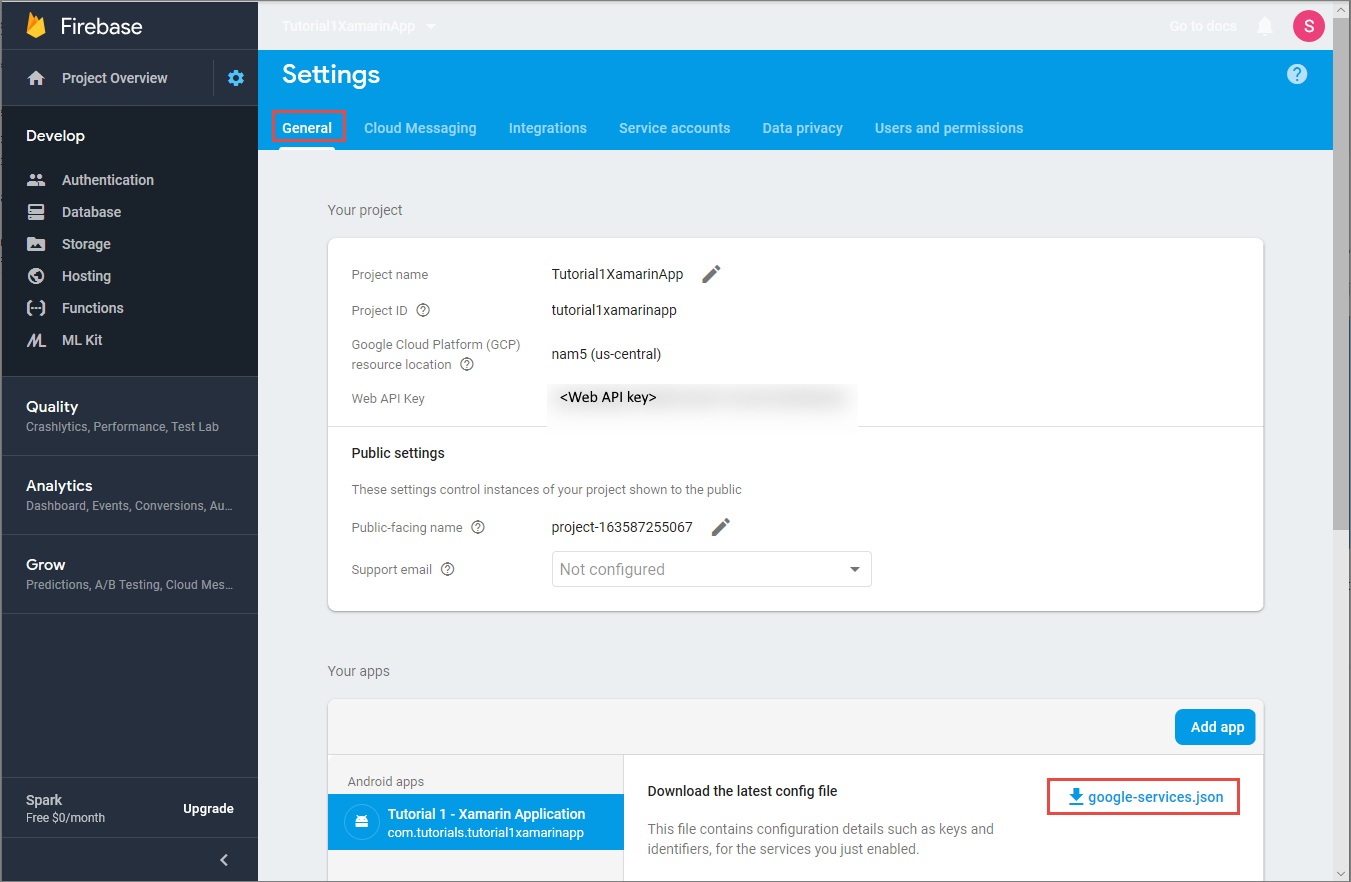
切換至頂端的 [ 雲端傳訊 ] 索引標籤。 複製並儲存 伺服器金鑰 以供稍後使用。 您可以使用此值來設定通知中樞。

建立通知中樞
登入 Azure 入口網站。
選取 左側功能表上的 [所有服務 ]。

在 [篩選服務] 文本框中輸入通知中樞。 選取服務名稱旁的星號圖示,將服務新增至左側功能表上的 [我的最愛] 區段。 選取 [ 通知中樞]。
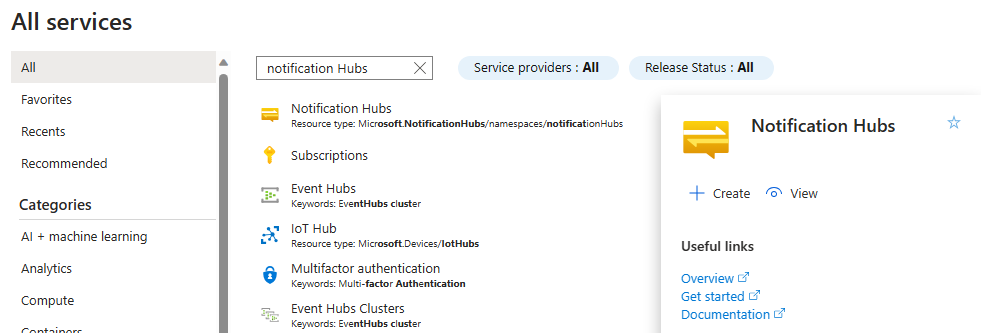
在 [通知中 樞] 頁面上,選取 工具欄上的 [建立 ]。

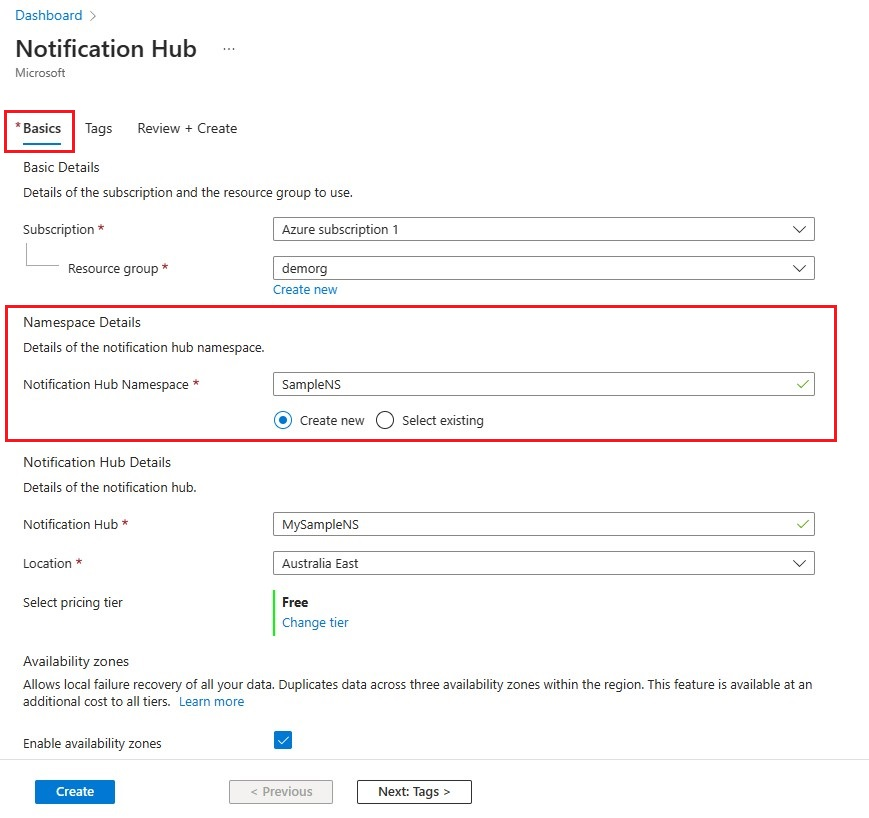
在 [通知中樞] 頁面上的 [基本] 索引標籤中,執行下列步驟:
在 [訂用帳戶] 中,選取您想要使用的 Azure 訂用帳戶名稱,然後選取現有的資源群組,或建立新的資源群組。
在命名空間詳細數據中輸入新命名空間的唯一名稱。
命名空間包含一或多個通知中樞,因此請在通知中樞詳細數據中輸入中樞的名稱。
從 [ 位置 ] 下拉式清單框中選取值。 這個值會指定您要在其中建立中樞的位置。
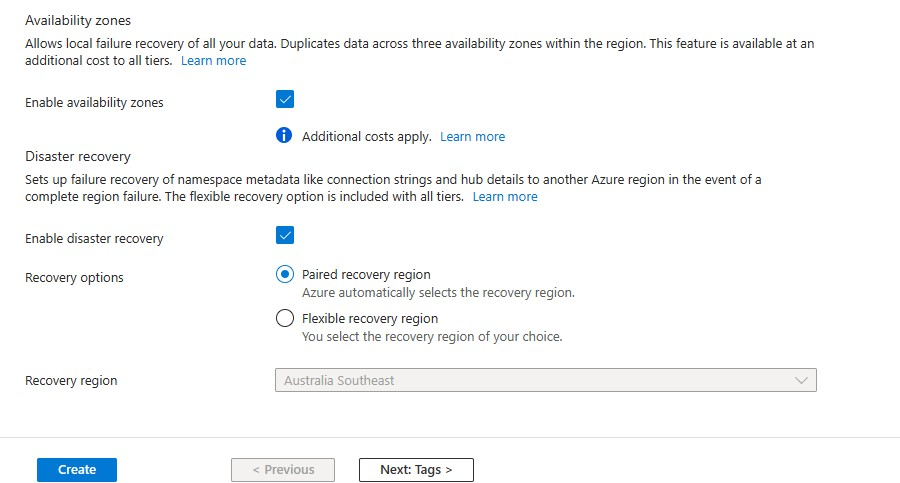
檢閱 [可用性區域] 選項。 如果您選擇具有可用性區域的區域,預設會選取複選框。 可用性區域 是付費功能,因此會將額外的費用新增至您的階層。
選擇災害復原選項:無、配對的復原區域或彈性復原區域。 如果您選擇 [配對復原區域],則會顯示故障轉移區域。 如果您選取 [ 彈性復原區域],請使用下拉式清單從復原區域清單中選擇。
選取 建立。
部署完成時,請選取 [移至資源]。
設定通知中樞的 GCM/FCM 設定
在左側功能表的 [設定] 區段中,選取 [Google][GCM/FCM]。
輸入您從Google Firebase 控制台所注意到的伺服器密鑰。
選取工具列上的 [ 儲存 ]。

您的通知中樞已設定為使用 FCM,而且您有 連接字串 來註冊您的應用程式以接收通知,以及傳送推播通知。
建立 Xamarin.Android 應用程式,並將其連線至通知中樞
建立 Visual Studio 專案並新增 NuGet 套件
注意
本教學課程中記載的步驟適用於Visual Studio 2017。
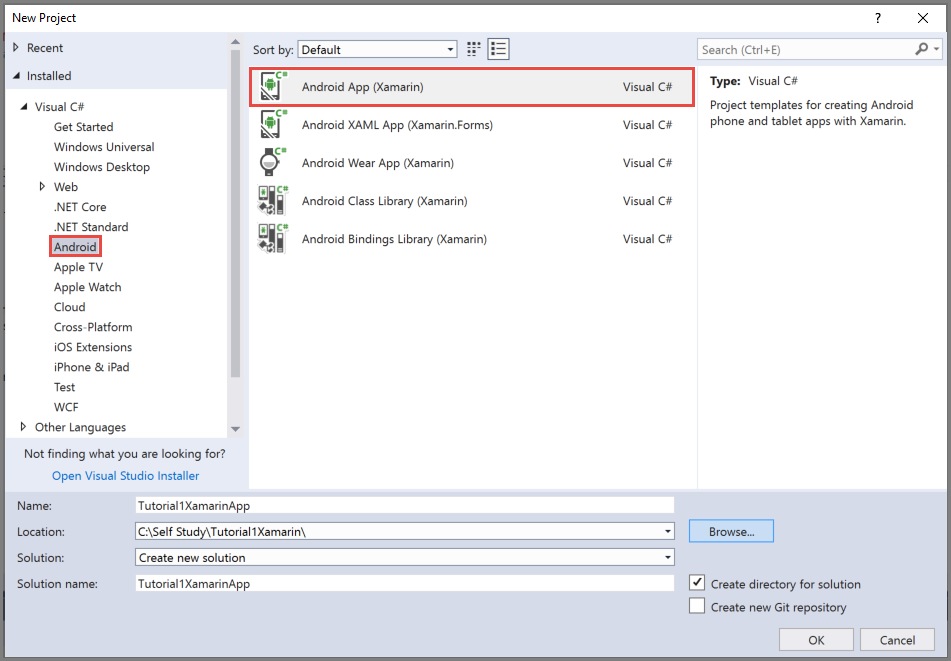
在 Visual Studio 中,開啟 [ 檔案 ] 功能表,選取 [新增],然後選取 [ 專案]。 在 [ 新增專案] 視窗中,執行下列步驟:
展開 [ 已安裝]、 [Visual C#],然後按兩下 [ Android]。
從清單中選取 [Android 應用程式] [Xamarin ]。
輸入項目的名稱。
選取專案的位置。
選取確定
在 [新增 Android 應用程式] 對話框中,選取 [空白應用程式],然後選取 [確定]。

在 [方案總管] 視窗中,展開 [屬性],然後按兩下 [AndroidManifest.xml]。 更新套件名稱,以符合您在 Google Firebase 控制台中將 Firebase 雲端通訊新增至專案時輸入的套件名稱。

依照下列步驟,將專案的目標 Android 版本設定為 Android 10.0 :
- 以滑鼠右鍵按下您的項目,然後選取 [ 屬性]。
- 針對 [ 使用 Android 版本編譯:(目標架構) ] 字段,選取 [Android 10.0]。
- 選取 消息框中的 [是 ],以繼續變更目標架構。
遵循下列步驟,將必要的 NuGet 套件新增至專案:
以滑鼠右鍵按下您的項目,然後選取 [ 管理 NuGet 套件...]。
切換至 [ 已安裝] 索引卷標,選取 [Xamarin.Android.Support.Design],然後在右窗格中選取 [更新 ],將套件更新為最新版本。
切換至 [ 流覽] 索引標籤。搜尋 Xamarin.GooglePlayServices.Base。 在結果清單中選取 Xamarin.GooglePlayServices.Base 。 然後,選取 [ 安裝]。

在 [NuGet 封裝管理員] 視窗中,搜尋 Xamarin.Firebase.Messaging。 選取 結果清單中的 Xamarin.Firebase.Messaging 。 然後,選取 [ 安裝]。
現在,搜尋 Xamarin.Azure.NotificationHubs.Android。 在結果清單中選取 Xamarin.Azure.NotificationHubs.Android 。 然後,選取 [ 安裝]。
新增Google Services JSON 檔案
google-services.json將您從Google Firebase 控制台下載的檔案複製到項目資料夾。將
google-services.json新增至專案。在 [方案總管] 視窗中選取
google-services.json。在 [ 屬性] 窗格中,將 [建置動作] 設定為 GoogleServicesJson。 如果您沒有看到 GoogleServicesJson,請關閉Visual Studio、重新啟動、重新開啟專案,然後重試。

在您的項目中設定通知中樞
向 Firebase 雲端通訊註冊
如果您要從Google雲端傳訊移轉至 Firebase,則專案的檔案可能包含過時的
AndroidManifest.xmlGCM 設定,這可能會導致通知重複。 編輯檔案,並在區段內<application>移除下列幾行,如果有的話:<receiver android:name="com.google.firebase.iid.FirebaseInstanceIdInternalReceiver" android:exported="false" /> <receiver android:name="com.google.firebase.iid.FirebaseInstanceIdReceiver" android:exported="true" android:permission="com.google.android.c2dm.permission.SEND"> <intent-filter> <action android:name="com.google.android.c2dm.intent.RECEIVE" /> <action android:name="com.google.android.c2dm.intent.REGISTRATION" /> <category android:name="${applicationId}" /> </intent-filter> </receiver>在應用程式專案之前新增下列語句。
<uses-permission android:name="android.permission.INTERNET" />
<uses-permission android:name="com.google.android.c2dm.permission.RECEIVE" />
<uses-permission android:name="android.permission.WAKE_LOCK" />
<uses-permission android:name="android.permission.GET_ACCOUNTS"/>
收集 Android 應用程式和通知中樞的下列資訊:
- 接聽 連接字串:在 Azure 入口網站 的儀錶板上,選擇 [檢視 連接字串]。
DefaultListenSharedAccessSignature複製此值的 連接字串。 - 中樞名稱:來自 Azure 入口網站 的中樞名稱。 例如, mynotificationhub2。
- 接聽 連接字串:在 Azure 入口網站 的儀錶板上,選擇 [檢視 連接字串]。
在 [方案總管] 視窗中,以滑鼠右鍵按下您的專案,選取 [新增],然後選取 [類別]。
為您的 Xamarin 專案建立類別
Constants.cs,並在 類別中定義下列常數值。 以您的值取代佔位元。public static class Constants { public const string ListenConnectionString = "<Listen connection string>"; public const string NotificationHubName = "<hub name>"; }將下列 using 語句新增至
MainActivity.cs:using WindowsAzure.Messaging.NotificationHubs;將下列屬性新增至 MainActivity 類別:
internal static readonly string CHANNEL_ID = "my_notification_channel";在 中
MainActivity.cs,將下列程式代碼新增至OnCreate之後base.OnCreate(savedInstanceState):// Listen for push notifications NotificationHub.SetListener(new AzureListener()); // Start the SDK NotificationHub.Start(this.Application, HubName, ConnectionString);將名為
AzureListener的類別新增至您的專案。將下列 using 語句新增至
AzureListener.cs。using Android.Content; using WindowsAzure.Messaging.NotificationHubs;在類別宣告上方新增下列內容,並讓類別繼承自
Java.Lang.Object並實作INotificationListener:public class AzureListener : Java.Lang.Object, INotificationListener在類別內
AzureListener新增下列程序代碼,以處理收到的訊息。public void OnPushNotificationReceived(Context context, INotificationMessage message) { var intent = new Intent(this, typeof(MainActivity)); intent.AddFlags(ActivityFlags.ClearTop); var pendingIntent = PendingIntent.GetActivity(this, 0, intent, PendingIntentFlags.OneShot); var notificationBuilder = new NotificationCompat.Builder(this, MainActivity.CHANNEL_ID); notificationBuilder.SetContentTitle(message.Title) .SetSmallIcon(Resource.Drawable.ic_launcher) .SetContentText(message.Body) .SetAutoCancel(true) .SetShowWhen(false) .SetContentIntent(pendingIntent); var notificationManager = NotificationManager.FromContext(this); notificationManager.Notify(0, notificationBuilder.Build()); }建置 您的專案。
在裝置或載入的模擬器上執行 您的應用程式
從 Azure 入口網站 傳送測試通知
您可以使用 Azure 入口網站 中的 [測試傳送] 選項,在應用程式中測試接收通知。 它會將測試推播通知傳送至您的裝置。

推播通知通常會在後端服務中傳送,例如透過相容連結庫 流動服務 或 ASP.NET。 如果後端無法使用連結庫,您也可以直接使用 REST API 來傳送通知訊息。
下一步
在本教學課程中,您已將廣播通知傳送至向後端註冊的所有 Android 裝置。 若要瞭解如何將通知推送至特定 Android 裝置,請繼續進行下列教學課程:
