快速入門:Language Understanding (LUIS) 用戶端程式庫和 REST API
重要
LUIS 將於 2025 年 10 月 1 日淘汰,而自 2023 年 4 月 1 日開始,您將無法建立新的 LUIS 資源。 建議移轉 LUIS 應用程式至交談語言理解,以享有產品持續支援和多語言功能的優點。
搭配此快速入門使用 C#、Python 或 JavaScript,建立並查詢具有 LUIS SDK 用戶端程式庫的 Azure LUIS 人工智慧 (AI) 應用程式。 您也可以使用 cURL,利用 REST API 來傳送要求。
Language Understanding (LUIS) 可讓您將自然語言處理 (NLP) 套用至使用者的對話、自然語言文字中,以預測整體意義,並找出相關的詳細資訊。
- 撰寫用戶端程式庫和 REST API 可讓您建立、編輯、定型及發佈 LUIS 應用程式。
- 預測執行階段用戶端程式庫和 REST API 可讓您查詢已發佈的應用程式。
使用適用於 .NET 的 Language Understanding (LUIS) 用戶端程式庫可以:
- 建立應用程式
- 使用範例語句新增意圖、機器學習實體
- 定型和發佈應用程式
- 查詢預測執行階段
參考文件 | 製作和預測 程式庫原始程式碼 | 製作和預測 NuGet | C# 範例
必要條件
- .NET Core 和 .NET Core CLI 的目前版本。
- Azure 訂用帳戶 - 建立免費帳戶
- 擁有 Azure 訂用帳戶之後,請在 Azure 入口網站中建立 Language Understanding 撰寫資源,以取得您的金鑰和端點。 部署完成後,按一下 [移至資源] 按鈕。
- 您需要您建立之資源的金鑰和端點,以將應用程式連線至 Language Understanding 撰寫。 您稍後會在快速入門中將金鑰和端點貼到下列程式碼中。 您可以使用免費定價層 (
F0) 來試用服務。
- 您需要您建立之資源的金鑰和端點,以將應用程式連線至 Language Understanding 撰寫。 您稍後會在快速入門中將金鑰和端點貼到下列程式碼中。 您可以使用免費定價層 (
設定
建立新的 C# 應用程式
在您慣用的編輯器或 IDE 中,建立新的 .NET Core 應用程式。
在主控台視窗中 (例如 cmd、PowerShell 或 Bash),使用 dotnet
new命令建立名為language-understanding-quickstart的新主控台應用程式。 此命令會建立簡單的 "Hello World" C# 專案,內含單一原始程式檔:Program.cs。dotnet new console -n language-understanding-quickstart將目錄變更為新建立的應用程式資料夾。
cd language-understanding-quickstart您可以使用下列命令來建置應用程式:
dotnet build建置輸出應該不會有警告或錯誤。
...
Build succeeded.
 0 Warning(s)
 0 Error(s)
...
安裝 NuGet 程式庫
在應用程式目錄中,使用下列命令安裝適用於 .NET 的 Language Understanding (LUIS) 用戶端程式庫:
dotnet add package Microsoft.Azure.CognitiveServices.Language.LUIS.Authoring --version 3.2.0-preview.3
dotnet add package Microsoft.Azure.CognitiveServices.Language.LUIS.Runtime --version 3.1.0-preview.1
製作物件模型
Language Understanding (LUIS) 撰寫用戶端是向 Azure 進行驗證的 LUISAuthoringClient物件,其中包含您的撰寫金鑰。
可供撰寫的程式碼範例
建立用戶端之後,請使用此用戶端來存取功能,包括:
- 應用程式 - 建立、刪除、發佈
- 範例語句 - 新增、依識別碼刪除
- 功能 - 管理片語清單
- 模型 - 管理意圖和實體
- 模式 - 管理模式
- 定型 - 定型應用程式及輪詢定型狀態
- 版本 - 使用複製、匯出和刪除進行管理
預測物件模型
Language Understanding (LUIS) 預測執行階段用戶端是向 Azure 進行驗證的 LUISRuntimeClient物件,其中包含您的資源金鑰。
預測執行階段的程式碼範例
建立用戶端之後,請使用此用戶端來存取功能,包括:
程式碼範例
這些程式碼片段說明如何使用適用於 Python 的 Language Understanding (LUIS) 用戶端程式庫來執行下列工作:
新增相依性
從專案目錄,在慣用的編輯器或 IDE 中開啟 Program.cs 檔案。 將現有的 using 程式碼取代為下列 using 指示詞:
using System;
using System.Linq;
using System.Threading.Tasks;
using Microsoft.Azure.CognitiveServices.Language.LUIS.Authoring;
using Microsoft.Azure.CognitiveServices.Language.LUIS.Authoring.Models;
using Microsoft.Azure.CognitiveServices.Language.LUIS.Runtime;
using Microsoft.Azure.CognitiveServices.Language.LUIS.Runtime.Models;
using Newtonsoft.Json;
新增未定案程式碼
將
Main方法的簽章變更為允許非同步呼叫:public static async Task Main()除非另有指定,否則請在
Program類別的Main方法中新增其餘程式碼。
為應用程式建立變數
建立兩組變數:您可變更第一組,第二組則保留為其出現在程式碼範例中的樣子。
重要
完成時,請記得從程式碼中移除金鑰,且不要公開張貼金鑰。 在生產環境中,請使用安全的方式來儲存和存取您的認證,例如 Azure Key Vault。 如需詳細資訊,請參閱 Azure AI 服務安全性一文。
建立變數來保存您的製作金鑰和資源名稱。
var key = "PASTE_YOUR_LUIS_AUTHORING_SUBSCRIPTION_KEY_HERE";

var authoringEndpoint = "PASTE_YOUR_LUIS_AUTHORING_ENDPOINT_HERE";
var predictionEndpoint = "PASTE_YOUR_LUIS_PREDICTION_ENDPOINT_HERE";
建立變數來保存您的端點、應用程式名稱、版本和意圖名稱。
var appName = "Contoso Pizza Company";
var versionId = "0.1";
var intentName = "OrderPizzaIntent";
驗證用戶端
使用您的金鑰建立 ApiKeyServiceClientCredentials 物件,並使用該物件與您的端點建立 LUISAuthoringClient 物件。
var credentials = new Microsoft.Azure.CognitiveServices.Language.LUIS.Authoring.ApiKeyServiceClientCredentials(key);
var client = new LUISAuthoringClient(credentials) { Endpoint = authoringEndpoint };
建立 LUIS 應用程式
LUIS 應用程式包含納入意圖、實體和範例語句的自然語言處理 (NLP) 模型。
建立 ApplicationCreateObject。 名稱和語言文化特性是必要屬性。 呼叫 Apps.AddAsync 方法。 回應為應用程式識別碼。
var newApp = new ApplicationCreateObject
{
    Culture = "en-us",
    Name = appName,
    InitialVersionId = versionId
};

var appId = await client.Apps.AddAsync(newApp);
建立應用程式的意圖
LUIS 應用程式模型中的主要物件為意圖。 意圖會與使用者語句「意圖」的群組相對應。 使用者可以詢問問題,或發出預期會由 Bot (或其他用戶端應用程式) 提供特定回應的陳述。 意圖的範例包括預約航班、詢問目的地城市的天氣,以及詢問客戶服務的連絡人資訊。
建立具有唯一意圖名稱的 ModelCreateObject,然後將應用程式識別碼、版本識別碼和 ModelCreateObject 傳至 Model.AddIntentAsync 方法。 回應為意圖識別碼。
intentName 值已硬式編碼為 OrderPizzaIntent,作為 為應用程式建立變數區段中的一部分變數。
await client.Model.AddIntentAsync(appId, versionId, new ModelCreateObject()
{
    Name = intentName
});
建立應用程式的實體
雖然實體並非必要,但大部分的應用程式中都會有實體。 實體會從使用者語句中擷取滿足使用者意圖所需的資訊。 目前有數種類型的預建和自訂實體,每一種分別有其本身的資料轉換物件 (DTO) 模型。 會新增至應用程式的常見預建實體包括 number、datetimeV2、geographyV2、ordinal。
請務必了解,實體上不會標示意圖。 它們可以且通常會套用至許多意圖。 只有範例使用者語句會標示特定的單一意圖。
實體的建立方法是模型類別的一部分。 每個實體類型都有本身的資料轉換物件 (DTO) 模型,而模型命名空間中通常會包含 model 這個字。
實體建立程式碼會建立機器學習實體,其中包含套用至 Quantity 子實體的子實體和功能。
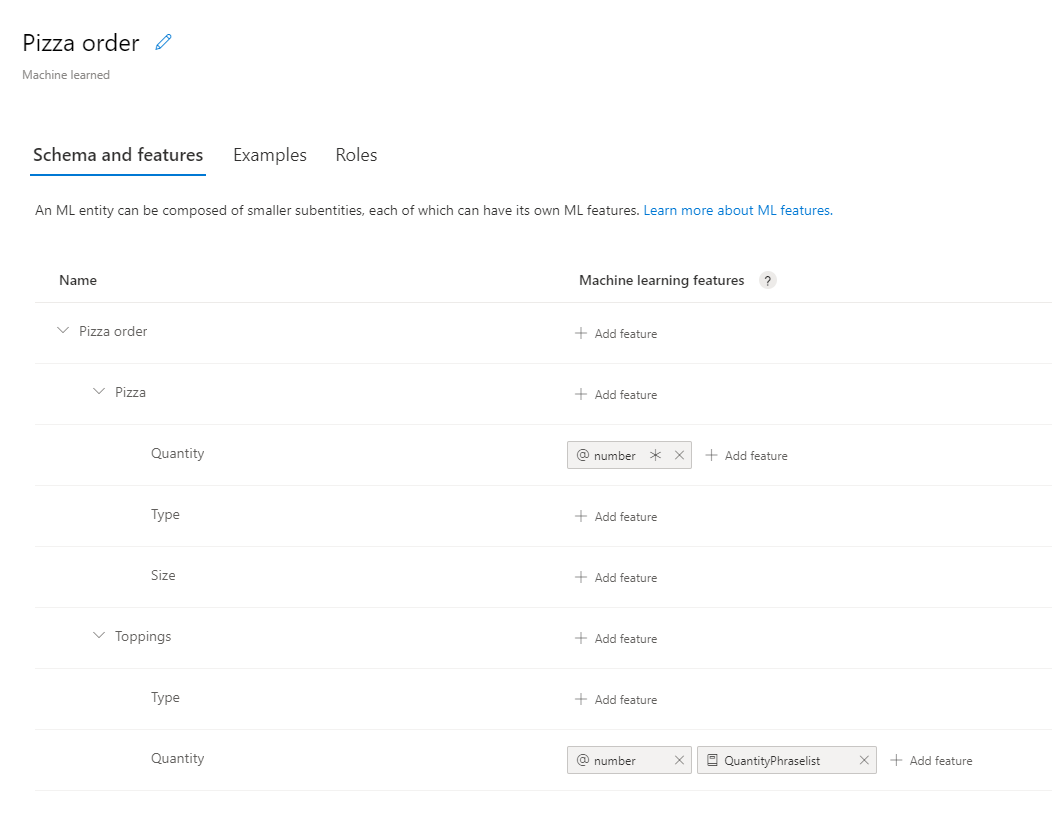
// Add Prebuilt entity
await client.Model.AddPrebuiltAsync(appId, versionId, new[] { "number" });

// Define ml entity with children and grandchildren
var mlEntityDefinition = new EntityModelCreateObject
{
    Name = "Pizza order",
    Children = new[]
    {
        new ChildEntityModelCreateObject
        {
            Name = "Pizza",
            Children = new[]
            {
                new ChildEntityModelCreateObject { Name = "Quantity" },
                new ChildEntityModelCreateObject { Name = "Type" },
                new ChildEntityModelCreateObject { Name = "Size" }
            }
        },
        new ChildEntityModelCreateObject
        {
            Name = "Toppings",
            Children = new[]
            {
                new ChildEntityModelCreateObject { Name = "Type" },
                new ChildEntityModelCreateObject { Name = "Quantity" }
            }
        }
    }
};

// Add ML entity
var mlEntityId = await client.Model.AddEntityAsync(appId, versionId, mlEntityDefinition); ;

// Add phraselist feature
var phraselistId = await client.Features.AddPhraseListAsync(appId, versionId, new PhraselistCreateObject
{
    EnabledForAllModels = false,
    IsExchangeable = true,
    Name = "QuantityPhraselist",
    Phrases = "few,more,extra"
});

// Get entity and subentities
var model = await client.Model.GetEntityAsync(appId, versionId, mlEntityId);
var toppingQuantityId = GetModelGrandchild(model, "Toppings", "Quantity");
var pizzaQuantityId = GetModelGrandchild(model, "Pizza", "Quantity");

// add model as feature to subentity model
await client.Features.AddEntityFeatureAsync(appId, versionId, pizzaQuantityId, new ModelFeatureInformation { ModelName = "number", IsRequired = true });
await client.Features.AddEntityFeatureAsync(appId, versionId, toppingQuantityId, new ModelFeatureInformation { ModelName = "number"});

// add phrase list as feature to subentity model
await client.Features.AddEntityFeatureAsync(appId, versionId, toppingQuantityId, new ModelFeatureInformation { FeatureName = "QuantityPhraselist" });
使用下列類別方法尋找數量子實體列的識別碼,以將功能指派給該子實體。
static Guid GetModelGrandchild(NDepthEntityExtractor model, string childName, string grandchildName)
{
    return model.Children.
        Single(c => c.Name == childName).
        Children.
        Single(c => c.Name == grandchildName).Id;
}
將範例語句新增至意圖
為了判斷語句的意圖及擷取實體,應用程式需要語句的範例。 這些範例必須以特定的單一意圖為目標,且應標示所有的自訂實體。 預建實體不需要標示。
藉由建立 ExampleLabelObject 物件的清單來新增範例語句,每個範例語句各有一個物件。 每個範例都應以實體名稱和實體值的名稱/值配對字典來標示所有實體。 實體值應與範例語句的文字中所顯示的完全相同。
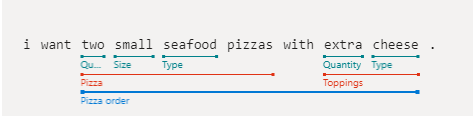
使用應用程式識別碼、版本識別碼和範例呼叫 Examples.AddAsync。
// Define labeled example
var labeledExampleUtteranceWithMLEntity = new ExampleLabelObject
{
    Text = "I want two small seafood pizzas with extra cheese.",
    IntentName = intentName,
    EntityLabels = new[]
    {
        new EntityLabelObject
        {
            StartCharIndex = 7,
            EndCharIndex = 48,
            EntityName = "Pizza order",
            Children = new[]
            {
                new EntityLabelObject
                {
                    StartCharIndex = 7,
                    EndCharIndex = 30,
                    EntityName = "Pizza",
                    Children = new[]
                    {
                        new EntityLabelObject { StartCharIndex = 7, EndCharIndex = 9, EntityName = "Quantity" },
                        new EntityLabelObject { StartCharIndex = 11, EndCharIndex = 15, EntityName = "Size" },
                        new EntityLabelObject { StartCharIndex = 17, EndCharIndex = 23, EntityName = "Type" }
                    }
                },
                new EntityLabelObject
                {
                    StartCharIndex = 37,
                    EndCharIndex = 48,
                    EntityName = "Toppings",
                    Children = new[]
                    {
                        new EntityLabelObject { StartCharIndex = 37, EndCharIndex = 41, EntityName = "Quantity" },
                        new EntityLabelObject { StartCharIndex = 43, EndCharIndex = 48, EntityName = "Type" }
                    }
                }
            }
        },
    }
};

// Add an example for the entity.
// Enable nested children to allow using multiple models with the same name.
// The quantity subentity and the phraselist could have the same exact name if this is set to True
await client.Examples.AddAsync(appId, versionId, labeledExampleUtteranceWithMLEntity, enableNestedChildren: true);
進行應用程式定型
建立模型之後,必須針對此版本的模型將 LUIS 應用程式定型。 已定型的模型可用於容器中,或發佈至預備或產品位置。
Train.TrainVersionAsync 方法需要應用程式識別碼和版本識別碼。
非常小的模型 (如本快速入門所示) 會非常快速地進行定型。 針對生產層級的應用程式,在為應用程式定型時,必須進行 GetStatusAsync 方法的輪詢呼叫,以確認定型成功的時間或是否成功。 其回應是 ModelTrainingInfo 物件的清單,每個物件各有不同的狀態。 所有物件都必須成功,才會將定型視為完成。
await client.Train.TrainVersionAsync(appId, versionId);
while (true)
{
    var status = await client.Train.GetStatusAsync(appId, versionId);
    if (status.All(m => m.Details.Status == "Success"))
    {
        // Assumes that we never fail, and that eventually we'll always succeed.
        break;
    }
}
將應用程式發佈至生產位置
使用 PublishAsync 方法發佈 LUIS 應用程式。 這會將目前的定型版本發佈至端點上的指定位置。 您的用戶端應用程式會使用此端點來傳送使用者語句,以進行意圖和實體擷取的預測。
await client.Apps.PublishAsync(appId, new ApplicationPublishObject { VersionId = versionId, IsStaging=false});
驗證預測執行階段用戶端
以您的金鑰使用 ApiKeyServiceClientCredentials 物件,並使用該物件與您的端點建立 LUISRuntimeClient 物件。
警告
本快速入門會使用撰寫密鑰作為運行時間認證的一部分。 製作金鑰可使用一些查詢來查詢執行階段。 若為暫存和生產層級程式碼,請使用預測執行階段金鑰來取代製作金鑰。
var runtimeClient = new LUISRuntimeClient(credentials) { Endpoint = predictionEndpoint };
從執行階段取得預測
新增下列程式碼,以建立對預測執行階段的要求。
使用者語句是 PredictionRequest 物件的一部分。
GetSlotPredictionAsync 方法需要數個參數,例如應用程式識別碼、位置名稱,以及用來完成要求的預測要求物件。 其他選項 (例如詳細資訊、顯示所有意圖和記錄) 是選擇性的。
// Production == slot name
var request = new PredictionRequest { Query = "I want two small pepperoni pizzas with more salsa" };
var prediction = await runtimeClient.Prediction.GetSlotPredictionAsync(appId, "Production", request);
Console.Write(JsonConvert.SerializeObject(prediction, Formatting.Indented));
預測回應是 JSON 物件,其中包括意圖和找到的任何實體。
{
    "query": "I want two small pepperoni pizzas with more salsa",
    "prediction": {
        "topIntent": "OrderPizzaIntent",
        "intents": {
            "OrderPizzaIntent": {
                "score": 0.753606856
            },
            "None": {
                "score": 0.119097039
            }
        },
        "entities": {
            "Pizza order": [
                {
                    "Pizza": [
                        {
                            "Quantity": [
                                2
                            ],
                            "Type": [
                                "pepperoni"
                            ],
                            "Size": [
                                "small"
                            ],
                            "$instance": {
                                "Quantity": [
                                    {
                                        "type": "builtin.number",
                                        "text": "two",
                                        "startIndex": 7,
                                        "length": 3,
                                        "score": 0.968156934,
                                        "modelTypeId": 1,
                                        "modelType": "Entity Extractor",
                                        "recognitionSources": [
                                            "model"
                                        ]
                                    }
                                ],
                                "Type": [
                                    {
                                        "type": "Type",
                                        "text": "pepperoni",
                                        "startIndex": 17,
                                        "length": 9,
                                        "score": 0.9345611,
                                        "modelTypeId": 1,
                                        "modelType": "Entity Extractor",
                                        "recognitionSources": [
                                            "model"
                                        ]
                                    }
                                ],
                                "Size": [
                                    {
                                        "type": "Size",
                                        "text": "small",
                                        "startIndex": 11,
                                        "length": 5,
                                        "score": 0.9592077,
                                        "modelTypeId": 1,
                                        "modelType": "Entity Extractor",
                                        "recognitionSources": [
                                            "model"
                                        ]
                                    }
                                ]
                            }
                        }
                    ],
                    "Toppings": [
                        {
                            "Type": [
                                "salsa"
                            ],
                            "Quantity": [
                                "more"
                            ],
                            "$instance": {
                                "Type": [
                                    {
                                        "type": "Type",
                                        "text": "salsa",
                                        "startIndex": 44,
                                        "length": 5,
                                        "score": 0.7292897,
                                        "modelTypeId": 1,
                                        "modelType": "Entity Extractor",
                                        "recognitionSources": [
                                            "model"
                                        ]
                                    }
                                ],
                                "Quantity": [
                                    {
                                        "type": "Quantity",
                                        "text": "more",
                                        "startIndex": 39,
                                        "length": 4,
                                        "score": 0.9320932,
                                        "modelTypeId": 1,
                                        "modelType": "Entity Extractor",
                                        "recognitionSources": [
                                            "model"
                                        ]
                                    }
                                ]
                            }
                        }
                    ],
                    "$instance": {
                        "Pizza": [
                            {
                                "type": "Pizza",
                                "text": "two small pepperoni pizzas",
                                "startIndex": 7,
                                "length": 26,
                                "score": 0.812199831,
                                "modelTypeId": 1,
                                "modelType": "Entity Extractor",
                                "recognitionSources": [
                                    "model"
                                ]
                            }
                        ],
                        "Toppings": [
                            {
                                "type": "Toppings",
                                "text": "more salsa",
                                "startIndex": 39,
                                "length": 10,
                                "score": 0.7250252,
                                "modelTypeId": 1,
                                "modelType": "Entity Extractor",
                                "recognitionSources": [
                                    "model"
                                ]
                            }
                        ]
                    }
                }
            ],
            "$instance": {
                "Pizza order": [
                    {
                        "type": "Pizza order",
                        "text": "two small pepperoni pizzas with more salsa",
                        "startIndex": 7,
                        "length": 42,
                        "score": 0.769223332,
                        "modelTypeId": 1,
                        "modelType": "Entity Extractor",
                        "recognitionSources": [
                            "model"
                        ]
                    }
                ]
            }
        }
    }
}
執行應用程式
使用 dotnet run 命令,從您的應用程式目錄執行應用程式。
dotnet run
使用適用於 Node.js 的 Language Understanding (LUIS) 用戶端程式庫,可以:
- 建立應用程式
- 使用範例語句新增意圖、機器學習實體
- 定型和發佈應用程式
- 查詢預測執行階段
必要條件
- Node.js
- Azure 訂用帳戶 - 建立免費帳戶
- 擁有 Azure 訂用帳戶之後,請在 Azure 入口網站中建立 Language Understanding 撰寫資源,以取得您的金鑰和端點。 部署完成後,按一下 [移至資源] 按鈕。
- 您需要您建立之資源的金鑰和端點,以將應用程式連線至 Language Understanding 撰寫。 您稍後會在快速入門中將金鑰和端點貼到下列程式碼中。 您可以使用免費定價層 (
F0) 來試用服務。
- 您需要您建立之資源的金鑰和端點,以將應用程式連線至 Language Understanding 撰寫。 您稍後會在快速入門中將金鑰和端點貼到下列程式碼中。 您可以使用免費定價層 (
設定
建立新的 JavaScript 應用程式
在主控台視窗中,為您的應用程式建立新的目錄,並移至該目錄。
mkdir quickstart-sdk && cd quickstart-sdk藉由建立
package.json檔案,將目錄初始化為 JavaScript 應用程式。npm init -y針對您的 JavaScript 程式碼,建立名為
index.js的檔案。touch index.js
安裝 NPM 程式庫
在應用程式目錄中,使用下列命令來安裝相依性,一次執行一行:
npm install @azure/ms-rest-js
npm install @azure/cognitiveservices-luis-authoring
npm install @azure/cognitiveservices-luis-runtime
您的 package.json 看起來應該類似:
{
  "name": "quickstart-sdk",
  "version": "1.0.0",
  "description": "",
  "main": "index.js",
  "scripts": {
    "test": "echo \"Error: no test specified\" && exit 1"
  },
  "keywords": [],
  "author": "",
  "license": "ISC",
  "dependencies": {
    "@azure/cognitiveservices-luis-authoring": "^4.0.0-preview.3",
    "@azure/cognitiveservices-luis-runtime": "^5.0.0",
    "@azure/ms-rest-js": "^2.0.8"
  }
}
製作物件模型
Language Understanding (LUIS) 撰寫用戶端是向 Azure 進行驗證的 LUISAuthoringClient物件,其中包含您的撰寫金鑰。
可供撰寫的程式碼範例
建立用戶端之後,請使用此用戶端來存取功能,包括:
- 應用程式 - 新增、刪除、發佈
- 範例語句 - 依批次新增、依識別碼刪除
- 功能 - 管理片語清單
- 模型 - 管理意圖和實體
- 模式 - 管理模式
- 定型 - 定型應用程式及輪詢定型狀態
- 版本 - 使用複製、匯出和刪除進行管理
預測物件模型
Language Understanding (LUIS) 撰寫用戶端是向 Azure 進行驗證的 LUISAuthoringClient物件,其中包含您的撰寫金鑰。
預測執行階段的程式碼範例
建立用戶端之後,請使用此用戶端來存取功能,包括:
程式碼範例
這些程式碼片段說明如何使用適用於 Python 的 Language Understanding (LUIS) 用戶端程式庫來執行下列工作:
新增相依性
在您慣用的編輯器或命名的 IDE 中開啟 index.js,並新增下列相依性。
const msRest = require("@azure/ms-rest-js");
const LUIS_Authoring = require("@azure/cognitiveservices-luis-authoring");
const LUIS_Prediction = require("@azure/cognitiveservices-luis-runtime");
新增未定案程式碼
新增
quickstart方法和其呼叫。 這個方法會保存剩下的大部分程式碼。 這個方法會在檔案結尾呼叫。const quickstart = async () => { // add calls here } quickstart() .then(result => console.log("Done")) .catch(err => { console.log(`Error: ${err}`) })除非另有指定,否則請在快速入門方法中新增其餘的程式碼。
為應用程式建立變數
建立兩組變數:您可變更第一組,第二組則保留為其出現在程式碼範例中的樣子。
重要
完成時,請記得從程式碼中移除金鑰,且不要公開張貼金鑰。 在生產環境中,請使用安全的方式來儲存和存取您的認證,例如 Azure Key Vault。 如需詳細資訊,請參閱 Azure AI 服務安全性一文。
建立變數來保存您的製作金鑰和資源名稱。
const authoringKey = 'PASTE_YOUR_LUIS_AUTHORING_SUBSCRIPTION_KEY_HERE';

const authoringEndpoint = "PASTE_YOUR_LUIS_AUTHORING_ENDPOINT_HERE";
const predictionEndpoint = "PASTE_YOUR_LUIS_PREDICTION_ENDPOINT_HERE";
建立變數來保存您的端點、應用程式名稱、版本和意圖名稱。
const appName = "Contoso Pizza Company";
const versionId = "0.1";
const intentName = "OrderPizzaIntent";
驗證用戶端
使用您的金鑰建立 CognitiveServicesCredentials 物件,並使用該物件與您的端點建立 LUISAuthoringClient 物件。
const luisAuthoringCredentials = new msRest.ApiKeyCredentials({
    inHeader: { "Ocp-Apim-Subscription-Key": authoringKey }
});
const client = new LUIS_Authoring.LUISAuthoringClient(
    luisAuthoringCredentials,
    authoringEndpoint
);
建立 LUIS 應用程式
LUIS 應用程式包含納入意圖、實體和範例語句的自然語言處理 (NLP) 模型。
建立 AppsOperation 物件用來建立應用程式的 add 方法。 名稱和語言文化特性是必要屬性。
const create_app_payload = {
    name: appName,
    initialVersionId: versionId,
    culture: "en-us"
};

const createAppResult = await client.apps.add(
    create_app_payload
);

const appId = createAppResult.body
建立應用程式的意圖
LUIS 應用程式模型中的主要物件為意圖。 意圖會與使用者語句意圖的群組相對應。 使用者可以詢問問題,或發出預期會由 Bot (或其他用戶端應用程式) 提供特定回應的陳述。 意圖的範例包括預約航班、詢問目的地城市的天氣,以及詢問客戶服務的連絡人資訊。
使用具有唯一意圖名稱的 model.add_intent,然後傳遞應用程式識別碼、版本識別碼和新的意圖名稱。
intentName 值已硬式編碼為 OrderPizzaIntent,作為 為應用程式建立變數區段中的一部分變數。
await client.model.addIntent(
    appId,
    versionId,
    { name: intentName }
);
建立應用程式的實體
雖然實體並非必要,但大部分的應用程式中都會有實體。 實體會從使用者語句中擷取滿足使用者意圖所需的資訊。 目前有數種類型的預建和自訂實體,每一種分別有其本身的資料轉換物件 (DTO) 模型。 會新增至應用程式的常見預建實體包括 number、datetimeV2、geographyV2、ordinal。
請務必了解,實體上不會標示意圖。 它們可以且通常會套用至許多意圖。 只有範例使用者語句會標示特定的單一意圖。
實體的建立方法是模型類別的一部分。 每個實體類型都有本身的資料轉換物件 (DTO) 模型。
實體建立程式碼會建立機器學習實體,其中包含套用至 Quantity 子實體的子實體和功能。
// Add Prebuilt entity
await client.model.addPrebuilt(appId, versionId, ["number"]);

// Define ml entity with children and grandchildren
const mlEntityDefinition = {
    name: "Pizza order",
    children: [
        {
            name: "Pizza",
            children: [
                { name: "Quantity" },
                { name: "Type" },
                { name: "Size" }
            ]
        },
        {
            name: "Toppings",
            children: [
                { name: "Type" },
                { name: "Quantity" }
            ]
        }
    ]
};

// Add ML entity
const response = await client.model.addEntity(appId, versionId, mlEntityDefinition);
const mlEntityId = response.body;

// Add phraselist feature
const phraselistResponse = await client.features.addPhraseList(appId, versionId, {
    enabledForAllModels: false,
    isExchangeable: true,
    name: "QuantityPhraselist",
    phrases: "few,more,extra"
});
const phraseListId = phraselistResponse.body;

// Get entity and subentities
const model = await client.model.getEntity(appId, versionId, mlEntityId);
const toppingQuantityId = getModelGrandchild(model, "Toppings", "Quantity");
const pizzaQuantityId = getModelGrandchild(model, "Pizza", "Quantity");

// add model as feature to subentity model
await client.features.addEntityFeature(appId, versionId, pizzaQuantityId, { modelName: "number", isRequired: true });
await client.features.addEntityFeature(appId, versionId, toppingQuantityId, { modelName: "number" });

// add phrase list as feature to subentity model
await client.features.addEntityFeature(appId, versionId, toppingQuantityId, { featureName: "QuantityPhraselist" });
將下列方法放在 quickstart 的方法上方,以尋找數量子實體列的識別碼,並將功能指派給該子實體。
const getModelGrandchild = (model, childName, grandchildName) => {

    return model.children.find(c => c.name == childName).children.find(c => c.name == grandchildName).id

}
將範例語句新增至意圖
為了判斷語句的意圖及擷取實體,應用程式需要語句的範例。 這些範例必須以特定的單一意圖為目標,且應標示所有的自訂實體。 預建實體不需要標示。
藉由建立 ExampleLabelObject 物件的清單來新增範例語句,每個範例語句各有一個物件。 每個範例都應以實體名稱和實體值的名稱/值配對字典來標示所有實體。 實體值應與範例語句的文字中所顯示的完全相同。
使用應用程式識別碼、版本識別碼和範例呼叫 examples.add。
// Define labeled example
const labeledExampleUtteranceWithMLEntity =
{
    text: "I want two small seafood pizzas with extra cheese.",
    intentName: intentName,
    entityLabels: [
        {
            startCharIndex: 7,
            endCharIndex: 48,
            entityName: "Pizza order",
            children: [
                {
                    startCharIndex: 7,
                    endCharIndex: 30,
                    entityName: "Pizza",
                    children: [
                        {
                            startCharIndex: 7,
                            endCharIndex: 9,
                            entityName: "Quantity"
                        },
                        {
                            startCharIndex: 11,
                            endCharIndex: 15,
                            entityName: "Size"
                        },
                        {
                            startCharIndex: 17,
                            endCharIndex: 23,
                            entityName: "Type"
                        }]
                },
                {
                    startCharIndex: 37,
                    endCharIndex: 48,
                    entityName: "Toppings",
                    children: [
                        {
                            startCharIndex: 37,
                            endCharIndex: 41,
                            entityName: "Quantity"
                        },
                        {
                            startCharIndex: 43,
                            endCharIndex: 48,
                            entityName: "Type"
                        }]
                }
            ]
        }
    ]
};

console.log("Labeled Example Utterance:", JSON.stringify(labeledExampleUtteranceWithMLEntity, null, 4 ));

// Add an example for the entity.
// Enable nested children to allow using multiple models with the same name.
// The quantity subentity and the phraselist could have the same exact name if this is set to True
await client.examples.add(appId, versionId, labeledExampleUtteranceWithMLEntity, { enableNestedChildren: true });
進行應用程式定型
建立模型之後,必須針對此版本的模型將 LUIS 應用程式定型。 已定型的模型可用於容器中,或發佈至預備或產品位置。
train.trainVersion 方法需要應用程式識別碼和版本識別碼。
非常小的模型 (如本快速入門所示) 會非常快速地進行定型。 針對生產層級的應用程式,在為應用程式定型時,必須進行 get_status 方法的輪詢呼叫,以確認定型成功的時間或是否成功。 其回應是 ModelTrainingInfo 物件的清單,每個物件各有不同的狀態。 所有物件都必須成功,才會將定型視為完成。
await client.train.trainVersion(appId, versionId);
while (true) {
    const status = await client.train.getStatus(appId, versionId);
    if (status.every(m => m.details.status == "Success")) {
        // Assumes that we never fail, and that eventually we'll always succeed.
        break;
    }
}
將應用程式發佈至生產位置
使用 app.publish 方法發佈 LUIS 應用程式。 這會將目前的定型版本發佈至端點上的指定位置。 您的用戶端應用程式會使用此端點來傳送使用者語句,以進行意圖和實體擷取的預測。
await client.apps.publish(appId, { versionId: versionId, isStaging: false });
驗證預測執行階段用戶端
將 msRest.ApiKeyCredentials 物件與金鑰搭配使用,並將它與您的端點搭配使用,以建立 LUIS。LUISRuntimeClient 物件。
警告
本快速入門會使用撰寫密鑰作為運行時間認證的一部分。 製作金鑰可使用一些查詢來查詢執行階段。 若為暫存和生產層級程式碼,請使用預測執行階段金鑰來取代製作金鑰。
const luisPredictionClient = new LUIS_Prediction.LUISRuntimeClient(
    luisAuthoringCredentials,
    predictionEndpoint
);
從執行階段取得預測
新增下列程式碼,以建立對預測執行階段的要求。 使用者語句是 predictionRequest 物件的一部分。
luisRuntimeClient.prediction.getSlotPrediction 方法需要數個參數,例如應用程式識別碼、位置名稱,以及用來完成要求的預測要求物件。 其他選項 (例如詳細資訊、顯示所有意圖和記錄) 是選擇性的。
// Production == slot name
const request = { query: "I want two small pepperoni pizzas with more salsa" };
const response = await luisPredictionClient.prediction.getSlotPrediction(appId, "Production", request);
console.log(JSON.stringify(response.prediction, null, 4 ));
預測回應是 JSON 物件,其中包括意圖和找到的任何實體。
{
    "query": "I want two small pepperoni pizzas with more salsa",
    "prediction": {
        "topIntent": "OrderPizzaIntent",
        "intents": {
            "OrderPizzaIntent": {
                "score": 0.753606856
            },
            "None": {
                "score": 0.119097039
            }
        },
        "entities": {
            "Pizza order": [
                {
                    "Pizza": [
                        {
                            "Quantity": [
                                2
                            ],
                            "Type": [
                                "pepperoni"
                            ],
                            "Size": [
                                "small"
                            ],
                            "$instance": {
                                "Quantity": [
                                    {
                                        "type": "builtin.number",
                                        "text": "two",
                                        "startIndex": 7,
                                        "length": 3,
                                        "score": 0.968156934,
                                        "modelTypeId": 1,
                                        "modelType": "Entity Extractor",
                                        "recognitionSources": [
                                            "model"
                                        ]
                                    }
                                ],
                                "Type": [
                                    {
                                        "type": "Type",
                                        "text": "pepperoni",
                                        "startIndex": 17,
                                        "length": 9,
                                        "score": 0.9345611,
                                        "modelTypeId": 1,
                                        "modelType": "Entity Extractor",
                                        "recognitionSources": [
                                            "model"
                                        ]
                                    }
                                ],
                                "Size": [
                                    {
                                        "type": "Size",
                                        "text": "small",
                                        "startIndex": 11,
                                        "length": 5,
                                        "score": 0.9592077,
                                        "modelTypeId": 1,
                                        "modelType": "Entity Extractor",
                                        "recognitionSources": [
                                            "model"
                                        ]
                                    }
                                ]
                            }
                        }
                    ],
                    "Toppings": [
                        {
                            "Type": [
                                "salsa"
                            ],
                            "Quantity": [
                                "more"
                            ],
                            "$instance": {
                                "Type": [
                                    {
                                        "type": "Type",
                                        "text": "salsa",
                                        "startIndex": 44,
                                        "length": 5,
                                        "score": 0.7292897,
                                        "modelTypeId": 1,
                                        "modelType": "Entity Extractor",
                                        "recognitionSources": [
                                            "model"
                                        ]
                                    }
                                ],
                                "Quantity": [
                                    {
                                        "type": "Quantity",
                                        "text": "more",
                                        "startIndex": 39,
                                        "length": 4,
                                        "score": 0.9320932,
                                        "modelTypeId": 1,
                                        "modelType": "Entity Extractor",
                                        "recognitionSources": [
                                            "model"
                                        ]
                                    }
                                ]
                            }
                        }
                    ],
                    "$instance": {
                        "Pizza": [
                            {
                                "type": "Pizza",
                                "text": "two small pepperoni pizzas",
                                "startIndex": 7,
                                "length": 26,
                                "score": 0.812199831,
                                "modelTypeId": 1,
                                "modelType": "Entity Extractor",
                                "recognitionSources": [
                                    "model"
                                ]
                            }
                        ],
                        "Toppings": [
                            {
                                "type": "Toppings",
                                "text": "more salsa",
                                "startIndex": 39,
                                "length": 10,
                                "score": 0.7250252,
                                "modelTypeId": 1,
                                "modelType": "Entity Extractor",
                                "recognitionSources": [
                                    "model"
                                ]
                            }
                        ]
                    }
                }
            ],
            "$instance": {
                "Pizza order": [
                    {
                        "type": "Pizza order",
                        "text": "two small pepperoni pizzas with more salsa",
                        "startIndex": 7,
                        "length": 42,
                        "score": 0.769223332,
                        "modelTypeId": 1,
                        "modelType": "Entity Extractor",
                        "recognitionSources": [
                            "model"
                        ]
                    }
                ]
            }
        }
    }
}
執行應用程式
使用快速入門檔案上使用 node index.js 命令執行應用程式。
node index.js
使用適用於 Python 的 Language Understanding (LUIS) 用戶端程式庫可以:
- 建立應用程式
- 使用範例語句新增意圖、機器學習實體
- 定型和發佈應用程式
- 查詢預測執行階段
參考文件 | 製作和預測 程式庫原始程式碼 | 套件 (Pypi) | 範例
必要條件
- 最新版的 Python 3.x。
- Azure 訂用帳戶 - 建立免費帳戶
- 擁有 Azure 訂用帳戶之後,請在 Azure 入口網站中建立 Language Understanding 撰寫資源,以取得您的金鑰和端點。 部署完成後,按一下 [移至資源] 按鈕。
- 您需要您建立之資源的金鑰和端點,以將應用程式連線至 Language Understanding 撰寫。 您稍後會在快速入門中將金鑰和端點貼到下列程式碼中。 您可以使用免費定價層 (
F0) 來試用服務。
- 您需要您建立之資源的金鑰和端點,以將應用程式連線至 Language Understanding 撰寫。 您稍後會在快速入門中將金鑰和端點貼到下列程式碼中。 您可以使用免費定價層 (
設定
建立新的 Python 應用程式
在主控台視窗中,為您的應用程式建立新的目錄,並移至該目錄。
mkdir quickstart-sdk && cd quickstart-sdk針對您的 Python 程式碼,建立名為
authoring_and_predict.py的檔案。touch authoring_and_predict.py
使用 Pip 來安裝用戶端程式庫
在應用程式目錄中,使用下列命令安裝適用於 Python 的 Language Understanding (LUIS) 用戶端程式庫:
pip install azure-cognitiveservices-language-luis
製作物件模型
Language Understanding (LUIS) 撰寫用戶端是向 Azure 進行驗證的 LUISAuthoringClient物件,其中包含您的撰寫金鑰。
可供撰寫的程式碼範例
建立用戶端之後,請使用此用戶端來存取功能,包括:
- 應用程式 - 建立、刪除、發佈
- 範例語句 - 依批次新增、依識別碼刪除
- 功能 - 管理片語清單
- 模型 - 管理意圖和實體
- 模式 - 管理模式
- 定型 - 定型應用程式及輪詢定型狀態
- 版本 - 使用複製、匯出和刪除進行管理
預測物件模型
Language Understanding (LUIS) 預測執行階段用戶端是向 Azure 進行驗證的 LUISRuntimeClient物件,其中包含您的資源金鑰。
預測執行階段的程式碼範例
建立用戶端之後,請使用此用戶端來存取功能,包括:
程式碼範例
這些程式碼片段說明如何使用適用於 Python 的 Language Understanding (LUIS) 用戶端程式庫來執行下列工作:
新增相依性
將用戶端程式庫新增至 Python 檔案。
from azure.cognitiveservices.language.luis.authoring import LUISAuthoringClient
from azure.cognitiveservices.language.luis.authoring.models import ApplicationCreateObject
from azure.cognitiveservices.language.luis.runtime import LUISRuntimeClient
from msrest.authentication import CognitiveServicesCredentials
from functools import reduce

import json, time, uuid
新增未定案程式碼
新增
quickstart方法和其呼叫。 這個方法會保存剩下的大部分程式碼。 這個方法會在檔案結尾呼叫。def quickstart(): # add calls here, remember to indent properly quickstart()除非另有指定,否則請在快速入門方法中新增其餘的程式碼。
為應用程式建立變數
建立兩組變數:您可變更第一組,第二組則保留為其出現在程式碼範例中的樣子。
重要
完成時,請記得從程式碼中移除金鑰,且不要公開張貼金鑰。 在生產環境中,請使用安全的方式來儲存和存取您的認證,例如 Azure Key Vault。 如需詳細資訊,請參閱 Azure AI 服務安全性一文。
建立變數來保存您的製作金鑰和資源名稱。
authoringKey = 'PASTE_YOUR_LUIS_AUTHORING_SUBSCRIPTION_KEY_HERE'
authoringEndpoint = 'PASTE_YOUR_LUIS_AUTHORING_ENDPOINT_HERE'
predictionKey = 'PASTE_YOUR_LUIS_PREDICTION_SUBSCRIPTION_KEY_HERE'
predictionEndpoint = 'PASTE_YOUR_LUIS_PREDICTION_ENDPOINT_HERE'
建立變數來保存您的端點、應用程式名稱、版本和意圖名稱。
# We use a UUID to avoid name collisions.
appName = "Contoso Pizza Company " + str(uuid.uuid4())
versionId = "0.1"
intentName = "OrderPizzaIntent"
驗證用戶端
使用您的密鑰建立 CognitiveServicesCredentials 物件,並將其與您的端點搭配使用,以建立 LUISAuthoringClient 物件。
client = LUISAuthoringClient(authoringEndpoint, CognitiveServicesCredentials(authoringKey))
建立 LUIS 應用程式
LUIS 應用程式包含納入意圖、實體和範例語句的自然語言處理 (NLP) 模型。
建立 AppsOperation 物件用來建立應用程式的 add 方法。 名稱和語言文化特性是必要屬性。
# define app basics
appDefinition = ApplicationCreateObject (name=appName, initial_version_id=versionId, culture='en-us')

# create app
app_id = client.apps.add(appDefinition)

# get app id - necessary for all other changes
print("Created LUIS app with ID {}".format(app_id))
建立應用程式的意圖
LUIS 應用程式模型中的主要物件為意圖。 意圖會與使用者語句意圖的群組相對應。 使用者可以詢問問題,或發出預期會由 Bot (或其他用戶端應用程式) 提供特定回應的陳述。 意圖的範例包括預約航班、詢問目的地城市的天氣,以及詢問客戶服務的連絡人資訊。
使用具有唯一意圖名稱的 model.add_intent,然後傳遞應用程式識別碼、版本識別碼和新的意圖名稱。
intentName 值已硬式編碼為 OrderPizzaIntent,作為 為應用程式建立變數區段中的一部分變數。
client.model.add_intent(app_id, versionId, intentName)
建立應用程式的實體
雖然實體並非必要,但大部分的應用程式中都會有實體。 實體會從使用者語句中擷取滿足使用者意圖所需的資訊。 目前有數種類型的預建和自訂實體,每一種分別有其本身的資料轉換物件 (DTO) 模型。 會新增至應用程式的常見預建實體包括 number、datetimeV2、geographyV2、ordinal。
請務必了解,實體上不會標示意圖。 它們可以且通常會套用至許多意圖。 只有範例使用者語句會標示特定的單一意圖。
實體的建立方法是 ModelOperations 類別的一部分。 每個實體類型都有本身的資料轉換物件 (DTO) 模型。
實體建立程式碼會建立機器學習實體,其中包含套用至 Quantity 子實體的子實體和功能。
# Add Prebuilt entity
client.model.add_prebuilt(app_id, versionId, prebuilt_extractor_names=["number"])

# define machine-learned entity
mlEntityDefinition = [
{
    "name": "Pizza",
    "children": [
        { "name": "Quantity" },
        { "name": "Type" },
        { "name": "Size" }
    ]
},
{
    "name": "Toppings",
    "children": [
        { "name": "Type" },
        { "name": "Quantity" }
    ]
}]

# add entity to app
modelId = client.model.add_entity(app_id, versionId, name="Pizza order", children=mlEntityDefinition)

# define phraselist - add phrases as significant vocabulary to app
phraseList = {
    "enabledForAllModels": False,
    "isExchangeable": True,
    "name": "QuantityPhraselist",
    "phrases": "few,more,extra"
}

# add phrase list to app
phraseListId = client.features.add_phrase_list(app_id, versionId, phraseList)

# Get entity and subentities
modelObject = client.model.get_entity(app_id, versionId, modelId)
toppingQuantityId = get_grandchild_id(modelObject, "Toppings", "Quantity")
pizzaQuantityId = get_grandchild_id(modelObject, "Pizza", "Quantity")

# add model as feature to subentity model
prebuiltFeatureRequiredDefinition = { "model_name": "number", "is_required": True }
client.features.add_entity_feature(app_id, versionId, pizzaQuantityId, prebuiltFeatureRequiredDefinition)

# add model as feature to subentity model
prebuiltFeatureNotRequiredDefinition = { "model_name": "number" }
client.features.add_entity_feature(app_id, versionId, toppingQuantityId, prebuiltFeatureNotRequiredDefinition)

# add phrase list as feature to subentity model
phraseListFeatureDefinition = { "feature_name": "QuantityPhraselist", "model_name": None }
client.features.add_entity_feature(app_id, versionId, toppingQuantityId, phraseListFeatureDefinition)
將下列方法放在 quickstart 的方法上方,以尋找數量子實體列的識別碼,並將功能指派給該子實體。
def get_grandchild_id(model, childName, grandChildName):

    theseChildren = next(filter((lambda child: child.name == childName), model.children))
    theseGrandchildren = next(filter((lambda child: child.name == grandChildName), theseChildren.children))

    grandChildId = theseGrandchildren.id

    return grandChildId
將範例語句新增至意圖
為了判斷語句的意圖及擷取實體,應用程式需要語句的範例。 這些範例必須以特定的單一意圖為目標,且應標示所有的自訂實體。 預建實體不需要標示。
藉由建立 ExampleLabelObject 物件的清單來新增範例語句,每個範例語句各有一個物件。 每個範例都應以實體名稱和實體值的名稱/值配對字典來標示所有實體。 實體值應與範例語句的文字中所顯示的完全相同。
使用應用程式識別碼、版本識別碼和範例呼叫 examples.add。
# Define labeled example
labeledExampleUtteranceWithMLEntity = {
    "text": "I want two small seafood pizzas with extra cheese.",
    "intentName": intentName,
    "entityLabels": [
        {
            "startCharIndex": 7,
            "endCharIndex": 48,
            "entityName": "Pizza order",
            "children": [
                {
                    "startCharIndex": 7,
                    "endCharIndex": 30,
                    "entityName": "Pizza",
                    "children": [
                        {
                            "startCharIndex": 7,
                            "endCharIndex": 9,
                            "entityName": "Quantity"
                        },
                        {
                            "startCharIndex": 11,
                            "endCharIndex": 15,
                            "entityName": "Size"
                        },
                        {
                            "startCharIndex": 17,
                            "endCharIndex": 23,
                            "entityName": "Type"
                        }]
                },
                {
                    "startCharIndex": 37,
                    "endCharIndex": 48,
                    "entityName": "Toppings",
                    "children": [
                        {
                            "startCharIndex": 37,
                            "endCharIndex": 41,
                            "entityName": "Quantity"
                        },
                        {
                            "startCharIndex": 43,
                            "endCharIndex": 48,
                            "entityName": "Type"
                        }]
                }
            ]
        }
    ]
}

print("Labeled Example Utterance:", labeledExampleUtteranceWithMLEntity)

# Add an example for the entity.
# Enable nested children to allow using multiple models with the same name.
# The quantity subentity and the phraselist could have the same exact name if this is set to True
client.examples.add(app_id, versionId, labeledExampleUtteranceWithMLEntity, { "enableNestedChildren": True })
進行應用程式定型
建立模型之後,必須針對此版本的模型將 LUIS 應用程式定型。 已定型的模型可用於容器中,或發佈至預備或產品位置。
train.train_version 方法需要應用程式識別碼和版本識別碼。
非常小的模型 (如本快速入門所示) 會非常快速地進行定型。 針對生產層級的應用程式,在為應用程式定型時,必須進行 get_status 方法的輪詢呼叫,以確認定型成功的時間或是否成功。 其回應是 ModelTrainingInfo 物件的清單,每個物件各有不同的狀態。 所有物件都必須成功,才會將定型視為完成。
client.train.train_version(app_id, versionId)
waiting = True
while waiting:
    info = client.train.get_status(app_id, versionId)

    # get_status returns a list of training statuses, one for each model. Loop through them and make sure all are done.
    waiting = any(map(lambda x: 'Queued' == x.details.status or 'InProgress' == x.details.status, info))
    if waiting:
        print ("Waiting 10 seconds for training to complete...")
        time.sleep(10)
    else:
        print ("trained")
        waiting = False
將應用程式發佈至生產位置
使用 app.publish 方法發佈 LUIS 應用程式。 這會將目前的定型版本發佈至端點上的指定位置。 您的用戶端應用程式會使用此端點來傳送使用者語句,以進行意圖和實體擷取的預測。
# Mark the app as public so we can query it using any prediction endpoint.
# Note: For production scenarios, you should instead assign the app to your own LUIS prediction endpoint. See:
# https://docs.microsoft.com/en-gb/azure/cognitive-services/luis/luis-how-to-azure-subscription#assign-a-resource-to-an-app
client.apps.update_settings(app_id, is_public=True)

responseEndpointInfo = client.apps.publish(app_id, versionId, is_staging=False)
驗證預測執行階段用戶端
以您的金鑰使用認證物件,並使用該物件與您的端點建立 LUISRuntimeClientConfiguration 物件。
警告
本快速入門會使用撰寫密鑰作為運行時間認證的一部分。 製作金鑰可使用一些查詢來查詢執行階段。 若為暫存和生產層級程式碼,請使用預測執行階段金鑰來取代製作金鑰。
runtimeCredentials = CognitiveServicesCredentials(predictionKey)
clientRuntime = LUISRuntimeClient(endpoint=predictionEndpoint, credentials=runtimeCredentials)
從執行階段取得預測
新增下列程式碼,以建立對預測執行階段的要求。
使用者語句是 prediction_request 物件的一部分。
get_slot_prediction 方法需要數個參數,例如應用程式識別碼、位置名稱,以及用來完成要求的預測要求物件。 其他選項 (例如詳細資訊、顯示所有意圖和記錄) 是選擇性的。 要求會傳回 PredictionResponse 物件。
# Production == slot name
predictionRequest = { "query" : "I want two small pepperoni pizzas with more salsa" }

predictionResponse = clientRuntime.prediction.get_slot_prediction(app_id, "Production", predictionRequest)
print("Top intent: {}".format(predictionResponse.prediction.top_intent))
print("Sentiment: {}".format (predictionResponse.prediction.sentiment))
print("Intents: ")

for intent in predictionResponse.prediction.intents:
    print("\t{}".format (json.dumps (intent)))
print("Entities: {}".format (predictionResponse.prediction.entities))
預測回應是 JSON 物件,其中包括意圖和找到的任何實體。
{
    "query": "I want two small pepperoni pizzas with more salsa",
    "prediction": {
        "topIntent": "OrderPizzaIntent",
        "intents": {
            "OrderPizzaIntent": {
                "score": 0.753606856
            },
            "None": {
                "score": 0.119097039
            }
        },
        "entities": {
            "Pizza order": [
                {
                    "Pizza": [
                        {
                            "Quantity": [
                                2
                            ],
                            "Type": [
                                "pepperoni"
                            ],
                            "Size": [
                                "small"
                            ],
                            "$instance": {
                                "Quantity": [
                                    {
                                        "type": "builtin.number",
                                        "text": "two",
                                        "startIndex": 7,
                                        "length": 3,
                                        "score": 0.968156934,
                                        "modelTypeId": 1,
                                        "modelType": "Entity Extractor",
                                        "recognitionSources": [
                                            "model"
                                        ]
                                    }
                                ],
                                "Type": [
                                    {
                                        "type": "Type",
                                        "text": "pepperoni",
                                        "startIndex": 17,
                                        "length": 9,
                                        "score": 0.9345611,
                                        "modelTypeId": 1,
                                        "modelType": "Entity Extractor",
                                        "recognitionSources": [
                                            "model"
                                        ]
                                    }
                                ],
                                "Size": [
                                    {
                                        "type": "Size",
                                        "text": "small",
                                        "startIndex": 11,
                                        "length": 5,
                                        "score": 0.9592077,
                                        "modelTypeId": 1,
                                        "modelType": "Entity Extractor",
                                        "recognitionSources": [
                                            "model"
                                        ]
                                    }
                                ]
                            }
                        }
                    ],
                    "Toppings": [
                        {
                            "Type": [
                                "salsa"
                            ],
                            "Quantity": [
                                "more"
                            ],
                            "$instance": {
                                "Type": [
                                    {
                                        "type": "Type",
                                        "text": "salsa",
                                        "startIndex": 44,
                                        "length": 5,
                                        "score": 0.7292897,
                                        "modelTypeId": 1,
                                        "modelType": "Entity Extractor",
                                        "recognitionSources": [
                                            "model"
                                        ]
                                    }
                                ],
                                "Quantity": [
                                    {
                                        "type": "Quantity",
                                        "text": "more",
                                        "startIndex": 39,
                                        "length": 4,
                                        "score": 0.9320932,
                                        "modelTypeId": 1,
                                        "modelType": "Entity Extractor",
                                        "recognitionSources": [
                                            "model"
                                        ]
                                    }
                                ]
                            }
                        }
                    ],
                    "$instance": {
                        "Pizza": [
                            {
                                "type": "Pizza",
                                "text": "two small pepperoni pizzas",
                                "startIndex": 7,
                                "length": 26,
                                "score": 0.812199831,
                                "modelTypeId": 1,
                                "modelType": "Entity Extractor",
                                "recognitionSources": [
                                    "model"
                                ]
                            }
                        ],
                        "Toppings": [
                            {
                                "type": "Toppings",
                                "text": "more salsa",
                                "startIndex": 39,
                                "length": 10,
                                "score": 0.7250252,
                                "modelTypeId": 1,
                                "modelType": "Entity Extractor",
                                "recognitionSources": [
                                    "model"
                                ]
                            }
                        ]
                    }
                }
            ],
            "$instance": {
                "Pizza order": [
                    {
                        "type": "Pizza order",
                        "text": "two small pepperoni pizzas with more salsa",
                        "startIndex": 7,
                        "length": 42,
                        "score": 0.769223332,
                        "modelTypeId": 1,
                        "modelType": "Entity Extractor",
                        "recognitionSources": [
                            "model"
                        ]
                    }
                ]
            }
        }
    }
}
執行應用程式
使用快速入門檔案上使用 python 命令執行應用程式。
python authoring_and_predict.py
遵循本快速入門,您將依序執行三個 REST 呼叫。
- 首先,您將使用 REST Batch 新增標籤話來上傳一批範例語句,以用來定型披薩應用程式模型。
- 接下來,您將使用 REST 訓練應用程式版本呼叫,開始比薩應用程式的訓練工作階段。
- 最後,您會使用 REST 取得版本訓練狀態呼叫,取得比薩應用程式訓練工作階段的狀態。
必要條件
免費的 LUIS 帳戶。
文字編輯器,例如 Visual Studio Code。
命令列程式 cURL。 cURL 程式已安裝在 macOS、大部分的 Linux 散發套件,以及 Windows 10 組建 1803 和更新版本上。
如果您需要安裝 cURL,您可以從 cURL 下載頁面下載 cURL。
建立披薩應用程式
建立 Pizza 應用程式。
- 選取 pizza-app-for-luis-v6.json 以顯示
pizza-app-for-luis.json檔案的 GitHub 頁面。 - 以滑鼠右鍵按一下或長點選 [原始] 按鈕,然後選取 [另存連結] 將
pizza-app-for-luis.json儲存到您的電腦。 - 登入 LUIS 入口網站。
- 選取我的應用程式。
- 在 [我的應用程式] 頁面中,選取 [+ 新增對話應用程式]。
- 選取 [匯入為 JSON]。
- 在 [匯入新的應用程式] 對話方塊中,選取 [選擇檔案] 按鈕。
- 選取您下載的
pizza-app-for-luis.json檔案,然後選取 [開啟]。 - 在 [匯入新的應用程式] 對話方塊的 [名稱] 欄位中,輸入您 Pizza 應用程式的名稱,然後選取 [完成] 按鈕。
應用程式將會匯入。
如果您看到 [如何建立有效的 LUIS 應用程式] 對話方塊,請關閉對話方塊。
將 Pizza 應用程式定型並發佈
您應該會看到 [意圖] 頁面,其中包含 Pizza 應用程式中的意圖清單。
在 LUIS 網站的右上方,選取 [定型] 按鈕。

[定型] 按鈕停用時,定型即完成。
若要在聊天機器人或其他用戶端應用程式中收到 LUIS 預測,則須將應用程式發佈到預測端點。
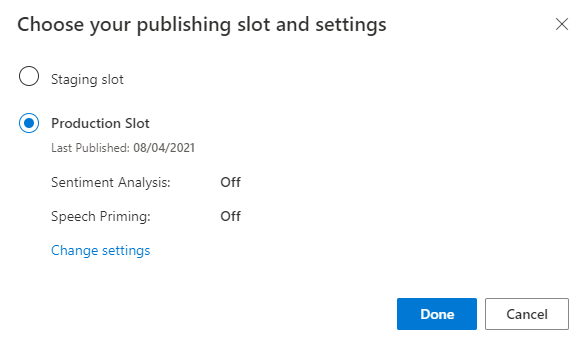
選取右上方導覽列中的 [發佈]。

選取 [生產位置],然後選取 [完成]。
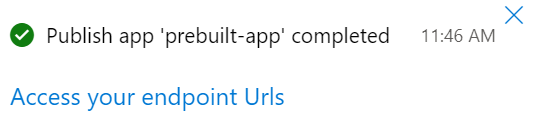
選取通知中的 [存取您的端點 URL],以移至 [Azure 資源] 頁面。 只有在具有與應用程式相關聯的預測資源時,您才能夠看到 URL。 您也可以按一下 [管理] 以尋找 [Azure 資源] 頁面。
將撰寫資源新增至 Pizza 應用程式
- 選取 [管理]。
- 選取 [Azure 資源]。
- 選取 [製作資源]。
- 選取 [變更製作資源]。
如果您有撰寫資源,請輸入租用戶名稱、訂用帳戶名稱,以及您撰寫資源的 LUIS 資源名稱。
如果您沒有撰寫資源:
- 選取 [建立新的資源]。
- 輸入租用戶名稱、資源名稱、訂用帳戶名稱和 Azure 資源群組名稱。
您的 Pizza 應用程式現在已準備好可以使用。
針對您的 Pizza 應用程式記錄存取值
若要使用您新的 Pizza 應用程式,將需要 Pizza 應用程式的應用程式識別碼、撰寫金鑰和撰寫端點。 若要取得預測,您需要個別的預測端點和預測金鑰。
若要尋找這些值:
- 從 [意圖] 頁面上,選取 [管理]。
- 從 [應用程式設定] 頁面上,記錄 [應用程式識別碼]。
- 選取 [Azure 資源]。
- 選取 [製作資源]。
- 從 [撰寫資源] 和 [預測資源] 索引標籤中,記下主要金鑰。 此值是您的撰寫金鑰。
- 記錄 [端點 URL]。 此值是您的撰寫端點。
建立 JSON 檔案來訓練比薩應用程式
若要建立包含三個範例語句的 JSON 檔案,請將下列 JSON 資料儲存至名為 ExampleUtterances.JSON 的檔案:
[
  {
    "text": "order a pizza",
    "intentName": "ModifyOrder",
    "entityLabels": [
      {
        "entityName": "Order",
        "startCharIndex": 6,
        "endCharIndex": 12
      }
    ]
  },
  {
    "text": "order a large pepperoni pizza",
    "intentName": "ModifyOrder",
    "entityLabels": [
      {
        "entityName": "Order",
        "startCharIndex": 6,
        "endCharIndex": 28
      },
      {
        "entityName": "FullPizzaWithModifiers",
        "startCharIndex": 6,
        "endCharIndex": 28
      },
      {
        "entityName": "PizzaType",
        "startCharIndex": 14,
        "endCharIndex": 28
      },
      {
        "entityName": "Size",
        "startCharIndex": 8,
        "endCharIndex": 12
      }
    ]
  },
  {
    "text": "I want two large pepperoni pizzas on thin crust",
    "intentName": "ModifyOrder",
    "entityLabels": [
      {
        "entityName": "Order",
        "startCharIndex": 7,
        "endCharIndex": 46
      },
      {
        "entityName": "FullPizzaWithModifiers",
        "startCharIndex": 7,
        "endCharIndex": 46
      },
      {
        "entityName": "PizzaType",
        "startCharIndex": 17,
        "endCharIndex": 32
      },
      {
        "entityName": "Size",
        "startCharIndex": 11,
        "endCharIndex": 15
      },
      {
        "entityName": "Quantity",
        "startCharIndex": 7,
        "endCharIndex": 9
      },
      {
        "entityName": "Crust",
        "startCharIndex": 37,
        "endCharIndex": 46
      }
    ]
  }
]`
範例語句檔案 JSON 會遵循特定格式。
text 欄位包含範例語句的文字。 intentName 欄位必須對應到 LUIS 應用程式中的現有意圖名稱。 entityLabels 是必填欄位。 如果您不想要標示任何實體,請提供空白陣列。
如果 entityLabels 陣列不是空的,startCharIndex 和 endCharIndex 必須標示 entityName 欄位中參考的實體。 索引以零為起始。 如果您在文字中的某個空格開始或結束標籤,新增語句的 API 呼叫將會失敗。
新增範例語句
若要上傳範例語句批次,請將此命令複製到文字編輯器中:
curl "***YOUR-AUTHORING-ENDPOINT***/luis/authoring/v3.0-preview/apps/***YOUR-APP-ID***/versions/***YOUR-APP-VERSION***/examples?verbose=true&show-all-intents=true" ^ --request POST ^ --header "Content-Type:application/json" ^ --header "Ocp-Apim-Subscription-Key: ***YOUR-AUTHORING-KEY***" ^ --data "@ExampleUtterances.JSON"使用您自己的值取代以
***YOUR-開頭的值。資訊 目的 ***YOUR-AUTHORING-ENDPOINT***您的撰寫 URL 端點。 例如,"https://REPLACE-WITH-YOUR-RESOURCE-NAME.api.cognitive.microsoft.com/"。 您已在建立資源時設定資源名稱。 ***YOUR-APP-ID***您的 LUIS 應用程式識別碼。 ***YOUR-APP-VERSION***您的 LUIS 應用程式版本。 針對比薩應用程式,版本號碼為 "0.1" (不含引號)。 ***YOUR-AUTHORING-KEY***您的 32 字元撰寫金鑰。 在 LUIS 入口網站中,您可以在 [Azure 資源] 頁面上的 [管理] 區段中看到指派的金鑰和端點。 在相同的 [管理] 區段中,您可以在 [應用程式設定] 頁面上取得應用程式識別碼。
重要
完成時,請記得從程式碼中移除金鑰,且不要公開張貼金鑰。 在生產環境中,請使用安全的方式來儲存和存取您的認證,例如 Azure Key Vault。 如需詳細資訊,請參閱 Azure AI 服務安全性一文。
啟動命令提示字元 (Windows) 或終端機 (macOS 和 Linux),並將目錄變更為您儲存
ExampleUtterances.JSON檔案的相同目錄。從編輯器複製 cURL 命令,並將其貼入命令提示字元 (Windows) 或終端機 (macOS 和 Linux)。 按 Enter 鍵以執行命令。
您應該會看見下列回應:
[{"value":{"ExampleId":1255129706,"UtteranceText":"order a pizza"},"hasError":false},{"value":{"ExampleId":1255129707,"UtteranceText":"order a large pepperoni pizza"},"hasError":false},{"value":{"ExampleId":1255129708,"UtteranceText":"i want two large pepperoni pizzas on thin crust"},"hasError":false}]以下是針對可讀性格式化的輸出:
[
  {
    "value": {
      "ExampleId": 1255129706,
      "UtteranceText": "order a pizza"
    },
    "hasError": false
  },
  {
    "value": {
      "ExampleId": 1255129707,
      "UtteranceText": "order a large pepperoni pizza"
    },
    "hasError": false
  },
  {
    "value": {
      "ExampleId": 1255129708,
      "UtteranceText": "i want two large pepperoni pizzas on thin crust"
    },
    "hasError": false
  }
]
訓練比薩應用程式模型
若要開始比薩應用程式的訓練工作階段,請將此命令複製到文字編輯器中:
curl "***YOUR-AUTHORING-ENDPOINT***/luis/authoring/v3.0-preview/apps/***YOUR-APP-ID***/versions/***YOUR-APP-VERSION***/train?verbose=true&show-all-intents=true" ^ --data "" ^ --request POST ^ --header "Content-Type:application/json" ^ --header "Ocp-Apim-Subscription-Key: ***YOUR-AUTHORING-KEY***"就像之前一樣,使用您自己的值取代以
***YOUR-開頭的值。從編輯器複製 cURL 命令,並將其貼入命令提示字元 (Windows) 或終端機 (macOS 和 Linux)。 按 Enter 鍵以執行命令。
您應該會看見下列回應:
{"statusId":2,"status":"UpToDate"}以下是針對可讀性格式化的輸出:
{
  "statusId": 2,
  "status": "UpToDate"
}
取得訓練狀態
若要取得訓練工作階段的訓練狀態,請將此命令複製到文字編輯器中:
curl "***YOUR-AUTHORING-ENDPOINT***/luis/authoring/v3.0-preview/apps/***YOUR-APP-ID***/versions/***YOUR-APP-VERSION***/train?verbose=true&show-all-intents=true" ^ --request GET ^ --header "Content-Type:application/json" ^ --header "Ocp-Apim-Subscription-Key: ***YOUR-AUTHORING-KEY***"就像之前一樣,使用您自己的值取代以
***YOUR-開頭的值。從編輯器複製 cURL 命令,並將其貼入命令提示字元 (Windows) 或終端機 (macOS 和 Linux)。 按 Enter 鍵以執行命令。
您應該會看見下列回應:
[{"modelId":"8eb7ad8f-5db5-4c28-819b-ca3905fffd80","details":{"statusId":2,"status":"UpToDate","exampleCount":171}},{"modelId":"6f53bc92-ae54-44ce-bc4e-010d1f8cfda0","details":{"statusId":2,"status":"UpToDate","exampleCount":171}},{"modelId":"6cb17888-ad6e-464c-82c0-d37fd1f2c4f8","details":{"statusId":2,"status":"UpToDate","exampleCount":171}},{"modelId":"a16fc4fd-1949-4e77-9de3-30369f16c3a5","details":{"statusId":2,"status":"UpToDate","exampleCount":171}},{"modelId":"6bacdb75-1889-4f93-8971-8c8995ff8960","details":{"statusId":2,"status":"UpToDate","exampleCount":171}},{"modelId":"be963f4c-4898-48d7-9eba-3c6af0867b9d","details":{"statusId":2,"status":"UpToDate","exampleCount":171}}]以下是針對可讀性格式化的輸出:
[
  {
    "modelId": "8eb7ad8f-5db5-4c28-819b-ca3905fffd80",
    "details": {
      "statusId": 2,
      "status": "UpToDate",
      "exampleCount": 171
    }
  },
  {
    "modelId": "6f53bc92-ae54-44ce-bc4e-010d1f8cfda0",
    "details": {
      "statusId": 2,
      "status": "UpToDate",
      "exampleCount": 171
    }
  },
  {
    "modelId": "6cb17888-ad6e-464c-82c0-d37fd1f2c4f8",
    "details": {
      "statusId": 2,
      "status": "UpToDate",
      "exampleCount": 171
    }
  },
  {
    "modelId": "a16fc4fd-1949-4e77-9de3-30369f16c3a5",
    "details": {
      "statusId": 2,
      "status": "UpToDate",
      "exampleCount": 171
    }
  },
  {
    "modelId": "6bacdb75-1889-4f93-8971-8c8995ff8960",
    "details": {
      "statusId": 2,
      "status": "UpToDate",
      "exampleCount": 171
    }
  },
  {
    "modelId": "be963f4c-4898-48d7-9eba-3c6af0867b9d",
    "details": {
      "statusId": 2,
      "status": "UpToDate",
      "exampleCount": 171
    }
  }
]
從預測端點取得意圖
使用 cURL 查詢預測端點並取得預測結果。
注意
此命令會使用您的預測端點。
將此命令複製到文字編輯器中:
curl "https://***YOUR-PREDICTION-ENDPOINT***/luis/prediction/v3.0/apps/***YOUR-APP-ID***/slots/production/predict" ^ --request GET ^ --get ^ --data "subscription-key=***YOUR-PREDICTION-KEY***" ^ --data "verbose=true" ^ --data "show-all-intents=true" ^ --data-urlencode "query=I want two large pepperoni pizzas on thin crust please"使用您自己的值取代以
***YOUR-開頭的值。資訊 目的 ***YOUR-PREDICTION-ENDPOINT***您的預測 URL 端點。 位於您應用程式的 LUIS 入口網站 [Azure 資源] 頁面上。
例如:https://westus.api.cognitive.microsoft.com/。***YOUR-APP-ID***您的應用程式識別碼。 位於您應用程式的 LUIS 入口網站 [應用程式設定] 頁面上。 ***YOUR-PREDICTION-KEY***您的 32 字元預測金鑰。 位於您應用程式的 LUIS 入口網站 [Azure 資源] 頁面上。 將文字複製到主控台視窗,然後按 Enter 鍵來執行命令:
檢閱預測回應,其以 JSON 格式傳回:
{"query":"I want two large pepperoni pizzas on thin crust please","prediction":{"topIntent":"ModifyOrder","intents":{"ModifyOrder":{"score":1.0},"None":{"score":8.55E-09},"Greetings":{"score":1.82222226E-09},"CancelOrder":{"score":1.47272727E-09},"Confirmation":{"score":9.8125E-10}},"entities":{"Order":[{"FullPizzaWithModifiers":[{"PizzaType":["pepperoni pizzas"],"Size":[["Large"]],"Quantity":[2],"Crust":[["Thin"]],"$instance":{"PizzaType":[{"type":"PizzaType","text":"pepperoni pizzas","startIndex":17,"length":16,"score":0.9978157,"modelTypeId":1,"modelType":"Entity Extractor","recognitionSources":["model"]}],"Size":[{"type":"SizeList","text":"large","startIndex":11,"length":5,"score":0.9984481,"modelTypeId":1,"modelType":"Entity Extractor","recognitionSources":["model"]}],"Quantity":[{"type":"builtin.number","text":"two","startIndex":7,"length":3,"score":0.999770939,"modelTypeId":1,"modelType":"Entity Extractor","recognitionSources":["model"]}],"Crust":[{"type":"CrustList","text":"thin crust","startIndex":37,"length":10,"score":0.933985531,"modelTypeId":1,"modelType":"Entity Extractor","recognitionSources":["model"]}]}}],"$instance":{"FullPizzaWithModifiers":[{"type":"FullPizzaWithModifiers","text":"two large pepperoni pizzas on thin crust","startIndex":7,"length":40,"score":0.90681237,"modelTypeId":1,"modelType":"Entity Extractor","recognitionSources":["model"]}]}}],"ToppingList":[["Pepperoni"]],"$instance":{"Order":[{"type":"Order","text":"two large pepperoni pizzas on thin crust","startIndex":7,"length":40,"score":0.9047088,"modelTypeId":1,"modelType":"Entity Extractor","recognitionSources":["model"]}],"ToppingList":[{"type":"ToppingList","text":"pepperoni","startIndex":17,"length":9,"modelTypeId":5,"modelType":"List Entity Extractor","recognitionSources":["model"]}]}}}}針對可讀性格式化的 JSON 回應:
{
  "query": "I want two large pepperoni pizzas on thin crust please",
  "prediction": {
    "topIntent": "ModifyOrder",
    "intents": {
      "ModifyOrder": {
        "score": 1.0
      },
      "None": {
        "score": 8.55e-9
      },
      "Greetings": {
        "score": 1.82222226e-9
      },
      "CancelOrder": {
        "score": 1.47272727e-9
      },
      "Confirmation": {
        "score": 9.8125e-10
      }
    },
    "entities": {
      "Order": [
        {
          "FullPizzaWithModifiers": [
            {
              "PizzaType": [
                "pepperoni pizzas"
              ],
              "Size": [
                [
                  "Large"
                ]
              ],
              "Quantity": [
                2
              ],
              "Crust": [
                [
                  "Thin"
                ]
              ],
              "$instance": {
                "PizzaType": [
                  {
                    "type": "PizzaType",
                    "text": "pepperoni pizzas",
                    "startIndex": 17,
                    "length": 16,
                    "score": 0.9978157,
                    "modelTypeId": 1,
                    "modelType": "Entity Extractor",
                    "recognitionSources": [
                      "model"
                    ]
                  }
                ],
                "Size": [
                  {
                    "type": "SizeList",
                    "text": "large",
                    "startIndex": 11,
                    "length": 5,
                    "score": 0.9984481,
                    "modelTypeId": 1,
                    "modelType": "Entity Extractor",
                    "recognitionSources": [
                      "model"
                    ]
                  }
                ],
                "Quantity": [
                  {
                    "type": "builtin.number",
                    "text": "two",
                    "startIndex": 7,
                    "length": 3,
                    "score": 0.999770939,
                    "modelTypeId": 1,
                    "modelType": "Entity Extractor",
                    "recognitionSources": [
                      "model"
                    ]
                  }
                ],
                "Crust": [
                  {
                    "type": "CrustList",
                    "text": "thin crust",
                    "startIndex": 37,
                    "length": 10,
                    "score": 0.933985531,
                    "modelTypeId": 1,
                    "modelType": "Entity Extractor",
                    "recognitionSources": [
                      "model"
                    ]
                  }
                ]
              }
            }
          ],
          "$instance": {
            "FullPizzaWithModifiers": [
              {
                "type": "FullPizzaWithModifiers",
                "text": "two large pepperoni pizzas on thin crust",
                "startIndex": 7,
                "length": 40,
                "score": 0.90681237,
                "modelTypeId": 1,
                "modelType": "Entity Extractor",
                "recognitionSources": [
                  "model"
                ]
              }
            ]
          }
        }
      ],
      "ToppingList": [
        [
          "Pepperoni"
        ]
      ],
      "$instance": {
        "Order": [
          {
            "type": "Order",
            "text": "two large pepperoni pizzas on thin crust",
            "startIndex": 7,
            "length": 40,
            "score": 0.9047088,
            "modelTypeId": 1,
            "modelType": "Entity Extractor",
            "recognitionSources": [
              "model"
            ]
          }
        ],
        "ToppingList": [
          {
            "type": "ToppingList",
            "text": "pepperoni",
            "startIndex": 17,
            "length": 9,
            "modelTypeId": 5,
            "modelType": "List Entity Extractor",
            "recognitionSources": [
              "model"
            ]
          }
        ]
      }
    }
  }
}
清除資源
您可以從 LUIS 入口網站刪除應用程式,並從 Azure 入口網站刪除 Azure 資源。
如果您是使用 REST API,請在完成快速入門時,從檔案系統中刪除 ExampleUtterances.JSON 檔案。
疑難排解
- 向客戶端連結庫進行驗證 - 驗證錯誤通常表示使用了錯誤的金鑰和端點。 為方便起見,本快速入門會針對預測執行階段使用撰寫金鑰和端點,但只有在您尚未使用每月配額時才適用。 如果您無法使用撰寫金鑰和端點,則必須在存取預測執行階段 SDK 用戶端程式庫時使用預測執行階段金鑰和端點。
- 建立實體 - 如果您在建立本教學課程中使用的巢狀機器學習實體時發生錯誤,請確定您已複製程式碼,但未改變程式碼來建立不同的實體。
- 建立範例語句 - 如果您在建立本教學課程中使用的已標記範例語句時發生錯誤,請確定您已複製程式碼,但未改變程式碼來建立不同的已標記範例。
- 定型 - 如果您收到定型錯誤,這通常表示應用程式是空的 (沒有包含範例語句的意圖),或應用程式的意圖或實體格式不正確。
- 雜項錯誤 - 由於程式碼會以文字和 JSON 物件呼叫用戶端程式庫,因此請確定您沒有變更程式碼。
其他錯誤 - 如果您收到上述清單中未涵蓋的錯誤,請在此頁面底部提供意見反應來讓我們知道。 包含您所安裝用戶端程式庫的程式設計語言和版本。