設定地圖樣式 (Android SDK)
本文說明使用 Azure 地圖服務 Android SDK 來設定地圖樣式的兩種方式。 Azure 地圖服務有六種不同的地圖樣式可從中選擇。 如需支援的地圖樣式的詳細資訊,請參閱 Azure 地圖服務中支援的地圖樣式。
注意
Azure 地圖服務 Android SDK 淘汰
適用於 Android 的 Azure 地圖服務原生 SDK 現已被取代,將於 3/31/25 淘汰。 若要避免服務中斷,請在 3/31/25 之前遷移至 Azure 地圖服務 Web SDK。 如需詳細資訊,請參閱 Azure 地圖服務 Android SDK 移轉指南 (部分機器翻譯)。
必要條件
務必完成快速入門:建立 Android 應用程式中的步驟。
在配置中設定地圖樣式
您可以在新增地圖控制項時,於活動類別的配置檔案中設定地圖樣式。 下列程式碼會設定中央位置、縮放等級和地圖樣式。
<com.azure.android.maps.control.MapControl
    android:id="@+id/mapcontrol"
    android:layout_width="match_parent"
    android:layout_height="match_parent"
    app:azure_maps_centerLat="47.602806"
    app:azure_maps_centerLng="-122.329330"
    app:azure_maps_zoom="12"
    app:azure_maps_style="grayscale_dark"
    />
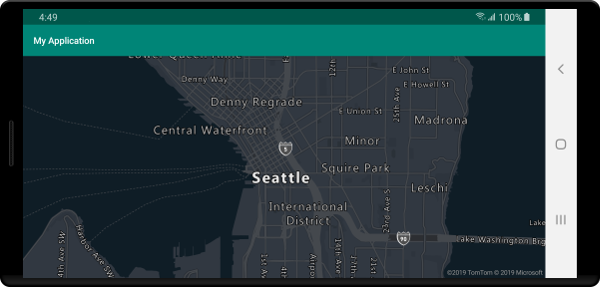
下列螢幕擷取畫面顯示上述程式碼,其中顯示具有灰階深色樣式的道路圖。
在程式碼中設定地圖樣式
地圖樣式可以使用地圖的 setStyle 方法,以程式設計方式在程式碼中設定。 下列程式碼會使用地圖 setCamera 方法和地圖樣式,將置中位置和縮放等級設定為 SATELLITE_ROAD_LABELS。
mapControl.onReady(map -> {

    //Set the camera of the map.
    map.setCamera(center(Point.fromLngLat(-122.33, 47.64)), zoom(14));

    //Set the style of the map.
    map.setStyle(style(MapStyle.SATELLITE_ROAD_LABELS));
});
mapControl!!.onReady { map: AzureMap ->
    //Set the camera of the map.
    map.setCamera(center(Point.fromLngLat(-122.33, 47.64)), zoom(14))

    //Set the style of the map.
    map.setStyle(style(MapStyle.SATELLITE_ROAD_LABELS))
}
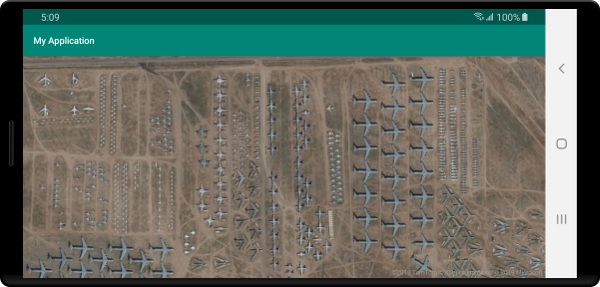
下列螢幕擷取畫面顯示上述程式碼,其中顯示具有衛星道路標籤樣式的地圖。
設定地圖觀景窗
地圖觀景窗可控制要在地圖檢視區中顯示的世界部分。 您可以在程式碼中以程式設計方式配置觀景窗。 在程式碼中設定它時,有兩個主要方法可用於設定地圖的位置;使用置中和縮放,或傳入週框方塊。 下列程式碼示範如何使用 center 和 zoom 時設定所有選擇性觀景窗選項。
//Set the camera of the map using center and zoom.
map.setCamera(
    center(Point.fromLngLat(-122.33, 47.64)),

    //The zoom level. Typically a value between 0 and 22.
    zoom(14),

    //The amount of tilt in degrees the map where 0 is looking straight down.
    pitch(45),

    //Direction the top of the map is pointing in degrees. 0 = North, 90 = East, 180 = South, 270 = West
    bearing(90),

    //The minimum zoom level the map will zoom-out to when animating from one location to another on the map.
    minZoom(10),

    //The maximum zoom level the map will zoom-in to when animating from one location to another on the map.
    maxZoom(14)
);
//Set the camera of the map using center and zoom.
map.setCamera(
    center(Point.fromLngLat(-122.33, 47.64)),

    //The zoom level. Typically a value between 0 and 22.
    zoom(14),

    //The amount of tilt in degrees the map where 0 is looking straight down.
    pitch(45),

    //Direction the top of the map is pointing in degrees. 0 = North, 90 = East, 180 = South, 270 = West
    bearing(90),

    //The minimum zoom level the map will zoom-out to when animating from one location to another on the map.
    minZoom(10),

    //The maximum zoom level the map will zoom-in to when animating from one location to another on the map.
    maxZoom(14)
)
通常最好將地圖焦點放在一組資料上。 週框方塊可以使用 MapMath.fromData 方法從特徵計算,並可傳入地圖觀景窗的 bounds 選項。 根據週框方塊設定地圖檢視時,指定 padding 值以說明呈現為泡泡或符號的資料點的像素大小通常很有用。 下列程式碼顯示如何使用週框方塊來設定觀景窗的位置時,設定所有選擇性觀景窗選項。
//Set the camera of the map using a bounding box.
map.setCamera(
    //The area to focus the map on.
    bounds(BoundingBox.fromLngLats(
        //West
        -122.4594,

        //South
        47.4333,

        //East
        -122.21866,

        //North
        47.75758
    )),

    //Amount of pixel buffer around the bounding box to provide extra space around the bounding box.
    padding(20),

    //The maximum zoom level the map will zoom-in to when animating from one location to another on the map.
    maxZoom(14)
);
//Set the camera of the map using a bounding box.
map.setCamera(
    //The area to focus the map on.
    bounds(BoundingBox.fromLngLats(
        //West
        -122.4594,

        //South
        47.4333,

        //East
        -122.21866,

        //North
        47.75758
    )),

    //Amount of pixel buffer around the bounding box to provide extra space around the bounding box.
    padding(20),

    //The maximum zoom level the map will zoom-in to when animating from one location to another on the map.
    maxZoom(14)
)
週框方塊的外觀比例可能與地圖的外觀比例不同,因此地圖通常會顯示完整的週框方塊區域,但通常只會在垂直或水平方向緊密。
以動畫方式呈現地圖的檢視
設定地圖的觀景窗選項時,動畫選項也可以用來建立目前地圖檢視與下一個檢視之間的轉換。 這些選項會指定移動觀景窗所需的動畫類型和持續時間。
| 選項 | 描述 |
|---|---|
animationDuration(Integer durationMs) |
指定觀景窗在檢視之間的動畫長度 (以毫秒 (ms) 為單位)。 |
animationType(AnimationType animationType) |
指定要執行的動畫轉換類型。 - JUMP - 立即變更。- EASE - 觀景窗設定的逐漸變更。- FLY - 建立類似飛行的弧線,觀景窗設定的逐漸變更。 |
此程式碼顯示如何在三秒的持續時間內,使用 FLY 動畫以動畫顯示地圖檢視:
map.setCamera(
    center(Point.fromLngLat(-122.33, 47.6)),
    zoom(12),
    animationType(AnimationType.FLY),
    animationDuration(3000)
);
map.setCamera(
    center(Point.fromLngLat(-122.33, 47.6)),
    zoom(12.0),
    AnimationOptions.animationType(AnimationType.FLY),
    AnimationOptions.animationDuration(3000)
)
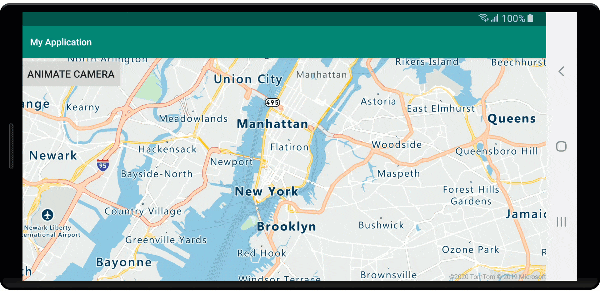
上述程式碼示範以動畫顯示從紐約到西雅圖的地圖檢視:
下一步
請參閱下列文章,以取得更多可新增至地圖的程式碼範例: